
TCG 2.0 - Computer component Supermicro - Free user manual and instructions
Find the device manual for free TCG 2.0 Supermicro in PDF.


| Product Type | Trusted Platform Module (TPM) 2.0 |
| Brand | Supermicro |
| Model | TCG 2.0 |
| Form Factor | LPC or SPI interface module |
| Dimensions | Approximately 20 mm x 15 mm x 2 mm |
| Weight | Less than 5 grams |
| Power Consumption | Powered via motherboard; < 1 W |
| Operating Temperature | 0°C to 70°C |
| Storage Temperature | -40°C to 85°C |
| Compliance | TCG TPM 2.0 specification |
| Key Functions | Secure generation and storage of cryptographic keys, platform authentication, integrity measurement |
| Security Features | Tamper-resistant hardware, secure encryption, remote attestation |
| Interface | SPI or LPC bus |
| Supported Operating Systems | Windows, Linux, and other TPM-aware OS |
| Maintenance | No user maintenance required; firmware updates via OEM tools |
| Safety | ESD sensitive; handle with care |
| Spare Parts & Repairability | Non-repairable; replace entire module if faulty |
| General Information | Designed for server and workstation platforms to enhance security |
Frequently Asked Questions - TCG 2.0 Supermicro
User questions about TCG 2.0 Supermicro
0 question about this device. Answer the ones you know or ask your own.
Ask a new question about this device
Download the instructions for your Computer component in PDF format for free! Find your manual TCG 2.0 - Supermicro and take your electronic device back in hand. On this page are published all the documents necessary for the use of your device. TCG 2.0 by Supermicro.
USER MANUAL TCG 2.0 Supermicro
The information in this User Guide has been carefully reviewed and is believed to be accurate. The vendor assumes no responsibility for any inaccuracies that may be contained in this document, and makes no commitment to update or to keep current the information in this manual, or to notify any person or organization of the updates. Please Note: For the most up-to-date version of this manual, please see our website at www.supermicro.com.
Super Micro Computer, Inc. ("Supermicro") reserves the right to make changes to the product described in this manual at any time and without notice. This product, including software and documentation, is the property of Supermicro and/or its licensors, and is supplied only under a license. Any use or reproduction of this product is not allowed, except as expressly permitted by the terms of said license.
IN NO EVENT WILL Super Micro Computer, Inc. BE LIABLE FOR DIRECT, INDIRECT, SPECIAL, INCIDENTAL, SPECULATIVE OR CONSEQUENTIAL DAMAGES ARISING FROM THE USE OR INABILITY TO USE THIS PRODUCT OR DOCUMENTATION, EVEN IF ADVISED OF THE POSSIBILITY OF SUCH DAMAGES. IN PARTICULAR, SUPER MICRO COMPUTER, INC. SHALL NOT HAVE LIABILITY FOR ANY HARDWARE, SOFTWARE, OR DATA STORED OR USED WITH THE PRODUCT, INCLUDING THE COSTS OF REPAIRING, REPLACING, INTEGRATING, INSTALLING OR RECOVERING SUCH HARDWARE, SOFTWARE, OR DATA.
Any disputes arising between manufacturer and customer shall be governed by the laws of Santa Clara County in the State of California, USA. The State of California, County of Santa Clara shall be the exclusive venue for the resolution of any such disputes. Supermicro's total liability for all claims will not exceed the price paid for the hardware product.
FCC Statement: This equipment has been tested and found to comply with the limits for a Class A digital device pursuant to Part 15 of the FCC Rules. These limits are designed to provide reasonable protection against harmful interference when the equipment is operated in a commercial environment. This equipment generates, uses, and can radiate radio frequency energy and, if not installed and used in accordance with the manufacturer's instruction manual, may cause harmful interference with radio communications. Operation of this equipment in a residential area is likely to cause harmful interference, in which case you will be required to correct the interference at your own expense.
California Best Management Practices Regulations for Perchlorate Materials: This Perchlorate warning applies only to products containing CR (Manganese Dioxide) Lithium coin cells. "Perchlorate Material-special handling may apply. See www.dtsc.ca.gov/hazardouswaste/perchlorate".
WARNING: Handling of lead solder materials used in this product may expose you to lead, a chemical known to the State of California to cause birth defects and other reproductive harm.
The products sold by Supermicro are not intended for and will not be used in life support systems, medical equipment, nuclear facilities or systems, aircraft, aircraft devices, aircraft/emergency communication devices or other critical systems whose failure to perform be reasonably expected to result in significant injury or loss of life or catastrophic property damage. Accordingly, Supermicro disclaims any and all liability, and should buyer use or sell such products for use in such ultra-hazardous applications, it does so entirely at its own risk. Furthermore, buyer agrees to fully indemnify, defend and hold Supermicro harmless for and against any and all claims, demands, actions, litigation, and proceedings of any kind arising out of or related to such ultra-hazardous use or sale.
Manual Revision 1.1c
Release Date: May 27, 2016
Unless you request and receive written permission from Super Micro Computer, Inc., you may not copy any part of this document. Information in this document is subject to change without notice. Other products and companies referred to herein are trademarks or registered trademarks of their respective companies or mark holders.
Copyright © 2016 by Super Micro Computer, Inc.
All rights reserved.
Printed in the United States of America
Preface
About This User Guide
This user guide is written for system integrators, IT professionals, and knowledgeable end users who wish to add additional data security levels to their systems to protect highly sensitive applications. It provides detailed information on configuring, provisioning, and using both TCG 1.2 and 2.0 for the trusted platform module (TPM).
Conventions Used in the User Guide
Special attention should be given to the following symbols for proper installation and to prevent damage done to the components or injury to yourself:

Warning: Important information given to avoid TPM configuration errors.

Note: Additional information given to differentiate various models or provides information for correct system setup.
Important Links
For your product to work properly, please follow the links below to download all necessary drivers/utilities and any pertinent user manuals/guides:
• Supermicro product manuals: http://www.supermicro.com/support/manuals/
- Product drivers and utilities: ftp://ftp.supermicro.com
- Product safety info: http://www.supermicro.com/about/policies/safety_information.cfm
- If you have any questions, please contact our support team at: support@supermicro.com
This user guide may be periodically updated without notice. Please check the Supermicro website for possible updates to the manual revision level.
An Important Note to the User
The graphics shown in this user guide were based on the latest information available at the time of publishing of this guide. The TPM screens shown on your computer may or may not look exactly like the screen shown in this user's guide.
Contacting Supermicro
Headquarters
Address: Super Micro Computer, Inc.
980 Rock Ave.
San Jose, CA 95131 U.S.A.
Tel: +1 (408) 503-8000
Fax: +1 (408) 503-8008
Email: marketing@supermicro.com (General Information)
support@supermicro.com (Technical Support)
Website: www.supermicro.com
Europe
Address: Super Micro Computer B.V.
's-Hertogenbosch, The Netherlands
Tel: +31 (0) 73-6400390
Fax: +31 (0) 73-6416525
Email: sales@supermicro.nl (General Information)
support@supermicro.nl (Technical Support)
rma@supermicro.nl (Customer Support)
Website: www.supermicro.nl
Asia-Pacific
Address: Super Micro Computer, Inc.
3F, No. 150, Jian 1st Rd.
Zhonghe Dist., New Taipei City 235
Taiwan (R.O.C)
Tel: +886-(2) 8226-3990
Fax: +886-(2) 8226-3992
Email: support@supermicro.com.tw
Website: www.supermicro.com.tw
Table of Contents
About This User Guide....3
Conventions Used in the User Guide ....3
An Important Note to the User....3
Contacting Supermicro....4
Chapter 1 Introduction
1.1 Overview of the Trusted Platform Module (TPM)....7
A. Types of TPMs for TPM 1.2 ....7
B. Types of TPMs for TPM 2.0 ....8
1.2 Supermicro TPM Features 9
1.3 Motherboards Supported for TPM....10
1.4 Intel® TXT....10
A. How the TXT Works ....10
Chapter 2 Installation of the TPM 1.2
2.1 Installing the TPM onto the Motherboard....11
2.2 Enabling the TPM 1.2 via the SUM .....13
2.3 Enabling the TPM 1.2 via the BIOS and Intel ® Provision Utility....14
A. Enabling the TPM 1.2 in the BIOS....15
B. Provisioning via the Intel Provision Utility (Server) 18
C. Provisioning via the Intel Provision Utility (Client) 22
D. Enabling TXT Support....27
Chapter 3 Installation of the TPM 2.0
3.1 Installing the TPM onto the Motherboard....28
3.2 Configuring the TPM 2.0 and Intel TXT for the Server....30
A. Enabling TPM 2.0 in the BIOS....30
B. Provisioning Intel TXT (Server)....34
C. Enabling TXT Support....37
3.3 Provisioning the TPM 2.0 and TXT Support for the Client....39
A. Clear the CMOS on the Motherboard ....39
B. Provisioning Utility ......39
C. Disabling PH Randomizations and TXT Support in the BIOS....40
D. Provisioning TXT Support in the UEFI Shell....44
E. Enabling PH Randomizations and TXT Support in the BIOS....47
F. Enabling TXT Support in the UEFI Shell 50
Chapter 1
Introduction
Congratulations on purchasing your TPM from an industry leader. Supermicro products are designed to provide you with the highest standards in quality and performance.
1.1 Overview of the Trusted Platform Module (TPM)
The Trusted Platform Module (TPM) is a special add-on module. It holds computer-generated encryption keys used to bind and authenticate input and output data passing through a system.
A. Types of TPMs for TPM 1.2

Note: Currently, all TPMs must be provisioned to use for TXT. Contact Supermicro technical support to get the Intel® Provisioning Utility.
The TPM-9655 series uses TCG 1.2 (Trusted Computing Group).
The following SKUs are available:
• AOM-TPM-9655V, a vertical TPM without provisioning
• AOM-TPM-9655H, a horizontal TPM without provisioning
• AOM-TPM-9655V-S, a vertical server TPM provisioned for TXT
• AOM-TPM-9655H-S, a horizontal server TPM provisioned for TXT
• AOM-TPM-9655V-C, a vertical client TPM provisioned for TXT
• AOM-TPM-9655H-C, a horizontal client TPM provisioned for TXT
• AOM-TPM-9665V-FS, a vertical server TPM provisioned for TXT, supports FIPs 140-2
• AOM-TPM-9665H-FS, a horizontal server TPM provisioned for TXT, supports FIPs 140-2
B. Types of TPMs for TPM 2.0
The TPM-9665 series uses TCG 2.0 (Trusted Computing Group).
The following SKUs are available:
• AOM-TPM-9665V, a vertical TPM without provisioning
• AOM-TPM-9665H, a horizontal TPM without provisioning
• AOM-TPM-9665V-S, a vertical server-side TPM
• AOM-TPM-9665H-S, a horizontal server-side TPM
• AOM-TPM-9665V-C, a vertical client-side TPM
• AOM-TPM-9665H-C, a horizontal client-side TPM
Horizontal vs. Vertical: Generally, whether you should use a TPM with a horizontal or vertical form factor depends on the physical space available. Horizontal TPMs can be used in 1U chassis. Vertical TPMs can be used in 2U or taller chassis heights; they are also designed with a smaller footprint to occupy less space on the motherboard.
Server vs. Client: To use the TXT function, each TPM has been provisioned as a server model or client model. Be sure to use the appropriate TPM for your needs. The server TPM is designed to run on Intel Xeon® E5 and E7, as well as Xeon-D processors. It has a 96-byte index memory. The client TPM is designed to run on Intel Core™ i5, Core i7, and Xeon E3 processors. It has a 48-byte index memory.
| TPM Models and Supported AOMs | |
| TPM Version 1.2 TPM Version 2.0 | |
| AOM-TPM-9655V AOM-TPM-9665V | |
| AOM-TPM-9655H AOM-TPM-9665H | |
| AOM-TPM-9655V-S AOM-TPM-9665V-S | |
| AOM-TPM-9655H-S AOM-TPM-9665H-S | |
| AOM-TPM-9655V-C AOM-TPM-9665V-C | |
| AOM-TPM-9655H-C AOM-TPM-9665H-C | |
| AOM-TPM-9665V-FS | |
| AOM-TPM-9665H-FS |
1.2 Supermicro TPM Features
• TCG 1.2 compliance

Note: TPM 2.0 has TCG 2.0 compliance instead
- Microcontroller in 0.22/0.09-μm CMOS technology
• Compliant embedded software - EEPROM for TCG firmware enhancements and for user data and keys
- Hardware accelerator for SHA-1 and SHA-256 hash algorithm

Note: SHA-256 is recommended for TPM 2.0
• True Random Number Generator (TRNG)
- Tick counter with tamper detection
• Protection against dictionary attack
- Infineon's TPM 1.2 is Common Criteria certified at Evaluation Assurance Level (EAL) 4 Moderate

Note: The same is true of TPM 2.0
- General-purpose I/O
- Intel® Trusted Execution Technology (TXT) support
- AMD® Secure Virtual Machine Architecture support (for TPM 1.2 only)
• Full personalization with Endorsement Key (EK) and EK certificate
• Power-saving sleep mode
• 3.3V power supply - WHQL dual-mode 1.1b + 1.2 TPM Windows Kernel Mode Driver (For TPM 1.2 only)

Note: At this time, TPM 2.0 supports Windows environments only
1.3 Motherboards Supported for TPM
Please refer to the Supermicro website (http://www.supermicro.com/) for a complete and most up-to-date list of the motherboards that can support the TPM. Such motherboards will have a specially designated JTPM1 connector, which will be listed in the respective motherboard's manual.
1.4 Intel® TXT
The Intel TXT is a software tool that may be used in conjunction with the TPM to provide additional security firmware (BIOS, IPMI, SAS, CMM, etc.) in virtualized environments such as cloud and cluster. It further increases system security by protecting firmware against malicious attacks to vulnerable areas.
It works by matching hypervisor measures with encryption keys upon system launch. If the hypervisor does not match the keys, then the hypervisor will be prevented from starting up.
To use the TXT, you need to enable TXT support after provisioning the TPM.

Note: TXT is only supported on Intel platforms that support TPM use.
A. How the TXT Works
The Intel TXT, when enabled, follows a step-by-step process to ensure security of pre-launch components.
- Measures the hypervisor launch upon system startup
- Checks for a match
- If matched: The TXT signals "trusted," and the launch is allowed to proceed.
- If mismatched: The TXT signals "untrusted," and the launch is blocked.
Chapter 2
Installation of the TPM 1.2
Follow the instructions below to begin using the TPM 1.2.

Note: Please note that the module is not hot-swappable; you will have to power down your system prior to installation.
2.1 Installing the TPM onto the Motherboard
To install the Trusted Platform Module (TPM) onto your motherboard, follow the steps below.
-
Locate the 20-pin male JTPM1 connector on the motherboard (see the image below). If the board does not have this connector, then it does not support the TPM.
-
Using the white connection on the TPM and the blank space on JTPM1 as a reference, orient and align your TPM with the connector. Installing the TPM with the incorrect orientation may cause damage to the module and the motherboard.
-
Carefully insert the TPM into the connector on the motherboard, taking care not to damage the pins.

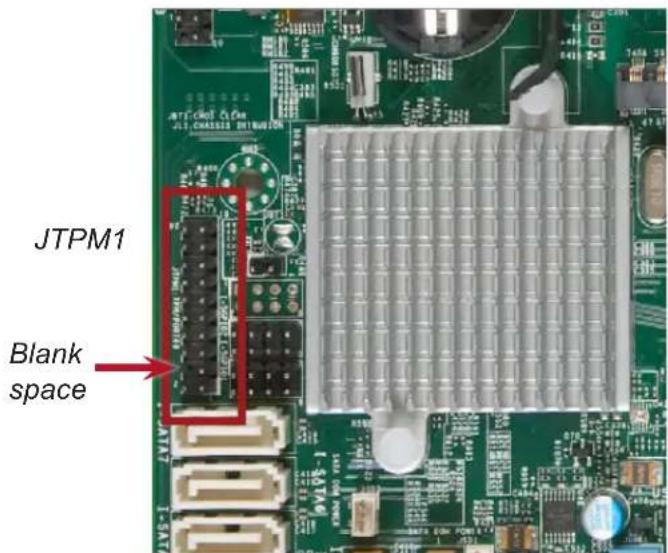

Note: The above picture is an example of JTPM1. Your JTPM1 connector may be in a different location, or oriented differently. Please consult your motherboard user manual for more information.

Note: The orientation of the TPM to be installed depends on whether it has a horizontal or vertical form factor. The vertical TPM is intended to "stand" perpendicular to the motherboard, while the horizontal TPM lies flat (parallel) on the motherboard. See the two images below for the correct orientation.

natural_image
3D illustration of a rectangular electronic device with a grid-patterned base and an integrated circuit block on top (no text or symbols)
natural_image
Illustration of an electronic component with pins and a circuit board (no text or symbols)Horizontal TPM Vertical TPM
2.2 Enabling the TPM 1.2 via the SUM
The SUM (Supermicro Update Manager) is an optional tool that can be used to update and monitor Supermicro servers, as well as configure some firmware settings. Among these features is the ability to enable and provision the TPM 1.2. For the sake of efficiency and ease, it is highly recommended that you use the SUM. However, if you do not have the SUM available, you may also use the BIOS and Intel Provision Utility, as described in section 2.3.
Note: If you don't have the SUM, you must request authorization to download it. For more information on the SUM and to request and download it, visit the Supermicro website at http://www.supermicro.com/products/nfo/SMS_SUM.cfm.
Note: The commands below do not apply to X9 dual processor nor X10 single processor motherboards. If you have one of these motherboards, you must use the method described in section 2.3.
Note: TPM 2.0 does not support the SUM.
- You will need to obtain a license key to enable Out-of-Band (OOB). Once you have enabled OOB, you will be able to use the SUM.
- Set up and activate the SUM if you have not done so. For instructions on how to do this, refer to the SUM user's guide.
- Enter the following command:
sum -i
For example,
- The TPM 1.2 should now be ready for use.
2.3 Enabling the TPM 1.2 via the BIOS and Intel® Provision Utility

Note: The steps described in the entirety of this section are for those who do not have the SUM, have motherboards incompatible with the SUM, or have experienced issues enabling the TPM 1.2 with the SUM. If you have already enabled the TPM 1.2 using the SUM as described in section 2.2, you do not need to complete the steps below.

Note: As described in subsections C and D, you will need the Intel Provision Utility to successfully provision the TPM 1.2 for use. Please contact Supermicro to download this utility.
There are two components to the process of enabling the TPM 1.2. After you have installed the TPM 1.2 onto the motherboard, you must first "verify" the TPM 1.2 for the motherboard; this is done through the BIOS. (Also in the BIOS, you should enable TXT support.) After that, you then "lock" the TPM 1.2 in the firmware. This is done through the provision utility provided by Intel.
A. Enabling the TPM 1.2 in the BIOS
- Enter the BIOS setup screen. You may do this either from the IPMI remote console or from the server directly using KVM. Reboot the system, and press the
key as the system boots until you reach the BIOS screen. - You will be presented with the BIOS Setup main screen. Using your arrow keys, navigate to the Advanced tab. From there, navigate down and select the "CPU Configuration" option, as shown below. Press
. - You will be taken to the CPU Configuration page. Using your arrow keys, navigate down to the "Intel Virtualization Technology" option, and press
. If this item is not already enabled, select "Enable" and press .
![Aptio Setup Utility - Copyright (C) 2016 American Megatrends, Inc. Advanced Processor Max Ratio 12H N/A Processor Min Ratio 0CH N/A Microcode Revision 00000038 N/A L1 Cache RAM 512KB N/A L2 Cache RAM 2048KB N/A L3 Cache RAM 20480KB N/A CPU1 Version:Intel(R) Xeon(R) CPU E 5-2630L v3 @ 1.80GHz CPU2 Version Not Present Intel Virtualization Technology Disable Enable Clock Spread Spectrum Hyper-Threading (ALL) Cores Enabled Execute Disable Bit PPIN Control [Unlock/Enable] Hardware Prefetcher [Enable] Adjacent Cache Prefetch [Enable] DCU Streamer Prefetcher [Enable] DCU IP Prefetcher [Enable] Direct Cache Access (DCA) [Auto] X2APIC [Disable] AES-NI [Enable] Intel Virtualization Technology [Enable] ► Advanced Power Management Configuration When enabled, a VMM can utilize the additional hardware capabilities provided by Vanderpool Technology +: Select Screen ↑↓: Select Item Enter: Select +/-: Change Opt. F1: General Help F2: Previous Values F3: Optimized Defaults F4: Save & Exit ESC: Exit Version 2.17.1249. Copyright (C) 2016 American Megatrends, Inc.](/content/2026/05/1060235/images/5cbc506f2f79268b704afb66d67d5f0158f4fb4a21289202ccd8130774c3a1f0.jpg)
- Once you have enabled virtualization support, press your
key until you are back to the Advanced tab. Navigate down to the "Trusted Computing" option and press . -
The Trusted Computing window will appear. Select "TPM State," and press
. -
From the window that pops up, select "Enabled," as shown below, and press
.
![Aptio Setup Utility - Copyright (C) 2016 American Megatrends, Inc. Advanced Configuration Security Device Support [Enabled] TPM State [Disabled] Pending Operation [None] Device Select [Auto] Current Status Information TPM Enabled Status [Enabled] TPM Active Status [Activated] TPM Owner Status TPM State Intel TXT(LT-SX) Configuration Disabled TXT Support Enabled Enable/Disable Security Device. NOTE: Your Computer will reboot during restart in order to change State of the Device. +: Select Screen ↑↓: Select Item Enter: Select +/-: Change Opt. F1: General Help F2: Previous Values F3: Optimized Defaults F4: Save & Exit ESC: Exit Version 2.17.1249. Copyright (C) 2016 American Megatrends, Inc.](/content/2026/05/1060235/images/06f2e4e66b887fa5bcbf6464a2009b982df0381d7aff6ed127ab49815f690340.jpg)
- Next, select "Device Select." Selecting the TPM 1.2/TPM 2.0 options will bypass any possible compatibility issues between the module and the motherboard. Selecting Auto will have the system auto-detect the model of TPM being used.
![Aptio Setup Utility - Copyright (C) 2016 American Megatrends, Inc. Advanced Configuration Security Device Support [Enabled] TPM State [Enabled] Pending Operation [None] Device Select [Auto] Current Status Information TPM Enabled Status [Enabled] TPM Active Status [Activated] TPM Owner Status Intel TXT(LT-SX) Configuration TXT Support Device Select TPM 1.2 TPM 2.0 Auto TPM 1.2 will restrict support to TPM 1.2 devices, TPM 2.0 will restrict support to TPM 2.0 devices, Auto will support both with the default set to TPM 2.0 devices if not found, TPM 1.2 devices will be enumerated ++: Select Screen ↑↓: Select Item Enter: Select +/-: Change Opt. F1: General Help F2: Previous Values F3: Optimized Defaults F4: Save & Exit ESC: Exit Version 2.17.1249. Copyright (C) 2016 American Megatrends, Inc.](/content/2026/05/1060235/images/69c9045691299a340e6173d0eaef3555d6f9d4c0f4252de68d5e4a622aa8988a.jpg)
- You must save your changes and reset for the changes to take effect. Press the
key to exit the Trusted Computing options and scroll to the Save & Exit tab. Select "Save Changes and Reset." The TPM is now enabled.
B. Provisioning via the Intel Provision Utility (Server)
After you enable the TPM 1.2 in the BIOS, you must provision it. Follow the steps below to do so on a server TPM platform. For provisioning on the client side, please refer to subsection D.
-
Save a copy of the utility to a USB flash drive, and plug the drive into your system. To download the utility, contact Supermicro support.
-
Boot into the UEFI shell. There are two ways you can do this, described below:
- Option 1: From the BIOS, scroll to the Save & Exit tab. Select the option "UEFI: Built-in EFI Shell" under Boot Override, as shown in the screenshot on the next page. Press
| Aptio Setup Utility - Copyright (C) 2016 American Megatrends, Inc. Main Advanced Event Logs IPMI Security Boot Save & Exit | |
| Discard Changes and Exit Save Changes and Reset Save Options Save Changes Discard Changes Restore Optimized Defaults Save as User Defaults Restore User Defaults Boot Override UEFI: Built-In EFI Shell SSATA PO: TOSHIBA MG03ACA300 IBA GE Slot 0200 v1572 | Exit system setup without saving any changes. |
| +: Select Screen ↑↓: Select Item Enter: Select +/-: Change Opt. F1: General Help F2: Previous Values F3: Optimized Defaults F4: Save & Exit ESC: Exit | |
| Version 2.17.1249. Copyright (C) 2016 American Megatrends, Inc. | |
- Option 2: Reboot the system. As the system boots up, press the

- You are now in the EFI shell. If a line prompts you to press
to skip startup.nsh, do so. - (Optional) Type map to find out your USB ID. A list of devices connected to the motherboard will appear. Your USB flash drive should, by default, be fs0.
EFI Shell version 2.40 [5.11]
Current running mode 1.1.2
Device mapping table
fs0 :Removable HardDisk - Alias hd32a0c0b blk0
PciRoot(0x0)/Pci(0x1A,0x0)/USB(0x0,0x0)/USB(0x2,0x0)/HD(1,MBR,0x0FA2586D,0x3F,0x3B9A7C1)
blk0 :Removable HardDisk - Alias hd32a0c0b fs0
PciRoot(0x0)/Pci(0x1A,0x0)/USB(0x0,0x0)/USB(0x2,0x0)/HD(1,MBR,0x0FA2586D,0x3F,0x3B9A7C1)
blk1 :HardDisk - Alias (null)
PciRoot(0x0)/Pci(0x11,0x4)/Sata(0x0,0xFFFF,0x0)/HD(1,MBR,0x6363CD45,0x800,0x32000)
blk2 :HardDisk - Alias (null)
PciRoot(0x0)/Pci(0x11,0x4)/Sata(0x0,0xFFFF,0x0)/HD(2,MBR,0x6363CD45,0x32800,0xFFFFCD800)
blk3 :BlockDevice - Alias (null)
PciRoot(0x0)/Pci(0x11,0x4)/Sata(0x0,0xFFFF,0x0)
blk4 :Removable BlockDevice - Alias (null)
PciRoot(0x0)/Pci(0x1A,0x0)/USB(0x0,0x0)/USB(0x2,0x0)

Press ESC in 2 seconds to skip startup.nsh, any other key to continue.
Shell>
- In the command line at the bottom of the screen, type fs0: then press the
key.
Shell> fs0:
fs0:\>
- Type cd serverTPMTool and press the
key.
fs0:\> cd serverTPMTool
fs0:\ServerTPMTool>
- Type cd Executable and press the
key.
fs0:\ServerTPMTool> cd Executable
fs0:\ServerTPMTool\Executable>
- Type DefaultTPMProvision-Locked.nsh and press the
key.
fs0:\ServerTPMTool\Executable> DefaultTPMProvision-Locked.nsh
- To check that the TPM 1.2 has been successfully locked, type ServerTPMTool.efi and press the
key.
TPM read successful.
ERROR: 0x40000005 - Data file data size does not match the existing index data size.
DefaultTPMProvision-Locked.nsh> ServerTPMTool.efi PPI.nvi

Intel(R) TPM Tool x64 DEBUG. Major version:[1] Minor version:[.0] BUILD DATE:[Apr 9 2013].
Data File Read Complete.
TPM locked
TPM_Read_NV_Index_Info: Return Code - 0x02000000
ERROR: 0x40000003 - TPM read index info failed.
DefaultTPMProvision-Locked.nsh> ServerTPMTool.efi TPM_Lock.def

Intel(R) TPM Tool x64 DEBUG. Major version:[1] Minor version:[.0] BUILD DATE:[Apr 9 2013].
Definition File Read Complete.
TPM locked
-
From the menu that appears, press <1> ("Display TPM Status"), as shown above, and press the
key. -
From the TPM Status Menu that appears, press <3>, and press the
key.
TPM Status Menu
1: Display TPM Interface Status
2: Display TPM Volatile flags
3: Display TPM Non-Volatile flags
4: Previous Menu
> 3
- You should receive an output log. The "nvLocked" item, indicated by the arrow below, should be set to 1. This shows that the TPM 1.2 has been successfully locked.
TPM Status Menu
1: Display TPM Interface Status
2: Display TPM Volatile flags
3: Display TPM Non-Volatile flags
Q: Previous Menu
> 3
TPM Permanent Flags value:
    disable = 0
    ownership = 1
    deactivated = 0
    readPubek = 0
    disableOwnerClear = 1
    allowMaintenance = 0
    physicalPresenceLifetimeLock = 0
    physicalPresenceHWEnable = 0
    physicalPresenceCMDEnable = 1
    FIPS = 0
    enableRevokeEK = 0
    nvLocked = 1
    tpmEstablished = 0
- If you come across any error messages along the way, or if the "nvLocked" item is still set to 0 despite your following the previous instructions, try the following troubleshooting tips:
- Make sure that the CPU you are using is compatible. It should be an Intel® Xeon® E3-1200 v2 or i3/i5/i7 model.

Note: AOM-TPM-9655V-S and AOM-TPM-9655H-S are compatible with Xeon E5/E7 processors. AOM-TPM-9655V-C and AOM-TPM-9655H-C are compatible with Intel Core i5/i7 and Xeon E3 processors.
- If the problem persists, contact Supermicro's technical support.

Note: To exit the UEFI Shell, press and
to reboot the system or type exit.
- If you entered the UEFI Shell from the BIOS, typing "exit" will send you back to the BIOS menu.
- If you entered the UEFI Shell from the F11 Boot Menu, typing "exit" will reboot the system.
C. Provisioning via the Intel Provision Utility (Client)
After you enable the TPM 1.2 in the BIOS, you must provision it. Follow the steps below to do so on a client TPM platform.
-
Save a copy of the utility to a USB flash drive, and plug the drive into your system. To download the utility, contact Supermicro support.
-
Boot into the UEFI shell. There are two ways you can do this, described below:
- Option 1: From the BIOS, scroll to the Save & Exit tab. Select the option "UEFI: Built-in EFI Shell" under Boot Override, as shown in the screenshot below. Press
| Main Advanced Event Logs IPMI Security Boot Save & Exit | |
| Discard Changes and Exit Save Changes and Reset Save Options Save Changes Discard Changes Restore Optimized Defaults Save as User Defaults Restore User Defaults Boot Override UEFI: Built-in EFI Shell sSATA PO: TOSHIBA MG03ACA300 IBA GE Slot 0200 v1572 | Exit system setup without saving any changes. |
| +: Select Screen ↑↓: Select Item Enter: Select +/-: Change Opt. F1: General Help F2: Previous Values F3: Optimized Defaults F4: Save & Exit ESC: Exit | |
| Version 2.17.1249. Copyright (C) 2016 American Megatrends, Inc. | |
- Option 2: Reboot the system. As the system boots up, press the

- You are now in the EFI shell. If a line prompts you to press
to skip startup.nsh, do so.
EFI Shell version 2.40 [5.11]
Current running mode 1.1.2
Device mapping table
fs0 :Removable HardDisk - Alias hd32a0c0b blk0
PciRoot(0x0)/Pci(0x1A,0x0)/USB(0x0,0x0)/USB(0x2,0x0)/HD(1,MBR,0x0FA2586D,0x3F,0x3B9A7C1)
blk0 :Removable HardDisk - Alias hd32a0c0b fs0
PciRoot(0x0)/Pci(0x1A,0x0)/USB(0x0,0x0)/USB(0x2,0x0)/HD(1,MBR,0x0FA2586D,0x3F,0x3B9A7C1)
blk1 :HardDisk - Alias (null)
PciRoot(0x0)/Pci(0x11,0x4)/Sata(0x0,0xFFFF,0x0)/HD(1,MBR,0x6363CD45,0x800,0x32000)
blk2 :HardDisk - Alias (null)
PciRoot(0x0)/Pci(0x11,0x4)/Sata(0x0,0xFFFF,0x0)/HD(2,MBR,0x6363CD45,0x32800,0xFFFFCD800)
blk3 :BlockDevice - Alias (null)
PciRoot(0x0)/Pci(0x11,0x4)/Sata(0x0,0xFFFF,0x0)
blk4 :Removable BlockDevice - Alias (null)
PciRoot(0x0)/Pci(0x1A,0x0)/USB(0x0,0x0)/USB(0x2,0x0)

Press ESC in 2 seconds to skip startup.nsh, any other key to continue.
Shell>
- Type the following command to enter the flash drive directory: fs0:
Shell> fs0:
fs0:\>
- Type TPMFactProv.efi -f defaultclientttpmprov-aux2.xml -l
- You should see the screen shown below indicating that the TPM 1.2 is now locked.
02/12/16 04:23p <DIR> 0 .
02/12/16 04:23p <DIR> 0 ..
09/09/14 07:20p 7,270 DefaultClientTpmProv-AUX2.xml
10/09/14 11:37a 325,888 ServerTPMTool.efi
10/24/14 06:46p 78 STARTUP.NSH
11/10/12 04:04p 268,032 TPMFactProv.efi
02/12/14 10:04a 215,872 txtinfo64_1.4.8.efi
5 File(s) 817,140 bytes
2 Dir(s)

fs0:\TPM Client Auto Script> TPMFactProv.efi -f DefaultClientTpmProv-AUX2.xml -l

DEBUG: main

Intel(R) TPM Factory Provisioning tool x64 DEBUG. Major version:[1] Minor version:[.0] BUILD DATE:[Oct 18 2012].

Parsing Intel(R) TPM Provisioning Tool Configuration File DefaultClientTpmProv-AUX2.xml.

PASSED - Intel(R) Factory Provisioning Tool. TPM provisioned properly. Return code = 0x0

fs0:\TPM Client Auto Script>
- To check that the TPM 1.2 has been successfully locked, type ServerTPMTool.efi
Parsing Intel(R) TPM Provisioning Tool Configuration File DefaultClientTpmProv-AUX2.xml.
PASSED - Intel(R) Factory Provisioning Tool. TPM provisioned properly. Return code = 0x0
fs0:\ServerTPMTool\Executable> ServerTPMTool.efi
Intel(R) TPM Tool x64 DEBUG. Major version:[1] Minor version:[.0] BUILD DATE:[Apr 9 2013].
1: Display TPM Status (Version, V-flags, P-flags, etc)
2: NV RAM Functions
3: Lock the TPM
4: Take Ownership
5: Clear Ownership
6: PCR Functions
7: TIS Functions
8: TPM Start Up
9: TPM Continue Self Test
10: Quit
>
- From the menu that appears, press <1> ("Display TPM Status"), and press
. - From the TPM Status Menu that appears, press <3>, and press
. - You should receive an output log. The "nvLocked" item, indicated by the arrow below, should be set to 1. This shows that the TPM 1.2 has been successfully locked.
TPM Status Menu
1: Display TPM Interface Status
2: Display TPM Volatile flags
3: Display TPM Non-Volatile flags
Q: Previous Menu
> 3
TPM Permanent Flags value:
    disable = 0
    ownership = 1
    deactivated = 0
    readPubek = 0
    disableOwnerClear = 1
    allowMaintenance = 0
    physicalPresenceLifetimeLock = 0
    physicalPresenceHWEnable = 0
    physicalPresenceCMDEnable = 1
    FIPS = 0
    enableRevokeEK = 0
    nvLocked = 1
    tpmEstablished = 0
- If you come across any error messages along the way, or if the "nvLocked" item is still set to 0 despite your following the previous instructions, try the following troubleshooting tips:
- Make sure that the CPU you are using is compatible. It should be an Intel® Xeon® E3-1200 v2 or i3/i5/i7 model.

Note: AOM-TPM-9655V-S and AOM-TPM-9655H-S are compatible with Xeon D/E5/E7 processors. AOM-TPM-9655V-C and AOM-TPM-9655H-C are compatible with Intel Core i5/i7 and Xeon E3 processors.
- If the problem persists, contact Supermicro's technical support.

Note: To exit the UEFI Shell, press and
to reboot the system or type exit.
- If you entered the UEFI Shell from the BIOS, typing "exit" will send you back to the BIOS menu.
- If you entered the UEFI Shell from the F11 Boot Menu, typing "exit" will reboot the system.
D. Enabling TXT Support
Follow the steps below to enable Intel TXT (Trusted Execution Technology). This is also done in the BIOS.
- After provisioning the TPM 1.2 via the provisioning utility, restart the system and enter the BIOS setup screen.
- Navigate to the Trusted Computing screen as described in subsection A, steps 2-4.
- Select the "TXT Support" item. Press
. A "TXT Support" window will pop up as shown below.
![Aptio Setup Utility - Copyright (C) 2016 American Megatrends, Inc. Advanced Configuration Security Device Support [Enabled] TPM State [Enabled] Pending Operation [None] Device Select [Auto] Current Status Information TPM Enabled Status [Enabled] TPM Active Status [Activated] TPM Owner Status Intel TXT(LT-SX) Configuration TXT Support TAX Support Disabled Enabled Enables Intel Trusted Execution Technology Configuration. Please disable "EV DFX Features" when TXT is enabled. +: Select Screen ↑↓: Select Item Enter: Select +/-: Change Opt. F1: General Help F2: Previous Values F3: Optimized Defaults F4: Save & Exit ESC: Exit Version 2.17.1249. Copyright (C) 2016 American Megatrends, Inc.](/content/2026/05/1060235/images/5004589a31ec17e450ac6f92eb969107b45595af761a778dcba366f760a1c0e7.jpg)
- Select "Enabled," and press
. - Save changes and reset to save your changes and allow them to take effect. The TXT is now enabled.
- Use a third-party tool to test the hypervisor launch.
Chapter 3
Installation of the TPM 2.0
Follow the instructions below to begin using the TPM 2.0.

Note: Please note that the module is not hot-swappable; you will have to power down your system prior to installation.
3.1 Installing the TPM onto the Motherboard
To install the Trusted Platform Module (TPM) onto your motherboard, follow the steps below.
- Locate the 20-pin male JTPM1 connector on the motherboard (see the image below). If the board does not have this connector, then it does not support the TPM.
- Using the white connection on the TPM and the blank space on JTPM1 as a reference, orient and align your TPM with the connector. Installing the TPM with the incorrect orientation may cause damage to the module and the motherboard.
- Carefully insert the TPM into the connector on the motherboard, taking care not to damage the pins.

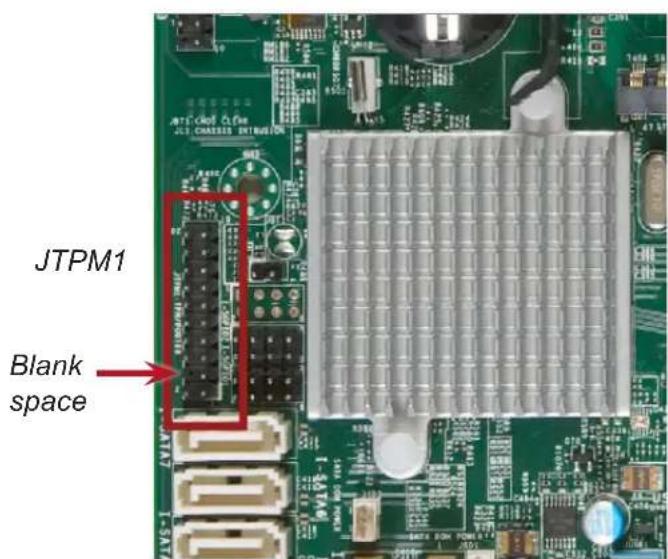

Note: The above picture is an example of JTPM1. Your JTPM1 connector may be in a different location, or oriented differently. Please consult your motherboard user manual for more information.

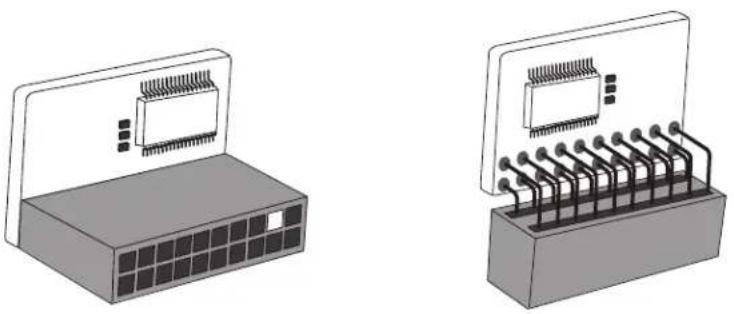
Note: The orientation of the TPM to be installed depends on whether it has a horizontal or vertical form factor. The vertical TPM is intended to "stand" perpendicular to the motherboard, while the horizontal TPM lies flat (parallel) on the motherboard. See the two images below for the correct orientation.
natural_image
Two 3D diagrams showing an electronic component with a grid-patterned base and its internal circuit board (no text or symbols)Horizontal TPM Vertical TPM
- After you have installed the TPM 2.0, you will need to obtain the Intel Provisioning Utility by contacting Supermicro technical support. Install the Intel Provisioning Utility onto a USB device and connect it to a compatible USB port on your motherboard.
3.2 Configuring the TPM 2.0 and Intel TXT for the Server
There are three steps involved in using the TPM 2.0. They are:
- Enable TPM 2.0 in the BIOS
- Provision Intel TXT in the UEFI shell
- Enable TXT Support in the BIOS and UEFI shell
A. Enabling TPM 2.0 in the BIOS
- Start your computer. When it reaches the POST screen, press the
key continuously to reach the BIOS.

- Your computer will boot into the BIOS (and you may stop pressing the Delete key).
![Aptio Setup Utility - Copyright (C) 2015 American Megatrends, Inc. Main Advanced Event Logs IPNI Security Boot Save & Exit System Date [Wed 01/07/2015] System Time [03:21:54] Supermicro X10ORU-i+ BIOS Version 2.0 Build Date 11/13/2015 Memory Information Total Memory 65536 MB Memory Speed 1867 MT/s Set the Date. Use Tab to switch between Date elements. ++: Select Screen ↑↓: Select Item Enter: Select +/-: Change Opt. F1: General Help F2: Previous Values F3: Optimized Defaults F4: Save & Exit ESC: Exit Version 2.17.1249. Copyright (C) 2015 American Megatrends, Inc.](/content/2026/05/1060235/images/7fc69149bde8808508ba9f9a7f39e3d6778d28b6609484d1ef928969d280421b.jpg)
- Using the arrow keys on your keyboard, toggle to the Advanced tab. Again using the arrow keys, select the Trusted Computing option. Press the
key.

- You will need to enable all [Disabled] options except for TXT Support. Using the arrow keys, select each option, press the
key, select Enabled, and press the key again.

Note: The Disabled options are TPM State, Platform Hierarchy, Storage Hierarchy, and Endorsement Hierarchy.
![Aptio Setup Utility - Copyright (C) 2015 American Megatrends, Inc. Advanced TPM20 Device Found Security Device Support [Enabled] Active PCR banks S Available PCR banks S SHA-1 PCR Bank [Enabled] SHA256 PCR Bank [Enabled] TPM State Pending operation TPM State Platform Hierarchy Disabled Storage Hierarchy Enabled Endorsement Hierarchy HashPolicy [Sha-1] TFM 20 InterfaceType[TIS] Device Select [Auto] Intel TXT(LT-SX) Configuration TXT Support [Disabled] Enable/Disable Security Device. NOTE: Your Computer will reboot during restart in order to charge State of the Device. ++: Select Screen ↑↓: Select Item Enter: Select +/-: Charge Opt. F1: General Help F2: Previous Values F3: Optimized Defaults F4: Save & Exit ESC: Exit Version 2.17.1249. Copyright (C) 2015 American Megatrends, Inc.](/content/2026/05/1060235/images/fcc2f1a66229ac2fe398518ceb003d87614ced37a84af5c4c097a7474ad31495.jpg)
![Aptio Setup Utility - Copyright (C) 2015 American Megatrends, Inc. Advanced TPM20 Device Found Security Device Support [Enabled] Active PCR banks S Available PCR banks S SHA-1 PCR Bank [Enabled] SHA256 PCR Bank [Enabled] TPM State [Enabled] Pending operation [None] Platform Hierarchy [Enabled] Storage Hierarchy [Enabled] Endorsement Hierarchy [Enabled] HashPolicy [Sha256] TPM 20 InterfaceType [TIS] Device Select [Auto] Intel TXT(LT-SX) Configuration TXT Support [Disabled] Enables Intel Trusted Execution Technology Configuration. Please disable "EV DFX Features" when TXT is enabled. +: Select Screen ↑↓: Select Item Enter: Select +/-: Change Opt. F1: General Help F2: Previous Values F3: Optimized Defaults F4: Save & Exit ESC: Exit Version 2.17.1249. Copyright (C) 2015 American Megatrends, Inc.](/content/2026/05/1060235/images/e4d5f4287499cb7cce330d9d818821ede0792b457c490ab3f0dfdd3753236318.jpg)
- Use the arrow keys to select HashPolicy. Press the
key. Change the default from Sha-1 to Sha256 using the arrow keys, and press the Enter key again.
![Aptio Setup Utility - Copyright (C) 2015 American Megatrends, Inc. Advanced TPM20 Device Found Security Device Support [Enabled] Active PCR banks S Available PCR banks S SHA-1 PCR Bank [Enabled] SHA256 PCR Bank [Enabled] TPM State HashPolicy Pending operation Sha-1 Platform Hierarchy Sha256 Storage Hierarchy Endorsement Hierarchy HashPolicy [She-1] TPM 20 InterfaceType [TIS] Device Select [Auto] Intel TXT(LT-SX) Configuration TXT Support [Disabled] Select the Hash policy to use. SHA-2 is most secure but might not be supported by all Operating Systems ++: Select Screen ↑↓: Select Item Enter: Select +/-: Change Opt. F1: General Help F2: Previous Values F3: Optimized Defaults F4: Save & Exit ESC: Exit Version 2.17.1249. Copyright (C) 2015 American Megatrends, Inc.](/content/2026/05/1060235/images/3e228f769e15ea12d13df5e13919bbd8d4768edb4c4b4c5181b6c4317071c443.jpg)
- Press the
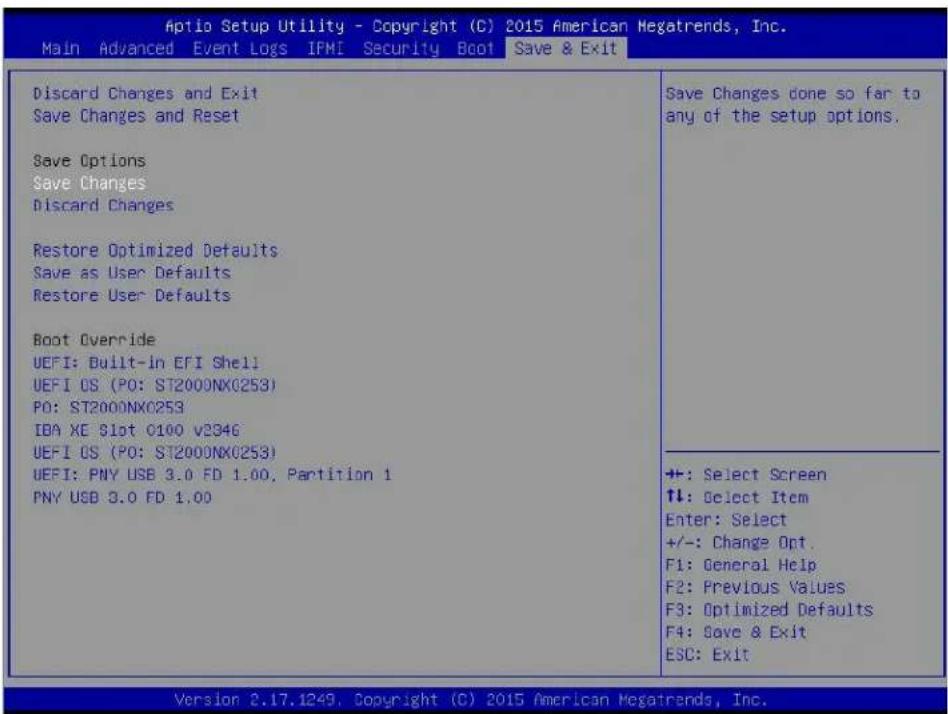
key to bring you back to the Advanced tab options. Use the arrow keys to toggle to the Save & Exit tab.
-
Use the arrow keys to select Save Changes. Press the
key. -
Use the arrow keys to select UEFI: Built-in EFI Shell and press the
key.
B. Provisioning Intel TXT (Server)
Next, you will need to provision Intel TXT in the UEFI shell.
-
Once you have selected UEFI: Built-in EFI Shell in the BIOS, the system will boot into the Unified Extensible Firmware Interface (UEFI) with a list of available USB devices.
-
Each USB device has its own code (circled in red in the picture below). Type the code for the USB device that you want to use into the command line at the bottom of the screen (outlined in green), then press the
key.

Note: The device used for the purposes of this user guide had a code of fs5. Replace this code with the code that corresponds to your device.
9,0x40,0x1FCO)
blk1 :HardDisk - Alias hd30a65535a2 fs1
PciRoot(0x0)/Pci(0x11,0x4)/Sata(0x0,0xFFFF,0x0)/HD(2,GPT,AF833ADD-8312-4D4B-B756-21719A9702B
8,0x6C2000,0x7FF800)
blk2 :HardDisk - Alias hd30a65535a5 fs2
PciRoot(0x0)/Pci(0x11,0x4)/Sata(0x0,0xFFFF,0x0)/HD(5,GPT,01A8DF67-DB2C-4EC2-970D-22FE8691EFE
2,0x2020,0x7CFEO)
blk3 :HardDisk - Alias hd30a65535a6 fs3
PciRoot(0x0)/Pci(0x11,0x4)/Sata(0x0,0xFFFF,0x0)/HD(6,GPT,84D9777E-9B77-4E74-A0AB-CB46285BBEO
8,0x7F020,0x7CFEO)
blk4 :HardDisk - Alias hd30a65535a8 fs4
PciRoot(0x0)/Pci(0x11,0x4)/Sata(0x0,0xFFFF,0x0)/HD(8,GPT,23A51B14-307B-496F-AE71-F07A924EOE3
9,0x133020,0x8EFEO)
blk5 :Removable HardDisk - Alias hd36a0cOb fs5
PciRoot(0x0)/Pci(0x1A,0x0)/USB(0x0,0x0)/USB(0x2,0x0)/HD(1,MBR,0x0051F21C,0x3F,0x3B9A7C1)
blk6 :HardDisk - Alias (null)
PciRoot(0x0)/Pci(0x11,0x4)/Sata(0x0,0xFFFF,0x0)/HD(3,GPT,4436988A-C55F-43D5-8275-A113B90259A
D,0xEC1800,0xE7F470BF)
blk7 :HardDisk - Alias (null)
PciRoot(0x0)/Pci(0x11,0x4)/Sata(0x0,0xFFFF,0x0)/HD(7,GPT,05BCO7E5-C100-4614-9DD2-C033EOB9C7C
O,0xFCO2O,0x36FEO)
blk8 :HardDisk - Alias (null)
PciRoot(0x0)/Pci(0x11,0x4)/Sata(0x0,0xFFFF,0x0)/HD(9,GPT,965CDC9B-33ED-4411-92AC-A3852F36O4F
B,0x1C200O,0x50000)
blk9 :BlockDevice - Alias (null)
PciRoot(0x0)/Pci(0x11,0x4)/Sata(0x0,0xFFFF,0x0)
blkA :Removable BlockDevice - Alias (null)
PciRoot(0x0)/Pci(0x1A,0x0)/USB(0x0,0x0)/USB(0x2,0x0)

press ESC in 1 seconds to skip startup.nsh, any other key to continue.
[hell]
- The provisioning process is complete. In the command line at the bottom of the screen, type tpm2txtprov.nsh sha256 example and press the
key.
07/15/15 01:10p 273,088 TPM2ProvTool.efi
05/11/15 10:36a 8,473 Tpm2SgxiProv.nsh
09/01/15 12:07p 15,269 Tpm2TxtProv.nsh
05/21/15 12:47p 15,041 Tpm2TxtProv.nsh.bak
12/14/14 04:22p 1,000 UnDefineSpaceSpecial.pDef
09/01/15 12:00p 21,122 Tpm2PpiProv.log
01/07/15 02:20a 10,344 Tpm2Prov.cfg
09/01/15 12:00p 22,872 Tpm2SgxProv.log
01/07/15 02:20a 43,974 Tpm2TxtProv.log
146 File(s) 1,297,891 bytes
2 Dir(s)

fs5:\TPM2ProvTool\TPM2 Prov Tool> Tpm2TxtProv.nsh sha256 example
Tpm2TxtProv.nsh> echo -OFF

***** Provisioning NV Indexes *****
If PlatformAuth is not EMPTY, then first run ResetPlatformAuth.nsh sha256 example
**** Start PW Session for PlatformAuth & Index Read Auth
********** Provisioning PS Index **********
**** Checking if PS Index exists
**** Comparing attributes against definition
**** Verifying if Data is correct
**** Checking AUX Index
**** Checking if AUX index exists
**** AUX already exists, check if provisioned correctly
Aux Index provisioned correctly

********** Provisioning Completed Successfully **********
********** Provisioning Complete Successful
fs5:\TPM2ProvTool\TPM2 Prov Tool>
- After the provisioning process has completed, you will need to go back into the BIOS and enable TXT Support. To do this, type exit in the command line at the bottom of the screen and press the
key.
07/15/15 01:10p 273,088 TPM2ProvTool.efi
05/11/15 10:36a 8,473 Tpm2SgxiProv.nsh
09/01/15 12:07p 15,269 Tpm2TxtProv.nsh
05/21/15 12:47p 15,041 Tpm2TxtProv.nsh.bak
12/14/14 04:22p 1,000 UnDefineSpaceSpecial.pDef
09/01/15 12:00p 21,122 Tpm2PpiProv.log
01/07/15 02:20a 10,344 Tpm2Prov.cfg
09/01/15 12:00p 22,872 Tpm2Sg×Prov.log
01/07/15 02:20a 43,974 Tpm2TxtProv.log
146 File(s) 1,297,891 bytes
2 Dir(s)

fs5:\TPM2ProvTool\TPM2 Prov Tool> Tpm2TxtProv.nsh sha256 example
Tpm2TxtProv.nsh> echo -OFF

***** Provisioning NV Indexes *****
If PlatformAuth is not EMPTY, then first run ResetPlatformAuth.nsh sha256 example
**** Start PW Session for PlatformAuth & Index Read Auth
*************************** Provisioning PS Index ***************************
**** Checking if PS Index exists
**** Comparing attributes against definition
**** Verifying if Data is correct
**** Checking AUX Index
**** Checking if AUX index exists
**** AUX already exists, check if provisioned correctly
Aux Index provisioned correctly
**************************
**************************
**************************
**************************
**************************
fs5:\TPM2ProvTool\TPM2 Prov Tool> exit_
C. Enabling TXT Support
The last step is enabling TXT Support in the BIOS and UEFI shell.
- Go back to the Advanced tab in the BIOS and enable TXT Support.
![Aptio Setup Utility - Copyright (C) 2015 American Megatrends, Inc. Advanced TPM20 Device Found Security Device Support [Enabled] Active PCR banks S Available PCR banks S SHA-1 PCR Bank [Enabled] SHA256 PCR Bank [Enabled] TPM State [Enabled] Pending operation [None] Platform Hierarchy [Enabled] Storage Hierarchy [Enabled] Endorsement Hierarchy [Enabled] HashPolicy [Sha256] TPM 20 InterfaceType [TIS] Device Select [Auto] Intel TXT(LT-SX) Configuration TXT Support [Enabled] Enables Intel Trusted Execution Technology Configuration. Please disable "EV DFX Features" when TXT is enabled. +: Select Screen ↑↓: Select Item Enter: Select +/-: Change Opt. F1: General Help F2: Previous Values F3: Optimized Defaults F4: Save & Exit ESC: Exit Version 2.17.1249. Copyright (C) 2015 American Megatrends, Inc.](/content/2026/05/1060235/images/0488d1a8cf4a49087d43257585b71430741a17ebdebeb5cbbc964a66cc443c8c.jpg)
-
Go back to the Save & Exit tab and select UEFI: Built-in EFI Shell in the BIOS.
-
After enabling TXT Support in the BIOS, you will need to run TXT in the UEFI shell. In the command line at the bottom of the page, type getsec64.ef1 -l sen -a and press the
key. TXT support is now enabled.
01/16/12 02:21a 1,712 Instructions.txt
11/26/13 12:56a 21,468 sinit_error.txt
04/01/14 01:14a 15,986 ver.txt
05/23/11 06:10p 139,961 Bootable EFI disk Instructions.pdf
01/16/12 02:33a 298,362 TTK-64.pdf
03/11/14 01:02a 72,896 getsec64.efi
06/05/12 11:29p 38,336 ServerSecrets.efi
01/16/14 11:33p 295,584 ServerTXTINFO.efi
14 File(s) 1,107,949 bytes
3 Dir(s)
fs5:\Grantley_Refresh\TXT> getsec64.efi -l sen -a
**************************
GETSEC64 v1.3.4
Built: Mar 10 2014 13:11:58
Intel Corporation
Copyright (c) 2010-2014
**************************
GETSEC[SENTER] complete. System is now in TXT Environment.
- To exit from the TXT environment, type getsec64.efi -I sexit in the command line at the bottom of the screen and press the
key.
fs5:\Grantley_Refresh\TXT> getsec64.efi -l sexit
******************************************************************************************
GETSEC64 v1.3.4
Built: Mar 10 2014 13:11:58
Intel Corporation
Copyright (c) 2010-2014
******************************************************************************************
GETSEC[SEXIT] complete. System has exited TXT Environment.
fs5:\Grantley_Refresh\TXT>
3.3 Provisioning the TPM 2.0 and TXT Support for the Client
Follow the instructions below to provision the TPM 2.0 for the client. This procedure can currently only be done on Supermicro X11 uniprocessor motherboards.
There are six steps involved in provisioning the TPM 2.0 for the client side. They are:
- Clear the CMOS on the motherboard
- Obtain the provisioning utility and connect it to your system
- Disable PH Randomizations and TXT Support in the BIOS
- Provision TXT Support in the UEFI shell
- Enable PH Randomizations and TXT Support in the BIOS
- Enable TXT Support in the UEFI shell
A. Clear the CMOS on the Motherboard
Before performing the client provisioning process, you will need to clear the CMOS on your motherboard. Refer to the motherboard user manual for your particular motherboard for instructions on how to perform this process.
B. Provisioning Utility
In order to perform the client provisioning, you will need to contact Supermicro support to obtain the provisioning utility. Upload it to a USB flash drive and connect the flash drive to the system you will be provisioning.
C. Disabling PH Randomizations and TXT Support in the BIOS
- Start your system. When it reaches the POST screen, press the
key continuously to reach the BIOS.

- Your computer will boot into the BIOS (and you may stop pressing the Delete key)
![Aptio Setup Utility - Copyright (C) 2016 American Megatrends, Inc. Main Advanced Event Logs IFMI Security Boot Save & Exit System Date [Thu 02/04/2016] System Time [19:36:56] Supermicro To be filled by O.E.M. BIOS Version 1.0b Build Date 02/04/2016 Memory Information Total Memory 16304 MD Memory Speed 2133 MHz Set the Date. Use Tab to switch between Date elements. +: Select Screen T↓: Select Item Enter: Select +/-: Change Opt.. F1: General Help F2: Previous Values F3: Optimized Defaults F4: Save & Exit ESC: Exit Version 2.17.1254. Copyright (C) 2016 American Megatrends, Inc.](/content/2026/05/1060235/images/d981706770221d829ad61082f8af527e01cde4b6134269655b02460cd5444b38.jpg)
- Using the arrow keys on your keyboard, toggle to the Advanced tab. Again using the arrow keys, select the Trusted Computing option. Press the
key.
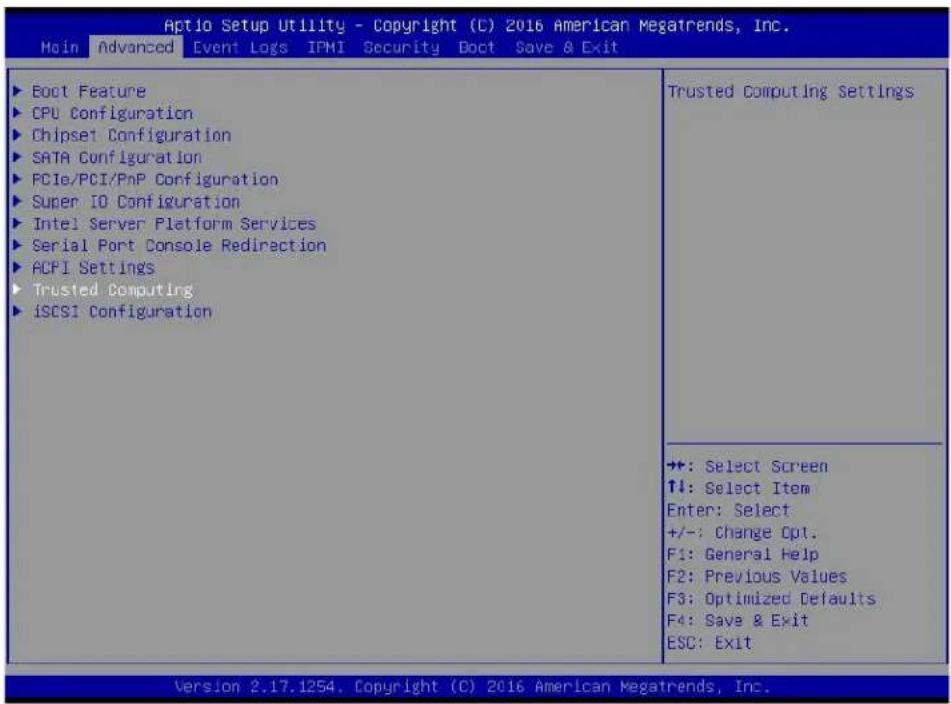
- PH Randomizations and TXT Support are enabled. You will need to disable them. Using the arrow keys, select PH Randomizations, press the
key, use the arrow keys to select Disabled, and press the key again. Do the same for TXT Support.
![Aptio Setup Utility - Copyright (C) 2016 American Megatrends, Inc. Advanced TPM20 Device Found Security Device Support [Enable] Active PCR Banks SHA-1,SHA256 Available PCR banks SHA-1,SHA256 SHA-1 PCR Bank [Enabled] SHA256 PCR Bank [Enabled] Pending Operation PH Randomization—— Platform Hierarchy Disabled Storage Hierarchy Enabled Endorsement Hierarchy TPM2.0 UEFI Spec Version PH Randomization [Enabled] Device Select [Auto] TXT Support [Enabled] Enables or Disables Platform Hierarchy randomization. DO NOT ENABLE THIS QUESTION IN PRODUCTION PLATFORMS. THIS IS FOR DEVELOPMENT TESTING. OVERRIDE ChangePlatformAuth ELINK for production platforms supporting TXT. +: Select Screen ↑↓: Select Item Enter: Select +/-: Change Opt. F1: General Help F2: Previous Values F3: Optimized Defaults F4: Save & Exit ESC: Exit Version 2.17.1254. Copyright (C) 2016 American Megatrends, Inc.](/content/2026/05/1060235/images/188c4abbd0c6387a48afe6971b2aafae1bc5f4ff7ab9ec6aa31e294665dc7632.jpg)
![Optio Setup Utility - Copyright (C) 2015 American Megatrends, Inc. Advanced TPM20 Device Found Security Device Support [Enable] Active PCR banks SHA-1,SHA256 Available PCR banks SHA-1,SHA256 SHA-1 PCR Bank [Enabled] SHA256 PCR Bank [Enabled] Pending Operation [None] Platform Hierarchy [Enabled] Storage Hierarchy [Enabled] Endorsement Hierarchy [Enabled] TPM2.0 UEFI Spec Version [1.0] PH Randomization [Disabled] Device Select [Auto] TXT Support [Disabled] Enables or Disables Intel(R) TXT(LT) support. +: Select Screen ↑↓: Select Item Enter: Select +/-: Charge Opt. F1: General Help F2: Previous Values F3: Optimized Defaults F4: Save & Exit ESC: Exit Version 2.17.1254. Copyright (C) 2016 American Megatrends, Inc.](/content/2026/05/1060235/images/2dff9b4e8b9b169b8259a64fcdad133201de76cdb068a4544916cb2e266a614a.jpg)
- Press the
key to return to the main Advanced tab. Toggle to the Save & Exit tab. Select Save Changes and press the key. You will be asked if you want to save the configuration. Select Yes and press the key.

- You will need to go into the UEFI shell and provision TXT Support. Select UEFI: Built-in EFI Shell and press the
key.

D. Provisioning TXT Support in the UEFI Shell
Once you have selected UEFI: Built-in EFI Shell in the BIOS, the system will boot into the United Extensible Firmware Interface (UEFI) with a list of available USB devices.
- Each USB device has its own code (circled in red in the picture below). Type the code for the USB device that you want to use into the command line at the bottom of the screen (outlined in green), then press the
key.

Note: The device used for the purposes of this user guide had a code of fs0. Replace this code with the code that corresponds to your device.
EFI Shell version 2.40 [5.11]
Current running mode 1.1.2
Device mapping table
fs0 :Removable HardDisk - Alias hd5e0b blk0
PciRoot(0x0)/Pci(0x14,0x0)/USB(0x4,0x0)/HD(1,MBR,0x000C3DCA,0x3F,0x1EBFC1)
blk0 :Removable HardDisk - Alias hd5e0b fs0
PciRoot(0x0)/Pci(0x14,0x0)/USB(0x4,0x0)/HD(1,MBR,0x000C3DCA,0x3F,0x1EBFC1)
blk1 :Removable BlockDevice - Alias (null)
PciRoot(0x0)/Pci(0x14,0x0)/USB(0x4,0x0)
Press ESC in 1 seconds to skip startup.nsh, any other key to continue.
Shell> fs0:
- You will need to access the package that contains the provisioning utility. In the command line, type CD and the name of the utility. Press the
key. Then type CD Provision_ALL_PS2. Press the key.

Note: The name of the utility may vary. For the purposes of this documentation, the utility used was named TPM2_X11UP.
EFI Shell version 2.40 [5.11]
Current running mode 1.1.2
Device mapping table
fs0 :Removable HardDisk - Alias hd5e0b blk0
PciRoot(0x0)/Pci(0x14,0x0)/USB(0x4,0x0)/HD(1,MBR,0x000C3DCA,0x3F,0x1EBFC1)
blk0 :Removable HardDisk - Alias hd5e0b fs0
PciRoot(0x0)/Pci(0x14,0x0)/USB(0x4,0x0)/HD(1,MBR,0x000C3DCA,0x3F,0x1EBFC1)
blk1 :Removable BlockDevice - Alias (null)
PciRoot(0x0)/Pci(0x14,0x0)/USB(0x4,0x0)

Press ESC in 1 seconds to skip startup.nsh, any other key to continue.
Shell> fs0:
fs0:\> CD TPM2_X11UP
fs0:\TPM2_X11UP> CD Provision_ALL_PS2
- Type Define_AUX.nsh and press the
key. Wait for the scripts to stop running and a line of yellow text to appear.
fs0:\TPM2_X11UP\Provision_ALL_PS2> Define_AUX.nsh
Define_AUX.nsh> echo -off
Reset Platform Auth
**** Start Policy Session for PlatformPolicy
Satisfy PlatformPolicy
**** Policy OR (0, PhSecretSHA256)
**** PH HierarchyChangeAuth
Did not satisfy PlatformPolicy
removing fs0:\TPM2_X11UP\Provision_ALL_PS2\Tpm2Prov.cfg
- [ok]
copying fs0:\TPM2_X11UP\Provision_ALL_PS2\Tpm2Prov_.cfg -> fs0:\TPM2_X11UP\Provision_ALL_PS2\Tpm2Prov.cfg
- [ok]
Creating Aux Index ...
Clearing AUXDeletionControl flag in PS Policy
Start Policy Session
Policy OR (Branch A, Branch B, Branch C)
Writing PS Policy to clear AUXDeletionControl flag
Flush Session 0
AUX Define
- Type Define_PS.nsh and press the
key. Wait for the scripts to stop running and a line of yellow text to appear.
fs0:\TPM2_X11UP\Provision_ALL_PS2> Define_PS.nsh
Define_PS.nsh> echo -off
Reset Platform Auth
**** Start Policy Session for PlatformPolicy
Satisfy PlatformPolicy
**** Policy OR (0, PhSecretSHA256)
**** PH HierarchyChangeAuth
Did not satisfy PlatformPolicy
removing fs0:\TPM2_X11UP\Provision_ALL_PS2\Tpm2Prov.cfg
- [ok]
copying fs0:\TPM2_X11UP\Provision_ALL_PS2\Tpm2Prov_.cfg -> fs0:\TPM2_X11UP\Provision_ALL_PS2\Tpm2Prov.cfg
- [ok]
Start Policy Session
Policy Command Code (0, TPM_CC_NV_UndefineSpaceSpecial)
Policy OR (Branch A, Branch B, Branch C)
UndefineSpecial PS_Def.iDef
PS Define
Flush Session 0
Writing PS Policy
Start Policy Session
Policy OR (Branch A, Branch B, Branch C)
Writing NV Data
Flush Session 0
- Type Define_SGX.nsh and press the
key. Wait for the scripts to stop running and a line of yellow text to appear.
fs0:\TPM2_X11UP\Provision_ALL_PS2> Define_SGX.nsh
Define_SGX.nsh> echo -off
Reset Platform Auth
**** Start Policy Session for PlatformPolicy
Satisfy PlatformPolicy
**** Policy OR (0, PhSecretSHA256)
**** PH HierarchyChangeAuth
Did not satisfy PlatformPolicy
removing fs0:\TPM2_X11UP\Provision_ALL_PS2\Tpm2Prov.cfg
- [ok]
copying fs0:\TPM2_X11UP\Provision_ALL_PS2\Tpm2Prov_.cfg -> fs0:\TPM2_X11UP\Provision_ALL_PS2\Tpm2Prov.cfg
- [ok]
Start Policy Session
Policy Command Code (0, TPM_CC_NV_UndefineSpaceSpecial)
Policy OR (Branch A, Branch B, Branch C)
UndefineSpecial SGX_Def.iDef
SGX Define
Writing NV Data
Flush Session 0

Note: This step may take a few minutes to process.
- Type Lock_PS2.nsh. Press the
key. Wait for the scripts to stop running and a line of yellow text to appear.
fs0:\TPM2_X11UP\Provision_ALL_PS2> Lock_PS2.nsh
Lock_PS2.nsh> echo -off
Reset Platform Auth
**** Start Policy Session for PlatformPolicy
Satisfy PlatformPolicy
**** Policy OR (0, PhSecretSHA256)
**** PH HierarchyChangeAuth
Did not satisfy PlatformPolicy
removing fs0:\TPM2_X11UP\Provision_ALL_PS2\Tpm2Prov.cfg
- [ok]
copying fs0:\TPM2_X11UP\Provision_ALL_PS2\Tpm2Prov_.cfg -> fs0:\TPM2_X11UP\Provision_ALL_PS2\Tpm2Prov.cfg
- [ok]
Lock PS (for PS2 index only)
- The provisioning process for TXT Support is complete. You will need to return to the BIOS and enable PH Randomizations and TXT Support. Type exit and press the
key. You will be brought back to the BIOS.
E. Enabling PH Randomizations and TXT Support in the BIOS
- When you return to the BIOS after provisioning TXT Support in the UEFI shell, you will be brought back to the Save & Exit tab. Toggle to the Advanced tab and select Trusted Computing. Press the
key.

- Select PH Randomization, press the
key, select Enabled, and press the key again. Do the same for TXT Support.
![Antio Setup Utility - Copyright (C) 2016 American Megatrends, Inc. Advanced TPM20 Device Found Security Device Support [Enable] Active PCR banks SHA-1,SHA256 Available PCR banks SHA-1,SHA256 SHA-1 PCR Bank [Enabled] SHA256 PCR Bank [Enabled] Pending Operation PH Randomization Platform Hierarchy Disabled Storage Hierarchy Enabled Endorsement Hierarchy TPM2.0 UEFI Spec Version PH Randomization [Disabled] Device Select [Auto] TXT Support [Disabled] Enables or Disables Platform Hierarchy randomization, DO NOT ENABLE THIS QUESTION IN PRODUCTION PLATFORMS. THIS IS FOR DEVELOPMENT TESTING. OVERRIDE ChangePlatformAuth ELINK for production platforms supporting TXT. ++: Select Screen ↑↓: Select Item Enter: Select +/-: Change Opt. F1: General Help F2: Previous Values F3: Optimized Defaults F4: Save & Exit ESC: Exit Version 2.17.1254. Copyright (C) 2016 American Megatrends, Inc.](/content/2026/05/1060235/images/3e0daec6ec65f3943ddca12e976f76b341e03aa4e67ca5d9e3ba94cab1db504b.jpg)
- Press the
key to return to the main Advanced tab. Toggle back to the Save & Exit tab. - Select Save Changes and Reset. Press the
key.

- You will be asked if you want to save the configuration and reset. Select Yes and press the
key.

- The BIOS portion of the provisioning process is complete. You will need to return to the UEFI shell and enable TXT Support. Select UEFI: Built-in EFI Shell and press the
key.

F. Enabling TXT Support in the UEFI Shell
- When you return to the UEFI shell, you will need to go back and follow steps 1 through 3 of Section 3.3 D: Provisioning TXT Support in the UEFI Shell. Once you have done that, type getsec64.efi -I sen in the command line. Press the
key. The TPM 2.0 is now enabled for the client.
fs0:\TPM2_X11UP\Provision_ALL_PS2> getsec64.efi -l sen
**********************************************************************
GETSEC64 v1.3.15
Built: Jan 27 2015 16:44:20
Intel Corporation
Copyright (c) 2010-2015
**********************************************************************
GETSEC[SENTER] complete. System is now in TXT Environment.
- Verify that there were no errors. If there were not, type getsec64.efi -I SEXIT in the command line. Press the
key to exit the UEFI shell.
fs0:\TPM2_X11UP\Provision_ALL_PS2> getsec64.efi -l sen
**********************************************************************
GETSEC64 v1.3.15
Built: Jan 27 2015 16:44:20
Intel Corporation
Copyright (c) 2010-2015
**********************************************************************
GETSEC[SENTER] complete. System is now in TXT Environment.
fs0:\TPM2_X11UP\Provision_ALL_PS2> getsec64.efi -l SEXIT
**********************************************************************
GETSEC64 v1.3.15
Built: Jan 27 2015 16:44:20
Intel Corporation
Copyright (c) 2010-2015
**********************************************************************
GETSEC[SEXT] complete. System has exited TXT Environment.
fs0:\TPM2_X11UP\Provision_ALL_PS2>

- Preface
- About This User Guide
- Conventions Used in the User Guide
- Important Links
- An Important Note to the User
- Contacting Supermicro
- Headquarters
- Europe
- Asia-Pacific
- Table of Contents
- Chapter 1 Introduction
- Chapter 2 Installation of the TPM 1.2
- Chapter 3 Installation of the TPM 2.0
- Chapter 1
- Introduction
- Overview of the Trusted Platform Module (TPM)
- Types of TPMs for TPM 1.2
- Types of TPMs for TPM 2.0
- Supermicro TPM Features
- Motherboards Supported for TPM
- Intel® TXT
- How the TXT Works
- Chapter 2
- Installation of the TPM 1.2
- Installing the TPM onto the Motherboard
- Enabling the TPM 1.2 via the SUM
- Enabling the TPM 1.2 via the BIOS and Intel® Provision Utility
- Enabling the TPM 1.2 in the BIOS
- Provisioning via the Intel Provision Utility (Server)
- Provisioning via the Intel Provision Utility (Client)
- Enabling TXT Support
- Chapter 3
- Installation of the TPM 2.0
- Installing the TPM onto the Motherboard
- Configuring the TPM 2.0 and Intel TXT for the Server
- Enabling TPM 2.0 in the BIOS
- Provisioning Intel TXT (Server)
- Enabling TXT Support
- Provisioning the TPM 2.0 and TXT Support for the Client
- Clear the CMOS on the Motherboard
- Provisioning Utility
- Disabling PH Randomizations and TXT Support in the BIOS
- Provisioning TXT Support in the UEFI Shell
- Enabling PH Randomizations and TXT Support in the BIOS
- Enabling TXT Support in the UEFI Shell
Brand : Supermicro
Model : TCG 2.0
Category : Computer component