
CCL3 - Lock Panduit - Free user manual and instructions
Find the device manual for free CCL3 Panduit in PDF.


| Brand | Panduit |
| Model | CCL3 |
| Product Type | Security Lock |
| Lock Type | Padlock / Key Lock |
| Body Material | Hardened Steel |
| Shackle Material | Case-Hardened Steel |
| Shackle Diameter | 5 mm |
| Overall Dimensions | 45 mm x 38 mm x 15 mm |
| Weight | 50 g |
| Key Type | Double-Bitted Key |
| Number of Keys Included | 2 |
| Locking Mechanism | Pin Tumbler |
| Security Level | Medium |
| Weatherproof | Yes (Rust-Resistant Coating) |
| Application | Network Racks, Cabinets, and Gates |
| Color | Black |
| Replacement Keys Available | Yes (via Panduit or Locksmith) |
| Compliance | RoHS, REACH |
| Operating Temperature | -20°C to 60°C |
| Maintenance | Apply graphite lubricant periodically |
Frequently Asked Questions - CCL3 Panduit
User questions about CCL3 Panduit
0 question about this device. Answer the ones you know or ask your own.
Ask a new question about this device
Download the instructions for your Lock in PDF format for free! Find your manual CCL3 - Panduit and take your electronic device back in hand. On this page are published all the documents necessary for the use of your device. CCL3 by Panduit.
USER MANUAL CCL3 Panduit
INSTRUCTIONS V00029AF Rev. 01
- Reference the latest revisions of the following instruction sheets for door removal (if necessary):
• N-Type Cabinets: CM598
• S-Type Cabinets: CM599
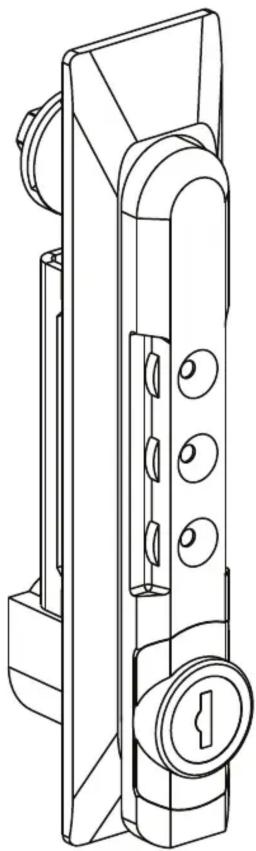
natural_image
Technical line drawing of a mechanical latch or lock mechanism (no text or symbols)NOTE
Entire handle assembly must be removed from door prior to installation of CCL3
Combination Lock Swing Handle Operation
- Default combination: "0,0,0"
- Set [3] dials to correct combination, or use key to open handle
SET NEW COMBINATION
- Open swing handle
- Rotate handle insert counter-clockwise 30^ (from unlocked position) or 210^ (from locked position)
- Set [3] dials to desired combination
- Return handle insert to original position
- Close swing handle
![[3] Dials Handle Insert (from unlocked) (rotate counter-clockwise 30° from unlocked position to set new combination) Handle Insert (from locked) (rotate counter-clockwise 210° from locked position to set new combination)](/content/2026/05/1060182/images/d3a980297445fa473f8f78e189f7876f0dddb24d6b53b77767a081508b70d131.jpg)
S-Type Single Hinge Door
Combination Lock Swing Handle Installation
- Remove Cam Screw (use 10mm socket wrench), Cam Stop (note orientation of Cam Stop), and Cam from existing handle
- Remove Door Handle Backing Plate and remove existing door handle (remove [2] Phillips screws)
• Install Combination Lock Swing Handle by securing Door Handle Backing Plate to Swing Handle with [2] Phillips screws
• Install Cam, Cam Stop, and Cam Screw (use 10mm socket wrench)
• Note orientation of Cam Stop
![REMOVE: - Cam Screw (use 10mm socket wrench) - Door Cam - Cam Stop (note orientation) REMOVE EXISTING DOOR HANDLE [2] Phillips Screws Door Handle Backing Plate Existing Door Handle INSTALL: - Cam Screw (use 10mm socket wrench) - Door Cam - Cam Stop (note orientation) [2] Phillips Screws Door Handle Backing Plate Combination Lock Swing Handle](/content/2026/05/1060182/images/1b0ecd909be623abc90ebb177c2aae24c289c19095b72698d5646f4997a51ea9.jpg)
For Technical Support: www.panduit.com/resources/install_maintain.asp
N-Type Single Hinge Door; N-Type & S-Type Solid Rear Door
Combination Lock Swing Handle Installation
- Remove Cam Screw (use 10mm socket wrench) and Cam Stop (note orientation of Cam Stop) from existing handle
- Remove Door Handle Backing Plate and remove existing door handle (remove [2] Phillips screws)
• Install Combination Lock Swing Handle by securing Door Handle Backing Plate to Swing Handle with [2] Phillips screws
• Install Cam Stop and Cam Screw (use 10mm socket wrench)
• Note orientation of Cam Stop - Ensure that square cutout of Door Rod Assembly sits securely on Combination Lock Swing Handle
- Ensure that door rods are behind door rod guides
Cam Screw
(use 10mm Socket Wrench)
![[2] Phillips Screws Door Handle Backing Plate Cam Stop N-Type & S-Type Solid Rear Door REMOVE: -Existing Door Handle INSTALL: -Combination Lock Swing Handle Follow procedure for N-Type Single Hinge Door hanle replacement](/content/2026/05/1060182/images/c2547f693fbc45770180b62d7fa48e5a1ac25250de0683f622a5192efedf81ab.jpg)
N-Type and S-Type Split Door
Combination Lock Swing Handle Installation
- Remove Cam Screw (use 10mm socket wrench) and Cam Stop (note orientation of Cam Stop) from existing handle
- Remove Door Handle Backing Plate and remove existing door handle (remove [2] Phillips screws)
• Install Combination Lock Swing Handle by securing Door Handle Backing Plate to Swing Handle with [2] Phillips screws
• Install Cam Stop and Cam Screw (use 10mm socket wrench)
• Note orientation of Cam Stop - Ensure that square cutout of Door Rod Assembly sits securely on Combination Lock Swing Handle
![[2] Phillips Screws Cam Screw (use 10mm Socket Wrench) Cam Stop Door Handle Backing Plate REMOVE: -Existing Door Handle INSTALL: -Combination Lock Swing Handle](/content/2026/05/1060182/images/8b81f6db7a97fe9a7d8faa2974793c03ba5ef2c3e10cb43436c8eec71f90909c.jpg)
For Instructions in Local Languages and Technical Support:
www.panduit.com/resources/install_maintain.asp

E-mail:
Brand : Panduit
Model : CCL3
Category : Lock