
BC3115 IX - Refrigerator Becken - Free user manual and instructions
Find the device manual for free BC3115 IX Becken in PDF.


| Product Type | Built-in Refrigerator |
| Model | BC3115 IX |
| Brand | Becken |
| Color | Stainless Steel |
| Energy Class | F |
| Total Net Capacity | 265 L |
| Refrigerator Net Capacity | 200 L |
| Freezer Net Capacity | 65 L |
| Dimensions (H x W x D) | 1770 x 540 x 540 mm |
| Weight | 55 kg |
| Power Supply | 220-240 V, 50 Hz |
| Noise Level | 42 dBA |
| Climate Class | SN-T |
| Defrost Type | Automatic (Refrigerator), Manual (Freezer) |
| Interior Lighting | LED |
| Shelves | Tempered Glass |
| Door Reversible | Yes |
| Child Lock | No (standard model) |
| Spare Parts Availability | Available through customer service |
| Maintenance | Clean with soft cloth and mild detergent |
| Installation Type | Built-in |
| Warranty | 2 years |
Frequently Asked Questions - BC3115 IX Becken
User questions about BC3115 IX Becken
0 question about this device. Answer the ones you know or ask your own.
Ask a new question about this device
Download the instructions for your Refrigerator in PDF format for free! Find your manual BC3115 IX - Becken and take your electronic device back in hand. On this page are published all the documents necessary for the use of your device. BC3115 IX by Becken.
USER MANUAL BC3115 IX Becken
natural_image
Exterior view of a modern stainless steel refrigerator with 'BECKEN' branding and digital display (no visible text or symbols beyond branding)Dear client,
Thank you for purchasing this product.
The quality of this appliance has been certified by several laboratory tests. This instruction manual is provided to simplify the use of the appliance. The instructions guarantee quick and safe use.
Please read the instructions and safety measures described in this manual carefully.
We wish our clients great satisfaction in using their new appliance.
EN
Index
- Safety Instructions 04
1.1. Power Supply 04
1.2. Power Cord and Other Cables 04
1.3. Humidity and Water 05
1.4. Cleaning 05
1.5. General Precautions 05
- Use and Operation 07
2.1. Product Description 07
2.2. Operating Instructions 07
2.3. Maintenance 15
2.4. Troubleshooting 16
-
Technical Specifications 17
-
Customer Service 18
-
Protection of the Environment 18
1. SAFETY INSTRUCTIONS

Important Warnings
Before using your appliance, read carefully this instruction manual and keep it in a safe place, as you may need it for future consultations.
Before you start your appliance, and to ensure a correct use, do not use it if:
It has fallen on the ground;
You notice any evidence of damage;
Any anomaly occurs during its operation;
To avoid hazards and deterioration of your appliance by an incorrect use, it is advisable to read the instructions carefully and attentively.
Your appliance must not be used to other ends than the ones foreseen in the instructions manual. Your safety is only guaranteed in a household use and not for commercial use. The incorrect use will not be covered and automatically cancels the right to warranty.
Assistance
Be sure that, in case of malfunction, you take your appliance to a qualified technician for assistance.
This appliance can be used by children from 8 years old and above and persons with reduced physical, sensory or mental capabilities or lack of experience and knowledge if they have been given instruction concerning use of the appliance in a safe way and understand the hazards involved. children shall not play with the appliance. cleaning and maintenance shall not be made by children without supervision.
These instructions are also available on www.suporteworten.pt
1.1. POWER SUPPLY
Make sure the mains voltage is compatible with the appliance voltage. If this is not the case consult the vendor or Customer Support Service.
1.2. POWER CORD AND OTHER CABLES
Do not roll up or pull the cord to disconnect the appliance, and do not use it to twine the appliance. Keep the cord away from warm surfaces.
Never use the appliance if it has a damaged cable or socket, or if it is not working properly. If the power cord is damaged, do not use your appliance. Take it to technical assistance for replacement.
04
[you can trust]
1.3. HUMIDITY AND WATER
Do not use your appliance in humid places. Do not allow the appliance to become wet under any circumstances as this may be dangerous.
TO AVOID FIRE HAZARD OR ELECTRIC SHOCK DO NOT EXPOSE YOUR APPLIANCE TO HUMIDITY OR WATER.
Do not place your appliance under water (for example to wash it).
1.4. CLEANING
Before cleaning, be sure to switch off the appliance.
For hygiene reasons the inside of the appliance, including accessories, should be cleaned regularly.
CAUTION! The appliance must not be connected to the power supply during cleaning. Danger of electric shock!
Before cleaning, switch the appliance off and remove the plug from the mains, or switch off or disconnect the circuit breaker or fuse.
Never clean the appliance with a steam cleaner. Moisture could accumulate in electric components causing a danger of electric shock! Hot vapors can cause damage to plastic parts. The appliance must be dry before it is put back into service.
Ethereal oils and organic solvents can attack plastic parts, e.g. lemon juice or the juice from orange peel, butyric acid, cleansers that contain acetic acid.
- Do not allow such substances to come into contact with the appliance parts.
- Do not use any abrasive cleaners
- Remove the food from the freezer. Store it in a cool place and cover it well.
- Switch the appliance off and remove the plug from the mains, or switch off or disconnect the circuit breaker or fuse.
- Clean the appliance and the interior accessories with a cloth and lukewarm water. After cleaning wipe with fresh water and wipe dry.
• After everything is dry put the appliance back into service.
1.5. GENERAL PRECAUTIONS
- Please follow the instructions in the user manual which help to properly install and operate this product and enjoy its advanced features. Please keep the instructions for future reference.
- Keep these instructions and make sure that they remain with the appliance if it is moved or sold so that everyone using it throughout its life will be properly informed on appliance use and safety.
- Read all instructions before using the product.
- Maintenance and service operations are only to be carried out by authorized dealers.
- Any damage caused by manual modifications to the product is not covered by the warranty.
- If this product is used for other purposes than originally designed, or if it is not correctly connected, the product may suffer damage and the warranty will be voided.
• Children should be supervised to make sure that they do not play with the appliance.
- Keep all packaging well away from children. There is a risk of suffocation.
- If you are discarding the appliance pull the plug out of the socket, cut the connection cable (as close to the appliance as you can) and remove the door to prevent playing children from suffering electric shocks or being shut inside it.
- If this appliance with magnetic door seals is to replace an older appliance with a spring lock (latch) on the door or lid, be sure to disable the spring lock before discarding the old appliance. This will prevent it from becoming a death trap for a child.
- Keep ventilation openings in the appliance casing or built into the structure clear of obstruction.
- Do not use mechanical devices or other means to accelerate the defrosting process other than those recommended by the manufacturer.
- Do not damage the refrigerant circuit.
- Do not use other electric appliances (such as ice cream makers) inside refrigerating appliances unless they are approved for this purpose by the manufacture.
- Do not touch the light bulb (when there is a light in the compartment) if it has been on for a long period of time because it could be very hot.
- Do not store explosive substances such as aerosol cans with a flammable propellant in this appliance.
- The isobutane (R600a) refrigerant which is contained inside the appliance's refrigerant circuit is a natural gas with a high level of environmental compatibility but which is nevertheless flammable.
- During the transport and installation of the appliance make sure that none of the refrigerant circuit components are damaged.
- Avoid open flames and sources of ignition.
- Thoroughly ventilate the room in which the appliance is located.
- It is dangerous to alter the specifications or modify this product in any way. Any damage to the cord may cause a short circuit, fire and/or electric shock.
- This appliance is intended for use in the home and for similar applications such as:
- staff kitchen areas in shops, offices and other working environments;
- in farmhouses and by clients in hotels, motels and other residential type environments; - bed and breakfast type environments;
- catering and similar non-retail applications.
- All electric components (plug, power cord, Compressor, etc.) must be replaced by a certified service agent or qualified service personnel.
- The light bulb supplied with this appliance (if there is a light in the compartment) is a "special use light bulb" usable only with this appliance. This "special use lamp" is not suitable for domestic lighting.
• The power cord must not be extended.
- Make sure that the power plug is not crushed or damaged by the back of the appliance. A crushed or damaged power plug may overheat and cause a fire.
- Make sure that the mains power outlet for the appliance is accessible.
- Do not pull on the power cord.
- If the mains power outlet is loose do not insert the power plug. There is a risk of electric shock or fire.
- Do not use the appliance without the lamp.
• This appliance is heavy. Care should be taken when moving it.
- Do not remove from or touch items inside the freezer compartment if your hands are damp/wet as this could cause skin abrasions or frost/freezer burns.
- Avoid prolonged exposure of the appliance to direct sunlight.
- Do not put hot items on the appliance's plastic parts.
- Do not place food products directly against the back wall.
- Frozen food must not be re-frozen once it has been thawed out. (If there is a freezer compartment).
- Store pre-packed frozen food in accordance with the frozen food manufacturer's instructions. (If there is a freezer compartment).
- The manufacturer's storage recommendations should be strictly adhered to. Please refer to the relevant instructions.
- Do not place carbonated or fizzy drinks in the freezer compartment as this creates pressure
[you can trust]
inside the container which may cause it to explode resulting in damage to the appliance. (If there is a fresh-food storage compartment).
- Iced lollies can cause frost burns if consumed straight from the appliance. (If there is a freezer compartment).
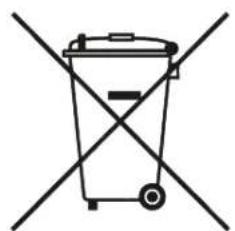
- The appliance must not be disposed of with household refuse and rubbish.
- The insulation foam contains flammable gases: the appliance must be disposed of according to applicable local regulations.
- Avoid damaging the cooling unit, especially the heat exchanger.
- This appliance does not contain gases which could damage the ozone layer either in its refrigerant circuit or its insulation materials.
2. USE AND OPERATION
2.1. PRODUCT DESCRIPTION
- Fridge Balconies
- Fridge Shelves
- Crisper Box
- Freezer Drawers
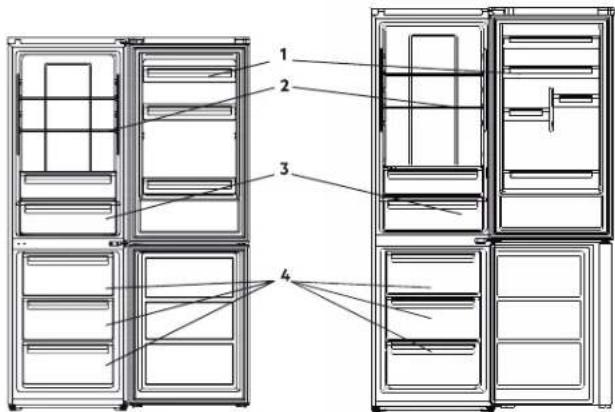
BC3115 IX BC3118 IX
2.2. OPERATIONS INSTRUCTIONS
Space Requirement
- Select a location with no direct exposure to sunlight;
- Select a location with enough space for the refrigerator doors to open easily;
- Select a location on level (or almost level) flooring;
- Allow sufficient space to install the refrigerator on a flat surface;
- Allow clearance to the right, left, back and top when installing. This will help reduce power consumption and keep your energy bills lower.
- Keep a gap of at least 50 mm at both sides and the back.
Positioning
Install this appliance in a location where the ambient temperature corresponds to the climate class indicated on the appliance rating plate:
| Climate class | Ambient temperature |
| SN | +10°C to +32°C |
| N | +16°C to +32°C |
| ST | +16°C to +38°C |
| T | +16°C to +43°C |
The appliance must be installed well away from heat sources such as radiators, boilers, direct sunlight, etc.
Make sure that air can circulate freely around the back of the cabinet.
To ensure the best performance, if the appliance is positioned below an overhanging wall unit, the minimum distance between the top of the cabinet and the wall unit must be at least 100 mm. Ideally, however, the appliance should not be positioned below overhanging wall units.
The level of the appliance can be adjusted by one or more of the adjustable feet at the base of the cabinet.
WARNING! It must be possible to disconnect the appliance from the mains power supply; the plug must therefore be easily accessible after installation.
Electric connection
Before plugging in the appliance make sure that the voltage and frequency shown on the rating plate correspond to your domestic power supply. The appliance must be earthed. The power cord plug has an earth terminal. If the domestic power supply socket is not earthed connect the appliance to a separate earth terminal in compliance with applicable regulations. Ask a qualified electrician for advice.
The manufacturer declines all liability if the above safety precautions are not observed. This appliance complies with E.E.C. Directives.
Installation
IMPORTANT! When connecting to the electricity supply follow the instructions given in the specific sections carefully.
- Unpack the appliance and check it for damage. Do not connect the appliance if it is damaged. Report eventual damage immediately to the retailer. If there is damage keep the packing.
- It is advisable to wait at least four hours before connecting the appliance to allow the oil to flow back into the compressor.
- There should be adequate air circulation around the appliance. Insufficient air flow leads to overheating. To achieve sufficient ventilation follow the installation instructions.
- Wherever possible the product spacers should be against a wall to avoid touching or catching on warm parts (compressor, condenser) to prevent possible burns.
- The appliance must not be located close to radiators or cookers.
- Make sure that the mains plug is accessible after the appliance has been installed.
Door Reversibility
Before reversing the door please prepare the following tools and materials: flat tipped screwdriver, cross tipped screwdriver, spanner and the components included in the poly bag:
Right door decorative Cover x 1

Left Door Hinge Cover x 1
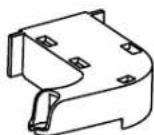
[you can trust]
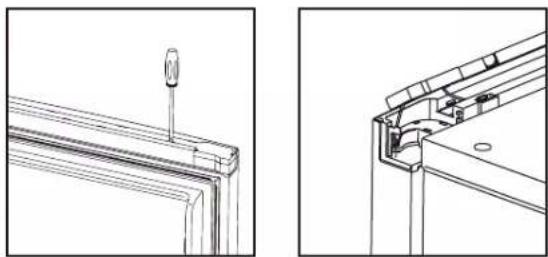
- Remove the plastic cover using a flat tipped screwdriver after opening the door. Please be careful of the wire inside.
natural_image
Technical line drawing showing two views of a mechanical bracket assembly (no text or symbols)- Close the door. Remove the screw from the top cover using a cross tipped screwdriver. Take off the front top cover and hinge cover, disconnect the terminal, and then remove the screw from the hinge. Make sure the door is closed when doing this.

- Take off the upper door, remove the screw from the middle hinge using a cross tipped screwdriver, and then take off the lower door.
natural_image
Technical line drawing of a mechanical clamp or bracket (no text or symbols)- Lay the refrigerator on its back, remove the adjusting feet as shown below, then take off the lower hinge using a cross tipped screwdriver.

natural_image
Technical diagram showing a mechanical assembly with an inset close-up of a bracket detail (no text or symbols)- Change the lower hinge and upper hinge to the opposite position.

natural_image
Diagram showing a mechanical tool being adjusted, with no text or symbols present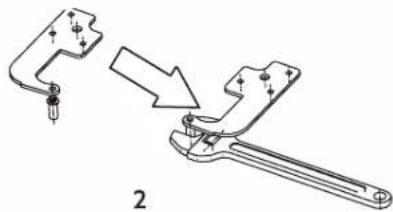
natural_image
Mechanical clamp tool diagram showing a disassembly process (no text or symbols present)- Install the lower hinge under the refrigerator as shown below. Screw in the adjusting feet. Make sure the position is horizontal.

natural_image
Technical line drawing of a mechanical assembly with an inset close-up showing a component detail (no text or symbols)- Install the lower door, adjust and fix the middle hinge onto the cabinet.

natural_image
Pure mechanical assembly diagram without any text, numbers, or symbols- Use the Right Door Decorative Cover from the poly bag to cover the insert and remove the one on the other side. Move the wire to the other side.

natural_image
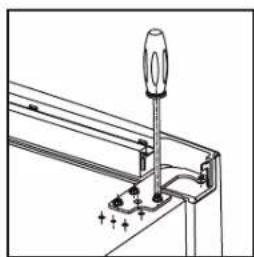
Technical line drawing of a mechanical component with directional arrows indicating movement (no text or symbols)- Install the upper door, then fix the upper door hinge onto the cabinet.
natural_image
Technical line drawing of a mechanical assembly with a screwdriver inserted, showing mounting holes and fasteners (no text or symbols)[you can trust]
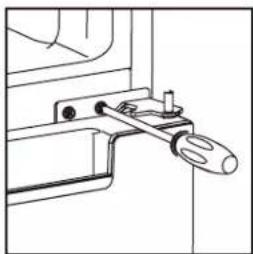
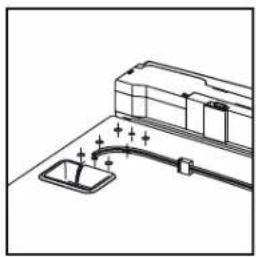
- Install the plastic cover and the Left Door Hinge Cover from r=the poly bag onto the product, place the wire (see diagram).

natural_image
Technical diagram of a mechanical assembly with an inset close-up showing detail (no text or symbols)- Fix the plastic cover and connect the terminal.
natural_image
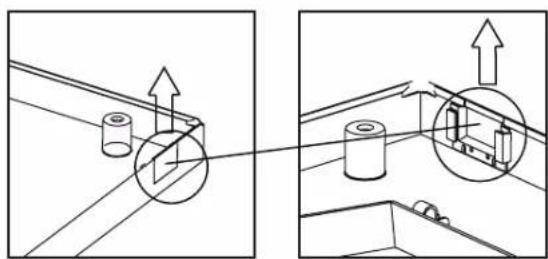
Technical line drawing of a mechanical assembly with a base and pipe connection (no text or symbols)12.Move the Decorative Cover from one side to the other

natural_image
Technical line drawing of a mechanical bracket with mounting holes and a curved arrow indicating direction (no text or symbols)Follow the instructions to remove the decorative cover and be careful not to damage it.
natural_image
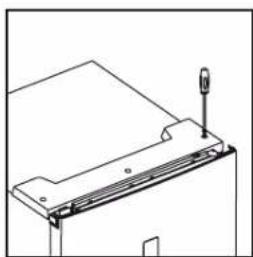
Technical diagram showing two mechanical assembly states with arrows indicating motion, no text or symbols present- Finally, screw on the top cover
natural_image
Technical line drawing of a mechanical component with a screw and mounting bracket (no text or symbols)- Do not put hot food inside the appliance.
- Do not pack food close together as this prevents the air from circulating.
- Make sure food does not touch the back of the compartment(s).
- If there is a power failure do not open the door(s).
- Do not open the door(s) frequently.
- Do not keep the door(s) open for too long.
- Do not set the thermostat to exceedingly cold temperatures.
- Some accessories, such as drawers, can be removed to obtain a larger storage volume and lower energy consumption.
USING THE CONTROL PANEL
1. Control Panel
1.1 Key Operation
A. Fridge Compartment Temperature Control
B. Freezer Compartment Temperature Control
C. Mode/ Locked / Unlocked
1.2 Led Display
- Fridge Compartment Temperature
- Freezer Compartment Temperature
- ECO Mode
- Vacation Mode
- Super Mode
- Locked / Unlocked

2. Operating Conditions
- The control panel lights fully for 3 seconds showing the exact setting (mode and temperature) that was active before powering off. The system will lock automatically 25 seconds after the last key operation. After locking, the panel light will turn off 30 seconds after the last key operation.
- Both the fridge compartment and freezer compartment preset temperatures are shown on the display.
2.1 Display
a) The panel will light for 2 minutes when the door of the fridge compartment or freezer compartment is opened (Each door sensor is separate).
b) The panel will light for any key operation; it will turn off 2 minutes after the last operation.
c) Display during normal operation.
- Fridge Compartment Temperature Display: Indicating the current temperature setting.
- Freezer Compartment Temperature Display: Indicating the current temperature setting.
3. Key Illustration
3.1 Fridge Compartment Temperature Control
a) Fridge Compartment Temperature Control:
[you can trust]
This key can be used both in User Defined Mode as well as in Super Mode. After entering the fridge compartment temperature control this key flashes. By pressing the key several times the temperature will change in a cycle of "2 C, 3C, 4C, 5C, 6C, 7C, 8C, OFF", following which it will flash for 5 seconds to indicate the temperature has been set.
b) Powering off the Fridge Compartment:
Press the "Fridge Compartment Temperature Control", select "OFF", the key will flash for 5 seconds to indicate that the fridge compartment has been turned off.
3.2 Freezer Compartment Temperature Control
Freezer Compartment Temperature Control: This key can be used both in User Defined Mode as well as Vacation Mode. After entering freezer compartment temperature control the key flashes. By pressing the key several times, the temperature will change in a cycle of -16C to -22C, following which it will flash for 5 seconds to indicate that the temperature has been set.
3.3 Mode/ Locked / Unlocked
a) By pressing this key several times the refrigerator operating mode will cycle through "ECO Mode-Vacation Mode-Super Mode-User Defined Mode. It will flash for 5 seconds to indicate that the setting has been taken into account.
b) Long press to Enter / Exit Lock Mode
- To unlock: Press for 3 seconds in lock mode. All the keys will be unlocked after the beep.
- Locking: Press for 3 seconds in unlocked mode. All the keys will be locked after the beep.
3.4 Press Button
Short beep following each press
All buttons are only valid in unlocked mode.
3.5 Lock Function
If there are no operations for 25 seconds the display will lock automatically.
4. ECO mode
Press mode to choose ECO mode. The ECO icon stays bright after flashing for 5 seconds.
5^ in the fridge compartment and -18^ in the freezer compartment in eco mode,
The "Freezer" & "Fridge" buttons will be disabled and the eco icon will flash three times.
To exit eco mode
Press mode again to exit eco mode. The new mode will be activated after 5 seconds.
4.1 Vacation Mode
Press mode to select Vacation Mode. The icon stays bright after flashing for 5 seconds.
Temperature will be set to 17° in the fridge compartment, the "fridge" button will be disabled, and the vacation icon will flash three times.
To exit vacation mode: select the new mode. Vacation mode will be exited 5 seconds after the new mode is selected.
4.2 Super Freezing mode
Select the mode. The icon stays bright after flashing for 5 seconds.
Freezing mode:
The temperature in the freezing compartment cannot be adjusted, the "freezer" button is disabled and the freezing icon will flash three times.
Freezing mode is exited in the following conditions.
-manually exit freezing mode
-freezing period of more than 26 hours
The mode returns to its setting before entering super freezing mode.
FIRST USE
Clean the interior
Before using the appliance for the first time, wash the interior and all internal accessories with lukewarm water and some neutral soap to remove the characteristic smell of a brand new product, and then dry thoroughly.
IMPORTANT! Do not use detergents or abrasive powders as these will damage the finish.
DAILY USE
Freezing fresh food
- The freezer compartment is suitable for freezing fresh food and storing frozen and deep-frozen food for a long time.
- Place the fresh food to be frozen in the bottom compartment.
- The maximum amount of food that can be frozen in 24 hours is specified on the rating plate.
- The freezing process lasts 24 hours: during this period do not add other food to be frozen.
Storing frozen food
When first starting-up, or following a period when it has not been used, let the appliance run for at least 2 hours on the higher settings before placing food inside it.
Important! In the event of accidental defrosting, for example if the power has been cut for longer than the value shown in the technical characteristics chart under "rising time", the defrosted food must be eaten quickly or cooked immediately and then re-frozen (after cooking).
Thawing
Prior to use, deep-frozen or frozen food can be thawed in the fridge compartment or at room temperature depending on the time available for this operation.
Small items may even be cooked when still frozen. In this case cooking will take longer.
HELPFUL HINTS AND TIPS
Hints for freezing
To help you make the most of the freezing process, here are some important hints:
- The maximum quantity of food that can be frozen in 24 hours is shown on the rating plate;
[you can trust]
- The freezing process takes 24 hours. No further food should be added during this period;
- Only freeze top quality, fresh and thoroughly cleaned foodstuffs;
- Prepare food in small portions to enable it to be quickly and completely frozen and to make it possible subsequently to thaw only the quantity required;
- Wrap up the food in aluminum foil or polythene and make sure that the packages are airtight;
- Do not allow fresh, unfrozen food to touch food which is already frozen to prevent the temperature of the frozen food from rising;
- Lean foods store better and longer than fatty ones; salt reduces the storage life of food;
- Water iced lollies, if consumed immediately after removal from the freezer compartment, may cause freeze burns to the skin;
- It is recommended to write the freezing date on each individual pack to be able to keep track of storage times.
Hints for storage of frozen food
To obtain the best performance from this appliance you should:
make sure that commercially frozen foodstuffs were correctly stored by the retailer;
make sure that frozen foodstuffs are transferred from the food store to the freezer in the shortest possible time;
not open the door frequently or leave it open longer than is absolutely necessary. Once defrosted, food deteriorates rapidly and cannot be refrozen.
Do not exceed the storage period indicated by the food manufacturer.
Hints for fresh food refrigeration
To obtain the best performance:
- Do not store warm food or evaporating liquids in the refrigerator
• Cover or wrap the food, especially if it has a strong flavor
Hints for refrigeration
- Maki (all types): wrap in polythene bags and place on the glass shelves above the vegetable drawer.
- For safety, only store in this way for one or two days at the most.
- Cooked foods, cold dishes, etc....: these should be covered and may be placed on any shelf.
- Fruit and vegetables: these should be thoroughly cleaned and placed in the special drawer(s) provided.
- Butter and cheese: these should be placed in special airtight containers or wrapped in aluminum foil or polythene bags to exclude as much air as possible.
- Milk bottles: these should have a cap and should be stored in the balconies in the door.
- Bananas, potatoes, onions and garlic: if not packed they must not be kept in the fridge.
2.3. MAINTENANCE
Before maintenance, switch off the appliance and disconnect the plug from the mains socket.
Do not clean the appliance using metal objects.
Do not use sharp objects to remove frost from the appliance. Use a plastic scraper. (If there is a freezer compartment).
Regularly examine the drain in the refrigerator for defrosted water. If necessary clean the drain. If the drain is blocked water will collect in the bottom of the appliance. (If there is a fresh-food storage compartment).
Any electrical work required to service the appliance should be carried out by a qualified electrician or competent person.
This product must be serviced by an authorized Service Center and only genuine spare parts must be used.
Disposal of the appliance
- Disconnect the mains plug from the mains socket.
- Cut off the power cord and discard it.
2.4. TROUBLESHOOTING
Before troubleshooting, disconnect the power supply. Only a qualified electrician or competent person must carry out troubleshooting that is not in this manual.
IMPORTANT! THERE IS SOME NOISE DURING NORMAL USE (compressor, refrigerant circulation).
| PROBLEM | POSSIBLE CAUSE | SOLUTION |
| Appliance does not work | Mains plug is not plugged in or is looseFuse has tripped or is defectiveSocket is defective | Insert mains plug.Check fuse, replace if necessary.Mains malfunctions are to be corrected by an electrician. |
| Appliance freezes or cools too much | Temperature is set too cold or the appliance is running in SUPER mode. | Temperature is set too cold or the appliance is running in SUPER mode. |
| The food is not frozen enough | Temperature is not properly adjusted.Door was open for an extended period.A large quantity of warm food was placed in the appliance within the last 24 hours.The appliance is near a heat source. | Please refer to the initial Temperature Setting section.Open the door only as long as necessary.Turn the temperature regulation to a colder setting temporarily.Please refer to the installation location section. |
| Heavy buildup of frost on the door seal | Door seal is not air tight. | Door seal is not air tight. |
| Unusual noises | Appliance is not level.The appliance is touching the wall or other objects.A component, e.g. a pipe, on the rear of the appliance is touching another part of the applianceor the wall. | Re-adjust the feet.Move the appliance slightly.If necessary, carefully bend the component out of the way. |
If the malfunction returns contact the Service Center.
This information is needed to help you quickly and correctly. Write it down here and refer to the rating plate.
[you can trust]
- TECHNICAL SPECIFICATIONS
| Model | BC3115 IX | BC3118 IX |
| Appliance Category | Category 7 (Refrigerator-Freezer) | Category 7 (Refrigerator-Freezer) |
| Overall Dimension (WxDxH) | 599 x 684 x 1855 mm | 599 x 684 x 1950 mm |
| Net Fresh Food Storage Volume | 222 L | 243 L |
| Net Frozen Food Storage Volume | 95 L | 95 L |
| Defrosting Type | No frost | No frost |
| Climate Class | SN-T | SN-T |
| Storage Temperature Fridge Compartment | 0 °C - 8 °C | 0 °C - 8 °C |
| Storage Temperature Freezer Compartment | ≤ -18 °C | ≤ -18 °C |
| Energy Consumption | 0.65kWh/24h | 0.67 kWh/24h |
| Airborne Acoustical Noise | 43 dB | 43 dB |
| Energy Class | A++ | A++ |
| Temperature Rise Time | 20h | 20h |
| Freezing Capacity | 15kg/24h | 15kg/24h |
| Rated Voltage | 220-240V/- | 220-240V/- |
| Rated Current | 1.3A | 1.3A |
| Defrost Power | 160W | 160W |
Features and specifications are subject to change without prior notice. Upper specifications are measured according to below standards:
EN ISO 15502: 2006,
IEC 62552:2007,
EC643/2009,
EC1060/2010
4. CUSTOMER SERVICE
Becken has designed this appliance in order to guarantee maximum reliability. However, if a problem occurs you may be able to determine its cause by following the procedures suggested in this section.
Do not attempt to open the appliance – there is a risk of electrical shock.
If you are not able to solve the problem please contact your seller or manufacturer.
All users must be familiar with this section. Knowing what could go wrong can help to prevent problems occurring.
WARNING: Any attempt to repair the appliance without contacting the manufacturer will void the warranty.
If the problem persists take your appliance to the customer service of any Worten, Modelo or Continente store in order to solve the problem.
Worten Equipamentos para o Lar provides a 2 year warranty for manufacturing defects from the date of purchase of the appliance. The warranty is applicable for correct use and maintenance of the appliance, namely according to the instructions in this manual. Malfunctions caused by any other situations are not covered by the warranty.
The repair of electric appliances must only be made by qualified technicians in order to prevent future problems.
To avoid unnecessary risks, any malfunctions concerning wires or other components must be repaired in a specialized technical support workshop because suitable tools are required.
5. PROTECTION OF THE ENVIRONMENT
In order to protect the environment we strive to reduce the volume of packaging used, limiting it to three easily sorted materials: cardboard, paper and plastic.
The appliance is manufactured using recyclable materials once disassembled by a specialized company. Comply with local regulations concerning recycling of all materials.
natural_image
Simple line drawing of a trash bin with two crossed lines indicating no waste or prohibition (no text or symbols)| Climate class | Ambient temperature |
| SN | +10°C to +32°C |
| N | +16°C to +32°C |
| ST | +16°C to +38°C |
| T | +16°C to +43°C |
natural_image
Technical line drawing of a structural component with a central pin (no text or symbols)
natural_image
Technical line drawing of a structural joint or bracket (no text or symbols)natural_image
Technical line drawing of a mechanical clamp or bracket (no text or symbols)natural_image
Technical diagram showing a mechanical assembly with an inset close-up of a bracket detail (no text or symbols)natural_image
Mechanical assembly diagram showing a tool being inserted into a bracket, with no visible text or symbols
natural_image
Technical illustration of a mechanical clamp or tool being adjusted, showing a bracket and handle assembly (no text or symbols)natural_image
Technical line drawing of a mechanical assembly with an inset close-up showing a component detail (no text or symbols)natural_image
Technical line drawing of a mechanical clamp or bracket assembly (no text or symbols)natural_image
Technical line drawing of a mechanical component with directional arrows indicating movement (no text or symbols)natural_image
Technical line drawing of a mechanical assembly with a screwdriver inserted, showing mounting holes and a bracket (no text or symbols)[you can trust]
natural_image
Technical diagram of a mechanical assembly with an inset close-up showing detail (no text or symbols)natural_image
Diagram of a mechanical or electrical component with a base and wiring, no visible text or symbolsnatural_image
Technical line drawing of a mechanical bracket with mounting holes and a curved arrow indicating direction (no text or symbols)natural_image
Technical diagram showing two mechanical assembly states with arrows indicating motion or force direction (no text or symbols present)natural_image
Technical line drawing of a mechanical component with a sensor or fixture (no text or symbols)natural_image
Simple line drawing of a trash bin with two crossed lines indicating no waste or prohibition (no text or symbols)BC3115 IX BC3118 IX
| Climate class | Ambient temperature |
| SN | +10°C to +32°C |
| N | +16°C to +32°C |
| ST | +16°C to +38°C |
| T | +16°C to +43°C |
natural_image
Technical line drawing showing two views of a window frame structure with a screw and mounting bracket (no text or symbols)natural_image
Technical line drawing of a mechanical clamp or bracket (no text or symbols)natural_image
Technical diagram showing a mechanical assembly with an inset close-up of a bracket detail (no text or symbols)natural_image
Mechanical assembly diagram showing a lever mechanism with a separate view of the lever (no text or symbols present)
natural_image
Technical illustration of a mechanical clamp tool being adjusted, showing disassembly and assembly (no text or symbols)natural_image
Technical line drawing of a mechanical assembly with an inset close-up showing a component detail (no text or symbols)natural_image
Technical line drawing of a mechanical clamp or bracket assembly (no text or symbols)natural_image
Technical line drawing of a mechanical bracket with directional arrows indicating movement (no text or symbols)natural_image
Technical line drawing of a mechanical assembly with a screwdriver inserted, showing mounting holes and fasteners (no text or symbols)[you can trust]
natural_image
Technical diagram of a mechanical assembly with an inset close-up showing a detail (no text or symbols present)- Fixe a capa de plástico e ligue o terminal.

natural_image
Diagram of a battery connected to a plug and outlet, with no visible text or symbolsnatural_image
Technical line drawing of a mechanical bracket with mounting holes and a curved support (no text or symbols)natural_image
Technical diagram showing two mechanical assembly states with arrows indicating motion, no text or symbols presentnatural_image
Technical line drawing of a mechanical component with a sensor mounted on top (no text or symbols)natural_image
Simple line drawing of a trash bin with two crossed lines indicating no waste or prohibition (no text or symbols)- Index
- SAFETY INSTRUCTIONS
- Important Warnings
- Assistance
- POWER SUPPLY
- POWER CORD AND OTHER CABLES
- HUMIDITY AND WATER
- TO AVOID FIRE HAZARD OR ELECTRIC SHOCK DO NOT EXPOSE YOUR APPLIANCE TO HUMIDITY OR WATER.
- CLEANING
- CAUTION! The appliance must not be connected to the power supply during cleaning. Danger of electric shock!
- GENERAL PRECAUTIONS
- USE AND OPERATION
- PRODUCT DESCRIPTION
- OPERATIONS INSTRUCTIONS
- Space Requirement
- Positioning
- Electric connection
- Installation
- Door Reversibility
- USING THE CONTROL PANEL
- Control Panel
- Key Operation
- Led Display
- Operating Conditions
- Display
- Key Illustration
- Fridge Compartment Temperature Control
- Freezer Compartment Temperature Control
- Mode/ Locked / Unlocked
- Press Button
- Lock Function
- ECO mode
- Vacation Mode
- Super Freezing mode
- FIRST USE
- Clean the interior
- IMPORTANT! Do not use detergents or abrasive powders as these will damage the finish.
- DAILY USE
- Freezing fresh food
- Storing frozen food
- Thawing
- HELPFUL HINTS AND TIPS
- Hints for freezing
- Hints for storage of frozen food
- Hints for refrigeration
- MAINTENANCE
- Disposal of the appliance
- TROUBLESHOOTING
- IMPORTANT! THERE IS SOME NOISE DURING NORMAL USE (compressor, refrigerant circulation).
- CUSTOMER SERVICE
- WARNING: Any attempt to repair the appliance without contacting the manufacturer will void the warranty.
- PROTECTION OF THE ENVIRONMENT
Brand : Becken
Model : BC3115 IX
Category : Refrigerator