ACX-650.5 - Audio Receiver AudioControl - Free user manual and instructions
Find the device manual for free ACX-650.5 AudioControl in PDF.


| Product Type | Compact High Power 5-Channel Amplifier |
| Brand | AudioControl |
| Model | ACX-650.5 |
| Dimensions | 11.97" W x 5.31" D x 2.36" H (304 x 135 x 60 mm) |
| Weight | 5.80 lbs (2.63 kg) |
| Power Output (RMS) | 4 x 50 W + 1 x 200 W @ 4 Ω; 4 x 75 W + 1 x 350 W @ 2 Ω; 2 x 150 W @ 4 Ω bridged |
| Frequency Response | 26 Hz - 22 kHz |
| Total Harmonic Distortion + Noise | < 0.05% |
| Signal-to-Noise Ratio | 102 dBa (ref 50 W @ 4 Ω) |
| Input Sensitivity | Line Level: 500 mV - 6 V RMS; Speaker Level: 1 V - 12 V RMS |
| Crossover | 12 dB/Octave Linkwitz-Riley; selectable High Pass (80 Hz, 120 Hz, Bypass) for channels 1/2 & 3/4; Low Pass/High Pass for channel 5 |
| Input Mode | 5 Ch (separate front/rear signals) or 2 Ch (input signal distributed to all channels) |
| Special Features | GTO™ Signal Sense (auto turn-on), AccuBASS® bass enhancement, IPX6 all-weather rating |
| Protection | Protection LED indicator for fault detection |
| Power Requirements | +12 V DC; recommended wire gauge 8-4 AWG; fuse rating 60 A |
| Cooling | Ensure ventilation; do not block openings |
| Accessories Included | Wiring harness, water-resistant harness options, ACR-1 remote level control (optional) |
| Maintenance | Clean with a dry cloth; no user-serviceable parts |
| Safety | Install by qualified personnel; use proper wire gauge; disconnect battery before installation; replace fuses with correct type and value |
| Recycling | Do not dispose in trash; recycle at appropriate facility |
Frequently Asked Questions - ACX-650.5 AudioControl
User questions about ACX-650.5 AudioControl
0 question about this device. Answer the ones you know or ask your own.
Ask a new question about this device
Download the instructions for your Audio Receiver in PDF format for free! Find your manual ACX-650.5 - AudioControl and take your electronic device back in hand. On this page are published all the documents necessary for the use of your device. ACX-650.5 by AudioControl.
USER MANUAL ACX-650.5 AudioControl
Features
- Compact High Power 5-Channel Amplifier
• High Current Design
• 4 x 50 Watts @ 4 Ohms, 1 x 200 Watts @ 4 Ohms
• 4 x 75 Watts @ 2 Ohms, 1 x 350 Watts @ 2 Ohms
• 2 x 150 Watts @ 4 Ohms, Bridged Mono
• 12 dB/Octave Linkwitz-Riley Alignment Crossover
• GTO™ Signal Sense (Great Turn On)
• 6 Speaker-level/ Line-Level RCA Inputs - All-weather IPX6 rated!
- Filled with home-grown audio goodness
ACX-650.5
COMPACT HIGH POWER ALL-WEATHER 5-CHANNEL AMPLIFIER
Important Safety Instructions
- Read these instructions.
- Keep these instructions.
- Heed all warnings.
- Follow all instructions.
- Do not use this apparatus near water.
- Clean only with a dry cloth.
- Do not block any ventilation openings. Install in accordance with the manufacturer's instructions.
- Do not install near any heat sources such as mufflers, silencers, exhaust pipes, or other apparatus (including amplifiers) that produce heat.
- WARNING: Improper installation may lead to permanent injury or death. Installation of the apparatus must be done with great care by qualified personnel, to prevent damage to fuel lines, power and other electrical wiring, hydraulic brake lines, and other systems, that might compromise vehicle safety.
- Provide +12V and Ground wiring of sufficient size to ensure adequate current to the amplifier. For the ACX-650.5 this means 8 gauge wire or thicker.
- Use rubber grommets to protect wiring whenever passing wires through metal openings or bulkheads.
- Only use attachments/accessories specified by the manufacturer.
-
Refer all servicing to qualified service personnel. Servicing is required when the apparatus has been damaged in any way, such as the power input terminals are damaged or objects have fallen into the apparatus, does not operate normally, or has been dropped.
-
Fuses shall be replaced only with the correct type and fuse value, and only when the apparatus is powered off.
- Exposure to high sound pressure levels may lead to permanent hearing loss. Take every precaution to protect your hearing.

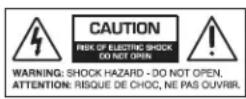
The lightning flash with arrowhead symbol within an equilateral triangle is intended to alert the user to the presence of uninsulated "dangerous voltage" within the product's enclosure, that may be of sufficient magnitude to constitute a risk of electric shock to persons.

The exclamation point within an equilateral triangle is intended to alert the user of the presence of important operating and maintenance (servicing) instructions in the literature accompanying the appliance.
Caution: to reduce the risk of electric shock, do not disassemble the apparatus, other than to remove the top panel to access the controls. There are no user-serviceable parts inside. Refer servicing to qualified personnel.

Recycling notice: If the time comes and this apparatus has fulfilled its destiny, do not throw it out into the trash. It has to be carefully recycled for the good of mankind, by a facility specially equipped for the safe recycling of electronic apparatii. Please contact your local or state recycling leaders for assistance in locating a suitable nearby recycling facility. Or, contact us and we might be able to repair it for you.
Connections & Control Panel Features
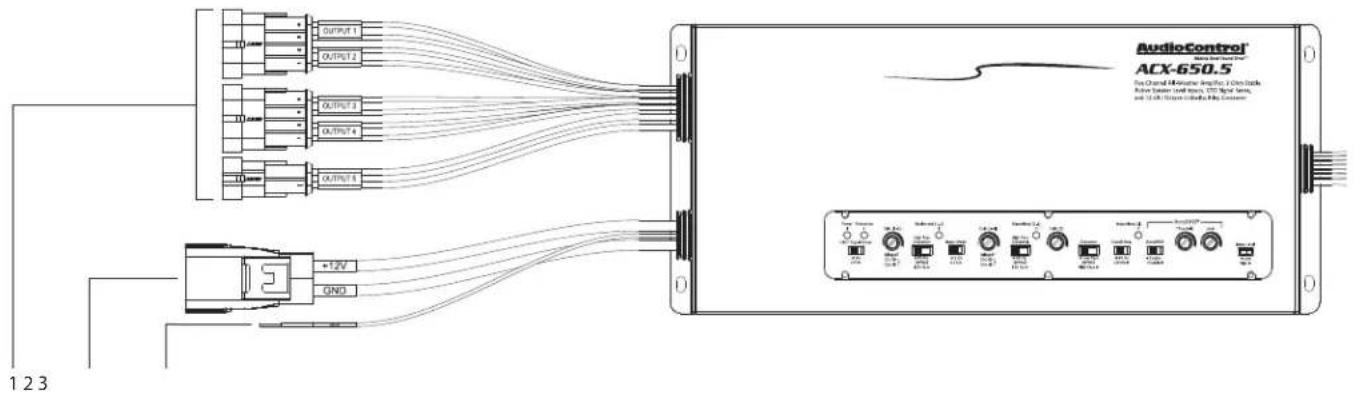
1. Speaker Outputs –
In Stereo operation, connect one loudspeaker to each channel as shown. The minimum impedance is 2 Ohms per channel.
In Bridged Mono operation, connect one loudspeaker to the outer 2 wires - White(+) and Grey/Black(-) for output 1/2, and Green(+) and Purple/Black(-) for output 3/4. The mono loudspeaker will be powered by each channel, and both input channels must be fed a signal. The minimum impedance is 4 Ohms.
- Power Input Terminal +12V & Ground – Connect these wires to the +12V and Negative binding posts of the vehicle battery via one of two included harness options. You may use either the included water resistant harness, or the included harness kit to terminate your own custom-length water-resistant harness. Use quality insulated wiring of the recommended wire gauge, such as wire gauge 8 or thicker.
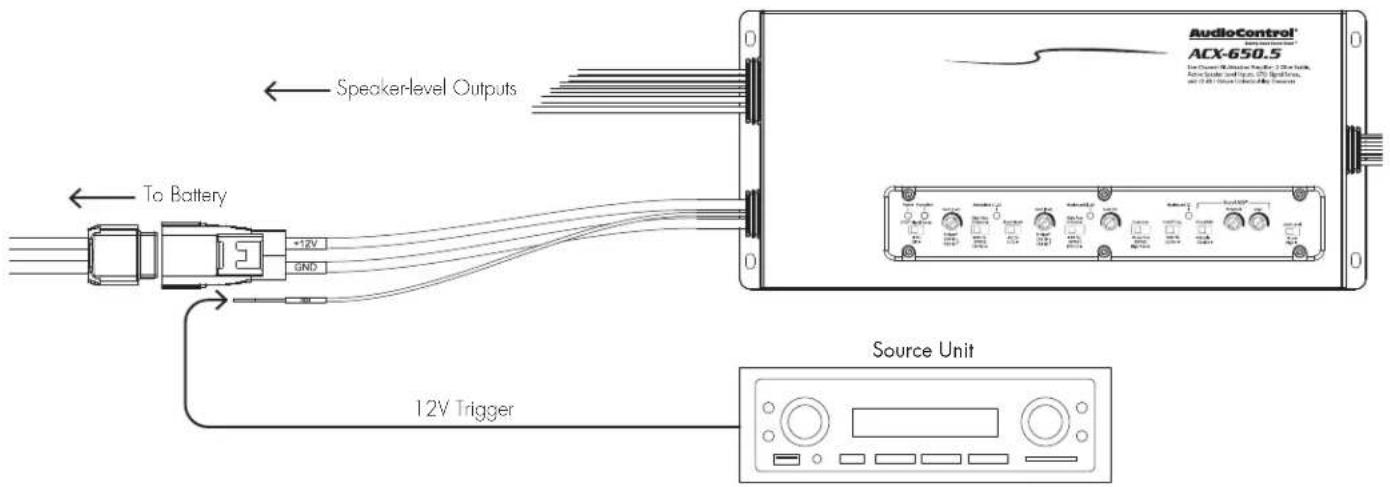
- Remote Power Input Wire – This wire connects to the 12V remote trigger output of some head units and controls the on/off state of the amplifier. Alternatively, you can use the GTO™ feature of the amplifier so it will turn on when an speaker level signal is detected at the RCA inputs.
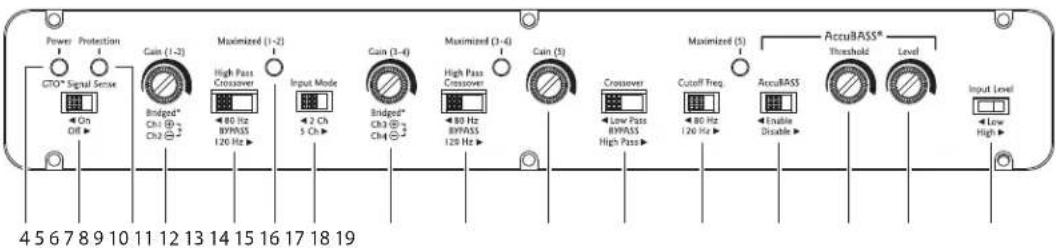
- Power LED – When the unit has been powered on, this LED will glow green and soft, like the understory of the Pacific Northwest Rain Forest on a rare, sunny day.
- GTO™ Signal Sense – In the ON position, the ACX-650.5 amplifier will gracefully turn on when it detects an incoming audio signal and turn off after a period of time when the audio signal fades away to silence. In some situations, factory installed audio systems may turn on or "wake up" due to convenience features like door
chimes, alarms or cell phone signals that trigger the source unit in the vehicle to come on. To prevent these from turning your audio system on unexpectedly, you can bypass the GTO™ circuit by moving the switch to the OFF position and use a switched 12v trigger from the vehicle.
-
Protection LED – This LED will shine if there is a problem being sensed by the unit. See troubleshooting section for best practice to determine the cause. If this lights up, remove the speaker connection and RCA inputs and try again. If error clears, examine your speaker, speaker wires, and RCAs for possible causes of short. If the issue still persists after removing the speakers/RCAs, best to call the lonely folks in tech support.
-
Gain Control 1/2 – This control allows you to adjust the overall output level for channels 1/2. Turn clockwise to increase, and counter-clockwise to decrease. With the source unit set to 75%, adjust this knob to the point where the Maximized light shines briefly. This will be your optimal gain setting.
- High Pass Crossover Frequency 1/2 – A crossover allows you to match a speaker to the frequency range it is designed to handle. Choosing the crossover point recommended by the speaker manufacturer will provide increased speaker reliability and optimum sound quality. The ACX-650.5 amplifier has selectable high pass crossover frequencies at 80 Hz, 120 Hz, and a "bypass" option. The amplifier reproduces the frequency range above the selected crossover frequency.
- Maximized – This LED will shine when the signal is approaching the clipping point. Please note that there are 3 of these LEDS - one for channels 1/2, 3/4, and 5. With your source unit turned up to 75%, use your gain controls to dial in the output by watching for this LED to shine, then back it off just a touch.
-
Input mode – If you have both front and rear input signals available - either by speaker level or line level - set this adjustment to 5 Ch mode. If you only have 2 signal wires, then set this to 2 Ch and the signal received on inputs 1/2 will be distributed out to 1/2, 3/4 and 5/6 amplifier outputs
-
Gain Control 3/4 – Similar to the gain control for channels 1/2, this control allows you to adjust the overall output level for channels 3/4. Turn clockwise to increase, and counter-clockwise to decrease. With the source unit set to 75%, adjust this knob to the point where the Maximized light shines briefly. This will be your optimal gain setting.
- High Pass Crossover Frequency 3/4 – Similar to the High Pass Crossover control for channels 1/2, this setting controls the High Pass Crossover for channels 3/4. Set this according to your speaker manufacturers recommended setting, usually found on the back page of the their documentation or manual.
- Gain Control 5 – This control allows you to adjust the overall output level for channel 5. Turn clockwise to increase, and counter-clockwise to decrease. With the source unit set to 75%, adjust this knob to the point where the Maximized light shines briefly. This will be your optimal gain setting.
-
Crossover (type) – Channel 5 crossover allows you to set a High Pass for something like a center channel. Because, you know, options. Likely though, you be setting this wonderful device in a more traditional way where this 5th channel output is a sub. If so, make sure this switch is set to Low Pass.
-
Cutoff Frequency – Choosing the crossover point recommended by the speaker manufacturer will provide increased speaker reliability and optimum sound quality. The ACX-650.5 amplifier has selectable crossover frequencies at 80 Hz, 120 Hz, and a "bypass" option. Select the crossover frequency on the ACX-650.5 amplifier to best match the value specified by your loudspeaker's manufacturer.
- AccuBASS® – This switch enables the renowned AccuBASS® bass enhancement to work it's magic on the lower bass of speaker outputs.
- AccuBASS® Threshold – Sets the level at which AccuBASS® will begin to work.
- AccuBASS® Level – Adjusts the level of the AccuBASS® enhancement circuitry.
- Input Level – Use this switch to specify which type of signal input voltage type you are using. High is speaker level & low is RCA line level
- Remote Level Port – Using the cable that came with the ACX-650.5 to connect your optional ACR-1 level control knob here.
- RCA Inputs - This is where you connect your source signal to. If using low level signals, make sure your Input Level setting switch is set to Low. If you are using high or speaker level signals, set your Input Level to High.
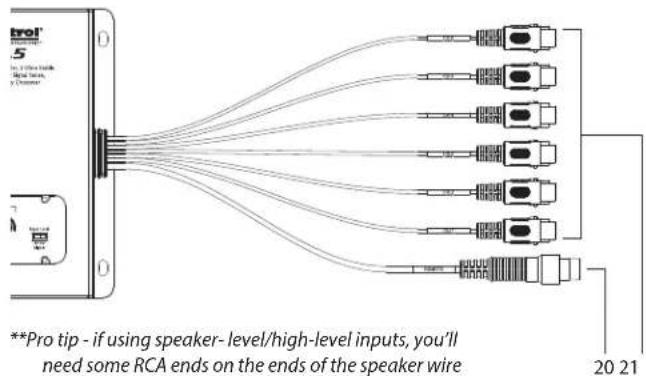
**Pro tip - if using speaker-level/high-level inputs, you'll need some RCA ends on the ends of the speaker wire to attached to the RCA inputs. Setting the Input Level to High of course.
Quick Start
Here are a few general steps to get your ACX-650.5 amplifier up and running:
- Undo the +12V and Ground connections to the vehicle battery before making any connections to the amplifier.
- Pick a mounting location that will provide access to the controls and connections, provide plenty of good ventilation.
- The ACX-650.5 amplifier needs to be securely mounted using the four mounting holes located in each corner.
- Before drilling any holes, take every precaution to prevent any damage to fuel lines, power and other electrical wiring, hydraulic brake lines, and other systems, that might compromise vehicle safety.
- When making connections, designate red RCA plugs as right, and designate white, black, or gray plugs as left. This is a good idea for consistency.
- Use quality interconnect cables.
-
Connect the +12V input wire on the included wiring harness assembly to the +12V terminal of the vehicle battery, using the appropriate gauge wire.
-
Connect the Ground wire of the power wiring harness assembly to a ground source such as the negative battery terminal, vehicle chassis or other ground source, using the same wire gauge as the +12V power wire.
- Connect the remote power terminal of the unit to the remote turn-on switch of your source unit. Alternatively, you can skip this connection and use the GTO ^™ Signal sensing.
- Connect your audio inputs to the unit – either speaker-level or line-level RCA... not both.
- Connect your loudspeakers (minimum impedance of 2 Ohms stereo, or 4 Ohms bridged mono).
- When all connections are made, reconnect the vehicle battery.
- Adjust your gain settings to maximize your signal level.
- Set the ACX-650.5 crossovers to the frequency recommended by the loudspeaker manufacturer.
- Enjoy the drive!
Power Connections
In this example, the head unit has a +12V trigger output that is connected to the ACX-650.5 remote input terminal. When the head unit is turned on, it will turn on the ACX-650.5 amplifier.
Alternatively, the GTO ^™ Signal Sense feature can be used to gently turn on the ACX-650.5 amplifier when an audio input signal is detected. (The connection to the ACX-650.5 remote input terminal is not required when using the GTO ^™ Signal Sense.)
Quick Start Guide
System #1: Using Speaker-Level Inputs & GTO™ Signal Sense Turn On
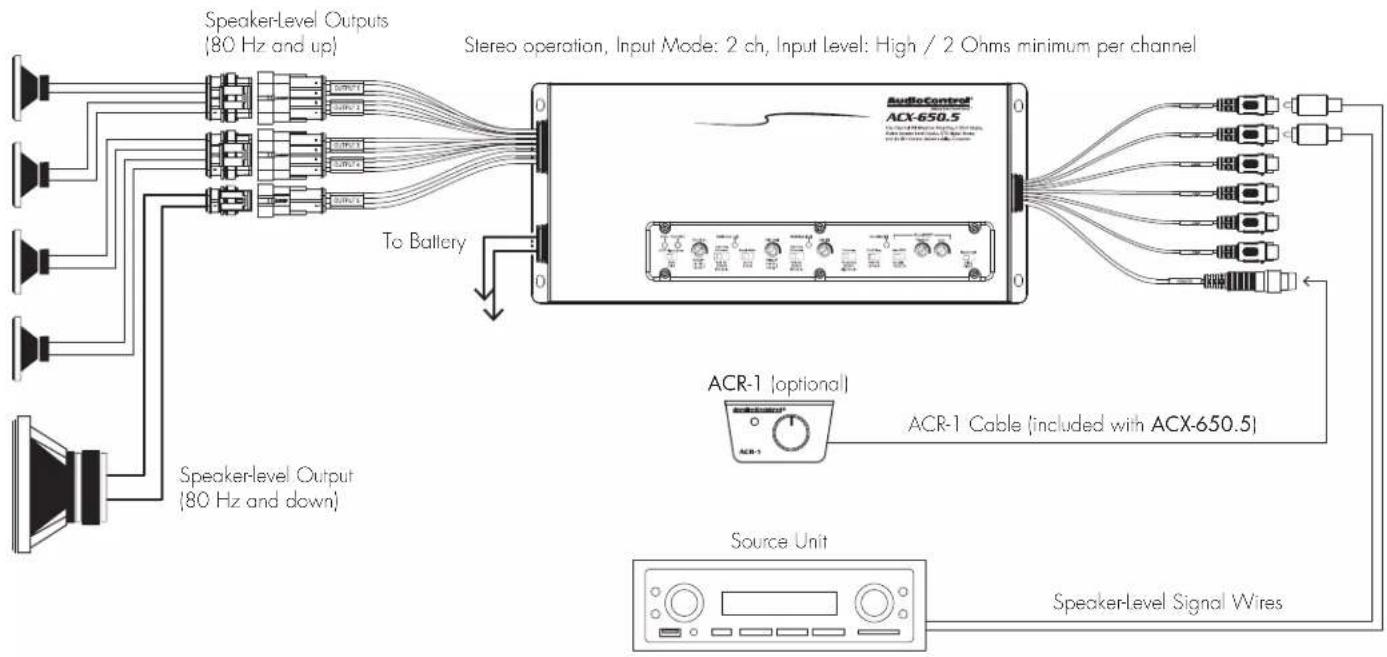
flowchart
graph TD
    A["Speaker-Level Outputs (80 Hz and up)"] --> B["To Battery"]
    C["Speaker-Level Output (80 Hz and down)"] --> B
    B --> D["AudioControl ACX-650.5"]
    D --> E["ACR-1 optional"]
    E --> F["ACR-1 Cable (included with ACX-650.5)"]
    F --> G["Source Unit"]
    G --> H["Speaker-Level Signal Wires"]
    style A fill:#f9f,stroke:#333
    style C fill:#f9f,stroke:#333
    style D fill:#ccf,stroke:#333
    style E fill:#cfc,stroke:#333
    style F fill:#fcc,stroke:#333
    style G fill:#cff,stroke:#333
    style H fill:#ffc,stroke:#333
Cover Plate Removal
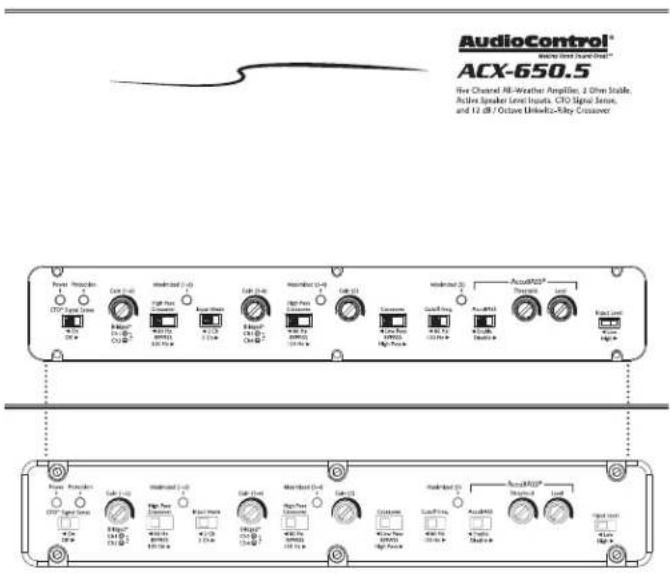
The cover plate must be removed to gain access to the controls, and then sealed again to protect the controls against moisture and debris.
Removal Procedure
- Locate the top six hex screws that hold down the sealed top cover.
- Use a 2.5mm hex wrench to remove the six screws.
- Gently lift cover off. It's a very tight fit there, so you may need to use some gentle force. Yes, it is with you!
- Keep the cover plate and screws in a safe and handy place, until you have finished adjusting the controls to your immense satisfaction.
Specifications
All specifications are measured at 14.4 VDC (standard automotive voltage). As technology advances, AudioControl reserves the right to continuously change our specifications, like our Pacific Northwest weather, although we are working on changing that as well.
The ACX-650.5 Amplifier
Power Output (RMS) 4x50 + 1x200 Watts @ 4 Ohms 4x75 + 1x350 Watts @ 2 Ohms 2x150 Watts @ 4 Ohms Bridged Frequency Response 26 Hz - 22 kHz Total Harmonic Distortion + N < 0.05% S/N Ratio 102 dBa, Ref 50 Watts @ 4 Ohms Power / Ground Wire Gauge Between 8 and 4 AWG Recommended fuse rating 60 Amps Crossover 12dB/Octave Linkwitz-Riley, 80 Hz, 120 Hz, Bypass Line/Speaker-Level Inputs 500mV - 6V/1V - 12VRMS Weight 5.80 lbs. Dimensions 11.97" W X 5.31" D X 2.36" H
Warranty
For details of the limited warranty for your ACX-650.5, please visit the following page on our website: audiocontrol.com/warranty Please keep your receipt in a safe place.
AudioControl, Inc.
22410 70th Avenue West
Mountlake Terrace, WA 98043 USA
Phone: 425-775-8461
email: sound.great@audiocontrol.com
©2022 AudioControl. All rights reserved.
Brand : AudioControl
Model : ACX-650.5
Category : Audio Receiver