SALD-1 - Salad Bowl Delfield - Free user manual and instructions
Find the device manual for free SALD-1 Delfield in PDF.


| Product Type | Salad and Vegetable Drier |
| Brand | Delfield |
| Model | SALD-1 |
| Category | Saladier |
| Exterior Dimensions (W x D x H) | 27.00" x 27.00" x 32.50" (69 x 69 x 83 cm) |
| Inner Liner Diameter | 15.62" (40 cm) |
| Inner Liner Height | 16.87" (43 cm) |
| Capacity | 20 Gal (77 L), up to 18 heads of chopped lettuce |
| Weight (Shipping) | 70 lbs (32 kg) |
| Electrical Rating | 115 V / 60 Hz / 1 Ph, 2.7 Amps |
| Power Cord Plug Type | NEMA 5-15P |
| Power Cord Length | Approx. 6 ft (183 cm) |
| Drain Size | 1" (25 mm) |
| Construction Material | Stainless steel tank, plastic inner liner and lids |
| Timer | Rotating timer, 1-4 minute cycle |
| Safety Features | Brake pedals on casters, lid suspension bracket, auto-off timer |
| Certification | NSF certified |
| Installation Requirements | Indoor use only, level and stable surface, do not install over drain |
| Maintenance | Clean with detergent-sanitizing solution; hand wash plastic parts; avoid abrasive cleaners |
| Warranty | Register online at www.delfield.com/warranty |
Frequently Asked Questions - SALD-1 Delfield
User questions about SALD-1 Delfield
0 question about this device. Answer the ones you know or ask your own.
Ask a new question about this device
Download the instructions for your Salad Bowl in PDF format for free! Find your manual SALD-1 - Delfield and take your electronic device back in hand. On this page are published all the documents necessary for the use of your device. SALD-1 by Delfield.
USER MANUAL SALD-1 Delfield
Salad and Vegetable Drier SALD-1
Original Instructions Installation, Operation and Maintenance Manual
This manual is updated as new information and models are released. Visit our website for the latest manual.
natural_image
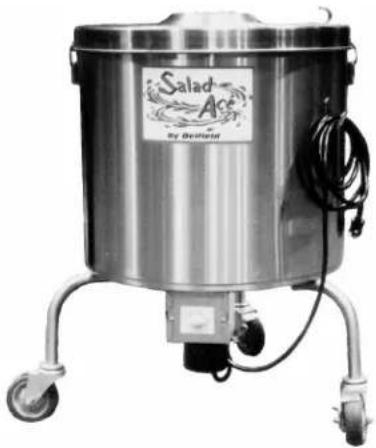
Exterior view of a stainless steel industrial reactor with wheels and control panel (no visible text or symbols)Safety Notices
▲Warning
Read this manual thoroughly before operating, installing or performing maintenance on the equipment. Failure to follow instructions in this manual can cause property damage, injury or death.
DANGER
Do not install or operate equipment that has been misused, abused, neglected, damaged, or altered/modified from that of original manufactured specifications.
DANGER
Keep power cord AWAY from HEATED surfaces. DO NOT immerse power cord or plug in water. DO NOT let power cord hang over edge of table or counter.
DANGER
All utility connections and fixtures must be maintained in accordance with Local and national codes.
▲Warning
This appliance is not intended for use by persons (including children) with reduced physical, sensory or mental capabilities, or lack of experience and knowledge, unless they have been given supervision concerning use of the appliance by a person responsible for their safety. Do not allow children to play with this appliance.
▲Warning
Do not store or use gasoline or other flammable vapors or liquids in the vicinity of this or any other appliance. Never use flammable oil soaked cloths or combustible cleaning solutions, for cleaning.
▲Warning
Do not use electrical appliances inside the food storage compartments of the appliance, unless they are of the type recommended by the manufacturer.
▲Warning
Authorized Service Representatives are obligated to follow industry standard safety procedures, including, but not limited to, local/national regulations for disconnection / lock out / tag out procedures for all utilities including electric, gas, water and steam.
▲Warning
Use caution when handling metal surface edges of all equipment.
Note
Proper installation, care and maintenance are essential for maximum performance and trouble-free operation of your equipment. Visit our website www.wbtkitchencare.com for manual updates, translations, or contact information for service agents in your area.
Table of Contents
Section 1 General Information
Model Number......4
Serial Number Location 4
Warranty Information 4
Regulatory Certifications 4
Section 2 Installation
Location 5
Weight of Equipment 5
Clearance Requirements....5
Dimensions 5
Capacity 5
Electrical Service 6
Voltage 6
Ground Fault Circuit Interrupter....6
Voltage, Rated Amperages & Power Cord Chart....6
Drain Connections....6
Section 3 Operation
Operating Instructions ....7
Section 4 Maintenance
Cleaning and Sanitizing Procedures....9
Cleaning Instructions....10
Preparation and disassembly....10
Inner liner and lids 10
Interior surface of tank....10
Exterior surface of tank 10
Reassembly....10
Stainless Steel Cleaning....10
Section 1
General Information
Model Number
Salad and Vegetable Drier
SALD-1 115 Volt Model
Serial Number Location
To view the serial number, turn the unit upside down. The serial number is listed on the bottom on the side opposite the motor.
Always have the serial number of your unit available when calling for parts or service.
Warranty Information
- Register your product for warranty,
- Verify warranty information,
• View and download a copy of your warranty,
@ www.delfield.com/warranty
Regulatory Certifications
Model SALD-1 is certified by:
National Sanitation Foundation (NSF)



Section 2 Installation
! DANGER
Installation must comply with all applicable fire and health codes in your jurisdiction.
! DANGER
Use appropriate safety equipment during installation and servicing.
▲Warning
Remove all removable panels before lifting and installing.
Location
▲Warning
This equipment must be positioned so that the plug is accessible unless other means for disconnection from the power supply (e.g., circuit breaker or disconnect switch) is provided.
▲Warning
Adequate means must be provided to limit the movement of this appliance without depending on or transmitting stress to the electrical conduit.
▲Warning
To avoid instability the installation area must be capable of supporting the combined weight of the equipment and product. Additionally the equipment must be level side to side and front to back.
▲Warning
This equipment is intended for indoor use only. Do not install or operate this equipment in outdoor areas.
The location selected for the equipment must meet the following criteria. If any of these criteria are not met, select another location.
- Units are intended for indoor use only.
- The location MUST be level, stable and capable of supporting the weight of the equipment.
- The location MUST be free from and clear of combustible materials.
-
Equipment MUST be level both front to back and side to side.
-
Position the equipment so it will not tip or slide.
- Recommended air temperature is 41^ - 86^ ( 5^ - 30^ ).
- Proper air supply for ventilation is REQUIRED AND CRITICAL for safe and efficient operation. Refer to Clearance Requirements chart on page 5.
- Do not install the equipment directly over a drain. Steam rising up out of the drain will adversely affect operation, air circulation, and damage electrical / electronic components.
Weight of Equipment
Model Ship Weight
SALD-1 70lbs/32kg
Clearance Requirements
! DANGER
Minimum clearance requirements are the same for noncombustible locations as for combustible locations. The flooring under the appliance must be made of a noncombustible material.
Clearance Requirements
None
Dimensions
| Model Width Depth Height | ||
| SALD-1 27.00" (69cm) 27.00" (69cm) 32.50" (83cm) | ||
| Model Inner Liner Diameter | Inner Liner Height |
| SALD-1 15.62" (40cm) 16.87" | (43cm) |
Capacity
Inner liner capacity is 20 Gal (77L), up to 18 heads of chopped lettuce.
Electrical Service
DANGER
Check all wiring connections, including factory terminals, before operation. Connections can become loose during shipment and installation.
▲Warning
This appliance must be grounded and all field wiring must conform to all applicable local and national codes. Refer to rating plate for proper voltage. It is the responsibility of the end user to provide the disconnect means to satisfy the authority having jurisdiction.
VOLTAGE
All electrical work, including wire routing and grounding, must conform to local, state and national electrical codes.
The following precautions must be observed:
• The equipment must be grounded.
- A separate fuse/circuit breaker must be provided for each unit.
- A qualified electrician must determine proper wire size dependent upon location, materials used and length of run (minimum circuit ampacity can be used to help select the wire size).
- The maximum allowable voltage variation is ± 10% of the rated voltage at equipment start-up (when the electrical load is highest).
- Check all green ground screws, cables and wire connections to verify they are tight before start-up.
GROUND FAULT CIRCUIT INTERRUPTER
Ground Fault Circuit Interrupter (GFCI/GFI) protection is a system that shuts down the electric circuit (opens it) when it senses an unexpected loss of power, presumably to ground. Manitowoc does not recommend the use of GFCI/GFI circuit protection to energize our equipment. If code requires the use of a GFCI/GFI then you must follow the local code. The circuit must be dedicated, sized properly and there must be a panel GFCI/GFI breaker. We do not recommend the use of GFCI/GFI outlets to energize our equipment as they are known for more intermittent nuisance trips than panel breakers.
VOLTAGE, RATED AMPERAGES & POWER CORD CHART
Units with plugs are supplied with approximately 6ft (183cm) cords.
| Model V/Hz/Ph Amps NEMA Plug | ||
| SALD-1 115/60/1 2.7 5-15P | ||
Drain Connections
▲Warning
Moisture collecting from improper drainage can create a slippery surface on the floor and a hazard to employees. It is the owner's responsibility to provide a container or outlet for drainage.
Each unit has a drain located inside the unit which removes the water to an appropriate drain location or container. Drain size is 1" (25mm). When draining, position the Salad Ace over the floor drain or place a (2) two gallon capacity container under the drain tube.
Section 3
Operation
The on-site supervisor is responsible for ensuring that operators are made aware of the inherent dangers of operating this equipment.
Do not operate any appliance with a damaged cord or plug. All repairs must be performed by a qualified service company.
Never stand on the unit! They are not designed to hold the weight of an adult, and may collapse or tip if misused in this manner.
▲Warning
Do not contact moving parts.
▲Warning
All covers and access panels must be in place and properly secured, before operating this equipment.
Operating Instructions
- Position the Salad Ace over the floor drain or place a (2) two gallon capacity container under the drain tube.
- Secure machine into position by depressing the brake pedal on each caster.
- Remove the double lid slowly. Do not pull or force lid off in a quick motion. Suspend the lid from the top edge of the stainless steel tank using the bracket provided on the lid.
- Remove the perforated inner liner and place in sink.
- To prepare products: Remove the center core from the lettuce heads; break apart, separating leaves or cut into desired size. Fill liner with no more than 18 heads.
Caution
Do not overload inner liner. Weight in excess of 20 lbs. will cause lid and motor failure.
- Run cold water into the sink. Turn water off when the product level rises within three (3) inches of liner top edge. Gently stir water through product to remove the dirt. Allow the produce to soak 10 minutes.
- Drain the water from the sink. Allow the liner to remain in the sink for 30 seconds to drain out the excess water.
- Remove the liner from the sink and place into the Salad Ace. Make sure the octagon shaped recess in the liner bottom engages with the metal octagon drive casting in the tank bottom.
- Place the lid on the machine, making sure the inner lid seats on the top of the inner liner.
- Turn the machine ON by rotating the bottom mounted timer clockwise. Choosing a one-to-four minute cycle. Generally, a two-minute cycle is sufficient to drain a full load. Machine will turn off automatically.
- When the time cycle has ended, wait 10 seconds for inner liner to stop rotating before removing the lid. Remove inner liner from the machine.
THIS PAGE INTENTIONALLY LEFT BLANK
Section 4
Maintenance
! DANGER
It is the responsibility of the equipment owner to perform a personal protective equipment hazard assessment to ensure adequate protection during maintenance procedures.
! DANGER
Failure to disconnect the power at the main power supply disconnect could result in serious injury or death. The power switch DOES NOT disconnect all incoming power.
! DANGER
Disconnect electric power at the main power disconnect for all equipment being serviced. Observe correct polarity of incoming line voltage. Incorrect polarity can lead to erratic operation.
▲Warning
When using cleaning fluids or chemicals, rubber gloves and eye protection (and/or face shield) must be worn.
▲Warning
When cleaning the unit, care should be taken to avoid the front power switch and the rear power cord. Keep water and/or cleaning solutions away from these parts.
▲Warning
Never use a high-pressure water jet for cleaning or hose down or flood the units with water. Do not use power cleaning equipment, steel wool, scrapers or wire brushes on stainless steel or painted surfaces.
Caution
Never use an acid based cleaning solution! Many food products have an acidic content, which can deteriorate the finish. Be sure to clean the stainless steel surfaces of ALL food products.
Caution
Maintenance and servicing work other than cleaning as described in this manual must be done by an authorized service personnel.
Cleaning and Sanitizing Procedures
You are responsible for maintaining the equipment in accordance with the instructions in this manual.
Maintenance procedures are not covered by the warranty.
| Maintenance Daily Weekly Monthly | After Prolonged Shutdown | At Start-Up | ||
| Inner Liner And Lids X X X | ||||
| Interior X X X | ||||
| Exterior X X X |
Cleaning Instructions
PREPARATION AND DISASSEMBLY
- Turn the machine timer to the OFF position.
- Disconnect the Salad Ace from the power source.
- Ensure each caster brake pedal is depressed.
- Ensure the Salad Ace drain tube is positioned over the floor drain or a (2) two gallon capacity container.
- Open the hook latches and remove the lid.
- Remove any food debris with a sponge.
- Unscrew the lid T handle in order to remove the inner lid.
- Remove the liner from the tank.
- Remove remaining food debris with a sponge.
INNER LINER AND LIDS
- Wash the liner and inner lid in warm, detergent-sanitizing solution designed for use with plastic materials in contact with food.
- Rinse the liner and inner lid in clean water. Allow to air dry. Never steam clean the liner or lids.
INTERIOR SURFACE OF TANK
- Wash the interior tank liner with warm, detergent-sanitizing solution designed to clean stainless steel surfaces that are in contact with food.
- Wash the lid with warm, detergent-sanitizing solution designed to clean stainless steel surfaces that are in contact with food.
- Rinse with clean water. Allow to air dry before placing on lid.
EXTERIOR SURFACE OF TANK
- Use a clean, damp cloth to wipe the wash solution from surface. Allow to air dry.
- Any commercial stainless steel polish can be used to shine clean surfaces.
REASSEMBLY
- Place inner lid into lid and screw together with T handle.
- Place the inner liner into the tank. Make sure the octagon shaped recess in the liner bottom engages with the metal octagon drive casting in the tank bottom.
Stainless Steel Cleaning
Wipe surfaces with a damp cloth rinsed in water to remove dust and dirt from the stainless steel. Always rub with the "grain" of the stainless steel to avoid marring the finish. If a greasy residue persists, use a damp cloth rinsed in a mild dish soap and water solution. Wipe dry with a clean, soft cloth.
Never use steel wool or abrasive pads for cleaning. Never use chlorinated, citrus based or abrasive cleaners.
Stainless steel has a clear coating that is stain resistant and easy to clean. Products containing abrasives will damage the coating and scratch the panels. Daily cleaning may be followed by an application of stainless steel cleaner which will eliminate water spotting and fingerprints. Early signs of stainless steel breakdown are small pits and cracks. If this has begun, clean thoroughly and start to apply stainless steel cleaners in attempt to restore the steel.

WELBILT®
Bringing innovation to the table
WWW.WELBILT.COM
Welbilt provides the world's top chefs, and premier chain operators or growing independents with industry leading equipment and solutions. Our cutting-edge designs and lean manufacturing tactics are powered by deep knowledge, operator insights, and culinary expertise.
All of our products are backed by KitchenCare ^® – our aftermarket, repair, and parts service.
▶ CLEVELAND
▶ CONVOTHERM®
DELFIELD®
▶ FITKITCHEN™
▶ FRYMASTER®
▶ GARLAND
KOLPAK®
▶ LINCOLN
MANITOWOC®
▶ MERCO®
▶ MERRYCHEF®
▶ MULTIPLEX®
- Salad and Vegetable Drier SALD-1
- Original Instructions Installation, Operation and Maintenance Manual
- Safety Notices
- ▲Warning
- DANGER
- Note
- Table of Contents
- Section 1 General Information
- Section 2 Installation
- Section 3 Operation
- Section 4 Maintenance
- Section 1
- General Information
- Model Number
- Serial Number Location
- Warranty Information
- Regulatory Certifications
- ! DANGER
- Location
- Weight of Equipment
- Clearance Requirements
- Dimensions
- Capacity
- Electrical Service
- VOLTAGE
- GROUND FAULT CIRCUIT INTERRUPTER
- VOLTAGE, RATED AMPERAGES & POWER CORD CHART
- Drain Connections
- Section 3
- Operation
- Operating Instructions
- Caution
- Section 4
- Maintenance
- Cleaning and Sanitizing Procedures
- Cleaning Instructions
- PREPARATION AND DISASSEMBLY
- INNER LINER AND LIDS
- INTERIOR SURFACE OF TANK
- EXTERIOR SURFACE OF TANK
- REASSEMBLY
- Stainless Steel Cleaning
- WELBILT®
- WWW.WELBILT.COM
Brand : Delfield
Model : SALD-1
Category : Salad Bowl