
Flav-R-Fresh FDWD-1 - Food warmer Hatco - Free user manual and instructions
Find the device manual for free Flav-R-Fresh FDWD-1 Hatco in PDF.


| Product Type | Countertop Food Warmer |
| Brand | Hatco |
| Model | Flav-R-Fresh FDWD-1 |
| Dimensions (W x D x H) | 15.5" x 18" x 20.5" |
| Weight | 25 lbs |
| Power Supply | 120V, 600W |
| Temperature Range | 140°F to 185°F |
| Capacity | 1 full-size food pan (12" x 20") |
| Construction Material | Stainless steel interior and exterior |
| Controls | Adjustable thermostat with indicator light |
| Heating Method | Convection heated air with fan |
| Water Usage | Moist heat operation, removable water pan |
| Safety Features | Thermostatic control, cool-touch exterior, non-skid feet |
| Cleaning | Wipe with damp cloth; removable water pan washable |
| Warranty | 1 year limited warranty |
| Certifications | NSF, cULus |
| Included Accessories | Water pan, drip tray, instruction manual |
| Spare Parts Availability | Thermostat, fan motor, heating element, water pan, drip tray |
Frequently Asked Questions - Flav-R-Fresh FDWD-1 Hatco
User questions about Flav-R-Fresh FDWD-1 Hatco
0 question about this device. Answer the ones you know or ask your own.
Ask a new question about this device
Download the instructions for your Food warmer in PDF format for free! Find your manual Flav-R-Fresh FDWD-1 - Hatco and take your electronic device back in hand. On this page are published all the documents necessary for the use of your device. Flav-R-Fresh FDWD-1 by Hatco.
USER MANUAL Flav-R-Fresh FDWD-1 Hatco
FLAV-R-FRESH®
Humidified Impulse Display Cabinets FDWD Series
Installation and Operating Manual
I&W #07.05.177.00

natural_image
Line drawing of a laboratory incubator with coiled tubing and control panel (no text or symbols)
natural_image
Line drawing of a simple industrial oven with coiled heating element (no text or symbols)
natural_image
Line drawing of a simple industrial oven with cooling fins and a side-mounted unit (no text or symbols)Register your unit online!
See IMPORTANT OWNER INFORMATION section for details.

Do not operate this equipment unless you have read and understood the contents of this manual! Failure to follow the instructions contained in this manual may result in serious injury or death. This manual Lcontains Limportant Lsafety Linformation concerning the maintenance, use, and operation of this product. If you're unable to understand the contents Lof Lthis Lmanual, Lplease bring Lit Lto the attention of your supervisor. Keep this manual in a safe location for future reference.

Important Safety Information....3
Model Description....4
Model Designation....5
Specifications....5
Plug Configurations 5
Electrical Rating Chart....5
Dimensions....7
InstallationL....8
General....8
Reversing the Access Door 9
Relocation the Proximity Switch ....10
OperationL....11
General 11
Setting the Air Temperature 11
Setting the Humidity Level....12
Food Holding Guide....12
MaintenanceL....13
General....13
Cleaning 13
Removing the Glass Panels 13
Removing the Rotating Rack....13
Draining the Water Reservoir 14
Removing Lime and Mineral Deposits....14
Replacing a Display Light 14
Troubleshooting GuideL....15
Options and Accessories....16
Limited Warranty....18
Authorized Parts DistributorsL......Back Cover
IMPORTANT OWNER INFORMATION
Record the model number, serial number, voltage, and purchase date of the unit in the spaces below (specification label located on the ceiling sheet inside of the unit). Please have this information available when calling Hatco for service assistance.
Model No. ____
Serial No.
Voltage
Date of Purchase
Register your unit!
Completing online warranty registration will prevent delay in obtaining warranty coverage. Access the Hatco website at www.hatcocorp.com, select the Parts & Service pull-down menu, and click on "Warranty Registration".
Business 8:00 AM to 5:00 PM
Hours: Central Standard Time (C.S.T.)
(Summer Hours: June to September –
8:00 AM to 5:00 PM C.S.T.
Monday through Thursday
8:00 AM to 2:30 PM C.S.T. Friday)
Telephone: (800) 558-0607; (414) 671-6350
E-mail: partsandservice@hatcocorp.com
Fax: (800) 690-2966 (Parts and Service)
(414) 671-3976 (International)

24 Hour 7 Day Parts and Service Assistance available in the United States and Canada by calling (800) 558-0607.
Additional information can be found by visiting our web site at www.hatcocorp.com..
INTRODUCTION
Hatco Flav-R-Fresh® Humidified Impulse Display Cabinets are designed to hold prepared foods for prolonged periods of time while maintaining that "just-made" quality. Hatco Humidified Impulse Display Cabinets provide the best environment for food products by regulating the air temperature while at the same time balancing the humidity level. The use of controlled, moisturized heat maintains serving temperature and food texture longer than conventional dry holding equipment.
The Flav-R-Fresh air flow pattern is designed to maintain consistent cabinet temperature without drying out foods. The precise combination of heat and humidity creates a "blanket" effect around the food. The air flow rate enables the cabinet to recover temperature rapidly after opening and closing the door.
Hatco Flav-R-Fresh Humidified Impulse Display Cabinets are products of extensive research and field testing. The materials used were selected for maximum durability, attractive appearance and optimum performance. Every unit is inspected and tested thoroughly prior to shipment.
This manual provides installation, safety, and operating instructions for Flav-R-Fresh Humidified Impulse Display Cabinets. Hatco recommends all installation, operating, and safety instructions appearing in this manual be read prior to installation or operation of the unit.
Safety information that appears in this manual is identified by the following signal word panels:
WARNING
WARNING Lindicates La Lhazardous Lsituation Lwhich, Lif Lnot avoided, could result in death or serious injury.
CAUTION
CAUTION Lindicates La Lhazardous Lsituation Lwhich, Lif Lnot avoided, could result in minor or moderate injury.
NOTICE
NOTICE Lis Lused Lto Laddress Lpractices Lnot Lrelated Lto personal injury.

Read the following important safety information before using this equipment to avoid serious injury or death and to avoid damage to equipment or property.
WARNING
ELECTRIC SHOCK HAZARD:
- LPlug unit into a properly grounded electrical receptacle of the correct voltage, size, and plug configuration. If plug and receptacle do not match, contact a qualified electrician to determine and install the proper voltage and size electrical receptacle.
- LTurn OFF power switch, unplug power cord, and allow unit to cool before performing any cleaning, setup, or maintenance.
- LDO NOT submerge or saturate with water. Unit is not waterproof. Do not operate if unit has been submerged or saturated with water.
- LUnit is not weatherproof. Locate unit indoors where ambient air temperature is a minimum of 70ircF (21°C).
- LDo not steam clean or use excessive water on unit.
- LDo not overfill water reservoir. Overfilling can cause electrical shock. Water reservoir is full when "LO H2O" stops flashing Lon LCABINET TEMPERATURE Ldisplay. Stop filling when "LO H2O" stops flashing on display.
- LTurn power switch OFF and allow unit to cool before draining water reservoir.
• LDo not pull unit by power cord.
• LDiscontinue use if power cord is frayed or worn. - LDo not attempt to repair or replace a damaged power cord. LThe Lcord Lmust Lbe Lreplaced Lby LHatco, Lan Authorized LHatco LService LAgent, Lor La Lperson Lwith similar qualifications.
- LThis unit must be serviced by qualified personnel only. Service by unqualified personnel may lead to electric shock or burn.
• LUse Lonly LGenuine LHatco LReplacement LParts Lwhen service Lis required. LFailure Lto Luse LGenuine LHatco Replacement LParts Lwill Lvoid Lall Lwarranties Land Lm subject operators Lof Lthe Lequipment Lto Lhazardous electrical voltage, resulting in electrical shock or burn. Genuine LHatco LReplacement LParts Lare Lspecified Ltd operate safely in the environments in which they are used. Some aftermarket or generic replacement parts do not have the characteristics that will allow them to operate safely in Hatco equipment.
FIRE HAZARD: Locate unit a minimum of 1" (25 mm) from combustible walls and materials. If safe distances are not maintained, discoloration or combustion could occur.
Make sure protective lamp cover(s) are installed in front of fluorescent Clamp(s). Breakage of fluorescent Lamps not properly protected could result in personal injury and/or food contamination.
Make sure food product has been heated to the proper food-safe temperature before placing in unit. Failure Lto heat food product properly may result in serious health risks. This unit is for holding pre-heated food product only.
WARNING
Hatco Corporation is not responsible for the actual food product serving temperature. It is the responsibility of the user to ensure that the food product is held and served at a safe temperature.
This Lunit Lhas Lno L"user-serviceable" Lparts. LIf Lservice Lis required on this unit, contact an Authorized Hatco Service Agent Lor Lcontact Lthe LHatco LService LDepartment Lat 800-558-0607 Lor L414-671-6350; Lfax L800-690-2966; Lor International fax 414-671-3976.
CAUTION
BURN HAZARD: Some exterior surfaces on the unit will get hot. Use caution when touching these areas.
Locate unit at the proper counter height in an area that is convenient for use. The location should be level to prevent the unit or its contents from falling accidentally and strong enough to support the weight of the unit and contents.
Transport unit in upright position only. Before moving or tipping unit, secure all glass surfaces with tape and drain water from water reservoir. Failure to do so may result in damage to unit or personal injury.
NOTICE
Use of distilled water in the water reservoir of humidified units is recommended to preserve the life of electrical and mechanical components. If non-distilled water is used, the reservoir will require periodic cleaning and deliming (refer to the MAINTENANCELsection for cleaning procedure). Unit failure due to lime or mineral deposits is not covered under warranty.
Do not use deionized water. Deionized water will shorten the life of the water pan and heating element.
a) Use non-abrasive cleaners only. Abrasive cleaners could scratch the finish of the unit, marring its appearance and making it susceptible to soil accumulation.
Clean Lunit Ldaily Lto Lavoid Lmalfunctions Land Lmaintain sanitary operation.
All Models
All Flav-R-Fresh® Humidified Impulse Display Cabinets have an air heating system, humidity system with low water control protection, fluorescent lamps, tempered glass sides, and a door. Units can be configured with or without the humidity system with low water control protection. The standard access door can be hinged left or right. The pretzel tree display rack is stainless steel and the other display racks are nickel-plated. All units are available in several DesignerPcolors.
Model FDWD-1
Model FDWD-1 is a single door model with a motorized rotating display. It comes standard with a pizza rack that holds up to four (4) round pizza pans with a maximum diameter of 15" (381 mm). The rotating rack stops automatically when the door is opened. An optional rotating pretzel tree or a 4-shelf multi-purpose stationary rack is available also.

natural_image
Line drawing of a laboratory incubator with coiled tubing and control panel (no text or symbols)Figure 1. FDWD-1
NOTE: PModel PFDWD-1 Pcannot Pbe Pconverted Pto Pa Pmodel FDWD-2 or FDWD-2X.
Model FDWD-2
Model FDWD-2 has the same features as the FDWD-1, but includes an additional door on the opposite side of the controls for pass-through convenience.
Model FDWD-1X
Model FDWD-1X is similar to the FDWD-1, but features a 4-shelf, multi-purpose stationary rack instead of the rotating display. The rack can hold pans with a maximum width of 13" (330 mm) and a depth of 18" (457 mm).

natural_image
Line drawing of a simple kitchen appliance with heat exchanger and cooling unit (no text or symbols)Figure 2. FDWD-1X
NOTE: PModel PFDWD-1X Pcannot Pbe Pconverted Pto Pa Pmodel FDWD-1, FDWD-2, or FDWD-2X.
Model FDWD-2X
Model FDWD-2X has the same features as the FDWD-1X, but includes an additional door on the opposite side of the controls for pass-through convenience.
NOTE: PModel PFDWD-2X Pcannot Pbe Pconverted Pto Pa Pmodel FDWD-2, FDWD-1, or FDWD-1X.
Model FDWD-12
Model FDWD-12 has the same features as the FDWD-1, but has a smaller frame with a reduced footprint. This unit can hold pizza pans with a maximum diameter of 12" (305 mm).

natural_image
Line drawing of a laboratory incubator with coiled tubing and control panel (no text or symbols)Figure 3. FDWD-12
Model FDWD-12-2X
The FDWD-12-2X has the same features as the FDWD-2X, but has a smaller frame with a reduced footprint.
NOTE: PRefer to the OPTIONS AND ACCESSORIES section in this manual for additional options available for the above models.

flowchart
graph TD
    A["Flav-R-Fresh"] --> B["Display"]
    B --> C["Warmer"]
    C --> D["Designer"]
    E["No Motorized Rack Rotation"] --> F["1 = One Door"]
    E --> G["2 = Two Doors"]
    E --> H["12 = One Door, Small Frame"]
    E --> I["12-2 = Two Doors, Small Frame"]
Figure 4. Model Designation
SPECIFICATIONS
Plug Configurations
Units are supplied from the factory with an electrical cord and plug installed. Plugs are supplied according to the applications.
WARNING
ELECTRIC SHOCK HAZARD: Plug unit into a properly grounded electrical receptacle of the correct voltage, size, and plug configuration. If plug and receptacle do not match, contact a qualified electrician to determine and install the proper voltage and size electrical receptacle.
NOTE: Specification label is located on the ceiling sheet inside of the unit. See label for serial number and verification of unit electrical information.

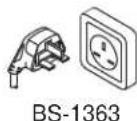
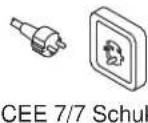

Figure 5. Plug Configurations
NOTE: Receptacle not supplied by Hatco.
Electrical Rating Chart
| ModelLVoltageLWattsLAmpsLPlug ConfigurationLShipping Weight | |||||
| FDWD-1(with humidity) | 100 1440 14.4 NEMA 5-15P 90 lbs. (41 kg) | ||||
| 120 1390 11.6 NEMA 5-15P 90 lbs. (41 kg) | |||||
| 220 1440 6.5 CEE 7/7 Schuko or BS-1363 90 lbs. (41 kg) | |||||
| 240 1440 6.0 | CEE 7/7 Schuko or AS 3112 | 90 lbs. (41 kg) | |||
| 220–230 (CE) | 1440–1574 | 6.5–6.8 | CEE 7/7 Schuko | 90 lbs. (41 kg) | |
| 230–240 (CE) | 1323–1440 | 5.8–6.0 | BS-1363 | 90 lbs. (41 kg) | |
| FDWD-1(no humidity) | 100 1115 | 11.2 NEMA 5-15P 90 lbs. (41 kg) | |||
| 120 1065 8.9 | NEMA 5-15P 90 lbs. (41 kg) | ||||
| 220 1115 | 5.1 CEE 7/7 Schuko or BS-1363 90 lbs. (41 kg) | ||||
| 240 | 1115 | 4.6 | CEE 7/7 Schuko or AS 3112 | 90 lbs. (41 kg) | |
| 220–230 (CE) | 1115–1219 5.1–5.3 CEE 7/7 Schuko | 90 lbs. (41 kg) | |||
| 230–240 (CE) | 1024–1115 4.5–4.6 | BS-1363 90 lbs. (41 kg) | |||
The shaded areas contain electrical information for International models only.
Electrical Rating Chart
| Model Voltage Watts Amps Plug Configuration Shipping Weight | |||||
| FDWD-1X(with humidity) | 100 1428 14.3 NEMA 5-15P 92 lbs. (42 kg) | ||||
| 120 1373 11.4 NEMA 5-15P 92 lbs. (42 kg) | |||||
| 220 1425 6.5 CEE 7/7 Schuko or BS-1363 92 lbs. (42 kg) | |||||
| 240 1425 5.9 CEE 7/7 Schuko or AS 3112 | 92 lbs. (42 kg) | ||||
| 220–230 (CE) | 1425–1558 | 6.5–6.8 | CEE 7/7 Schuko | 92 lbs. (42 kg) | |
| 230–240 (CE) | 1558–1425 | 6.8–5.9 | BS-1363 | 92 lbs. (42 kg) | |
| FDWD-1X(no humidity) | 100 | 1103 | 11.0 NEMA 5-15P 92 lbs. (42 kg) | ||
| 120 1048 8.7 | NEMA 5-15P 92 lbs. (42 kg) | ||||
| 220 | 1100 5.0 | CEE 7/7 Schuko or BS-1363 92 lbs. (42 kg) | |||
| 240 1098 4.6 CEE 7/7 Schuko or AS 3112 | 92 lbs. (42 kg) | ||||
| 220–230 (CE) | 1100–1203 | 5.0–5.2 | CEE 7/7 Schuko | 92 lbs. (42 kg) | |
| 230–240 (CE) | 1203–1098 | 5.2–4.6 | BS-1363 | 92 lbs. (42 kg) | |
| FDWD-2(with humidity) | 100 1440 14.4 NEMA 5-15P 90 lbs. (41 kg) | ||||
| 120 1390 11.6 NEMA 5-15P 90 lbs. (41 kg) | |||||
| 220 1440 6.5 CEE 7/7 Schuko or BS-1363 90 lbs. (41 kg) | |||||
| 240 1440 6.0 CEE 7/7 Schuko or AS 3112 | 90 lbs. (41 kg) | ||||
| 220–230 (CE) | 1440–1574 | 6.5–6.8 | CEE 7/7 Schuko | 90 lbs. (41 kg) | |
| 230–240 (CE) | 1323–1440 | 5.8–6.0 | BS-1363 | 90 lbs. (41 kg) | |
| FDWD-2(no humidity) | 100 | 1115 | 11.2 NEMA 5-15P 90 lbs. (41 kg) | ||
| 120 1065 8.9 | NEMA 5-15P 90 lbs. (41 kg) | ||||
| 220 | 1115 | 5.1 CEE 7/7 Schuko or BS-1363 90 lbs. (41 kg) | |||
| 240 | 1115 | 4.6 | CEE 7/7 Schuko or AS 3112 | 90 lbs. (41 kg) | |
| 220–230 (CE) | 1115–1219 | 5.1–5.3 | CEE 7/7 Schuko | 90 lbs. (41 kg) | |
| 230–240 (CE) | 1024–1115 | 4.5–4.6 | BS-1363 | 90 lbs. (41 kg) | |
| FDWD-2X(with humidity) | 100 1428 14.3 NEMA 5-15P 92 lbs. (42 kg) | ||||
| 120 1373 11.4 NEMA 5-15P 92 lbs. (42 kg) | |||||
| 220 1425 6.4 CEE 7/7 Schuko or BS-1363 92 lbs. (42 kg) | |||||
| 240 1423 5.9 CEE 7/7 Schuko or AS 3112 | 92 lbs. (42 kg) | ||||
| 220–230 (CE) | 1425–1558 | 6.4–6.8 | CEE 7/7 Schuko | 92 lbs. (42 kg) | |
| 230–240 (CE) | 1558–1423 | 6.8–5.9 | BS-1363 | 92 lbs. (42 kg) | |
| FDWD-2X(no humidity) | 100 | 1103 | 11.0 NEMA 5-15P 92 lbs. (42 kg) | ||
| 120 1048 8.7 | NEMA 5-15P 92 lbs. (42 kg) | ||||
| 220 | 1100 5.0 | CEE 7/7 Scheko or BS-1363 92 lbs. (42 kg) | |||
| 240 1098 4.6 CEE 7/7 Schuko or AS 3112 | 92 lbs. (42 kg) | ||||
| 220–230 (CE) | 1100–1203 | 5.0–5.2 | CEE 7 /7 Schuko | 92 lbs. (42 kg) | |
| 230–240 (CE) | 1203–1098 | 5.2–4.6 | BS-1363 | 92 lbs. (42 kg) | |
The shaded areas contain electrical information for International models only.
Electrical Rating Chart
| Model Voltage Watts Amps Plug Configuration Shipping Weight | |
| FDWD-12(with humidity) | 120 1390 11.6 NEMA 5-15P 98 lbs. (44 kg) |
| FDWD-12(no humidity) | 120 1065 8.9 NEMA 5-15P 98 lbs. (44 kg) |
| FDWD-12-2X(with humidity) | 120 1373 11.4 NEMA 5-15P 98 lbs. (44 kg) |
| FDWD-12-2X(no humidity) | 120 1048 8.7 NEMA 5-15P 98 lbs. (44 kg) |
Dimensions
| Model | Width(A) | Depth(B) | Height(C)* | FootprintWidth (D) | FootprintDepth (E) |
| FDWD-1 19-3/8" | (492 mm) | 20-7/8"(530 mm) | 28-5/8"(727 mm) | 19-1/16"(485 mm) | 15-3/8"(390 mm) |
| FDWD-1X 19-3/8" | (492 mm) | 20-7/8"(530 mm) | 28-5/8"(727 mm) | 19-1/16"(485 mm) | 15-3/8"(390 mm) |
| FDWD-2 19-3/8" | (492 mm) | 22"(559 mm) | 28-5/8"(727 mm) | 19-1/16"(485 mm) | 15-3/8"(390 mm) |
| FDWD-2X 19-3/8" | (492 mm) | 22"(559 mm) | 28-5/8"(727 mm) | 19-1/16"(485 mm) | 15-3/8"(390 mm) |
| FDWD-12 17-1/2" | (445 mm) | 19-1/8"(486 mm) | 28-5/8"(727 mm) | 17-3/8"(441 mm) | 13-11/16"(348 mm) |
| FDWD-12-2X | 17-1/2"(445 mm) | 19-7/8"(506 mm) | 28-5/8"(727 mm) | 17-3/8"(441 mm) | 13-11/16"(348 mm) |
| Cabinet Openings:FDWD-1, -1X, -2, -2X = 15-3/4" W x 19-3/4" H (400 x 502 mm)FDWD-12, -12-2X = 14" W x 19-3/4" H (356 x 502 mm) | |||||
* Add 3" (76 mm) to Height (C) of the unit if the 4" (102 mm) leg option is installed.

Front View

SideView
Figure 6. Dimensions
General
Flav-R-Fresh ® Humidified Impulse Display Cabinets are shipped with most components installed and ready for operation. The following installation instructions must be performed before plugging in and operating this unit.
WARNING
ELECTRIC LSHOCK LHAZARD: LUnit Lis Lnot Lweatherproof. Locate unit indoors where the ambient air temperature is a minimum of 70irc F ( 21irc C).
FIRE HAZARD: Locate unit a minimum of 1" (25 mm) from combustible walls and materials. If safe distances are not maintained, discoloration or combustion could occur.
CAUTION
Locate unit at the proper counter height in an area that is convenient for use. The location should be level to prevent the unit or its contents from falling accidentally and strong enough to support the weight of the unit and contents.
Transport unit in upright position only. Before moving or tipping unit, secure all glass surfaces with tape and drain water from water reservoir. Failure to do so may result in damage to unit or personal injury.
- Remove the unit from the carton. Two people are required for this step.
- Remove the information packet.
NOTE: PTo Pprevent Pdelay Pin Pobtaining Pwarranty Pcoverage, complete online warranty registration. See the IMPORTANT POWNER PINFORMATION Psection Pfor details.
-
Remove tape and protective packaging from all surfaces of the unit, shelves, and any accessories.
-
Floor Sheet — The stainless steel floor in all cabinets is protected during shipping with a sheet of corrugated cardboard. This protection must be removed prior to cabinet operation.
- Display Racks — The display racks have packing material and cardboard attached for protection during shipping. This protection must be removed prior to cabinet operation.
- Legs — The cabinets are shipped with four 1" (25 mm) metal screw-type feet attached to the bottom of the unit. For cabinets with the accessory 4" (102 mm) adjustable legs, see the OPTIONS AND ACCESSORIES section for installation instructions.
NOTE:Plf Pinstalling P4" P(102 Pmm) Plegs, Pdo Pnot Remove Pglass protection Puntil Pleg Pinstallation Pis complete. PSee Pthe OPTIONS AND ACCESSORIESPsection for installation instructions.
- Glass Panels — The cabinets have tempered glass panels that are protected during shipping using rubber tabs along the glass edges and tape to hold the panels securely. These tabs and tape must be removed prior to cabinet operation.
Rubber Tab

Figure 7. Shipping Tab for Glass Panels
-
Place the unit in the desired location. Two people are required for this step.
-
Locate the unit in an area where the ambient air temperature is constant and a minimum of 70ircF (21°C). Avoid areas that may be subject to active air movements or currents (i.e., near exhaust fans/hoods and air conditioning ducts).
- Make sure the unit is at the proper counter height in an area convenient for use.
- Make sure the countertop is level and strong enough to support the weight of the unit and food product.
Reversing the Access Door
The Flav-R-Fresh ® access door(s) may be hinged on either the left or right side for convenience. Use the following procedure to reverse the access door.
NOTE: For models equipped with a motorized rotating rack (FDWD-1, FDWD-2, and FDWD-12), the "Relocating the Proximity Switch" procedure in this section must be performed after reversing the access door(s).
- Remove the top hinge pin screw that holds the door to the hinge.
- Tip the door assembly forward (away from cabinet) and lift gently to clear the bottom hinge assembly. Remove the nylon washer(s).
- Reinstall the top hinge pin screw that was removed in Step 1.
- Remove the fluorescent lamp cover to allow access to the hinge/striker plate hardware.
-
Remove the screws holding the hinges to the cabinet.
-
Remove the screws from the striker plates on the non-hinge side of the cabinet.
- Install the striker plates on the opposite side of the cabinet where the hinges were previously mounted.
- Install the hinges on the opposite side of the cabinet where the striker plates were previously mounted using the original hinge mounting screws.
- Replace the fluorescent lamp cover.
- Carefully rotate the door 180°.
- Remove the hinge pin screw from the end that is now the top.
- Carefully place the door assembly with the nylon washer(s) into the bottom hinge.
- Tip/tilt the door assembly towards the cabinet and align the door top with the hinge. Reinstall the top door hinge pin screw through the hinge and into the door top.

Figure 8. Reversing the Access Door
Relocating the Proximity Switch (Rotating Rack Models Only)
Units equipped with a rotating rack will require relocating the proximity switch(es) after reversing the door(s).
The proximity switch signals the rack motor to stop when a door is opened and to start when the door is closed. Follow the steps listed below to move the proximity switch(es) to the proper position after reversing the door(s). Unit requires one switch per door.
- Turn off the unit. Unplug the unit from the power source.
- Remove the four screws and top cover.
- Remove the screw and nut securing the proximity switch to the cabinet ceiling sheet. The screw is accessed from inside the cabinet. Reinstall screw and nut into hole after removing switch.
- Cut the cable tie securing the proximity switch wires to the wiring harness. Mark the two wires for reassembly and unplug the wires from the proximity switch wire leads. Route the wires to the opposite corner and reattach the wires to the switch wire leads.
NOTE: Make sure to install the proximity switch in the orientation shown below for the specific installation location. Incorrect orientation will result in malfunction of the proximity switch.
- Remove the screw and nut from the new mounting hole. Secure the proximity switch to the mounting hole with the screw and nut. Make sure to maintain proper switch orientation when tightening the hardware.
- Make sure wires do not interfere with the other components inside the cabinet, then secure switch wires to wiring harness with a cable tie (not supplied).
NOTE: On models equipped with two doors, it may be necessary to move the air chamber to access the proximity switch on the customer-side door. Drain all water from the unit, remove the drain plug from inside the cabinet, and remove the four screws securing the air chamber assembly to the cabinet. Carefully move the air chamber out of the way to access the proximity switch. Reassemble after relocating switch.
-
Install the top cover and four screws.
-
Plug the unit into the proper power source.
-
Turn on the unit and test the operation of the proximity switch(es) by making sure the rack rotates when the doors are closed and stops rotating when a door is opened.

Figure 9. Relocating the Proximity Switch
General
Use the following procedures to operate Flav-R-Fresh Humidified Impulse Display Cabinets.
WARNING
Read Lall Lsafety Lmessages Lin Lthe LIMPORTANT LSAFETY INFORMATIONLsection before operating this equipment.
Startup
- Plug unit into a properly grounded electrical receptacle of the correct voltage, size, and plug configuration. See the SPECIFICATIONS section for details.
- Move the POWER ON/OFF (I/O) switch to the ON (I) POSITION.
- The display lights will turn on and the heating system will start up.
- On humidified units, the cabinet temperature display will flash "LO H2O" four times and then flash the cabinet temperature. It will continue to alternate this way until the water reservoir is filled. Once the reservoir is full, "LO H2O" will stop flashing and the display will show the cabinet temperature.
NOTICE
Use of distilled water in the water reservoir of humidified units is recommended to preserve the life of electrical and mechanical components. If non-distilled water is used, the reservoir will require periodic cleaning and deliming (refer to the MAINTENANCELsection for cleaning procedure). Unit failure due to lime or mineral deposits is not covered under warranty.
Do not use deionized water. Deionized water will shorten the life of the water pan and heating element.
NOTE: Unit failure caused by deionized water is not covered by warranty.
- On humidified units, fill the water reservoir with clean water. To fill the reservoir:
a. Lift up the fill cup cover and pull forward.
b. Slowly pour the water into the cup until "LO H2O" stops flashing on the cabinet temperature display.
\*IMPORTANT NOTE\*
When using distilled water, add one teaspoon of salt to the water reservoir during the initial water fill only. This will ensure proper operation of the water level sensors.
WARNING
ELECTRIC SHOCK HAZARD: Do not overfill water reservoir. Overfilling can cause electrical shock. Water reservoir is full when "LO H2O" stops flashing on CABINET TEMPERATURE display. Stop filling when "LO H2O" stops flashing on display.
NOTE: On the initial fill, the water reservoir capacity is 80 ounces or 2-1/2 quarts (2.3 liters).
- On humidified units, set the humidity to the desired level (refer to the "Setting the Humidity Level" procedure in this section). See the "Food Holding Guide" for recommendations.
- Set the air temperature to the desired temperature (refer to the "Setting the Air Temperature" procedure in this section). See the "Food Holding Guide" for recommendations.
- Allow the unit 20 minutes to reach operating temperature before loading the cabinet with pre-heated food product.
WARNING
Make sure food product has Lbeen Lheated to the proper food-safe temperature before placing in unit. Failure to heat food product properly may result in serious health risks. This unit is for holding pre-heated food product only.
BURN HAZARD: Some exterior surfaces on the unit will get hot. Use caution when touching these areas.
Setting the Air Temperature
- Press the key to enter temperature mode ("tSP" will appear on the CABINET TEMPERATURE display).
- Press the key again to show the current temperature setting.
- Press the ke▲ or key to ▶ each the desired temperature. The temperature range is 80°–195°F (27°–91°C) in single degree increments. See the "Food Holding Guide" in this section for recommendations.
- After the desired temperature is set, wait 15 seconds without pushing any keys for the cabinet temperature display to return automatically to operational mode.
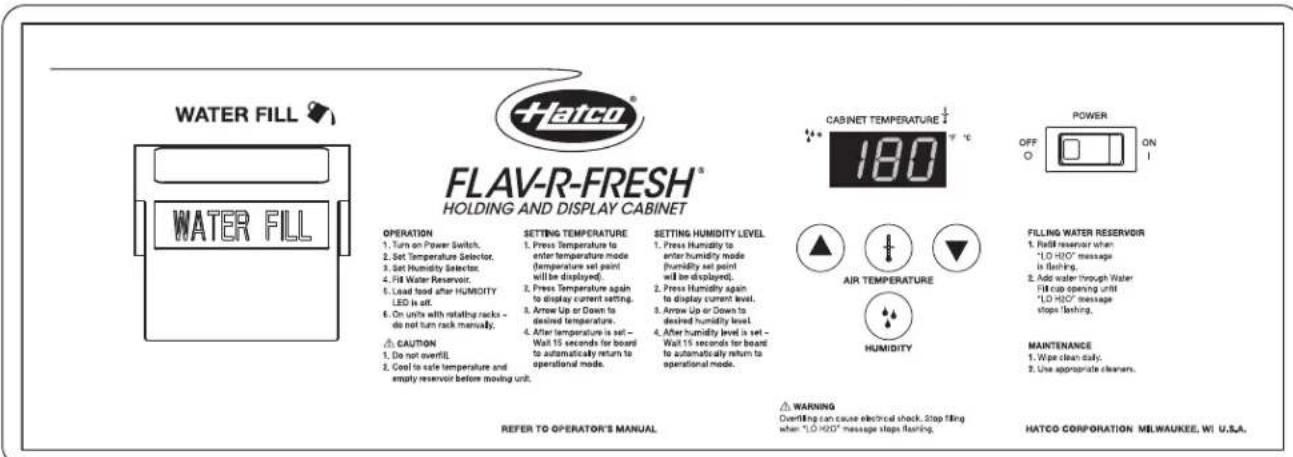
Figure 10. Flav-R-Fresh Control Panel
Setting the Humidity Level
Use the following procedure to set the humidity level on humidified units.
- Press the key to enter humidity mode ("hSP" will appear on the CABINET TEMPERATURE display).
- Press the key again to show the current humidity level.
- Press the key or key to reach the desired humidity level. Humidity range is 1 through 5 (1 is the lowest amount of humidity and 5 is the highest). See the "Food Holding Guide" in this section for recommendations.

Figure 11. Setting the Humidity Level
- After the desired humidity level is set, wait 15 seconds without pushing any keys for the CABINET TEMPERATURE display to return automatically to operational mode.
NOTE: Temperature and humidity settings may vary depending upon product make-up and consistency. The CABINET TEMPERATURE display shows the lowest temperature point inside the cabinet, not the product temperature.
The capacity of the water reservoir permits uninterrupted operation for approximately 3–6 hours, depending on the settings and how frequently the door is opened. When "LO H2O" is flashing on the CABINET TEMPERATURE display, add water to the reservoir. The water reservoir refill capacity is approximately 64 ounces, or two (2) quarts (1.9 liters). WARNING: ELECTRIC SHOCK HAZARDL— Do not overfill water reservoir.
Food Holding Guide
| Type of FoodLHolding TimeLSetting | MaximumLHumidityLTemperature °F | °C | ||
| Biscuits | 4 Hours | 4 | 130 | 55 |
| Chicken Pieces (Fried) | 4 Hours | 5 | 175 | 80 |
| Croissants | 4 Hours | 1 | 140 | 60 |
| Fruit Pies | 3-1/2 Hours | 4 | 140 | 60 |
| Onion Rings | 1/2 to 1 Hour | 1 | 175 | 80 |
| Pizza — Thick Crust | 1 Hour | 4 | 185 | 85 |
| Thin Crust | 1 Hour | 5 | 180 | 82 |
| Pretzels | 3 Hours | 4 | 140 | 60 |
| Wrapped Sandwiches | 2 Hours | 4 | 180 | 82 |
NOTE: All times and settings are recommendations only and may vary depending on product preparation, cooking time, and internal food temperature.
General
Hatco Flav-R-Fresh® Humidified Impulse Display Cabinets are designed for maximum durability and performance, with minimum maintenance.
WARNING
ELECTRIC SHOCK HAZARD:
- LTurn OFF power switch, unplug power cord, and allow unit to cool before performing any cleaning, setup, or maintenance.
- LDO NOT submerge or saturate with water. Unit is not waterproof. Do not operate if unit has been submerged or saturated with water.
- LDo not steam clean or use excessive water on unit.
• LUse Lonly LGenuine LHatco LReplacement LParts Lwhen service Lis Lrequired. LFailure Lto Luse LGenuine LHatco Replacement LParts Lwill Lvoid Lall Lwarranties Land Lm subject Loperators Lof Lthe Lequipment Lto Lhazardous electrical voltage, resulting in electrical shock or burn. Genuine LHatco LReplacement LParts Lare Lspecified Ltd operate safely in the environments in which they are used. Some aftermarket or generic replacement parts do not have the characteristics that will allow them to operate safely in Hatco equipment.
This Lunit Lhas Lno L"user-serviceable" Lparts. LIf Lservice required on this unit, contact an Authorized Hatco Service Agent or contact the Hatco Service Department at 800-558-0607 or 414-671-6350; fax 800-690-2966; or International fax 414-671-3976.
Cleaning
To preserve the finish of the Merchandising Warmer, perform the following cleaning procedure daily.
NOTICE
Use non-abrasive cleaners only. Abrasive cleaners could scratch the finish of the unit, marring its appearance and making it susceptible to soil accumulation.
- Turn off the unit, unplug the power cord, and allow the unit to cool.
- Remove and wash all food pans.
- Wipe down all interior and exterior metal surfaces with a damp cloth. Stubborn stains may be removed with a good non-abrasive cleaner. Clean hard to reach areas using a small brush and mild soap.
NOTE: Both the rotating display rack and the stationary rack are removable for cleaning, if necessary. Refer to the "Removing the Rotating Rack" procedure in this section for removal.
- Clean the glass side panels and door panel(s) using ordinary glass cleaner and a damp, soft cloth or paper towel. The side panels are removable for detailed cleaning, if necessary. Refer to the "Removing the Glass Panels" procedure in this section for removal.
Removing the Glass Panels
- Lift the glass panel out of the bottom channel of the cabinet.
- Pull the lower edge away from the cabinet.
- Carefully lower the glass until the top clears the cabinet.
Replacing the Glass Panel
- Position the glass panel with the top edge under the top cabinet lip, and raise the glass until it clears the bottom channel of the cabinet.
- Move the bottom of the glass towards the cabinet until the glass rests against the cabinet frame.
- Carefully lower the glass until it rests in the bottom channel of the cabinet.
Removing the Rotating Rack
(Models FDWD-1, FDWD-2, and FDWD-12)
- Open the front access door.
- Remove the two (2) connecting pins from the connecting coupling located at the top of the rack inside the cabinet.
- Lower the connecting coupling until it is free of the motor shaft and remove the rack from the cabinet.

Figure 12. Removing Motorized Display Racks
Replacing the Rotating Rack
- With the connecting coupling in position on the top rack shaft, insert the rack into the cabinet through the access door and place the rack bottom point in the dimple located at the center of the cabinet floor.
- Slide the connecting coupling up onto the motor shaft and align the coupling holes.
- Insert the two (2) connecting pins. The top connecting pin goes through the connecting coupling and the motor shaft. The bottom connecting pin goes through the connecting coupling and the rack shaft.
Draining the Water Reservoir
On humidified units, the water reservoir must be drained prior to moving the cabinet as well as during the “Removing Lime and Mineral Deposits” procedure.
WARNING
ELECTRIC SHOCK HAZARD: Turn the power switch OFF, unplug the power cord, and allow the unit to cool before performing any maintenance or cleaning.
- Move the POWER ON/OFF (I/O) switch to the OFF (O) position and unplug the power cord. Allow the unit to cool.
- Locate the valve inside the cabinet on the underside of the ceiling sheet. CAUTION: BURN HAZARD—Ceiling sheet and water in reservoir are hot during operation. Allow to cool before draining.
- Position a one gallon (four liter) container under the valve.
- Turn the valve handle from the horizontal position (closed) to the vertical position (open) to drain the reservoir.
- Once the reservoir is empty, return the valve handle to the closed position.

Figure 13. Draining Reservoir Valve
NOTE: PIf the water used has an excessive amount of lime or mineral Pcontent, Pfollow Pthe PREMOVING PLIME PA MINERAL DEPOSITS procedure for periodic cleaning and deliming of the water reservoir.
NOTE: PUnit failure caused by liming or sediment buildup is not covered under warranty.
Removing Lime and Mineral Deposits
Use the following procedure for periodic cleaning and de-liming of the water reservoir on humidified models.
NOTE: PThe lime and mineral content of the water used for daily operation Pwill Pdetermine Phow Poften Pthe Pdeliming procedure must be performed.
NOTE: PPerform this procedure when the unit will not be used for a period of time, such as the end of the day.
- Move the POWER ON/OFF (I/O) switch to the OFF (O) position and unplug the power cord. Allow the unit to cool.
- After the unit has cooled down, perform the "Draining the Water Reservoir" procedure in this section.
- Fill the water reservoir with a mixture of 75% water and 25% white vinegar. Do not use flavored vinegar.
- Plug in and turn on the unit.
- Set both the air temperature and humidity to their highest settings and allow the unit to run for 30 minutes.
- Move the POWER ON/OFF (I/O) switch to the OFF (O) position and unplug the power cord. Allow the unit to cool.
- Perform the "Draining the Water Reservoir" procedure to empty the deliming solution from the water reservoir.
- Continue to fill and drain the water reservoir with clean water until the deliming solution is rinsed through and the reservoir is clean.
- Plug the unit into its power source and fill the reservoir as usual for daily operation using the procedure in the OPERATION section of this manual.
Replacing A Display Light
WARNING
Make sure protective lamp cover(s) are installed in front of fluorescent lamp(s). Breakage of fluorescent lamps not properly protected could result in personal injury and/or food contamination.
Units are equipped with two fluorescent lamps that illuminate the warming area. These lamps have a special lamp cover to guard against injury and food contamination in the event of breakage. When replacing a fluorescent lamp, use Hatco P/N 02.30.074.00. Use the following procedure to replace a fluorescent lamp.
- Turn off the unit, unplug the power cord, and allow the unit to cool.
- Remove the lamp cover from in front of the fluorescent lamp.
- Carefully twist the fluorescent lamp and pull out to remove it from the sockets on each end.
- Align the tabs on each end of the new fluorescent lamp with the channels on each socket, and push the lamp into the sockets.
- Carefully twist the fluorescent lamp in the sockets until it "snaps" into position.
- Replace the lamp cover in front of the fluorescent lamp.
WARNING
WARNING
This Lunit Lmust Lbe Lserviced Lby Ltrained Land Lqualified ELECTRIC SHOCK HAZARD: Turn the power switch OFF, personnel only. Service by unqualified personnel may lead to electric shock or burn. unplug the power cord, and allow the unit to cool before performing any maintenance or cleaning.
| SymptomLProbable | CauseLCorrective Action | |
| Fluorescent lamp not working. Lamp | loose or defective. Re-install or replace fluorescent lamp. | |
| Unit operates, but is not circulating air inside cabinet. | Blower motor is defective. Contact Authorized Service Agent or Hatco for assistance. | |
| The correct voltage may not be supplied to blower. | Contact Authorized Service Agent or Hatco for assistance. | |
| Unit is plugged in, but nothing works. | No power to unit. Check electrical receptacle and verify that power supply matches specifications on unit. If receptacle is not working, check circuit breaker and reset, or plug unit into a different known working receptacle. | |
| Power cord connections are loose or disconnected. | Contact Authorized Service Agent or Hatco for assistance. | |
| Power cord is damaged. Contact Authorized Service Agent or Hatco for assistance. | ||
| Defective ON/OFF switch. Contact Authorized Service Agent or Hatco for assistance. | ||
| Unit is operational, but rotating rack (if equipped) does not turn. | Proximity switch was not relocated after door reversal. | See “Relocating the Proximity Switch” in the INSTALLATION section of this manual. |
| Proximity magnet or proximity switch not working properly. | Contact Authorized Service Agent or Hatco for assistance. | |
| Incorrect voltage is supplied to rack motor. | Contact Authorized Service Agent or Hatco for assistance. | |
| Unit is not producing any “hot air” inside cabinet. | Safety high-limit is tripped or open. | Contact Authorized Service Agent or Hatco for assistance. |
| Incorrect voltage supplied to heating element. | Contact Authorized Service Agent or Hatco for assistance. | |
| Blower motor is not working. | Check blower motor — refer to Symptom “Unit operates, but is not circulating air inside cabinet.” | |
| Air heating element is defective. | Contact Authorized Service Agent or Hatco for assistance. | |
| Unit is heating, but is not producing humidity inside cabinet. Low water light is off, and unit is full of water. | Incorrect voltage supplied to water heating element or heating element is defective. | Contact Authorized Service Agent or Hatco for assistance. |
| Unit is heating, but is not producing humidity inside cabinet. Low water light is on and unit is full of water. | When using distilled water, no minerals are being sensed by low water probe. | On initial fill, add one teaspoon of salt to the water reservoir. |
| Low water protection system is malfunctioning. | Contact Authorized Service Agent or Hatco for assistance. | |
Error Codes
The following error codes may appear on the digital display to indicate an error in the operating condition of the unit.
LO H20 = Low water probe does not detect water. Refill water reservoir — refer to instructions in OPERATION section of this manual.
E1 = Air temperature sensor malfunctioning. Contact Authorized Service Agent or Hatco for assistance.
E2 = Humidity temperature sensor malfunctioning. Contact Authorized Service Agent or Hatco for assistance.
4" (102 mm) Adjustable Legs
The 4" (102 mm) adjustable legs are used to add additional height to the unit.
- Secure all glass sides and doors with tape. Lay the unit on its side.
- Remove the four 1" (25 mm) metal screw-type feet.
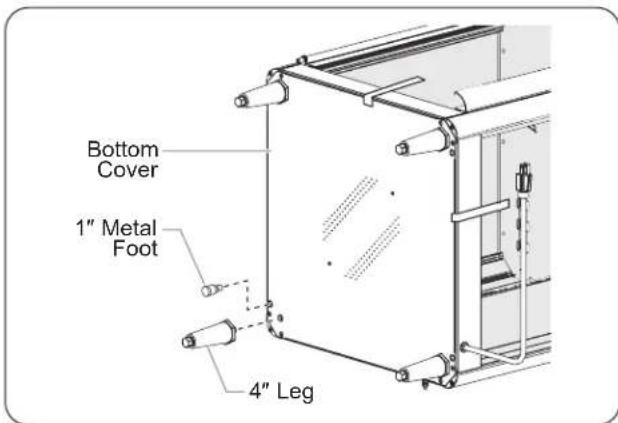
Figure 14. Installation of 4" Legs
- Screw the 4" (102 mm) legs into the holes in the middle of each corner on the bottom cover. After all the legs are tightened, return the unit to its upright position. If the unit is not level or rocks, turn the adjustable tip of the appropriate leg to level the unit.

Display Racks
Several display racks are available to "customize" Flav-R-Fresh® to specific foodservice operations. All are nickel-plated except the pretzel tree, which is stainless steel.

4-Tier Circle Rack*
Model FDW4TCR
3-1/4" (83 mm) opening
between racks.
Max. 15" diameter
pans.
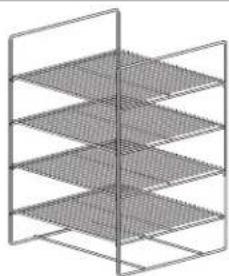
natural_image
3D wireframe diagram of a multi-tiered grid structure (no text or symbols)4-Shelf Multi-Purpose Rack Model FDW4SMP 3-3/4" (95 mm) opening between shelves. 1st and 3rd shelves are removable.
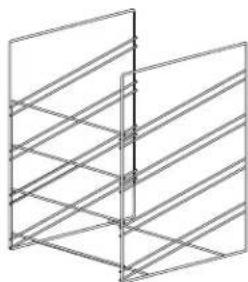
natural_image
Isometric line drawing of a 3D rectangular prism with internal diagonal lines and a vertical line (no text or symbols)4-Shelf Angle Rack Model FDW4SAR 3-3/4" (95 mm) opening between shelves.

natural_image
Pure electrical circuit lines without any symbols3-Tier Pretzel Tree * Model FDW3TPT 5-7/8" (149 mm) opening between racks.

4-Tier Circle Rack*
Model FDWD124TCR
3-1/4" (83mm) opening
between racks.
Max. 12" diameter pans.
Only available for FDWD-12.

natural_image
Pure technical diagram of a multi-layered mechanical or structural component with no text, numbers, or symbols4-Shelf Circle Rack with Retainers* Model FDWD4TCRR 3-1/4" (83mm) opening between racks. Max. 15" diameter pans.
*Racks designed for use with motorized display.
Figure 15. Display Racks
Motorless Rack Coupling
The motorless rack coupling allows the stationary installation of a 4-tier circle rack or 3-tier pretzel tree in cabinets that do not have a rack motor (FDWD-1X and -2X).

Motorless Rack Coupling
Merchandising Decal
Self-adhesive merchandising decals are available to promote food products. The decals are designed to be installed on three (3) sides of the cabinet above the glass panels. Merchandising decals are red with yellow letters reading HOT PIZZA or HOT PRETZELS. A graphic decal featuring pizza illustrations is also available.
Decal Installation
- Before installing decals, clean the side panels with a non-oily cleaner, such as isopropyl alcohol (rubbing alcohol).
- After the cleaned surfaces have dried, remove the protective backing from the decal and apply to the panel.
- Any air pockets or bubbles behind the sticker can be removed by rubbing gently with a soft cloth from the center towards the outer edges.

Figure 16. Decal Installation
Sign Holders
(FDWD-1, FDWD-1X, FDWD-2, and FDWD-2X)
Use the following procedures to install either a Display Sign Holder(s) or the Three-Sided Sign Holder.

ELECTRIC SHOCK HAZARD: Turn the power switch OFF, unplug the power cord, and allow the unit to cool before performing any maintenance or cleaning.
Display Sign Holder Installation
Display Sign Holders can be installed on any side of the unit except the control side. Up to three Display Sign Holders can be installed on a unit. There are two height sizes available for display sign holders, 3" and 6-3/8".
NOTE: Signage not supplied by Hatco. Sign dimensions are: 3" Holder = 19-1/16" W (484 mm) x 3-1/4" H (83 mm) 6-3/8" Holder = 19-1/16" W (484 mm) x 6-3/8" H (162 mm) Order custom signs for Hatco equipment at www.hatcographics.com.
- Remove the appropriate hood mounting screws from the cabinet hood. The screws that need to be removed are determined by the location and number of sign holders being installed.
- Align the mounting holes on the sign holder(s) with the mounting holes in the cabinet hood.
- Insert the hood mounting screws through the holes in the sign holder(s) and into the cabinet hood. Tighten securely.
NOTE: If more than one display sign holder is being installed, some of the hood mounting screws may need to thread through and secure two display sign holders.
- Place the polycarbonate window(s) into sign holder.
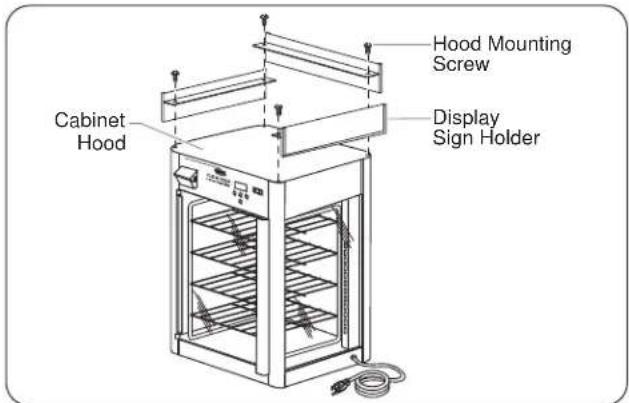
Figure 17. Display Sign Holder Installation
Three-Sided Sign Holder Installation
The Three-Sided Sign Holder can be installed on the cabinet in place of the cabinet hood. The Three-Sided Sign Holder will be installed at the factory if ordered at the time of sale, but can be retro-fitted using the following procedure.
NOTE: The Three-Sided Sign Holder is available on FDWD-1 and FDWD-1X models only and comes installed when ordered with the unit.
NOTE: Signage not supplied by Hatco. Sign dimensions are 19-5/16" W (491 mm) x 6-5/8" H (168 mm). Order custom signs for Hatco equipment at www.hatcographics.com.
- Remove the four hood mounting screws from the cabinet hood.
- Remove the cabinet hood.
- Place the sign holder assembly on the cabinet and align it with the cabinet hood mounting holes.
- Insert the four hood mounting screws through the holes in the sign holder assembly and into the cabinet.
- Tighten all screws.
- Place the polycarbonate window(s) into sign holder.

Figure 18. Three-Sided Sign Holder Installation
1.LPRODUCT WARRANTY
Hatco warrants the products that it manufactures (the "Products") to be free from defects in materials and workmanship, under normal use and service, for a period of one (1) year from the date of purchase when installed and maintained in accordance with Hatco's written instructions or 18 months from the date of shipment from Hatco. Buyer must establish the Product's purchase date by returning Hatco's Warranty Registration Card or by other means satisfactory to Hatco in its sole discretion.
Hatco warrants the following Product components to be free from defects in materials and workmanship from the date of purchase (subject to the foregoing conditions) for the period(s) of time and on the conditions listed below:
a) LOne (1) Year Parts and Labor PLUS One
(1) Additional Year Parts-Only Warranty:
Conveyor Toaster Elements (metal sheathed)
Drawer Warmer Elements (metal sheathed)
Drawer Warmer Drawer Rollers and Slides
Food Warmer Elements (metal sheathed)
Display Warmer Elements (metal sheathed air heating)
Holding Cabinet Elements (metal sheathed air heating)
Built-In Heated Well Elements — HWB and HWBI Series (metal sheathed)
b) LOne (1) Year Parts and Labor PLUS Four
(4) Years Parts-Only Warranty on pro-rated terms that Hatco will explain at Buyer's request:
3CS and FR Tanks
c) LOne (1) Year Parts and Labor PLUS Nine
(9) Years Parts-Only Warranty on:
Electric Booster Heater Tanks
Gas Booster Heater Tanks
d)LNinety (90) Day Parts-Only Warranty:
Replacement Parts
THE FOREGOING WARRANTIES ARE EXCLUSIVE AND IN LIEU OF ANY OTHER WARRANTY, EXPRESSED OR IMPLIED, INCLUDING BUT NOT LIMITED TO ANY IMPLIED WARRANTY OF MERCHANTABILITY OR FITNESS FOR A PARTICULAR PURPOSE OR PATENT OR OTHER INTELLECTUAL PROPERTY RIGHT INFRINGEMENT. Without limiting the generality of the foregoing, SUCH WARRANTIES DO NOT COVER: Coated incandescent light bulbs, fluorescent lights, heat lamp bulbs, coated halogen light bulbs, halogen heat lamp bulbs, glass components, and fuses; Product failure in booster tank, fin tube heat exchanger, or other water heating equipment caused by liming, sediment buildup, chemical attack, or freezing; or Product misuse, tampering or misapplication, improper installation, or application of improper voltage.
2. LLIMITATION OF REMEDIES AND DAMAGES
Hatco's liability and Buyer's exclusive remedy hereunder will be limited solely, at Hatco's option, to repair or replacement using new or refurbished parts or Product by Hatco or a Hatco-authorized service agency (other than where Buyer is located outside of the United States, Canada, United Kingdom, or Australia, in which case Hatco's liability and Buyer's exclusive remedy hereunder will be limited solely to replacement of part under warranty) with respect to any claim made within the applicable warranty period referred to above. Hatco reserves the right to accept or reject any such claim in whole or in part. In the context of this Limited Warranty, "refurbished" means a part or Product that has been returned to its original specifications by Hatco or a Hatco-authorized service agency. Hatco will not accept the return of any Product without prior written approval from Hatco, and all such approved returns shall be made at Buyer's sole expense. HATCO WILL NOT BE LIABLE, UNDER ANY CIRCUMSTANCES, FOR CONSEQUENTIAL OR INCIDENTAL DAMAGES, INCLUDING BUT NOT LIMITED TO LABOR COSTS OR LOST PROFITS RESULTING FROM THE USE OF OR INABILITY TO USE THE PRODUCTS OR FROM THE PRODUCTS BEING INCORPORATED IN OR BECOMING A COMPONENT OF ANY OTHER PRODUCT OR GOODS.
HATCO AUTHORIZED PARTS DISTRIBUTORS
ALABAMA
Jones McLeod Appl. Svc. Birmingham 205-251-0159
ARIZONA
Service Solutions Group
Phoenix 602-234-2443
Byassee Equipment Co.
Phoenix 602-252-0402
CALIFORNIA
Industrial Electric
Commercial Parts & Service, Inc.
Huntington Beach 714-379-7100
Chapman Appl. Service
San Diego 619-298-7106
P & D Appliance
Commercial Parts & Service, Inc.
S. San Francisco 650-635-1900
COLORADO
Hawkins Commercial Appliance
Englewood 303-781-5548
FLORIDA
Whaley Foodservice Repair
Jacksonville 904-725-7800
3Wire Nass Service Co., Inc.
Orlando 407-425-2681
B.G.S.I
Pompano Beach 954-971-0456
Comm. Appliance Service
Tampa 813-663-0313
GEORGIA
TWC Services
Mableton 770-438-9797
Heritage Service Group
Norcross 866-388-9837
Southeastern Rest. Svc
Norcross 770-446-6177
HAWAII
Burney's Comm. Service, Inc.
Honolulu 808-848-1466
Food Equip Parts & Service
Honolulu 808-847-4871
ILLINOIS
Parts Town
Lombard 708-865-7278
Eichenauer Elec. Service
Decatur 217-429-4229
Midwest Elec. Appl. Service
Elmhurst 630-279-8000
Cone's Repair Service
Moline 309-797-5323
INDIANA
GCS Service
Indianapolis 317-545-9655
IOWA
Electric Motor Service Co.
Davenport 319-323-1823
Goodwin Tucker Group
Des Moines 515-262-9308
KENTUCKY
Service Solutions Group
Lexington 859-254-8854
Service Solutions Group
Louisville 502-451-5411
LOUISIANA
Chandlers Parts & Service
Baton Rouge 225-272-6620
MARYLAND
Electric Motor Service
Baltimore 410-467-8080
GCS Service
Silver Spring 301-585-7550
MASSACHUSETTS
Ace Service Co., Inc.
Needham 781-449-4220
MICHIGAN
Bildons Appliance Service
Detroit 248-478-3320
Commercial Kitchen Service
Bay City 517-893-4561
Midwest Food Equip. Service
Grandville 616-261-2000
MINNESOTA
GCS Service
Plymouth 800-345-4221
MISSOURI
General Parts
Kansas City 816-421-5400
Commercial Kitchen Services
St. Louis 314-890-0700
Kaemmerlen Parts & Service
St. Louis 314-535-2222
NEBRASKA
Anderson Electric
Omaha 402-341-1414
NEVADA
Burney's Commercial
Las Vegas 702-736-0006
Hi. Tech Commercial Service
N. Las Vegas 702-649-4616
NEW JERSEY
Jay Hill Repair
Fairfield 973-575-9145
Service Plus
Flanders 973-691-6300
NEW YORK
Acme American Repairs, Inc.
Brooklyn 718-456-6544
Alpro Service Co.
Brooklyn 718-386-2515
Appliance Installation
Buffalo 716-884-7425
Duffy's Equipment Services, Inc.
Buffalo 800-836-1014
3Wire Northern
Plattsburgh 800-634-5005
Duffy's Equipment Services, Inc.
Sauquoit 800-836-1014
J.B. Brady, Inc.
Syracuse 315-422-9271
NORTH CAROLINA
Authorized Appliance
Charlotte 704-377-4501
OHIO
Akron/Canton Comm. Svc. Inc.
Akron 330-753-6635
Service Solutions Group
Cincinnati 513-772-6600
Commercial Parts and Service
Columbus 614-221-0057
Electrical Appl. Repair Service
Brooklyn Heights 216-459-8700
E. A. Wichman Co.
Toledo 419-385-9121
OKLAHOMA
Hagar Rest. Service, Inc.
Oklahoma City 405-235-2184
Krueger, Inc.
Oklahoma City 405-528-8883
OREGON
Ron's Service, Inc.
Portland 503-624-0890
PENNSYLVANIA
Elmer Schultz Services
Philadelphia 215-627-5401
FAST Comm. Appl. Service
Philadelphia 215-288-4800
Appliance Installation & Service
Pittsburgh 412-809-0244
K & D Service Co.
Harrisburg 717-236-9039
Electric Repair Co.
Reading 610-376-5444
RHODE ISLAND
Marshall Electric Co.
Providence 401-331-1163
SOUTH CAROLINA
Whaley Foodservice Repair
W. Columbia 803-791-4420
TENNESSEE
Camp Electric
Memphis
TEXAS
GCS Service
Fort Worth 800-433-1804
Armstrong Repair Service
Houston 713-666-7100
Cooking Equipment Specialist
Mesquite 888-866-9276
Refrigerated Specialist, Inc
Mesquite 888-866-9276
Commercial Kitchen Repair Co.
San Antonio 210-735-2811
UTAH
La Monica's Rest. Equip. Service
Murray 801-263-3221
VIRGINIA
Daubers
Norfolk 757-855-4097
Daubers
Springfield 703-866-3600
WASHINGTON
3Wire Restaurant Appliance
Seattle 800-207-3146
WISCONSIN
A.S.C., Inc.
Madison 608-246-3160
A.S.C., Inc.
Milwaukee 414-543-6460
CANADA
ALBERTA
Key Food Equipment Service
Edmonton 780-438-1690
BRITISH COLUMBIA
Key Food Equipment Service
Vancouver 604-433-4484
Key Food Equipment Service
Victoria 250-920-4888
MANITOBA
Air Rite, Inc.
Winnipeg 204-895-2300
NEW BRUNSWICK
EMR Services, Ltd.
Moncton 506-855-4228
ONTARIO
R.G. Henderson Ltd.
Toronto 416-422-5580
Choquette - CKS, Inc.
Ottawa 613-739-8458
QUÉBEC
Choquette - CKS, Inc.
Montreal 514-722-2000
Choquette - CKS, Inc.
Québec City 418-681-3944
UNITED KINGDOM
Marren Group
Northants +44(0)1933 666233
HATCO CORPORATION
P.O. Box 340500
Milwaukee, WI 53234-0500 U.S.A.
(800) 558-0607 (414) 671-6350
Parts and Service Fax (800) 690-2966
International Fax (414) 671-3976
partsandservice@hatcocorp.com
www.hatcocorp.com
Register your unit online!
See IMPORTANT OWNER INFORMATION section for details.

- FLAV-R-FRESH®
- Humidified Impulse Display Cabinets FDWD Series
- Installation and Operating Manual
- Register your unit online!
- IMPORTANT OWNER INFORMATION
- Register your unit!
- INTRODUCTION
- WARNING
- CAUTION
- NOTICE
- ELECTRIC SHOCK HAZARD:
- All Models
- Model FDWD-1
- Model FDWD-2
- Model FDWD-1X
- Model FDWD-2X
- Model FDWD-12
- Model FDWD-12-2X
- SPECIFICATIONS
- Plug Configurations
- General
- Reversing the Access Door
- Relocating the Proximity Switch (Rotating Rack Models Only)
- Read Lall Lsafety Lmessages Lin Lthe LIMPORTANT LSAFETY INFORMATIONLsection before operating this equipment.
- Startup
- \*IMPORTANT NOTE\*
- Setting the Air Temperature
- Setting the Humidity Level
- Cleaning
- Removing the Glass Panels
- Replacing the Glass Panel
- Removing the Rotating Rack
- (Models FDWD-1, FDWD-2, and FDWD-12)
- Replacing the Rotating Rack
- Draining the Water Reservoir
- Removing Lime and Mineral Deposits
- Replacing A Display Light
- Error Codes
- 4" (102 mm) Adjustable Legs
- Display Racks
- Motorless Rack Coupling
- Merchandising Decal
- Decal Installation
- Sign Holders
- (FDWD-1, FDWD-1X, FDWD-2, and FDWD-2X)
- Display Sign Holder Installation
- Three-Sided Sign Holder Installation
- 1.LPRODUCT WARRANTY
- a) LOne (1) Year Parts and Labor PLUS One
- b) LOne (1) Year Parts and Labor PLUS Four
- c) LOne (1) Year Parts and Labor PLUS Nine
- d)LNinety (90) Day Parts-Only Warranty:
- LLIMITATION OF REMEDIES AND DAMAGES
- HATCO AUTHORIZED PARTS DISTRIBUTORS
- ALABAMA
- ARIZONA
- CALIFORNIA
- COLORADO
- FLORIDA
- GEORGIA
- HAWAII
- ILLINOIS
- INDIANA
- IOWA
- KENTUCKY
- LOUISIANA
- MARYLAND
- MASSACHUSETTS
- MICHIGAN
- MINNESOTA
- MISSOURI
- NEBRASKA
- NEVADA
- NEW JERSEY
- NEW YORK
- NORTH CAROLINA
- OHIO
- OKLAHOMA
- OREGON
- PENNSYLVANIA
- RHODE ISLAND
- SOUTH CAROLINA
- TENNESSEE
- TEXAS
- UTAH
- VIRGINIA
- WASHINGTON
- WISCONSIN
- CANADA
- ALBERTA
- BRITISH COLUMBIA
- MANITOBA
- NEW BRUNSWICK
- ONTARIO
- QUÉBEC
- UNITED KINGDOM
Brand : Hatco
Model : Flav-R-Fresh FDWD-1
Category : Food warmer