
PMUX6 - Hand blender Pyle - Free user manual and instructions
Find the device manual for free PMUX6 Pyle in PDF.


| Product Type | Hand Blender (Immersion Blender) |
| Brand | Pyle |
| Model | PMUX6 |
| Motor Power | 300 Watts |
| Voltage | 120V / 60Hz |
| Number of Speeds | 2 (Variable Speed Control) |
| Attachments Included | Blending Shaft, Whisk Attachment, Measuring Cup |
| Shaft Material | Stainless Steel |
| Handle Design | Ergonomic Soft-Grip Handle |
| Cord Length | 4 feet (1.2 meters) |
| Product Dimensions (L x W x H) | 7.5 x 2.5 x 3.5 inches (19 x 6.4 x 8.9 cm) |
| Weight | 1.5 lbs (0.68 kg) |
| Color | Black/Stainless Steel |
| Dishwasher Safe Parts | Yes (blending shaft and whisk) |
| Safety Features | Lock Button to Prevent Accidental Operation, Overheat Protection |
| Warranty | 1 Year Limited Manufacturer Warranty |
| Usage | Blending, Pureeing, Whipping, Mixing Soups, Sauces, Smoothies |
Frequently Asked Questions - PMUX6 Pyle
User questions about PMUX6 Pyle
0 question about this device. Answer the ones you know or ask your own.
Ask a new question about this device
Download the instructions for your Hand blender in PDF format for free! Find your manual PMUX6 - Pyle and take your electronic device back in hand. On this page are published all the documents necessary for the use of your device. PMUX6 by Pyle.
USER MANUAL PMUX6 Pyle
Need service or repair?
Want to leave a comment?
PyleUSA.com/ContactUs

Questions? Comments?
We are here to help!
Phone: (1) 718-535-1800
Email: support@pyleusa.com
PYLE
PyleUSA.com

PMUX6
Professional USB Audio Interface
with MIC/LINE, Guitar, AUX Stereo and RCA Inputs, Phone/Stereo/Monitor Outputs
USER GUIDE
ATTENTION
To avoid the possibility of malfunction/damage to the product, damage to data, or damage to other property, please follow the points as below.
Operation and maintenance
- Do not use the device in the vicinity of a TV, radio, stereo equipment, mobile phone, or other electric devices. Otherwise, the device, TV, or radio may generate noise.
- In order to prevent the possibility of panel disfiguration, unstable operation, or damage to the internal components. Do not expose the device to excessive dust or vibration, or extreme cold or heat (such as in direct sunlight, near a heater, or in a car during the day).
- Do not place vinyl, plastic or rubber objects on the device, since this might discolor the panel.
- When cleaning the device, use a dry and soft cloth. Do not use paint thinners, solvents, cleaning fluids, or chemical impregnated wiping cloths.
- Condensation can occur in the device due to rapid, drastic changes in ambient temperature when the device is moved from one location to another, or air conditioner is turned on or off. For example, using the device while condensation is present can cause damage. If there is reason to believe that condensation might have occurred, leave the device for several hours without turning on the power until the condensation has completely dried out.
- Avoid setting all controls to their maximum. Depending on the condition of the connected devices, doing so may cause feedback and may damage the speakers.
- When turning on the power in your audio system, always turn on the power amplifier LAST, to avoid speaker damage. When turning the power off, the power amplifier should be turned off FIRST for the same reason.
Precautions when using the USB 2.0 and 5V DC terminals
When connecting the USB2.0 connector to computer, please must abide by following points. If not, it may cause computer crash, breakdown, or losing data. If the computer or unit crash, please restart the application software or computer operating system, or disconnect the unit, then power on again.
- Use an AB type USB cable. USB 3.0 cable cannot be used.
- Before connecting the computer to the USB 2.0 terminal, exit from any power-saving mode of the computer (such as suspend, sleep, standby).
CONNECTION DIAGRAM
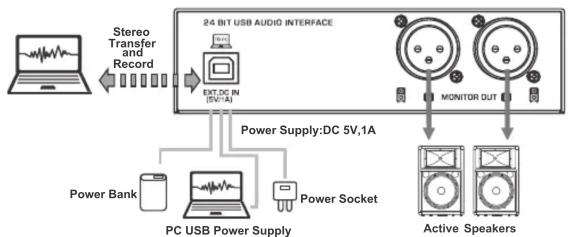
flowchart
graph TD
    A["Computer"] -->|Stereo Transfer and Record| B["24 BIT USB AUDIO INTERFACE"]
    B --> C["ExtDC IN (5V/1A)"]
    C --> D["Power Supply:DC 5V,1A"]
    D --> E["Monitor OUT"]
    E --> F["Active Speakers"]
    B --> G["PC USB Power Supply"]
    G --> H["Power Bank"]
    G --> I["Power Socket"]
CONTROLS AND FUNCTIONS


- [GUITAR] Controller, control the input level of guitar channel, adjust to balance the volume.
- [SIG] Signal Indicator, the brightness will change with the intensity of the signal input.
- [PEAK] LED, it will light up when the input signal is too high. When the LED light will keep flashing, please rotate the [MIC] Controller counterclockwise to turn down the volume.
- [MIC] Controller, control the input level of mic channel, adjust to balance the volume.
- [MONITOR] Controller, used to adjust the volume of MONITOR output.
- [+48V PHANTOM POWER] Button/LED, when the button is turned on, the LED light is on, provide DC+48V phantom power to XLR plug on MIC mono input.
Please turn ON this button when using the condenser microphone which is powered by a phantom power. - [PC USB] Controller, control the input level from PC USB port, adjust to balance the volume.
- [POWER ON] LED, it will light up when the mixer's power is on.
- [CLIP L & R] LED, they will light up when the MONITOR output signal is too high.
-
[PHONES] Controller, control the volume of earphones.
-
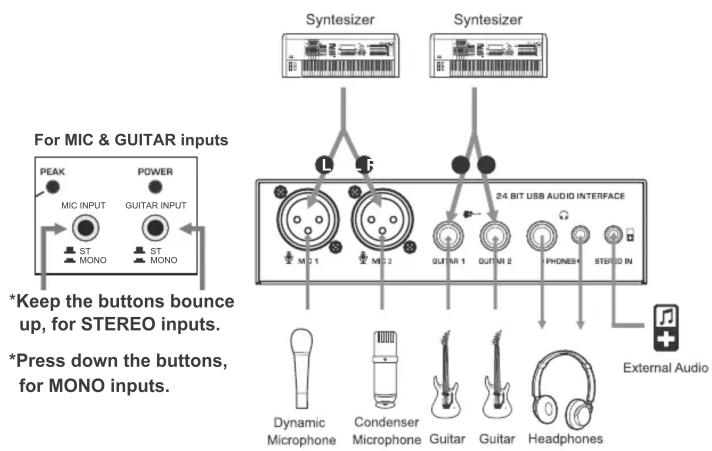
[MIC INPUT] Converting switch:
a. When it is bounce up, it is for STEREO input, connect MIC 1 and MIC 2 input, MIC 1 is channel L, MIC 2 is channel R, compose to the stereo signal.
b. Press it down, it is for MONO input, the signal of MIC 1 and MIC 2 are separately.
- [GUITAR INPUT] Converting switch:
a. When it is bounce up, it is for STEREO input, connect GUITAR 1 and GUITAR 2 input, GUITAR 1 is channel L, GUITAR 2 is channel R, compose to the stereo signal.
b. Press it down, it is for MONO input, the signal of GUITAR 1 and GUITAR 2 are separately.
-
[MIC] Input jack, connect the microphone with XLR PLUG.
-
[GUITAR] Input jack, for connecting to an Instrument, such as electric guitar or electric bass.
-
[PHONES] Output jack, two kinds of jacks (6.35mm and 3.5mm jacks) for optional, connect with earphones, they are supporting stereo phone plug.
- [STEREO IN] 3.5mm jack, this is an auxiliary input, flexible connectivity for a variety of external devices. The playing from STEREO IN, the volume can be controlled by external audio devices or MONITOR knob. The input signal from STEREO IN can be recorded to PC only when the [PC REC] switch is bounce up on MIC+PC recording state. The recording volume is controlled by external audio devices only, without MONITOR knob control.
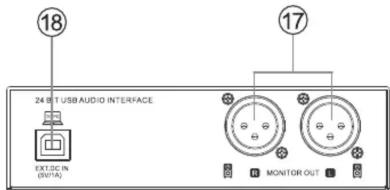
- [MONITOR OUT] Output, connect the active speaker or amplifier.
- [USB 2.0] Terminal, for data transferring, recording and power supplying. When connecting with computer, it will supply power to mixer, and the audio data can be sent between mixer and computer. It is supporting stereo play and record with 24 Bit, 48kHz sampling rate. If using power socket or power bank for power supplying, it must meet the following requirements:
Output voltage: 4.8V to 5.2V
Output current: 1A or even more
- [PC REC] Switch for PC recording control:
a. When the switch is bounce up on MIC+PC recording state, the audio from PC playing, can be flowed back to PC recording. The PC recording signal is not only from PC plays, but also from the inputs of MIC, GUITAR and STEREO IN. The recording volume of MIC and GUITAR are controlled by their corresponding channel knobs, but the recording volume of STEREO IN is controlled by external audio device only, all without MONITOR knob control.
b. Press down the switch on MIC recording state, the audio source on the PC still plays, but cut off the audio flowed back to PC recording, the PC recording signal is from the inputs of MIC and GUITAR only. The recording volume is controlled by their corresponding channel knobs, without MONITOR knob control.
Features:
- Ultralow Noise Design with High Headroom
- USB Audio Interface for Computer Playing & Recording
- Preset 24 Digital Effects
- Providing 24Bits 48kHz Resolution for Amazingly-detailed and Pristine Recording Quality
• Independent 3.5mm Stereo Input - Flexible Connectivity for a Variety of External Devices
- Two Kinds of Headphone's Outputs for Optional (6.35mm & 3.5mm Stereo)
- Recording, Monitoring, and Leveling, All Accommodated in the Smallest of Spaces
• Rugged Metal Housing with Compact Size
• DC 5V Power Supply, or PC Power Supply
What's in the Box:
- USB Audio Interface
- USB Cable
Technical Specs:
• Power Consumption: 3W
• Power Output Current: 1A
• Power Output Voltage: DC 5V
• Phantom Power Voltage: +48V DC
• T.H.D.: <0.5%@+4dBu(20Hz-20KHz)
- USB Interface: 2.0 Type-B
• Frequency Response: ±1dB, +4dBu@1kHz
- MIC/LINE: 2 Combo Jacks (XLR+6.35mm jack)
- Product Dimensions (L x W x H): 1.5" x 5.6" x 4.1"-inches
Brand : Pyle
Model : PMUX6
Category : Hand blender