
Dream Time - Baby bouncer Lorelli - Free user manual and instructions
Find the device manual for free Dream Time Lorelli in PDF.


| Product Type | Baby Bouncer / Rocking Chair |
| Brand | Lorelli |
| Model | Dream Time |
| Maximum Child Weight | 9 kg |
| Age Suitability | From birth until child can sit unaided |
| Functions | Cradle, hand-basket, eating chair |
| Backrest Positions | 3 (seating, leaning halfway, lying) |
| Feeding Tray | Adjustable to 2 positions, removable |
| Canopy | Yes, provides sun protection |
| Toy Bar | Included, removable |
| Restraint System | 5-point harness (built-in) |
| Frame Material | Metal and plastic |
| Cover Material | Textile, machine washable at 30°C |
| Safety Standards | EN 12790:2009, EN 71 |
| Cover Cleaning | Machine wash at 30°C maximum |
| Metal/Plastic Cleaning | Lukewarm water and mild soap |
| Assembly Required | Yes, adult assembly (especially toy bar) |
| Portability | Carrying handles provided |
| Usage | Indoor and outdoor |
| Not Intended For | Prolonged sleep, car seat use, elevated surfaces |
Frequently Asked Questions - Dream Time Lorelli
User questions about Dream Time Lorelli
0 question about this device. Answer the ones you know or ask your own.
Ask a new question about this device
Download the instructions for your Baby bouncer in PDF format for free! Find your manual Dream Time - Lorelli and take your electronic device back in hand. On this page are published all the documents necessary for the use of your device. Dream Time by Lorelli.
USER MANUAL Dream Time Lorelli
DREAM TIME
natural_image
Product photo of a baby boom seat with adjustable arms and a canopy cover (no visible text or symbols)MANUAL INSTRUCTION
natural_image
Close-up of a mechanical component with a numbered callout (1) and an arrow pointing to a pipe fitting (no text or symbols present)
natural_image
Close-up of a mechanical device with a foot and cable, showing a highlighted section (no text or symbols visible)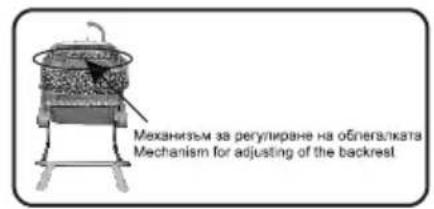
natural_image
Mechanical device with attached cable and handle, labeled with number 3 (no text or symbols on the device itself)
natural_image
Close-up of a metallic mechanical device with attached cable and textured grip (no visible text or symbols)
natural_image
Close-up of a mechanical clamp or clip device with attached tubing (no visible text or symbols)
natural_image
Close-up of a baby seat with a strap and cord, labeled with number 4 (no text or symbols on the device itself)a

natural_image
Medical device with surgical band and clasp, no visible text or symbolsb
natural_image
Close-up of a mechanical component with a circular annotation and label 'C' (no readable text or symbols)
natural_image
Metal frame with curved legs and a circular number 5 on top (no text or symbols on the structure itself)
natural_image
Medical illustration of a surgical instrument with a magnified inset showing internal components (no text or symbols)3
Fig.2

natural_image
Close-up of a mechanical component with a circular feature and textured surface (no visible text or symbols)IMPORTANT! KEEP FOR FUTURE REFERENCE! READ CAREFULLY!
SAFETY REQUIREMENTS
- WARNING! Never leave the child unattended!
- WARNING! Do not use the reclined cradle once your child can sit unaided!
-
WARNING! This reclined cradle is not intended for prolonged periods of sleeping!
-
WARNING! It is dangerous to use this reclined cradle on an elevated surface, e.g. a table!
-
WARNING! Always use the restraint system!
-
WARNING! Never use the toy bar to carry the reclined cradle!
-
The maximum weight of the child for which the reclined cradle is intended is 9 kg.
-
This reclined cradle does not replace a cot or a bed. Should your child need to sleep, then it should be placed in a suitable cot or bed!
-
Do not use the reclined cradle if any components are broken or missing!
-
Do not use accessories or replacement parts other than those approved by the manufacturer!
-
WARNING! The toy bar is an additional article! The toy bar has to be installed by an adult! Keep removed toy bar on a safety place!
-
WARNING! Do not attach any additional toys on the toy bar! Do not replace the toy bar! Do not bind the toys together! Take the toys while your child sleeps!

EN 12790:2009; EN 71
- Put the rocker on horizontal and even surfaces.
- On adjusting the backrest you must be sure that both mechanisms are well locked in the chosen position.
- On adjusting the feeding tray you must be sure that both mechanisms are well locked in the chosen position.
- Do not use the rocker as a car seat as this is not its function.
- Do not leave the rocker near a switched on fan, heat sources, sharp objects and water containers.
- When carrying the rocker use the handles.
MAINTENANCE AND CARE
- The cover of the rocker can be washed in a washing machine and the temperature shouldn't be higher than 30^ .
- The metal and plastic parts can be cleaned with lukewarm water and mild soap detergent.
This rocking chair belongs to portable articles for baby use. It can be used as a cradle, a hand-basket and an eating chair. Equipped with a canopy this rocking chair protects your child from direct sunlight and is very convenient for outdoor activities.
1. Function as a cradle:
- The swing of the rocking chair should be operated by hand. The swing range can be adjusted according to different needs. The backrest has 3 positions: seating position, leaning halfway down and lying.
- On adjusting the backrest you must be sure that both mechanisms are well locked in the chosen position.
2. Function as a hand-basket:
- When the feeding tray is put in the position, shown on picture 4a, it can be used as a hand basket.
3. Function as an eating chair:
- The product is equipped with a feeding tray and it can be used as an eating chair when the brackets are fixed.
INSTALLATION
-
Install the feeding tray to the pipe of the metal construction as shown on picture 1.
-
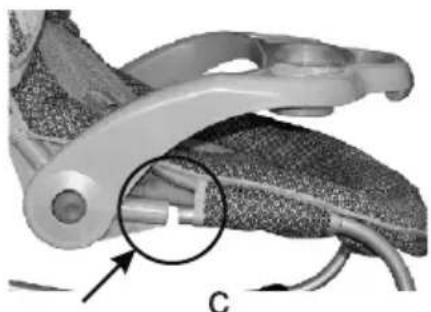
Insert the curved pipe of canopy into the plastic elements located on the bottom of rocking chair and fix it by using the bolts. (picture 2)
The backrest can be adjusted to 3 positions. Hold the adjusting mechanism with one hand. Loosen the adjusting mechanism when the backrest is adjusted to the needed position. It will be locked automatically by "click" sound. (picture 3)
ADJUSTING THE POSITION OF THE FEEDING TRAY
The feeding tray can be adjusted to 2 positions. Press the adjusting buttons located on the both sides of the feeding tray (picture 4c). Make sure that the feeding tray is locked.
FIXATION OF THE ROCKING CHAIR
The rocking chair can be fixed when the position of the brackets are as shown on picture 5.
INSTALLATION AND REMOVAL OF THE TOY
1. Installation:
- insert the base of the toy into corresponding hole on the feeding tray (fig.1) and ensure that cylindrical object on the bottom side of the base is in the hole, as shown on fig.2.
2. Removal:
- push the cylindrical object on the bottom side of the toy out of the hole in the base of feeding tray.
BG
ВАЖНО! ПАЗЕТЕ ЗА БЪДЕЩИ СПРАВКИ! ПРОЧЕТЕТЕ ВНИМАТЕЛНО!
- DREAM TIME
- MANUAL INSTRUCTION
- IMPORTANT! KEEP FOR FUTURE REFERENCE! READ CAREFULLY!
- SAFETY REQUIREMENTS
- EN 12790:2009; EN 71
- MAINTENANCE AND CARE
- Function as a cradle:
- Function as a hand-basket:
- Function as an eating chair:
- INSTALLATION
- ADJUSTING THE POSITION OF THE FEEDING TRAY
- FIXATION OF THE ROCKING CHAIR
- INSTALLATION AND REMOVAL OF THE TOY
- Installation:
- Removal:
- BG
- ВАЖНО! ПАЗЕТЕ ЗА БЪДЕЩИ СПРАВКИ! ПРОЧЕТЕТЕ ВНИМАТЕЛНО!
Brand : Lorelli
Model : Dream Time
Category : Baby bouncer