LF-173F - Motor Lifan - Free user manual and instructions
Find the device manual for free LF-173F Lifan in PDF.


| Brand | Lifan |
| Model | LF-173F / LF-173FD |
| Product Type | 4-stroke, OHV, single cylinder general gasoline engine |
| Displacement | 242 cm³ |
| Bore × Stroke | 73 × 58 mm |
| Max. Power | 5.9 kW (8 PS) at 3600 rpm |
| Max. Torque | 14.5 N·m at 2500 rpm |
| Fuel Consumption | 374 g/kWh |
| Fuel Tank Capacity | 6.0 L |
| Engine Oil Capacity (crankcase) | 1.1 L |
| Reduction Gear Oil Capacity | 0.3 L (if equipped) |
| Recommended Oil | SAE 10W-30 |
| Cooling System | Force air-cooled |
| Ignition System | TCI (Transistor Controlled Ignition) |
| Spark Plug | BPR6ES (NGK) or NHSP LD F7RTC |
| Spark Plug Gap | 0.7 - 0.8 mm |
| Valve Clearance (cold intake) | 0.15 ± 0.02 mm |
| Valve Clearance (cold exhaust) | 0.20 ± 0.02 mm |
| Dimensions (L×W×H) | 335 × 430 × 410 mm |
| Dry Weight | 25 kg |
| Starting System | Recoil starter (electric start optional) |
| Lubrication | Splash |
| Power Shaft Rotation | Counterclockwise |
| Exhaust Emission Control | Poor-fuel carburetor system |
Frequently Asked Questions - LF-173F Lifan
User questions about LF-173F Lifan
0 question about this device. Answer the ones you know or ask your own.
Ask a new question about this device
Download the instructions for your Motor in PDF format for free! Find your manual LF-173F - Lifan and take your electronic device back in hand. On this page are published all the documents necessary for the use of your device. LF-173F by Lifan.
USER MANUAL LF-173F Lifan
Thank you for choosing a general gasoline engine by the company.
The manual gives information with respect to operation and maintenance of the general gasoline engine, and be sure to read it carefully first before operation. All the materials and diagrams of this manual are in accordance with the newest products at the publishing time. Due to revision and other change, the information described in this manual may be a little different from the actual status. The copy right of this book belongs to our Co., any group or individual is forbidden to reprint or copy it. The manual is subject to change without notice.
Please pay special attention to statements preceded by the following words:
WARNING:
Indicates a strong possibility of severe personal injury or death if instructions are not followed.
CAUTION:
Indicates a possibility of personal injury or equipment damage if instructions are not followed.
NOTE:
Give helpful information.
Although the engine conforms to the safety requirement of EN1679-1, the user must notice the possible danger when they install the engine with other terminal products because the different installing purposes maybe will result in new danger to the engine and its driving product. So, all users must be responsible to take action for assuring the safety.
CONTENTS
Safety precautions (1)
Parts description ......(2)
Battery connection (only for electric-start type) …… (3)
Control connection of remote distance (option) ……(4)
Pre-operate inspection …… (6)
Starting the engine …… (12)
Running the engine (14)
Stop……(16)
Exhaust control system (18)
Maintenance …… (20)
Transport, storage and removal from storage....(29)
Troubleshooting (32)
Specifications ...... (44)
Electric diagram (46)
SAFETY PRECAUTIONS
WARNING:
Before operating the engine, be sure to read and familiar with the manual carefully, otherwise personal injury or equipment damage may produce.
Please pay special attention to the following:
- Running the engine in a well-ventilated place, keep it at least one meter away from building walls or other equipments, keep away from inflammables such as gasoline, matches and so on to avoid possibility of fire.
- Keep the engine out of reach of children and pets to avoid accidents.
- Operator of the engine has been specially trained.
- Refuel in a well-ventilated area with the engine stopped, and in places refueling or storing gasoline, no smoking and any flames or sparks.
- Refuel the fuel tank not too full so as to avoid fuel's spilling out. If there is spilled fuel around, be sure to clean it thoroughly before starting.
- Locate the engine on a level-working platform to avoid fuel's spilling out.
- Maker sure the fuel filler cap is tightened securely.
- The exhaust muffler is very hot during running the engine even after the engine stops. Never touch it, or you may get burns. Transport or store the engine with it cooling down entirely.
- This machine should not be used underground or in areas where explosive conditions may be present.
- It's recommended that the operator wears the ear protection equipment during operation.
PARTS DESCRIPTION
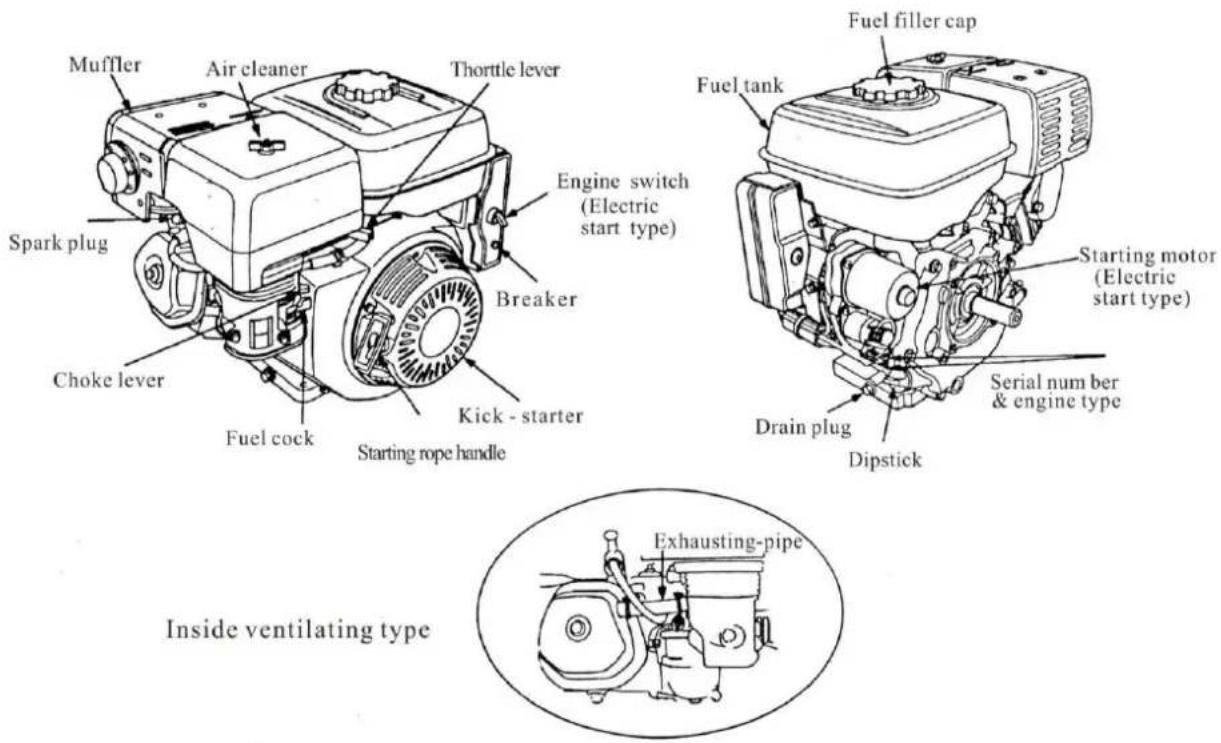
BATTERY CONNECTION (electric-start type)
In the case that the specifications of the batte4ry are 12V and more than 18A.h, connect its positive lead to the electromagnetic coil while connect its negative lead to engine mount strew, base screw or any place capable of grounding with the engine well.
Make sure the battery leads are connected tightly and no corrosion is found. If any, eliminate it.
WARNING:
The battery may give off explosive gas, keep sparks, flames and cigarettes away. Charge or use it in an area with good ventilation.
The battery contains euphonic acid (electrolyte). Contact with skin or eyes may cause severe burns. Wear protective clothing and a face shield.
If electrolyte gets in your skin, flush with water; if gets in your eyes, flush with water for at least 15 minutes and call a physician at once.
Electrolyte is poisonous. If swallowed, drink large quantities of water or milk, and follow with milk of magnesia or vegetable oil and call a physician.
- Keep out of reach of children.
CAUTION:
- Do not add tap water to the battery instead of distilled water, or the battery life will be shortened.
- Do not add distilled water over electrolyte upper level mark, or electrolyte will spill out to corrupt the engine parts. If so, be sure to wash them sway with water.
Make sure not to connect the battery leads in reverse order, or short-circuit or breaker's cutting may result.

CONTROL CONNECTION OF REMOTE DISTANCE (OPTION)
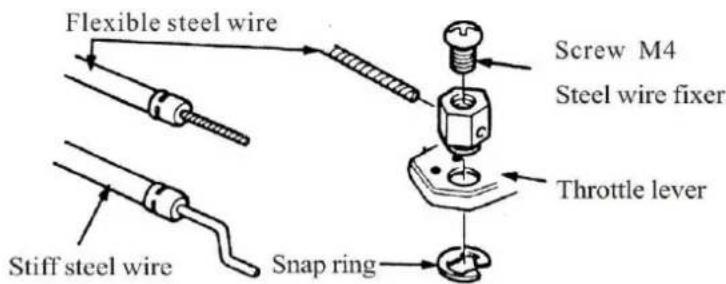
The holes in levers of both the choke and throttle are used for mounting optioned steel wires. The diagrams shown illustrate how to mount a solid steel wire and a meshed steel wire. If choosing a meshed steel wire, a retaining spring is in need.
If necessary, you may screw loose the damping nut on the throttle lever slightly when controlling the throttle by a remote-controlled steel wire
Accessory options
Remote-controlled throttle
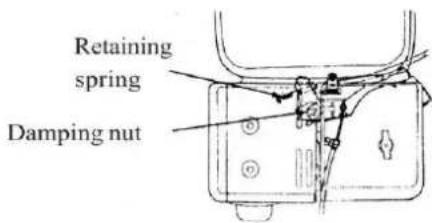
Remote-controlled choke
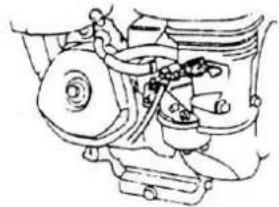
Steel wire fixer Choke lever
PRE-OPERATE INSPECTION
ENGINE OIL
CAUTION:
- Engine oil is a key factor in deciding the engine's Performance. Do not apply engine oil with additives or 2-stroke gasoline engine oil, as they haven't enough lubrication, which may shorten the engines service life.
- Check the engine with it stopped on a level ground.
Engine oil recommended: SAE10W-30
As viscosity varies with regions and temperatures, so the lubricant has to be selected in accordance with our recommendation.

Check
- Ensure that the engine is stopped on a level ground.
- Remove the dipstick and clean it.
-
Reinsert the dipstick into the oil filler without screwing it, and check oil level.
-
If the oil level is too low, add the recommended engine oil up to the oil filler neck.
- Reinstall the dipstick.
CAUTION: Run with insufficient engine oil may damage the engine Severely.
OIL IN THE REDUCTION GEAR BOX (only for the model equipped with it)
1/2 Reduction gear with an auto-centrifugal clutch brand of box oil is the same as that of engine oil.
Oil capacity: 0.30 liters
- Remove the dipstick and clean it.
- Reinsert the dipstick without screwing it in, and then check oil level.
- If the oil level is too low, add the recommended engine oil until it arrives the upper level mark.
- Reinstall the dipstick.


AIR CLEANER
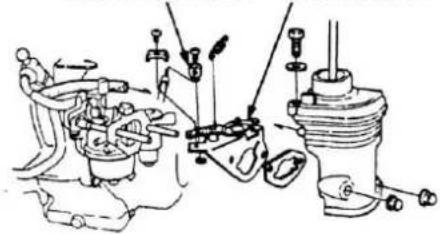
1. Double-core type
Dismantle the air cleaner housing and check its filter element, make sure it clean and intact, otherwise clean or replace it.
II. Single-core type
Dismantle the air cleaner housing and check its filter element, Make sure it is clean and intact, otherwise clean or replace.

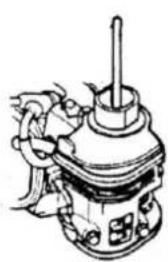

III. Dust-collecting type


Filter element
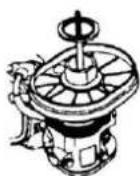
- Dismantle the dust-collecting hood and check the filter element of the air cleaner; make sure it is clean and intact, otherwise clean or replace.
- Check whether there is any dust or dirt inside the dust-collecting hood, if any, clear away.
IV. Oil-bath type
- Dismantle the air cleaner housing and check its core, make sure it is clean and intact, otherwise clean or replace.
- Check oil level and oil quality. If the oil level is too low, add the recommended engine oil up to oil level mark.
CAUTION:
Never run the engine without an air cleaner, or severe wear of the engine may result.
FUEL AND FUEL TANK
Fuel
The engine must apply unleaded gasoline with an octane number over 86. Using unleaded gasoline will decrease the possibility of producing carbon deposit and will prolong the engine's service life. Never apply used or polluted gasoline or a mixture of gasoline with engine oil. Make sure the fuel is free of dirt and water.
Gasoline Containing Alcohol
If you decide to use a gasoline containing alcohol (fuel blend), be sure its octane rating is at least as high as high as that recommended by the company. There are two types of “gasohol”. One contains ethanol, and the other contains methanol. Neither gasoline containing more than 10% ethanol nor 5% methanol is allowed to be used. If methanol content in the fuel blend exceeds 5%, it may bring bad effect on the engine performance, besides, it may damage metals, rubber and plastic parts.
CAUTION:
If “spark knock” or “pinking” occurs at a steady speed under normal load, change brand of gasoline; if such phenomena still happen, consult your dealer for help, otherwise the engine may be damaged.
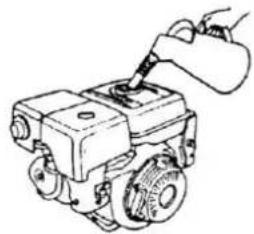
Fuel Tank
Fuel tank capacity 6.0 liters for 173F/177F, 6.5 liters for 182F/188F/190F.
Fuel tank capacity 6.0 liters for 173FD /177FD, 6.5 liters for 182FD /188FD/190FD.
Check
- Remove the fuel filler cap and check fuel level.
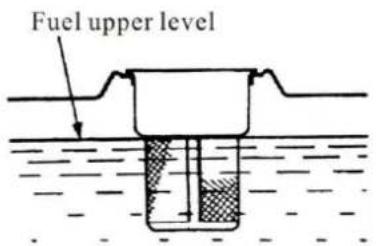
- If the level is too low, refuel the tank. Remember adding fuel not over the fuel filler shoulder.
WARNING:
● Gasoline is extremely flammable and is explosive under certain conditions. Refueling in a well-ventilation area with the engine stopped. Do not smoke and allow flames or sparks in the area where gasoline is stored or where the fuel tank is refueled.
- Do not overfill the tank (there should be no fuel in the filler neck). After refueling, make sure the fuel filler cap is set back securely.
- Be careful not to spill fuel when refueling. Spilled fuel or fuel vapor may ignite. If any fuel is spilled, make sure the area is dry before starting the engine.
● Avoid repeated or prolonged contact with skin or breathing of fuel vapor. Keep out of reach of children.
STARTING THE ENGINE
- Push the fuel cock to "ON".
- Push the choke lever to "CLOSE".
NOTE: if the engine is hot, closing the choke is unnecessary.


- Move left the throttle lever a little.
- Start the engine as follows: a) Hand-operated kick-starter Push the engine switch to "ON". Pull slightly the starting rope handle up until feeling anti-action, and then make a rapid pull.
Engine switch

(Electric start type)
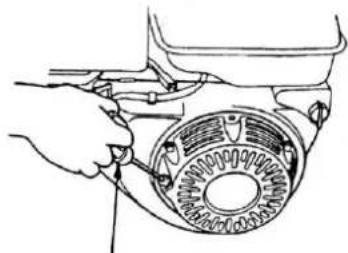
Starting rope handle
CAUTION:
Releasing the handle suddenly may make it hitting the engine. Release the handle slowly conforming with its recoiling force.
b) Electric starter
Push the engine switch to "START" and remain there until the engine starts. Once the engine starts, reset the engine switch to "ON".
CAUTION:
Use the engine switch not than 5 minutes each time to avoid damage of the
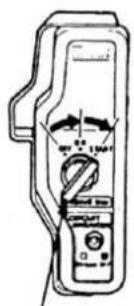
Engine switch (Electric start type)
engine. Try once more 10 minutes later after last attempt failures.
RUNNING THE ENGINE
-
Preheat the engine and push back the choke lever to "OPEN".
-
Set the throttle lever in proper position to ensure the engine runs at required velocity.


ENGINE OIL ALARM
The engine oil alarm is designed to function when the engine oil in the crankcase is insufficient. Lack of engine oil may damage the engine. Once oil level in the crankcase is too low, the engine oil alarm will stall the engine automatically to make it free of damage while the engine switch is still at "ON".

CAUTION:
If cannot restart the engine, check the engine oil level first before go to other check items.
BREAKER (Electric-start type)
The breaker will cut off automatically to protect the charging circuit of the battery in the case that short circuit or incorrect connection of the battery poles occurs.
The green indicator in the breaker will jump out with the circuit cutting off. After finding troubles and troubleshooting, depress the breaker button to turn the breaker on.
On highlands, the standard mixture ratio is relatively too big so the engine performance may be impaired while the fuel consumption may increase, besides, too big mixture ratio will pollute the spark plug to result in starting the engine difficultly. This problem can be solved by amending the carburetor technological status. If always using on highlands with a height above sea level of 1800 meters, ask your dealer for doing the job.
However, the engine power will decrease by about 3.5% with every 305 meters up in height.
CAUTION:
Amended engine applicable to highlands may be damaged seriously in area below altitude of 1800 meters for overheating, because its mixture ratio is too small for operation in low altitude area. In the case, ask your dealer to recover the engine to its normal technical status.
STOP
In emergency, push the engine switch to "OFF" to stall. The engine to stop it in normal, do as follows:
- Push right the throttle lever to the bottom.

- Push the engine switch to "OFF".
- Set the fuel cock to "OFF".

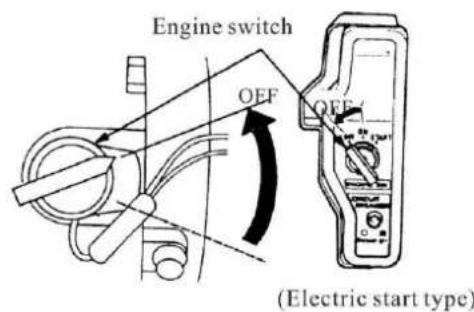
CAUTION:
Sudden stopping at high speed under heavy load is forbidden, otherwise damage will result.
EXHAUST CONTROL SYSTEM
With the engine running, carbon monoxide, oxide of nitrogen and hydrocarbon will produce, and in certain conditions, oxide of nitrogen and hydrocarbon will react chemically each other to make smoke while carbon monoxide is toxic, so exhaust control of them is very important. The company decreases the exhaust emissions by introducing poor-fuel carburetors and other devices into the engine to solve the problem.
To keep the exhaust of your engine with in the standard exhaust emission, pay attention to the following:
1. Maintenance
Maintain the engine periodically in accordance with the maintenance schedule in the manual. The maintenance schedule is made out on the base of normal use in normal conditions, if using under heavy load, dusty or wet circumstances or in high temperature, service of the engine should be done more often.
2. Replacement of parts
We recommend that you should choose such parts which are manufactured by the company or equivalent to these in quality as replacement ones. Replacement without so high quality as the original may impair the exhaust control system in effectiveness.
3. Modifying
Modifying the exhaust control system may make actual exhaust emissions exceeding statutory limit values.
Illegal modification as such:
a) Dismantle or modify any part of air intake or exhaust system.
b) Modify or take off speed – adjusting connection device or speed adjustment device to result in the engines running beyond the set parameters.
4. Problems affecting exhaust emissions
a) Difficult starting or difficult stopping.
b) Unstable idling.
c) Give off back smoke or consume too much fuel.
d) Poor ignition sparks or sparks returned.
Once you find any of above problems, contact your dealer for help.
MAINTENANCE
MAINTENANCE SCHEDULE
| Item\Frequency | Each time | First month or 20 hrs | Each season or 50 hrs | Every 6 month or 100 hrs | Each year or 300 hrs | |
| Engine oil | Oil level check | √ | ||||
| Replace | √ | √ | ||||
| Reduction gear oil | Oil level check | √ | ||||
| Replace | √ | √ | ||||
| Air cleaner | Check | √ | ||||
| Clean | √1 | √1* | ||||
| Replace | √** | |||||
| Deposit cup | Clean | √ | ||||
| Spark plug | Clean, adjust | √ | ||||
| Replace | √ | |||||
| Spark eliminator | Clean | √ | ||||
| Idling | Check-adjust | 2 | ||||
| Valve clearance | Check-adjust | 2 | ||||
| Fuel tank & fuel filter | Clean | 2 | ||||
| Fuel supply line | Check | Every two years (do a replacement if necessary) | ||||
CAUTION
Use only parts from the company or equivalents in quality; otherwise engine damage may result.
NOTE:
*: only for inside-ventilating double-core carburetors.
**: only for paper core air cleaners. Every two years or 600 hour's later for dust collecting air cleaners.
① More often than that in the schedule if in dusty circumstances.
② Should be done by your dealer unless you are specially trained and is well equipped with tools.
WARNING:
Stall the engine before service. If service is required with the engine running, be sure to keep good ventilation in the area. The exhaust emissions from the engine contain toxic carbon monoxide, inbreathing of it may result injury and even death.
REPLACEMENT OF ENGINE OIL

A still hot engine is helpful to drain out the engine oil in the crankcase rapidly and entirely.
-
Turn off the oil filler cap and drain plug to drain engine oil thoroughly. Reinstall the drain plug and screw in securely.
-
Fill the specified engine oil up to the upper level mark.
-
Reinstall the oil filler cap.
Engine oil capacity in the reduction gearbox is 0.3 liters, engine oil capacity in the crankcase is 1.1 liters.
NOTE:
Do not dump oil containers or discarded engine oil into rubbish boxes or onto the ground. For the sake of environmental protection, we suggest you take in discarded engine oil with a closed container and bring to local recycling station.
SERVICE OF AIR CLEANER
A dirty air's flowing into the carburetor. To keep the carburetor in good working conditions, please service the air cleaner periodically. If operating the engine in extremely dusty area, the job should be done more often.
WARNING:
Never clean the air cleaner core in gasoline or low flash-point detergents, or explosion may happen.
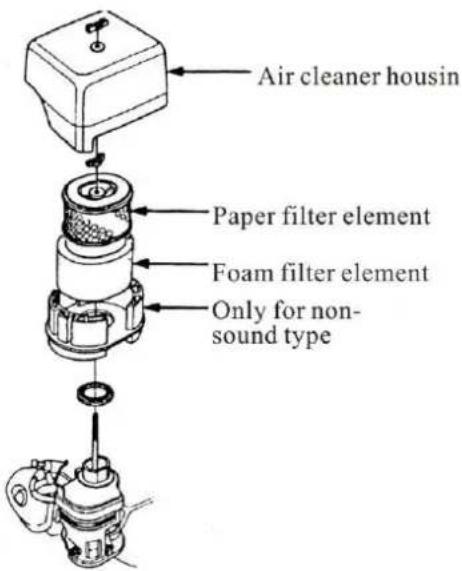
CAUTION:
Never run the engine without an air cleaner, or air with dirt and dust may enter the engine so speed the engine's wear.
Unscrew the wing nut, dismantle the air cleaner housing. Check if the two cores are damaged, if so, replace with new one.
a) Foam filter element: clean with home detergents and warm water (or non-flammable or high flash-point cleansing solvents) and dry up, then soak in clean engine oil until saturated. Squeeze out excess oil, otherwise, the engine will discharge smoke in starting stage.
b) Paper filter element: knock the core against a solid plane to get rid of accumulated dust or blow out dust from inside to outside with high-pressure air flow (not more than 30 psi). Never clean with a brush, as brushing may force the dust into the core fiber. If the core is extremely filthy, replace with a new one.
Dust-collecting type
- Unscrew the wing nut, dismantle the air cleaner housing, check if the two cores are damaged, if so, replace with new one.

a) Foam filter element: clean with home detergents and warm water (or non-flammable or high flash-point cleansing solvents) and dry up, then soak in clean engine oil until saturated. Squeeze out excess oil, otherwise, the engine will discharge smoke in starting stage.
b) Paper filter element: knock the core against a solid plane to got rid of accumulated dust or blow out dust from inside to outside with high-pressure air flow (not more than 30psi). Never clean with a brush, as brushing may force the dust into the core fiber. If the core is extremely filthy, replace with a new one.
- Clean the dust-collecting hood: screw off the three special semi-round screw and remove the hood, wash parts with water and then dry up. Reinstall the hood.
CAUTION:
- When reinstalling the dust collecting core air cleaner, make sure to embed the fin on the pre-air cleaner hood in the dent in the dust- collecting hood.
● Install the air guide in correct order.
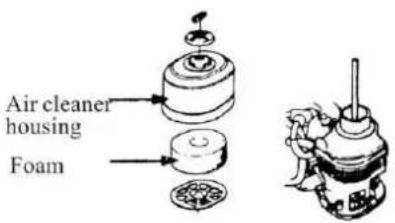
Single-core type
- Remove the wing nut and air cleaner housing, and take out the filter element.
- Clean with home detergents (or high flash-point cleansing solvents) and warm water, and dry up.
- Soak n clean engine oil until saturated; squeeze oil, or the engine will exhaust smoke in starting stage.
- Reinstall the filter element and air cleaner housing.
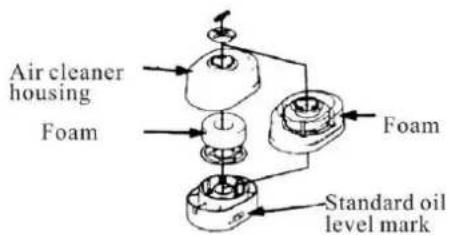
Oil bath type
- Remove the nut and air cleaner housing, and take out the filter element.
- Clean with home detergents (or high flash-point cleansing solvents) and warm water, and dry up.
- Soak in clean engine oil until saturated. Squeeze excess oil, or the engine will discharge smoke in starting stage.
- Empty the air cleaner housing of oil. Clear away the dust in side with non-flammable or high flash-point cleansing solvents, and dry it up.
- Fill the air cleaner housing with the specified engine oil up to the standard oil level mark.
- Reinstall the air cleaner
Oil capacity: 1.1L.
WASHING OF DEPOSIT CUP
Set the fuel cock at “OFF”, disconnect the deposit cup and O-ring. Wash in non-flammable or high flash-point cleansing solvents, and then try them up, at last, reinstall it. Set the fuel cock to “ON” and check for leaks.

WARNING:
Gasoline is extremely flammable and explosive in certain condition. Keep cigarette, sparks and open flames away.
● After reinstalling the deposit cup, make sure the area around
spark plug
Spark plug type:BPR6ES (NGK) or NHSP LD F7RTC
Proper spark plug clearance ensures the engine's normal running under no deposit around the spark plug.
- Remove the spark plug cap.
- Clear away dirt around the spark plug base.
- Dismantle the spark plug with a spark plug wrench.
- Clean with a steel brush. If the insulator is damaged, replace the spark plug instead.
- Measure the spark plug clearance with a feeler. The clearance should be 0.7\~0.8mm. If adjustment is necessary, bend the side electrode carefully.
- Check if the spark plug gasket is in good conditions, or replace with a new one. Screw on the spark plug to the bottom first by hand a then screw in by a spark plug wrench. If a new spark plug is used, twist 1/2 more turns after impacting the gasket, if reinstall the original one, just twist 1/8-1/4 more turns.

CAUTION:
The spark plug must be tightened securely, or it may become v
- Only use recommended spark plug or the equivalent. Incorrect heat range of the spark plug may damage the engine.
SPARK ELIMINATOR (Option)

The spark eliminator should be serviced at least once every 100 hour's operation so as to keep it in a sound condition.
WARNING:
The muffler is very hot during running the engine and even a long time after stopping. Never touch it, or you may get burns. Service after the engine cools down.
- Unscrew the two nuts M8⑥, and disconnect the muffler⑤ from the engine body.
- Turn off the four screws M5② from the muffler hood① and disconnect the hood.
- Turn off the screw M4③ from the spark eliminator④ and separate it from the muffler.
- Clear away carbon deposit from the spark eliminator mesh with a brush.
- Reinstall the spark eliminator in reverse order of removal.
CAUTION:
- Be careful not to damage the mesh of the spark eliminator.
● Never use a damaged spark eliminator.
CARBURETOR IDLING ADJUSTMENT
- Start and preheat the engine until arriving at the normal working temperature.
- Obtain standard idling by adjusting the throttle fixing screw under the engine's idling.
Standard idling: 1500±150rpm.
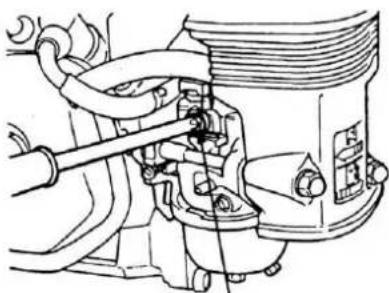
Throttle fixing screw
TRANSPORT, STORAGE AND REMOVAL FROM STORAGE
Transport
Transport with the fuel cock turned off. Transport or store the engine when it is cool so as to avoid getting burns or fire.
CAUTION:
Do not incline the engine so as to avoid fuel's spill. Spilled fuel or fuel vapor may ignite to cause fire.
Storage
If the engine is not kept in use for a long time, be sure to store it properly. Make sure the storage area is dry and free of dust.
- Replace engine oil.
- Disconnect the spark plug. Fill about a spoon of fresh engine oil from the spark plug mount hole onto the cylinder. Crank the engine up to distribute engine oil evenly. Reinstall the spark plug.
- Pull the starting rope slowly until feeling a slight anti-action, and then keep pulling it so as to align the arrow of the starting sleeve with the hole of the starter. At this time, both the inlet and outlet valves are closed so help prevent the engine inside from rusting.
- Electric starter: disconnect the battery and store in dry and cool area. Charge one every month.
- Cover the engine so keep dust away.

Removal from storage
Before reusing, service the engine in accordance with the instruction of the table
| STORAGE TIME | SERVICE ITEM |
| Within one month | Non |
| One ~ two months | Drain out original fuel of the fuel tank and refuel |
| Two month ~one year | Drain out original fuel of the fuel tank and refuel;Drain out fuel in the carburetor1;Empty the deposit cup2 |
| Above one year | Drain out original fuel of the fuel tank and refuel;Empty the fuel cup in the carburetor1;Empty the deposit cup2 |
(1) Screw off the drain plug and drain out fuel in the carburetor.
(2) Turn off the engine switch first, disconnect the deposit cup and empty it.
Note: for the sake of environmental protection, we recommend to fill the discarded fuel into a closed container and bring to local recycling station. Never pour freely.
WARNING:
Fuel is extremely flammable and explosive under certain conditions. Keep cigarette, open flames and sparks away from operating site.
TROUBLESHOOTING
I. START ENGINE DIFFICULTLY
- By using kick-starter
| TROUBLE | CAUSE | REMEDY |
| 1. Normal cylinder compression.2. Normal spark plug spark.3. Something wrong with the fuel system.4. Fuel supply is not smooth or no fuel supply. | There is no enough fuel in fuel tank of fuel cock is closed. | Fill fuel, open fuel cock. |
| Air vent in the fuel filler cap is clogged. | Dredge air vent. | |
| Fuel cock is clogged. | Clean first and then dredge. | |
| Improper or clogged main oil flow hole. | Readjust or clean, blow to get through. | |
| Needle valve is not closed properly or start hole is clogged. | Dismantle needle valve and repair, clean, blow to get through. | |
| Float is damaged or sticking. | Repair float. | |
| 1. Normal cylinder compression.2. Normal spark plug spark.3. Something wrong with the fuel system.4. Smooth fuel flow. | Fuel is too filthy or deteriorated. | Replace. |
| There is water in fuel. | Replace. | |
| Too much fuel in engine. | Drain extra fuel, dry up spark plug electrodes. | |
| Wrong fuel brand. | Select proper fuel brand corresponding with the requirements. | |
| 1. Normal cylinder compression.2. Normal spark supply.3. Normal high – pressure coil spark.4. Spark plug is in bad conditions. | Too much carbon deposit and dirt around electrodes. | Clear away. |
| Electrodes are burn damaged seriously or insulators damaged. | Replace spark plug. | |
| Improper electrodes gap. | Adjust to proper value. | |
| 1. Normal cylinder compression.2. Normal fuel supply.3. Normal high - pressure coil spark.4. Normal spark plug. | High - pressure coil is damaged. | Replace |
| Ignition coil is damaged. | Replace | |
| Magneto loses magnetism. | Replace | |
| 1. Poor cylinder compression.2. Normal fuel supply system.3. Normal ignition system. | Piston ring is worn to or even over its wear limit. | Replace |
| Piston ring is broken. | Replace | |
| Piston ring is sticking. | Clear up carbon fouling. | |
| Spark plug is not installed tighten or without a gasket. | Tighten with a gasket in. | |
| Air leakage between cylinder block and cylinder head. | Check cylinder gasket, and the flatness of the surface by which cylinder block contacting with cylinder head, tighten cylinder head bolts in stipulated order to stipulated torque. | |
| Do. | Air leakage in valves. | Check valve. Clearance and tightness, repair if necessary. |
WARNING:
-
When testing the spark plug, never hold the high-voltage wire of the spark plug with wet hand.
Make sure there is no spilled fuel outside the engine and that the spark plug isn't dipped with fuel.
● To prevent fire, keep sparks far away from the spark plug mount hole. -
By using starting motor
| ITEM | CAUSE | REMEDY |
| Check battery connection | Incorrect connection | Correct |
| Check battery | No charge or under charge, corrosion | Check the breaker, charge up the battery or replace it |
| Starting motor for functions normally | Be the same as kick-starter | Conduct it in the same way of kick-starter |
Once you find any of above problems, contact the authorization entitle to the dealer of the privilege helps for you.
II. LOW GASOLING ENGINE POWER OUTPUT
| TROUBLE | CAUSE | REMEDY | |
| When turning throttle greater, speed increase responds slowly or speed is decreased even engine stops running. | Ignition system | Incorrect ignition time. | Readjust ignition advance angle |
| Fuel supply system | Air in fuel line or fuel line clogged. | Exhaust air or dredge fuel line | |
| Main oil flow hole is not adjusted properly. | Readjust | ||
| In carburetor, needle valve hole and main oil flow hole clogged. | Clean and blow to get through | ||
| Fuel cock is clogged up. | Clean, replace damaged part | ||
| Too much carbon deposit in combusting chamber. | Clear away | ||
| do. | do. | Too much car bon fouling in muffler and exhaust pipe. | Clear away |
| Air cleaner is clogged up. | Clean air cleaner filter element | ||
| Intake pipe is leaking. | Repair or replace | ||
| Poor compression | Piston or cylinder or piston ring is worn. | Replace the worn | |
| Air leakage from the surface by which cylinder block contacting with cylinder head. | Replace cylinder gasket | ||
| Too big or too small valve clearance. | Readjust | ||
| Valve tightness is poor. | Repair | ||
III. GASOLINE ENGINE GANNOT RUN SMOOTHLY
| TROUBLE | CAUSE | REMEDY |
| Engine is pinking | Piston, cylinder or piston ring is worn excessively. | Replace the worn |
| Piston pin and piston pin hole are worn excessively. | Replace piston or piston pin | |
| Tie rod small head is worn excessively. | Replace tie rod | |
| Roller bearing for crankshaft main shaft is worn. | Replace roller bearing | |
| Abnormal combustion | Engine is too hot | Shoot trouble |
| Too much carbon deposit in combustion chamber | Clear away | |
| Improper gasoline brand or low gasoline quality | Replace with qualified gasoline | |
| Engine cannot start because of spark lacking | There is water in float chamber | Clean |
| Improper spark plug electrodes clearance | Adjust | |
| do. | Incorrect ignition time | Readjust |
| Something wrong with induced coil, and so on | Check and replace damaged parts |
IV. STOP SUDDENLY WHEN RUNNING
| TROUBLE | CAUSE | REMEDY | |
| Stop suddenly when running. | Fuel supply system | Fuel is used up | Refill fuel |
| Carburetor is clogged | Check fuel line and dredge | ||
| Float is leaking | Repair | ||
| Needle valve sticks | Dismantle float chamber and eliminate it | ||
| Ignition system | Spark plug is struck through, or short-circuited by carbon deposit | Replace spark plug | |
| do. | do. | Side electrode of spark plug is dropped out | Replace spark plug |
| High-pressure wire is dropped out | Weld on | ||
| Ignition coil is struck through to be short-circuited | Replace ignition coil | ||
| Parking wire is located on engine body | Find out meeting and insulate | ||
| The other | Cylinder is pulled damage, valve is dropped out | Repair or replace damaged parts | |
V. GASOLINE ENGINE IS EXCEEDSIVELY HOT
| TROUBLE | CAUSE | REMEDY |
| Gasoline engine is excessively hot | Improper ignition time | Adjust ignition advance angle properly |
| Insufficient fuel supply | Refill engine oil | |
| Exhaust pipe is blocked up | Dredge exhaust pipe | |
| Flow guard is leaking | Repair damaged part | |
| Dirt or something like this fill up among air cooling fins | Clear away dirt or something like this | |
| Cooling fan is loosen, losing function | Reinstall well | |
| Tie rod deformation makes piston and cylinder bushing side wear | Replace tie rod | |
| do. | Cylinder or piston or piston ring is worn, resulting in air flow between cylinder and crankcase | Replace the worn |
| Improper adjustment of engine speed produces excessive rotational speed | Readjust engine speed to proper valve by speed regulator | |
| Crankshaft main bearing is burnt out | Replace main bearing |
NOTE: the gasoline should run under cretin temperature. Generally, permitting temperature at the flow guard outlet is between 80-110°C, while the temperature of the crankcase is about 60°C under the magneto. If temperatures surpass the limits, it is an indication that the gasoline engine is excessive hot.
VI. THERE EXISTS ABNORMAL NOISE WHEN ENGINE RUNNING
| TROUBLE | CAUSE | REMEDY |
| There is noise of beating | Piston, piston ring or cylinder is worn | Replace the worn |
| Tie rod or piston pin and piston pin hole is worn | Replace the worn | |
| Crankshaft main bearing is worn | Replace | |
| Piston ring is broken | Replace | |
| Too much carbon deposit in combusting chamber | Clear away carbon deposit | |
| Too small electrode clearance of spark plug | Adjust electrode clearance properly | |
| Engine is flooded with fuel | Check relative parts such as carburetor | |
| Improper fuel brand | Replace fuel | |
| Engine is excessively hot | Find a cause and eliminate it | |
| The other | Improper valve clearance | Readjust valve clearance properly |
| Fly wheel is not connected with crankshaft tightly | Connect tightly |
SPECIFICATIONS
MAIN SPECIFICATION
| Items\Model | 173F/173FD | 177F/177FD | 182F/182FD | 188F/188FD | 190F/190FD |
| L×W×H (mm) | 335×430×410 | 380×450×433 | 380×450×433 | ||
| Dry weight (kg) | 25 | 31 | 33 | ||
| Engine type | 4-stroke, OHV, single cylinder tilt 25 °C | ||||
| Displacement (cm3) | 242 | 270 | 337 | 389 | 420 |
| Bore × Stroke (mm) | 73×58 | 77×58 | 82×64 | 88×64 | 90×66 |
| Max. theory power【kW (PS)/r/min】 | 5.9 (8)/3600 | 6.6 (9)/3600 | 8.1 (11)/3600 | 9.6 (13)/3600 | 11 (15)/3600 |
| Using power recommended【kW (PS)/r/min】 | 5.1 (6.9)/3600 | 5.7 (7.7)/3600 | 7.1 (9.6)/3600 | 8.2(11.1)/3600 | 8.5(11.6)/3600 |
| Max. torque (N • m/r/min) | 14.5/2500 | 16.4/2500 | 21.0/2500 | 23.0/2500 | 25.0/2500 |
| Fuel consume. (g/kWh) | 374 | ||||
| Cooling system | Force air-cooled | ||||
| Ignition system | TCI | ||||
| Spark plug type | BPR6ES(NGK).NHSP LD F7TC | ||||
| Lubrication mode | Splash | ||||
| Output direction of power shaft | Counterclockwise | ||||
DATE RELATING ADJUSTMENT
| Item | Date |
| Spark plug clearance | 0.7~0.8mm |
| Carburetor | 1500±150rpm |
| Valve clearance (cold engine) | Intake: 0.15±0.02mm; |
| Exhaust: 0.20±0.02mm; |
ELECTRIC DIAGRAM(for electric-start type)
| B1 | Black | Gr | Grey |
| Y | Yellow | R | Red |
| W | White | G | Green |
Switch combination
| B1 | Black |
| Y | Yellow |
| G | Green |

Note: The diagram for other types may be different with the exception of electric-start type.
- WARNING
- CAUTION
- NOTE
- GIVE HELPFUL INFORMATION
- CONTENTS
- SAFETY PRECAUTIONS
- BATTERY CONNECTION (ELECTRIC-START TYPE)
- CONTROL CONNECTION OF REMOTE DISTANCE (OPTION)
- ACCESSORY OPTIONS
- REMOTE-CONTROLLED THROTTLE
- PRE-OPERATE INSPECTION
- ENGINE OIL
- CHECK
- OIL IN THE REDUCTION GEAR BOX (ONLY FOR THE MODEL EQUIPPED WITH IT)
- AIR CLEANER
- DOUBLE-CORE TYPE
- SINGLE-CORE TYPE
- DUST-COLLECTING TYPE
- OIL-BATH TYPE
- FUEL AND FUEL TANK
- FUEL
- GASOLINE CONTAINING ALCOHOL
- FUEL TANK
- STARTING THE ENGINE
- RUNNING THE ENGINE
- ENGINE OIL ALARM
- BREAKER (ELECTRIC-START TYPE)
- STOP
- EXHAUST CONTROL SYSTEM
- MAINTENANCE
- REPLACEMENT OF PARTS
- MODIFYING
- PROBLEMS AFFECTING EXHAUST EMISSIONS
- SERVICE OF AIR CLEANER
- OIL BATH TYPE
- WASHING OF DEPOSIT CUP
- SPARK PLUG
- SPARK ELIMINATOR (OPTION)
- CARBURETOR IDLING ADJUSTMENT
- TRANSPORT, STORAGE AND REMOVAL FROM STORAGE
- TRANSPORT
- STORAGE
- REMOVAL FROM STORAGE
- TROUBLESHOOTING
- START ENGINE DIFFICULTLY
- ELECTRIC DIAGRAM(FOR ELECTRIC-START TYPE)
Brand : Lifan
Model : LF-173F
Category : Motor