
SC-1207 - Women's razor Coline - Free user manual and instructions
Find the device manual for free SC-1207 Coline in PDF.


| Product Type | Women's Electric Razor |
| Brand | Coline |
| Model | SC-1207 |
| Power Supply | 230 V AC via supplied charging station |
| Charging Time | 8 hours (first charge); max 10 hours |
| Operating Time | Approximately 30 minutes per charge |
| Blade Type | Foil and trimmer |
| Intended Use Areas | Arms, legs, bikini line |
| Indicator Light | Red (charging station powered), Green (charging) |
| Cleaning Method | Rinse cutter head under warm water; use cleaning brush |
| Lubrication | 2-3 times per year with sewing machine oil |
| Storage | Dry, frost-free location |
| Safety Features | Charging station must not contact water; use on flat surface; unplug when not in use |
| Protective Cover | Yes |
| Locking Button for Cutter Head | Yes (two buttons) |
| On/Off Switch | Slide switch (0/1) |
| Included Accessories | Charging station, adaptor, cleaning brush |
| Disposal | Follow local regulations |
Frequently Asked Questions - SC-1207 Coline
User questions about SC-1207 Coline
0 question about this device. Answer the ones you know or ask your own.
Ask a new question about this device
Download the instructions for your Women's razor in PDF format for free! Find your manual SC-1207 - Coline and take your electronic device back in hand. On this page are published all the documents necessary for the use of your device. SC-1207 by Coline.
USER MANUAL SC-1207 Coline
Please read the entire instruction manual before using the product and save it for future reference. We reserve the right for any errors in text or images and any necessary changes made to technical data. If you have any questions regarding technical problems please contact Customer Services.
Safety
- The mains lead should be checked regularly. Never use the device if the mains lead or plug is damaged.
- The charging station should be placed on a flat surface.
- Never place the charging station where it might be knocked into the wash basin/bath.
- Never place the charging station close to sources of high temperature such as cookers or fireplaces.
- This ladyshaver is designed for use with 230 V mains electricity.
• Always unplug the charging station from the wall socket when it is not in use. - This ladyshaver must not be used by anyone (including children) suffering from physical or mental impairment. This ladyshaver should not be used by anyone that has not read the instruction manual unless they have been instructed in its use by someone who will take responsibility for their safety.
- Never let children play with the ladyshaver.
- The charging station must not come into contact with water or other liquid.
- The charging station must not be used outdoors.
- Never handle the charging station with wet or moist hands.
- Only use the supplied charging station.
- Store the ladyshaver in a dry, frost-free location.
- This ladyshaver is designed exclusively for private use.
Product description

- Protective cover
- Cutter head with foil and trimmer (specially designed for arms, legs and bikini lines)
- Blade holder
- Locking button for cutter head
- On/off switch
- Adaptor
- Cleaning brush
- Charging station
- Indicator lamp
Charging
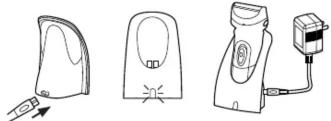
The ladyshaver can only be charged using the charging station and cannot be connected directly to the wall socket. The ladyshaver should be charged for about 8 hours before using it for the first time, or if it hasn't been used for a while. A fully charged battery should last for approx. 30 minutes shaving.
- Make sure that the ladyshaver is switched off (on/off switch (5) set to 0) and then insert it into the charging station. The ladyshaver will not charge if the on/off switch is set to 1.
- When the charging station is connected to a wall socket the red indicator lamp (9) will come on. When the ladyshaver is inserted into the charging station and starts charging, the green indicator lamp will come on.
- Charge the ladyshaver for at least 8 hours but no more than 10 hours. Charging must be stopped manually by disconnecting the ladyshaver from the wall socket. Do not leave the adaptor plugged in permanently.
natural_image
Line drawings of three different types of hair filter devices: a curved top, a rounded bottom, and a handheld device with cable (no text or symbols)Use
- Set the on/off switch to position 1.
- Pass the ladyshaver slowly over your skin, applying a gentle pressure.
- For best results, shave against the direction of growth.
Care and maintenance
- Make sure the ladyshaver is switched off before cleaning it.
- Make sure that the power lead is disconnected from the wall socket before cleaning the charging station.
- Clean the charging station using a lightly moistened cloth. Never clean the ladyshaver using solvents or abrasive cleaning agents.
After every use
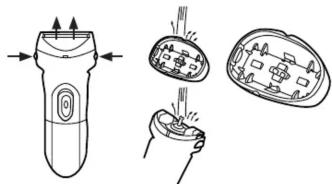
- Press in both locking buttons (4) and remove the cutter head (2).
- Rinse everything in warm water for a few minutes. The provided brush can also be used to remove hair cuttings.
- Assemble the parts again. A click can be heard when they are inserted correctly. Note! The cutter head will only fit one way.
natural_image
Illustration of a hand holding a small electronic device with three views: front, side, and top (no text or symbols)A few times a year
- Lubricate the cutter head with a drop of sewing machine oil a couple of times a year.
- Switch the ladyshaver on and run it for 1 or 2 minutes.
- Wipe off any excess oil with a dry cloth.
Disposal
Follow local ordinances when disposing of this product. If you are unsure of how to dispose of this product, please contact your local authority.
Specifications
Charging time 8 hours
Operating time 30 minutes
natural_image
Line drawings of three different types of hair accessories: a curved frame, a rounded rectangular opening, and a cylindrical device with a plug (no text or symbols)Användning
natural_image
Illustration of a hand holding a remote light bulb and a close-up of its internal components (no text or symbols)Några gånger per år
natural_image
Three technical line drawings of a hairdryer device, showing front, side, and side views with no text or symbols.Bruk
natural_image
Illustration of a hand holding a small electronic device with three views: front, side, and top (no text or symbols present)Noen ganger per år
- Smør trimmerhodets metalldeler med en dråpe symaskinolje ett par ganger årlig.
- Start ladyshaveren og la den gå i 1 til 2 minutter før den igjen skrus av.
- Tørk deretter av overflødig olje med en tørr klut.
Avfallshåndtering
natural_image
Illustration of a hand holding a small device with three views: one with light beams, one with a grid, and one with a magnified view (no text or symbols)Käyttö
Brand : Coline
Model : SC-1207
Category : Women's razor