
BG-UM-88ANS - Router BZBGear - Free user manual and instructions
Find the device manual for free BG-UM-88ANS BZBGear in PDF.


| Product Type | Wireless Router |
| Brand | BZBGear |
| Model | BG-UM-88ANS |
| Wireless Standard | 802.11ac (Wi-Fi 5) |
| Frequency Bands | 2.4 GHz and 5 GHz |
| Maximum Speed | Up to 1200 Mbps (300 Mbps on 2.4 GHz + 867 Mbps on 5 GHz) |
| Ports | 1x Gigabit WAN, 4x Gigabit LAN |
| USB Ports | 1x USB 2.0 |
| Antennas | 4x external fixed antennas |
| Security | WPA/WPA2-PSK, WEP, SPI Firewall |
| Dimensions (W x D x H) | 230 x 145 x 35 mm |
| Weight | 350 g |
| Power Supply | DC 12V / 1A adapter |
| Power Consumption | Max 10W |
| Operating Temperature | 0 to 40°C |
| Storage Temperature | -20 to 60°C |
| Humidity | 10% to 90% non-condensing |
| LED Indicators | Power, WAN, LAN, Wi-Fi, WPS |
| Buttons | Reset, WPS, Power |
| Mounting | Desktop or wall-mountable |
| Package Contents | Router, power adapter, Ethernet cable, quick start guide |
| Certifications | CE, FCC, RoHS |
Frequently Asked Questions - BG-UM-88ANS BZBGear
User questions about BG-UM-88ANS BZBGear
0 question about this device. Answer the ones you know or ask your own.
Ask a new question about this device
Download the instructions for your Router in PDF format for free! Find your manual BG-UM-88ANS - BZBGear and take your electronic device back in hand. On this page are published all the documents necessary for the use of your device. BG-UM-88ANS by BZBGear.
USER MANUAL BG-UM-88ANS BZBGear
8x8 HDMI 18Gbps Matrix with Audio De-embedded

User Manual
Thank you for purchasing this product
For opmum performance and safety, please read these instrucons carefully before connecng, operang or adjusng this product. Please keep this manual for future reference.
Surge protecon device recommended
This product contains sensitive electrical components that may be damaged by electrical spikes, surges, electric shook, lighng strikes, etc. Use of surge protecon systems is highly recommended in order to protect and extend the life of your equipment.
Table of Contents
- Introducon .... 3
2.Features .... 3
3.Package Contents .... 3 - Specicaons .... 4
- Operaon Controls and Funcons .... 5
5.1 Front Panel 5
5.2 Rear Panel....8
6.Remote Control....9
7.Web GUI User Guide 9
8.FAQ 17
9.Applicaon Example.... 18
Warranty / Mission Statement.... 19
1. Introducon
The 8x8 HDMI Matrix supports the transmission of video (up to 4K2K@60Hz YUV 4:4:4, 18Gbps, HDCP 2.2) and mul-channel digital audio from 8 HDMI sources to 8 HDMI displays. Audio de-embedded is supported from 8 HDMI output ports. Control is via buon, IR, RS-232, LAN and Web GUI.
2. Features
☆ HDMI 2.0b, HDCP 2.2 and HDCP 1.4 compliant
☆ Up to 4K2K@60Hz (YUV 4:4:4) on all HDMI ports
☆ Supports pass-through audio up to 7.1 channels of High Denion audio (LPCM, Dolby TrueHD, and DTS-HD Master Audio)
☆ Audio de-embedded is supported via coax port
☆ HDR, CEC and smart EDID management supported
☆ Control is via on-panel Buon, IR, RS-232, LAN and Web UI
☆ 1U rack mounted design with metal enclosure
3. Package Contents
① 1x 8x8 HDMI Matrix
② 1x 12V/3A Locking Power Adaptor
③ 1x Remote Control
④ 1x Wideband IR Receiver cable
⑤ 1x RS-232 male to female serial cable
⑥ 1x User Manual
- Specicaons
| Technical | |
| HDMI Compliance HDMI 2.0b | |
| HDCP Compliance HDCP 2.2 and HDCP 1.4 | |
| Video Bandwidth 18Gbps | |
| Video Resoluons Up to 4K2K@50/60Hz (YUV 4:4:4), 4K2K@30Hz, 1080p@120Hz, and 1080p 3D@60Hz | |
| Color Depth 8-bit, 10-bit, 12-bit | |
| Color Space RGB, YCbCr 4:4:4, YCbCr 4:2:2 | |
| HDMI Audio Formats | LPCM 2/5.1/7.1, Dolby Digital, DTS 5.1, Dolby Digital+, Dolby TrueHD, DTS-HD Master Audio, Dolby Atmos, DTS:X |
| Audio Formats PCM2.0, 32K/44.1K/48K/88.2K/96K/192K, 16/20/24bit | |
| ESD Protecon Human-body Model: ±8kV (Air-gap discharge), ±4kV (Contact discharge) | |
| Connecons | |
| Inputs 8x HDMI Type A [19-pin female] | |
| Outputs 8x HDMI Type A [19-pin female] | |
| Mechanical | |
| Housing Metal Enclosure | |
| Color Black | |
| Dimensions 483mm (W)×253 mm (D)×44.5mm (H) | |
| Weight | 3.35kg |
| Power Supply | Input: AC100~240V 50/60Hz, Output: DC12V/3A (US/EU standards, CE/FCC/UL cered) |
| Power Consumpon | 26.5W (max) |
| Operang Temperature | 0°C ~ 40°C / 32°F ~ 104°F |
| Storage Temperature | -20°C ~ 60°C / -4°F ~ 140°F |
| Relave Humidity 20~90% RH (non-condensing) | |
5. Operaon Controls and Funcons
5.1 Front Panel

| Number | Name | Funcon descripons |
| 1 | OLED display | Display system input/output port status, EDID management and matrix IP address. |
| 2 | IR Window | IR receiver window, it receives IR remote control signal to control this device. |
| 3 | Le/Right/Up/Down/MenuBuons | Aer system power up, the OLED screen default displaysthe input and output status of the last power o.A) On the initial OLED display, first press the 'Le' or 'Right' buon to select output port, then press the 'up' or 'down' buon to select the input port, then press the 'MENU' buon to conrm this operaon.B) On the initial OLED display, you can press the 'Up' or 'Down' buon to check each input EDID seng, press the 'Menu' buon go back to the initial OLED display.C) On the initial OLED display, you can press 'Menu' buon to operate the following funcons by the combinaon of these ve buons, press 'Up' or 'Down' buon to select funcon:1. Select EDID: Press the 'Right' button, then press the 'Up' or 'Down' buon to select EDID as showed in thebelow table. Once you complete EDID selecon, press the ‘Right’ buon then press the ’Le’ or ‘Right’ buon to select which input port to copy EDID , press the ‘Right’ buon to conrm this operaon.2. PTP Set: Press the ‘Right’ buon to set PTP mode (point to point, means IN1-OUT A, IN2-OUT B, IN3-OUT C...).3. Save Preset: Press the ‘Right’ buon to save current conguraon to preset, press ‘Up’ or ‘Down’ buon to select storage locaon, press the ‘Right’ buon to conrm this operaon.4. Recall Preset: Press the ‘Right’ buon to recall previous preset, press ‘Up’ or ‘Down’ buon to select preset you want, press the ‘Right’ buon to conrm this operaon.5. View IP: Press the ‘Right’ buon to check IP address and DHCP status.6. Select Baud: Press the ‘Right’ buon, then press the ‘Up’ or ‘Down’ buon to select baud, press the ‘Right’ buon to conrm this operaon.7. Factory Reset: Press the ‘Right’ buon to set factory reset status, then press the ‘Right’ buon to conrm this operaon or the ‘Le’ buon to quit this operaon. |
| 4 | Power andPower LED | Long press this buon to power on/o device. The LED will illuminate in green when the device is power on and show in red when this device is standby. |
The EDID table:
| EDID Mode | EDID Descripon |
| 1 | 720P 2.0 CH |
| 2 | 1080P 2.0 CH |
| 3 | 1080P 5.1 CH |
| 4 | 1080P 7.1CH |
| 5 | 1080I 2.0 CH |
| 6 | 1080I 5.1 CH |
| 7 | 1080I 7.1CH |
| 8 | 3D 2.0 CH |
| 9 | 3D 5.1 CH |
| 10 | 3D 7.1 CH |
| 11 | 4K*2K@30 2.0 CH |
| 12 | 4K*2K@30 5.1 CH |
| 13 | 4K*2K@30 7.1 CH |
| 14 | 4K60_420 2.0CH |
| 15 | 4K60_420 5.1CH |
| 16 | 4K60_420 7.1CH |
| 17 | 4K*2K@60 2.0 CH |
| 18 | 4K*2K@60 5.1 CH |
| 19 | 4K*2K@60 7.1 CH |
| 20 | Copy HDMI Out A |
| 21 | Copy HDMI Out B |
| 22 | Copy HDMI Out C |
| 23 | Copy HDMI Out D |
| 24 | Copy HDMI Out E |
| 25 | Copy HDMI Out F |
| 26 | Copy HDMI Out G |
| 27 | Copy HDMI Out H |
5.2 Rear Panel
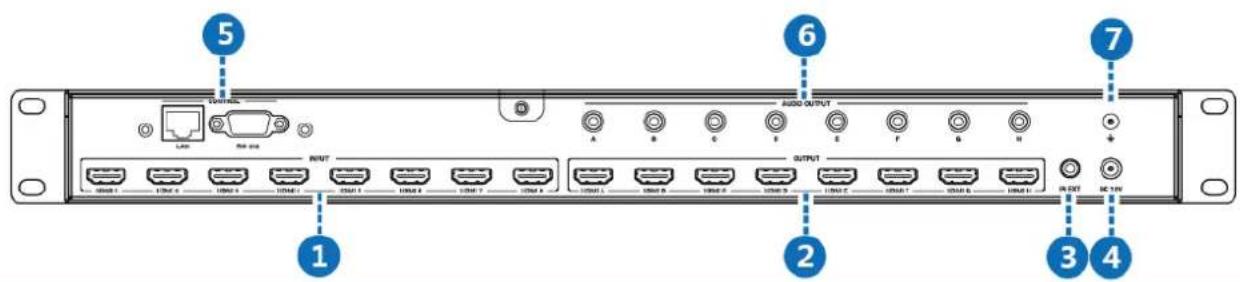
| Number | Name | Funcon descripons |
| 1 | HDMI INPUT | Connect to the HDMI input source devices such as a DVD player or Set-top Box. |
| 2 | HDMI OUTPUT | Connect to the HDMI output source devices such as a TV player or monitor. |
| 3 | IR EXT | If the front IR sensor of unit is obstructed or the unit is installed in a closed area out of infrared line of sight, the IR receiver cable can be inserted to this IR EXT port to extend IR signal. |
| 4 | DC 12V | Plug the 12V/3A adapter to AC wall outlet for power supply. |
| 5 | CONTROL | LAN: connects to an acve Ethernet link by an RJ-45 cable.RS-232: Connect to a PC or control system by D-Sub 9-pin cable to control the matrix with RS-232 commands. |
| 6 | AUDIO OUTPUT | Connect to audio amplifiers or speakers. |
| 7 | GND | Connect the GND port to the ground. |
6. Remote Control

Power on or set it to standby status.
Input 1/2/3/4/5/6/7/8:Press these buon to select input signal source.
◀: Press these buon to select the last or the next input signal source.
Output 1/2/3/4/5/6/7/8: Press these buon to select output signal source.
All: Press this buon to select all output signal
source simultaneously.
Operang instrucons: User needs to select output buon rst and then select desired input buon.
7. Web GUI User Guide
The Matrix can be controlled via Web GUI. You must know the current IP address of the matrix. The stac IP address is 192.168.1.100. You can connect PC Web GUI through dynamic IP address. Generally speaking, you can get IP address from two ways. The rst way gets the IP address via Upper Controller . The second way gets IP address via on-panel buon. Then you need set the IP address to your PC or laptop or mobile device is within the same IP address segment with the Matrix. Aer above, you can enter the Matrix IP address in the web browser to access Web GUI.
The rst way: The Matrix gets IP address via Upper Controller. The RS-232 port connects USB port on PC. The LAN port and the PC connect via a router. At this me, you need to open the Upper Computer sware of the product. The page looks as below:

Select “TCP Control Mode” port, then click the “Search” buon. At this point you can get current IP address. Enter the IP address in your web browser to enter Web GUI page.
The second way: The Matrix gets IP address via on-panel buon. On the initial OLED display, you can press the “Menu” buon to enter funcon page. Then press "Up" or "Down" buon to select funcon.
Select the "View IP" funcon, then press the "Right" buon to check current IP address and DHCP status. At this point, you can get the current IP address.
Step 1: The LAN port connects directly PC with an UTP cable.
Step 2: On the PC, go to Control Panel> Network and Internet>Network Connecons> Local Area Connecons, right click on it, choose Properers.
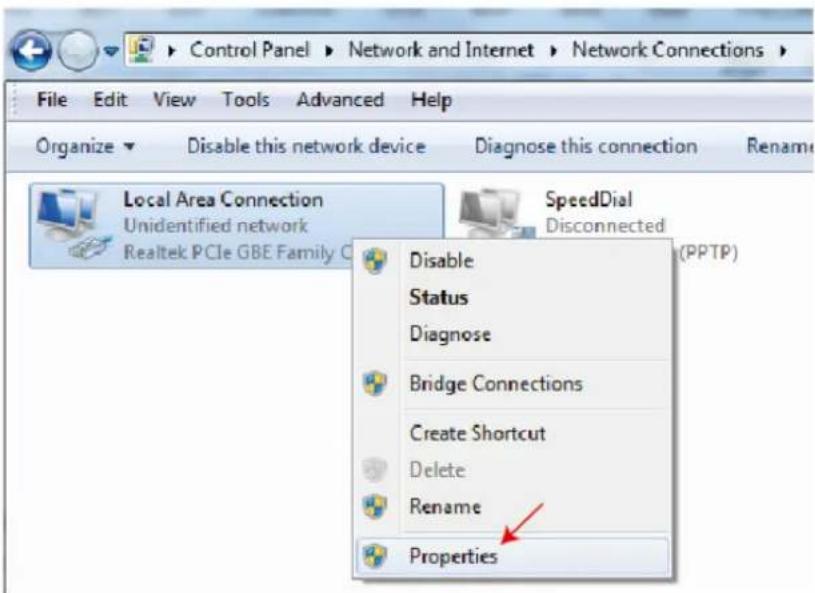
Double click Internet Protocol Version 4 (TCP/IPv4)

Choose Use the following IP address, input 192.168.1.200 as IP address, 255.255.255.0 as Subnet mask, and then click on OK, click on OK again.

Note: The IP address of the computer and matrix should be in the same network segment. As the matrix's IP address is 192.168.10.100, the computer's IP should be 192.168.10.X (X contains 1\~255 except 100).
Step 3. Input the IP address from front panel into a brower on the PC to enter Web GUI page, The pages like below.
The Web GUI :
General page
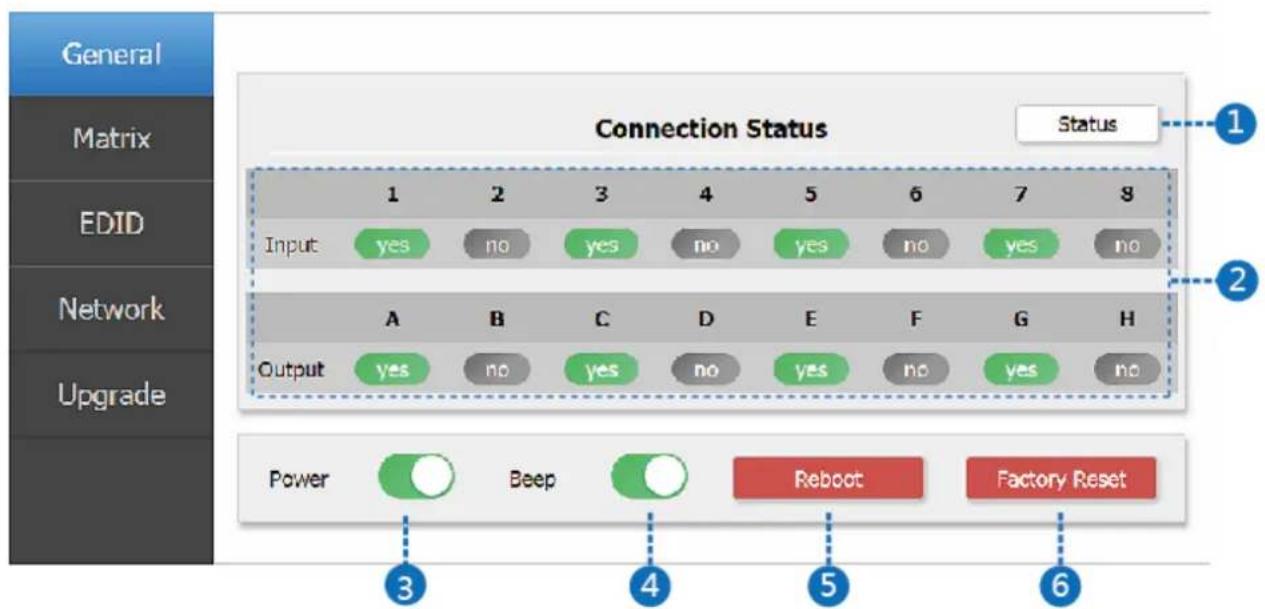
① Click this buon to check current the Matrix conncon status.
② Display currently the Matrix input and output port status. The “yes” have connected input or output source and “no” represent not conncon.
③ Power switch. The Matrix will work when open this switch. Otherwise, the Matrix will standby.
④ Beep switch. Open this switch, press the Matrix on-panel buon will have voice. Close this switch, it will mute.
⑤ Click this buon will reboot device.
⑥ Click this buon will set it to factory reset.
Matrix page
![graph TD A["General"] --> B["Matrix"] B --> C["EDID Network"] C --> D["Upgrade"] B --> E["1 2 3 4"] B --> F["IN 1"] B --> G["5 6 7 8"] E --> H["OUTPUT B"] E --> I["IN 1"] F --> J["OUTPUT C"] F --> K["IN 3"] G --> L["OUTPUT D"] G --> M["IN 4"] H --> N["OUTPUT E"] H --> O["IN 5"] I --> P["OUTPUT F"] I…](/content/2026/05/1059320/images/907be067acdf651b1c1638b50a353c4666822b30f0f452f48cdaf974ceabada6.jpg)
① You need click green area and then choose one input source to the OUTPUT A port. (The others OUTPUT ports have similar to funcon about Tab ①.)
EDID page

① Select EDID mode to input source, then click “Set” button.
② Copy EDID from output display to input source, then click “Set” button.
③ Open EDID le to input source.
④ Display the input source EDID mode status.
Network page
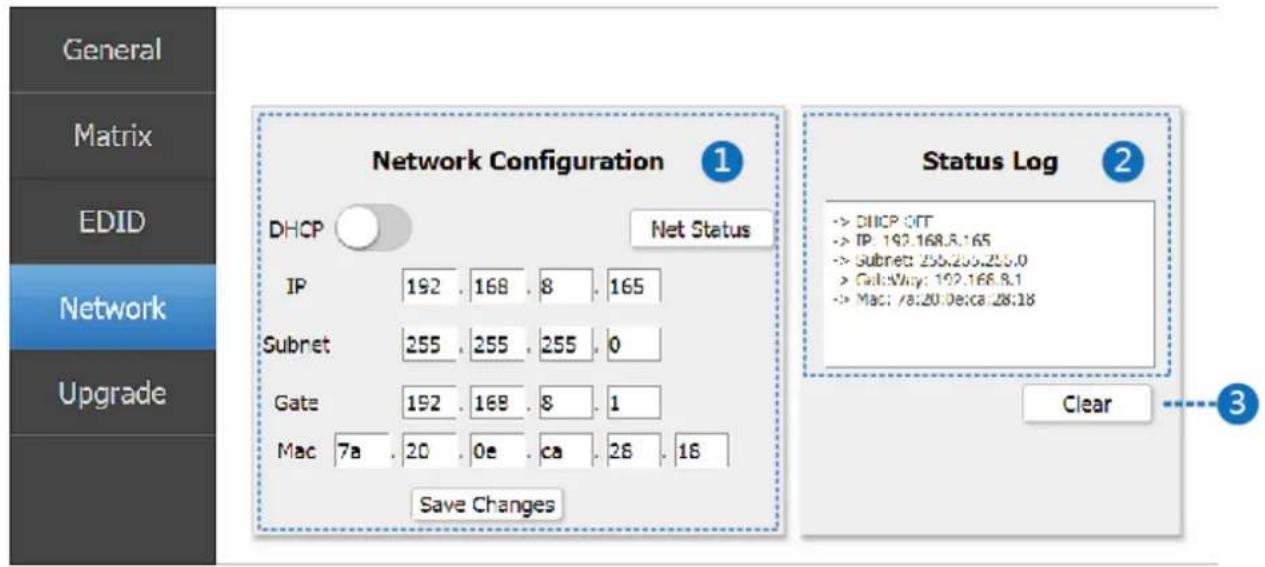
① Network Conguraon
◆ In DHCP open status:
DHCP switch: Oban the network conguraon informaon, including IP address, Subnet, Gateway and MAC. Then click “Set” buon to save DHCP status.
◆ In DHCP close status:
DHCP switch: If the DHCP switch has been closed, user can set IP, Subnet, Gateway and Mac address. In this moment, click the “Set” buon to save current status informaon. (Note: If user have set a new IP address and click the “Set” buon. At this moment, user have changed the IP address.)
Net Status buon: Clicking this buon will refresh currently network conguraon informaon to display in Status Log.
② Status Log: Display the Net conguraon informaon.
③ Clear buon: Clear the Status Log informaon.
Upgrade page
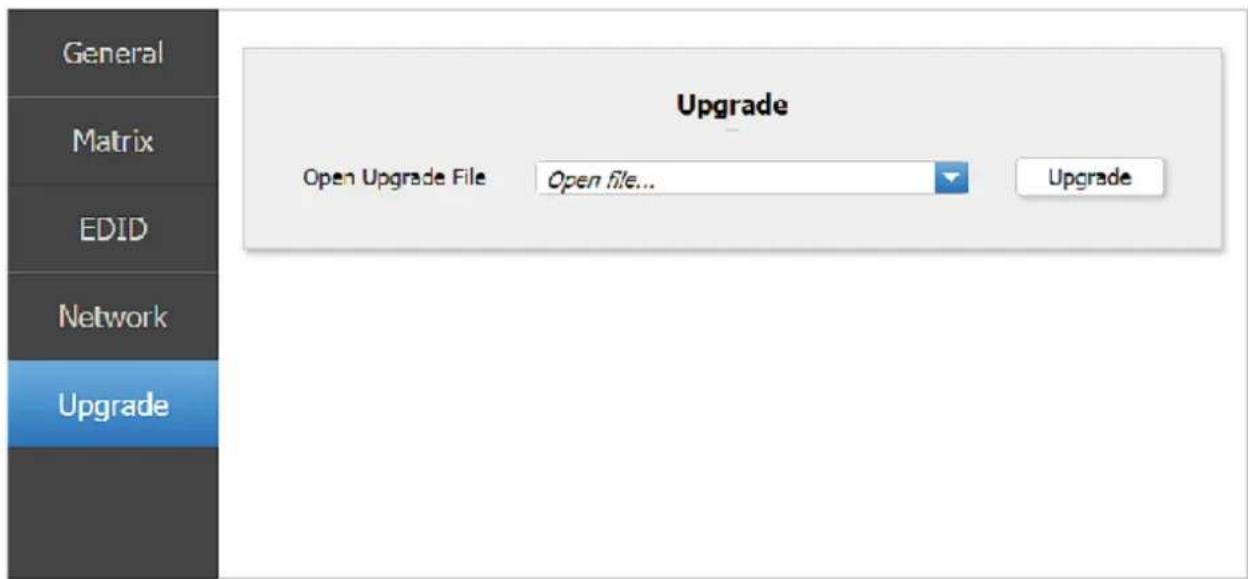
① Open upgrade le, then click the “Upgrade” button.
8. FAQ
- Q: Does this product require an HDMI line length for the conncon interface?
A: According to HDMI line length test, HDMI input / output with 4K2K@60Hz YUV 4:4:4 is the longest line length up to 16.4 / 5m.
The use of "Premium High Speed HDMI" cables is recommended.
9. Applicaon Example

BZBGEAR wants to assure you peace of mind. We're so confident in the quality of our products that along with the manufacturer's one-year limited warranty, we are offering free second-year warranty coverage upon registration*.
Taking advantage of this program is simple, just follow the steps below:
- Register your product within 90 days of purchase by visiting BZBGEAR.com/warranty.
- Complete the registration form. Provide all necessary proof of purchase details, including serial number and a copy of your sales receipt.
For questions, please call 1.888.499.9906 or email support@bzbgear.com.
For complete warranty information, please visit BZBGEAR.com/warranty or scan the QR code below.

*Terms and conditions apply. Registration is required.
11. Mission Statement
BZBGEAR manifests from the competitive nature of the audiovisual industry to innovate while keeping the customer in mind. AV solutions can cost a pretty penny, and new technology only adds to it. We believe everyone deserves to see, hear, and feel the advancements made in today's AV world without having to break the bank. BZBGEAR is the solution for small to medium-sized applications requiring the latest professional products in AV.
We live in a DIY era where resources are abundant on the internet. With that in mind, our team offers system design consultation and expert tech support seven days a week for the products in our BZBGEAR catalog. You'll notice comparably lower prices with BZBGEAR solutions, but the quality of the products is on par with the top brands in the industry. The unparalleled support from our team is our way of showing we care for every one of our customers. Whether you're an integrator, home theater enthusiast, or a do-it-yourselfer, BZBGEAR offers the solutions to allow you to focus on your project and not your budget.
- 8X8 HDMI 18GBPS MATRIX WITH AUDIO DE-EMBEDDED
- THANK YOU FOR PURCHASING THIS PRODUCT
- SURGE PROTECON DEVICE RECOMMENDED
- TABLE OF CONTENTS
- INTRODUCON
- FEATURES
- PACKAGE CONTENTS
- OPERAON CONTROLS AND FUNCONS
- 5.1 FRONT PANEL
- REMOTE CONTROL
- WEB GUI USER GUIDE
- THE WEB GUI
- NETWORK PAGE
- UPGRADE PAGE
- FAQ
- APPLICAON EXAMPLE
- MISSION STATEMENT
Brand : BZBGear
Model : BG-UM-88ANS
Category : Router