
EM3FPAC32BC - Monitor Element - Free user manual and instructions
Find the device manual for free EM3FPAC32BC Element in PDF.


| Product Type | LED Monitor |
| Model | EM3FPAC32BC |
| Screen Size | 32 inches |
| Resolution | 1920 x 1080 (Full HD) |
| Aspect Ratio | 16:9 |
| Refresh Rate | 60 Hz |
| Response Time | 5 ms (GTG) |
| Brightness | 250 cd/m² |
| Contrast Ratio | 1000:1 (Static) |
| Viewing Angles | 170° (H) / 160° (V) |
| Inputs | HDMI, VGA, Audio Out |
| Power Supply | AC 100-240V, 50/60Hz |
| Power Consumption | 30W (Typical), <0.5W (Standby) |
| Weight (with stand) | 7.2 kg |
| Dimensions (WxHxD) with stand | 73.0 x 51.0 x 19.0 cm |
| VESA Mount | 100 x 100 mm |
| Tilt Adjustment | -5° to +15° |
| Built-in Speakers | Yes, 2 x 2W |
| Color | Black |
| Included Accessories | Power cable, HDMI cable, Stand |
| Cleaning Instructions | Wipe with a soft, dry cloth. Do not use liquid cleaners. |
| Safety Precautions | Ensure ventilation, avoid exposure to moisture. |
Frequently Asked Questions - EM3FPAC32BC Element
User questions about EM3FPAC32BC Element
0 question about this device. Answer the ones you know or ask your own.
Ask a new question about this device
Download the instructions for your Monitor in PDF format for free! Find your manual EM3FPAC32BC - Element and take your electronic device back in hand. On this page are published all the documents necessary for the use of your device. EM3FPAC32BC by Element.
USER MANUAL EM3FPAC32BC Element
natural_image
Modern monitor displaying a yellow and blue abstract background with no visible text or symbols on the screen.Table of Contents
Opening the Package....3
Package Contents 3
Installation....3
Installing the Monitor Stand Assembly......4
Removing the Stand for Wall Mounting....6
Identifying Front and Rear Panel 7
Front View 7
Rear View with Buttons 8
Rear View with Connections 9
Connections....10
Connecting to Your Computer 10
On Screen Display(OSD)Menu 11
Luminance 11
Image Setup 11
Color Temp 11
OSD Setting 12
Reset 12
Extra 12
Supported HDMI/DP Resolutions 15
Troubleshooting 16
Specification 19
Opening the Package
The Element monitor display is packaged in a carton. The size and weight of the product might be too heavy for 1 person to handle. In the event of that happening; it is recommended that the display package must be handled by a minimum of 2 or more persons. Since the glass can be easily scratched or broken, please handle the product gently. Never place the unit on a surface with the glass facing downwards unless it is on protective padding. When opening the carton, check that the product is in good condition and that all standard accessories and items are included. Save the original box and all packing materials for future shipping needs.
Package Contents
Element Monitor x 1
Monitor Base x 1
Monitor Base Screws x 1 (M5 x 12mm)
Monitor Neck x 1
Monitor Neck Screws x 4 (M4 x 10mm)
Monitor Hinge Cover x 1
HDMI Cable x 1
USB-C Cable x 1
DC Adapter x 1
Warranty Card
Registration Card
Installation
Please read the user manual carefully before performing the installation. When an extension cord is required, use one with the correct power rating. Use only the Element provided power cable or AC adapter approved for use with this device. The product should be installed on a flat surface to avoid tipping. Space should be maintained between the back of the product and the wall for proper ventilation. Avoid installing the product in the kitchen, bathroom or other places with high humidity dust or smoke, so as not to shorten the service life of the electronic components. Please ensure the product is installed with the screen in landscape orientation. Any 90 clockwise or counterclockwise installation may induce poor ventilation and successive component damage.
Installing the Monitor Stand Assembly
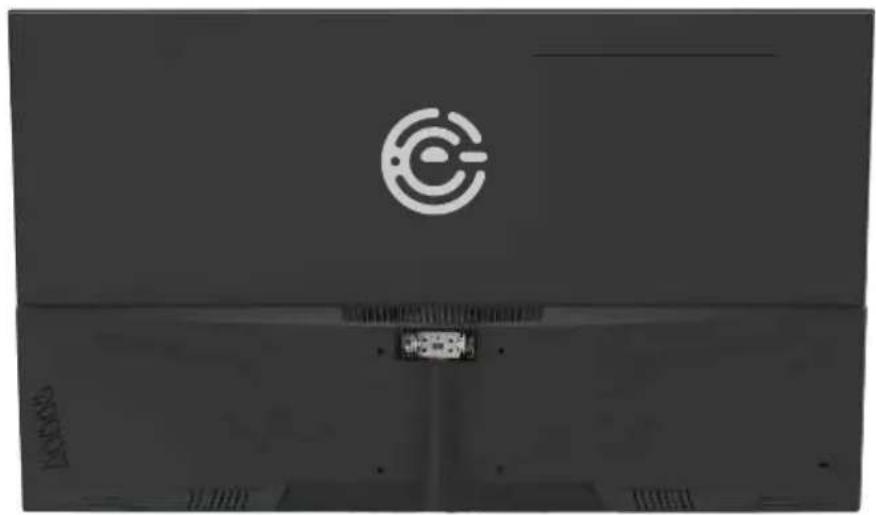
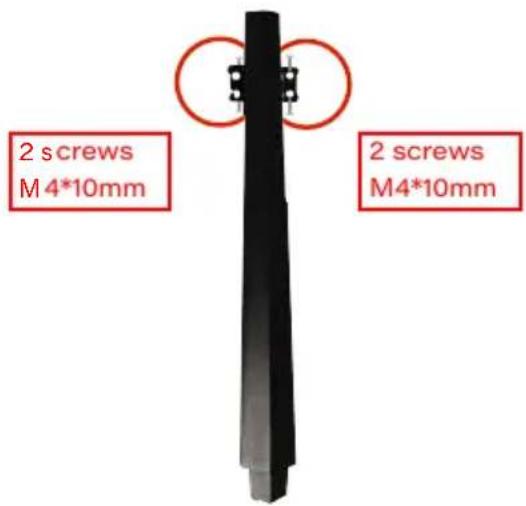
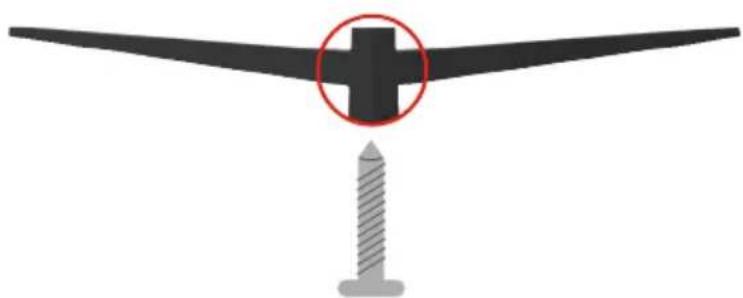
- With the packing foam still on, lay the monitor screen facing down on a table and open the top half of the packing foam. Install the neck to the base and insert the 1 base screw from the bottom. Tighten the screw to secure the base.
natural_image
Top-down view of a laptop with a circular logo on the screen (no visible text or symbols)↓
natural_image
Diagram of a turbine blade with a red circle highlighting the blade center, mounted on a screw base (no text or symbols present)-4-
www.elementetelectronics.com
Element monitor User Manual
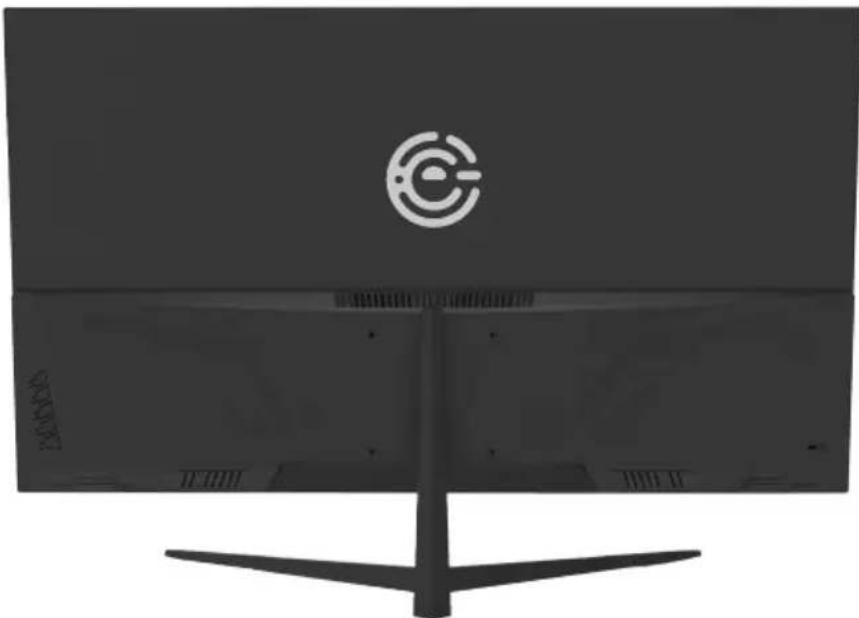
- Install the assembled stand to the back of the monitor and screw in the 4pcs M4 x 10mm neck screws into the metal plate on the back of the monitor. The metal plate is covered with the plastic hinge cover.

natural_image
Top-down view of a computer monitor with a circular logo and red directional arrows indicating motion or movement (no text or symbols on the device itself)- To finalize your installation of the monitor, please read the following: a. If you are placing the display on a stand, we would recommend you to use display safety strap (not included) in order to minimize the possibility of the display toppling over. b. Securely install all screws and connections.
Removing the Stand for Wall Mounting
- To wall mount your monitor, do not install the stand. To uninstall the stand lay the monitor facing downwards on a table. Remove the hinge cover and unscrew the four screws to remove the stand.

2 The installation height of wall mounting should be less than 2m.
Identifying Front and Rear Panel Front View

Indicator Light - the light is blue when the monitor is turned on. The light is off when the monitor is turned off. The light is red when there is no signal given to the monitor.
Panel Tilt Adjustment
The screen can be adjusted by inclining forward and backward; however, the specific adjustment depends on the specific model of the device. Generally, it may be inclined -5^ 15^
Please Note:
- When adjusting the angle of the monitor, be sure not to touch or press the LCD screen.
natural_image
Front view of a modern computer monitor with a circular logo on top (no visible text or symbols)Buttons from Up to Down
-
M This button activates the the On Screen Display (OSD). While the OSD is active, this button will act as the select button to open up an option for adjustment.
-
E-When the OSD is active, this button acts as the EXIT button and exits out of the option or OSD. This button switches between all the different inputs of the monitor.
-
▲ – With no OSD, this button increases the volume of the monitor's speakers. * With the OSD turned on, this button moves the selection upwards. This button will also increase the value of an adjustment while an option is open.
-
▼ – With no OSD, this button decreases the volume of the monitor's speakers. * With the OSD turned on, this button moves the selection downwards. This button will also decrease the value of an adjustment an option is open.
-
⏻ - This button turns the monitor on or off.
*Volume control applies only to models with built-in speakers. Products may vary. Please refer to the actual product.
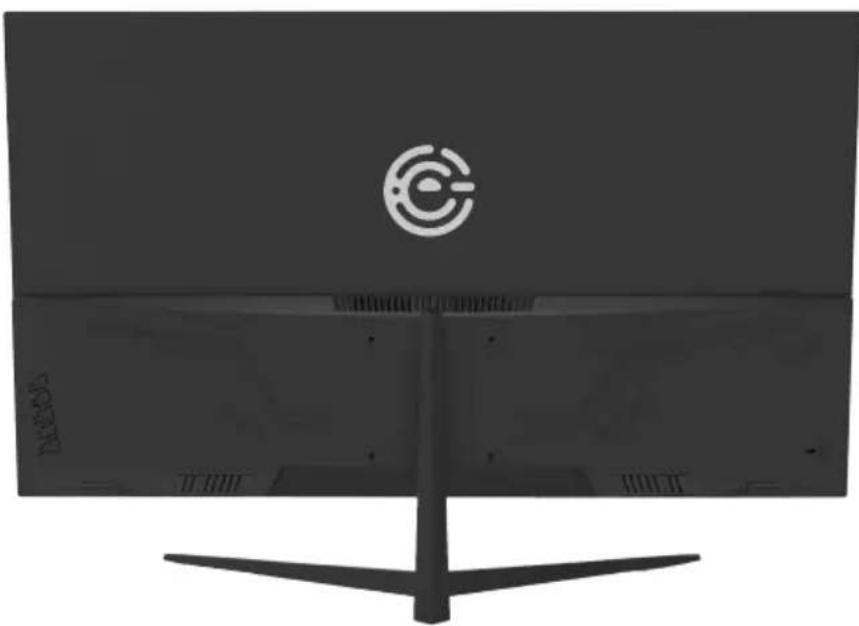
natural_image
Front view of a modern computer monitor with a circular logo on top (no visible text or symbols)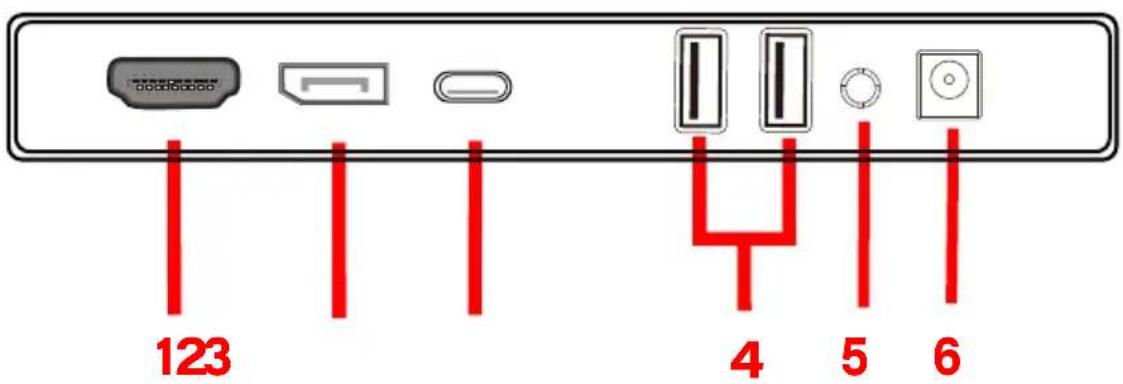
- HDMI - stands for High Definition Multimedia Interface. This connection is for computers with HDMI video output.
- DP - DisplayPort a digital video connection for connection to computers with DisplayPort video output.
- USB - C - You can attach your computer with the included USB-C cable to transmit video signal, charge your computer and transmit data via the 2 USB downstream ports. Note: Your device must support DP Alt Mode and Power Delivery to utilize all functions of this connection.
- USB - Connect and charge your USB devices (charging speeds will vary by device). Note: The USB-C port must be connected to a compatible computer for these to function correctly.
- 3.5mm Audio Out - Sends audio signal out to headphones or speakers.
- DC - This connection is for electricity supplied from the included power adapter.
Connections Connecting to Your Computer

- Make sure the power of the LED MONITOR is turned off.
2 Connect one end of a HDMI, DP or USB-C cable to the back of the monitor and the other end to your computer. - Turn on the power of both the LED MONITOR and the computer.
On Screen Display (OSD) Menu

Input Source
Move the signal input to DP, HDMI, USB-C or let the monitor select the automatic source.
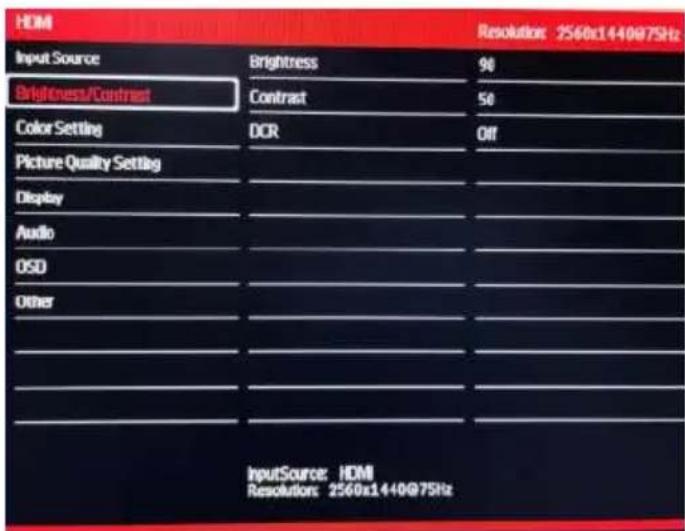
Brightness/Contrast
Brightness: Displays brightness values from 0 to 100.
Contrast: Adjust the contrast value from 0 to 100.
DCR: Enable or disable DCR (Dynamic Contrast Radio) functionality.

Color Setting
Gamma: Changes the gamma value between 1.8, 20, 22, 24 and 26.
Picture Mode: Changes the Picture Mode between Standard, Photo, Movie, Game, FPS or RTS.
Color Temperature: Changes the color temperature between Warm, Normal, Cool, sRGB and USER.
Hue: Modifies the value of the hue to display from 0 to 100.
Saturation: Modifies the saturation value of the display from 0 to 100.
Low blue light: Modifies the blue light on the display from 0 to 100.

Picture Quality Setting
Sharpness: Changes the displayed sharpness value from 0 to 100.
Response Time: Accelerates the pixel response time with Low, Middle or High overdrive settings.
Noise Reduction: Select between Low, Middle or High noise reduction.
Dynamic Luminous Control: Activate or disable the Dynamic Luminous Control function.

Display
Scale: Change the scale of the full-screen image to Auto, 4:3 or 1:1.
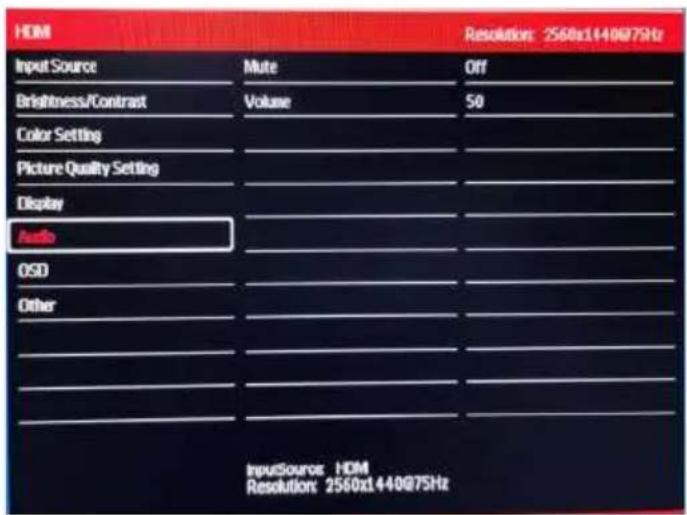
Audio
Mute: Choose to turn on or off audio.
Volume: Turn the volume of the source from 0 to 100.
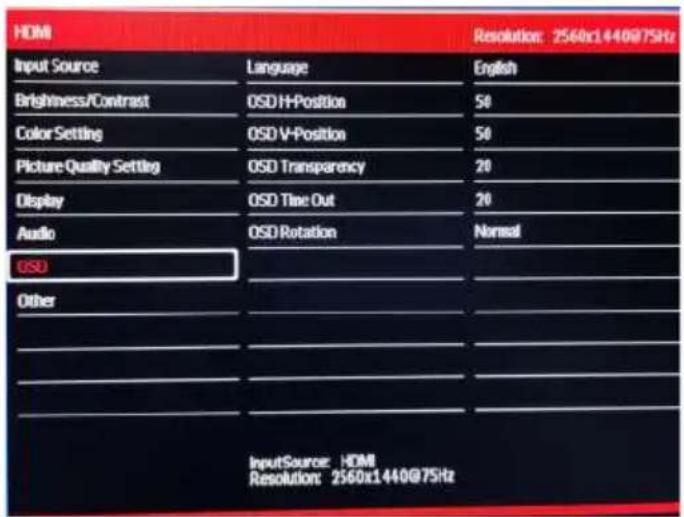
OSD
Language: Changes the language displayed in the OSD.
OSD H - Position: Changes the horizontal position of the OSD menu
OSD V - Position: Changes the vertical position of the OSD menu.
OSD Transparency: Adjust the opacity value of the OSD menu from 0 to 100.
OSD Time Out: Adjust the activation time before the OSD menu is closed
Automatically.
OSD Rotation: Rotate the OSD menu.
![HDMI Input Source FreeSync [Adaptive Sync] Off Brightness/Contrast USB Update FW Idle Color Setting Reset Picture Quality Setting Display Audio OSD Other InputSource: HDMI Resolution: 2560x1440@75Hz](/content/2026/05/1059290/images/fbd798e84c6e2a0f1d36d8d8a2c991c5b1b13271cbf7165b530c370ca8ab3149.jpg)
Other
FreeSync: Choose to turn free YNC on or off.
USB UpdataFW: Update the display firmware with the correct firmware using the USB port.
Reset: Restores the manufacturer's default settings.
Supported HDMI/DP Resolutions
| HDMI | DP | |
| 2560x1440 | 2560x1440 | @ 60Hz,75Hz |
| 1920x1080 | 1920x1080 | @ 60Hz,75Hz |
| 1680x1680 | 1680x1680 | @ 60Hz,75Hz |
| 1600x 900 | 1600x900 | @ 60Hz,75Hz |
| 1440x1440 | 1440x1440 | @ 60Hz,75Hz |
| 1440x810 | 1440x810 | @ 60Hz,75Hz |
| 1280x1240 | 1280x 1024 | @ 60Hz,75Hz |
| 1280x960 | 1280x1960 | @ 60Hz,75Hz |
| 1280x720 | 1280x720 | @ 60Hz,75Hz |
| 1024x768 | 1024x600 | @ 60Hz,75Hz |
| 800x600 | 800x600 | @ 60Hz,75Hz |
| 720x400 | 720x400 | @ 60Hz,75Hz |
| 640X480 | 640x480 | @ 60Hz,75Hz |
*Specifications are subject to change without notice.
| Problem | Possible solutions |
| THERE IS NO LED DISPLAY or SCREEN SAYS NO SIGNAL | Make sure you switched to the correct source. Check both sources to see video is on the other source. Check your video cable. It might be corrupt. Swap out the video cable for another one to see if the monitor will work. Check your power plug. See if it is fully plugged in on both the monitor and the wall. |
| MONITOR SAYS "SIGNAL OUT OF RANGE" | If you have a CRT monitor, please connect the CRT monitor to the computer and change the refresh rate down to 60 Hz via your video card's display settings menu. After the setting of 60 Hz has been changed, you can then use the LED Monitor on the computer.1. To change the setting go to display settings by right clicking on your desktop with nothing selected.Choose the PROPERTIES option.2. Click on the SETTINGS tab, verify the resolution is NOT higher than 1920 x 1080, and click on the ADVANCED button.3. Click on the MONITOR tab and change the refresh rate to 60 Hz4. Click on OK 2-3 times to finalize your change.If you do NOT have a CRT monitor or it's already broken, please make sure both the LED monitor and your computer is turned off.1. Turn on the LED monitor and the computer.2. While the computer is turned on, press the "F8" key on your keyboard continuously until selection menu appears and select the "Safe Mode" option.3. When you've entered Safe Mode please uninstall any video card driver and monitor driver by using either the Add/ Remove Programs" icon or going into "System Properties" and manually removing anything under "Monitors" and "Display Adapters". After removing all the drivers, please reboot your computer and you should be able to see windows.4. Please install your monitor driver first, then your video card driver. Please remember to make sure your refresh rate should be at 60Hz |
| I CAN'T OPEN THE OSD | You need to have a valid video signal going through the monitor before you can turn on the OSD. |
| I CANNOT GET THE RESOLUTION2560x1440 | Sometimes your video card will not read the monitor correctly and will not allow you to achieve the resolution you want. Rebooting your computer will solve the situation. You can also make sure your video card's video drivers are up to date. You can find what video card you have by clicking on START then RUN. Type in"DXDIAG". When the diagnostic window pops up, click on the DISPLAY tab. The program will tell you what video chipset you have. Copy that name then search it with an online search engine like GoogleTM. Find your video card company's web address and search for newer drivers. If updating your drivers does not work, you probably have one of the older video cards and cannot achieve a widescreen resolution. You'll need to upgrade your video card to a newer one. |
| THE VIDEO IS TOO BRIGHT NO MATTER WHAT I ADJUST | Sometimes having older video cards this type of problem might happen due to newer LEDs having to provide HD video capability and not being fully compatible with older video cards. You can try adjusting the contrast to a lower value and adjust the brightness to compensate. |
| THE WORDS AND VIDEO ARE TOO BLURRY | Are you using the monitor's native resolution? If not you'll need to switch resolution to the native 2560 x 1440 resolution to make the words clearer.If the words are still blurry, please try enabling or disabling CLEAR TYPE function from windows. |
| THE COLORS ARE NOT CORRECT | Sometimes the colors are not correct because your DP or HDMI cable is loose or corrupt. Please try reconnecting your cable or swap out your current cable to see if the problem persists. |
| HOW DO I RESET THE MONITOR | Make sure there is a valid video signal to the monitor and press menu to open the OSD. Look for RESET under the OTHER options. |
| I CHANGED MY COLOR SETTINGS NOW I CAN'T GET THE FACTORY DEFAULT BACK. | Open the OSD, under OTHER, select RESET to reset all values back to factory default. |
| THE WORDS ARE TOO SMALL AT 2560x1440 | At the native resolution of 2560 x 1440 some people might feel that the words are too small to read. You can change the size of the words in Windows Operating System via its display properties.For Windows XP1. Right click on the background with nothing. selected. Left click on the PROPERTIES option.2. Click on the SETTINGS tab3. Under SETTINGS, click on the ADVANCED button.4. Under GENERAL tab, change the size of the words by selecting the option NORMAL SIZE and change it to LARGE SIZE.5. Click on OK on all windows to exit.6. Once you have finished rebooting, the computer is ready for use.For Windows VISTA or Windows 8 or Windows 101. Right click on the Wallpaper, Left click on the PERSONALIZE option.2. Click on ADJUST FONT SIZE(DPI) option on the left column and3. Click on CONTINUE.4. In there you can change the size of the words by changing from the option DEFAULT SCALE to LARGE SCALE.5. Click on APPLY to finalize your selection.6. Once you have finished rebooting, the computer is ready for use. |
Specification
| Display panel | |
| Active Area /Screen Size | 32" (diagonal 31.5") |
| Aspect Ratio | Widescreen 16:9 |
| Resolution | Native: 2560 x 1440 |
| Brightness | Typ: 300cd/m ^2 |
| Dynamic Contrast | 1,000,000:1 (3,000:1 typical) |
| Response Time | 14ms (6.5ms with OD function on) |
| Refresh Rate75Hz Maximum Refresh Rate | |
| Viewing Angle | H/178° V/178° |
| Colors | 16.7 million colors(72% NTSC) |
| LED Backlight lifetime | ≥30,000 hours |
| Monitor Display | |
| Dimension | Without Stand: 28.2"x 15.5"x 1.5"With Stand: 28.2"x 19.7"x 7.4" |
| Wall Mount Pattern | 100mm x100mm |
| Base Screws | M5x12mm (1pc)Neck Screw M4X10mm (4pcs) |
| Power input | DC 19V =6.32A |
| Tilt | -5°~15° |
| Speaker Specification | 4Ω2W x2 |
| Features | |
| On Screen Display Control (OSD) | Luminance, Image Setup, Color Temp, OSDSetting, Reset, Extra |
| OSD Language | English (Default), French, Spanish |
| ECO Mode | Standard. Movie. Game. Internet |
| Preset Game Mode | NA |
| Blue Light Elimination | Available |
| I/O | HDMI x 1, DP x 1, USB-C x 1, USB x 2, Audio Out x 1 |
| Compliance | FCC. CTUVus. CEC. CA65 HDMI USB-IF |
*Specifications are subject to change without notice.
FCC STATEMENT
This device complies with Part 15 of the FCC Rules. Operation is subject to the following two conditions: (1) This device may not cause harmful interference, and (2) This device must accept any interference received, including interference that may cause undesired operation.
LET'S REGISTER YOUR PRODUCT

natural_image
Blue globe icon with 'WWW' text and a cursor arrow, no additional text or symbolsIt's super easy, just head on over to elementelectronics.com/register
BENEFITS OF REGISTERING YOUR PRODUCT:

Support Get assistance quickly by pre-registering your product.

News & Offers Take advantage of the latest news and special offers from Element.

Updates Stay current with important product updates and notifications.
WE'RE HERE TO HELP
Find resources and get help for product setup, connecting devices, technical issues, downloading manuals and more!
We're available 24 hours a day, 7 days a week

elementelectronics.com

1.888.842.3577

customerservice@elementelectronics.com
- Table of Contents
- Opening the Package
- Package Contents
- Installation
- Installing the Monitor Stand Assembly
- Removing the Stand for Wall Mounting
- Identifying Front and Rear Panel Front View
- Panel Tilt Adjustment
- Buttons from Up to Down
- Connections Connecting to Your Computer
- On Screen Display (OSD) Menu
- Input Source
- Brightness/Contrast
- Color Setting
- Picture Quality Setting
- Display
- Audio
- OSD
- Other
- Supported HDMI/DP Resolutions
- Specification
- FCC STATEMENT
- LET'S REGISTER YOUR PRODUCT
- BENEFITS OF REGISTERING YOUR PRODUCT:
- WE'RE HERE TO HELP
Brand : Element
Model : EM3FPAC32BC
Category : Monitor