72002 - Electric stove WestBend - Free user manual and instructions
Find the device manual for free 72002 WestBend in PDF.


| Product Type | Bread Machine |
| Model Number | 72002 |
| Brand | WestBend |
| Dimensions (approx.) | 12 x 10 x 12 inches |
| Weight (approx.) | 10 lbs |
| Power Rating | 600 watts |
| Voltage | 120 V |
| Bread Loaf Size | 1.5 lb or 2 lb |
| Programs | 12 pre-programmed cycles including basic, whole wheat, gluten-free, etc. |
| Crust Control | Light, medium, or dark |
| Delay Timer | Up to 13 hours |
| Keep Warm Function | Yes, up to 1 hour |
| Viewing Window | Yes, with interior light |
| Non-stick Bread Pan | Yes, removable |
| Measuring Cup and Spoon | Included |
| Baking Capacity | 2 lb maximum |
| Construction Material | Stainless steel and plastic |
| Cleaning | Wipe exterior with damp cloth; wash pan and kneading blades in warm soapy water |
| Safety Features | Automatic shut-off, cool-touch handle |
| Spare Parts Availability | Bread pan and kneading blades sold separately |
| Warranty | 1 year limited |
Frequently Asked Questions - 72002 WestBend
User questions about 72002 WestBend
0 question about this device. Answer the ones you know or ask your own.
Ask a new question about this device
Download the instructions for your Electric stove in PDF format for free! Find your manual 72002 - WestBend and take your electronic device back in hand. On this page are published all the documents necessary for the use of your device. 72002 by WestBend.
USER MANUAL 72002 WestBend
Register this and other West Bend ^® products through our website: www.westbend.com
Model No. 72000 through 72700
RECIPES AND INSTRUCTIONS
TO PREVENT PERSONAL INJURY OR PROPERTY DAMAGE, READ AND FOLLOW THE INSTRUCTIONS AND WARNINGS IN THIS CARE AND USE INSTRUCTION MANUAL.
IMPORTANT SAFEGUARDS
Use electricity safely and wisely! Observe safety precautions when using your skillet including the following:
- Read all instructions before using.
- If the skillet features unassembled cover rest, knob or handle/legs, be sure they are assembled and fastened properly. See assembly instructions later in this booklet.
- Always attach heat control to skillet first, then plug cord into wall outlet. After cooking and serving, turn heat control to "off" and unplug from wall outlet. Let skillet cool before removing heat control. Do not leave skillet plugged in when not being used.
- Skillet should always be unplugged before cleaning.
- Do not let cord touch hot surfaces or hang over the edge of counter, table or other surface area.
- Your skillet and its heat control should not be used outdoors, placed near a hot gas or electric burner or placed in a heated oven.
• Do not immerse heat control, its cord and plug in water or other liquid. - Do not touch skillet or its cover when they are hot. Use handles and knobs for lifting and carrying. Be very careful when moving skillet if it contains hot liquid. Let cool before pouring out.
• Supervise closely when skillet is being used by or near children. - Use your skillet only for cooking tasks described in this booklet. Do not use attachments with your skillet unless recommended by The West Bend Company.
- Do not use your skillet if it or its cord or heat control has been damaged or if it is not working properly. Return your skillet, if it is within the warranty period, to the West Bend Company for examination and/or repair.
SAVE THESE INSTRUCTIONS
Your skillet needs no special care other than cleaning. If servicing becomes necessary, within the warranty period, return your skillet to The West Bend Company. See Warranty information for details. Do not attempt to repair it yourself.
WARNING: To prevent personal injury or property damage caused by fire, always unplug this and other appliances when not in use.
WARNING: This appliance may contain substances know to the State of California to cause cancer, birth defects or other reproductive harm. FOR HOUSEHOLD USE ONLY
This appliance has a polarized plug (one blade is wider than the other). As a safety feature, this plug will fit in a polarized outlet only one way. If the plug does not fit fully into the outlet, reverse the plug. If it still does not fit, contact a qualified electrician. Do not attempt to defeat this safety feature.
SPECIAL NOTE: This booklet contains instructions for electric skillets with different styles of covers and made of different materials such as metal or glass. These different covers require special care and handling. Be sure to follow the correct care and handling instructions for your particular skillet cover.
INSTRUCTIONS FOR CARE AND USE
- Clean Before Using
CAUTION: To prevent personal injury or electric shock, always remove heat control before immersing this product in water. Do not immerse the heat control, its cord and plug in water or other liquid.
Wash skillet, cover, rack if included, in hot soapy water with a sponge or dishcloth to remove any manufacturing oils. Rinse thoroughly and dry.
• Condition the Non-Stick Interior Surface
The non-stick surface must be conditioned to ensure stick-free cooking. Lightly wipe a teaspoon of cooking oil with paper toweling or soft cloth over the entire surface. The skillet is now ready to use.
• Assemble Cover Knob or Strap Handle on Metal Cover.
Metal skillet cover will feature a knob or strap type handle which must be assembled before use. Follow directions below for assembly:
- Assemble Cover Knob
Parts Included: Tools Required:
Cover Knob Common Phillips Screwdriver
Phillips Screw
- Remove screw form bottom of cover knob. Attach knob to cover with screw as shown in Diagram 1. Tighten with screwdriver until secured, but do not over-tighten to prevent stripping of threads. Do not use cover without cover knob attached. See Diagram below.
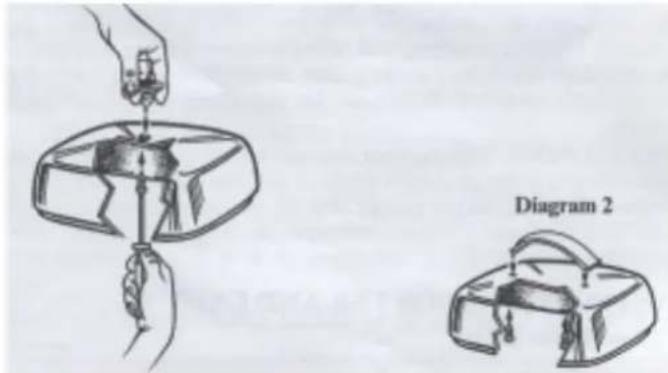
- Assemble Strap Handle
Parts Included: Tools Required:
Strap Handle Common Slotted Screwdriver
2 Slotted Screws
- Remove handle and screws for plastic bag. Attached handle to cover with screws as shown in Diagram 2. Tighten with screwdriver until secured, but do not over-tighten to prevent stripping of threads. Do not use cover without handles attached. See Diagram 2.
• Assemble Handle/Leg Before Using (unassembled models only).
CAUTION: To prevent personal injury or property damage, be sure handles are securely attached before use. Never use skillet without attached handle/legs. Make sure that screws are inserted straight into skillet mounting projections for proper assembly. To prevent stripping of threads, do not over-tighten.
Parts Included:
2 Handle/Legs
4 Long Handle/Leg Screws
2 Leveling Washers
Tools Required:
Common Slotted Screwdriver

Handle/Leg Assembly:
- Place the skillet upside down on tabletop or countertop.
- Position one handle/leg on side of skillet with socket, lining up holes in handle with mounting projections on skillet. See Diagram below.
- Using appropriate screwdriver, securely attach handle with the screws provided (2 long screws per handle). See Diagram above. Repeat steps 1 and 2 to assemble the second handle on the opposite side of the skillet.
-
To assure proper installation of skillet handles, place assembled unit right side up on a flat surface and lift item with handles. Handles should feel tightly secured.
-
If the skillet rocks when place on a flat surface, remove screw on the leg which is not resting on the surface. Install one of the enclosed washers between the skillet mounting projection and the handle. Replace the screw following the instructions 3 and 4 above. If the skillet is not level after the addition of the washer, add the second leveling washer in the same manner as the first.
\* SPECIAL SAFEGUARDS FOR GLASS COVER\*
CAUTION: Failure to follow these instructions may cause immediate or later breakage of glass cover, which can result in personal injury or property damage. Carefully read and follow the safeguards below:
CAUTION: Glass cover can shatter from direct heat.
• DO NOT place cover under broiler, microwave browning element or in a toaster oven.
- DO NOT set glass cover on hot burner or on oven heat vent
- DO NOT use cover if it has been used in the above manners even if it does not look damaged. See warranty section in this booklet on how to obtain a replacement cover.
CAUTION: Glass cover can shatter if cooled suddenly. Avoid sever temperature change.
- DO NOT take cover directly from freezer to oven.
• DO NOT set hot glass cover on cold wet surface; let cover cool before placing in water.
• ALWAYS handle hot cover with dry pot holders or oven mitts; do not use wet cloths.
• ALWAYS set hot glass cover on dry, heat-protective surface for gradual cooling.
CAUTION: Chips, cracks or deep scratches weaken the glass cover. Weakened glass can shatter during use.
- DO NOT use cover if chipped, cracked or scratched. Discard immediately. See Warranty section in this booklet on how to obtain a replacement cover.
- ALWAYS follow care and use instructions in this booklet to avoid chip, cracks and scratches due to hitting rims, using metal utensils, using abrasive scouring pads or cleaners or accidental impact.
CAUTION: To prevent personal injury or steam burns when removing cover from skillet base:
• ALWAYS use both hands when removing or replacing the glass cover.
• ALWAYS use pot holders or oven mitts when removing glass cover from skillet or when replacing it.
• ALWAYS tilt cover toward you to prevent steam burns. See Diagram 4.
COOKING INSTRUCTIONS
- Operating the Skillet
- Always use skillet on a dry, level, heat resistant surface. Be sure your hands are dry.
- Attach heat control to skillet, making sure it is sat at "OFF". Plug cord into 120 volt, AC electrical outlet ONLY.
CAUTION: To prevent personal injury or property damage, inspect cordset for damage or wear before each use. Do not use your product if it or its cord has been damaged or if it is not working properly.
CAUTION: Your skillet has a short cord as a safety precaution to prevent personal injury or property damage resulting from pulling, tripping or becoming entangled with the cord. Do not allow children to be near or use this skillet without close adult supervision. If you must use a longer cordset or an extension cord when using your skillet, the cord must be arranged so it will not drape or hang over the edge of a countertop, tabletop or surface area where it can be pulled on by children or tripped over. To prevent electric shock, personal injury or fire, the electrical rating of the extension cord you use must be the same or more than the wattage of the skillet (wattage is stamped on the underside of skillet).
- Preheat skillet, uncovered, for 2 to 4 minutes until desired temperature is reached, unless recipe states not to preheat. Signal light on heat control will be on while skillet is heating.
- Refer to the Temperature Guide in this booklet for selecting the correct heat setting. (If food is frozen, use heat setting as indicated but allow longer cooking time.)
- When signal light on the heat control goes out indicating that the cooking temperature was reached, add the food. Heat may be increased or decreased, depending on personal preference and type or amount of food being prepared. The signal light will go on and off during cooking to indicate that proper temperature is being maintained.
ALWAYS USE POT HOLDER OR OVEN MITTS WHEN HANDLING COVER AS HANDLES BECOME HOT.
- At the end of the cooking period, set the heat control to WARM for serving or at OFF if food is to be removed immediately from skillet. After dial is set at OFF, unplug cord from wall outlet. Invert glass cover and use as a serving dish if desired.
CAUTION: To prevent personal injury or property damage, handle the heat control carefully if you remove it from the product immediately after cooking because the metal probe will be hot—do not touch the metal probe or let it touch anything or any surface that may burn.
• Using Glass Cover as a Casserole Dish (not metal cover)
If your skillet features a glass cover, it may be inverted for use as a casserole dish in a conventional or convection oven up to preheated temperatures of 400^ F or in a microwave oven. If casserole should be covered during baking in oven, use aluminum foil in conventional ovens and plastic wrap in microwave oven.
Do not use glass cover under broiler or in browning unit or in a toaster oven as breakage can occur.
CAUTION: To prevent personal injury or property damage, do not use glass cover on range top unit as it could shatter due to sudden temperature change.
• Cooking with Butter, Shortening or Oil
Foods may be prepared with or without butter, shortening or oil. When frying, using a small amount will improve the flavor, color and/or crispness of meat, fish, poultry and eggs. Meat may be cooked in its own juices if skillet is covered and heat control is set at SIMMER.
• Using Cooking Tools on the Non-Stick Surface
Plastic, rubber and wooden cooking tools are recommended for use on non-stick surface. Smooth-edged metal cooking tools may be used with care. However, do not use sharp-edged metal tools (forks, knives, mashers, beaters or food choppers) as scratching may occur. Minor scratching will affect only the appearance of the surface; it will not harm its non-stick property or the food prepared in the skillet.
CLEANING INSTRUCTIONS
- Clean After Every Use
To keep your skillet looking attractive and cooking efficiently, clean it thoroughly after each use.
• Let Skillet Cool by Itself
After using skillet, let it cool by itself. Do not pour cold water into skillet while it is hot. Although made of extra-thick aluminum a sudden change in temperature may cause the metal to warp.
- Remove Heat Control
After skillet has cooled, remove the heat control.
CAUTION: To prevent personal injury or electric shock, do not immerse heat control, its cord and plug in water or other liquid. Wipe clean with a damp cloth if necessary.
• Retighten Loose Handle/Legs and Knobs
CAUTION: To prevent personal injury or property damage, check, skillet for loose handles after each use. Retighten loose screws with the appropriate tool, but do not over-tighten. Over-tightening can result in stripping of screw or cracking of handle/leg or knobs.
- In-the-Sink Cleaning
- Clean the non-stick interior surface of the skillet with hot soapy water, using a non-metal cleaning pad such as a Scrunge® Scrubber Sponge, Dobie® Scotch-Brite Cookware Scrub 'n Sponge®. A dishcloth or sponge may give the non-stick surface a clean look but will not remove the tiny food particles that can settle in the finish. Do not use metal scouring pads or harsh scouring powders.
- Clean the exterior finish of the skillet with hot soapy water using a sponge or dishcloth. A non-metal cleaning pad such as Scrunge® Scurbber Sponge, Dobie® Scotch-Brite Cookware Scrub 'n Sponge® and/or a non-abrasive cleaner such as Bon Ami® or Copper Glow® may be used if necessary. Do not use metal scouring pads or harsh scouring powders.
- Clean the non-coated aluminum underside of the skillet with a nylon or metal pad. A cleaning powder may also be used if necessary.
- Clean the skillet cover and rack, if included, with a sponge or dishcloth only. Do not use any type of scouring pad or cleaning powder on glass or metal cover. The aluminum underside of the cover may discolor during use, which is normal.
CAUTION: Do not use abrasive scouring pads or cleaners on glass cover as scratching can occur. Scratching can weaken glass and cause breakage when used. Be careful not to drop glass cover or hit it sharply with cooking utensils.
- After washing, always rinse the skillet, cover and rack thoroughly with clear hot water. Any detergent left on the skillet or cover after cleaning can cause staining when the appliance is reheated.
- Dishwasher Cleaning
The skillet (with heat control removed), cover and rack may be cleaned in automatic dishwasher. However, the underside of the skillet and the inside of the cover (non-coated aluminum surfaces) will darken. This happens when minerals in water and chemicals used in water purification are combined with detergent and the high heat of the drying cycle. Position the skillet and cover in the dishwasher so they are not touching one another or other objects being washed. The non-stick surface of the skillet must be reconditioned with cooking oil after each dishwasher cleaning.
SPECAIL CLEANING INSTRUCTIONS
After consistent use, the non-stick surface may discolor. Minor stains are considered normal and do not affect the performance of the skillet. Dark and widespread staining, however which usually results from overheating and/or improper cleaning, may lessen the effectiveness of the non-stick property. If staining occurs, treat with a commercial cleaner for non-stick finishes such as Dip-It® coffee pot destainer. Follow the package directions. If staining is quite severe, simmer longer or repeat cleaning. (Do not use household bleach to clean non-stick finish as it will permanently fade it.) After using the commercial cleaner, wash skillet thoroughly, rinse and dry. Recondition the non-stick interior surface with a teaspoon of cooking oil before using. Dip-It® coffee pot destainer is available in most grocery and department stores.
- Removing a Mineral Film
A spotted white film may form on the non-stick surface. This is a buildup of minerals from water and is not a defect in the finish. To remove, soak a soft cloth in lemon juice or vinegar and rub onto the finish. After cleaning, wash, rinse and dry. RECONDITION THE NON-STICK SURFACE WITH COOKING OIL BEFORE USING.
STORAGE - For compact storage, invert cover and nest inside skillet base.
TEMPERATURE GUIDE
WARM Crisping; keeping meats, casseroles and vegetables warm for serving
SIMMER Simmering, warming leftovers; preparing frozen foods; heating soups; cooking casseroles, pudding, cereals; baking apples; braising and roasting meats and poultry
225° F Preparing gravy; white sauce and cheese sauce; cooking frozen and fresh vegetables; baking beans
250°F Scrambling and frying eggs
300°F Frying bacon and sausage
325° F Browning meats and poultry; frying fish, ham chicken and potatoes
350°F Grilling French toast and pancakes
375° F Grilling Sandwiches
400°F Heating frozen pizza
ROASTING- Best Suited for skillets with a high dome cover.
Beef, pork, lamb, veal and poultry may be roasted in the skillet. To obtain more satisfactory results, a metal wire rack, which may be included with your skillet, should be used to lift the food off the cooking surface. If rack is not included with skillet, a metal wire rack that fits into the bottom of the skillet and is about 12 inch high with smooth support legs can be used. Follow these basic guidelines.
- To help seal in natural juices, roasts should be browned in the skillet before roasting. Simply preheat the skillet uncovered, at 325^ and add the roast. Brown, as desired, on all sides. Remove roast, place rack into the skillet and replace roast on rack, fat side up. Season as desired.
- Insert meat thermometer tip into thickest part of roast making sure it does not touch a bone or rest in fat. Cover skillet and roast at 225^ . If spattering of juices becomes excessive during the roasting period, reduce the temperature to SIMMER. A small amount ( 12 cup) of water may be added if desired.
- Roast meat to recommended or desired internal temperature, see Roasting Chart. Turn skillet OFF. Avoid removing the cover too frequently as roasting time will be lengthened. Remove roast from rack and allow to stand 10 minutes for easier carving. Always use hot pads to remove rack. Juices in the skillet may be used for gravy, if desired.
POULTRY
- Place unstuffed roasting onto rack in the skillet. Baste with melted butter or margarine and season as desired. Using seasoned salt will help to brown any poultry.
- Insert meat thermometer tip into thick part of thigh making sure the tip does not touch a bone. Cover and roast at 225^ . Reduce temperature setting to SIMMER if spattering becomes excessive. A small amount of water ( 12 cup) may be added if desired. Baste poultry occasionally with melted butter or margarine if desired.
- Roast poultry to an internal temperature of 180^ to 185^ . Turn skillet OFF. Remove poultry from rack and allow to stand 10 minutes for easier carving. Always use hot pads to remove rack. Juices may be used for gravy if desired.
Note: Roasting duckling and goose is not recommended due to the excess amount of grease that accumulates,
HAM---Fresh, Smoked or Canned
- Place ham on rack in skillet. Score if desired. Insert meat thermometer tip into thickest part of ham, making sure the tip does not touch a bone or rest in fat. Cover and roast at 225°. Reduce temperature setting to SIMMER if spattering becomes excessive. A small amount ( 12 cup) of water may be added if desired.
- Roast ham to internal temperature recommended for type of ham being prepared. If desired, ham may be glazed at the end of the roasting period. Turn skillet OFF. Remove ham from rack and allow to stand 10 minutes before carving. Use hot pads to remove rack as it will be hot.
Note: If space permits, scrubbed and pricked potatoes may be baked on rack around meat or poultry. Medium sized potatoes will require about 1 hour of baking time at 225^ .
ROASTING CHART
| Meat | Internal | Temperature |
| Becf 140° rare | ||
| 160° medium | ||
| 170° well | ||
| Pork: Fresh 170° | ||
| Smoked 160° cook before eating | ||
| 140° fully cooked | ||
| Canned 140° | ||
| Lamb 170° to 180° | ||
| Veal | 170° | |
| Poultry 180° to 185° | ||
STEAMING
Your skillet may include a square metal wire rack for steaming. If a steaming rack is not included, a metal wire rack that fits into the bottom of the skillet and is about 12 inch high can be used providing it has smooth support legs that will not scratch the non-stick interior.
Follow the guidelines for teaming foods in your skillet:
- Place steaming rack into bottom of skillet and add 2 to 3 cups of water. Place food to be steamed directly on rack, in a single layer, to ensure even cooking. Cover skillet.
- Steam food at 225^ until desired or recommended doneness is obtained. See Steam Guide. If food is steamed more than 20 minutes more water may need to be added to prevent skillet from boiling dry. ALWAYS REMOVE COVER CAREFULLY DUE TO ESCAPING STEAM. After steaming, turn skillet OFF and unplug cord from electrical outlet. Remove food from rack and allow skillet to cool before cleaning.
STEAM GUIDE
| Food | Time | Special Tips |
| Chicken Breasts- 1 pound | 15-20 minutes | Cook thoroughly |
| Fist Steaks- 2 to 3 | 10-15 minutes | Defrost if frozen. Steam until fish flakes |
| Fish Filets- 2 to 3 | 8-10 minutes | Defrost if frozen. Steam until fish flakes |
| Hot Dogs 8-10 | 8-10 minutes | Heat thoroughly |
| Lobster Tails- 2 medium | 10-12 minutes | Defrost if frozen |
| Shrimp | 5-8 minutes | Peel and de-vein before steaming |
| Artichoke | 25-30 minutes | Leave whole, trimming points off leaves. |
| Asparagus- 1 pound | 10-12 minutes | Trim ends |
| Broccoli- 1 pound spears | 12-15 minutes | Trim ends |
| Cauliflower- 1 large head | 12-15 minutes | Remove core |
| Corn-on-the-cob- 4 cars | 10-12 minutes | Remove husk and silk |
Breakfast Brighteners
SCRAMBLED EGGS
Break eggs into a bowl with 1-tablespoon water, milk or cream for each egg; add salt and pepper. Blend thoroughly. Preheat skillet to 250^ uncovered. Melt butter or margarine (1 tablespoon for 2 eggs). Pour in egg mixture. As eggs begin to set, gently lift cooked portion with spatula to allow uncooked portion to flow underneath. Continue cooking until all of the egg mixture has set, 5 to 7 minutes. Quickly remove to warmed platter. Serve at once.
FRIED EGGS
Preheat skillet, uncovered, at 250^ . Melt a small amount of butter, margarine or bacon fat (about 1 teaspoon per egg) in skillet. Break eggs, one at a time, into small cup. Slip eggs into skillet. Cook slowly to desired doneness or turn egg over quickly when whites are set and then cook to desired doneness. Sprinkle with salt and pepper.
POACHED FRIED EGGS
Fry eggs as directed in previous recipe, but use enough fat to coat skillet. Immediately add 12 teaspoon water or milk for each egg. Cover. Cook to desired doneness, 5 to 7 minutes.
EGGS BAKED IN BEEF HASH
Spread one 1-pound 9¼- ounce can corned beef or roast hash (or homemade variety) in lightly greased skillet. Using bottom of custard cup make 6 deep wells in hash. Dot with butter or margarine. Break an egg into each well. Season with salt and pepper, cover each egg with 1 tablespoon milk or cream. Cover, and turn temperature control to 225°. Bake 15-20 minutes or until set. Serve from skillet, keeping hot at WARM. Makes 6 servings
BRUNCH EGGS'N MUFFINS
3 English muffins, split
1 tablespoon butter or margarine
2 tablespoons minced onion
1 10 12 -ounce can condensed cream of chicken soup
^2/_3 cup milk
6 eggs
-
Preheat skillet, uncovered, at 350°. Toast muffins on skillet surface, with cut side facing down, about 5 minutes.
-
Reduce heat to 225^ . Add butter or margarine and melt. Sauté onions, about 2 minutes. Stir in soup mix. Heat to boiling.
-
Crack eggs into soup mixture. Cover and cook until eggs are done, about 5 minutes. Place 1 egg on each muffin half and spoon sauce over top. Garnish with paprika and parsley flakes, if desired. Makes 6 servings
SAUSAGE
Links: Place links in cold skillet and add small amount of water. Cover, and simmer at 225^ for 10 minutes. Do not prick. Turn heat up to 300^ and pan fry until brown, 15 to 20 minutes.
Patties: Place patties in cold skillet and fry at 300^ for 10 minutes per side or until brown.
BACON
Place slices in cold skillet. Heat at 300^ . Fry first side about 7 to 8 minutes. Turn slices and fry 4 to 5 minutes longer or until bacon is crisp. Drain on absorbent paper.
HAM
Slice ham 14 to 12 inch thick. Trim off some fat to rub on skillet. Preheat at 325^ , uncovered. Cook ham slowly until brown on one side, 6 to 8 minutes. Turn and brown second side.
PANCAKES
2 cups sifted flour
2 tablespoons sugar
1 tablespoon baking powder
12 teaspoon salt
1 34 cups milk
2 eggs, slightly beaten
2 tablespoons oil or melted shortening
-
Sift flour with sugar, baking powder and salt. In mixing bowl, combine milk, eggs and oil. Add dry ingredients. Blend thoroughly, but only until lumps disappear.
-
Preheat skillet, uncovered at 350^ . Pour scant 14 cup batter onto skillet for each pancake and bake until bubbles break and edges are cooked. Turn and bake on the other side, about 1 minute per side. Serve immediately. Makes 20 to 24 pancakes.
FRENCH TOAST
2 eggs, slightly beaten
1 cup milk
14 teaspoon salt
3 tablespoons, butter or margarine
8-10 slices, day old bread
- In small bowl, thoroughly combine eggs, milk and salt.
- Preheat skillet, uncovered at 350^ . Melt 1 tablespoon butter or margarine. Dip bread in egg mixture, turning to coat both sides.
- Place 3 to 4 slices into skillet. Fry until golden brown. Turn and brown the other side. Repeat procedure for additional bread slices. Serve hot with maple syrup, jelly or honey. Makes 4 to 5 servings.
CHEESE-TOMATO SCRAMBLE
14 cup butter or margarine
10-12 eggs, well beaten
1 cup dairy sour cream
1 cup grated cheddar cheese
2 large tomatoes, peeled and diced
4 green onions, thinly sliced
1 teaspoon salt
14 teaspoon pepper
- Preheat skillet at 250^ . Add butter or margarine; heat until it sizzles. Beat eggs well in mixing bowl. Add sour cream and stir to combine. Pour egg mixture into skillet.
- When eggs begin to set, add cheese, tomatoes, onion, salt and pepper. Stir until eggs are completely set and cheese is melted. Reduce heat to WARM for serving. Makes 8 servings.
EGG AND BEEF SCRAMBLE
2 tablespoons butter or margarine
1 3 12 ounce package of dried beef
6 eggs, slightly beaten
^1/_8 teaspoon pepper
3 tablespoons milk or cream
1 3-ounce package cream cheese, softened.
- Preheat skillet at 225°. Melt butter or margarine
- Cut or tear beef into bite-sized pieces. Sauté in butter 3 to 4 minutes until lightly browned. Reduce heat to SIMMER.
- Combine eggs and pepper, milk and cream cheese. Pour into skillet and slowly cook until cheese is melted and eggs are thoroughly cooked, but are still moist and glossy, 6 to 8 minutes. Makes 4 servings.
ORANGE PANCAKES
2 eggs, slightly beaten
1 ½ cups milk
14 cup oil
2 teaspoons grate orange rind
14 cup orange juice
2 cups pancake mix
- In large mixing bowl combine eggs, milk, oil, orange rind and juice. Add pancake mix. Stir until smooth.
- Preheat skillet, uncovered, at 350^ . Pour scant 14 cup batter into skillet for each pancake and bake until it bubbles break and edges are cooked. Turn and bake on other side, about 1 minute per side. Serve immediately with Orange Sauce. Makes 24 4-inch cakes.
ORANGE SAUCE
In saucepan, blend 2 tablespoons sugar, 13 cup orange juice and a bit of grated orange rind with 13 cup melted butter. Heat until hot.
MAIN DISHES
CHICKEN WITH RICE
3 - 3 12 pounds frying chicken, cut into serving pieces
14 cup butter or margarine
1 12 cups instant rice
1 10 ½ -ounce can condensed cream of chicken soup
1 cup water
1 teaspoon instant chicken flavored bouillon crystals or 1 chicken bouillon cube
-
Preheat skillet, uncovered at 325^ . Add butter or margarine and allow to melt. Place chicken pieces into skillet and brown on both sides. Season with salt and pepper. Remove chicken from the skillet.
-
Reduce heat to SIMMER and add rice. Combine soup, water and bouillon. Pour 12 mixture over rice. Replace chicken pieces into skillet over rice. Pour remaining soup mixture over chicken. Cover and simmer 35 to 40 minutes or until chicken is done. Reduce heat to WARM for serving. Makes 4 to 6 servings.
TURKEY & DRESSING DINNER
13 cup butter or margarine
12 cup shredded carrots
13 cup chopped onion
1 8-ounce package corn bread stuffing mix
2 cups chopped cooked turkey
1 10 ½ -ounce can condensed cream of chicken soup
1 cup water
1 teaspoon poultry seasoning
1-2 teaspoon parsley flakes
-
Melt butter or margarine in skillet, uncovered at 300°. Add carrots and onion. Sauté until carrots are tender.
-
Reduce heat to 225^ . Stir in stuffing mix and turkey. In small bowl, combine soup, water and poultry seasoning. Stir into turkey mixture.
-
Heat through, uncovered, about 10 minutes, stirring occasionally. Sprinkle with parsley. Reduce heat to WARM for serving. Makes 4 to 6 servings.
TIP: One 8-ounce package of herb-seasoned stuffing mix may be substituted for corn bread stuffing mix. Omit the poultry seasoning.
GLORI-FRIED CHOPS
4-6 pork or lamb chops, 12 inch thick
salt and pepper
1 10 ½ - ounce can condensed cream of mushroom or celery soup
-
Preheat skillet, uncovered at 325°. Brown chops for 5 minutes per side. Season with salt and pepper.
-
Cover chops with soup. Reduce heat to SIMMER. Cover and simmer 15 to 20 minutes or until fork tender. Reduce heat to WARM for serving. Makes 4 to 6 servings.
SWISS STEAK
2 tablespoon flour
1 teaspoon salt
^1/_4 teaspoon pepper
2 pounds round stead, 1-inch thick
1 tablespoon shortening
12 cup minced onion
12 cup finely chopped celery
12 cup finely chopped green pepper
1 cup canned tomatoes, undrained
2 cups water
-
Combine flour with salt and pepper. Pound mixture thoroughly into both sides of steak. Cut into serving size pieces.
-
Preheat skillet, uncovered, at 375°. Melt shortening. Brown steak for 5 minutes per side.
- Combine vegetables and water. Pour over steak. Cover, reduce heat to SIMMER and simmer until tender 1 to 1 12 hours. Reduce heat to WARM for serving. Makes 4 to 6 servings.
FIESTA BURGERS
14 cup margarine or butter, softened
12 teaspoon garlic powder
3 hamburger buns, split in half
1 pound ground beef
1 cup shredded processed American hot pepper cheese or pepper pasteurized cheese spread
14 cup chopped onion
2 teaspoons Worcestershire sauce
1 teaspoon salt dash pepper
- In small bowl, cream together margarine or butter and garlic powder. Spread evenly on hamburger buns.
- In medium bowl, combine ground beef, cheese, onion, Worcestershire sauce, salt and pepper. Mix thoroughly. Shape into 6 patties 12 inch thick.
- Preheat skillet, uncovered, at 375^ . Brown buttered buns in skillet until golden. Remove from skillet. Keep warm.
- Reduce heat to 325^ . Pan fry patties on each side to desired doneness. Serve open faced on hamburger bun. Makes 6 sandwiches.
TIP: For fun garnish, skewer a cherry tomato inside two onion rings.
TUNA NOODLE WITH PEAS
1 10 ½ - ounce can condensed cream of celery soup
1 cup milk 1 cup water
12 cup celery salt
12 teaspoon dill weed
14 cup chopped onion
6 ounces egg noodles (3 cups uncooked)
1 10-ounce package frozen peas
1 6 12 ounce can tuna, drained
- In skillet, combine soup, milk, water, celery salt, dill weed and onion. Bring to boil at 225^ .
- Add uncooked noodles and bring to a second boil. Reduce heat to SIMMER and cook, covered, for 30 minutes or until noodles are tender. Stir in peas and tuna. Cook uncovered an additional 10 minutes.
GRILLED HAM SANDWICHES
2 cups cooked ground ham
3or 4 sweet pickles, finely chopped
13 cup mayonnaise or salad dressing
8 slices sandwich-style white bread
2 tablespoons soft butter or margarine
- To prepare ham filling, combine ham, pickles and mayonnaise. Spread 4 slices of bread with mixture.
- Top with remaining bread. Spread outside of each sandwich with butter or margarine.
- Preheat skillet at 375^ . Toast sandwiches on both sides until golden brown, about 3 to 4 minutes per side. Makes 4 servings.
CHEESY TACOS
3 tablespoons butter or margarine
1 cup chopped onion
1 cup chopped celery
1 pound ground beef, browned
1 16-ounce can whole tomatoes, undrained and chopped
1 16-ounce can tomato paste
1 teaspoon salt
12 teaspoon sugar
12 -1 teaspoon chili powder
14 teaspoon hot pepper sauce
16 taco shells
shredded lettuce
- Melt butter or margarine in skillet, uncovered, at 250° Add onion and celery; sauté until crisp.
- Reduce heat to SIMMER. Add browned ground beef, tomatoes, tomato paste, salt, sugar, chili powder and hot pepper sauce. Cook gently, uncovered at SIMMER for 20 to 30 minutes.
- Cut cheese into 12 x 12 x 3-inch sticks. Place 1 cheese stick into each taco shell. Add about 14 cup tomato mixture to each taco. Top each with shredded lettuce. Makes 16 tacos.
COMPANY LIVER WITH ONIONS
1 ½ pounds of calf or baby beef livers, cut into 1-inch strips
12 teaspoon salt
^1/_8 teaspoon pepper
14 up butter or bacon drippings
2 onions, thinly sliced
1 8-ounce can sliced mushrooms, undrained
2 cups dairy sour cream
1 teaspoon Worcestershire sauce.
- Season liver with salt and pepper. Preheat skillet, uncovered, at 325°. Melt butter and sauté onions until tender. Add liver and brown on all sides.
- Add mushrooms with liquid. Reduce heat to SIMMER. Simmer covered for 8 to 10 minutes
- Add sour cream and continue to cook for an additional 8 to 10 minutes. Add Worcestershire sauce. Make 6 servings.
PORK 'N BEER
1-1 12 pounds port tenderloin, cut 1-inch thick
^1/4 cup flour
2 tablespoons vegetable oil
1 4-ounce can mushroom stems and pieces, undrained
1 12-ounce can beer
14 teaspoon garlic salt
12 teaspoon salt
14 teaspoon pepper
^1/8 teaspoon cloves
1 tablespoon flour
14 cup cold water
- Dredge meat in 14 cup flour. Preheat oil in skillet, uncovered, at 350^ . Brown meat, about 5 minutes per side.
- Stir in mushrooms, beer, garlic salt, pepper and cloves. Bring to a boil; cover. Reduce heat to SIMMER. Simmer for 1 hour or until meat is tender.
- Thoroughly blend 1-tablespoon flour with water. Increase heat to 225^ . Vigorously stir flour-water mixture into meat mixture. Cook stirring constantly until thickened. Reduce heat to WARM for serving. Makes 4 to 6 servings.
SKILLT POT ROAST
3-4 pound chuck or blade roast
12 teaspoon seasoned salt
12 teaspoon seasoned pepper
1 1-3/8 ounce envelope dry onion soup mix or thinly sliced onion.
- Preheat skillet, uncovered, at 325°. Brown roast for 5 minutes per side.
- Reduce heat to SIMMER. Sprinkle roast with seasoned salt and pepper and soup mix or onion. Roast covered for 2 to 2 12 hours. Turn after 1 hour. Vegetables such as quartered potatoes or cut carrots may be added at this time. Juices that accumulate may be used for gravy. Makes 6 to 8 servings.
PAN-FRIED FISH
1 ½ - 2 pounds fish fillets
1 egg, slightly beaten
12 cup milk
12 cup flour, cornmeal or cracker crumbs salt and pepper
14 cup butter or margarine
- Wash fish. Pat dry on paper toweling. Cut into serving-sized pieces.
- In small bowl, combine egg with milk. Dip fish into mixture and coat with flour, cornmeal or cracker crumbs. Sprinkle salt and pepper.
- Preheat skillet, uncovered, at 325°. Melt butter or margarine. Place coated fish fillets in skillet.
- Fry fish until golden brown, about 6 to 8 minutes. Turn fish only once. Makes 6 to 8 servings.
BEEF ORINETAL CASSEROLE
1 pound lean ground beef
12 cup chopped onion
14 cup diced green pepper
1 cup elbow macaroni, cooked according to package directions
1 6-ounce can sliced water chestnuts, undrained
1 2-ounce jar diced pimento, undrained
1 10 ½ ounce can condensed cream of celery soup
1 cup milk
1 tablespoon soy sauce
12 cup chow mein noodles
-
Brown ground beef with onion and green pepper in uncovered skillet at 325°. Remove any excess grease.
-
Add cooked macaroni, water chestnuts, pimento, soup, milk and soy sauce. Stir to blend. Bring just to a boil, cover and reduce heat to SIMMER. Heat 10 to 15 minutes. Reduce heat to WARM setting and garnish with chow mein noodles for serving. Makes 6 to 8 servings.
BEEF-TOMATO DINNER
1 pound lean ground beef
2 tablespoons minced onion
1 tablespoon parsley flakes
1 6-ounce can tomato paste
3 cups water
1 teaspoon salt
2 teaspoons chili powder
1 4-ounce can mushroom stems and pieces, undrained.
1 7-ounce package macaroni
-
Brown beef in skillet at 325^ . Add onion, parsley flakes, tomato paste, water, salt, chili powder, mushrooms and macaroni. Bring to boil.
-
Cover, reduce heat to SIMMER and cook for 20 to 25 minutes or until macaroni is tender. Reduce heat to WARM for serving. Makes 5 to 6 servings.
GRILLED TOMATO-CHEESE SANDWICHES
12 cup mayonnaise or salad dressing
12 teaspoon dried dill weed
8 slices white bread
4 slices Swiss cheese
1 large tomato, thinly sliced
1 tablespoon butter or margarine
1. In small bowl, combine mayonnaise and dill weed. Spread on side of each of the 8 slices of bread. Put cheese and tomato slices on 4 of the bread slices over dressing, cover with remaining 4 bread slices, dressing side down.
2. Preheat, skillet, uncovered, at 375^ . Melt butter or margarine. Toast sandwiches on both sides until golden brown about 4 minutes per side. Makes 4 servings.
BEEF ROAST
4-5 pound rolled beef roast* salt and pepper
-
Preheat skillet, uncovered, at 325^ . Add roast and brown on all sides. Remove roast
-
Place rack in skillet. Replace roast on rack. Season as desired. Insert meat thermometer into thickest part of the roast.
-
Cover and roast at 225^ until desired doneness is reached, about 112 hours for rare ( 140^ ), 2 hours medium ( 160^ ) or 212 hours for well done ( 170^ ). Let roast stand 10 minutes before carving. Makes 6 to 8 servings.
*Skillet with high dome cover only.
PINEAPPLE -GLAZED HAM SLICE
1 pound ham slice, cut 34 to 1-inch thick
^3/_4 cup orange juice
14 cup brown sugar
4 pineapple slices
-
Preheat skillet, uncovered, at 325°. Cook ham until lightly browned on both sides for 8 to 10 minutes per side. Remove from skillet and keep hot.
-
Combine orange juice and brown sugar in skillet. Bring to boil at 225^ . Add pineapple slices and glaze fruit.
-
Arrange fruit on top of ham. Pour orange sauce over ham and serve at once. Makes 3 to 4 servings.
MEAT LOAF
1 ½ pounds ground beef
^3/_4 cup quick cooking oatmeal
1 12 teaspoons salt
14 teaspoon pepper
14 cup chopped onion
1 8-ounce can tomato sauce
1 egg, slightly beaten
-
Combine all ingredients thoroughly. Pack firmly into a 9 x 4-inch loaf pan.
-
In preheated skillet at 225^ . Melt 1-tablespoon butter. Remove meat loaf from pan, place in skillet and bake, covered for 30 minutes.
-
Carefully turn meat loaf to second side. Continue to bake for an additional 15 to 20 minutes. Let stand 5 minutes before slicing. Makes 8 servings.
ROAST CHICKEN
4-5 pound roasting chicken*
2 tablespoons melted butter or margarine seasoned salt
- Rinse chicken and pat dry. Place on rack in skillet. Baste with butter or margarine and season with salt. Insert meat thermometer into thick part of thigh.
- Cover and roast at 225^ until thermometer registers 180^ - 185^ , about 1 12 to 2 hours. Let chicken stand 10 minutes before carving. Makes 4 to 6 servings.
*Whole chicken can only be prepared in skillet with high dome cover. If you skillet has a low dome the chicken can be halved. Place cut side down and cook about 1 hour.
SOUTHERN FRIED CHICKEN
3-4 pounds frying chicken
12 cup flour
14 teaspoon baking powder
12 teaspoon salt
^1/_4 teaspoon pepper
12 teaspoon paprika
14 cup light cream
1 cup oil or shortening
-
Cut chicken into serving sized pieces. Wash and pat dry with paper toweling.
-
Combine flour, baking powder, salt pepper and paprika. Dip pieces of chicken in cream, then coat as thickly as possible with seasoned flour.
-
Preheat skillet, uncovered, at 325^ with oil, about 5 minutes. Arrange coated chicken pieces in skillet. Brown on all sides about 10 minutes.
-
Cover, reduce heat to 225^ and fry for 30 minutes. Remove cover and fry an additional 10 minutes. Makes 4 to 6 servings.
EASY SKILLET DINNER
2 cups diagonally sliced celery
1 tablespoon chopped onion
2 tablespoons butter or margarine
2 12 cups water
^3/_4 teaspoon salt
^1/_2 teaspoon basil
14 teaspoon oregano
1 cup raw rice
1 1-pound can tomatoes, reserve liquid
2 6 ½-ounce cants tuna, drained, or 5 -ounce cans boned chicken or turkey
-
In skillet, combine celery, onion, butter or margarine, water, salt, basil, oregano and reserved tomato liquid. Bring to boil at 225°.
-
Add rice and bring to second boil. Reduce heat to SIMMER and cook, covered, for 30 minutes until rice is fluffy. Add tomatoes and tuna, chicken or turkey. Heat, covered to serving temperature. Reduce heat to WARM for serving. Makes 6 servings.
CHOW MEIN
1 pound ground lean fresh pork
2 cups diagonally sliced celery
12 cup chopped onion
1 teaspoon seasoned salt
1 tablespoon brown sugar
14 teaspoon pepper
14 cup mushroom liquid
1 tablespoon flour
1 cup milk
14 cup soy sauce
1 1-pound can bean sprouts or Oriental vegetables, drained
1 4-ounce can mushroom stems and pieces, drained (reserve liquid)
-
Preheat skillet, uncovered, at 325^ . Add ground pork, celery and onion. Stir gently and fry until browned, about 5 minutes. Remove excess grease.
-
Add salt, brown sugar, pepper and reserved mushroom liquid. Stir to combine. Cover, reduce heat to SIMMER and cook for 20 minutes.
-
Stir in flour. Increase heat to 225^ . Gradually add milk and stir until thickened.
-
Add soy sauce, bean sprouts or Oriental vegetables and mushrooms. Stir to combine. Heat until hot about 5 minutes. Reduce heat to WARM for serving. Serve with rice or chow mein noodles. Makes 6 servings.
THE POTATO PATCH
BAKED POTATOES
Scrub and prick skins of potatoes. Place on rack, over and bake at 400^ until done. Medium-sized potatoes require about 45-55 minutes of baking.
AMERICAN FRIED POTATOES
For each serving:
1 medium potato
1 tablespoon butter or margarine
Pare at least 4 potatoes; slice thin. Rinse in cold water and pat dry. Season as desired. Preheat skillet, uncovered, at 325^ . Melt butter or margarine. Spread potatoes evenly in skillet. Cover and fry 15 minutes. Uncover and turn potatoes and season with salt and pepper. Fry, uncovered for 15 minutes, loosening potatoes occasionally.
CANDIED SWEET POTATOES
^3/_4 cup firmly packed brown sugar
12 cup light corn syrup
14 cup butter or margarine
14 teaspoon salt
6-8 cooked sweet potatoes, peeled and halved lengthwise.
- In skillet, combine brown sugar, corn syrup, better or margarine and salt.
- Bring mixture to a boil at 250^ . Stir until butter melts and sugar dissolves.
- Add sweet potatoes, baste with syrup. Reduce heat to SIMMER. Cook for 15 minutes.
- Uncover; cook, basting occasionally, for 10 minutes or until potatoes are well glazed. Reduce heat to WARM for serving. Makes 6 to 10 servings.
POTATO NOBLESSE
4 cups sliced cooked or canned potatoes
14 cup chopped green pepper
14 cup chopped onion
14 cup chopped pimento, optional
12 cup French dressing
13 cup shredded cheddar cheese
-
Marinate potatoes, green pepper, onion and pimento in salad dressing for 2 hours.
-
Put marinated mixture in skillet. Cook at SIMMER for 20 minutes.
-
Reduce heat to WARM for serving. Sprinkle with cheese and serve hot. Makes 6 to 8 servings.
SCALLOPED POTATOES
4 cups peeled, diced potatoes
12 cup minced onions
2 teaspoons salt
1 12 cups milk
12 cup grated cheddar cheese
Dash pepper
14 cup cracker or bread crumbs.
- Combine potatoes with onion, salt and milk in skillet. Cook, covered, at SIMMER for 30 to 40 minutes, or until tender.
- Sprinkle cheese, pepper and crumbs over top. Continue cooking, uncovered for 15 to 20 minutes. Reduce heat to WARM for serving. Makes 6 to 8 servings.
DISTINCTIVE DESSERTS
BAKED APPLES
6-8 apples cored
^1/_4 cup raisins
14 cup chopped nuts
3 tablespoons butter or margarine
1 cup brown sugar
^1/_2 teaspoon cinnamon
1 cup water
- Remove 1-inch peel around top of each cored apple. Place apples in skillet. Fill each center with combined raisin, and nut mixture. Dot with butter or margarine.
- Combine sugar and cinnamon. Sprinkle over apples. Add water to skillet. Cover, set control at 300° and bring water to a boil.
- Reduce heat to SIMMER. Cook apples until tender about 30 to 35 minutes. Baste with syrup occasionally. Makes 6 to 8 servings.
SKILLET COOKIES
2 tablespoons butter or margarine
1 cup pitted dates, cut into small pieces
1 cup sugar
2 eggs
3 cups oven-toasted rice cereal
12 cup chopped nuts
Flaked coconut
- Preheat skillet, uncovered at 250°. Melt butter or margarine. Add dates, sugar and eggs.
- Continue cooking, stirring constantly until mixture forms a ball between 15 to 18 minutes. Cool slightly.
- Stir in cereal and nuts. Combine thoroughly.
- Divide mixture into two equal portions, shape into a roll 2 inches in diameter. Roll in flaked coconut. Wrap in waxed paper. Refrigerate.
- To serve, cut into slices about 14 -inch thick. Makes 5 dozen cookies.
REPLACEMENT PARTS
Replacement parts for skillets such as cover, handle/legs or heat control, may be obtained directly from the West Bend Company. To order, contact West Bend Customer Service at the address or phone number below. Or order on-line at www.westbend.com
Be sure to include the model number of your skillet, a description of the part you want and the quantity. Along with this information, please include your name, shipping address, phone number and your Visa, MasterCard or Discover credit card number for the billing of the part(s) to you. Your state's sales tax and a shipping/handling fee will be added to your total charge. Or, to send a check or money order, call (262) 334-6949 to obtain purchase amount. Please allow 2 to 3 weeks for delivery.
90-DAY WARRANTY
Your West Bend® Warranty covers failures in the materials and workmanship of this Electric Skillet for 90 days from the date of original purchase. This warranty does not cover discoloration or damage to non-stick surface caused by misuse, abuse, scratches or overheating. Any failed part of the Electric Skillet will be repaired or replaced without charge.
This warranty gives you specific legal rights, and you may also have other rights, which may vary from state to state. This warranty does not cover alleged damage caused by misuse, abuse, accidents or alterations to the Electric Skillet.
If you think the Electric Skillet has failed or requires service within the warranty period, please carefully package and return the Electric Skillet, prepaid an insured with a description of the difficulty to:
Attn: Housewares Customer Service
1100 Schmidt Road
West Bend, WI 53090-1961
The West Bend Company
(262)
Please ensure that you enclose the dated cash register sales slip or proof of purchase in order to assure warranty coverage. Also include your name, shipping address and daytime phone number.
WEST BEND®

NOT VALID IN MEXICO
This booklet contains important and helpful information on your new product. Please file it for handy reference to instructions and proper use and care, warranty and service information.
For your personal reference, attach dated sales receipt for warranty proof of purchase and record the following information:
Date of purchase or received as a gift:
Where purchased and price if known:
L5474 ©The West Bend Company Printed in U.S.A.
- RECIPES AND INSTRUCTIONS
- TO PREVENT PERSONAL INJURY OR PROPERTY DAMAGE, READ AND FOLLOW THE INSTRUCTIONS AND WARNINGS IN THIS CARE AND USE INSTRUCTION MANUAL.
- IMPORTANT SAFEGUARDS
- SAVE THESE INSTRUCTIONS
- INSTRUCTIONS FOR CARE AND USE
- - Clean Before Using
- \* SPECIAL SAFEGUARDS FOR GLASS COVER\*
- COOKING INSTRUCTIONS
- - Operating the Skillet
- ALWAYS USE POT HOLDER OR OVEN MITTS WHEN HANDLING COVER AS HANDLES BECOME HOT.
- • Using Glass Cover as a Casserole Dish (not metal cover)
- • Cooking with Butter, Shortening or Oil
- • Using Cooking Tools on the Non-Stick Surface
- CLEANING INSTRUCTIONS
- - Clean After Every Use
- • Let Skillet Cool by Itself
- - Remove Heat Control
- • Retighten Loose Handle/Legs and Knobs
- - In-the-Sink Cleaning
- - Dishwasher Cleaning
- SPECAIL CLEANING INSTRUCTIONS
- - Removing a Mineral Film
- STORAGE - For compact storage, invert cover and nest inside skillet base.
- TEMPERATURE GUIDE
- ROASTING- Best Suited for skillets with a high dome cover.
- POULTRY
- HAM---Fresh, Smoked or Canned
- STEAMING
- Breakfast Brighteners
- SCRAMBLED EGGS
- FRIED EGGS
- POACHED FRIED EGGS
- EGGS BAKED IN BEEF HASH
- BRUNCH EGGS'N MUFFINS
- SAUSAGE
- BACON
- HAM
- PANCAKES
- FRENCH TOAST
- CHEESE-TOMATO SCRAMBLE
- EGG AND BEEF SCRAMBLE
- ORANGE PANCAKES
- ORANGE SAUCE
- MAIN DISHES
- CHICKEN WITH RICE
- TURKEY & DRESSING DINNER
- GLORI-FRIED CHOPS
- SWISS STEAK
- FIESTA BURGERS
- TUNA NOODLE WITH PEAS
- GRILLED HAM SANDWICHES
- CHEESY TACOS
- COMPANY LIVER WITH ONIONS
- PORK 'N BEER
- SKILLT POT ROAST
- PAN-FRIED FISH
- BEEF ORINETAL CASSEROLE
- BEEF-TOMATO DINNER
- GRILLED TOMATO-CHEESE SANDWICHES
- BEEF ROAST
- PINEAPPLE -GLAZED HAM SLICE
- MEAT LOAF
- ROAST CHICKEN
- SOUTHERN FRIED CHICKEN
- EASY SKILLET DINNER
- CHOW MEIN
- THE POTATO PATCH
- BAKED POTATOES
- AMERICAN FRIED POTATOES
- CANDIED SWEET POTATOES
- POTATO NOBLESSE
- SCALLOPED POTATOES
- DISTINCTIVE DESSERTS
- BAKED APPLES
- SKILLET COOKIES
- REPLACEMENT PARTS
- 90-DAY WARRANTY
- WEST BEND®
- NOT VALID IN MEXICO
Brand : WestBend
Model : 72002
Category : Electric stove