
Forbidden Sky - Board game Gamewright - Free user manual and instructions
Find the device manual for free Forbidden Sky Gamewright in PDF.

| Product Type | Cooperative Board Game |
| Brand | Gamewright |
| Model | Forbidden Sky |
| Number of Players | 2–5 (Recommended 4) |
| Ages | 10 and up |
| Playing Time | Approximately 60 minutes |
| Box Dimensions | 29.5 x 29.5 x 7.5 cm |
| Weight | Approximately 1.0 kg |
| Power Source | 3 x 1.5V LR44 button cell batteries (for rocket lights/sound) |
| Main Game Components | 37 cards, 36 Power Platform tiles, 32 circuit components, 13 meter clips, 6 wooden pawns, Storm meter, rocket, starting grid |
| Game Designer | Matt Leacock |
| Illustrator | C.B. Canga |
| Publisher | Gamewright (a division of Ceaco, Inc.) |
| Release Year | 2018 |
| Game Mechanics | Cooperative play, tile placement, circuit building, hand management, variable player powers |
| Difficulty Levels | Novice, Normal, Elite, Legendary (via Blueprint cards) |
| Cleaning Instructions | Wipe with dry cloth; remove batteries before long-term storage |
| Battery Safety | Do not mix old/new batteries; do not mix battery types; remove if exhausted; keep out of reach of children |
| Spare Parts | Not sold separately; contact Gamewright for replacements |
| Warranty | Standard manufacturer warranty against defects |
Frequently Asked Questions - Forbidden Sky Gamewright
User questions about Forbidden Sky Gamewright
0 question about this device. Answer the ones you know or ask your own.
Ask a new question about this device
Download the instructions for your Board game in PDF format for free! Find your manual Forbidden Sky - Gamewright and take your electronic device back in hand. On this page are published all the documents necessary for the use of your device. Forbidden Sky by Gamewright.
USER MANUAL Forbidden Sky Gamewright
37 cards, divided as follows:
• 15 Storm cards
• 14 Equipment cards
• 6 Adventurer cards
• 2 Blueprint cards
36 Power Platform tiles
32 circuit components:
• 16 wires (12 short, 4 long)
- 6 lightning rods
- 6 small capacitors
• 3 large capacitors
- 1 launch pad
13 meter clips
6 wooden pawns
1 Storm meter
1 Storm meter stand
1 starting grid
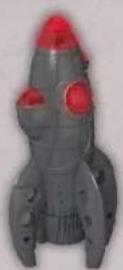
1 rocket
OVERVIEW
Your flying machine is about to dock at a secret power platform
that floats 7,000 feet above the ground. As you descend, you catch a glimpse of a rocket poking out of the fog. If your team can power this rocket, you'll be able to blast off with the hope of finally finding the Archean's long-lost civilization. In order to succeed in your mission, you will have to explore the platform and wire together all the necessary components (capacitors, lightning rods, and the launch pad) into a true electrical circuit. Your problem? The platform is in the middle of a fierce storm that threatens every move with lightning and high winds. Will your team be able to power up the rocket before you're electrocuted or blown off to the depths below?
SETUP
1. Examine the Tiles
Look at the 36 Power Platform tiles to get an idea of what they look like. (See "Tile Symbols" for more.) Flip them all face down, mix them, and stack them to form the Power Platform draw pile.

natural_image
Five abstract geometric patterns with no text or symbols, rendered in grayscale and patterned surfaces (no readable text or symbols)2. Place the Starting Grid
If this is your first time playing, assemble the starting grid by placing the wind compass arrow into the center hole on one end and snapping the bottom connector to secure it. Place the starting grid in the center of the playing area. Put a lightning rod on the location indicated. Treat this grid as 4 separate tiles from now on. Point the wind compass towards the platform as shown below.

natural_image
Illustration of a candle flame over two purple film strips, with a small fish nearby (no text or symbols)
Equipment Deck

Storm Deck

Small & Large Capacitors
natural_image
Illustration of a fantasy helmet with decorative elements and arrows, no readable text or symbols present.Starting Grid

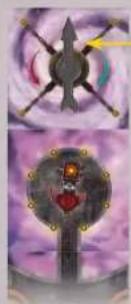
Lightning Rods
Wind Compass
Landing Pad

Launch Pad

Short & Long Wires
3. Place the Rocket and Circuit Components
Place the rocket, launch pad, large and small capacitors, lightning rods, and wires near the starting grid. (If this is your first time playing, remove the tab from the side of the rocket.)
4. Set Up the Storm
Place the red clip on the Storm meter according to the number of players and push the meter into its stand.
natural_image
Aerial view of a green and blue rectangular structure with numbered labels (1, 2) and a red arrow pointing to it, no readable text or symbols beyond labels.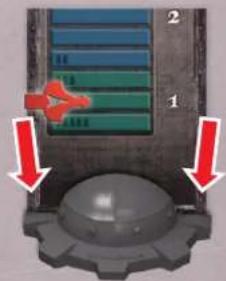
5. Divide the Cards
Separate the cards into the Storm deck (radar pattern back), Equipment deck (gear back), Blueprint cards, and Adventurer cards. Shuffle the Storm deck and place it face down near the Storm meter. Shuffle the Equipment deck and place it off to the side.
6. Choose Your
Difficulty Level
Select the Blueprint card corresponding to the difficulty you want to play and place it face up, near the circuit components. (For example, if this is your first time playing a cooperative game, select the Novice blueprint. If you have played Forbidden Island or Forbidden Desert, or if you are an experienced cooperative game player, start on Normal.) Put the other Blueprint cards back into the box.
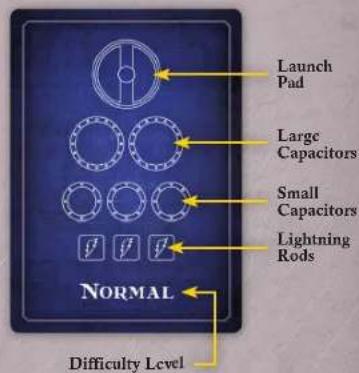
Note that each Blueprint shows the outline of the launch pad (up top) along with a different number of large capacitors, small capacitors, and lightning rods, which you will have to wire into a circuit to win the game. See "Creating the Circuit" for more details.
7. The Adventurers Appear
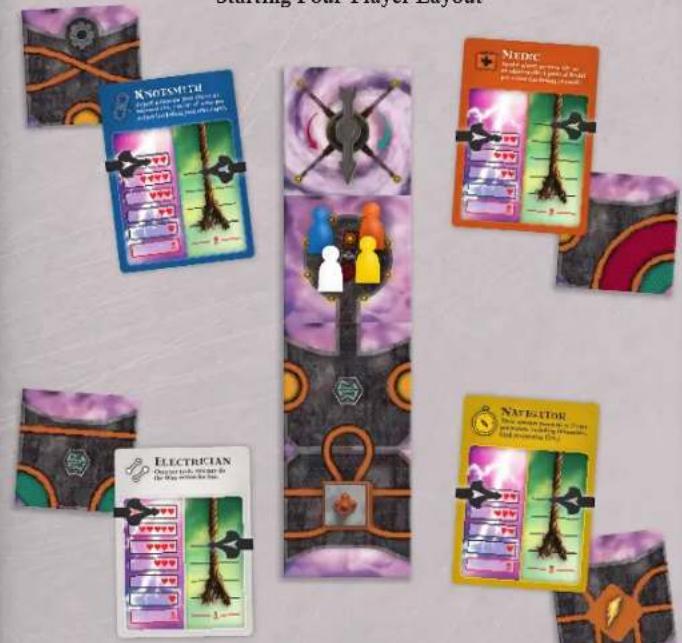
Shuffle the 6 Adventurer cards and randomly deal 1 to each player. Take a moment to read aloud the powers written on the front of your cards so your teammates know your strengths. (More details can be found in "Meet the Adventurers.") You'll find you may need to take advantage of each player's special abilities in order to win. The front of your card also shows your adventurer's health meter and rope meter.

Take 2 clips and place them over your card so that one covers the top mark of your health meter (left) and one covers the top mark of your rope meter (right). As you lose health or your rope takes wear, you'll move these clips down.
Take a pawn matching the color of your Adventurer card and place it on the "landing pad" tile on the starting grid. Put any extra Adventurer cards, pawns, and clips back into the box.
Hand a tile from the Power Platform draw pile to each player. Players should keep these tiles face up.
Starting Four-Player Layout
ORDER OF PLAY
The person who last traveled by air goes first and play continues to the left. On every turn, do the following things in order:
- Take up to 4 actions.
- Draw and resolve Storm cards equal to the Storm Intensity.
The parts of each turn are described below. Also note that every Adventurer card shows a quick reference guide on the back.
![ORDER OF PLAY 1. Diving a game; 2. Draw and write down each right in the game field. ACTIONS More • Use an advance the player to deliver • Show you have your own. Saw [Do you move, I'm sure] (do it) Dipling Play a game to find this • Use a game to save you with your own you're Wye And we need to have a difficulty to do it.](/content/2026/05/1059012/images/8e70e899ec81245cb7a28e2d194d0ce58445ce5a30bb72f2d676b337c2ea2095.jpg)
1. TAKE UP TO 4 ACTIONS
You may take up to 4 actions each turn (0, 1, 2, 3, or 4, in any order). Your teammates are allowed (and encouraged!) to give you advice on the best actions to take during your turn. Select any combination of the following actions: Move, Scout, Explore, and Wire.
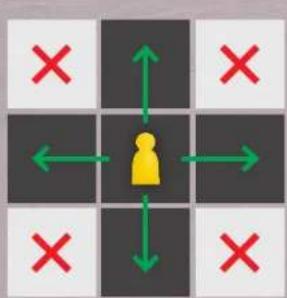
Move
You may move your pawn to an adjacent tile for 1 action per move: either up, down, left, or right, but never diagonally. The surface of the platform must be connected across the two tiles for you to move in this way. (You cannot move across sky.) You may also move between teleporter tiles for 1 action (see "Teleporters").
flowchart
graph TD
    A["User Icon"] --> B["Left"]
    A --> C["Right"]
    A --> D["Down"]
    A --> E["Left"]
    A --> F["Right"]
    style A fill:#ff0000,stroke:#333
    style B fill:#ff0000,stroke:#333
    style C fill:#ff0000,stroke:#333
    style D fill:#ff0000,stroke:#333
    style E fill:#ff0000,stroke:#333
    style F fill:#ff0000,stroke:#333

flowchart
graph TD
    A["Start"] --> B{Green Arrow}
    B --> C["Yellow Arrow"]
    C --> D["Red Arrow"]
    D --> E["Green Arrow"]
    E --> F{Red Arrow}
    F --> G["Yellow Arrow"]
    G --> H["Red Arrow"]
    H --> I["Green Arrow"]
    I --> J{Red Arrow}
    J --> K["Yellow Arrow"]
    K --> L["Red Arrow"]
    L --> M["Green Arrow"]
    M --> N{Red Arrow}
    N --> O["Yellow Arrow"]
    O --> P["Red Arrow"]
    P --> Q["Green Arrow"]
Scout
Draw the top tile from the Power Platform draw pile and place it face up in front of you. You may hold up to 3 tiles at any one time. If you already have 3 tiles, you may not perform the Scout action.

flowchart
graph TD
    A["Purple Box"] --> B["Blue Box with Orange X"]
    B --> C["Orange X"]
Explore
Place one of your tiles onto the Power Platform so that it is adjacent to the tile that your pawn is on. Rotate the tile any way you want as long as at least one printed copper wire on the new tile connects to a printed wire on your current tile. (You cannot connect a side with only sky to an adjacent tile.) The tile must also square up with the adjacent tile.

If the tile you place has a lightning rod symbol on it, immediately place a lightning rod component on the tile.
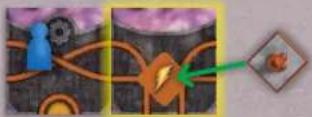
If the tile you place completes a circle filled with a color, immediately place the corresponding circuit component on top of it:
Small Capacitor

Launch Pad
natural_image
Abstract geometric pattern with concentric circles and a central purple star-like shape (no text or symbols)
Large Capacitor
natural_image
Abstract geometric pattern with green and purple circles on dark background, no text or symbols presentYou may place the launch pad in any orientation.
You may place a component even if you've already placed the number of components required in your chosen blueprint. However, once every component of a given type is used, you can no longer place any more of that type of component. (For example, once you place all 3 large capacitors, you cannot place another large capacitor, even if you make another green circle.)
Note that all component part circles have printed copper wires as their borders. You may place a tile so that a component part connects with a plain wire on another tile. This counts for connecting wires, but the component will remain incomplete.
natural_image
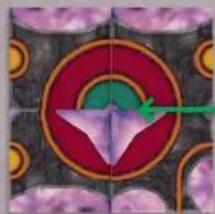
Abstract geometric pattern with purple circles, orange curved lines, and a hexagon (no text or symbols)Tile Symbols

Lightning Rod (6 tiles, including one on the starting grid)
Whenever you place a tile with the lightning rod symbol on the power platform, immediately add a lightning rod component. These components are all struck by lightning every time a Lightning Strikes! card is drawn from the Storm deck. Be careful how you place these—any players on tiles connected to a lightning rod by wires (both physical and printed) will be jolted when lightning strikes.

Teleporter (7 tiles, including one on the starting grid)
You may move between any two tiles containing teleporters for 1 action.

Gear (12 tiles)
When you explore (place) a tile with a gear symbol on it, you've discovered a valuable piece of equipment that can help your team during the game. Immediately draw the top card from the Equipment deck, place it face up in front of you, and read its instructions. Keep the card until you decide to use it. Important: Equipment cards may only be used by the player who possesses them. However, you may pass them for free at any time to another player on your tile. Most equipment can be played at any time (see specifics on each card), though as a general rule they cannot reverse the effects of Storm cards once they have been drawn. There is no hand limit for Equipment cards.

Wind Shelter (3 tiles)
Wind Shelters provide protection from High Winds cards. Pawns on tiles with these symbols are not blown when a High Winds card is drawn. Note: If your pawn is blown to a tile with this symbol during the Storm phase, you are sheltered from future high winds as long as your pawn is on it.

Faraday Cage (4 tiles)
Faraday Cages provide protection from electricity. Pawns on tiles with these symbols are not jolted (and therefore do not lose any health) when lightning strikes. Note: If your pawn is blown to a tile with this symbol during the Storm phase, you are protected from future lightning strikes as long as your pawn is on it.
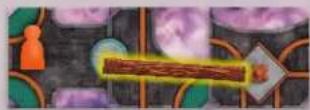
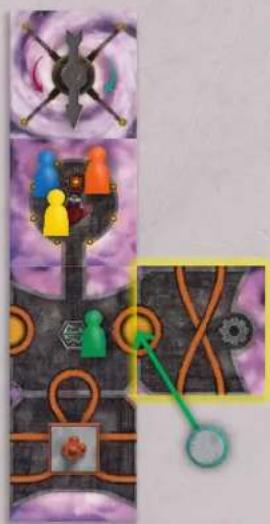
Wire
Add a physical wire to a circuit component attached to your tile so that it connects to another circuit component. You may use either a short or long wire, as long as it reaches the other component. If the wire cannot span both components without falling off, you may not add it there.
You may also perform this action to remove a wire from a circuit component on your tile. (When you do this, return the wire to the supply.)
Important:
• Each component may have up to two wires connecting to it.
• To complete the circuit, the launch pad must have one wire touching each metal side.
• Make sure that each wire makes a clean connection to the metal of the component.
- You do not have to wire a component if it's beyond the required minimum to complete your blueprint.
Examples:
The Medic connects a wire between a small capacitor and a lightning rod.


natural_image
Game map with colored zones and a white character (no text or symbols)The Electrician connects a wire between a large and a small capacitor.


natural_image
Game map interface with a circular progress bar and player icon (no readable text or symbols)The Knotsmith connects a wire between the launch pad and a small capacitor.

You can connect a wire to the launch pad as long as your pawn is on one of the four tiles that hold it.
CREATING THE CIRCUIT
In order to take off in the rocket, you must wire the launch pad into a circuit, using the components listed on your blueprint card.
The blueprint shows the minimum number of each kind of component that must be used. (You may use more.) The components must be in a true series circuit, that is, they must be connected in a circle starting with a wire connected to one side of the launch pad and ending with a wire connected to the opposite side of the launch pad.
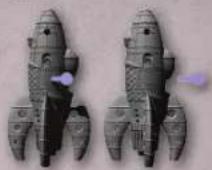
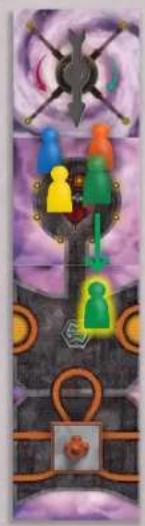
Watch out! As soon as the very last wire is placed, the rocket will launch! Be sure each pawn is on one of the four tiles holding the launch pad before you place the last wire, or the rocket will leave adventurers behind—and everyone will lose the game!
Don't get left behind! The yellow pawn will be abandoned if the circuit is completed.
A wire here will complete the circuit. The blue, white, and orange pawns will lift off with the rocket.
natural_image
Game map layout with numbered moves and player icons (no readable text or symbols)Improper Circuit Connections
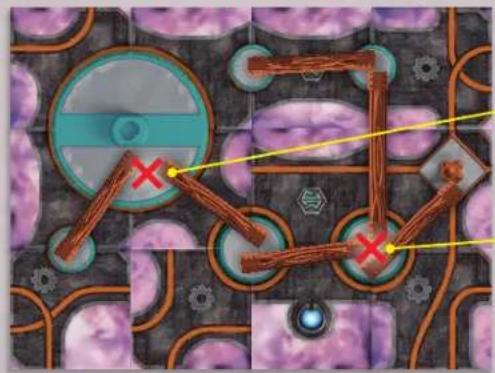
Only one wire can connect to each side of the launch pad.
A maximum of two wires can connect to any component.
Share Equipment
In addition to the above actions, players on the same tile may pass equipment cards at any time during the game for free. Unless your adventurer says otherwise, you may not pass tiles or share ropes or health.
Turn Example
① Move the Surveyor one platform tile.
natural_image
Illustration of a stylized human figure with colorful accents, set against a purple and black background (no text or symbols)② Scout to draw a tile.

natural_image
Two abstract images showing a purple cloud-like shape transforming into a textured orange patterned square (no text or symbols)③ Explore to add the tile. (The small capacitor is added automatically.)
natural_image
Game map interface showing character placement and route map with green arrows (no readable text or symbols)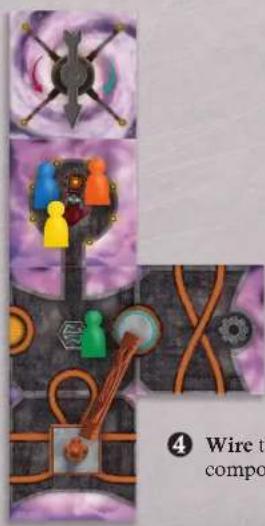
4 Wire the two circuit components together.
2. DRAW STORM CARDS
After taking actions, you must now take on the role of the lightning storm! Draw cards from the Storm draw pile equal to the Storm Intensity level on the Storm meter. Reveal and resolve the cards one at a time and discard them face up into the discard pile. Note: You may look through the discard pile at any time during the game.

Lightning Strikes!
There are 6 Lightning Strikes! cards in the Storm deck. When you draw one of these cards, every lightning rod in play is struck by lightning and every player on a lightning rod tile receives a "jolt" of electricity and loses 1 health. In addition, the electricity from the lightning rod follows the wires (both the printed wires on the board and the
wires added by the players) that can trace a path to them, and everyone on a tile that is connected in this way gets jolted and loses 1 health. (Lower the clip on the health meter on your Adventurer card to the next lowest tick mark.) If a clip reaches the symbol, that character has received too many jolts and everyone loses the game.
Note: A player only ever loses 1 health per Lightning Strikes! card.
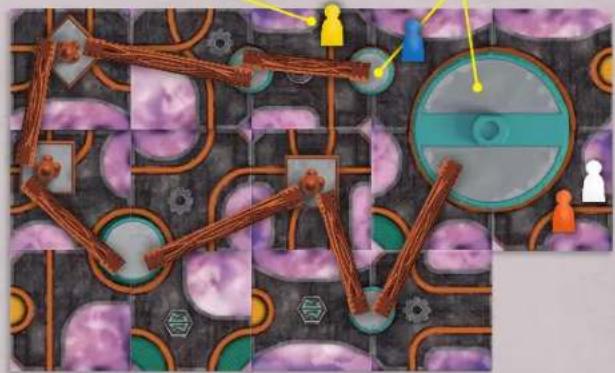
Example:
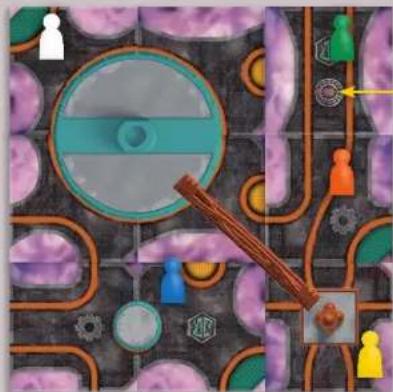
natural_image
Top-down map view of a mobile game with numbered players and puzzle pieces (no readable text or symbols)Faraday Cage
When a Lightning Strikes! card is drawn, the Navigator (yellow pawn) gets jolted and loses 1 health because she's on a tile with a lightning rod. The Medic (orange) also loses 1 health because she's on a tile that's connected to a lightning rod by a printed copper wire. The Surveyor (green) does not lose health because he's on a tile with a Faraday Cage. The Electrician (white) loses 1 health because she's on a launch pad tile and the launch pad is connected to the lightning rod. The Knotsmith (blue) does not lose health because he's on a tile that is not connected to the lightning rod by either type of wire. (It's okay that a wire passes over his tile.)
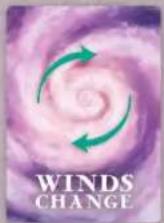
Winds Change
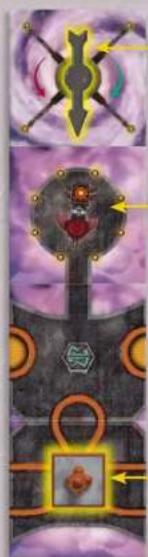
These 2 cards change the direction of the wind. Rotate the arrow on the wind compass 90° either clockwise or counter-clockwise as shown on the card.


High Winds
These 4 cards "blow" the adventurers one tile in the direction of the arrow on the wind compass. If a pawn cannot move because there is no tile in that direction, then that adventurer's rope gets worn by 1 point instead. (Lower the rope clip on the adventurer card to the next lowest tick mark.) If there's a tile in that direction but it is only
connected by clouds (the platform surface is not attached) the pawn does not move and that adventurer's rope loses 1 point instead. If a clip reaches the symbol, the rope has snapped, that character falls 7,000 feet, and everyone loses the game.
Example:
Wind
Shelter

natural_image
Two abstract illustrations: top shows a metallic arrow with cross-shaped elements, bottom shows a glowing circular emblem with heart and arrow (no text or symbols)Wind Compass
When a High Winds card is drawn, players look at the direction of the wind compass (up in this case). The Electrician (white pawn) loses 1 point of rope because there is no tile above her for her to move to. The Medic (orange) moves up 1 tile (to the tile with the white pawn—no rope loss). The Surveyor (green) does not move and loses 1 point of rope because he cannot cross the cloud gap between tiles. The Navigator (yellow) also does not move and loses 1 point of rope because the tile above her is not connected by platform. The Knotsmith (blue) does not lose rope because he's on a tile with a Wind Shelter.
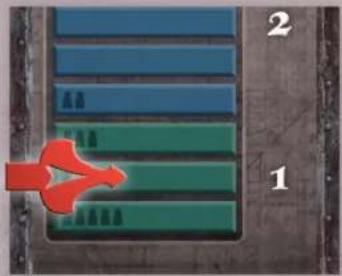
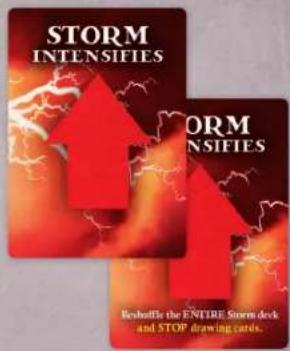
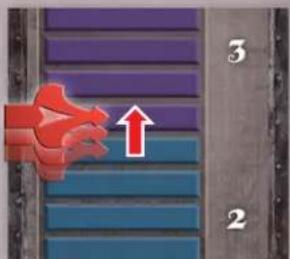
Storm Intensifies
There are 3 Storm Intensifies cards in the Storm deck. When you draw a Storm Intensifies card, move the clip on the Storm meter up 1 tick mark.
The numbers on the Storm meter show the Storm Intensity. This is how many cards you'll draw, starting on the next player's turn. If the clip on the Storm meter ever reaches the ②the storm has become so intense that the players are all blown off the platform and lose the game!
One of the Storm Intensifies cards instructs you to also reshuffle all the cards in the Storm deck and to stop drawing cards. Shuffle cards in the draw pile and discard pile together, stack them to form a new Storm draw pile, and stop drawing Storm cards for that turn.
WINNING THE GAME
Get to the Launch Pad! Once you have wired the required components into a circuit (except one final wire that you'll use to take off), first place the rocket onto the launch pad. Then everyone should head to one of the four tiles containing the launch pad. (You all don't have to be on the same tile.) As a final step, one player must add the last wire (either on their turn or by Remote Fuser) to complete the circuit and launch the rocket for the win!
LOSING THE GAME
There are 4 possible ways to lose:
-
Electrocuted. If the clip on any player's health meter reaches
-
Fall. If the clip on any player's rope meter reaches

- Swept Away. If the clip on the Storm meter reaches

- Abandoned. If the rocket takes off before everyone is on a launch pad tile.
DIFFICULTY
Once you've won on the Novice game, try the Normal, Elite, or Legendary difficulty settings. Each one presents a more challenging circuit to build. Also, try playing with different mixes of adventurers.
MEET THE ADVENTURERS

Electrician
Once per turn, the Electrician may add (or remove) a wire token to a component on her tile for free. She also starts the game with the most health of all the adventurers.

Surveyor
The Surveyor starts with 2 tiles at the beginning of the game and can hold 4 in hand. He can also give tiles to other players on his tile or an adjacent tile for free at any time.
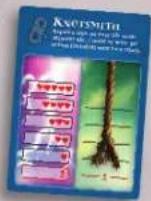
Knotsmith
The Knotsmith may spend actions to repair the rope belonging to a player on his tile or an adjacent tile by 1 point of wear per action.

Navigator
The Navigator may move another player 3 tiles per action, and may use teleporters while doing so. When she moves the Climber this way he can use his powers to cross clouds and take one other player with him—including the Navigator!

Medic
The Medic may spend actions to heal an adventurer on her tile or an adjacent tile by 1 point of health per action.
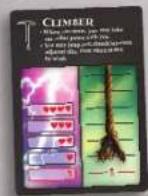
Climber
The Climber may jump over clouds that appear between two adjacent platform tiles. He may take one other player with him whenever he moves, even across clouds and through teleporters. Additionally, if the Climber is blown across clouds between adjacent tiles by a High Winds card, he crosses without losing any rope and may take another player with him.
A WORD FROM GAMEWRIGHT
The saga continues! What started off as a simple island adventure has evolved into an ever-developing storyline. From ocean, to desert, and now to the sky, this latest installment takes you to new heights with several novel challenges, including collectively planning a terrain using only limited information, and constructing a real electrical circuit.
Forbidden Sky also breaks new ground for us as a publisher, as it's our first game to include an electronic component. Inventor Matt Leacock created such a compelling mechanism with building a circuit that we felt it warranted breaking our long-held rule of not publishing games with batteries. Hopefully, you'll agree that the payoff is electrifying!
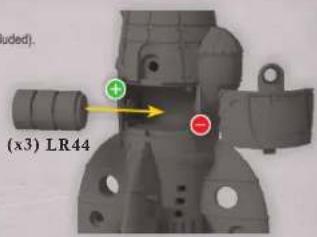
BATTERY REPLACEMENT
- Unscrew the battery cover with a Philips screwdriver (not included).
- Remove batteries and dispose of them safely.
• Install 3 new 1.5V button call (LR44) batteries in the
orientation (+,-) shown. - Replace battery cover and tighten screw.
• For best performance, use only alkaline batteries. - Replace batteries if sounds are distorted
and/or lights don't flash.
BATTERY SAFETY INFORMATION
- Do not mix old and new batteries.
- Do not mix batteries of different types: alkaline, standard (carbon-zinc) or rechargeable (nickel-cadmium).
• Non-rechargeable batteries are not to be recharged.
- Rechargeable batteries are only to be charged under adult supervision.
- Rechargeable batteries are to be removed from the toy before being charged.
• The supply terminals are not to be short-circuiled.
- Remove batteries when product is stored for long periods of time or when batteries are exhausted. Dispose of batteries safely. Do not dispose of this product in a fire. The batteries inside may explode or leak.
- Batteries are to be inserted with the correct polarity.

- Correct disposal of this product.
This marking indicates that this product should not be disposed with other household wastes throughout the EU. To prevent possible harm to the environment or human health from uncontrolled waste disposal, recycle it responsibly to promote the sustainable reuse of material resources.
NOTE: This equipment has been tested and found to comply with the limits for a Class B digital device, pursuant to Part 15 of the FCC Rules. These limits are designed to provide reasonable protection against harmful interference in a residential installation. This equipment generates, uses and can radiate radio frequency energy and, if not installed and used in accordance with the instructions, may cause harmful interference to radio communications. However, there is no guarantee that interference will not occur in a particular installation. If this equipment does cause harmful interference to radio or television reception, which can be determined by turning the equipment off and on, the user is encouraged to try to correct the interference by one or more of the following measures:
- Reorient or relocate the receiving antenna.
- Increase the separation between the equipment and receiver.
- Connect the equipment into an outlet on a circuit different from that to which the receiver is connected.
- Consult the dealer or an experienced radio/TV technician for help.
Changes or modifications not expressly approved by the party responsible for compliance could void the user's authority to operate the equipment.

GAMEWRIGHT ^®
70 Bridge Street, Newton, MA 02458
email: jester@gamewright.com
Gamewright.com
©2018 Gamewright, a division of Ceaco, Inc.
All worldwide rights reserved.
Game by Matt Leacock Illustrations by C.B. Canga


facebook.com/gamewright
@gamewright
FORBIDDENSKY


- OVERVIEW
- SETUP
- Examine the Tiles
- Place the Starting Grid
- Place the Rocket and Circuit Components
- Set Up the Storm
- Divide the Cards
- Choose Your
- Difficulty Level
- The Adventurers Appear
- ORDER OF PLAY
- TAKE UP TO 4 ACTIONS
- Move
- Scout
- Explore
- Tile Symbols
- Lightning Rod (6 tiles, including one on the starting grid)
- Teleporter (7 tiles, including one on the starting grid)
- Gear (12 tiles)
- Wind Shelter (3 tiles)
- Faraday Cage (4 tiles)
- Wire
- Important:
- Examples:
- CREATING THE CIRCUIT
- Share Equipment
- Turn Example
- DRAW STORM CARDS
- Lightning Strikes!
- Winds Change
- High Winds
- Storm Intensifies
- WINNING THE GAME
- LOSING THE GAME
- DIFFICULTY
- MEET THE ADVENTURERS
- Electrician
- Surveyor
- Knotsmith
- Navigator
- Medic
- Climber
- A WORD FROM GAMEWRIGHT
- BATTERY REPLACEMENT
- BATTERY SAFETY INFORMATION
- GAMEWRIGHT ®
- FORBIDDENSKY
Brand : Gamewright
Model : Forbidden Sky
Category : Board game