
ELST4017 - Television Element - Free user manual and instructions
Find the device manual for free ELST4017 Element in PDF.


| Product Type | LED Television |
| Screen Size | 40 inches (diagonal) |
| Resolution | 1920 x 1080 (Full HD) |
| Dimensions (with stand) | 36.2 x 22.8 x 8.7 inches (W x H x D) |
| Weight (with stand) | 16.5 lbs |
| Power Consumption | 75 W (typical), <0.5 W standby |
| Connectivity | 3 x HDMI, 1 x USB, 1 x Composite, 1 x Component, 1 x RF, 1 x Optical Audio Out |
| Audio Output | 2 x 8W speakers |
| TV Tuner | ATSC / NTSC |
| Energy Saving | Eco mode, backlight adjustment |
| Mounting | VESA 200x200 |
| Remote Control | IR remote included |
| Cleaning | Wipe with dry soft cloth; do not use liquid cleaners |
| Safety | Anti-tip strap included; keep ventilation slots clear |
| Spare Parts | Contact Element customer support for remote, stand, or power cord |
| Repairability | User accessible: replaceable remote, stand, and power cord. Internal parts by technician only. |
Frequently Asked Questions - ELST4017 Element
User questions about ELST4017 Element
0 question about this device. Answer the ones you know or ask your own.
Ask a new question about this device
Download the instructions for your Television in PDF format for free! Find your manual ELST4017 - Element and take your electronic device back in hand. On this page are published all the documents necessary for the use of your device. ELST4017 by Element.
USER MANUAL ELST4017 Element
Please refer to the actual product
INSTRUCTION MANUAL
Please read all the instructions carefully before using this TV, and keep the manual for future reference.
Important Safety Instructions 2
Additional Safety Information 3
Preparations 4
What's Included
Front View
Rear View
Wall Mounting
Remote Control 7
Connecting External Devices 8
TV SETUP 9
Turning On/Off Your TV
Initial Setup
Source 11
Channel Selection 11
Volume Adjustment and Mute Setup 11
Current Channel Information
Picture 12
Sound 12 14
Function 14 15
Time 15 17
Option 17 18
Lock 19
Channel 10 20
Network Setting 22
INTERNET/Screencast Operation 25
Parental Control 29
Troubleshooting 31
FCC Notes/Specifications 34
OTT APP Service 35
Warranty 36

IMPORTANT SAFETY INSTRUCTIONS
- Read these instructions – All the safety and operating instructions should be read before this product is operated.
- Keep these instructions – The safety and operating instructions should be retained for future reference.
- Heed all warnings – All warnings on the appliance and in the operating instructions should be adhered to.
- Follow all instructions – All operating and use instructions should be followed.
- Do not use this apparatus near water – The appliance should not be used near water or moisture – for example, in a wet basement or near a swimming pool, and the like.
- Clean only with dry cloth.
- Do not block any ventilation openings. Install in accordance with the manufacturer's instructions.
- Do not install near any heat sources such as radiators, heat registers, stoves, or other apparatus (including amplifiers) that produce heat.
- Do not defeat the safety purpose of the polarized or grounding-type plug. A polarized plug has two blades with one wider than the other. A grounding-type plug has two blades and a third grounding prong. The wide blade or the third prong are provided for your safety. If the provided plug does not fit into your outlet, consult an electrician for replacement of the obsolete outlet.
- Protect the power cord from being walked on or pinched particularly at plugs, convenience receptacles, and the point where they exit from the apparatus.
- Only use attachments/accessories specified by the manufacturer.
- Use only with the cart, stand, tripod, bracket, or table specified by the manufacturer, or sold with the apparatus. When a cart is used, use caution when moving the cart/apparatus combination to avoid injury from tip-over.

- Unplug this apparatus during lightning storms or when unused for long periods of time.
- Refer all servicing to qualified service personnel. Servicing is required when the apparatus has been damaged in any way, such as the power-supply cord or plug is damaged, liquid has been spilled or objects have fallen into the apparatus, the apparatus has been exposed to rain or moisture, does not operate normally, or has been dropped. - Please keep the unit in a well-ventilated environment.
WARNING: To reduce the risk of fire or electric shock, do not expose this apparatus to rain or moisture. The apparatus should not be exposed to dripping or splashing. Objects filled with liquids, such as vases should not be placed on apparatus.
WARNING: The batteries shall not be exposed to excessive heat such as sunshine, fire or the like.
WARNING: The main plug is used as disconnect device, the disconnect device shall remain readily operable.
WARNING: To reduce the risk of electric shock, do not remove cover (or back) as there are no user-serviceable parts inside. Refer servicing to qualified personnel.


This lightning flash with arrowhead symbol within an equilateral triangle is intended to alert the user to
the presence of non-insulated "dangerous voltage" within the product's enclosure that may be of sufficient magnitude to constitute a risk of electric shock.

The exclamation point within an equilateral triangle is intended to alert the user to the presence of
important operating and maintenance instructions in the literature accompanying the appliance.

This equipment is a Class II or double insulated electrical appliance. It has been designed in such a way
that it does not require a safety connection to electrical earth.
HDMI
The terms HDMI and HDMI High-Definition Multimedia Interface, and the HDMI Logo are trademarks or registered trademarks of HDMI Licensing Administrator, Inc in the United States and other countries
To ensure reliable and safe operation of this equipment, please read carefully all the instructions in this user guide, especially the safety information below.
Electrical Safety
- The TV set should only be connected to a main power supply with voltage that matches the label at the rear of the product.
• To prevent overload, do not share the same power supply socket with too many other electronic components.
- Do not place any connecting wires where they may be stepped on or tripped over.
- Do not place heavy items on them, which may damage the leads.
- Hold the main plug, not the wires, when removing from a socket.
- During a thunderstorm, or when not using the television for extended period of time, turn off the power switch on the back of the television.
- Do not allow water or moisture to enter the TV or power adapter. Do NOT use in wet, moist areas, such as bathrooms, steamy kitchens or near swimming pools.
- Pull the plug out immediately, and seek professional help if the main plug or cable is damaged, liquid is spilt onto the set, if accidentally exposed to water or moisture, if anything accidentally penetrates the ventilation slots or if the set does not work normally.
- Do not remove the safety covers. There are no user serviceable parts inside. Trying to service the unit yourself is dangerous and may invalidate the product's warranty. Qualified personnel must only service this apparatus.
- To avoid battery leakage, remove exhausted batteries from the remote control, or when not using for long period.
- Do not break open or throw exhausted batteries on a fire.
• Do not mix old and new batteries.
- Do not mix Alkaline, Standard (Carbon-Zinc) or Rechargeable (Nickel Cadmium) or (Nickel Metal Hydride) batteries.
Physical Safety
- Do not block ventilation slots in the back cover. You may place the TV in a cabinet, but ensure at least 5cm (2") clearance all around.
- Do not tap or shake the TV screen, or you may damage the internal circuits. Take good care of the remote control.
• To clean the TV use a soft dry cloth. Do not use solvents or petroleum based fluids.
- Do not install near any heat sources such as radiators, heat registers, stoves or other apparatus (including amplifiers) that produce heat.
- Do not defeat the safety purpose of the polarized or grounding-type plug. A polarized plug has two blades with one wider than the other. A grounding type plug has two blades and a third grounding prong, the wide blade, or the third prong is provided for your safety. If the provided plug does not fit into your outlet, consult an electrician for replacement of the obsolete outlet.
- Protect the power cord from being walked on or pinched particularly at plugs.
• Unplug the apparatus during lightning storms or when unused for long periods.
• Refer all servicing to a qualified service personnel. Servicing is required when the apparatus has been damaged in any way, such as power-supply cord or plug is damaged, liquid has been spilled, or objects have fallen into the apparatus, has been exposed to rain or moisture, does not operate normally, or has been dropped.
- Please always connect your television to a power outlet with protective groud connection.
What is Included?

TV Set

natural_image
Illustration of a remote control with two cylindrical batteries, one displaying the function button (no text or symbols on the main device)Remote Control with Batteries

User Manual

Quick Start Guide
Front View

• STANDBY
Switch the TV between On / Standby mode.
- SOURCE
Press to select among different input signal sources.
- MENU
Display the OSD (on screen display) menu.
- CH-/+
Press to select a channel.
• VOL-/+
Press to adjust the volume.
• LED
The LED light indicates when the TV is activated.
• IR
Infrared Receiver.
Rear View

natural_image
Technical line drawing of a front view of a rectangular electronic device with mounting brackets and central panel (no text or symbols)
Headphone Output

Antenna Input(75Ω VHF/UHF)

Optical Output

USB Input

RJ-45

MINI YPBPR/CVBS

HDMI Input

Audio Input
Wall Mounting
WARNING
Never place a television set in an unstable location. A television set may fall, causing serious personal injury or death. Many injuries, particularly to children, can be acoided by taking simple precautions such as:
• Using cabinets or stands recommended by the manufacturer of the television set.
- Only using furniture that can safely support the television set.
- Ensuring the television set is not overhanging the edge of the supporting furniture.
- Not placing the television set on tall furniture(for example, cupboards or bookcases) without anchoring both the furniture and the television set to a suitable support.
- Not placing the television set on cloth or other materials that may be located between the television set and supporting furniture.
• Educating children about the dangers of climbing on furniture to reach the television set or its controls.
If your existing television set is being retained and relocated, the same considerations as above should be applied.

Your new TV is heavy, please consult with professional wall mount installer to perform this installation.
Remote Control
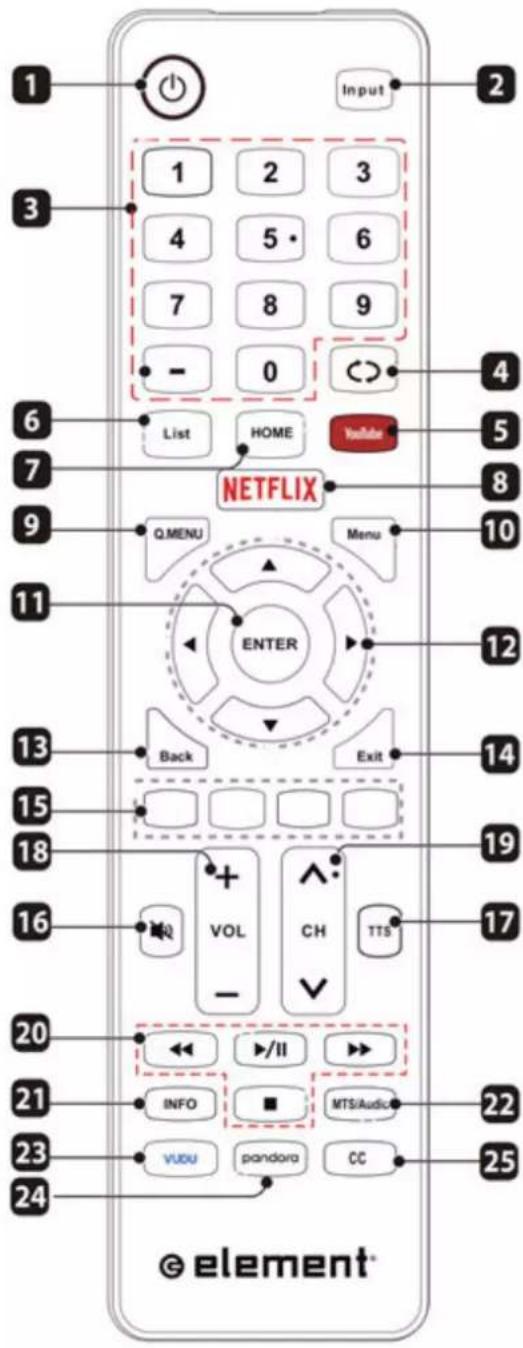
-
POWER: Turn the TV on and off.
-
Input: This button is used to switch among different sources, Select a source and press ENTER button to confirm.
-
Digital Buttons(0-9, -): Directly select channel with digital buttons.
-
⬇: Switch to the previous program.
-
YouTube: If network connects, press this key to view YouTube directly.
-
List: Press it to show channel list and favorite list on screen.
-
HOME: Press it to go to App home page.
-
NETFLIX: If network connects, press this key to view NETFLIX directly.
-
Q.MENU: Press this key to go to quick menu.
-
Menu: Display the main menu or exit the current menu.
-
ENTER: Validation key.
-
Arrow buttons ▲▼◀▶ : Use to select on-screen menu items and change men u values.
-
Back: Return.
-
Exit : Exit the menu.
-
Color buttons: It's used as it's showed in the EPG or Program Edit menu.
-
MUTE: Press this button to cut off the sound of the TV set temporarily, press again to resume.
-
TTS (Text-To-Speech): Pree this button to adjust TTS on or off.
-
VOL + /: Press these buttons to adjust the volume.
-
CHΛ/V: Press these buttons to change channel upward or downward.
-
Digital Media Player controlbutton: Include play/pause, stop, previous, next, backward, forward is used in USB mode. Please refer to relevnat instructions in the section of multimed player.
-
INFO: Display the program information.
-
MTS/Audio: In USB mode, press this button to switch audio track when movie is playing. In TV mode, press this button to switch MTS or Audio Language.
-
VUDU:Press this button to select VUDU application.
-
Pandora: Press this button to select pandora application.
-
CC: Press this button to adjust CC mode.

Connecting External Devices

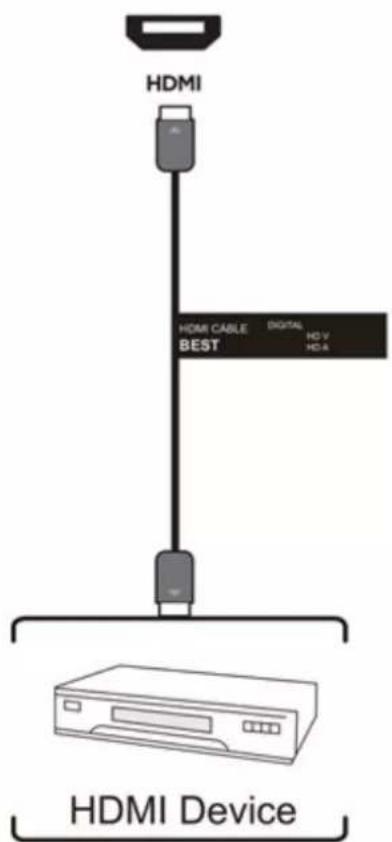

Match colored connectors to colored ports on back side of the TV.
Turning On/Off Your TV
- Connect the power cord to the power socket after you have completed all the physical connections. At this stage, the TV will enter Standby Mode and the red LED indicator will illuminate.
- In Standby Mode, press the ⏻ button on the main unit or on the remote control to turn the TV on.

The POWER button on the main unit or on the remote control can only switch the TV into standby. To completely turn off the TV, please disconnect the power cord from the power socket.
Initial Setup
- Connect the power cord to the power socket after you have completed all the physical connections. At this stage, the TV will enter Standby Mode and the red LED indicator will illuminate.
- In Standby Mode, press the ⏻ button on the main unit or on the remote control to turn the TV on. The red LED indicator will turn blue.
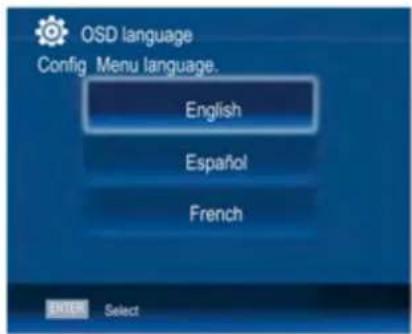
- The first time you turn the TV on, it will go into the Setup Wizard. Press ◀/▶ ▲/▼ buttons to select your desired mode and press ENTER confirm.
1

2
![DATA COLLECTION AND FIRMWARE UPDATES NOTICE When this television is connected to the internet, it will collect limited, non-personally identifiable information which will be sent to MStar Semiconductor Inc. ("MStar") and its service providers. Certain of this information may be aggregated and shared with third party partners for business and product analysis purposes only. By clicking "Accept" you acknowledge and agree to the collection and sharing of this information as described in more detail in the "View Additional Details" section, as well as the automatic download of essential firmware/software updates. Please note if this Notice is translated in a language other than English, version in English language shall always prevail as the sole basis for the interpretation of the terms described herein. VIEW ADDITIONAL DETAILS [ACCEPT]](/content/2026/05/1058557/images/cb04c7fcce983b7ef658d807922ea4cb39613c9829a2f966f01aa709cca3fe93.jpg)
3
Initial Setup
![DATA COLLECTION AND FIRMWARE UPDATES NOTICE VIEW ADDITIONAL DETAILS When this television is connected to the internet, it will collect limited, non-personally identifiable information which will be sent to MStar Semiconductor Inc. ("MStar") and its service providers. Certain of this information may be aggregated and shared with third party partners for business and product analysis purposes only. By clicking "Accept" you acknowledge and agree to the collection and sharing of this information as described below, as well as the automatic download of essential firmware/software updates. The information that will be collected and sent to MStar consists of: confirmation of initial television start up (year/month only) and country/region of launch, device information that indicates television manufacturer, model, and serial number, number and launch of streaming service within a calendar month ("Usage Information"). This Usage Information will be collected and stored by MStar and its service providers. Where MStar shares information with third party partners, it will do [ ] ACCEPT ALL [ ] ACCEPT AUTOMATIC UPDATES [ ] ACCEPT USAGE INFORMATION COLLECTION [ ] DECLINE ALL](/content/2026/05/1058557/images/e8eba009841ed3462c8b7b5e7cab0140e8133b0c5dd495fa45eceab8abb31741.jpg)
4

5

6
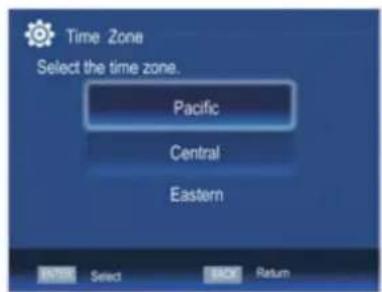
7

8

9
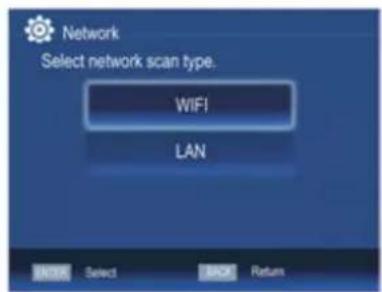
10
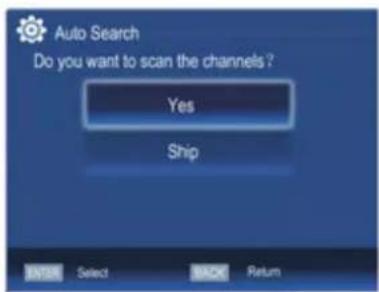
11
Source
1 Input Setup
Press Input key on the remote control to enter "INPUT SOURCE" menu. There are these options for you to select: "TV", "AV", "Component", "HDMI1", "HDMI2", "HDMI3", "USB".
Use ◀/▶key to select a input source and press ENTER key to confirm.

Channel Selection
2 Channels Selection
There are four ways to select channel:
1) Using number keys, and ENTER keys on the remote control to select channel directly.
To select channel 90, press ⑨ → ⑩ → ENTER.
When you use the number buttons, you can directly select channels that were either erased or not memorized.
2) Using CHΛ/V key on the remote control or on your TV to select channel.
When you press the CHA/V key, the TV changes channels in sequence. You will see all the channels that the TV has memorized.
You will not see channels that were either erased or not memorized.
3) Press ⬇ key to return to previous channel, press it again to return to current channel.
To quickly switch between two channels that are far apart, tune to one channel, then use the number keys to select the second channel. Then use the ⬤ button to quickly alternate between them.
is not activated if no channel has been changed after TV turning on.
4) Select channels from "Channels List" or "Favorite List".
Press List key to choose from "Channel List" menu.
3 Volume Adjustment and Mute Setup
Volume adjustment
Press VOL+/- key on the remote control or the TV to display "Volume" menu, adjust the volume of TV between 0 to 100 by using VOL+/- key:
● To increase the volume, press VOL+ key;
● To decrease the volume, press VOL-key;

Mute
Mute
Press "Mute" and the sound cuts off. The MUTE icon will appear in the lower-right corner of the screen.
To resume sound, press the "Mute" button again, or simply press the VOL+ key.
4 Current Channel Information
Press "INFO" key on the remote control to view current channel information, the indications of channel information are listed in the following table.

Press "EXIT" key on the remote control to exit this OSD.
Picture
- Press MENU key to display the main menu on the screen.
- Press ▲/▼ key to select "Picture" option.
- Press ▶ or ENTER key to enter "Picture" submenu.
Picture Mode
Your TV has four picture settings ( Sports, Normal, Soft, User) that are preset at the factory. Only "User" mode can be set to your preference by adjusting particular items such as Contrast, Brightness, Color, Sharpness, Tint.
- Press ▲/▼ key to select "Picture Mode" option.
- Press ▶ or "ENTER" key to enter submenu.
- Press ▲/▼key to select one picture mode.
- You can also press the P.Mode key on the remote control to select one of the picture settings.
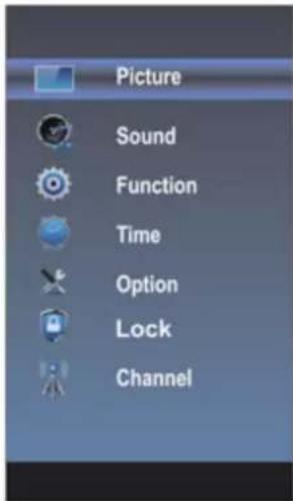
User settings for PICTURE
(Contrast, Brightness, Color, Sharpness, Tint)
Your set has several settings which allow you to control picture quality.
- Press ▲/▼ key to select a particular item.
- Press ◀/▶ key to decrease or increase the value of a particular item.
Note: The adjusted values are stored according to the selected particular item.
Contrast: Adjusts the lightness and darkness between objects and the background. Brightness: Adjusts the brightness of the picture.
Color: Adjusts the colors, making them lighter or darker.
Sharpness: Adjusts the outline of objects to either sharpen them or make them more dull.
Tint: Adjusts the Tint of the picture.

Backlight
You can change the brightness of the entire screen according to your preference.
- Press ▲/▼key to select "Backlight" option.
- Press ◀/▶ key to increase or decrease the backlight value.
Backlight: Adjusts the brightness of the whole screen.
Color Temperature
You can change the color of the entire screen according to your preference.
- Press ▲/▼key to select "Color Temperature" option.
- Press "▶" or "ENTER" key to enter submenu.
- Press ◀/▶ key to select one Color Temperature.
Cool: Makes whites bluish. Standard: Makes whites nature. Warm: Makes whites reddish.
Sound
- Press MENU key to display the main menu on the screen.
- Press ▲/▼ key to select "Sound" option.
- Press ▶ or ENTER key to enter "Sound" submenu.
Sound Mode
You can select the type of the special sound effect to be used when watching a given broadcast.
Your TV has five sound settings ("Standard", "Music", "Movie",
"Sports", "User") that are preset at the factory.
- Press ▲/▼ key to select "Sound Mode" option.
- Press "▶" or "ENTER" key to enter submenu.
- Press ◀/▶ key to select one sound mode.
- You can also press the S.Mode key on the remote control to select one of the sound.
Standard: Selects the normal sound mode. Music: Provides clear and live sound for music. Movie: Provides live and full sound for movies. Sports: Emphasizes bass over other sounds. User: Selects your custom sound settings.

Balance
If the volumes of the left speaker and the right speaker are not the same, you can adjust the "Balance" to suit your personal preference.
- Press ▲/▼ key to select "Balance" option.
- Press ◀/▶ key to decrease or increase the value of the item.
AVL
Each broadcasting station has its own signal conditions, and it is inconvenient to adjust the volume every time the channel is changed. "AVL" automatically adjusts the volume of the desired channel by lowering the sound output when the modulation signal is high or by raising the sound output when the modulation signal is low.
-
Press ▲/▼ key to select "AVL" option, press ENTER/▶ key to enter submenu.
-
Press ▲/▼ key to select "On" or "Off".
Surround Sound
This is used to turn on surround sound to gain better sound effect.
- Press ▲/▼ key to select "Surround Sound" option, press ENTER/▶ key to enter submenu.
- Press ▲/▼ key to select "Surround" or "Off".
Video Description
- Press ▲/▼ key to select "Video Description" option, press ENTER/▶ key to enter submenu.
- Press ▲/▼ key to select "On" or "Off".
Digital Audio Output
This is used to set digital audio output.
- Press ▲/▼ key to select "Digital Audio Output" option. Press ENTER/▶ key to enter submenu.
- Press ▲/▼ key to select "Auto" or "PCM".
Audio Languages
You can set the primary and secondary language for audio.
Dolby Audio Process
This is used to set Dolby Audio Process.
- Press ▲/▼ key to select "Dolby Audio Process" option.
- Press ENTER/▶ key to enter "Dolby Audio Process" submenu.
HDMI ARC
Turn on or turn off the HDMI ARC function.
| Dolby Audio Process | |
| Dolby Audio Process | Off |
| Mode | Standard |
| Surround Virtualizer | High |
| Dialog Enhancer | High |
| Auto Volume Control | Off |
Function
- Press MENU key to display the main menu on the screen.
- Press ▲/▼ key to select "Function" option.
- Press ENTER/▶ key to enter "Function" submenu.
Noise Reduction
Press ▲/▼ key to select the Noise Reduction mode. Press ENTER/▶ key to enter submenu.
Press ▲/▼ key to select the mode: off/low/middle/high/Auto.
MPEG Noise Reduction
Press ▲/▼ key to select "MPEG Noise Reduction" option. Press ENTER/▶ key to enter submenu.
Press ▲/▼ key to select the mode: off/low/middle/high. The picture will be better when it is in "high" mode.
| Noise Reduction |
| MPEG Noise Reduction |
| Aspect Ratio |
| Link Setup |
| Netflix Deactivate |
| Netflix ESN |
| Netflix Version |
| Vudu Deactivate |
| TTS |
Aspect Ratio
Press ▲/▼ key to select "Aspect Ratio" option. Press ENTER/▶ key to enter submenu. Press ▲/▼ key to change the size of the picture on the size of the picture on the screen. Select the aspect ratio settings: 4:3/16:9/Movie/Subtitle/Native/Panorama.
Link Setup
- Press ▲/▼ key to select "Link Setup" option.
- Press ENTER or ▶ key to enter "Link Setup" submenu.
Enable Link: Press ◀/▶ to turn on/off the link setup.
Auto Power On: When this option is "On" and the TV is in standby mode. To turn on the DVD can also turn the TV at the same time.
Auto Standby: When this Option is "On" and the TV is on, to turn off TV can also turn the DVD into standby mode.
| Link Setup | |
| Enable link | On |
| Auto Power On | Off |
| Auto Standby | Off |
Netflix Deactivate
- Press ▲/▼ key to select "Netflix Deactivate" option.
- Press ENTER or ▶ key to confirm.
- Press "Yes" to confirm again, the Netflix will be activated.
Netflix ESN
Display the Netflix Esn information.
Netflix Version
Display the Netflix version.
Vudu Deactivate
- Press "▲/▼" key to select "Vudu Deactivate" option.
- Press "▶" or "ENTER" key to confirm.
TTS
You can set TTS information in the TTS menu.
Time
- Press MENU key to display the main menu on the screen.
- Press ▲/▼ key to select "Time" option.
- Press ENTER/▶ key to enter "Time" submenu.
Off Time
In "Off Time" item, press ▶ button or ENTER button to enter the submenu, set the day & time to turn off the TV set.
On Time
In "On Time" item, press ▶ button or ENTER button to enter the submenu, set the time to turn on the TV set, when the TV set is in the standby mode. You can also choose which day to control you TV set in a week.
| Off Time |
| On Time |
| Sleep Timer |
| Auto Sleep |
| Auto Sync |
| Clock 02:04 |
| Time Zone |
Sleep Timer
- Press ▲/▼ key to select "Sleep Timer" option, press ▶ or ENTER button to enter the submenu.
- Press ▲/▼ key repeatedly until the desired time appears (Off, 10mins, 20mins, 30mins, 60mins, 90mins, 120mins, 180mins, 240mins).
Notes: The sleep timer you have set will be cancelled when the TV turns off or if a power failure occurs.
Notes: When the time is less than 60 seconds, remind information will be displayed on the screen. Press any key button to cancel timer function.
Auto Sleep
Press ▲/▼ key to select whether to open the Nosignal Power off features. If this function is opened, the TV will power off in ten minutes when there is no signal.
Auto Sync
You can modify the time of your TV set in Manual mode. In Auto mode, the "clock" is decided by the DTV signal.
Clock
When Auto Sync is on, the clock is got from DTV streams; Set the clock when Auto Sync is off.
Time Zone
You can choose it to modify your time zone in the TV set.
-
Press ▲/▼ key to select "Time Zone" option, press ▶ or ENTER button to enter the submenu.
-
Press ▲/▼ key to select time zone.
Option
- Press MENU key to display the main menu on the screen.
- Press ▲/▼ key to select "Option" option.
- Press ▶ key to enter "Option" submenu.
OSD Language
- Press ▲/▼ key to select "OSD Language" option.
- Press ENTER or ▶ key to select a proper language for OSD
OSD Time
Set the preferred amount of time for the OSD to be displayed on the screen.
Closed Caption
- Press ▲/▼ key to select "Closed Caption" option.
- Press ENTER key to open CC submenu.
Reset
- Press "▲/▼" key to select "Reset" option.
- Press "▶" or "ENTER" key to confirm.
- Press "Yes" to confirm again, TV will turn off automatically and change all setting to factory setting.
Network configuration
Please refer to "Network setting"behind.
Software Update(USB)
When the TV need to be updated, please copy the new software to a USB storage and inset the USB storage to TV, then operating by following steps.
- Press "▲/▼" key to select "Software Update(USB)" option.
- Press "▶" or "ENTER" key to confirm.
- Press "Yes" to confirm again, the TV will update by USB, Please wait a few minutes and don't turn off the power, it will turn off automatically when updating is finish.
Info
Press"Info" to check software version and network information.
View End-User License
- Press "▲/▼" key to select "View End-User License" option.
- Press "▶" or "ENTER" key to confirm.
Internet Update Check
- Press "▲/▼" key to select "Internet Update Check" option.
- Press "▶" or "ENTER" key to confirm.
Network Update Information
- Press "▲/▼" key to select "NetworkUpdate Information" option.
- Press "▶" or "ENTER" key to confirm.
User Mode
- Press "▲/▼" key to select "User Mode" option.
- Press "▶" or "ENTER" key to confirm.
3.Switch to use mode "Home" or "Store".
OSD Language
OSD Time
Closed Caption
Reset
Network Configuration
Software Upadate (USB)
Info
View End-User License
Internet Update Check
Network Update Information
User Mode
Lock
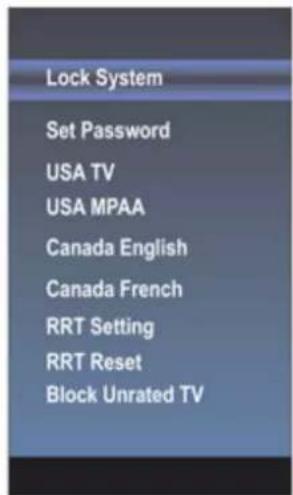
The "Lock" feature automatically locks out programming that is deemed inappropriate for children. The user must first enter a Password before any of the lock restrictions can be set up or changed.
- Press ▲/▼ key to select "Lock" option.
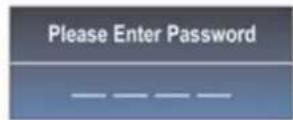
- Press ENTER or ▶ key to enter "Lock" submenu, "Enter Password" menu will appear, enter your 4-digit password to enter "Lock" submenu (the default password is 0000, and the universal password is 1980).
Lock System
Set the Lock function on or off.
- Press ▲/▼ key to select "Lock System" option.
- Press "▶" or "ENTER" key to confirm.
- Press ▲/▼ key to select "On" or "Off".
Set Password
- Press ▲/▼ key to select "Set Password" option.
- Enter your 4-digit password to enter enter "Set Password" submenu. Choose any 4-digits for your new password and enter them. As soon as the 4 digits are entered, the cursor skipped to "Confirm Password" item, re-enter the same 4 digits, and your new password has been memorized.
When the programs is locked, you can also press the menu key, Info key and so on. Then you can press ◀/▶ key to call back the input-password window.
USA TV
- Press ▲/▼ key to select "USA TV" option.
- Press ENTER or ▶ key to open USA TV menu.
USA MPAA
- Press ▲/▼ key to select "USA MPAA" option.
- Press ENTER or ▶ key to open USA MPAA menu.
Canada English
- Press ▲/▼ key to select "Canada English" option.
- Press ENTER or ▶ key to open Canada English menu.
Canada French
- Press ▲/▼ key to select "Canada French" option.
- Press ENTER or ▶key to open Canada French menu.
RRT Setting
- Press ▲/▼ key to select "RRT Setting" option.
- Press ENTER or ▶ key to open RRT Setting menu.
RRT Reset
- Press ▲/▼ key to select "RRT Reset" option.
- Press ENTER or ▶key to open RRT Reset menu.
Block Unrated TV
- Press ▲/▼ key to select "Block Unrated TV" option.
- Press ENTER or ▶ key to open Block Unrated TV menu.
Channel
Before your television can begin memorizing the available channels, you must specify the type of signal source that is connected to the TV (i.e. an antenna or a cable system).
- Press MENU key to display the main menu on the screen.
- Press ▲/▼ key to select "Channel" option.
- Press ENTER or ▶ key to enter "Channel" submenu.
Antenna Mode
- Press ▲/▼ key to select "Antenna Mode" option.
- Press "▶" or "ENTER" key to enter submenu.
- Press ▲/▼ key to select "Antenna" or "CABLE"

Auto Search
- Press ▲/▼ key to select "Auto Search" option.
- Press ▶ or ENTER key to enter submenu.
then a notice window will be displayed on the screen. Select "Start" to start search or "Cancel" to cancel it. When searching, press EXIT key to exit tuning at any moment. Press MENU key to skip DTV tuning when searching DTV, skip ATV tuning when searching ATV. - After all the available channels are stored, the searching menu will exit.
Program Edit
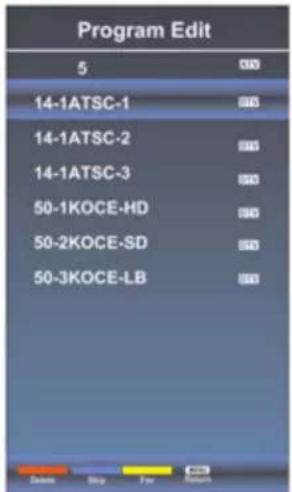
After the program is searched, select "Program Edit" in the "Channel" menu, press "ENTER" button, program can be edited such as delete or skip according to the user's habit.
Skip (Blue) Button
This function can help shield certain program. Program skips when selecting program by the “▲/▼” button on the TV or remote control.
- Select the program to be shielded in the "Program Edit".
- Press "Skip" (Blue) button, the skip mark is displayed at the left side of the program and this program is shielded.
- To cancel the Skip function, enter the channel edit menu, select the shielded program and press "Skip" (Blue) button, the skip mark at the left side of the program disappears then program is recovered.
This function can help delete program. - Select the program to be deleted in the "Program Edit".
- Press "Delete"(Red) button, the program will be deleted.
Delete (Red) Button
Favorite(Yellow) button
This function can help store the favorite program then these programs can be quickly selected.
- Select the program which is favorite.
- Press "Fav"(Yellow) Button, the favorite mark is displayed at the left side of the Program Edit is store into the Favorites.
- To cancel the Favorite function, enter the program edit menu, select the program and press "Fav"(Yellow) button, the favorite mark at the left side of the program disappears.
DTV Manual Search
Enter digital number and press "ENTER" to select DTV Channel.

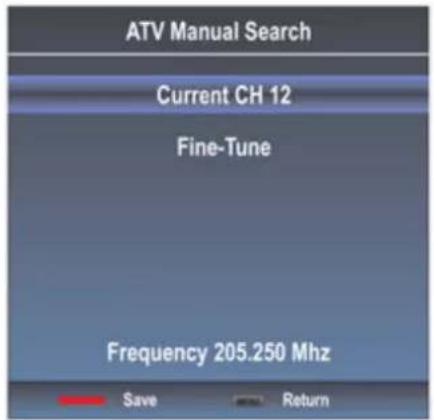
ATV Manual Search
- Press ▲/▼ key to select "ATV Manual Search" option.
- Press ▶ or "ENTER" key to enter submenu.
Current CH
- Press ▲/▼ key to select the Current CH.
- Press ◀/▶ key to select current channel.
Fine-Tune
- Press ▲/▼ key to select the Fine-Tune.
- Press ◀/▶ key to select a better frequency for current channel.

Signal Information(Used only in DTV)
- Press ▲/▼ key to select "Signal Information" option.
- Press "ENTER" or ▶ key, you can see the information of the DTV channel.

Network Setting
- Press the "Menu" to enter, then pitch on the "Option", and press "ENTER" or click the right button to enter the submenu.
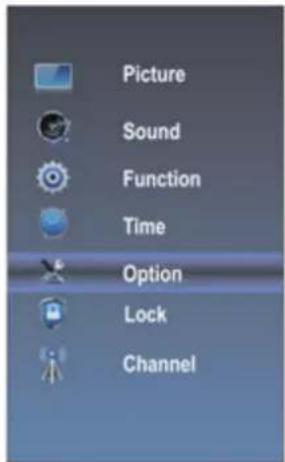

2.Pitch on the "Network Configuration", and press "ENTER" or click right button to enter the "Network Configuration".

- When the wired network is used, if select dynamic IP address setting, pitch on the "DHCP" in the "Network Configuration", then click the "Setting", and press the "ENTER" button to enter.
If select static IP address setting, pitch on the "Static" in the "Network configuration", then setting up the IP, Nemask, Gateway and DNS in sequence. When the setting complete, pitch on the "setting" and press the "Enter".


Network setting
- If shows "Success", the "WLAN" on the bottom right corner will turn to green from red, and it means the network connected successfully; If shows "Fail", it means the network can not connect, please check whether the network and router are connected
successfully or not.

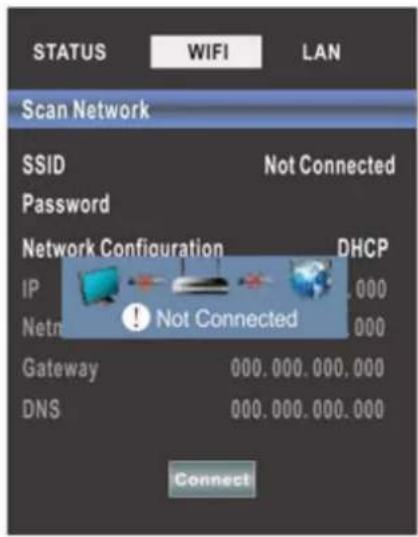
- Select the "WIFI" in the Network Configuration before using WIFI connecting.

Pitch on the "Setting", press the "ENTER" to confirm. If shows "Success", the "WIFI" on the bottom right corner will turn to green from red, and it means the network connect successfully; If shows "Not Connected", it means the network can not connect, please check whether the wireless router connects successfully or not.
Screencast Operation
On Windows 10 computer:
- Use Start > Settings > Devices > Bluetooth & other devices
- Click "Add Bluetooth or other device"
- Choose "Wireless Display or Dock" in the pop-up
- Devices named "Screencast" will show up. Click the device and your computer screen will be cast to the TV
- After the cast, you can disconnect the TV by hitting the "Disconnect" button
Screencast function is available on most Android devices. Depending on the configuration, it can be operated from "Screen Mirroring", "Wireless & Networks -> Screen Mirroring", or "HTC Connect -> Scan options" under the Android Settings menu. Please refer to your android manual for possible setup help
Press "he" key to enter internet interface.

1. NETFLIX
① Use arrow key to Select 📋 Netflix button, then press "ENTER" key to enter NETFLIX.

② Use arrow button to select one video and press "ENTER" key to play. Press "MENU" key to exit playing.
③ Use arrow key to browse the pages. press "MENU" key to return to main menu and press "EXIT" key to exit.
2. Youtube
Use arrow key to Select YouTube button, then press "ENTER" key to enter Youtube.

② Use arrow button to select one video and press "ENTER" key to play. Press "MENU" key to exit playing.
③ Press ▼ key to open or close control menu when playing.
3.VUDU
① Use arrow key to Select vudu button, then press "ENTER" key to enter VUDU.

4. Pandora
① Use arrow key to Select pandora button, then press "ENTER" key to enter pandora.

5.Twitter
① Use arrow key to Select button, then press "ENTER" key to enter Twitter.
![Authorize TVMessage to use your account? TVMessage By email wt email: https://tread.com/ & further check for 'Tread' F& Authorization This application will be able to: • Read Newto from your timeline. • See why you follow, and follow new people. • Update your profile. • Final Twenty for you. English 1 2 3 4 5 6 7 8 9 0 - = # Tab q w e r t y u i o p [ ] Caps a s d f g h j k l : * # Enter Shift \ z x c v b n m , . / Shift SPACE All do](/content/2026/05/1058557/images/616decfa5c0f1bd953a0545e7f6afdbd30626d23157c4854621f28db721cd111.jpg)
② Input the right Email and password, then select "Authorize app" button and press "ENTER" key to log in.

③ Use arrow key to browse the pages. press "MENU" key to return to main menu and press "EXIT" key to exit twitter.
Red key: log in or log out twitter.
Green key: refresh current page.
Yellow key: write new tweet.
Blue key: Search tweet.
6.Facebook
① Use arrow key to Select facebook button, then press "ENTER" key to enter Facebook.

② Input the right Email and password, select "Log In" button, then press "ENTER" key to log in.

③ Press arrow key to browse the pages and press "ENTER" key to view.
Press "MENU" key to return the main menu.
Press "EXIT" key to exit Facebook.
Red key: log in or log out Facebook.
Green key: refresh current page.
Yellow key: sign "like" or "unlike" for current content.
Blue key: view comments and add comments.
7.Accuweather
① Use arrow key to Select button, then press "ENTER" key to enter Accuweather.

② Input a city or zip code press select to get the weather information.
8.Screencast
Use arrow key to Select 📄 Screencast button, then press "ENTER" key to enter Screencast.

Press the MENU button on the main unit or on the remote control and then press the ▲/▼ buttons to select LOCK menu. Use the 0-9 buttons to input 4-digit password to enter the LOCK menu. If used, this option feature can "block" undesirable programming from appearing on the TV. Parental Control offers the user a wide variety of options and settings that restrict or "block" the programming that can appear on the TV. Parental Control allows the user the capability of defining which program rating they consider acceptable to the younger more sensitive viewer. It can be preset and turned either on or off by the user who specifies the secret 4-number code, the password. The number of hours blocked are specified. General audiences and children blocks should be both programmed into the TV's memory. Viewer ratings are specified for both TV and the motion picture Industry; both rating systems should be used, for complete coverage. The ratings are based on the ages of children.
Overview
To ensure complete coverage for all TV programs, (movies and regular TV shows) choose a rating for MPAA, from the selections below, as well as ratings from the TV Parental Guidelines Rating Systems below, using the Age Block option for General Audiences, and for children. In addition to those, you may wish to add additional restrictions from the content block menu, and submenus examples below.
Things to Consider before Setting up Parental Control
Determine which rating you consider acceptable to the viewer. (For example, if you choose TV-PG, more restrictive ratings will be automatically blocked; the viewer will not be able to see: TV-PG, TV-14, or TV-MA rated programming.) Do you want to block the auxiliary video source entirely? (Blocks the signal sent by the equipment, such as VCR, connected to the TV Audio/Video Input Jacks) Or leave unblocked, then choose allowable ratings. Block program "Content" based on individual parameters such as: Strong Dialog, Bad Language, Sex Scenes, Violent Scenes, or Fantasy. Violent Scenes; in Content Blk option. Select a secret password, in the Set Password option, using the numbers keys on the remote control. Do not forget the password, it is the only way you can access the Parental Control menu and change rating selections, or turn Parental Control off. If you want the Parental Control to be active at all times? If not, you can turn it on or off with the Lock On/Off option.
- You can set different Parental Control viewing restrictions for general audiences and for children, both can be active at the same time.
- Simply specifying one content block such as Sex Scenes, will not automatically restrict the programming that appears from the video sources.
• Even If you choose to leave the AUX Inputs unblocked, the ratings you specify will automatically restrict the programming that appears from the video sources. - You can not disable Parental Control by disconnecting the TV from power. Block hours will be automatically reset to the original block time setting specified if power is disconnected.
The default password is "0000".
Motion Picture Association of America (MPAA) Rating System
| Grade | Meaning | |
| G | General Audiences | Content not offensive to most viewers. |
| PG | Parental Guidance Suggested | Content is such that parents may not want their children to view the program. |
| PG-13 | Parents Strongly Cautioned | Program is inappropriate for pre-teens, with a greater degree of offensive material suggested than a PG rated program. |
| R | Restricted | Not for children under 17, strong element of sex and/or violence. |
| NC-17 | No children under age 17 | Not for children under 17 under any circumstances. Strong sexual content. |
| X | Hard Core Films | Same as NC-17 rating. |
| No Rating | No Rating | MPAA Not Rated |
TV Parental Guideline Rating System
| Grade | Meaning | |
| TV-Y | All Children | Content not offensive to most viewers. |
| TV-Y7 | Directed to Older Children | Considered suitable for children over 7, may contain fantasy violence scenes. |
| TV-G | General Audience | Considered suitable for all audience; children may watch unattended. |
| TV-PG | Parental Guidance Suggested | Suggested unsuitable for younger children, may contain suggestive language, bad language, sex and violence scenes. |
| TV-14 | Parents Strongly Cautioned | Unsuitable for children under 14, may contain strong language, bad language, sex and violence scenes. |
| TV-MA | Mature Audience Only | Adults only, may contain strong language, bad language, sex and violence scenes. |
| TV-NONE | All the people | No restrictions |
Canadian Rating:
• Canadian English is used throughout all English-speaking Canada (C, C8+, G, PG, 14+, 18+).
• Canadian French is used in Quebec (G,8 ans+, 13 ans+, 16 ans+, 18 ans+).

The V-Chip will automatically block certain categories that are "more restrictive". If you block TV-Y category, then TV-Y7 will be automatically blocked. Similarly, if you block TV-G category, then all the categories in the "young adult" will be blocked (TV-G, TV-PG, TV-14, and TV-MA).
If your TV does not operate normally or cannot be turned on, please check the following troubleshooting questions. Remember also to check any other connected electronic device, such as DVD or blu-ray player to pinpoint the problem. If the TV still fails to operate normally, please contact technical support (Refer to Warranty page).
| SYMPTOM | POSSIBLE CAUSE | REMEDY |
| Dead. No LED lit | No power to the TV. | ·Check all connections to the TV's AC socket. |
| Dead. No LED lit white | Set in standby mode. | ·Press either the Power button or the Standby button on the remote control. |
| Blue screen | No signal. | ·Press the SOURCE button to select the correct source. |
| Incorrect source selected. | ||
| Noisy, snowy, ghosting picture (TV) | Poor antenna signal. | ·If using an indoor antenna, try adjusting the antenna position. Check antenna connections. |
| No sound | Sound "Mute". | ·Turn sound "Mute" off. |
| Volume set too low. | ·Check volume settings. | |
| External leads not connected "if used". | ·Check that all external leads are connected properly. | |
| PASSWORD | ||
| Lost password | Select the SET Password setting in the LOCK menu, then enter the following master password "0000". The master password clears your previous password and allows you to enter a new password. | |
Before contacting the service technician, perform the following simple checks. If any problem still persists, unplug the LED TV and call for assistance.
| PROBLEM | POSSIBLE SOLUTIONS |
| No sound and picture | Check that the main plug has been connected to a wall outlet.Check that you have pressed the POWER on the front of the TV set.Check the picture contrast and the brightness setting. |
| White LED indicator lights | Set in standby mode. Press either the Power button or the Standby button on the remote control. |
| Normal picture but no sound | Check the volume.Sound muted? Press the MUTE button.Try another channel, the problem may be with the broadcast.Are the audio cables installed properly? |
| The remote control does not work | Check to see if there are any objects between the TV and remote control causing obstruction.Are batteries installed with correct polarity (+/-)?Correct remote operating mode set: TV, VCR, etc?Install new batteries. |
| Power suddenly turns off | Is the sleep timer set?Check the power connection, power may be interrupted.No broadcast on the station tuned. |
| Picture appears slowly after switching on | This is normal, the image is muted during the product start up process. Please contact a service provider if the picture has not appeared after 5 minutes. |
| Poor color or picture | Adjust the color in Menu option.Keep a sufficient distance between the product and the VCR.Try another channel, the problem may be with the broadcast.Are the VIDEO cables installed properly?Activate any function to restore the brightness of the picture. |
| Horizontal/vertical bars or picture shaking | Check for local interference, such as an electrical appliance or power tool. |
| Blue screen | Press the SOURCE button to select correct source. |
| Poor reception on some channels | Station or cable experiencing problems. Tune to another station.Station signal is weak, reorient antenna for better reception.Check for sources of possible interference. |
| Lines or streaks in pictures | Check the antenna (change the direction of the antenna). |
| No output from one of the speakers | Adjust balance in the Menu option. |
Note: When there is a problem in VGA mode (only when VGA mode is applied).
| PROBLEM | POSSIBLE SOLUTIONS |
| The signal is out of range | Adjust resolution, horizontal or vertical frequency.Check whether the signal cable is connected or loose.Check the input source. |
| Vertical bar or strip on the background, horizontal noise and incorrect position | Set the auto configure or adjust clock, phase, or H/V position. |
| Screen color is unstable or is a single color | Check the signal cable.Reinstall the PC video card. |
Maintenance
Early malfunction can be prevented. Careful and regular cleaning can extend the amount of time you will have with your new TV. Be sure to turn the power off and unplug the power cord before you begin any cleaning.
Do not use your TV in areas that are too hot or too cold, because the cabinet may warp or the screen may malfunction. Your TV works best in temperatures that are comfortable to you.
Storage temperatures are 32° to 122°F(0° to 50°C).
Working temperatures are 32° to 95°F(0° to 35°C).
Do not place your TV in direct sunlight or near a heat source.
-minimum 5cm distances around the apparatus for sufficient ventilation;
-the ventilation should not be impeded by covering the ventilation openings with items, such as newspapers, table-cloths, curtains, etc.;
-no naked flame sources, such as lighted candles, should be placed on the apparatus;
-attention should be drawn to the environmental aspects of battery disposal.
Clean the screen
A great tip to dust off your screen: wet a soft cloth in a mixture of lukewarm water and a little fabric softener or dish washing detergent. Wring the cloth until it's almost dry, and then use to wipe the screen.
Make sure the excess water is off the screen, then let air-dry before you turn on the TV.
Cleaning the cabinet
To remove dirt or dust, wipe the cabinet with a soft, dry, line-free cloth. Please be sure not to use a wet cloth.

FCC STATEMENT
This device complies with Part 15 of the FCC Rules. Operation is subject to the following two conditions:
(1) This device may not cause harmful interference, and
(2)This device must accept any interference received, including interference that may cause undesired operation.
Changes or modifications not expressly approved by the party responsible for compliance could void the user's authority to operate the equipment.
NOTE: This equipment has been tested and found to comply with the limits for a Class B digital device, pursuant to Part 15 of the FCC Rules. These limits are designed to provide reasonable protection against harmful interference in a residential installation.
This equipment generates uses and can radiate radio frequency energy and, if not installed and used in accordance with the instructions, may cause harmful interference to radio communications. However, there is no guarantee that interference will not occur in a particular installation. If this equipment does cause harmful interference to radio or television reception, which can be determined by turning the equipment off and on, the user is encouraged to try to correct the interference by one or more of the following measures:
Reorient or relocate the receiving antenna.
Increase the separation between the equipment and receiver.
Connect the equipment into an outlet on a circuit different from that to which the receiver is connected.
Consult the dealer or an experienced radio/TV technician for help.
FCC Radiation Exposure Statement
This equipment complies with FCC radiation exposure limits set forth for an uncontrolled environment. This equipment should be installed and operated with minimum distance 20cm between the radiator & your body.
For customer support: 1-888-842-3577
Please send all correspondence to:
Element TV Company, LP. Customer Service
customerservice@elementelectronics.com
www.elementetelectronics.com
SPECIFICATIONS
| Panel Size | 39.5 inches diagonally |
| Display Type | LCD |
| Panel Technology | TFT |
| Panel60HzVs.120Hz | 60Hz |
| Display Resolution | 1920x1080 |
| HDMI & Component Support | Up to 1080P |
| Panel Resolution | 1920x1080 |
| Aspect Ratio | 16:9 |
| Dynamic Contrast Ratio-Panel | 5000:1 |
| Brightness(Centre Typ.)Cd/M ^2 | 220-250 |
| ResponseTime(G To G) | 9.5 ms |
| LampLife(Typ.Hours) | >30000 hours |
| HorizontalViewing Angle(AtCR>20) | 178 |
| VerticalViewing Angle(AtCR>20) | 178 |
| TV System | ATSC/QAM |
| Channel Range | Air CH2~CH69 / Cable CH1~CH135 |
OTT APP SERVICE
If you want to know about these APP information or get more service. Please refer to following content.
- Netflix

You can call the following telephone for more help: 866-579-7172
If your matter is regarding customer service, please refer to https://contactus.netflix.com/help for alternative contact information.
- YouTube

YouTube
You can browse the following website for more help:
https://productforums.google.com/forum/#!categories/youtube/smart-tvs
• VUDU

You can call the following telephone for more help: 888-554-8838
- Pandora

You can send E-mail to Pandora for more help: pandora-support@pandora.com
- AccuWeather

You can send E-mail to AccuWeather for more help: CustomerService@AccuWeather.com
ELEMENT LCD TV LIMITED WARRANTY TO ORIGINAL CONSUMER LCD TV – 40 inches and under Screen Size Models (the "Product")
This Product (including any accessories included in the original packaging) as supplied and distributed in new condition, is warranted by Element TV Company, LP ("Element") to the original purchaser against defects in material and workmanship ("Warranty") as follows:
- WARRANTY SERVICE (Parts, Labor and/or Replacement): For a period of one (1) year from the date of the original customer purchase ("the Warranty Period"), if this Product or any of its parts are determined by Element or an Element authorized customer service provider to be defective in material or workmanship, Element will, at its sole discretion and option: (i) supply, at no charge to the original customer, new or rebuilt replacement parts in exchange for defective parts, (ii) repair the Product and pay the labor charges of such Element authorized service provider for same, at no charge to the original customer, (iii) replace the Product with a new or refurbished product of similar or better quality, at no charge to the original customer, or (iv) refund the original purchase price of the Product (excluding tax) to the original customer. After the Warranty Period, the customer must pay for all parts, labor and replacement costs associated with the Product, regardless of any defects in the Product.
A. SHIPPING COSTS: Notwithstanding the foregoing, the customer is responsible for any shipping or transportation charges incurred to ship or otherwise deliver the Product or part(s) to Element or an Element authorized service provider for diagnosis, repair or replacement. The customer shall not return the Product to Element without Element's prior written consent. Element recommends that the customer insure the Product for its full replacement cost when shipping.
B. TIMING AND PROCEDURE: Before Warranty service can commence, the original customer purchaser must contact Element for problem determination and service procedures. Proof of purchase in the form of a bill of sale or receipted invoice, evidencing that the Product is within the Warranty Period, MUST be presented to an Element authorized customer service provider in order to obtain the requested service. Please call the Toll Free Customer Service Line at (888) 842-3577 to obtain Warranty Service and Troubleshooting information. Please have your model and serial number available, along with your date of purchase of the Product. You can also visit us online at: www.elementetelectronics.com.
- EXCLUSIONS AND LIMITATIONS TO WARRANTY SERVICE: This Warranty covers manufacturing defects in materials and workmanship encountered in the normal, non-commercial use of the Product, and does not cover (a) damage or failure caused by or attributable to Product abuse or misuse, failure to follow instructions, improper installation or maintenance, alteration, accident, or excess voltage or current; (b) improper or incorrectly performed repairs by non-authorized service facilities; (c) onsite customer instruction or adjustments; (d) transportation, shipping, delivery, insurance, installation or set-up costs; (e) costs of product removal, transportation or reinstallation costs; (f) ordinary wear and tear, cosmetic damage or damage due to acts of nature, including but not limited to water, floods, wind, tornado, earthquake or fire, or due to damage caused by automobile accidents or extraordinary impact events, such as dropping or crushing; (g) commercial use of the Product; (h) modification of the Product or to any part of the Product. In addition, this Warranty does not cover images "burnt" into the screen.
This Warranty applies to the original consumer only and does not cover Products sold AS IS or WITH ALL FAULTS, or consumables (e.g., fuses, batteries, bulbs etc.). The Warranty is invalid if the factory-applied serial number has been altered or removed from the Product. This Warranty is valid only in the United States and Canada, and only applies to products purchased and serviced in the United States and Canada. All replaced parts and Products, and Products on which a refund is made, become the property of Element. The addition of equipment or features to the Product that are not manufactured or recommended by Element could affect the intended function of the Product, and therefore may void the Warranty. The Warranty is contingent upon the proper use, maintenance and care of the Product. The Warranty may be void if the Product has been used in a manner contradictory to or in violation of the terms of the user's manual, warnings or instructions accompanying the Product.
This Warranty is made in lieu of and supersedes all other warranties or conditions of merchantability or fitness for a particular purpose or general use, whether express, implied, collateral, statutory, or provided by common law, the Uniform Commercial Code or otherwise. Element further disclaims all warranties after the end of the Warranty Period defined above. No other express warranty or guaranty given by any other person, firm or entity with respect to the Product shall be binding on Element. Repair, replacement, or refund of the original purchase price, at Element's sole discretion, are the exclusive remedies of the customer. Element shall not be liable for any incidental or consequential damages caused by the use, misuse or inability to use the Product. These include but are not limited to any damages in the form of lost profits, loss of use, legal fees, economic loss, personal injuries, or any other damages caused by circumstances beyond the control of Element. Notwithstanding the foregoing, the customer's recovery shall not exceed the purchase price of the Product. This Warranty shall not extend to anyone other than the original customer who purchased the Product, and is not transferrable. No person is authorized to alter, extend or waive the Warranty of Element.
Some states do not allow the exclusion or limitation of incidental or consequential damages, or allow limitations on warranties, so the above limitations or exclusions may not apply to you. This Warranty gives you specific rights, and you may have other rights, which vary from state to state. The exclusions and limitations to the Warranty apply to the maximum extent permitted by law and unless restricted or prohibited by law. Where any term of this Warranty is prohibited by applicable law, it shall be null and void, but the remainder of this Warranty shall remain in effect.
PLEASE DIRECT ALL CORRESPONDENCE TO:
Element TV Company, LP Customer Service
customerservice@elementelectronics.com
(888) 842-3577
www.elementetelectronics.com
PLEASE CONTACT CUSTOMER SERVICE TO CONFIRM ADDRESSES AND PROCEDURES FOR WARRANTY SERVICE.
- INSTRUCTION MANUAL
- IMPORTANT SAFETY INSTRUCTIONS
- HDMI
- Electrical Safety
- Physical Safety
- What is Included?
- Front View
- Rear View
- Wall Mounting
- WARNING
- Remote Control
- Connecting External Devices
- Turning On/Off Your TV
- Initial Setup
- Source
- Input Setup
- Channel Selection
- Channels Selection
- Volume Adjustment and Mute Setup
- Volume adjustment
- Mute
- Current Channel Information
- Picture
- Picture Mode
- User settings for PICTURE
- (Contrast, Brightness, Color, Sharpness, Tint)
- Backlight
- Color Temperature
- Sound
- Sound Mode
- Balance
- AVL
- Surround Sound
- Video Description
- Digital Audio Output
- Audio Languages
- Dolby Audio Process
- HDMI ARC
- Function
- Noise Reduction
- MPEG Noise Reduction
- Aspect Ratio
- Link Setup
- Netflix Deactivate
- Netflix ESN
- Netflix Version
- Vudu Deactivate
- TTS
- Time
- Off Time
- On Time
- Sleep Timer
- Auto Sleep
- Auto Sync
- Clock
- Time Zone
- Option
- OSD Language
- OSD Time
- Closed Caption
- Reset
- Network configuration
- Software Update(USB)
- Info
- View End-User License
- Internet Update Check
- Network Update Information
- User Mode
- Lock
- Lock System
- Set Password
- USA TV
- USA MPAA
- Canada English
- Canada French
- RRT Setting
- RRT Reset
- Block Unrated TV
- Channel
- Antenna Mode
- Auto Search
- Program Edit
- Skip (Blue) Button
- Delete (Red) Button
- Favorite(Yellow) button
- DTV Manual Search
- ATV Manual Search
- Current CH
- Fine-Tune
- Signal Information(Used only in DTV)
- Network Setting
- Screencast Operation
- On Windows 10 computer:
- NETFLIX
- Youtube
- 3.VUDU
- Pandora
- 5.Twitter
- 6.Facebook
- 7.Accuweather
- 8.Screencast
- Overview
- Things to Consider before Setting up Parental Control
- Canadian Rating:
- Maintenance
- Clean the screen
- Cleaning the cabinet
- FCC STATEMENT
- FCC Radiation Exposure Statement
- OTT APP SERVICE
- YouTube
- ELEMENT LCD TV LIMITED WARRANTY TO ORIGINAL CONSUMER LCD TV – 40 inches and under Screen Size Models (the "Product")
- PLEASE DIRECT ALL CORRESPONDENCE TO:
Brand : Element
Model : ELST4017
Category : Television