
VTC-IR303FNP - Fan heater Vitek - Free user manual and instructions
Find the device manual for free VTC-IR303FNP Vitek in PDF.


| Product Type | Fan Heater |
| Brand | Vitek |
| Model | VTC-IR303FNP |
| Dimensions (H x W x D) | 240 x 180 x 120 mm |
| Weight | 1.2 kg |
| Power Supply | 220-240 V ~ 50/60 Hz |
| Heating Power | 2000 W |
| Fan Speeds | 2 (low/high) |
| Thermostat | Adjustable thermostat |
| Oscillation | Yes, 75° wide |
| Heating Modes | Fan only, low heat, high heat |
| Overheat Protection | Yes, automatic shut-off |
| Tip-Over Switch | Yes |
| Control Type | Rotary knobs |
| Noise Level | Approx. 45 dB |
| Heating Element | PTC ceramic |
| Cleaning | Wipe with dry cloth; do not immerse |
| Safety Certifications | CE compliant |
| Package Contents | Heater, user manual |
Frequently Asked Questions - VTC-IR303FNP Vitek
User questions about VTC-IR303FNP Vitek
0 question about this device. Answer the ones you know or ask your own.
Ask a new question about this device
Download the instructions for your Fan heater in PDF format for free! Find your manual VTC-IR303FNP - Vitek and take your electronic device back in hand. On this page are published all the documents necessary for the use of your device. VTC-IR303FNP by Vitek.
USER MANUAL VTC-IR303FNP Vitek
natural_image
White VITEK security camera with visible lens and port (no text or symbols on body)2:Virtuoso
FEATURES:
• 1/2.8" Sony® 3.23 MegaPixel RGB Bayer Array CMOS Sensor
- Up to 30fps live view @ 2048 x 1536 (3.15 MegaPixel)
• MegaPixel IR Corrected 3.6mm Fixed Iris Lens
• 30 Dynamic Infrared LEDs at 850nm enable viewing in total darkness up to 100 feet
• Dual Glass Compartments to Eliminate IR Reflection
- XD-DNR (2D-DNR + 3D-DNR) Noise Reduction
• True Day/Night by ICR - Dual Filter Switch
- Triple Streaming (H.264/MJPEG) offering Extensive Integration Possibilities
• Real-time Lens Distortion Correction (LDC) for an optically correct picture
• Compliance with the latest Onvif Profile S
- On-board network security with IP address filtering
- Advanced OSD Features including Image Stabilization & Corridor Mode
- MicroSD memory card slot for Local recording supporting up to 128GB MicroSDXC cards
• IP-66 Rated Water Resistance
• 12VDC and PoE (Power over Ethernet) Operation
PLEASE NOTE:
Complete user guide available online. Scan the QR Code or visit: http://www.vitekcctv.com/Manuals/Virtuoso-IP_Operation-Manual.pdf
Safety Precaution
• To prevent fire or shock hazard, do not expose the unit to rain or moisture.
- To prevent electric shocks and risk of fire hazards, do NOT use other than specific power source.

CAUTION
RISK OF ELECTRIC SHOCK, DO NOT OPEN

CAUTION: TO REDUCE THE RISK OF ELECTRIC SHOCK, DO NOT REMOVE COVER (OR BACK). NO USER SERVICEABLE PARTS INSIDE. REFER SERVICING TO QUALIFIED SERVICE PERSONNEL.

The symbol is intended to alert the user to the presence of uninsulated "dangerous voltage" within the product's enclosure that may be of sufficient magnitude to constitute a risk of electric shock to persons.

The symbol is intended to alert the user to the presence of important operating and maintenance(servicing) instructions in the literature accompanying the unit.
- Warning :
This equipment has been tested and found to comply with the limits for a Class A digital device, pursuant to part 15 of the FCC Rules. These limits are designed to provide reasonable protection against harmful interference when the equipment is operated in a commercial environment. This equipment generates, uses, and can radiate radio frequency energy and, if not installed and used in accordance with the instruction manual, may cause harmful interference to radio communications. Operation of this equipment in a residential area is likely to cause harmful interference in which case the user will be required to correct the interference at his own expense.
- Caution :
Any changes or modifications in construction of this device which are not expressly approved by the party responsible for compliance could void the user's authority to operate the equipment.
Mains power quality should be that of a typical commercial environment. If the user of the model requires continued operation during power mains interruptions, it is recommended that the model be powered from an uninterruptible power supply (UPS) or a battery.
Composition
natural_image
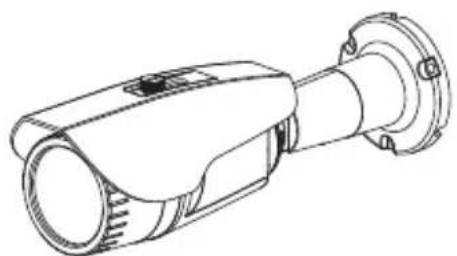
Line drawing of a surveillance camera with lens and mounting flange (no text or symbols)Camera
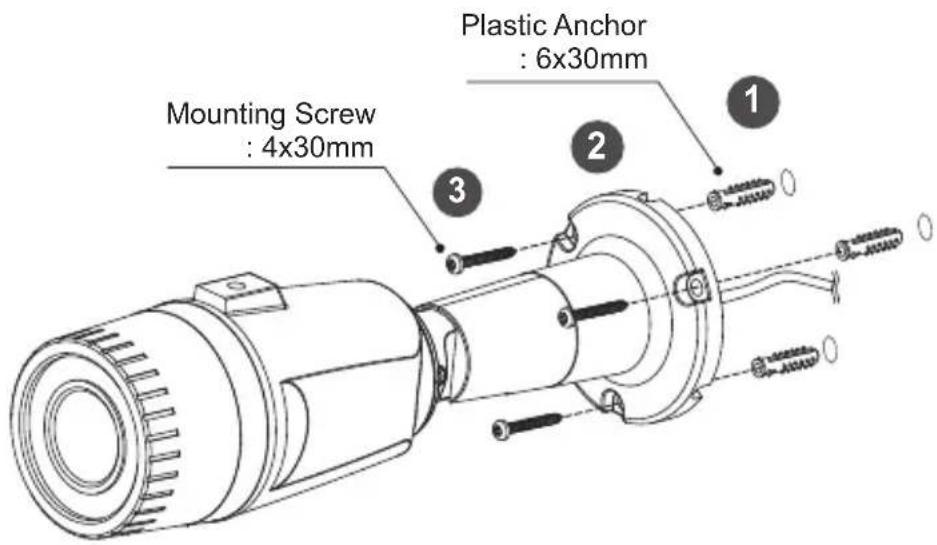
Plastic Anchor: 6 x 30mm (3pcs)
Mounting Screw: 4 x 30mm (3pcs)
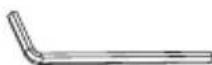
Hex L-Wrench: 3 mm (1pc)



Installation CD

Quick Start Guide

Mounting Template

Coupler for
RJ45 Cable (1pc)
Dimensions
(unit : mm)

Part Names

Installation Instructions
- Attach the mounting template at the installation site and drill three holes for mounting on the ceiling or wall.
- Route the power cable to the connecting place and place the bracket on the pre-drilled position.
- Attach the camera bracket using mounting screws.
- Adjust the camera's viewing angle by using the L-Wrench supplied. (Refer to 'TIP')
- Put the sunshield onto the camera unit and tighten the sunshield-bolts.
[TIP]
- Before installation, adjust the 'Tilt' and 'Rotation' angle.
[TIP]
- Before installation, adjust the 'Pan' angle.


Pan & Tilt Adjustment
Loosen screws at the side of the bracket as illustrated below to adjust all three axes at once. L-Wrench
1) Pan: Adjusts view direction
2) Tilt: Adjusts view angle
3) Inclination: Adjusts horizontal image alignment.


CAUTION
- Extreme care should be taken NOT to scratch the window in front of lens.
- Care should be taken that the cable is NOT damaged, kinked or exposed in a hazardous area.
- Do not point the camera lens directly at a strong light source such as the sun or spot light.
- When reattaching the front lens cover make sure that the rubber gasket is properly seated. Do not over tighten lens cover
Installation and commissioning Instructions
- Make sure power is removed before the installation.
• After all connections are properly finished, follow this order for applying power.
a) Plug the network cable into RJ-45 Ethernet Port.
If PoE is the unique power, there will be no need to connect Power terminal.
b) When 12VDC Local power is necessary, connect power cables first, then plug the AC adapter into AC outlet to avoid damage.
Power Supply Connections
Camera can work with either 12VDC or PoE(IEEE Std. 802.3af). Primary and secondary grounds are completely isolated to avoid possible ground loop problems.
▶ When PoE and Local DC power are connected at the same time, Local power has priority.
Virtuoso Quick Start Guide
1. PC Requirements
1. Operating System
• Windows Vista (32 bit) Ultimate, Business Edition
• Windows 7, 8, 10 (32/64 bit) Ultimate, Professional Edition
2. Processor
- Intel Core 2 Duo 2.4 GHz or higher (for using 1920*1080 30 fps)
- Intel Core i7 2.8 GHz or higher (for using 2048*1536 30fps)
3. Memory
- 2 GB or more
4. Resolution
• 1280X1024 pixels or higher (32 bit color)
5. Web Browser
- Microsoft Internet Explorer Ver. 9.0, 10.0 or Higher
- Safari Ver. 4.0 (Plug-in free viewer only)
- Google Chrome Ver. 4.0 (Plug-in free viewer only)
2. IP Manager
The IP Manager can be installed by locating the program on the enclosed CD or visiting: www.vitekcctv.com/support/downloads
- Open IP MANAGER
- Highlight the camera and right click
- Click the "Change IP" button.
- Input IP Address and Subnet, Gateway and click the button "OK".


Virtuoso Quick Start Guide
3. Accessing the IP Camera
- Open Web browser
-
Type IP address
-
Enter the camera's IP address in Internet Explorer® address bar.
• The default IP address is 192.168.0.10 - The default User ID and Password is admin / admin

4. Live View Page
The network camera's Live View page appears in your browser after successful login.

ICONS:

Live: Displays live video.

Setup: Enters setup menu.

Exit: Exit current login and/or Enter new login.

Snapshot: Take a picture of the video image currently on display. Supports original image size, view, print, and save feature.

Zoom: Supports a digital zoom in live video image.

creen: Expand the current windows into maximum monitor size.

Information: Shows the current major setting status.
LEFT COLUMN SETTINGS:
Stream: Specify the viewable video stream source to display in live view page.
Screen Ratio: Specify the viewable video size to display in live view page.
Event Action: Used to start or stop an event manually according to event
Virtuoso Quick Start Guide
5. Quick Setup Menu
Enter the setup menu icon on the Web Viewer.

Setting the Quick setup menu.

5-1. Information
The Information shows the camera basic information such as Model name, MAC address, IP address, Zeroconf IP address and Firmware version.
| Information | |
| Model | XXX-XXXX |
| MAC Address | AC:DE:48.04.02.8E |
| IP Address | 192.168.0.118 |
| Zeroconf IP Address | 189.254.184.165 |
| Firmware Version | 2.7 XX |
5-2. Users
User accounts can be added or modified or removed. The authority depends upon user group automatically and shows the permission status to access the menus.
- Name: Shows the name registered name to access the camera.
- Group: Shows the assigned permission given to users.
• Authority: Shows the permission status to access the menus.
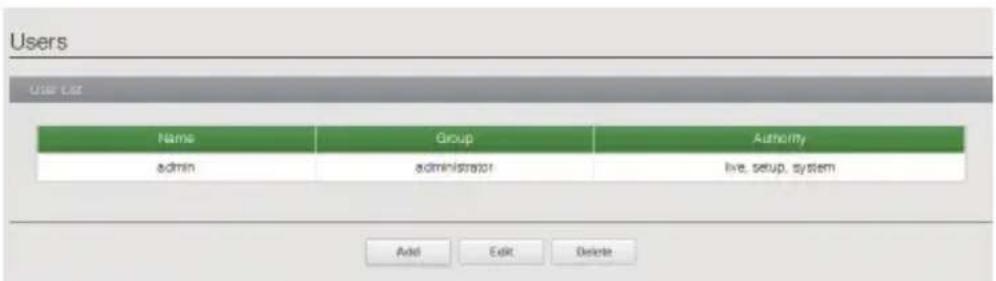
Click the Add, Edit, or Delete button for managing user account.
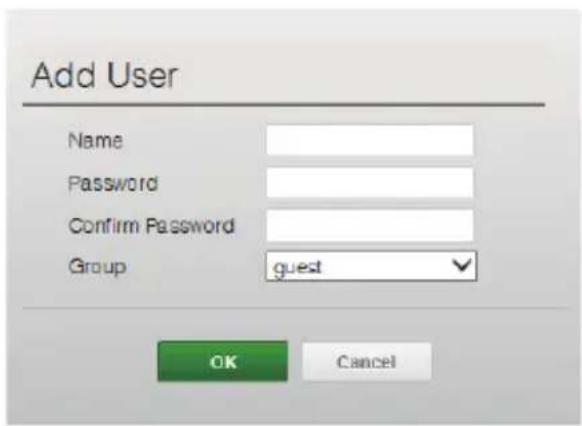
5-2-1. Add
To add a new user:
- Click the Add tab, and type a new user name. (1 to 14 alphanumeric characters).
- User names are not case sensitive.
- Type a password and retype confirm password. (1 to 8 alphanumeric characters).
- Passwords are case sensitive.
- Select one of the groups you wish to assign to the user.
- Click the OK button to save the settings and add a new user
Virtuoso Quick Start Guide

5-2-2. Edit
To edit a user:
- Select one of the User Names in the User List you want to modify.
- Click the Edit tab, then new pop-up window appears.
- Type a password (1 to 8 alphanumeric characters) and retype confirm password.
- The user name can't be modified.
-
Select one of the groups you wish to assign to the user.
-
Click the OK button to save the settings and modify a user.
-
Select one of the groups you wish to assign to the user.
- Click the OK button to save the settings and modify a user.
5-2-3. Delete
To delete a user:
- Select one of the User Names in the User List you want to remove.
- Click the Delete tab. A dialog box appears with confirmation message.
- Click the OK button. The user profile is removed from the User List profile.
5-3. Network
IP Address:
The DHCP (Dynamic Host Configuration Protocol) server has a feature that automatically assigns an IP address to the device if there is a device on the network.
Network
IP Address
○ Obtain IP address via DHCP server
Use the following IP address
IF address
Subnet mask
Gateway
| 192 | 169 | 0 | 107 |
| 255 | 255 | 255 | 0 |
| 192 | 169 | 0 | 1 |

Virtuoso Quick Start Guide
- Obtain IP address via DHCP :
Select the choice box if you want to assign the IP address from DHCP server automatically, and then the remaining setting are read-only text.
- Use the following IP address:
Select the choice box if you want to assign the IP address manually.
- IP address:
The address of the camera connected to the network. Specify a unique IP address for this network camera.
- Subnet mask:
The address that determines the IP network that the camera is connected to (relative to its address). Specify the mask for the subnet the network camera is located on.
- Gateway:
The Gateway that accesses other networks. Specify the IP address of the default router (Gateway) used for connecting devices attached to different networks and network segments.
5-4. Date & Time
Date & Time
![Current Time Date 1970-01-03 Time 15:16.25 New Time Synchronize with computer time Date 2015-05-15 Time 09:15:28 Set manually Date 1970-01-03 Time 15:15:13 Synchronize with NTP server NTP Server time.nist.gov Interval 12 [Hour] Time Zone (GMT) Greenwich Mean Time Dublin, Edinburgh, Lisbon, London Automatically adjustment for daylight saving time changes Date & Time Display Date Format YYYY-MM-DD Time Format 24 Hour Save Cancel](/content/2026/05/1058546/images/e5471c410997f0b929342d720329641c4ec1f458631232bf0629ab13cf56ba48.jpg)
Virtuoso Quick Start Guide
5-4-1. Current Time
Shows the current date and time.
- Date: The default setting is 1970-01-01.
• Time: The default setting is 00:00:00.
5-4-2. New Time
Select one of the server time.
- Synchronize with computer time:
Sets the time according to the clock on your computer.
- Set manually: Using this option allows you to manually enter the date and time.
- Synchronize with NTP Server:
This option will obtain the correct time from an NTP server every 60 minutes.
The NTP server's IP address or host name is specified in the time server.
5-4-3. Time Zone
Select the time zone where your camera is located. Click the "Automatically adjust for daylight saving changes" checkbox to automatically update the time changes caused by daylight saving.
- Time zone: The default setting is GMT.
5-4-4. Day & Time Display
Select one of the Date and Time format.
- Date Format: The default setting is YYYY-MM-DD.
- Time Format: The default setting is 24 hours.
* For more details, refer to enclosed CD.
Virtuoso Quick Start Guide
If you suspect a problem is being caused by incorrect configuration or some other minor problem, consult the troubleshooting guide below.
Upgrading the Firmware
Firmware is software that determines the functionality of the network camera. One of your first actions when troubleshooting a problem should be to check the current firmware. The latest version may contain a correction that fixes your particular problem. The current firmware version in your camera is displayed on the Basic Configuration or About. For the latest firmware of the camera, please contact your product administrator.
Detailed instructions on how to perform the upgrade process are provided with each new release. See also the Maintenance / Upgrade for more information.
General Troubleshooting
The following list covers some of the problems that may be encountered and suggests how to remedy them:
| Symptom Guide | |
| The camera cannot be accessed by some clients. | If using a proxy server, try disabling the proxy setting in your browser. Check all cabling and connectors. |
| The camera works locally, but not externally | Check if there are firewall settings that need to be adjusted. Check if there are router settings that need to be configured. |
| Poor or intermittent network connection. | If using a network switch, check that the port on that device uses the same setting for the network connection type (speed/duplex). |
| The camera cannot be accessed via a host name. | Check that the host name and DNS server settings are correct. |
| Not possible to log in. When HTTPS is enabled, ensure that the correct protocol (HTTP or HTTPS) is used. When attempting to log in, you may need to manually type in http or https in the browser's address bar. | |
| No image using Refresh and/or slow updating of images. | If images are very complex, try limiting the number of clients accessing the camera. |
| Images only shown in black & white. | Check the Video & Image setting. |
| Blurred images. Refocus the camera. | |
Virtuoso Quick Start Guide
| Poor image quality. Increased lighting | can often improve image quality.Check that there is sufficient lighting at the monitored location. Check all image and lighting settings. |
| Rolling dark bands or flickering in image. | Try adjusting the Exposure Control setting under AE and AWB part. |
| H.264 not displayed in the client. Check that the correct network interface is selected in the Video & Image/Stream. | |
| Multicast H.264 not displayed in the client. | Check with your network administrator that the multicast addresses used by the camera are valid for your network. Check that the Enable multicast checkbox are enabled in the System/Network/RTP tab. Check with your network administrator to see if there is a firewall preventing viewing. |
| Multicast H.264 only accessible by local clients. | Check if your router supports multicasting, or if the router settings between the client and the server needs to be configured. The TTL value may need to be increased. |
| Color saturation is different in H.264 and Motion JPEG. | Modify the settings for your graphics adapter.Please see the adapter's documentation for more information. |
| Poor audio quality. Too many users/clients connected to the camera may affect the sound quality adversely.Try limiting the number of clients allowed to connect. | |
| Distorted audio. Check that the correct Audio Input source is selected.Select Microphone for a connected external microphone.Select Line for a connected line in source. | |
[ NOTE ]
If you cannot find the help you require, please see the User's Manual, or contact your network administrator.
Virtuoso Quick Start Guide
Setup Menu table
| Main MENU Sub MENU | CONFIGURATION | ||
| Quick Setup | Information | ||
| Users | Add / Edit / Delete | ||
| Network | IP Address | ||
| Date & Time | Current Time / New Time / Time Zone / Date & Time Display | ||
| Video & Audio | Video | Video Source / Video Stream1 / Video Stream2 / Video Stream3 | |
| Audio(*) | Audio Stream / Audio Input / Audio Output | ||
| Image | Basic | Appearance Control | |
| Brightness / Contrast / Saturation / Hue / Sharpness | |||
| OSD | OSD Control | ||
| Enable text OSD / Enable date&time OSD / Enable zoom&focus | |||
| AE | Exposure Control | ||
| Mode / Shutter / Min.Shutter / Max.Shutter / Gain / Min.Gain / Max.Gain / Auto Iris / Auto Flickerless | |||
| AWB | White Balance Control | ||
| Mode / Cb Gain / Cr Gain | |||
| AF | Focus Control | ||
| Mode / Speed / Lens Calibration / Enable Day &Night sync focus / Enable lens locking | |||
| Day/Night | Day & Night Control | ||
| Mode / Switch Time / Threshold | |||
| WDR | Digital WDR Control | ||
| Mode / Level | |||
| Defog Control | |||
| Mode | |||
| BLC | BLC Control | ||
| Mode / Level | |||
| HLC Control | |||
| Mode | |||
| DNR | 2DNR (Mode / Level), 3DNR (Mode, Level) | ||
| Corridor | Rotation | ||
| LDC | Mode / Level | ||
| Privacy Mask | Color | ||
| Digital Zoom | x1.0 ~ x16.0 | ||
Virtuoso Quick Start Guide
| Events | Motion Detection | Sensitivity |
| Triger | Alarm In(*) / System / Manual / Network | |
| Action | Alarm Out(*) / E-Mail / FTP / Video | |
| Rule | ||
| Record | Record | Record / Schedule / Storage |
| Video Analytics | Tamper | |
| System | Security | Users / HTTPS / IP Filer / ONVIF |
| Date & Time | Current Time / New Time / Time Zone / Date & Time Display | |
| Network | TCP/IP / DDNS / RTP / UPnP / Zeroconf | |
| Language | English / Korean / Russian | |
| Maintenance | Maintain / Update / Setup Export / Setup Import | |
| Logs & Report | Logs / Report |
(*) Not Available
Detailed Specifications
| Sensor | 1/2.8" Sony® 3.23 MegaPixel RGB Bayer Array CMOS |
| Resolution | 3.15 MegaPixel (2048x1536) |
| Video Encoding | H.264 / MJPEG |
| Frame Rate | 30fps max |
| Dynamic Intensity IR LEDs | 30 850nm IR LEDs |
| IR Range | 100' |
| Lens | 3.6mm Fixed Iris |
| Corridor Format | 90° / 270° |
| Digital Zoom | 0 ~ x16 |
| Minimum Illumination | Color Mode: 0.15 lx at 50IRE/30fps / B/W Mode: 0.00 lx 30fps With IR on |
| Day/Night | True Day/Night by ICR |
| Electronic shutter speed | 1/10,000 sec ~ Max. 1/30 sec |
| White Balance | ATW-Indoor/Outdoor, Shade, Clear sky, Fluorescent light, Light bulb, Flame, Manual |
| DSS (Sens-Up) | AUTO |
| Noise Reduction | XD-DNR (2D-DNR+3D-DNR) |
| WDR | Digital WDR (ATR-EX) |
| Privacy | Max.8 Area Selection |
| Motion Detection | YES |
| Advanced OSD Functions | Privacy Mask, Motion Detection, Tamper, Defog, D-Zoom, HLC/ BLC, LDC (Lens Distortion Correction), Mirror/Flip, Hue, Brightness, Contrast, Saturation, Sharpness |
| Memory Card | MicroSD - up to 128GB |
| Video Streaming | Simultaneously H.264 and MJPEG (Triple Streaming) Independent Frame Rate and Bandwidth Control, VBR/CBR Mode |
| Connectivity | Up to 10 simultaneous user connections |
| Security | Multi User Authority, IP Filtering, HTTPS |
| Weather Resistance Rating | IP-66 |
| Input Voltage | 12VDC / PoE |
| Power Consumption (12VDC) | 300mA (IR Off) / 540mA (IR On) |
| Power Consumption (PoE) | 6.8 Watts |
| Operating Conditions | 14°-122°F (-10°-50°C) < 80% RH |
| Dimensions (W x H x D) | 3.15" 2.99" x 9.25" (80 x 76 x 235mm) |
| Weight | 1.19lb (540g) |

CONSIDER THESE OTHER
GREAT PRODUCTS FROM


natural_image
Exterior view of two black VITEK home devices with ports and control buttons (no visible text or symbols on the device surfaces)OnCue IP NVR Series:
VT-NV Series Stand-alone Real-time IP Network Video Recorders with Real Time HD Recording on all channels and shares the same local and remote software platform as our award winning OnCue HD-SDI / EX-SDI recorders. The Advanced OnCue Central Monitoring software (CMS) is capable of connecting multiple OnCue NVRs and HD-SDI / EX-SDI recorders. Up 6 Internal SATA2 HDD Slots support up to 24TB (6 x 4TB HDD) using Advanced HDD Format plus optional eSATA for storage expansion (up to 5 more HDD).

natural_image
Front view of a dark rectangular electronic device with no visible text or symbols on its bodyOnCue IP "S" NVR
4, 8, and 16 Channel Real Time IP Network Video Recorders
• Full HD (720p/1080p) Real-time recording with 120fps live display & playback
- Internal 4-Port PoE Switch
• Supports up to 12GB Internal Storage (3x4TB - 8 & 16 Channel Models) / 8GB (2x4TB - 4 Channel Model)
- eSATA for storage extension of up to 5 more HDD (8 & 16 Channel Models)
- Plug & Play and Auto configuration for VITEK ENVI IP Cameras and many leading ONVIF compliant Cameras
- Convenient Panorama (Thumbnail) Search

natural_image
Exterior view of a black VITEK device with ports and indicator lights (no readable text or symbols beyond branding)OnCue IP "P" NVR
8, 16, and 32 Channel Real Time IP Network Video Recorders
• Full HD (720p/1080p) Real-time recording, live display, and playback
- Internal 8-Port PoE Switch
• Supports up to 24GB Internal Storage (6x4TB)
• eSATA for storage extension of up to 5 more HDD
- Standard Rack Mount Width (Rack Ears Included)
- Plug & Play and Auto configuration for VITEK ENVI IP Cameras and many leading ONVIF compliant Cameras
- Convenient Panorama (Thumbnail) Search
LIMITED PRODUCT WARRANTY
VITEK products carry a three (3) year limited warranty. VITEK warrants to the purchaser that products manufactured by VITEK are free of any rightful claim of infringement or the like, and when used in the manner intended, will be free of defects in materials and workmanship for a period of three (3) years, or as otherwise stated above, from the date of purchase by the end user. This warranty is nontransferable and extends only to the original buyer or end user customer of a VITEK Authorized Reseller.
The product must have been used only for its intended purpose, and not been subjected to damage by misuse, willful or accidental damage, caused by excessive voltage or lightning.
The product must not have been tampered with in any way or the guarantee will be considered null and void.
This guarantee does not affect your statutory rights.
Contact your local VITEK Reseller should servicing become necessary.
VITEK makes no warranty or guarantee whatsoever with respect to products sold or purchased through unauthorized sales channels. Warranty support is available only if product is purchased through a VITEK Authorized Reseller.
- FEATURES:
- PLEASE NOTE:
- Safety Precaution
- CAUTION
- - Warning :
- - Caution :
- Composition
- Dimensions
- Part Names
- Installation Instructions
- [TIP]
- Pan & Tilt Adjustment
- Installation and commissioning Instructions
- Power Supply Connections
- Virtuoso Quick Start Guide
- PC Requirements
- Operating System
- Processor
- Memory
- Resolution
- Web Browser
- IP Manager
- Accessing the IP Camera
- Live View Page
- ICONS:
- LEFT COLUMN SETTINGS:
- Quick Setup Menu
- 5-1. Information
- 5-2. Users
- 5-2-1. Add
- 5-2-2. Edit
- 5-2-3. Delete
- 5-3. Network
- IP Address:
- Network
- IP Address
- 5-4. Date & Time
- 5-4-1. Current Time
- 5-4-2. New Time
- 5-4-3. Time Zone
- 5-4-4. Day & Time Display
- Upgrading the Firmware
- General Troubleshooting
- [ NOTE ]
- OnCue IP NVR Series:
- OnCue IP "S" NVR
- OnCue IP "P" NVR
- LIMITED PRODUCT WARRANTY
Brand : Vitek
Model : VTC-IR303FNP
Category : Fan heater