
43DP660 - Television TCL - Free user manual and instructions
Find the device manual for free 43DP660 TCL in PDF.


| Product Type | LED Television |
| Brand | TCL |
| Model | 43DP660 |
| Screen Size | 43 inches (109 cm) |
| Resolution | 1920 x 1080 (Full HD) |
| Display Technology | LED |
| Refresh Rate | 60 Hz |
| Dimensions (with stand) | 970 x 614 x 220 mm |
| Dimensions (without stand) | 970 x 569 x 76 mm |
| Weight (with stand) | 8.5 kg |
| Weight (without stand) | 8.3 kg |
| Power Consumption (typical) | 75 W |
| Standby Power Consumption | < 0.5 W |
| Power Supply | AC 100-240V, 50/60Hz |
| Connectivity | 2 x HDMI, 1 x USB, 1 x RF, 1 x AV, 1 x Digital Audio Out |
| Smart TV | No (standard LED TV) |
| Remote Control | Included (RC120 or similar) |
| Wall Mount VESA | 100 x 100 mm |
| Speakers | 2 x 8W |
| Energy Class | A+ |
| Cleaning Instructions | Use a soft dry cloth. Avoid liquid cleaners. |
| Safety Warning | Do not open the TV. Refer servicing to qualified personnel. |
| Spare Parts Availability | Contact TCL support or authorized service centers. |
| Repairability | Designed for professional repair. Lithium battery in remote. |
Frequently Asked Questions - 43DP660 TCL
User questions about 43DP660 TCL
0 question about this device. Answer the ones you know or ask your own.
Ask a new question about this device
Download the instructions for your Television in PDF format for free! Find your manual 43DP660 - TCL and take your electronic device back in hand. On this page are published all the documents necessary for the use of your device. 43DP660 by TCL.
USER MANUAL 43DP660 TCL
Ensure that your domestic mains supply voltage matches the voltage indicated on the identification sticker located at the back of your set. Where the mains plug, AC inlet or an appliance coupler is used as disconnect device, it shall remain readily operable.
On certain models, the light indicator is located at the side of the TV set. The absence of a light indication at the front does not mean that the TV set is fully disconnected from the mains. To disconnect the TV set completely, the mains plug must be pulled out.
The TV set's components are sensitive to heat. The maximum ambient temperature should not exceed 35° Celsius. Do not cover the vents at the back or sides of the TV set. Leave sufficient space around it to allow adequate ventilation. Install the appliance away from any source of heat (fireplace, etc.) or appliances creating strong magnetic or electric fields.
Moisture in rooms where the set is installed should not exceed 75% humidity. Moving the set from a cold place to a warm one can cause condensation on the screen (and on some components inside the TV set). Let the condensation evaporate before switching the TV set on again.
The ⏻ or POWER/⏻ button on the TV set or the ⏻ button on the remote control can be used to switch it on and put it into standby mode. If you are not going to be watching the TV for a lengthy period of time, switch it off completely by removing the plug from the mains power socket.
During thunderstorms, we recommend that you disconnect the TV set from the mains and aerial so that it is not affected by electrical or electromagnetic surges that could damage it. For this reason, keep the mains and aerial sockets accessible so they can be disconnected, if necessary.
Unplug the TV set immediately if you notice it giving off a smell of burning or smoke. You must never, under any circumstances, open the TV set yourself, as you run the risk of an electric shock in doing so.
WARNINGS
This appliance is intended for domestic household use only and should not be used for any other application, such as for non-domestic use or in a commercial environment.
If the external flexible cable or cord of this product is damaged, it shall be replaced by the manufacturer or his service agent or a similar qualified person in order to avoid a hazard.
Leave more than 10cm clearance around the television to allow adequate ventilation. The ventilation should not be impeded by covering the ventilation openings with items, such as newspapers, table-cloths, curtains, etc.
The apparatus shall not be exposed to dripping or splashing and no objects filled with liquids, such as vases shall be placed on the apparatus.
Batteries (battery pack or batteries installed) shall not be exposed to excessive heat such as sunshine, fire or the like.
To reduce the risk of fire or electric shock, do not expose this apparatus to rain or moisture.
Never place a television set in an unstable location. A television set may fall, causing serious personal injury or death. Many injuries, particularly to children, can be avoided by taking simple precautions such as:
- Using cabinets or stands recommended by the manufacturer of the television set.
- Only using furniture that can safely support the television set.
- Ensuring the television set is not overhanging the edge of the supporting furniture.
- Not placing the television set on tall furniture (for example, cupboards or bookcases) without anchoring both the furniture and the television set to a suitable support.
- Not placing the television set on cloth or other materials that may be located between the television set and supporting furniture.
- Educating children about the dangers of climbing on furniture to reach the television set or its controls. If your existing television set is being retained and relocated, the same considerations as above should be applied.
Equipment with this symbol is a Class II or double insulated electrical appliance. It has been designed in such a way that it does not require a safety connection to electrical earth. Equipment without this symbol is a Class I electrical appliance. It shall be connected to a mains socket outlet with a protective earthing connection.

To prevent the spread of fire, keep candles or other open flames away from this product at all times.

To prevent injury, this apparatus must be securely attached to the floor/wall in accordance with the installation instructions.
To reduce the risk of RF exposure, the use distance of this apparatus should be at least 100cm.
TV screen
The TV screen used in this product is made of glass. Therefore, it can break when the product is dropped or impacted upon by other objects.
The TV screen is a very high technology product, giving you finely detailed pictures. Occasionally, a few nonactive pixels may appear on the screen as a fixed point of blue, green or red. This does not affect the performance of your product.
Care
Use a glass-cleaning product to clean the screen and a soft cloth and mild detergent to clean the rest of the set.
Important: Using strong detergents, alcohol-based and abrasive products may damage the screen.
Dust the vents at the back and sides regularly. Using solvents, abrasive or alcohol-based products could damage the TV set. If an object or liquid enters the appliance, unplug it immediately and have it checked by an authorized engineer. Never open the appliance yourself since this may put you at risk or damage the appliance.
ESD regulation
This apparatus meets ESD performance criteria. In case the apparatus does not recover in Ethernet connection mode due to electrostatic discharge, user interference is required.
Hanging the TV set on the wall
Warning: This operation requires two people.
To ensure a safe installation, observe the following safety notes:
- Check that the wall can support the weight of the TV set and wall mount assembly.
- Follow the mounting instructions provided with the wall mount. For certain models, make sure to screw the hexagonal VESA wall mounting screw bosses (and screws) provided with the set into the nuts for the wall mount at the back of your set before your wall mounting.
- The TV set must be installed on a vertical wall.
- Make sure to use only screws suitable for the material of the wall.
- Make sure that the TV set cables are placed so that there is no danger of tripping over them.
All other safety instructions about our TV sets are also applicable here.
Multi product user manual
The features described in this manual are common to most models. Some features may not be available on your TV and/or your TV may include features that are not described in this user manual. The illustrations in this manual may differ from the actual product. Please refer to the actual product.
Information for Users on Disposal of Old Equipment and Batteries
[European Union]
![TCL 43DP660 - [European Union] - 1](/content/2026/05/1058531/images/2ae46f61583c86d8f385a2dc0d5ee7de03db3f9a3ee58aceb58c90a7b7b3267a.jpg)
Products
These symbols indicate that the electrical and electronic equipment and the battery with this symbol should not be disposed of as general household waste at their end-of-life. Instead, the products should be handed over to the applicable collection points for the recycling of electrical and electronic equipment as well as batteries for proper treatment, recovery and recycling in accordance with your national legislation and the Directive 2012/19/EU, 2006/66/EC and 2008/12/EC.
![TCL 43DP660 - [European Union] - 2](/content/2026/05/1058531/images/cf2346393454f7217da5f8f1ed681e40e3b2b14d2f32028cda56cdf2021c27e0.jpg)
Pb Battery
By disposing of these products correctly, you will help to conserve natural resources and will help to prevent potential negative effects on the environment and human health which could otherwise be caused by inappropriate waste handling of these products.
Notice: The sign Pb below the symbol for batteries indicates that this battery contains lead.
For more information about collection points and recycling of these products, please contact your local municipal office, your household waste disposal service or the shop where you purchased the product.
Penalties may be applicable for incorrect disposal of this waste, in accordance with national legislation.
[Business users]
If you wish to dispose of this product, please contact your supplier and check the terms and conditions of the purchase contract.
[Other Countries outside the European Union]
These symbols are only valid in the European Union. If you wish to dispose of these items, please do so in accordance with applicable national legislation or other rules in your country for the treatment of old electrical equipment and batteries.
Dear Customer,
Hereby, TCL declares that this device is in compliance with Directive 2014/53/EU. The full text of the EU declaration of conformity is available at the following internet address: www.tcl.eu
Figures and illustrations in this User Manual are provided for reference only and may differ from actual product appearance. Product design and specifications may be changed without notice.
Important information 1
Chapter 1 - Connections
Connect the power and antenna 5
Connect Blu-ray Disc player, HD game console, HD camcorder, headphones, CI module .... 5
Connect to the Internet 6
Chapter 2 - Getting started
Remote control functions 7
Installing batteries 7
Switch the TV on and off....8
Initial setup 8
HbbTV 12
HbbTV access 13
HbbTV deactivation 13
Instant power on 13
E-manual 13
Software update 13
Reset shop 13
Viewing pictures, playing music and watching videos from a USB storage device 13
Chapter 5 - Other information
Password in Parental Control....15
Troubleshooting 15
Chapter 3 - Basic TV operations
Accessing channels 9
Watching connected devices 9
Adjusting volume 9
Accessing Smart TV homepage 9
Using TV settings menu 9
Chapter 4 - Using more of your TV
Installing channels 10
Common interface 10
Using the common interface module .... 10
Accessing common interface services 10
Using EPG (Electronic Programme Guide) ...... 10
Using subtitles 10
Turning on/off subtitles 11
Enabling subtitle languages on digital TV channels .... 11
Selecting a subtitle type on digital TV channels 11
Using Teletext 11
Turning on/off Teletext 11
Selecting decoding page language 11
Digital Teletext language 11
Network connection 11
Connecting to a wireless network 11
Connecting to a wired network 12
Networked waking up 12
T-Link 12
Enabling or disabling T-Link 12
Using one-touch play 12
Using system standby 12
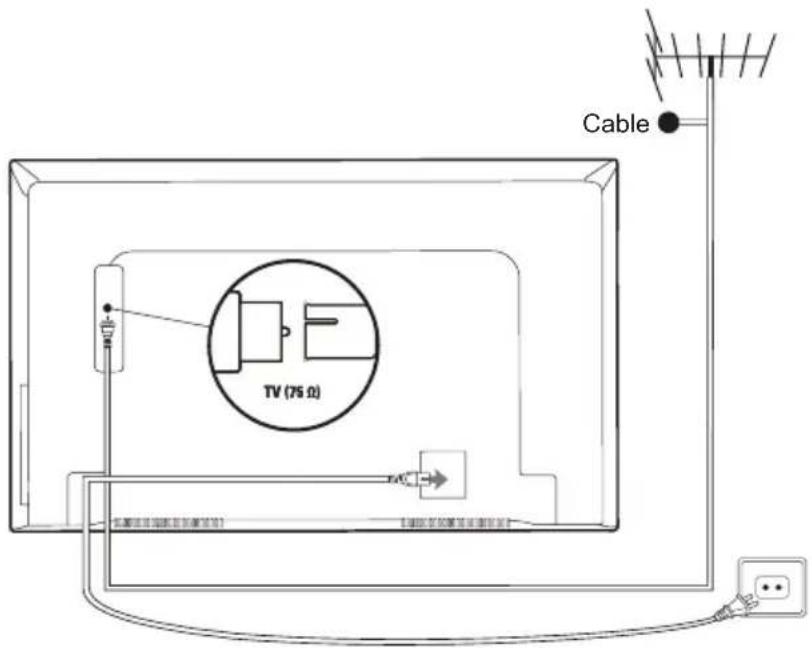
Connect the power and antenna
To switch on TV after connecting power cord, press ⏻ or POWER/⏻.
Notes:
- Position of power socket varies according to TV model.
- Disconnect the power cord before connecting devices.
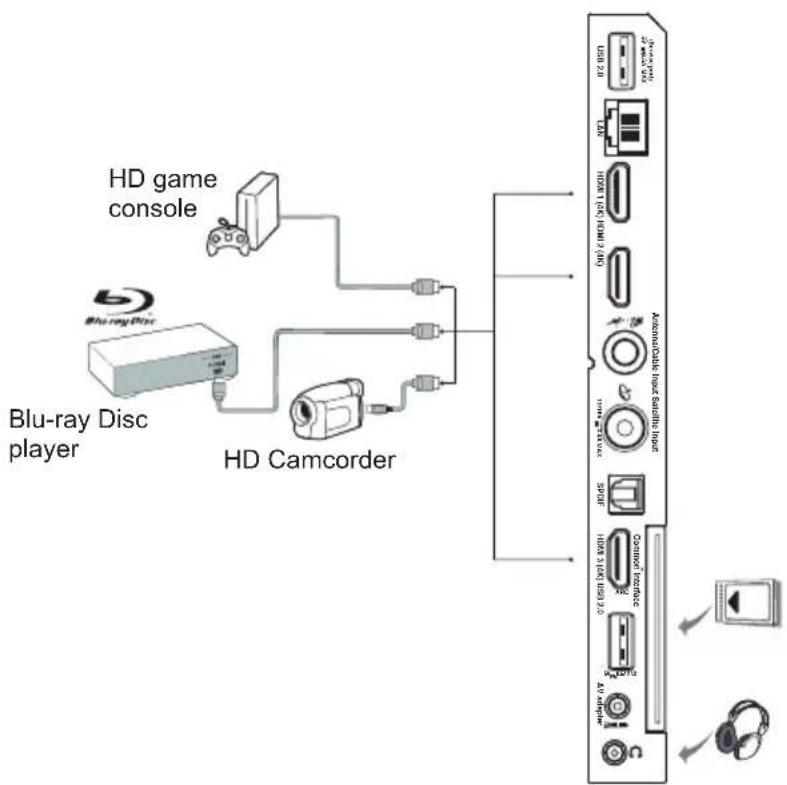
Connect Blu-ray Disc player, HD game console, HD camcorder, headphones, CI module
flowchart
graph TD
    A["HD game console"] --> B["HD Camcorder"]
    C["Blu-ray Disc player"] --> B
    B --> D["Internal device with ports like HDMI 2.0, USB 1.0, HDMI 1.5, HDMI 2.0, HDMI 3.0, HDMI 4.0, HDMI 5.0, HDMI 6.0, HDMI 7.0, HDMI 8.0, HDMI 9.0, HDMI 10.0, HDMI 11.0, HDMI 12.0, HDMI 13.0, HDMI 14.0, and external devices via USB port to the right panel"]
    style A fill:#f9f,stroke:#333
    style C fill:#ccf,stroke:#333
    style B fill:#cfc,stroke:#333
    style D fill:#fcc,stroke:#333
    style E fill:#ffc,stroke:#333
    style F fill:#fcc,stroke:#333
    style G fill:#fcc,stroke:#333
    style H fill:#fcc,stroke:#333
    style I fill:#fcc,stroke:#333
    style J fill:#fcc,stroke:#333
    style K fill:#fcc,stroke:#333
    style L fill:#fcc,stroke:#333
    style M fill:#fcc,stroke:#333
    style N fill:#fcc,stroke:#333
    style O fill:#fcc,stroke:#333
    style P fill:#fcc,stroke:#333
    style Q fill:#fcc,stroke:#333
    style R fill:#fcc,stroke:#333
    style S fill:#fcc,stroke:#333
    style T fill:#fcc,stroke:#333
    style U fill:#fcc,stroke:#333
    style V fill:#fcc,stroke:#333
    style W fill:#fcc,stroke:#333
    style X fill:#fcc,stroke:#333
    style Y fill:#fcc,stroke:#333
    style Z fill:#fcc,stroke:#333
Connect to the Internet
Note: The following instructions are just the usual ways to connect your TV to the wired or wireless network. The connection method may be different depending on your actual network configuration. If you have any questions about your home network, please refer to your Internet service provider.
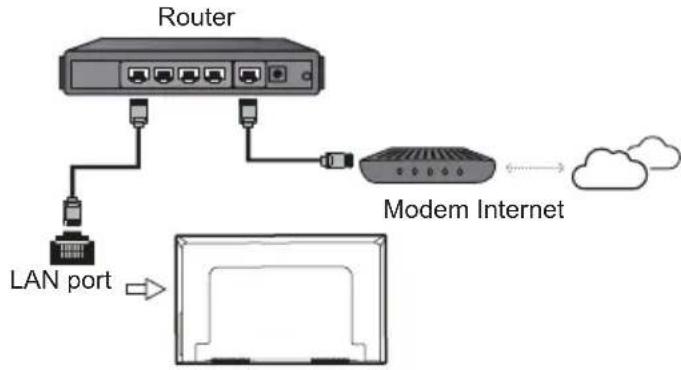
Wired connection
flowchart
graph TD
    A["Router"] --> B["LAN port"]
    B --> C["Modem Internet"]
    C --> D["Cloud"]
    style A fill:#f9f,stroke:#333
    style B fill:#ccf,stroke:#333
    style C fill:#cfc,stroke:#333
    style D fill:#fcc,stroke:#333
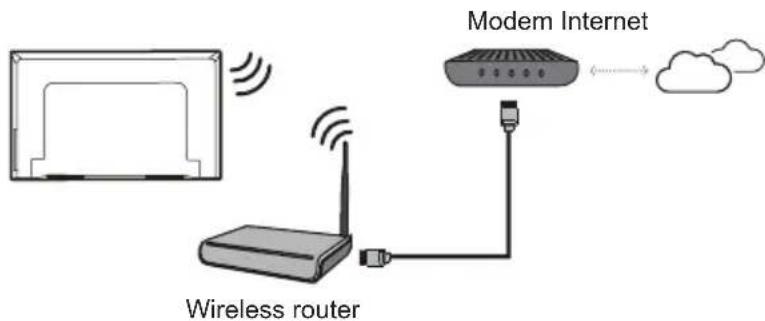
Wireless connection
Notes:
- Your TV might not have all connectors visible on diagram above. Number of USB and HDMI ports may vary according to TV model.
- Button and connector locations may vary according to TV model.
- USB connectors are for data input from USB drives and for connecting other relevant USB devices where applicable.
- All USB devices have to be directly connected to TV set without cable extenders. In case extender is required, maximum 50cm length is recommended. Longer extenders should have ferrite beads.
- ARC (Audio Return Channel) function is only supported on the HDMI port identified with ARC. To use ARC function, please turn on T-Link function first as described in the T-Link section.
- It is recommended to use high quality and well shielded HDMI cables to avoid possible interferences.
- Please use headphones with 3.5mm TRS connector. Excessive sound pressure from headphones can cause hearing loss.
Remote control functions
Most of your television's functions are available via the menus that appear on the screen. The remote control supplied with your set can be used to navigate through the menus and to configure all the general settings.

To switch the sound off and back on. Standby / quit standby.
Numeric buttons To enter channel numbers or a digit.
PRE-CH To return to the previous channel in TV mode.
LIST To display the channel list.
To control the volume.
To display programme information, if available.
To display the Settings menu.
P\N\V To change channels.
To access or exit the Smart TV homepage.
≡ To display the Option menu.
▲/▼/ ◀▶ Navigation direction buttons.
OK To confirm an entry or selection.
To return to the previous menu.
To select input source.
EXIT To exit the menu, homepage or an App, etc.
∅LANG To select a sound type available for selected analogue TV programme; to select an audio language available for selected digital TV programme.
GUIDE To toggle the Electronic Programme Guide on or off (only available for digital channels).
TEXT To toggle Teletext on or off.
SUBT. To select a subtitle language available for selected digital TV programme.
Colour buttons To select tasks or Teletext pages; to be used for HbbTV function.
◀ To start fast reverse.
11 To pause playback.
▶▶ To start fast forward.
ZOOM To select the screen mode.
Note: You are recommended to use the full screen mode. Do not use the display mode with black bars on both sides of the picture (such as 4:3) for a long time; otherwise the TV screen may be damaged permanently.
▶ To start playback.
■ To stop playback.
NETFLIX To access Netflix if available.
Installing batteries
- Push to open the back cover as illustrated.
- Insert two AAA batteries according to the polarities marked on the batteries case.
- Replace the back cover as illustrated.
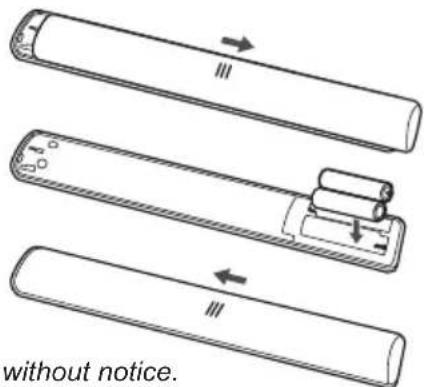
Important:
Batteries shall not be exposed to excessive heat such as sunshine, fire or the like. Remove batteries when the remote control is not to be used for a long time. Batteries left in equipment may cause damage through deterioration and corrosive leakage, invalidating the guarantee.
To protect the environment use local recycling facilities for battery disposal. Dispose of used batteries according to the instructions.
CAUTION: Risk of explosion if batteries are replaced by an incorrect type. Replace only with the same or equivalent type recommended by the equipment manufacturer.
If the batteries in your remote control are run down, you can use the buttons on your TV set. They have the following functions:
For models with below buttons on the set: For models with below buttons on the set:
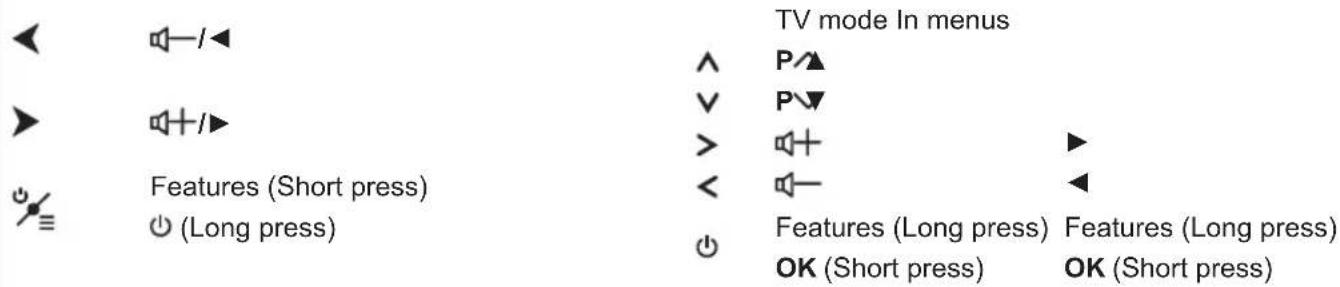
For models with below button on the set:

/
Power on (Short press)
Features (Short press)
Confirm (Long press)
Switch the TV on and off
- When the power cord is connected, the TV will be turned on directly or be in standby mode. If the TV is in standby mode, press the ⏻ or POWER/⌘ button on the set or the ⏻ button on the remote control to turn it on.
- To put the TV into standby mode, press the ⏻ button on the remote control. The TV set remains powered up, but with low energy consumption.
- To switch the TV off, unplug the mains plug from the mains outlet.
Initial setup
The first time you switch the set on, the Hello screen appears, which guides you through the initial setup process. Follow the on-screen instructions to finish the initial setup process such as selecting the language, connecting to the network, scanning channels, and more. During each step, either make a choice or skip the step. If you skip a step, you can perform the setup later from the settings menu.
Note: If the channel search retrieved only the analogue channels it could be caused by poor broadcasting and therefore is not covered by manufacturer warranty. Manufacturers cannot be held responsible for lack of or poor broadcasting in some areas.
Accessing channels
Using the numeric buttons: press the corresponding numeric buttons on the remote control to access the channels.
Using the P^buttons : press the P^v buttons on the remote control to scroll through the channels.
Using the LIST button: press the LIST button on the remote control to display the channel list and press
▲/▼/◄/► and OK to select channels.
Watching connected devices
Press ➕ on the remote control to display the source list. Press ▲/▼ to select TV or other input sources and press OK to confirm.
You can also press ⬆ on the remote control to display the homepage, press ◀/▶ to select the TV page, then press ▲/▼/◀/▶ and OK to select the input source.
Adjusting volume
Volume control: press the 🔊+/- buttons on the remote control to increase or decrease the volume.
Sound mute: press the 📄 button to temporarily mute the sound. Press this button again or the 🖱 button to restore the sound.
Accessing Smart TV homepage
Allows you to enjoy Internet Applications (Apps) and specially adapted Internet websites. You can make controlling with the TV remote control.
WARNING:
- Configure the network settings before using Smart TV applications.
- Slow responses and/or interruptions may occur, depending on your network conditions.
- If you experience a problem using an application, please contact the content provider.
- According to circumstances of the content provider, an application's updates or the application itself may be discontinued.
- Depending on your country's regulations, some applications may have limited service or not be supported.
-
Changes in application content may be made without prior notice by the service provider.
-
Press ⬆ on the remote control to display the Smart TV homepage.
-
Press ◀/▶ to select pages, then press ▲/▼/◀/▶ and OK to enter the desired Apps or functions.
-
Press EXIT or ➕ to return to the homepage.
-
Press EXIT or ↗ to exit the homepage.
Note: Since the connection with Internet takes time, it's recommended that you wait a few minutes to use the Smart TV feature after activation of TV from standby.
Using TV settings menu
Allows you to adjust TV settings, such as picture and sound.
- Press ⚙️ on the remote control to display the Settings menu.
- Press ▲/▼ to select the desired item, then press OK/▶ to enter the corresponding submenu.
-
In submenus, press ▲/▼ to select menu options, then press OK/▶ to enter the option list, the adjustment interface, or the corresponding submenu.
-
Press ⊃ to return to the previous menu.
-
Press EXIT or ⚙ to close the menu. Notes:
- You can also press ☑ on the remote control, select Settings (if available) and press OK to enter the Settings menu. Some options may not be available for certain signal sources.
- Setting LED Motion clear on will make fast moving images clearer by controlling the LED backlight, but the picture will be darker and more flickering than with LED Motion clear off.
Installing channels
This section describes how to search and store channels automatically. This may be done in any of the cases below:
- you have skipped the channel installation step in the initial setup;
- you are prompted that there are no channels in TV mode;
-
you want to update your channels.
-
In TV mode, press ⚙️ on the remote control and select Channel > Channel scan. Press OK/▶ to enter.
-
The TV installs and arranges channels according to your country or region. Press ▲/▼ to select Country/Region, and press OK/▶ to enter. Enter the default password 1234 or your own password in case you have changed the password in the System > Lock menu. Press ▲/▼ to select your country or region and press OK to confirm.
-
Press ▲/▼ to select Automatic search and press OK/▶ to enter.
-
Press ▲/▼ to select Tuner mode and press ◀/▶ to select Antenna, Cable or Satellite. (Note: Satellite option is available only in selected models.)
-
Press ▲/▼ to select other options to configure.
-
After configuration is completed, press ▼ to select Search and press OK to start scanning channels.
-
The channel search may take a few minutes. After the automatic search, channels are arranged in a preset order. If you want to edit the channel list, press 🌐 on the remote control, select Channel > Channel organizer and press OK/▶ to enter.
Common interface
Encrypted digital TV channels can be decoded with a common interface module and a card provided by a digital TV service operator.
The common interface module may enable several digital services, depending on the operator and services you choose (for example, pay TV). Contact your digital TV service operator for more information about services and terms.
Using the common interface module
WARNING: Switch off your TV before inserting a common interface module. Be sure to follow the instructions described below. Wrong insertion of a common interface module may damage both the module and your TV.
-
Following the directions printed on the common interface module, gently insert the module into the common interface slot on the TV.
-
Push the module in as far as it will go.
- Turn on the TV and wait for the common interface function to be activated. This may take several minutes.
Note: Do not remove the common interface module from the slot. Removing the module will deactivate the digital services. This TV set has passed CI+ certification. It is recommended that you use a common interface module marked with CI+.
Accessing common interface services
After inserting and activating the common interface module, press ⚙ on the remote control, select Channel > Common interface and press OK/▶ to enter.
This menu option is only available if the common interface module is correctly inserted and activated. On-screen applications and content are provided by your digital TV service operator.
Using EPG (Electronic Programme Guide)
EPG is an on-screen guide that displays scheduled digital TV programmes. You can navigate, select and view programmes.
-
Press ⚙️ on the remote control, select Channel > EPG and press OK/▶ to enter, or press GUIDE on the remote control, the Program Guide menu will appear, which allows you to get information about the current or next programme playing on each channel. Navigate through the different programmes using the ▲/▼/◀/▶ buttons on the remote control.
-
Use the related buttons shown at the bottom of the screen to view EPG.
-
More: Press OK to view more information.
- Program filter: Press ≡ to display programme filter for digital TV programmes.
- Custom schedule: Press the red button to set a schedule.
- Select date: Press the green button and OK to select date.
-
Schedule list: Press the yellow button to view your schedule list.
-
Press EXIT to exit EPG.
Using subtitles
You can enable subtitles for each TV channel. Subtitles are broadcast via Teletext or DVB-T/DVB-C digital broadcasts. With digital broadcasts, you have the additional option of selecting a preferred subtitle language.
Turning on/off subtitles
- Press ⚙️ on the remote control, select Channel > Subtitle and press OK/▶ to enter.
- Select the Subtitle option, press OK/▶ to enter, press ▲/▼ to select On or Off and press OK to confirm.
- Press EXIT or ⚙ to close the menu.
Enabling subtitle languages on digital TV channels
- Press ⚙️ on the remote control, select Channel > Subtitle > Digital subtitle language 1st and press OK/▶ to enter.
- Press ▲/▼ to select a subtitle language as your preferred language and press OK to confirm.
- Press ▲/▼ to select Digital subtitle language 2nd and press OK/▶ to enter.
- Press ▲/▼ to select a secondary subtitle language and press OK to confirm.
- Press EXIT or ⚙ to close the menu.
Shortcut operation: Press SUBT. on the remote control to directly select a subtitle language available for the selected digital TV programme.
Selecting a subtitle type on digital TV channels
- Press ⚙️ on the remote control, select Channel > Subtitle > Subtitle type and press OK/▶ to enter.
- Press ▲/▼ to select a subtitle type and press OK to confirm. You can select Hearing impaired to display the hearing impaired subtitles with your selected language.
- Press EXIT or ⚙ to close the menu.
Using Teletext
Turning on/off Teletext
- Press TEXT on the remote control to turn Teletext on.
- Press TEXT on the remote control again to turn on Teletext PAT mode.
- Press TEXT on the remote control again to turn Teletext off.
Selecting decoding page language
- Press ⚙️ on the remote control, select Channel > Teletext > Decoding page language and press OK/▶ to enter.
- Press ▲/▼ to select a proper type of language in which Teletext will display and press OK to confirm.
- Press EXIT or ⚙ to close the menu.
Digital Teletext language
On digital TV channels, depending on the broadcaster, you may be able to enjoy a service with multiple initial Teletext pages in different languages. This function allows you to select an available language as primary language, which relates to different initial Teletext pages.
- Press 📍 on the remote control, select Channel > Teletext > Digital teletext language and press OK/▶ to enter.
- Press ▲/▼ to select a language and press OK to confirm.
- Press EXIT or ⚙ to close the menu.
Network connection
You can set up your TV so that it can access the Internet through your local area network (LAN) using a wired or wireless connection.
Connecting to a wireless network
Your TV is equipped to be connected to your home network wirelessly. To do that you need a wireless router or modem.
- Press 📍 on the remote control, select Network > Wireless connection > Wireless connection and press OK/▶ to enter.
- Press ▲/▼ to select On and press OK to confirm.
- You can set the wireless network connection in 3 ways:
- a) Scan
When Wireless connection is turned on, the TV will search all access points within range. Access points found by the TV will be displayed. Press ▲/▼ to select an available access point, then press OK/▶ to connect. Select All wireless (if available) to find more access points.
Note: If you select a protected access point, you will have to enter the corresponding password.
- b) Manual
Press ▲/▼ to select Manual and press OK/▶ to enter. You will be prompted to enter the correct SSID of an available wireless router, select its security type and enter the password (if needed) to set up the connection.
- c) Auto
If your AP (Access Point) supports WPS (Wi-Fi Protected Setup), you can connect to the network via PIN (Personal Identification Number) or PBC (Push Button Configuration). WPS will automatically configure the SSID and WPA key in either mode.
Press ▲/▼ to select Auto and press OK/▶ to enter.
- PIN: Select PIN and press OK/▶ to enter. Choose a random PIN code. Make sure this code is installed on the AP. (For the procedures, refer to your router manual.) Select OK and press OK to set up the connection.
- PBC: If your router has a PBC push button, select PBC and press OK/▶ to enter. Press the PBC push button on your router within 2 minutes before you select OK and press OK again. Your TV will automatically acquire all the network setting values it needs and connect to your network.
- Press to return to the Network menu.
- If you want to check the Internet connectivity, press ▲/▼ to select Connecting test and press OK/▶.
Connecting to a wired network
You can connect your TV to your LAN using cable in three ways:
- You can connect your TV to your LAN by connecting the LAN port on your TV to an external modem using a Cat 5 cable.
- You can connect your TV to your LAN by connecting the LAN port on your TV to an IP sharer, which is connected to an external modem. Use Cat 5 cable for the connection.
-
Depending on how your network is configured, you may be able to connect your TV to your LAN by connecting the LAN port on your TV directly to a network wall outlet using a Cat 5 cable. Note that the wall outlet is connected to a modem or router elsewhere in your house.
-
Press ⚙️ on the remote control, select Network > Wired settings and press OK/▶ to enter.
-
Check the network information or enter IP settings to set the IP address, Subnet mask, Default gateway, Primary DNS and Secondary DNS values manually. Then press ▲/▼/◄/► to select OK and press OK to confirm. The TV set will try to connect to the network and inform you about the result.
-
Press to return to the Network menu.
-
If you want to check the Internet connectivity, press ▲/▼ to select Connecting test and press OK/▶.
Networked waking up
This function allows you to turn on your TV from standby mode via a network. To use this function, please make sure:
-
Your TV is connected to an effective home network;
-
The desired controller, such as a smartphone, is connected to the same network as your TV;
- An App which supports networked waking up function, has been installed into the controller;
- Networked standby is set to On in the Network menu.
When the TV is in networked standby mode, you can use the App to wake up the TV remotely.
T-Link
Use this function to search for CEC devices connected to the HDMI sockets in your TV and enable one-touch play and one-touch standby between CEC devices.
Enabling or disabling T-Link
- Press ⚙️ on the remote control, select System > T-Link and press OK/▶ to enter.
- Press ▲/▼ to select T-Link and press OK/▶ to enter.
- Press ▲/▼ to select On or Off and press OK to confirm.
- Press EXIT or ⚙ to close the menu.
Using one-touch play
With one-touch play, pressing the play button on (for example) your DVD remote control starts playback on your DVD device and automatically switches your TV to the correct source, displaying DVD content.
Using system standby
With system standby, pressing the ⏻ button on (for example) your TV remote control switches your TV and all connected HDMI devices to standby mode.
Note: The CEC functions depend on the devices connected and it is possible that some devices may not interoperate correctly when connected to this TV. The user manual or the manufacturer of the problematic devices should be consulted for further information.
HbbTV
HbbTV (Hybrid broadcast broadband TV) is a service offered by certain broadcasters and available only on some digital TV channels. HbbTV delivers interactive television over broadband Internet. These interactive features are added to and enrich the normal digital programmes, and include services such as digital teletext, electronic programme guide, games, voting, specific information related to the current programme, interactive advertising, information magazines, catch-up TV, etc.
To use HbbTV please ensure your TV is connected to Internet and HbbTV is switched on.
Notes:
- HbbTV services are broadcast- or country-dependent and may be unavailable in your area.
- You cannot download files to your TV with HbbTV function.
- Application provider or broadcasting related conditions may cause an HbbTV application to be unavailable momentarily.
- To access HbbTV applications you must connect your TV to the Internet via a broadband link. HbbTV applications may not work correctly in case of network related issues.
HbbTV access
- Press ⚙️ on the remote control, select System > HbbTV settings > HbbTV and press OK/▶ to enter.
- Press ▲/▼ to select On and press OK to confirm.
- When you tune to a digital TV channel that offers HbbTV, this will be signalled to you by an on-screen indication (generally a red button, but other colour buttons may also be used). Press the indicated colour button to open the interactive pages.
- Use ▲/▼/◄/► and the colour buttons to navigate through the HbbTV pages and press OK to confirm.
HbbTV deactivation
To avoid disturbances that may be caused by HbbTV broadcasting tests, you can turn off the HbbTV function:
-
Press ⚙️ on the remote control, select System > HbbTV settings > HbbTV and press OK/▶ to enter.
-
Press ▲/▼ to select Off and press OK to confirm.
Instant power on
It enables you to turn on your TV faster from standby mode than turning this function off, but it will also increase standby power consumption.
-
Press 📍 on the remote control, select System > Advanced settings > Instant power on and press OK
-
Press ▲/▼ to select On and press OK to confirm.
-
Press to return to the previous menu.
E-manual
E-manual is an electronic user manual for the product. You can find instructions for the features of this TV set.
-
Press ⚙️ on the remote control, select Support > E-manual and press OK/▶ to enter.
-
Press ▲/▼/◄/► and OK to view the contents. Press ⊃ to return to the previous page.
-
Press EXIT to exit.
Software update
Note: Do not switch off or unplug the TV until the upgrade is completed.
Press 📍 on the remote control, select Support > Software update and press OK/▶ to enter. You have the following options to update the software.
- By network: Enables you to download and install the latest version software from the Internet. Make sure to set up a wired or wireless network connection first then select By network and press OK/▶ to enter. Follow the on-screen instructions to complete the process.
Note: Keep successful network connection during upgrade.
- By channel: Enables you to install the latest version software if available from the broadcast. Select By channel and press OK/▶ to enter. Follow the on-screen instructions to complete the process.
- By USB: Enables you to install a new version software from a USB stick. Insert the USB stick in which a new version software is stored into a USB socket of the set. Select By USB and press OK/▶ to enter. Follow the on-screen instructions to complete the process.
Reset shop
Allows you to reset the TV to factory default settings.
- Press ⚙️ on the remote control, select Support > Reset shop and press OK/▶ to enter.
- Use the numeric buttons to enter the password.
- Press ◀/▶ to select OK and press OK to confirm.
- The Hello screen appears. Follow the on-screen instructions.
Viewing pictures, playing music and watching videos from a USB storage device
Your TV is fitted with USB connectors that enable you to view pictures, listen to music or watch videos stored on USB drives.
When a USB device is connected, press ➕ on the remote control to display the source list. Press ▲/▼ to select Media and press OK to enter.
Supported file formats:
Picture JPEG, PNG, BMP
Music/Audio Container: MP3, AVI, AC3, AAC, FLV, MKV
Codec: MPEG1 layer 3, MPEG2 layer
2/3, AC3, EAC3, AAC, LPCM
Video Container: AVI, MP4, TS, MKV, FLV
Codec: MPEG1/2/4, H.263, H.264,
H.265, VP8, VP9
Notes:
- Some USB keys and USB products like digital cameras or mobile phones are not fully compatible with USB standard so they may not work with the TV media player. Not all USB keys or devices are compatible with the USB function. Not all above formats are recognised. The encoding formats of your files will determine whether or not they can be played.
- Please use high speed (minimum 5MB/s read transfer) USB drives.
Password in Parental Control
- The default password is 1234. You can change it to a new one.
- The super password is 0423. If you forget your code, enter the super password to override any existing codes.
Troubleshooting
Please check the following list before requesting service.
There is no picture or sound.
- Make sure the power cord is properly inserted in the power outlet.
- Make sure the source type is set correctly.
- Make sure the antenna is properly connected.
- Make sure the volume is not set to minimum or the sound is not set to mute.
- Make sure the headphones are not connected.
- The TV may be receiving a signal other than from TV broadcasting stations.
Picture is not clear.
- Make sure the antenna cable is properly connected.
- Consider whether your TV signal is being properly received.
- Poor picture quality can occur due to a VHS camera, camcorder, or other peripheral being connected at the same time. Switch off one of the other peripherals.
- The ‘ghost’ or double image may be caused by obstruction to the antenna due to high-rise buildings or hills. Using a highly directional antenna may improve the picture quality.
- The horizontal dotted lines shown on the pictures may be caused by electrical interference, e.g., hair dryer, nearby neon lights, etc. Turn off or remove these.
Picture is too dark, too light or tinted.
- Check the colour adjustment.
- Check the brightness setting.
- Check the sharpness function.
Remote control does not work.
- Check the batteries of the remote control.
- Make sure the remote sensor window on the TV front is not under strong fluorescent lighting.
- Try to clean the remote sensor window on the TV front with a soft cloth.
If the above suggestions do not solve your technical issue, please refer to the warranty card for service information.
Operating Conditions
Temperature 5°C - 35°C (41°F - 95°F) Humidity 20 - 75% (non-condensing)
Storage Conditions
Temperature -15°C - 45°C (5°F - 113°F) Humidity 10 - 90% (non-condensing)
Radio Information
• 2.4G Wi-Fi transmitter frequency range: 2412 - 2472MHz
• 2.4G Wi-Fi transmitter power: 16dBm (+/- 4dB)
• DVB-T/T2/C tuner frequency range: 45 - 858MHz
• DVB-S/S2 tuner frequency range: 950 - 2150MHz
OSS Notice
To send inquires and requests for questions regarding open source, contact nearest TCL office.
This product uses the GPL (Version 2 and 3) and LGPL (version 2.1).
This product uses some software programs which are distributed under the Independent JPEG Group.
This product uses some software programs which are distributed under the libpng Project.
This product uses some software programs which are distributed under the Freetype Project.
This product uses some software programs which are distributed under the zlib Project.
This product uses some software programs (xml2, iniparser, curl, c-areas) which are distributed under the MIT.
This product uses openssl which is distributed under the OpenSSL and SSLeay Apache License Project. GPL software: Linux Kernel, uboot, busybox, mali, glib, cario, fontconfig, alsa-lib, libogg, harfbuzz, webkit LGPL software: DFB (DirectFB), gstreamer, libgcrypt, pango, nl, mstreamer, iconv BSD software: chromium, freetype2
GNU software: dosfstools
[Legal Statement] of TCL - manufacturer of this TV set
Due to the various capabilities of products featuring the SmartTV - Services, as well as limitations in the available content, certain features, applications, and services may not be available on all devices or in all territories. Some features on SmartTV may also require additional peripheral devices or membership fees that are sold separately. Please visit our website for more information on specific device information and content availability. The services and availability of content through SmartTV are subject to change from time to time without prior notice.
All content and services accessible through this device belong to third parties and are protected by copyright, patent, trademark and/or other intellectual property laws. Such content and services are provided solely for your personal noncommercial use. You may not use any content or services in a manner that has not been authorized by the content owner or service provider. Without limiting the foregoing, unless expressly authorized by the applicable content owner or service provider, you may not modify, copy, republish, upload, post, transmit, translate, sell, create derivative works, exploit, or distribute in any manner or medium any content or services displayed through this device.
YOU EXPRESSLY ACKNOWLEDGE AND AGREE THAT USE OF THE DEVICE IS AT YOUR SOLE RISK AND THAT THE ENTIRE RISK AS TO SATISFACTORY QUALITY, PERFORMANCE AND ACCURACY IS WITH YOU. THE DEVICE AND ALL THIRD PARTY CONTENT AND SERVICES ARE PROVIDED "AS IS" WITHOUT WARRANTY OF ANY KIND, EITHER EXPRESS OR IMPLIED. TCL EXPRESSLY DISCLAIMS ALL WARRANTIES AND CONDITIONS WITH RESPECT TO THE DEVICE AND ANY CONTENT AND SERVICES, EITHER EXPRESS OR, IMPLIED, INCLUDING BUT NOT LIMITED TO, WARRANTIES OF MERCHANTABILITY, OF SATISFACTORY QUALITY, FITNESS FOR A PARTICULAR PURPOSE, OF ACCURACY, OF QUIET ENJOYMENT, AND NON-INFRINGEMENT OF THIRD PARTY RIGHTS. TCL DOES NOT GUARANTEE THE ACCURACY, VALIDITY, TIMELINESS, LEGALITY, OR COMPLETENESS OF ANY CONTENT OR SERVICE MADE AVAILABLE THROUGH THIS DEVICE AND DOES NOT WARRANT THAT THE DEVICE, CONTENT OR SERVICES WILL MEET YOUR REQUIREMENTS, OR THAT OPERATION OF THE DEVICE OR SERVICES WILL BE UNINTERRUPTED OR ERROR-FREE. UNDER NO CIRCUMSTANCES, INCLUDING NEGLIGENCE, SHALL TCL BE LIABLE, WHETHER IN CONTRACT OR TORT, FOR ANY DIRECT, INDIRECT, INCIDENTAL, SPECIAL OR CONSEQUENTIAL DAMAGES, ATTORNEY FEES, EXPENSES, OR ANY OTHER DAMAGES ARISING OUT OF, OR IN CONNECTION WITH, ANY INFORMATION CONTAINED IN, OR AS A RESULT OF THE USE OF THE DEVICE, OR ANY CONTENT OR SERVICE ACCESSED BY YOU OR ANY THIRD PARTY, EVEN IF ADVISED OF THE POSSIBILITY OF SUCH DAMAGES.
Third party services may be changed, suspended, removed, terminated or interrupted, or access may be disabled at any time, without notice, and TCL makes no representation or warranty that any content or
service will remain available for any period of time. Content and services are transmitted by third parties by means of networks and transmission facilities over which TCL has no control. Without limiting the generality of this disclaimer, TCL expressly disclaims any responsibility or liability for any change, interruption, disabling, removal of or suspension of any content or service made available through this device. TCL may impose limits on the use of or access to certain services or content, in any case and without notice or liability. TCL is neither responsible nor liable for customer service related to the content and services. Any question or request for service relating to the content or services should be made directly to the respective content and service providers.
- WARNINGS
- TV screen
- Care
- ESD regulation
- Hanging the TV set on the wall
- Warning: This operation requires two people.
- Multi product user manual
- Information for Users on Disposal of Old Equipment and Batteries
- [European Union]
- [Business users]
- [Other Countries outside the European Union]
- Dear Customer,
- Chapter 1 - Connections
- Chapter 2 - Getting started
- Chapter 5 - Other information
- Chapter 3 - Basic TV operations
- Chapter 4 - Using more of your TV
- Connect the power and antenna
- Connect to the Internet
- Notes:
- Remote control functions
- Installing batteries
- Important:
- Switch the TV on and off
- Initial setup
- Accessing channels
- Watching connected devices
- Adjusting volume
- Accessing Smart TV homepage
- WARNING:
- Using TV settings menu
- Installing channels
- Common interface
- Using the common interface module
- Accessing common interface services
- Using EPG (Electronic Programme Guide)
- Using subtitles
- Turning on/off subtitles
- Enabling subtitle languages on digital TV channels
- Selecting a subtitle type on digital TV channels
- Using Teletext
- Turning on/off Teletext
- Selecting decoding page language
- Digital Teletext language
- Network connection
- Connecting to a wireless network
- Connecting to a wired network
- Networked waking up
- T-Link
- Enabling or disabling T-Link
- Using one-touch play
- Using system standby
- HbbTV
- HbbTV access
- HbbTV deactivation
- Instant power on
- E-manual
- Software update
- Reset shop
- Viewing pictures, playing music and watching videos from a USB storage device
- Password in Parental Control
- Troubleshooting
- There is no picture or sound.
- Picture is not clear.
- Picture is too dark, too light or tinted.
- Remote control does not work.
- Operating Conditions
- Storage Conditions
- Radio Information
- OSS Notice
- [Legal Statement] of TCL - manufacturer of this TV set
Brand : TCL
Model : 43DP660
Category : Television