
OP1000 - Uncategorized ZKTeco - Free user manual and instructions
Find the device manual for free OP1000 ZKTeco in PDF.


| Product Type | Biometric Access Control Terminal |
| Display | 2.4-inch TFT color screen |
| Fingerprint Sensor | Optical sensor, 500 dpi |
| Card Reader | EM (125 kHz) / MIFARE (13.56 MHz) optional |
| User Capacity | 3,000 fingerprints, 10,000 cards, 100,000 records (typical) |
| Communication | TCP/IP, RS485, USB Host, optional Wi-Fi |
| Power Supply | 12V DC, 3A |
| Power Consumption | < 5W (idle), < 15W (operation) |
| Operating Temperature | 0°C to 45°C |
| Operating Humidity | 20% to 80% (non-condensing) |
| Dimensions (W×H×D) | 180 × 80 × 35 mm (approx.) |
| Weight | 0.5 kg (approx.) |
| Enrollment Methods | Fingerprint, password, card (optional) |
| Verification Speed | < 1 second |
| Volume Output | Built-in buzzer, adjustable volume |
| Wiegand Input/Output | Support for external controller or reader |
| Tamper Switch | Yes, internal anti-tamper sensor |
| Housing Material | ABS plastic, scratch-resistant |
| Mounting | Wall mount (screws included) |
| Included Accessories | Power adapter, mounting kit, quick start guide |
Frequently Asked Questions - OP1000 ZKTeco
User questions about OP1000 ZKTeco
0 question about this device. Answer the ones you know or ask your own.
Ask a new question about this device
Download the instructions for your Uncategorized in PDF format for free! Find your manual OP1000 - ZKTeco and take your electronic device back in hand. On this page are published all the documents necessary for the use of your device. OP1000 by ZKTeco.
USER MANUAL OP1000 ZKTeco
1.1 Model number and access control.... 1
1.2 Chassis design and dimensions.... 1
1.3 Function features....2
1.4 Electronic control system 2
1.5 Specifications....3
-
Electrical test before installation....4
-
Electrical and civil installation....4
3.1 Equipment installation condition and position....4
3.2 Cables installation....5
3.3 Equipment installation and fixing....6
3.4 Set up a warning line 6
- Equipment wiring and debugging....7
4.1 Internal wiring diagram 7
4.2 Master and slave wiring diagram....7
- Menu Introduction 8
5.1 Function introduction....8
5.2 Menu introduction 8
5.3 Operation and instruction of menu....10
- Product Maintenance 12
6.1 Chassis maintenance.... 12
6.2 Power maintenance....12
1. Product Introduction
1.1 Model number and access control
| Access Model | None | C3-200 and 2*KR800E readers | inBio 260 and 2* FR1500 readers |
| OP1000 | √ | ||
| OP1011 | √ | ||
| OP1022 | √ | ||
| OP1200 | √ | ||
| OP1211 | √ | ||
| OP1222 | √ |
1.2 Chassis design and dimensions
OP1000 series is with SUS304 housing, anti-corrosion and durable. It serves as a carrier, equipped with the direction indicator, reader, infrared sensor, door lock, and more. It provides legal access to persons while eliminating illegal access by setting alarm prompts. In case of emergency, it ensures that evacuation passage runs smoothly and is convenient for personnel.
The appearance and dimensions of OP1000 are as shown in Figure 1-1:
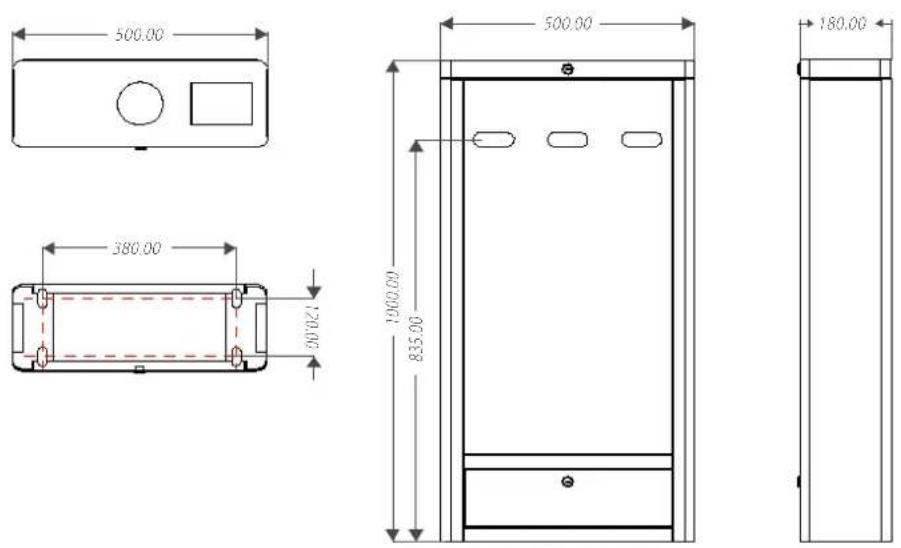
Figure 1-1
1.3 Function features
- It offers clear direction indicating whether it is allowed to walk through the device with intuitive LED light.
- Anti-trailing function: the system will automatically trigger the alarm when it, for instance, detects a person closely following the person in front with the intention to pass without card swiping. The alarm will be raised until the pedestrian exits the passage; Rebrush valid CARDS to allow pass.
- There are a variety of working modes available for two-way traffic. Infrared alarm or the main board release signal (need for additional access control system, access control, fingerprint, etc.) can be set on the main board menu.
- It has the function of canceling the passageway permission: when a person does not pass through the device within a specified time after receiving the release signal, the system will automatically cancel the passageway permission. You may set the time duration on the main board menu.
- It has the function of fire control free passage. When there is a fire, the trigger channel is normal open, and there will not be alarm.
- It has the liquid crystal display function and can describe the channel operation in intuitive words.
1.4 Electronic control system
The electronic control system of the OP1000 series is mainly composed of the reader, the master control panel, the access controller, the infrared sensor, the direction indicator and the alarm.
Reader: The reader reads the data in the card and sends it to the controller.
Access control panel: Receive the information collected by the card reader, make judgment, transmit the controlling signal, and control the switch of the brake machine.
Master control panel: The master control panel is the system's control center that receives signals from the reader and the photoelectric switch. It performs logical judgment and processing of such signals, and sends executive commands to the direction indicator, the electric motor and the alarm.
Infrared sensor: It detects the position of a pedestrian, and triggers alarm warning when illegal behaviours occur.
Direction indicator: This indicator displays the current status of the sign at the lane, and directs the pedestrian to pass through the lane in a safe and orderly manner.
Alarm: The alarm gives an alerting sound when the system detects any unauthorized entry.
1.5 Specifications
| Dimension (mm) | OP1000 Series: L=500, W=180, H=1000OP1200 Series: L=500, W=180, H=1000 | ||
| Communication | RS485 | Input voltage | AC100~240V, 50-60Hz |
| Input control signal | Switching signal | Output voltage | DC 24V 5A, DC 12V 3A |
| Time of opening/closing | 5 s (adjustable) | Passage rate | Maximum 30/minute |
| Temperature | -28°C - 60°C | Relative humidity | 20% - 95% (Non-condensing) |
| Infrared sensor | 3 | Working environment | Indoor |
2. Electrical test before installation
Steps of the test:
1) Connect the machine with a temporary test cable with input power AC 100 \~ 240V adaptive
(Note: must be grounded).
2) Turn on the built-in air switch of the brake and wait for 10 seconds to let the brake completes the self-check procedure.
3) Make sure the brake is working properly and check the LED indicator. If all goes well, you can start the civil installation program. In case of any abnormality, please contact your seller.
3. Electrical and civil installation
3.1 Equipment installation condition and position
Equipment installation conditions
The ground base must be concrete to ensure the expansion screws are firmly fixed. If you do not have this condition, please consult construction or decoration professionals about creating the stable condition of firmly fixed brake machines, such as piling, laying steel plate, etc.
Equipment installation location
According to the chassis space ratio, determine the installation location. For details, please refer to Figures 3-1 and 3-2.
Decision on the installation plan and composition of a single or multiple intelligent management channels
There must be a distance of 100mm between the chassis and the wall for opening the top cover of the machine to perform maintenance and adjustment. The master and slave devices of OP1000 model can form a single channel or dual channels, as shown in Figures 3-1 and 3-2.
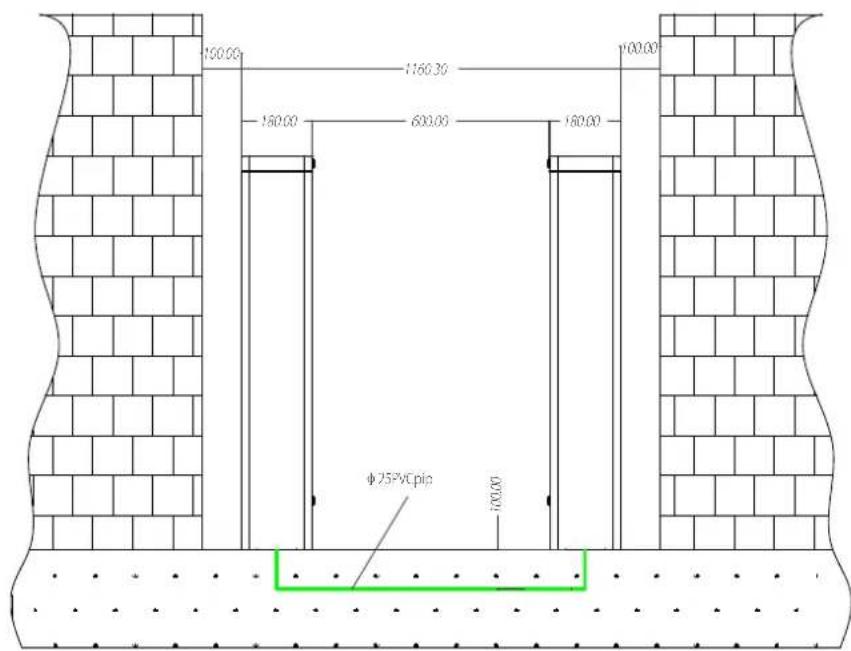
Figure 3-1 OP1000-series single channel
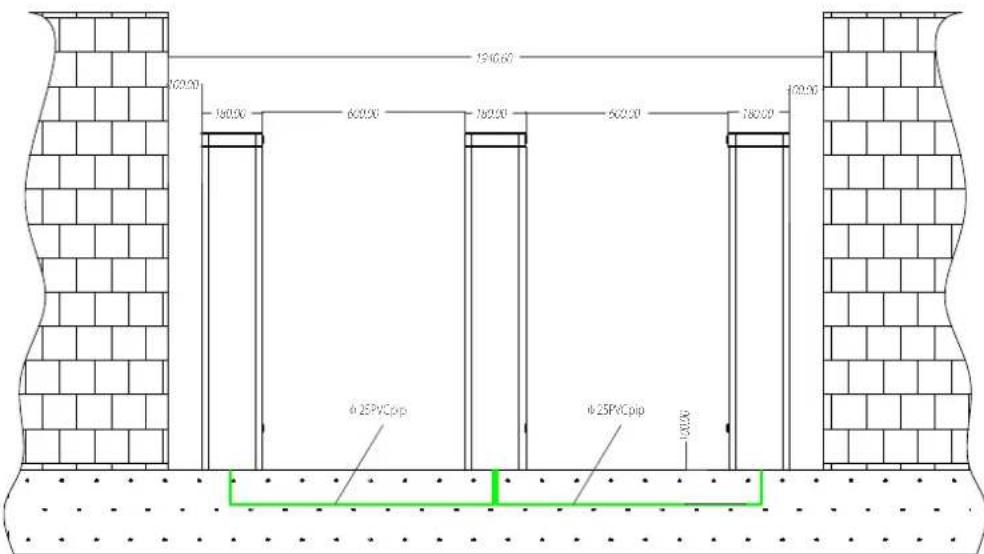
Figure 3-2 OP1000-series dual channel
3.2 Cables installation
For the outlet of buried cable, please refer to the locations of the installation holes illustrated in Figure
3-3. The input voltage of this machine is AC100-120V/200-240V and its master and slave are
connected with a 6-core connection wire. When installing this swing barrier turnstile, you only need
to connect it to the corresponding ports. Note that the PVC conduits must be buried 100mm under
the ground, with the height of the exposed part not exceeding 100mm. In addition, the conduit outlet is bent back to prevent ingress of water into the conduit.
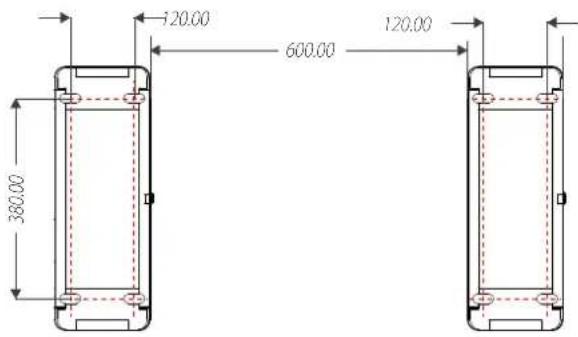
Figure 3-3
3.3 Equipment installation and fixing
Mark the screw hole centre of the stand, and the edge of the chassis base on the ground according to the size as shown in Figure 3-3. Use a hammer drill to drill M12 screw holes and fix the screws accordingly. Place the swing barrier turnstile according to the size and position as shown in the figure before installation and fixing. Connect the online cables and perform the power-on test. Tighten the screws after the test is passed.
3.4 Set up a warning line
It is recommended to mark a warning line on the ground, as shown in Figure 3-4, after the machine is installed, so as to instruct the pedestrian to stand behind the warning line during card swiping:
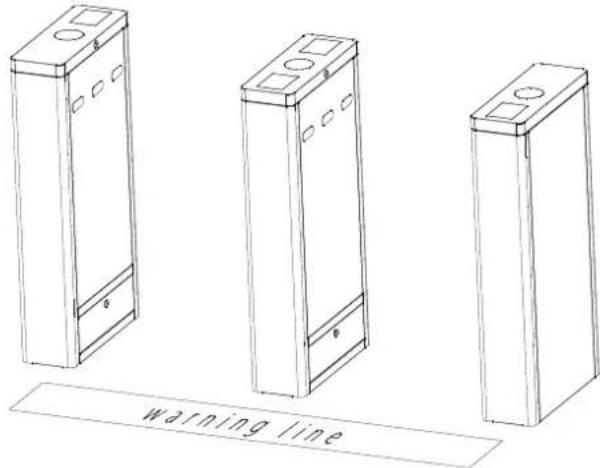
Figure 3-4
4. Equipment wiring and debugging
4.1 Internal wiring diagram
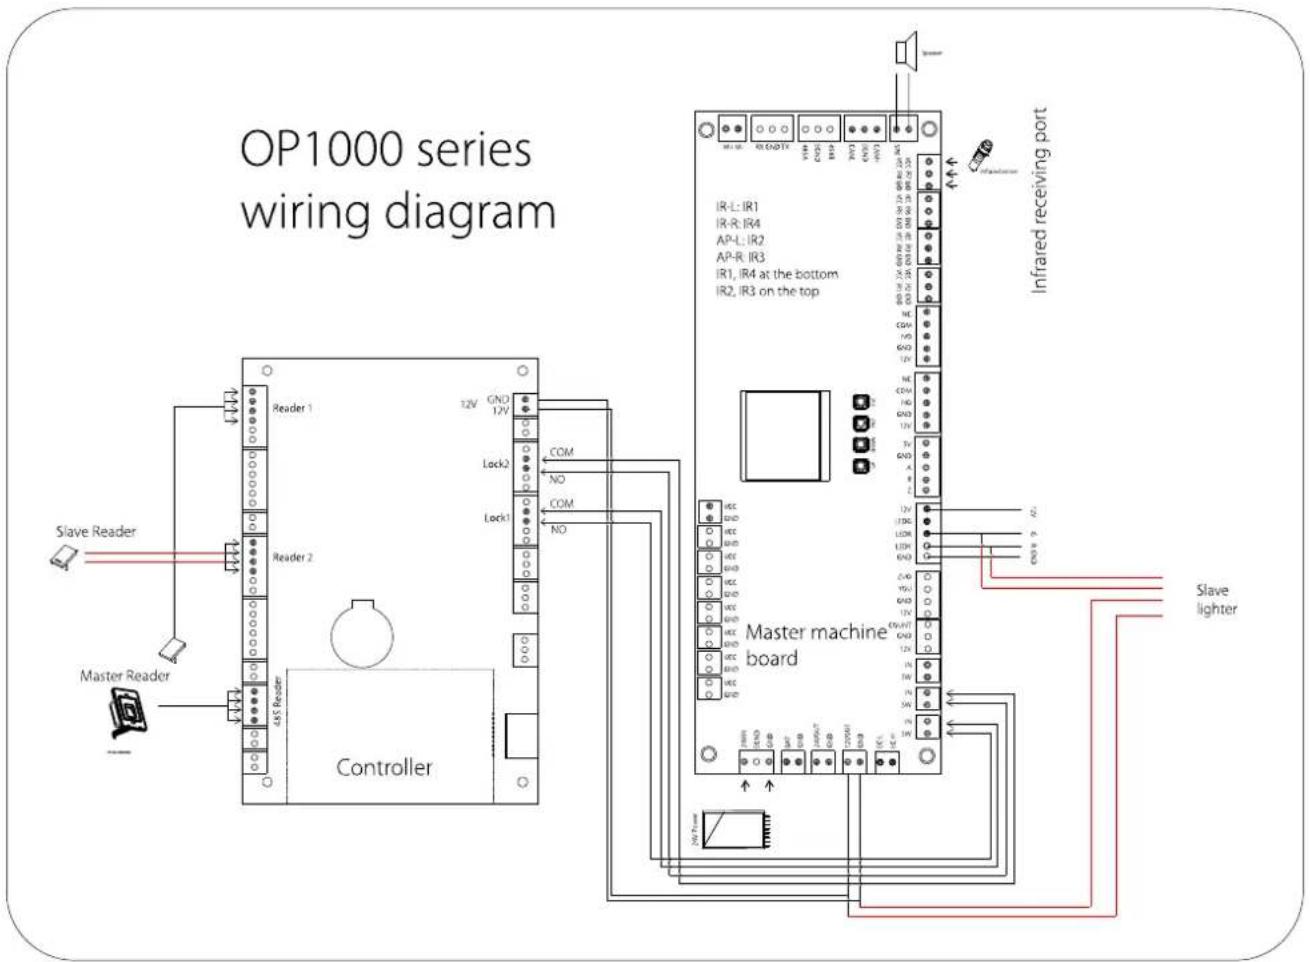
flowchart
graph TD
    A["Slave Reader"] --> B["Master Reader"]
    B --> C["Controller"]
    C --> D["Master machine board"]
    D --> E["Infrared receiving port"]
    E --> F["Master reader"]
    F --> G["Controller"]
    G --> H["Master reader 2"]
    H --> I["Reader 1"]
    H --> J["Reader 2"]
    H --> K["Controller"]
    style A fill:#f9f,stroke:#333
    style B fill:#ccf,stroke:#333
    style C fill:#cfc,stroke:#333
    style D fill:#fcc,stroke:#333
    style E fill:#cff,stroke:#333
    style F fill:#ffc,stroke:#333
    style G fill:#cfc,stroke:#333
    style H fill:#fcc,stroke:#333
    style I fill:#ffc,stroke:#333
    style J fill:#cfc,stroke:#333
    style K fill:#fcc,stroke:#333
Figure 4-1
4.2 Master and slave wiring diagram
The connection between the master and the slave is illustrated with red lines in Figure 4-1.
5. Menu Introduction
5.1 Function introduction
- After powered on, the LCD screen on the control board will display a default status, which represents the current work mode.
- There are 4 buttons, namely, "UP", "DOWN", "ENT" and "ESC" on the control board, as shown in Figure 5-1:
UP: to move a menu item upwards or increase the value.
DOWN: to move a menu item downwards or decrease the value.
ENT: to enter menu setting item or confirm the current modified value.
ESC: to return to the previous menu or to cancel the current operations.
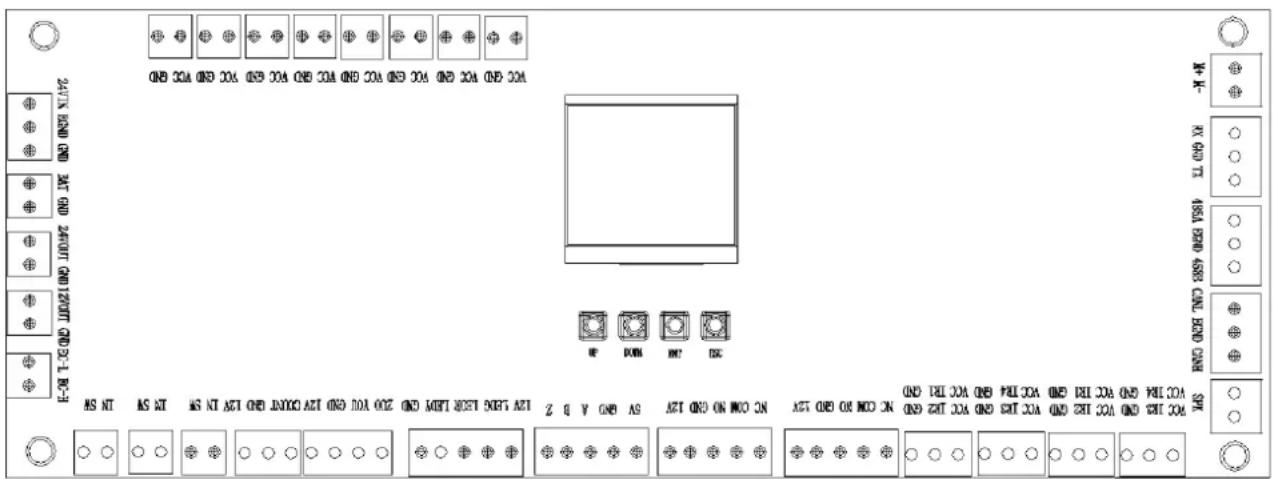
Figure 5-1
5.2 Menu introduction
1. Open duration (Press 'ENT' to modify)
After the gate is opened, it will automatically close if no one passes through within a certain time duration. The default value is 5 seconds.
The current value is: xxx. Press "UP" or "DOWN" to change the value, then press "ESC" to return.
The setting is completed. Press "ESC" to exit.
2. Opening mode (Press 'ENT' to modify)
You may unlock by card swiping or infrared induction. There are four available choices as listed below. The "Freedom" mode represents unlock by infrared induction.
0: Bi-direction card swiping. (→ C, C←)
1: Card swiping on the left. (→ C, F←)
2: Card swiping on the right. (→ F, C←)
3: Bi-direction controlled by the IR sensor. (→ F, F←)
The current value is: xxx. Press "UP" or "DOWN" to change the value, then press "ESC" to return. The default value is 0.
The setting is completed. Press "ESC" to exit.
3. False direction entry (Press 'ENT' to modify)
Set whether to trigger the alarm when reverse intrusion occurs.
The current value is: xxx. Press "UP" or "DOWN" to change the value, then press "ESC" to return. The default setting is enabled.
The setting is completed. Press "ESC" to exit.
4. Anti-tailgate (Press 'ENT' to modify)
Set whether to enable following intrusion detection.
The current value is: xxx. Press "UP" or "DOWN" to change the value, then press "ESC" to return. The default setting is enabled.
The setting is completed. (cancel or set). Press "ESC" to exit.
5. Memory function (Press 'ENT' to modify)
Whether to record the number of swiping. When the function is enabled, swipe several times to record several permissions.
The current value is: xxx. Press "UP" or "DOWN" to change the value, then press 'ESC' to return. The default setting is disabled.
6. Firefighting signal setting (Press 'ENT' to modify)
Select whether to enable the fire green channel function and select with what signal triggered.
0 — Unavailable
1 — Pulse signal
2 — Continuous signal
The current value is: xxx. Press "UP" or "DOWN" to change the value, then press 'ESC' to return. The default value is 0.
The setting is completed. Press "ESC" to exit.
Note: please set the same value for the master and slave devices.
7. System working mode (Press 'ENT' to modify)
1 — Working mode
2 — Factory Reset
There are two modes available. The working mode is the normal working mode of the machine, while the factory reset mode is to restore brake parameters to default values. The default value is 1. Device normally working.
8. Volume setting (Press 'ENT' to modify)
Adjustable range: from 0 to 15
0 is the minimum value; 15 is the maximum value.
The current value is: xxx. Press "UP" or "DOWN" to change the value, then press 'ESC' to return. The default value is 8.
The setting is completed. Press "ESC" to exit.
9. Version
Version information of the device.
5.3 Operation and instruction of menu
Press the ENT button, enter the password input interface. The default password is: UP, UP, DOWN, DOWN, DOWN, DOWN. You may press the ESC button to erase the last input. After entering the
menu, press UP or DOWN to choose a menu item, then press ENT to enter the interface and adjust such function or value.
6. Product Maintenance
6.1 Chassis maintenance
The chassis is made up of 304 stainless steels. There may be rust stains on its surface after being used for a long time. Regularly sand the surface along the grain softly and carefully. Coat the surface with anti-rust oil. Do not cover the infrared sensor.
6.2 Power maintenance
Cut off power supply before maintenance. Check whether the plug is loose; if yes, tighten it. Do not change the connection position. Check whether the external power supply is exposed; if yes, timely wrap it. Also, check whether there is any leakage; if yes, do timely treatment. Check if the technical parameters of the interface is normal. The aged electronic components should be replaced.
Attention: The maintenance procedure of the swing barrier above must be conducted by professional personnel. Always cut off the power supply before any maintenance and repair. Ensure all operations are safely performed.
ZK Building, Wuhe Road, Gangtou, Bantian, Buji Town, Longgang District, Shenzhen China 518129
Tel: +86 755-89602345
Fax: +86 755-89602394
www.zkteco.com

- Product Introduction
- Model number and access control
- Chassis design and dimensions
- Function features
- Electronic control system
- Specifications
- Electrical test before installation
- Steps of the test:
- Electrical and civil installation
- Equipment installation condition and position
- Equipment installation conditions
- Equipment installation location
- Decision on the installation plan and composition of a single or multiple intelligent management channels
- Cables installation
- Equipment installation and fixing
- Set up a warning line
- Equipment wiring and debugging
- Internal wiring diagram
- Master and slave wiring diagram
- Menu Introduction
- Function introduction
- Menu introduction
- Open duration (Press 'ENT' to modify)
- Opening mode (Press 'ENT' to modify)
- False direction entry (Press 'ENT' to modify)
- Anti-tailgate (Press 'ENT' to modify)
- Memory function (Press 'ENT' to modify)
- Firefighting signal setting (Press 'ENT' to modify)
- System working mode (Press 'ENT' to modify)
- Volume setting (Press 'ENT' to modify)
- Version
- Operation and instruction of menu
- Product Maintenance
- Chassis maintenance
- Power maintenance
Brand : ZKTeco
Model : OP1000
Category : Uncategorized