
PD-2600R - Receiver Posiflex - Free user manual and instructions
Find the device manual for free PD-2600R Posiflex in PDF.


| Product Type | Pole Mount Customer Display (Receiver) |
| Model | PD-2600R |
| Display Type | VFD (Vacuum Fluorescent Display) with green filter |
| Display Format | 20 characters x 2 lines |
| Character Size | Height: 9.03 mm, Width: 5.25 mm |
| Viewing Angle Adjustment | 15°, 30°, 45° tilt; 270° horizontal rotation |
| Interfaces | Serial RS-232 or USB (depending on model variant) |
| Power Supply | +5 VDC, 1 A from host system (via COM port or USB) |
| Command Emulation Modes | ADM, AEDEX, EPSON, Futaba, Noritake, UTC (selectable via DIP switches) |
| Software Support | OPOS, UPOS 1.8, WEPOS ready |
| Dimensions (Total) | Height: 283 mm |
| Display Head Dimensions | Height: 57.5 mm, Width: 196.6 mm, Depth: 39.5 mm |
| Weight | Approx. 0.5 kg |
| Case Color | Black |
| Operating Temperature | 0°C to +40°C |
| Storage Temperature | -10°C to +60°C |
| Operating Humidity | 20% to 85% non-condensing |
| Storage Humidity | 5% to 90% non-condensing |
| Regulatory Compliance | FCC Class A |
| Maintenance | Clean with dry soft cloth; do not use liquids or open housing |
| Warranty | Void if opened by unauthorized personnel; follow instructions |
Frequently Asked Questions - PD-2600R Posiflex
User questions about PD-2600R Posiflex
0 question about this device. Answer the ones you know or ask your own.
Ask a new question about this device
Download the instructions for your Receiver in PDF format for free! Find your manual PD-2600R - Posiflex and take your electronic device back in hand. On this page are published all the documents necessary for the use of your device. PD-2600R by Posiflex.
USER MANUAL PD-2600R Posiflex
PD - 309 / 2605 Series
User's Manual
Rev. A0
FCC Notes:
This equipment generates, uses, and can radiate radio frequency energy and, if not installed and used in accordance with the instructions manual, may cause interference to radio communications. It has been tested an found to comply with limits for a Class A digital device pursuant to subpart J of Part 15 of FCC Rules, which are designed to provide reasonable protection against interference when operated in a commercial environment.
Operation of this equipment in a residential area is likely to cause interference in which case the user at his own expense will be required to take whatever measures to correct the interference.
Warranty Limits:
Warranty terminates automatically when any person other than the authorized technicians opens the machine. The user should consult his/her dealer for the problem happened. Warranty voids if the user does not follow the instructions in application of this merchandise. The manufacturer is by no means responsible for any damage or hazard caused by improper application.
About This Manual:
Posiflex has made every effort for the accuracy of the content in this manual. However, Posiflex will assume no liability for any technical inaccuracies or editorial or other errors or omissions contained herein, nor for direct, indirect, incidental, consequential or otherwise damages, including without limitation loss of data or profits, resulting from the furnishing, performance, or use of this material.
This information is provided “as is” and Posiflex Technology, Inc. expressly disclaims any warranties, expressed, implied or statutory, including without limitation implied warranties of merchantability or fitness for particular purpose, good title and against infringement.
The information in this manual contains only essential hardware concerns for general user and is subject to change without notice. Posiflex reserves the right to alter product designs, layouts or drivers without notification. The system integrator shall provide applicative notices and arrangement for special options utilizing this product. The user may find the most up to date information of the hardware from web sites:
http://www.posiflex.com or http://www.posiflex.com.tw
All data should be backed-up prior to the installation of any drive unit or storage peripheral. Posiflex will not be responsible for any loss of data resulting from the use, disuse or misuse of this or any other Posiflex product.
All rights are strictly reserved. No part of this documentation may be reproduced, stored in a retrieval system, or transmitted in any form or by any means, electronic, mechanical, photocopying, or otherwise, without prior express written consent from Posiflex Technology, Inc. the publisher of this documentation.
© Copyright Posiflex Technology, Inc. 2010
All brand and product names and trademarks are the property of their respective holders.
P/N: 19430903020
Part 1


natural_image
Two black electronic devices with display screens, shown from front and side views (no visible text or symbols)BRIEF INTRODUCTION
THE PRODUCT
The PD-309/ PD-2605 is a pole mount customer display option designed for Posiflex mini slim base of KS-2010A, KS-6810, DT-20X and Gen.6 & 4.5 base of KS series POS terminals. It is delivered in separate carton for the host system and shall be installed per instructions in this manual.
FEATURES
- LCD (Liquid crystal display) with dark blue character and yellow green back-light for PD-309
- Bright VFD (vacuum fluorescent display) with green filter for PD-2605
- Two-line display with 20 characters per line
- Easy viewing characters (6.0 mm by 9.66 mm for PD-309 / 9.03 mm by 5.25 mm for PD-2605)
- Long life and trouble free operation
- 15irc, 30irc and 45irc adjustable viewing angles
• Display frame can rotate horizontally 270irc freely - Selectable command emulation modes including PST and EPSON command emulation modes for PD-309
- Various command emulation modes selectable by DIP switch for PD-2605
• Support 13 Code Pages of 128 characters each for PD-2605 - Support 12 international character sets of 12 characters each for PD-2605
- Simple installation
- Selectable between Serial (RS232) interface models: PD-309S/2605S and USB interface models: PD-309U/2605U.
• Supports UPOS 1.8 and is WEPOS ready for PD-2605
INSTALLATION GUIDES
For serial interface (RS232) PD-309 or PD-2605 to be used in KS-2010A, KS-6810, DT-20X and Gen.6 & 4.5 base of KS series, you have to adjust during power off the internal jumper of the host system to supply 5 V DC to the COM port selected for the serial interface pole display. This adjustment has to be done by a qualified electronic technician following guide from relevant technical manual. The default communication protocol should be set to 9600 bps, none parity, 8 data bits, 1 stop bit with hardware handshaking on CTS. The power for the USB interface type pole display is supported through the USB connection. However, should these customer displays are to be connected through an USB HUB instead of a direct USB port of the system, the HUB must be powered by a separate power adaptor otherwise there could be the power shortage problem.
INSTALLATION
The PD-309 or PD-2605 can be attached to the corner in bottom plate of the KS-2010A, KS-6810, with slim base, DT-20X and Gen.6 & 4.5 base of KS series. It takes examples of this LCD customer display to fix in the KS-2010A, KS-6810, and DT-20X. Refer to the pictures Base for KS-2010
Bottom of DT-20X

natural_image
Close-up of a mechanical component with three circular features and a central hole (no visible text or symbols)
natural_image
Close-up of a computer motherboard showing cable, socket, and ventilation slots (no text or symbols visible)Pix. 1
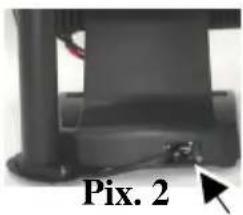
in Pix.1 at right. Use the 3 attached screws to fix the metal base plate of the PD to bottom of mini slim base or DT-20X at the circled positions. For mini slim base Connect the interface cable to go into the base through cable exit arrowed in Pix.2 at right to the main unit. For DT-20X arrange the interface cable to go through under bottom to connector area arrowed in Pix.1 at above right.
natural_image
Close-up of a black electronic device with a cursor pointing to a component labeled 'Pix. 2' (no other text or symbols visible)CAUTION: There are self-tapping screws for PD-309/ PD-2605 when use in Gen.4.5 base stand and please aim to the holes which marked “DT” as showing in the upper picture Pix.1. Other Bing Head Screws are use when fix in KS-2010A, KS-6810, DT-20X and Gen.6 base stand of KS series.
COMMAND EMULATION MODE SETUP (FOR PD-2605)

Now please check the back of PD-2605 display head as in the above left picture in Pix. 3. There is a small piece of plastic cover for the “DIP switch window”. Slide the cover downward but don’t pull it off otherwise you may have to practice for inserting it back. You can find 6 positions of DIP switches in this window. Adjust for the appropriate command mode used by the application program according to below table. Switch position counts from left to right and “ON” means pushed up as indicated in the above right part in Pix. 3.
| Switch Position | Command Mode | |||||
| 1 2 | 3 4 5 | 6 | ||||
| ON | OFF | OFF | ON | OFF | OFF | ADM |
| ON | OFF | ON | ON | OFF | OFF | Aedex |
| ON | OFF | ON | OFF | OFF | OFF | Epson |
| ON | OFF | OFF | ON | ON | OFF | Futaba |
| ON | OFF | ON | OFF | ON | OFF | Noritake |
| ON | OFF | ON | ON | ON | OFF | UTC |
The factory default command mode is set to Noritake mode for normal delivery. Please change it to Epson mode if OPOS or UPOS driver is used for the application program.
POWER ON SIGN
With interface cable connection well installed (and with COM port power set for serial models), turn on the Posiflex POS system, a firmware identifier as power on sign will appear on the pole display screen for a while to indicate that pole display is self-tested O.K. and ready to work.
USING THE CUSTOMER DISPLAY
INTERRFACE SELECTION
This series of customer display is designed to serve in Posiflex POS systems with RS232 interface models and with USB interface models. It is advisable to well study the I/O port availability of the host system before determining which interface model to be used.
When a RS232 (serial) interface model of PD-309 / 2605 is used, the jumper on main board of the host system must be modified to supply power to the COM port designated for PD-309 / 2605. Whenever the RS232 interface PD-309 / 2605 is to be removed from the host system, consequently the jumper has to be changed back to neutralize the power support COM port, otherwise damage could occur!
The USB interface model of PD-309 / 2605 should be connected directly to an USB port and must not be through any non-self-powered USB HUB to get power through the USB port itself and there is no need for other special arrangement.
COMMAND MODE SELECTION GUIDE
The below table provides some comparison for selection on command mode to be used in the application program for PD-2605 if it is not yet determined.
| Mode ADM Aedex | Epson Futaba | Noritake | UTC | |||
| Cursor N.A. N.A. Invisible | Blinking Block | Blinking Block | Blinking Block (DP) | |||
| Default mode N.A. N.A. Over/W | V. scroll | Over/W | PT | |||
| User defined font N.A. N.A. 2 chars | N.A. 2 chars | 2 chars (PT) | ||||
| Brightness control | NO | NO | YES | YES | YES | YES (DP) |
| Leading code change | NO YES | NO | YES | YES | YES (PT) | |
| Code page select | NO | NO | YES | YES | YES | YES |
| Auto scroll message | NO NO | NO YES | YES | YES | (PT) | |
| Timer clock | NO | NO | YES | NO | NO | YES (PT) |
For PD-309 it is always the Epson command mode at power on. It can enter or exit the PST command mode through software command.
DRIVER INSTALLATION
FOR RS-232 INTERFACE MODELS:
For direct I/O control over the serial interface (RS232) models, you have to send all commands (listed later in this manual) under communication protocol 9600 bps, none parity, 8 data bits, 1 stop bit with hardware handshaking on CTS signal to the COM port used. No other driver installation is required.
FOR USB INTERFACE MODELS:
Copy the driver and library from Posiflex Product Information CD or DVD under \Drivers\PD23_26U to your system or download from web site http://www.posiflex.com.tw/Download%20list.asp?Status=1&Series_Name=P D%20Series&Model_Name=PD-2300U. Follow instructions given in the file
"README.TXT" to send commands (listed later in this manual) and data to the customer display under the programming language.
FOR OPOS APPLICATION:
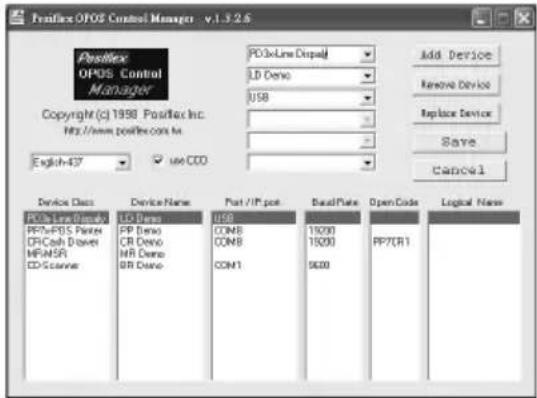
Find the subfolder \Drivers\UPOS\OPOS of the Posiflex Product Information CD or DVD or download it from web site http://www.posiflex.com.tw/Download%20list.asp?Status=1&Series_Name=UPOS&Model_Name=OPOS and execute the file “SETUP.EXE” to install the OPOS Control Manager. To add the customer display under OPOS control please set in OPOS Control Manager device name “PD3x-Line Display” in the top row. For RS-232 models, select the COM port in the 3 rd row and set baud rate to “9600” in 4 th row as in the left sample screen below. Select “USB” in 3 rd row for USB interface models as in the right sample picture below.

SPECIFICATION
OPTICAL
Number of digits 20 digits/row, 2 rows
Dot matrix 5 X 7 dots
Digit height 9.66 mm (PD-309) / 9.03 mm (PD-2605)
Digit width 6.0 mm (PD-309) / 5.25 mm (PD-2605)
Display color Dark blue (PD-309) / Green (PD-2605)
MECHANICAL
Total Height 283 mm
Display Head Height 57.5 mm
Display Head Width 196.6 mm
Display Head Depth 39.5 mm
Case color Black
ELECTRICAL
Power from interface port of KS or DT system:
+ 5 VDC 1 A
ENVIRONMENTAL
Operating temperature 0° to +40°C
Storage temperature -10irc to +60ircC
Operating humidity 20% to 85%, non-condensing
Storage humidity 5% to 90%, non-condensing
WARNING: If the user opens the pole display housing to make any modification, all the product warranty will be voided.
NOTE: Please refer to Posiflex Product Information CD or DVD or visit our web http://www/posiflex.com.tw for further information when needed.
APPENDIX
APPLICABLE COMMANDS (FOR PD-309)
| EPSON COMMAND MODE (POWER ON DEFAULT): | ||
| NAME | HEX CODES | FUNCTION |
| BS <08> | Move Cursor | Left |
| HT <09> | Move Cursor | Right |
| LF <0A> | Move Cursor | Down |
| HOM <0B> | Move Cursor | To Home Position |
| CLR <0C> | Clear Display | Screen |
| CR <0D> | Move Cursor | To Left Most Position |
| CAN <18> | Clear Cursor | Line |
| ESC = <1B><3D><n> | Select Peripheral Device / Command Mode n=1 pass through (should not be used) n=2, 3 (not required) n=4 switch to PST command mode | |
| ESC @ | <1B><40> | Initialize Display |
| ESC t <1B><74><n> | Disable / Enable Euro Dollar Sign n = 0, 19 | |
| US MD1 | <1F><01> | Specify Overwrite Mode |
| US MD2 | <1F><02> | Specify Vertical Scroll Mode |
| US MD3 | <1F><03> | Specify Horizontal Scroll Mode |
| US LF <1F><0A> | Move | Cursor Up |
| US CR | <1F><0D> | Move Cursor To Right Most Position |
| US $ | <1F><24><n><m> | Move Cursor To Specified Position n = 1 ~ 20 m = 1, 2 |
| US @ <1F><40> | Show | Version |
| US B <1F><42> | Move | Cursor To Bottom Position |
| US C <1F><43><n> | Cursor On / Off, n = 1, 0 | |
| US E <1F><45><n> | Blink Display Screen n = 0 ~ 255 | |
| PST COMMAND MODE: | ||
| HEX CODES | FUNCTION | |
| <01> | Set Pass Through Flag (should not be used) | |
| <06><N1><N2> | Change Leading Code | |
| <14> <01> | Wraparound Mode (Default) | |
| <14> <02> | Vertical Scroll Mode | |
| <14> <03> | Insert Mode | |
| <14> <04> Overwrite Mode (Default) | |
| <14> <08> Back Space | |
| <14> <09> Move Cursor Right | |
| <14> <0A> Move Cursor Down | |
| <14> <0B> Move Cursor Left | |
| <14> <0C> Delete Character | |
| <14> <0D> Move Cursor To Left Most Position | |
| <14> <0E> Clear Display | |
| <14> <10> Clear Line 1 | |
| <14> <11> Clear Line 2 | |
| <14> <12> Cursor Block Mode | |
| <14> <13> Cursor Under Line Mode | |
| <14> <15> <02> Clear Pass Through Flag | |
| <14> <16> Switch To Epson Mode | |
| <14> <17> Cursor On | |
| <14> <18> Cursor Off | |
| <14> <19> Reset | |
| <14> <1A>Move Cursor To Position P (P=0~13,14~27h) | |
| <14> <1B> Move Cursor To Rightmost Position Of Line 1 | |
| <14> <1C> Move Cursor To Rightmost Position Of Line 2 |
The Euro Dollar Sign is designated at code
COMMAND CODES SUMMARY (FOR PD-2605)
| Command Function Command | Function | |||
| ADM mode | ||||
| OC Clear Display 10 Write Decimal Point | ||||
| OD Carriage Return 1E Write Field | 1 | |||
| OE | Write Line 1 | 1F | Write Field 2 | |
| OF | Write Line 2 | |||
| AEDEX mode | Attention code + Function code + data + CR | |||
| 1 | Display top | 7 | Stop trapping | |
| 2 | Display bottom | 8 | Change attention code | |
| 4 | On going scroll | 9 | Display whole area | |
| 6 | One time scroll | |||
| EPSON mode | ||||
| BS | Move cursor left | US; | Mark semicolon | |
| HT | Move cursor right | US< | Clear mark | |
| LF | Move cursor down | USE | Set/cancel blinking | |
| HOM | Move cursor home | UST | Set and display counter | |
| CLR | Clear display screen | US X Brightness adjustment | ||
| CR | Move cursor left-most | ESC % | Set/cancel user-defined char. | |
| CAN | Clear cursor line ESC | & | Define user-defined char. | |
| US MD1 | Overwrite mode ESC | ? | Delete user-defined char. | |
| US MD2 | Vertical scroll mode | US @ Show | firmware version | |
| US MD3 | Horizontal scroll mode | ESC = | Select peripheral device | |
| US LF | Move cursor up ESC | t Select code | page table | |
| US CR | Move cursor right-most | US B Move | cursor to bottom | |
| US $ | Move cursor specified | ESC @ Initialize display | ||
| US , Mark comma ESC R | International character set | |||
| US . Mark period US U Display counter | ||||
| FUTABA mode | ||||
| 1F Reset 10 | pp Digit select | |||
| 04 bb Brightness control 13 Cursor | on | |||
| 1E pp Change code page 14 Cursor off | ||||
| 1C 0i | International character set | 08 Back space | ||
| 05 . . . 0D | Moving sign 11 09 Horizontal tab | |||
| 06 x1 x2 Change leading code | 12 09 Vertical scroll up | |||
| 01 | Set pass through flag | 11 0A | Cursor up/down | |
| x1 x2 02 | Clear pass through flag | 12 0A | Line feed | |
| 0D Carriage return | ||||
| NORIRAKE mode | ||||
| 1B 49 | Reset | 1B 54 nn | Cursor blinking Rate | |
| 0E Clear | 15 Cursor on | |||
| 1B 4C bb | Brightness control | 16 | Cursor off | |
| 1E pp Change code page 08 Back space | ||||
| 1C 0i | International character set | 11 09 Horizontal tab | ||
| 05 . . . 0D | Moving sign 12 09 Vertical scroll up | |||
| 06 x1 x2 Change leading code | 11 0A | Cursor up/down | ||
| 01 | Set pass through flag | 12 0A | Line feed | |
| x1 x2 02 | Clear pass through flag | OC Form feed | ||
| 1B 48 pp Digit select OD Carriage return | ||||
| 1B 43 ad x1 ~ x5 | User defined fonts | |||
| UTC Pass through mode | Command [+data] [+CR] | |||
| ESC uA Top | line message ESC uH | Redefine graphic | ||
| ESC uA CR | Clear top line ESC uIx | Display fonts | ||
| ESC uB CR | Clear bottom line ESC uE Set/Dis | play time | ||
| ESC uB Bottom line message | ESC utcEx | Change d mode | ||
| ESC uD Continuous scrolling | ESC utcFx | Change RS mode | ||
| ESC uF Top | line scroll once ESC RS * | Direct to pole mode | ||
| UTC Direct to pole mode | ||||
| EOT x | Brightness | DC4 | Cursor off | |
| BS | Back spacing | CAN | Clear to end of line | |
| HT | Horizontal tab | EM | Clear to end of display | |
| LF | Line feed | SUB x | Display fonts | |
| CR | Carriage return ESC d * Pass thru mode | |||
| DLE | Display position | FS | Flashing text start | |
| DC1 | Normal display mode | GS | Flashing text end | |
| DC2 | Vertical scroll mode | RS | Clear display | |
| DC3 | Cursor on | US | Reset display | |
INTERNATIONAL CHARACTER SETS (FOR PD-2605)
Hex code Country
Hex code Country
0 USA 6 Italy
1 France 7 Spain
2 Germany 8 Japan
3 United Kingdom 9 Norway
4 Denmark I A Denmark II
5 Sweden B Ex-Jugoslavia
POSIFLEX
②
T31454
警告使用者
- PD - 309 / 2605 Series
- User's Manual
- FCC Notes:
- Warranty Limits:
- About This Manual:
- © Copyright Posiflex Technology, Inc. 2010
- BRIEF INTRODUCTION
- THE PRODUCT
- FEATURES
- INSTALLATION GUIDES
- INSTALLATION
- POWER ON SIGN
- USING THE CUSTOMER DISPLAY
- INTERRFACE SELECTION
- COMMAND MODE SELECTION GUIDE
- DRIVER INSTALLATION
- FOR RS-232 INTERFACE MODELS:
- FOR USB INTERFACE MODELS:
- FOR OPOS APPLICATION:
- SPECIFICATION
- OPTICAL
- MECHANICAL
- ELECTRICAL
- ENVIRONMENTAL
- APPENDIX
- INTERNATIONAL CHARACTER SETS (FOR PD-2605)
- Hex code Country
- 警告使用者
Brand : Posiflex
Model : PD-2600R
Category : Receiver