Launch Control - Software Newline - Free user manual and instructions
Find the device manual for free Launch Control Newline in PDF.


| Product Type | Launch Control System |
| Brand | Newline |
| Model | Launch Control |
| Dimensions (approx.) | 150 x 80 x 30 mm |
| Weight (approx.) | 200 g |
| Power Source | 4 x AA batteries (not included) |
| Number of Channels | 6 channels |
| Launch Delay | Adjustable from 1 to 10 seconds |
| Safety Lock | Key switch and arming button |
| Display | LCD screen with backlight |
| Wireless Range | Up to 100 meters (line of sight) |
| Frequency Band | 2.4 GHz |
| Audible Alerts | Buzzer for countdown and warnings |
| Operating Temperature | -10°C to 50°C |
| Storage Temperature | -20°C to 60°C |
| Maintenance | Wipe clean with dry cloth; remove batteries when not in use |
| Safety Instructions | Use only in open areas; keep away from flammable materials |
| Spare Parts Availability | Contact Newline support for replacement antennas and battery covers |
| Repair Information | Do not disassemble; seek authorized repair center |
Frequently Asked Questions - Launch Control Newline
User questions about Launch Control Newline
0 question about this device. Answer the ones you know or ask your own.
Ask a new question about this device
Download the instructions for your Software in PDF format for free! Find your manual Launch Control - Newline and take your electronic device back in hand. On this page are published all the documents necessary for the use of your device. Launch Control by Newline.
USER MANUAL Launch Control Newline
Launch Control user guide
Wednesday, January 5, 2022
Pre-requisite set up....5
System requirements....6
Hardware requirements....6
Operating system requirements....6
Language requirements....6
Network requirements .... 7
On-screen keyboard requirements....7
Windows user account requirements 8
Mobile app requirements ....11
Application shortcut requirements 12
Room calendar requirements....13
Room mailboxes 13
Exchange one-touch configuration for MS Teams....13
Microsoft 365 permissions....16
Meeting room console requirements.... 17
Display configuration 17
Touch display calibration....19
Zoom configuration for meeting room consoles....19
Getting started....20
Installing Launch Control.... 21
Setting up Launch Control 24
License and registration 25
Room calendar setup 26
Room details....33
Display controller....34
Settings PIN 35
Setup complete 36
Configuring Launch Control....37
Settings....38
Access application settings....38
Exporting and importing settings....39
Display controller configuration 42
Home screen appearance 43
Adding a company logo ....44
Home screen background 45
Managing shortcuts....48
Adding shortcuts....49
Editing shortcuts ....55
Network drive shortcuts....57
Securing the device....58
Device Cleanup....58
Kiosk Mode 61
Calendar event privacy....62
Updating Launch Control 63
Auto-updates....64
Using Launch Control....65
Using the mobile app....66
Setting up the mobile app....66
Connecting to Launch Control 67
Launching calls via mobile....69
Using Launch Control Windows....70
Launching shortcuts....71
Microsoft 365 functions....72
Using the room calendar....76
Call controls for meeting room consoles....77
Running a device clean up....78
Setting speaker and microphone defaults 79
Scheduling meetings 80
Zoom meetings....81
Microsoft Teams meetings....83
GoToMeeting meetings 87
Bluejeans meetings 90
Pre-requisite set up
In this section, we look at the best way to install Launch Control. All requirements are detailed for the following:
- System
- Mobile app
- Room calendar
- Application shortcut
- Microsoft 365
System requirements
Hardware requirements
Launch Control is an application that operates across a wide range of devices as it does not require high-performance processing power.
Minimum hardware specification is as follows:
- System: Intel Core i3 (8th Gen.) processor, 8GB RAM 64GB storage
• Network: Ethernet or WI-FI (2Mbps and above)
Operating system requirements
Operating system requirements are as follows:
• Minimum OS: Windows 10 version 1809
- Recommended OS: Windows 10 version 1909
Note: it is always recommended to update Windows to the latest public version.
Language requirements
Launch Control can be displayed in six languages: English, Spanish, French, German, Italian, Chinese Traditional.
Launch Control uses the system language to set its own application language. To set your system language:
- Go to Settings > Time & Language > Language on the Windows system.
- Set your Windows display language from the available list. Note that if you do not see your preferred language, you may add a language under preferred languages.
If Launch Control does not support your default system language, it will set its language to English.
Network requirements
An active internet connection is required to establish a connection to the licensing server during setup.
An active internet connection is not required to operate Launch
Control. However, for a better product experience and access to the full feature set, it is recommended to maintain an active internet connection while using Launch Control. Access to signaling servers should be maintained if access to mobile app functionality is desired, for instance.
Ports
Your network may already be set up to allow access to the Launch Control licensing and signaling servers. If you are unsure, we recommend installing and setting up the application before making any changes to your network configuration. The following ports must be opened:
- Signaling server:
○ Port: TCP 5671
URL: http://heavy-duck.rmq.cloudamqp.com/
- Licensing server:
○ Port: TCP 80, 443, 5671
- URL: http://displaynoteshadow.azurewebsites.net
On-screen keyboard requirements
To ensure the OSK (on-screen keyboard) shows on the display while using Launch Control, you must ensure the appropriate setting is in place as below:
- On Windows, go to Settings > Devices > Typing.
- Under the Touch keyboard heading, look for the option Show the touch keyboard when not in tablet mode and there's no keyboard attached, and turn it On.
- Your OSK will now open when appropriate while using Launch Control.
Windows user account requirements
Local user account
Launch Control requires a local user account to run the application. Being a UWP application, Launch Control is only available for use via the local user account on which it is installed.
A new licence and fresh installation of Launch Control is required for each new local user that requires access to the application.
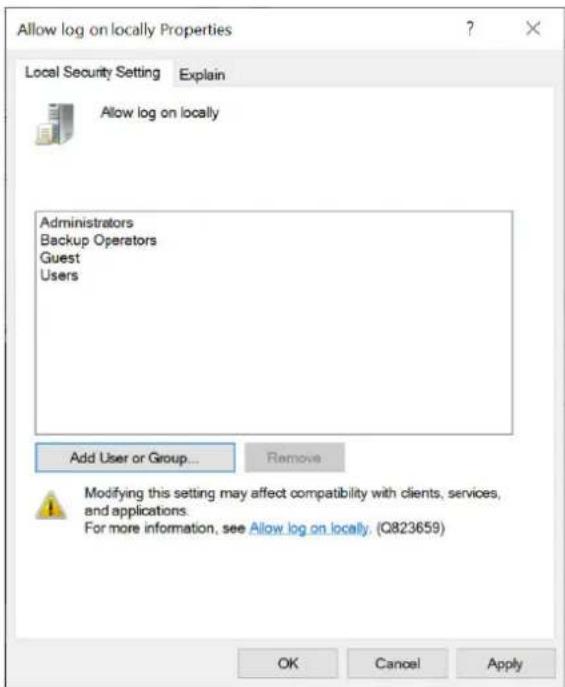
Security policy setting: Allow log on locally
For Launch Control to work, the local policy Allow log on locally must be enabled. This policy is used to specify which users or groups can log into the local computer.
This setting may already be enabled on your system, and please also note that the instructions below are only available to systems running on Windows 10 Pro Edition.
To enable the security policy setting Allow log on locally, please follow the instructions below.
- Go to Control Panel > System and Security > Administrative Tools > Local Security Policy > Local Policies > User Rights Assignment > Allow log on locally. This will open the Allow log on locally Properties, as illustrated in the screenshot below:
- Ensure that Groups are enabled by pressing Add User or Group > Object types. Ensure the Groups option is checked, then press OK, as per the screenshot below.

- You are returned to the Select Users or Groups window, where the new object must be selected. Type Local in the text box, then press Check Names to generate a new window, as shown below. Ensure that Local account is select, then Press OK.

- You are returned to the properties window, where Local account is listed as a part of the users and groups allowed to log on locally. Press Apply to allow finish.
User Access Control (UAC)
The local user account requires its system privileges to be temporarily elevated during the installation process.
The process of assigning elevated privileges to the local user account is triggered by the Windows system UAC (User Access Control) by requesting Administrator credentials during the installation of packages and services necessary for Launch Control to run.
When the installation is complete, the local user account elevated privileges are no longer in place. Launch Control can now be run by the local user that installed the application.
Mobile app requirements
Launch Control includes an associated mobile application for Android and iOS. These are available with the following minimum operating systems:
- iOS 12.1
- Android 4.4
The mobile application requires location services to be enabled in order to discover nearby Launch Control installations.
- Always allow: This option is recommended to discover devices when the app is not running or when the device is locked.
- Only while using the app: This option will only discover devices while the app is running in the foreground.
Application shortcut requirements
As an application launcher, Launch Control allows meeting space users to open applications via the home screen interface. In Launch Control, these are called shortcuts.
Any application shortcut can be added to Launch Control. However, applications must be installed on the system before Launch Control is opened. Installing applications while Launch Control is running will lead to unexpected results and should be avoided.
Find out more about how to manage shortcuts.
Room calendar requirements
Room mailboxes
As Launch Control is designed to be used on a shared device, it is strongly recommended that each installation of the software is assigned a dedicated user account for the setup of the room calendar.
Launch Control can operate using Microsoft Exchange or Google calendar services. For room mailbox creation instructions, please see below:
- Exchange | Create and manage room mailboxes
- Google | Create a calendar for a room or shared space
Please note that Microsoft Exchange version 2016 is the earliest version supported for the room calendar in Launch Control.
Exchange one-touch configuration for MS Teams
This section outlines the steps for configuring your Exchange calendar service for one-touch calls with Microsoft Teams. One-touch calls are a function of Launch Control whereby users can launch calls – such as MS Teams and Zoom calls – with the touch of a button.
If you do not configure your Exchange calendar service as outlined in this section, Launch Control requires you to copy and paste every Microsoft Teams meeting invitation directly into the location field of Outlook invitations to avail of one-touch functionality.
To configure Exchange room resource for one-touch Microsoft Teams functionality, follow the instructions below.
- Run the Windows Powershell application as an administrator. You can find this application by searching for Windows Powershell using the system search. Then, right-click the application icon and press Run as administrator.
- When Windows Powershell is running as administrator, the first step is to log in to the Exchange account that manages the room resource, using basic or multi-factor authentication. For example, if you're configuring the room mailbox room@company.com using admin@company.com, the multi-factor or basic authentication applies to the admin@company.com. Continue by using one of the following options:
a. If using basic authentication, type the following command and press the Enter key:
\$UserCredential = Get-Credential
b. If using multi-factor authentication, type the following command and press the Enter key:
Connect-EXOPSSession [-UserPrincipalName -ConnectionUri
- Next, we will load Cmdlets into Windows Powershell using one of the relevant options below.
a. If using Exchange Online, type the following command and press the Enter key:
(Session = New-PSSession -ConfigurationName Microsoft.Exchange -ConnectionUri https://outlook.office365.com/powershell-liveid/ -Credential (UserCredential -Authentication Basic -AllowRedirection)
b. If using Exchange Server (on-premises), type the following command and press the Enter key:
Session = New-PSSession -ConfigurationName Microsoft.Exchange -Credential UserCredential -ConnectionUri http://
- Set the execution policy of the mailbox by typing the following command in Windows Powershell and pressing the Enter key. If prompted, press A for yes to all.
Set-ExecutionPolicy RemoteSigned
- Create a persistent connection by typing the following command in Windows Powershell and pressing the Enter key:
Import-PSSession \$Session
- If haven't already set the mailbox type to room when creating the mailbox, type the following command in Windows Powershell, replacing
meetingroom@company.com with your own mailbox address, and pressing the Enter key:
Set-Mailbox -Identity meetingroom@company.com -Type room
- To prevent the organizer name from replacing the original meeting subject, set the Add Organizer to false by typing the following command in Windows Powershell, replacing meetingroom@company.com with your own mailbox address, and pressing the Enter key:
Set-CalendarProcessing -Identity meetingroom@company.com - AddOrganizerSubject \$False
- Set the mailbox to not automatically delete the body of the email invitation by typing the following command in Windows Powershell, replacing meetingroom@company.com with your own mailbox address, and pressing the Enter key:
Set-CalendarProcessing -Identity meetingroom@company.com -DeleteComments \$false
- Set the mailbox to not automatically delete the meeting subject in invitations by typing the following command in Windows Powershell, replacing meetingroom@company.com with your own mailbox address, and pressing the Enter key:
Set-CalendarProcessing -Identity meetingroom@company.com -DeleteSubject \$false
- Set the mailbox to auto-accept meeting invitations by typing the following command in Windows Powershell, replacing meetingroom@company.com with your own mailbox address, and pressing the Enter key:
Set-CalendarProcessing -Identity meetingroom@company.com -AutomateProcessing AutoAccept
- Close Windows Powershell.
Microsoft Teams meetings scheduled with your Exchange mailbox will now be one-touch enabled from the Launch Control home screen.
Microsoft 365 permissions
Launch Control provides users with access to their Microsoft 365 account to access personal calendar events and OneDrive files.
For Launch Control users to avail of Microsoft 365 functionality and access Microsoft content via Launch Control, the following permission scopes are required:
- User.Read: Allows users to sign in to the app and allows the app to read the profile of the signed-in user. It also allows the app to read basic company information of signed-in users.
- User.ReadBasic.All: Allows the app to read a basic set of profile properties of other users in the organization on behalf of the signed-in user. This includes display name, first and last name, email address, open extensions, and photo. This also allows the app to read the full profile of the signed-in user.
- Calendars.Read: Allows the app to read events in user calendars.
- Files.Read: Allows the app to read the signed-in user's files.
Meeting room console requirements
This section outlines how to set up a meeting room console from the Windows system. Setting up a meeting room console is also possible via the application setup or from the application settings.
Launch Control is compatible in meeting room configurations where meeting room consoles are set up.
These tablet-sized touchscreen monitors are usually located on the meeting room table and are connected to the meeting room's compute device. In meeting rooms where Launch Control might be found, this compute device will be running Windows 10 operating system.
Display configuration
To set up Launch Control for meeting room consoles from the Windows system, please follow these steps:
- On the Windows system, while the meeting room console is connected, go to Settings > System > Display to show the display panel settings.
- Here, you will see the displays connected to the Windows system. Identify which of the screens is the meeting room controller, then place it to the left or the right of the other display (vertical arrangement is not currently supported), as follows:
Display
Rearrange your displays
Select a display below to change the settings for it. Press and hold (or select) a display, then drag to rearrange it.

- Once you've arranged the displays according to your preference, select the meeting room controller by clicking on the relevant display as shown
in the image above. The display panel settings will now be shown for the selected display.
- Next, scroll to the bottom of the display settings. Under Multiple displays, ensure that:
a. Extend these displays is selected.
b. Make this my main display is checked.
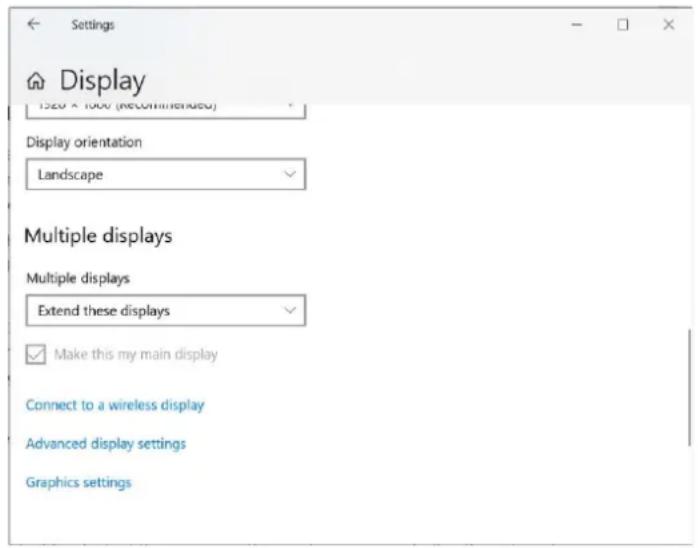
- You may now close the display settings and proceed with the application setup. You will be prompted to choose your main display during the application set up, however as you have done this on the system, you may continue with the default selection.
Touch display calibration
It is recommended to calibrate your touch display(s) to optimise your experience with the system. This is particularly important for configurations with two touch input sources, as the Windows system may not immediately recognise these.
To calibrate your display(s) for touch input, please follow these instructions:
- Open Control Panel > Hardware and sound > Calibrate the screen for pen or touch input to open a new window with tablet PC settings.
- On the Tablet PC settings, configure your pen and touch displays by pressing Setup.
- A setup wizard will guide you through the steps of identifying touch display. Follow on screen instructions until its completion.
- In the Tablet PC settings, you can now calibrate each of your configured touch displays by following these instructions:
a. Under the Display options section, choose the display to configure from the available list of displays.
b. Press Calibrate.
c. Choose the type of input (pen or touch).
d. Follow on screen instructions until its completion.
e. Your screen is now calibrated for touch.
-
Repeat step 4 for each touch display you wish to calibrate.
-
Your displays are calibrated, and you should enjoy a greater interactive experience with your displays and system applications.
Zoom configuration for meeting room consoles
For the best experience, we recommend the following:
- Ensure the Zoom application has a dedicated room account. This account should never be the meeting organiser.
- In the Zoom application settings under General, ensure the following option is unchecked: Enter full screen automatically when starting or joining a meeting
- In the Zoom application settings under Keyboard Shortcuts, ensure the following options are checked:
a. Start/Stop Video
b. Mute/Unmute My Audio
Getting started
In this section, we take a deep dive into getting up and running with Launch Control. Here is what you'll find:
• Installing Launch Control
- Setting up Launch Control
Installing Launch Control
The Launch Control application may or may not be installed on your Newline device when you receive it. If Launch Control is not installed, please get in touch with your Newline dealer, who will supply you with the application installer.
If Launch Control is already installed on your device, all you need to do is set up the application (see Setting up Launch Control).
When you have obtained the installer from your Newline dealer, follow these steps to install Launch Control:
- Run the installer. If you are not using an administrator account, you will be prompted to enter administrator credentials during the installation.
- When the installer opens, choose your launch option using the Launch application on finish option.
- Optional step: If you have previously exported settings from another Launch Control installation, you may import settings by selecting the option Choose settings file and selecting the previously exported .Isf file. For details on how to create a settings file, see exporting settings.
- Press Install. This starts the installation process.
Newline Launch Control Installer
1.10.2.16
Import settings (optional)
Settings can be imported from a .lsf file. Choose a settings file to import, or continue with the installation.
Note: Settings will be imported when the application is launched for the first time.
Choose settings file
√ Launch application on finish
Cancel
Install
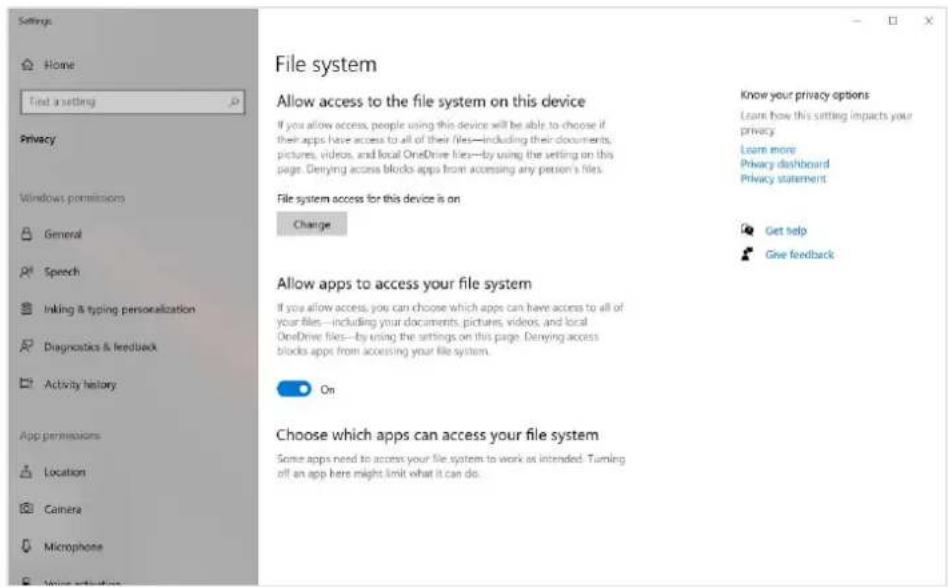
- When the installer prompts you to enable file system access via a dialog, press Show settings to open the Windows settings.
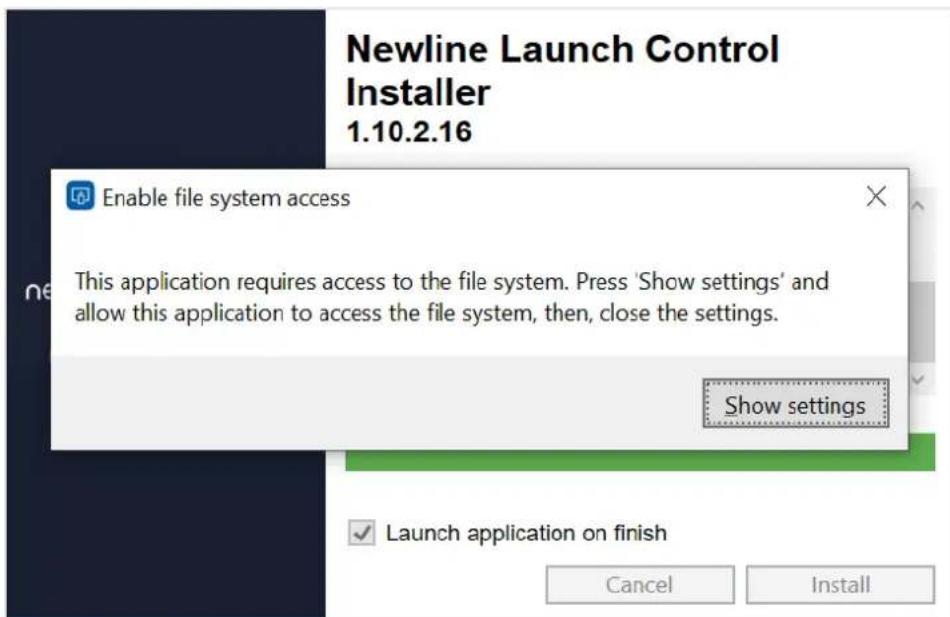
- In the Windows settings under Allow apps to access your file system, ensure the option is On.
-
Close the Windows settings using the close option (X) button to return to the installer.
-
The installer prompts you to confirm you have enabled file system access. Press No if you have not and follow instructions from step 5 above; otherwise, press Yes.

Setting up Launch Control
The content of this section assumes that:
- You have met the pre-requisites.
- You have installed launch control.
- You have a license key. If you do not have a license key, please get in touch with your Newline dealer.
Found in this section:
- Activating your license and registering your details.
- Setting up your room calendar with Exchange or Google.
- Choosing your room details and PIN.
License and registration
The first step for all new installations of Launch Control is to activate your license key and register your details against the license.
License keys are tied to the local user account on the system, meaning that a license key is only valid for one user per system.
Follow these simple steps to activate your license and register your details:
-
Run Launch Control.
-
Enter your 18-digit license key in the input field and press Activate.
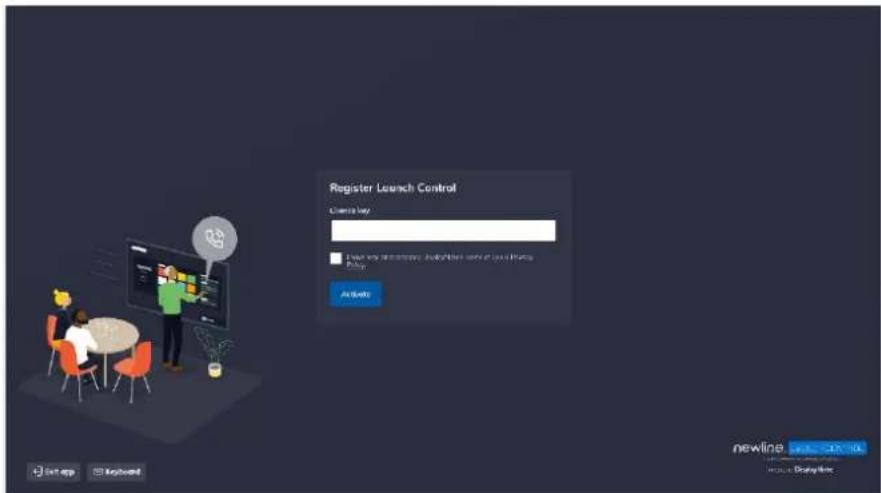
-
When your license key has activated successfully, complete the registration form and ensure you have read and accepted Displaynote's Terms of Use & Privacy Policy. Then, press Register.
-
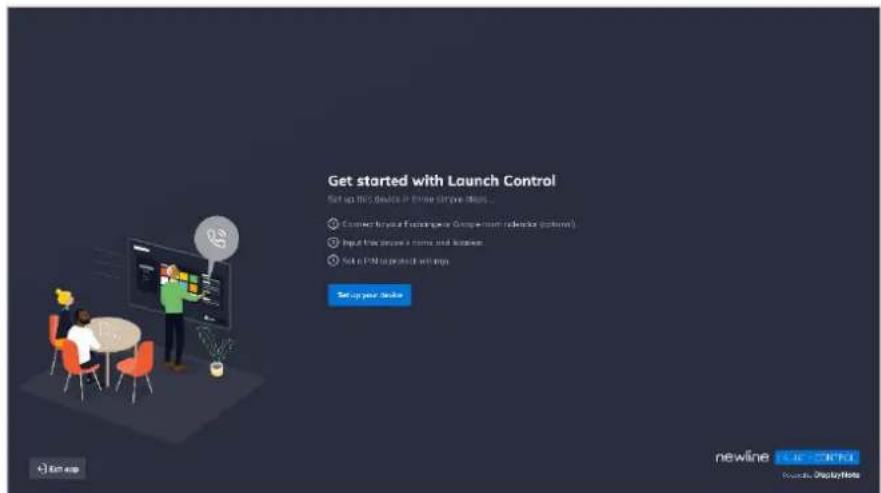
When your registration is successful, press Set up your device to continue with the application set up.
Room calendar setup
Launch Control offers two calendar services: Exchange calendar and Google Calendar. Each of these services offers two set up methods, as follows:
• Exchange Calendar: Exchange Online; Exchange Server (on-premises)
- Google Calendar: Google account; Google API credentials
Note about the authentication of Launch Control for Exchange and Google Calendar services:
DisplayNote (software development company) and Launcher (parent product name of Launch Control) are used for authentication purposes when authenticating Exchange and Google Calendar services.
Room calendar set up using Exchange Online
- On the Room calendar step, choose Exchange Calendar and press Proceed to continue.

- Next, choose Exchange Online and press Proceed to continue.

- A Microsoft authentication browser window appears to verify your Exchange account details. Follow instructions by entering the Exchange email address and password to complete the authentication.

- When your Exchange account has been authenticated, you will return to the application set up. Enter the email address of a shared or delegate calendar that can be accessed by your Exchange account (note that this can be the same as your Exchange account). Then, press Add calendar to complete the setup of your Exchange calendar.
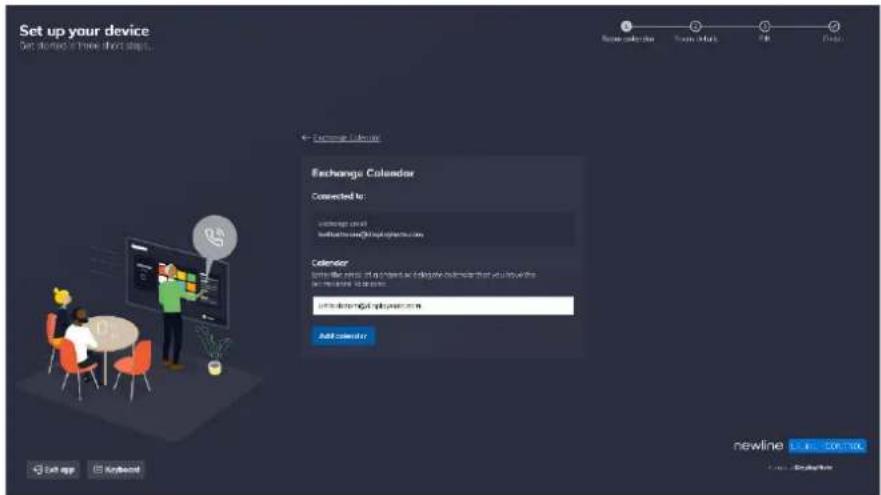
Room calendar set up using Exchange Server (on-premises)
- On the room calendar step, choose Exchange Calendar and press Proceed to continue.
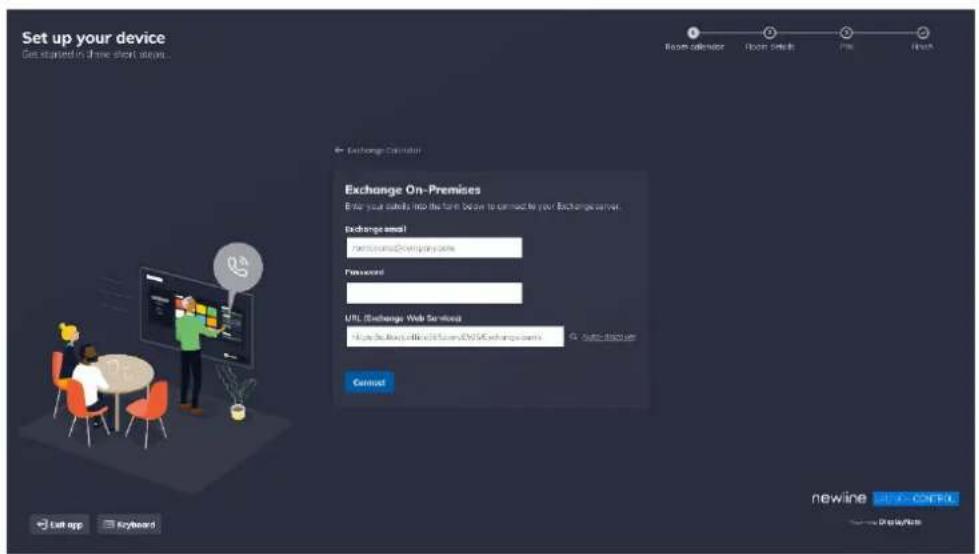
- Next, choose Exchange On-Premises and press Proceed to continue.

- Enter details to connect to your Exchange Server and press Connect to complete the room calendar set up.
Room calendar set up using Google account
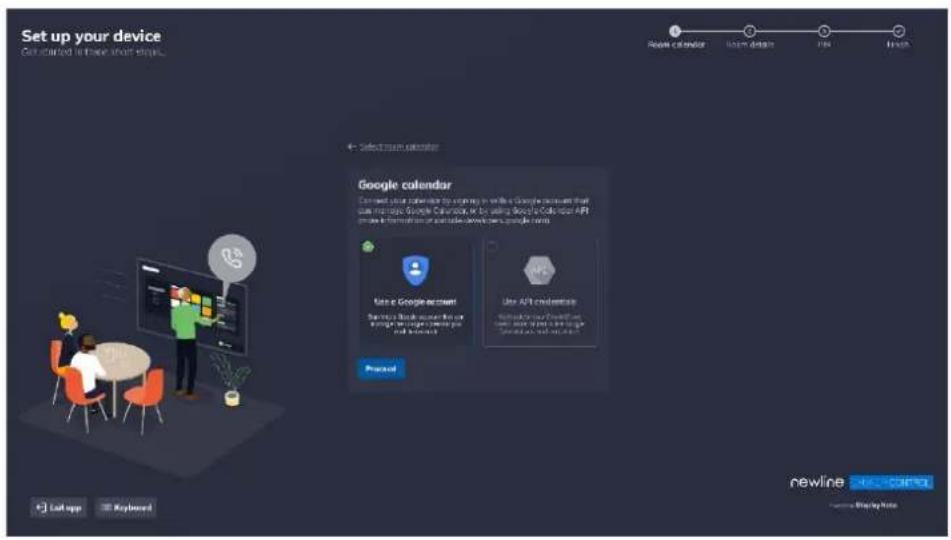
- On the room calendar step, choose Google Calendar and press Proceed to continue.

- Next, choose Use a Google account and press Proceed to continue.
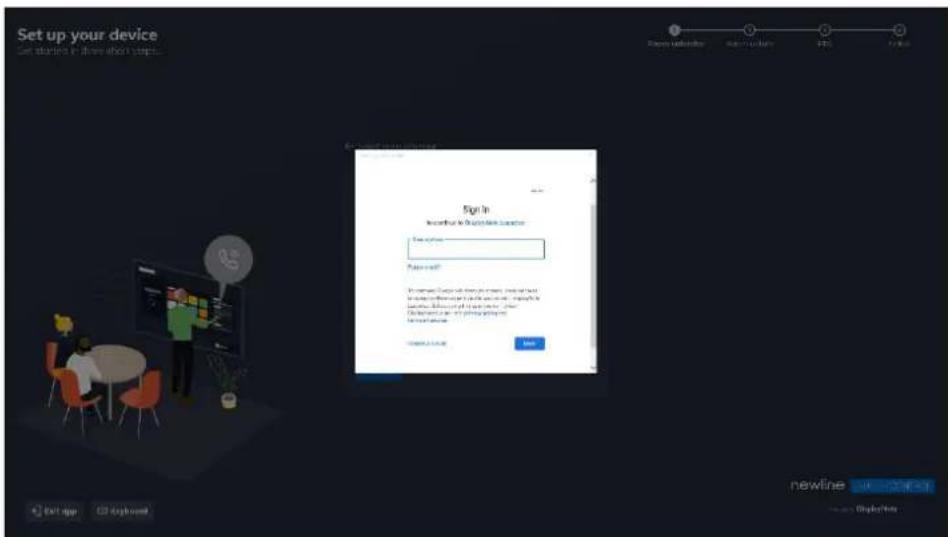
- A Google authentication browser window appears to verify your google account details. Follow instructions by entering the Google email address and password to complete the authentication.
- When prompted, allow access to the requested information. This is required to access relevant calendar information for your room calendar.
- When your Google account has been authenticated, you are returned to the application set up. Under Calendar, select the calendar you wish to use as the shared resource on Launch Control and press Connect to finish with your Google Calendar set up.

Room calendar setup using Google API credentials
Before you start, you need to retrieve your client ID and client secret to set up Google Calendar using API credentials. To retrieve your API credentials, go to the Google Cloud Platform, choose the relevant project, and find your client ID and client secret under Credentials in the side navigation.
- On the room calendar step, choose Google Calendar and press Proceed to continue.

- Next, choose Use API credentials and press Proceed to continue.
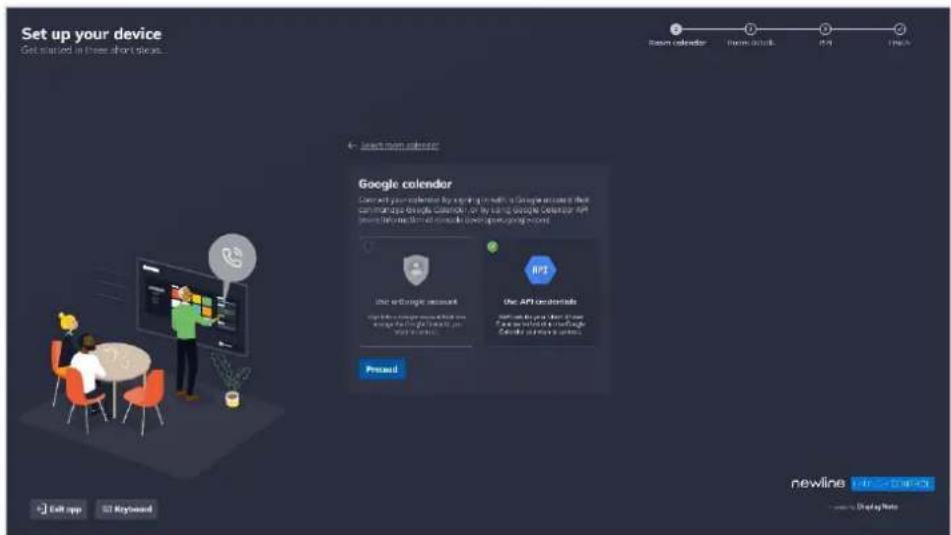
- Enter the client ID and client secret for your enabled calendar API using the form. Press Proceed to continue.

- A Google authentication browser window appears to verify your google account details. Follow instructions by entering the Google email address and password. Press Next to complete the authentication.

- A known issue with the Google verification process may appear on your screen reading Google hasn't verified this app. If you are viewing this message, please follow these steps to continue:
a. Press Advanced to reveal further options.
b. Press Proceed to complete the verification.
- When your Google account has been authenticated, you will return to the application set up. Under Calendar, select the calendar you wish to use as the shared resource on Launch Control. Press Add calendar to finish with your Google Calendar set up.

Room details
Room details are requested during the application setup. These are used for identification purposes, for your own benefit, and that of your users.
Room name
The room name is shown on the Launch Control home screen. While it is a useful way for users to confirm they are in the right meeting space, it is primarily used by the mobile application as a means of identifying the correct device while scanning for nearby Launch Control installations.
Room location
The room location is an optional piece of information to help identify the geographical location of the Launch Control device.
To complete this step of the setup, simply type your desired room name and location (optional) and press Next.

Display controller
This step will only appear when several displays are connected to the Windows system. For Launch Control, this means a meeting room console. Please see the meeting room console requirements to ensure your configuration is set up appropriately.

If you are viewing this step:
-
Choose a new controller by selecting a screen from the list and pressing Apply. You will be prompted to restart your device to apply the new settings.
-
When your device has restarted, you will have the desired configuration for your meeting room console.
Settings PIN
Adding a PIN to Launch Control is a required step. The settings PIN limits access to Launch Control application settings, protecting the device configuration from those without the sufficient level of access.
To complete this step of the setup, simply type your desired PIN using digits from 0 to 9 and press Set PIN to continue.
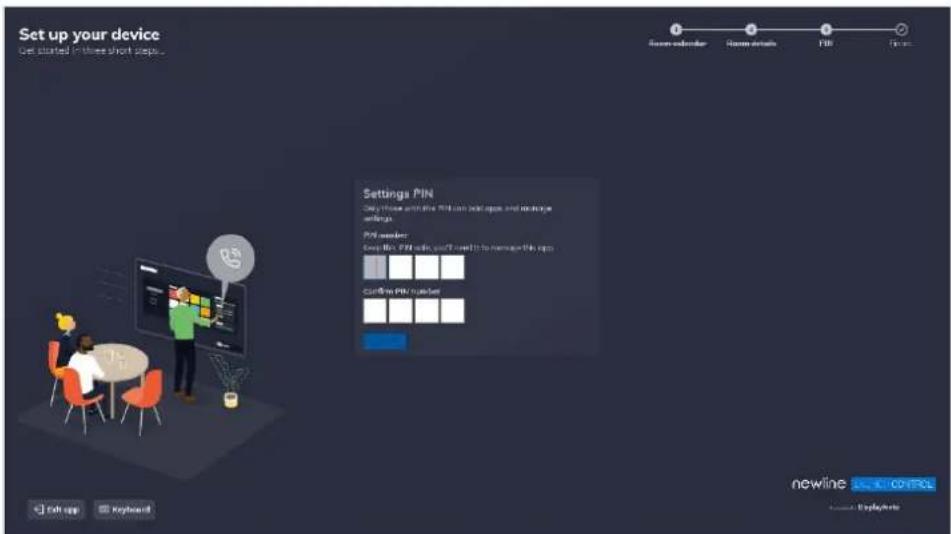
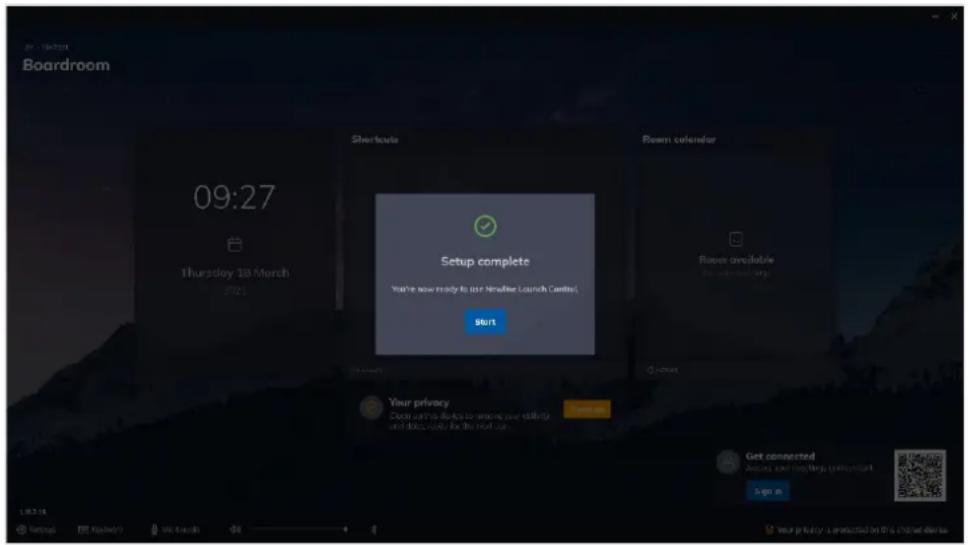
Setup complete
The Launch Control application set up is now complete. Next, you may wish to add app and web shortcuts or even change the appearance of the home screen. All supplied information along with further configurations is available in the settings, which you can access at any time via the Launch Control home screen.
Configuring Launch Control
This section covers how IT administrators can interact with Launch Control to improve meeting space functionality.
For IT administrators, we look at Launch Control settings that can be changed from the application settings at any time. Here's what we'll cover:
- Accessing settings
- Setting the home screen appearance
- Managing shortcuts
- Securing the device
- Updating Launch Control
Settings
In Launch Control, application settings are available from within the application on the home screen. The home screen is the front-facing side of Launch Control, which can be viewed by anyone who steps into the meeting space.
Application settings, however, are secured behind a four digit-PIN and can only be accessed by those with the correct PIN combination.
Access application settings
Follow the instructions below to access Launch Control application settings.
- Ensure that you are on the Launch Control home screen, which will look like the image below:

- In the bottom left corner of the screen, press Settings. This will open the settings panel with the PIN screen.

- Enter the correct four-digit PIN using the on-screen numerical keypad and press OK to continue.
- When the correct PIN combination has been entered, the application settings are shown as illustrated below:

Exporting and importing settings
Exporting settings speeds up deployment across multiple meeting spaces. The following settings can be exported:
• Room details: room name and location given to this device.
- Personal sign in: Sign in permissions that are set on this device.
- Kiosk Mode: The Kiosk Mode set on the device.
- Auto-update: The auto-update parameters set on this device.
- Shortcuts: All shortcuts, including options and appearance.
- Appearance: Home screen background and logo set on this device.
• Security: Cleanup settings and PIN set on this device
• Licence: Licence key, registered name, email, and organization.
Exporting settings
Follow the instructions below to export settings:
- Go to the General section of the application settings.
- Under Export settings, press Export.
- Select any or all settings listed by tapping individual items or by pressing Select all, then press Next to continue.

- You must now choose the export destination using the system file browser. Press Choose export location and export the file to a suitable location. Do not rename the export file.
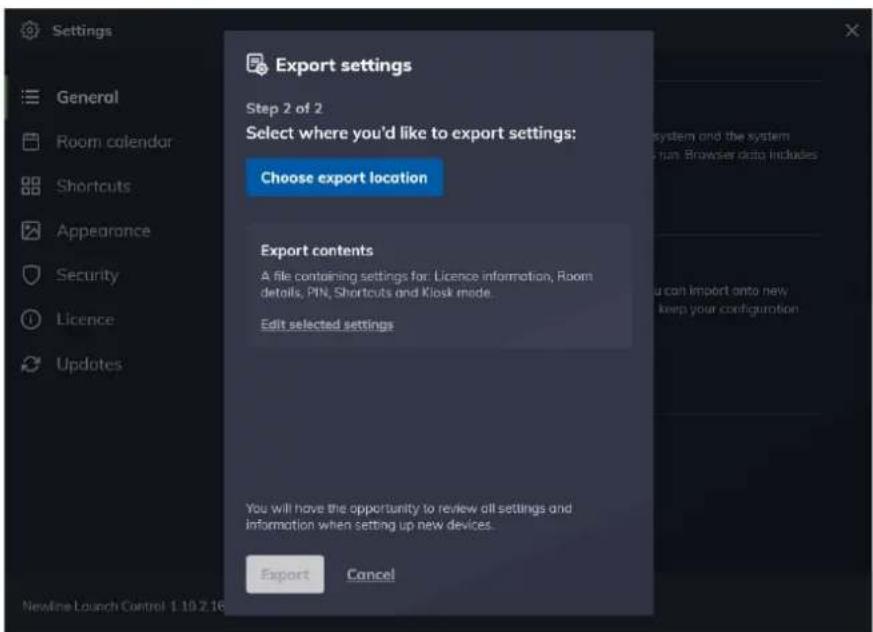
- When the export location has been chosen, press Export.
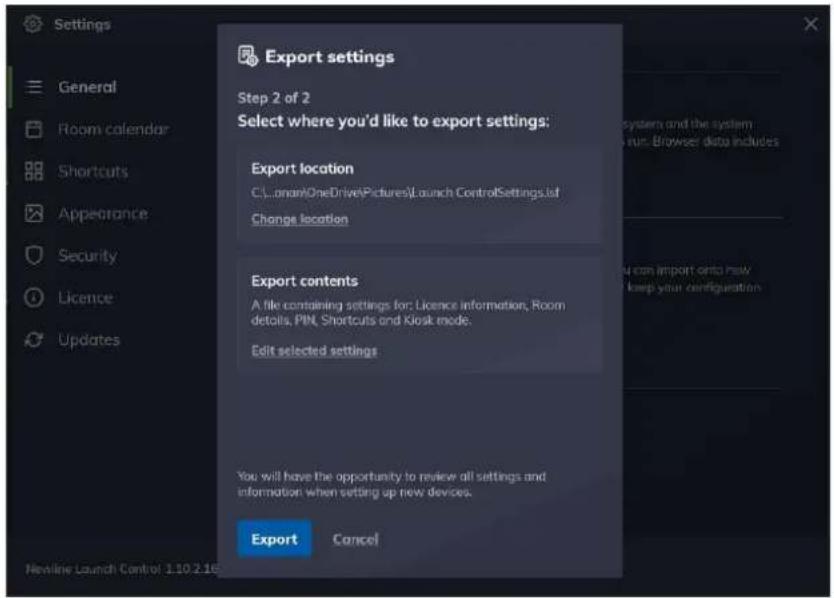
- Your settings have been exported to your chosen location. Read instructions for importing settings and press OK, I understand.
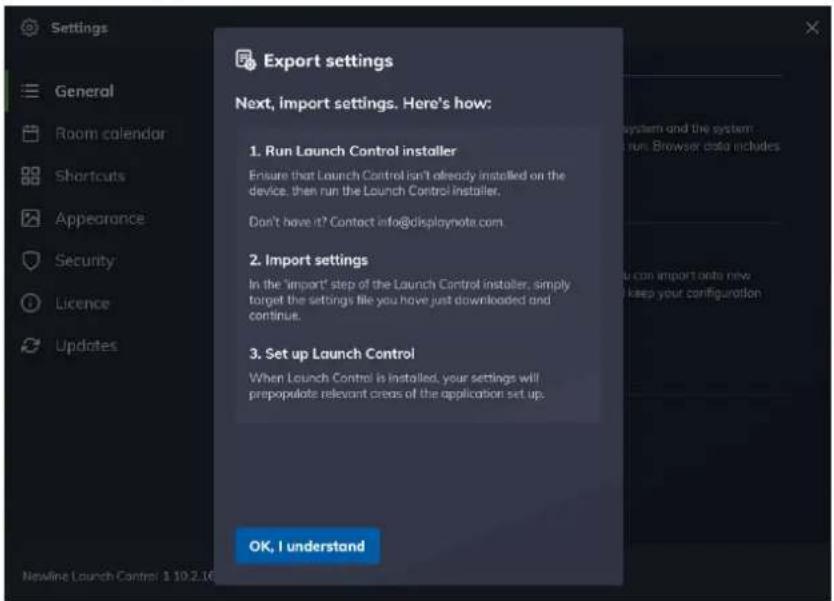
Importing settings
Importing settings are achieved during the software installation process. See installing Launch Control for more details.
Display controller configuration
These options will only appear to those who have several displays connected to the Windows system. For Launch Control, this means a meeting room console. Please see the meeting room console requirements to ensure your configuration is set up appropriately.
If you wish to change the configuration of your displays from the Launch Control application settings, please follow these steps:
- In the application settings, go to General > Display controller.
- You are taken to a new view, where you will see a list of displays connected to the Windows system.
- Choose a new controller by selecting a screen from the list and pressing Apply. You will be prompted to restart your device to apply the new settings.
- When your device has restarted, you will have the desired configuration for your meeting room console.
Home screen appearance
If you're following along from the first-time setup, your home screen looks like the image below.

For Goliath - our fictional meeting space – there's more we can do to personalize the home screen.
If you're not interested in changing the appearance of the home screen right now, you can skip ahead to managing shortcuts.
In the following sub-sections, however, we'll cover ways to change the background and add a logo so that your home screen can look like the example illustrated below.

Adding a company logo
This function is available from the application settings. See how to access application settings.
Follow the instructions below to add a new company logo:
- Go to the Appearance section of the application settings.
- In the Appearance settings, under Company logo, press Choose a logo to open a system file browser.

- In the file browser, choose a suitable image and press Open.

- The file browser automatically closes, and you are returned to the application settings, where you will see a preview of your chosen image. Your chosen image is now set as the company logo, which appears on the top right of the Launch Control home screen.

- You may close the application settings. If you wish to change the company logo, press Remove and start again from step 2.
Home screen background
This function is available from the application settings. See how to access application settings.
Changing background using a gallery image
Follow the instructions below to change the home screen background using a gallery image:
-
Go to the Appearance section of the application settings.
-
In the Appearance settings under Background image, choose any gallery image by pressing once on any of the preview images from the list.
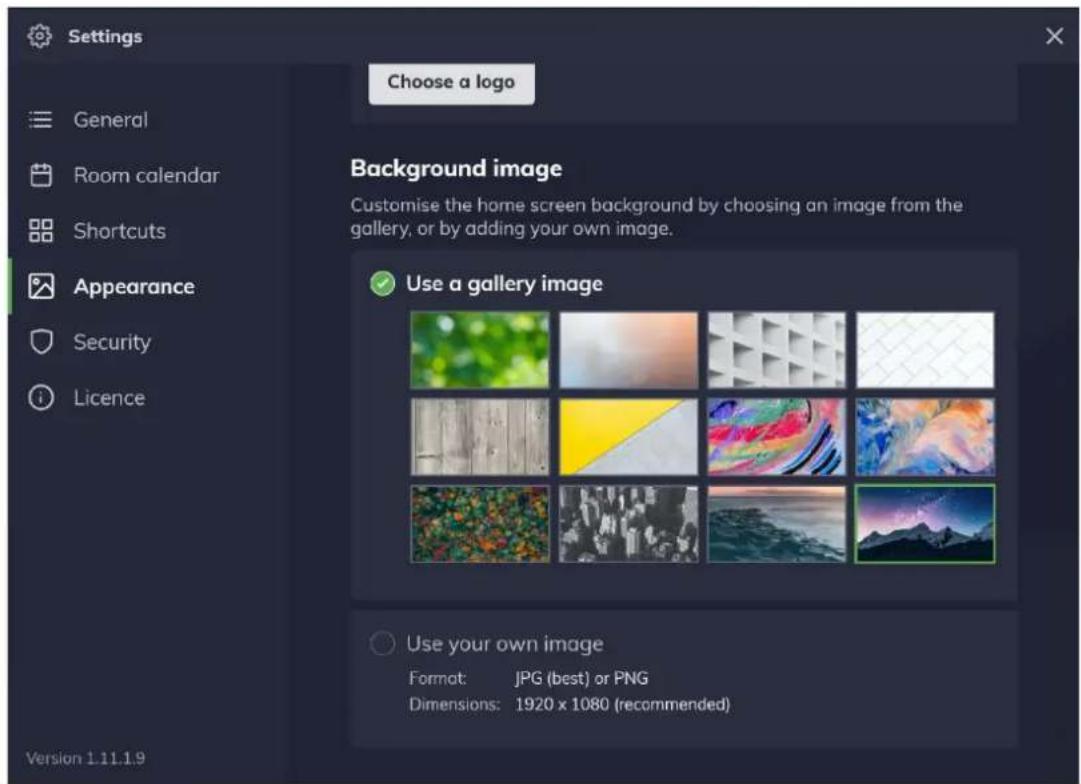
- Your home screen background has changed based on your gallery image selection. You may close the application settings.
Changing background using a custom image
Follow the instructions below to change the home screen background using a custom image:
- Go to the Appearance section of the application settings.
-
In the Appearance settings under Background image, press anywhere within the area labeled Use your own image to open a system file browser.
-
In the file browser, choose a suitable image and press Open.

- The file browser automatically closes, and you are returned to the application settings, where you will see a preview of your chosen image. Your chosen image is now set as the home screen background.
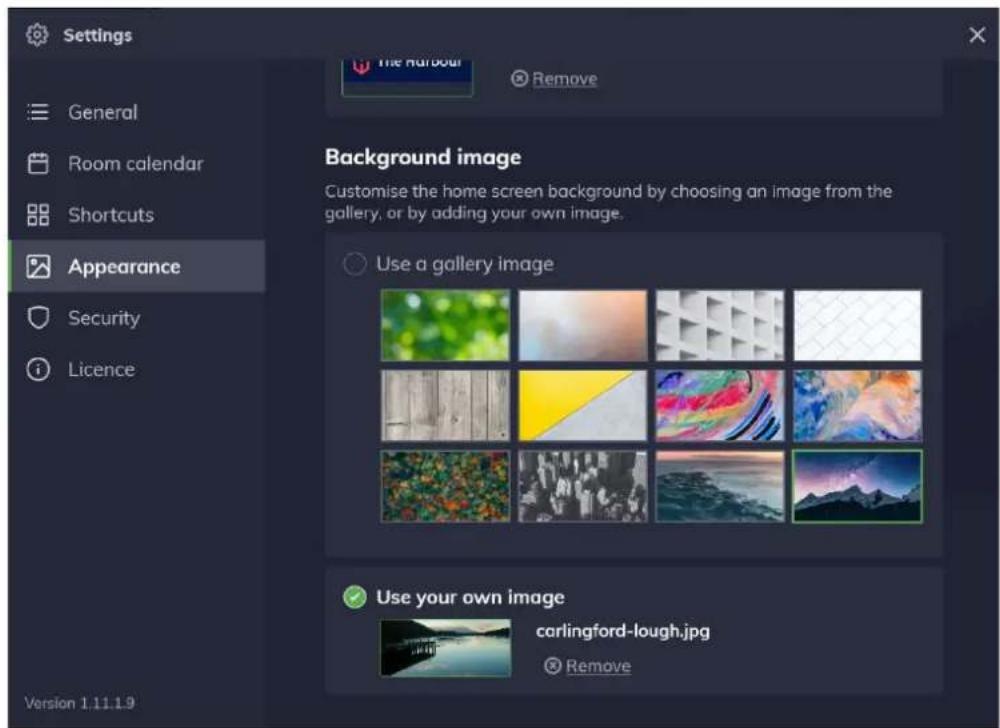
- You may close the application settings. If you wish to change the company logo, press Remove and start again from step 2.
Managing shortcuts
Please ensure you have read the pre-requisite information on application shortcuts before you continue.
If you've just completed a first-time setup and you don't have any shortcuts set up, your home screen will look like this:

In the following subsections, we'll learn how to add, edit and remove web and application shortcuts. By the end of this section, meeting room users will be able to open shortcuts. Your home screen will then look something like the example home screen below.
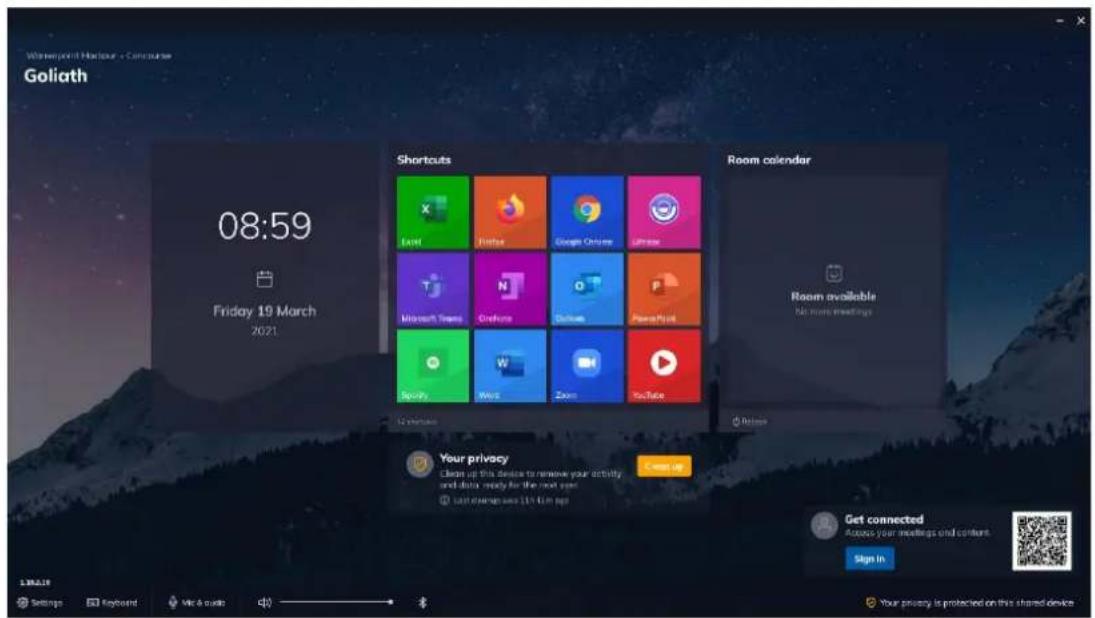
Adding shortcuts
This function is available from the application settings. See how to access application settings.
Add a new application shortcut
Follow the instructions below to add a new application shortcut:
- Go to the Shortcuts section of the application settings.
- In the Shortcuts settings, press Add app.

- A new window labeled Add app appears, and Launch Control searches for applications on your system. A full list of applications appears when the search is complete.
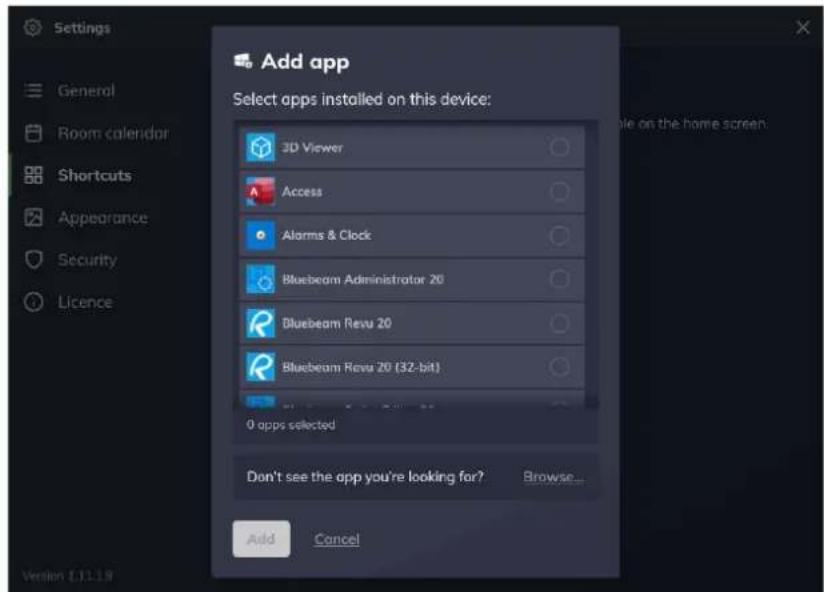
- Select any number of applications you wish to set up as shortcuts by tapping on individual list items and then press Add.
- The window disappears, and you will return to the shortcut settings where your selected shortcuts are shown. Return to the home screen by closing the application settings.

- On the home screen, you will now see your list of shortcuts.
Add a new application shortcut using file path
Some software makes use of shortcut executables to run their application. In such cases, users may experience issues when trying to start these applications via Launch Control, as they may not have been set up correctly.
If you experience issues launching an application via app shortcuts in Launch Control, please check that the application executable (.exe) added to Launch Control is correct and not the shortcut executable.
To make certain that the application is added correctly, follow these steps:
- On your Windows system, outside of Launch Control, access the application shortcut properties: Right-click or long-press (touch) on a desktop application shortcut and select Properties.
- In the properties, find the correct application location under the Shortcut > Open file location to open a file explorer window with the application executable selected.
- Right-click the application executable and select Copy address as text.

- Open Launch Control and go to the Shortcuts section of the application settings.
-
In the Shortcuts settings, press Add app.
-
A new window labeled Add app appears. Press Browse... to open the Windows file explorer.

- Right-click or long-press the path field, then:
a. Press Paste to paste the file address.
b. Press the right-facing arrow or the enter key on a keyboard to access the file address.
-
Select the application executable file (.exe) and press Open.
-
The application has been added to Launch Control as a shortcut and appears on the home screen.
Add a new web shortcut
- Go to the Shortcuts section of the application settings.
- In the Shortcuts, settings press Add web link.

- A new window labeled Add web link appears.
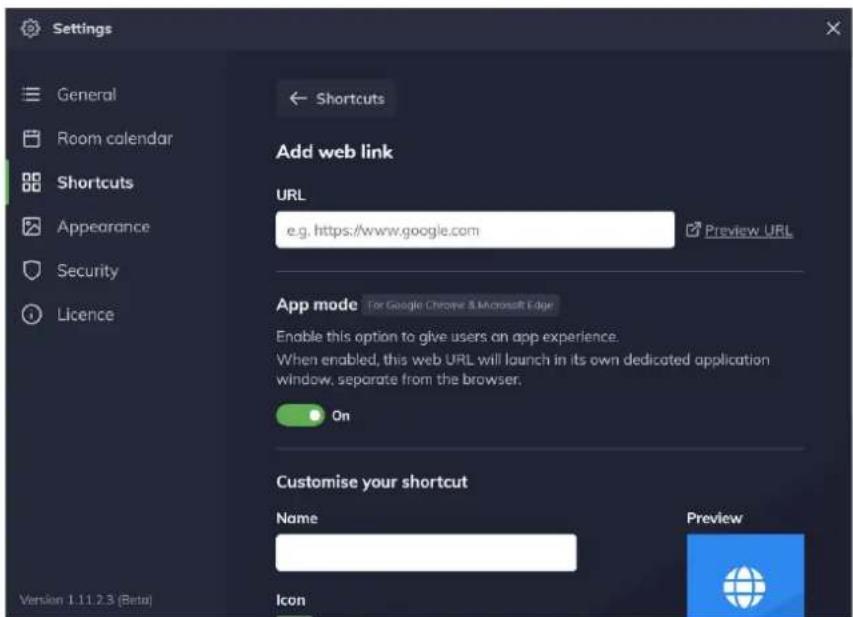
- Under URL, type a valid URL. Note that you can preview the URL using the option labeled Preview. When a valid URL is entered, the name and icon of the shortcut are automatically generated based on the URL information.
- Choose to turn App mode on or off. When App mode is enabled, the web shortcut will open in its own dedicated application window, separate
from the browser. This option is only available while Google Chrome or Microsoft Edge are set as the default browser.
- If desired, change the name of the web shortcut by typing a new name in the appropriate field under Name.
- If desired, change the web shortcut icon by choosing an alternative icon from the preset list under Icon.
- If desired, change the background color of the web shortcut by choosing a color from the preset list under Background color.
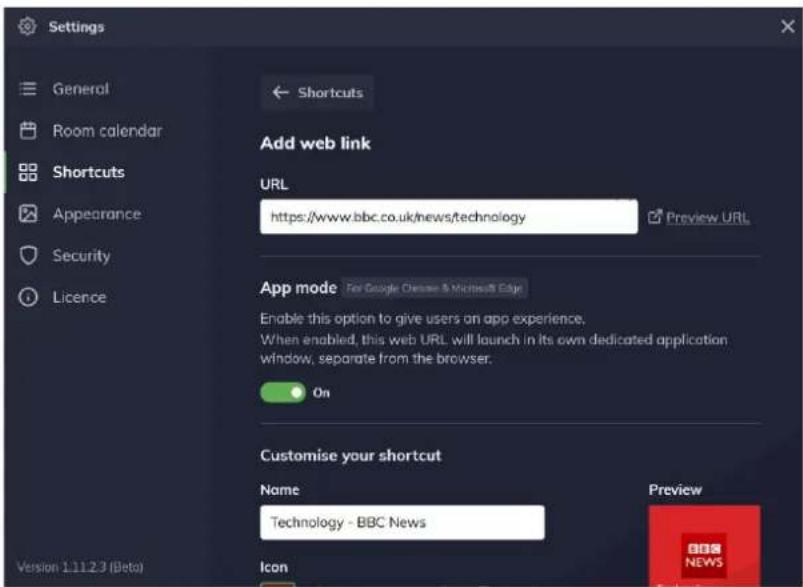
- Check that you are satisfied with the web shortcut appearance using the preview, then press Add to finish. Your web shortcut is now available on your list of shortcuts in the shortcut settings and on the home screen.
Editing shortcuts
Follow these instructions to edit your web and application shortcuts.
- Go to the Shortcuts section of the application settings.
- Choose a shortcut from your list of web and application shortcuts under Your shortcuts.

- A new view appears, where you may change the shortcut parameters: a. Editable web shortcut parameters: URL, Name, Icon, Color.

b. Editable app shortcut parameters: URL, Name, Icon, Background color, Command line arguments.

- When your changes are complete, press Save to apply your changes.
Command-line arguments
Command-line arguments is a function of application shortcuts that allows you to pass commands to the target application when it is launched.
Any valid command-line argument can be added using this function. Follow these instructions to add a command-line argument to an application shortcut:
- Go to the Shortcuts section of the application settings.
- Choose an application shortcut from Your shortcuts to view the shortcut parameters.
- Scroll down to Command line arguments and add your parameter to the input field, then press Save.
- Your command-line argument has been applied; you may close the application settings.
Network drive shortcuts
This shortcuts type is very useful to those who wish to access content that is held on a network drive, during meetings.
- Go to the Shortcuts section of the application settings.
- In the Shortcuts, settings press Add network drive.
- A new window labeled Add network drive appears.

- Under Drive URL, type a valid drive URL (see UNC path format).
- Choose to drive letter from the list of available letters.
- Next, choose which method of authentication you wish to proceed with:
a. Choose User authentication to require a username and password every time a user wishes to access the network drive.
b. Choose Shared access to allow any user to access the network drive without entering a username and password. For this option, you must enter a username and password, which are securely stored on the system.
- Enter a username for the network drive under Name.
- If desired, change the background color of the network drive shortcut by choosing a color from the preset list under Background color.
- Press Add to finish. Your network drive shortcut is now available on your list of shortcuts in the shortcut settings and on the home screen.
Securing the device
We've covered how Launch Control keeps your settings secure using the settings PIN.
In this section, we explore additional built-in functions that keep end-user information safe and secure the Windows system, thanks to the following security measures:
- Device Cleanup
- Kiosk Mode
Device Cleanup
Device Cleanup is a feature of Launch Control that removes sensitive data from the system after use, keeping end-user information private.
The data removed from the system during a device Clean up includes local data, cached information, and web history. Additionally, any application that was launched from Launch Control will also close.
There are two methods for running a clean up: Manual and automatic.
Triggering manual clean up
The manual clean up function is available from the Launch Control home screen and is available to anyone interacting with the application.
The process of triggering a manual clean up is straightforward. Simply press the Clean up on the Launch Control home screen. Get a step-by-step breakdown.
Configuring Automatic Cleanup triggers
This function is available from the application settings. See how to access application settings.
The Automatic Cleanup function can be configured to trigger based on a set of parameters found in the Launcher security settings.
Follow the instructions below to configure automatic clean up options:
- Go to the Security section of the application settings.
- In the Security Settings, under Device Cleanup you may configure the Automatic Cleanup triggers as follows:
a. After a period of inactivity can be toggled On or Off. The period of inactivity and bandwidth usage (optional) can be set here.

b. At a scheduled time can be toggled On or Off. The time and day(s) of the week can be set here.

c. When my meetings end can be toggled On or Off. This triggers the Cleanup operation when a scheduled meeting has ended.
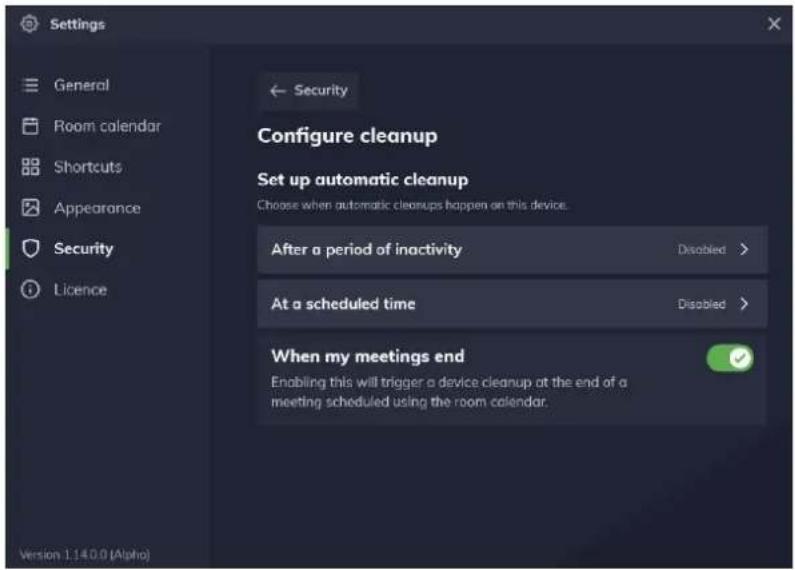
- When you are finished, you may close the application settings with your Automatic Cleanup configured.
Note: An alert will appear one minute before the Automatic Cleanup trigger is executed. Any user may Confirm or Cancel the Automatic Cleanup.
Kiosk Mode
This function is available from the application settings. See how to access application settings.
Windows systems are protected and made more secure thanks to Kiosk Mode. When enabled, Kiosk Mode will:
- Open Launch Control in full screen when the device starts up.
- Restrict access to the Windows desktop.
- Disable Windows keyboard shortcuts and touch gestures that would allow users to access the system.
To enable or disable Kiosk Mode, please follow these instructions:
- Go to the Security section of the application settings.
- Under Kiosk Mode, press the toggle option to trigger a confirmation alert.
- On the confirmation alert, press Enable Kiosk or Disable Kiosk depending on your configuration. Note that Launch Control will automatically restart upon confirmation.
- If you have just enabled Kiosk Mode, your Windows device will automatically run Launch Control when booting up.
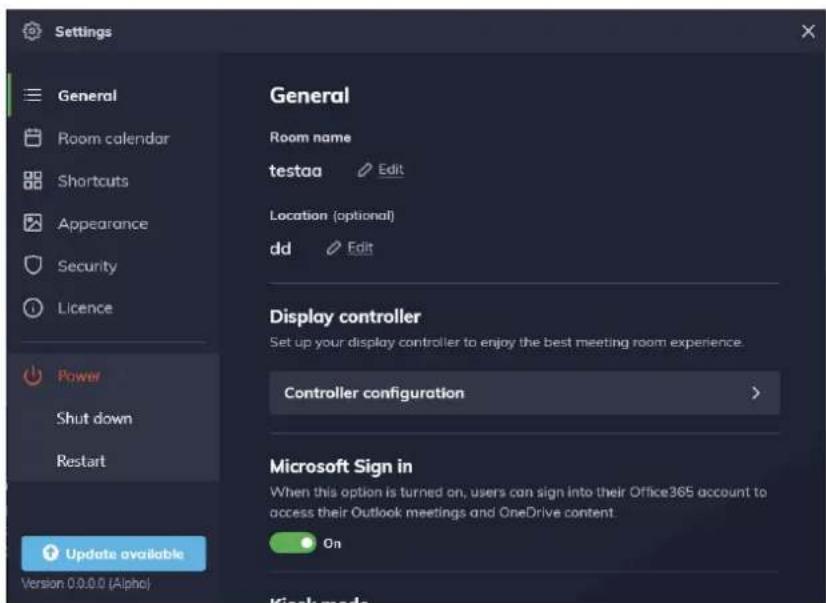
Shut down and restart
When Kiosk mode is enabled, you may shut down or restart the device by accessing the application settings. These are available in the left hand navigation menu as the last item on the list, as shown below:
Calendar event privacy
This function is available from the application settings. See how to access application settings.
Depending on the strictness of your company's security measures, you may wish to show or hide meeting room calendar event titles. You may toggle this option on or off as follows:
- Go to the Security section of the application settings.
- Under Calendar event privacy, press the toggle option.
- If you have just disabled this option, your event title will be shown.
Alternatively, if you've enabled this option, your event title will be hidden. This option takes effect immediately.
Updating Launch Control
This function is available from within the application settings. See how to access application settings.
Launch Control receives regular updates that introduce new features and functions while also improving the application through routine maintenance of the software and fixes to common or critical issues.
It is strongly recommended to update Launch Control regularly to enjoy the best possible experience that the software has to offer.
Updates are carried out 'over-the-air,' meaning that the application will download the update using the internet. When the application is up to date, the version number of the application will be displayed in the settings navigation, to the bottom left of the panel.
When an update is available, a notification appears on the settings button on the home screen. Opening the application settings while an update is available will show a message and prompt you to Install & restart:

This process will first install the update and then restart the application with the new version installed.
Auto-updates
This function is available from the application settings. See how to access application settings.
An auto-update function is available within Launch Control, allowing you to set a time window in which updates can be applied, causing minimal disruption.
Follow these steps to set up auto-updates:
- Go to the General section of the applications settings.
- Under Auto-updates, press the toggle option.
- When the toggle option is turned On, you may set a time window of your choosing, by selecting times from the available list, as illustrated below.

- The application will now update automatically when a new version is available.
Using Launch Control
This section covers how meeting users can interact with Launch Control to improve their experience within the meeting room space.
For meeting users, we will dive into everyday tasks when using Launch Control on Windows and on the mobile app. Here's the breakdown:
- Launching shortcuts
• Using the mobile app - Launching calls
- Accessing Microsoft 365
- Running a device clean up
Using the mobile app
Launch Control comes with a mobile application. This allows users to simplify their meeting room experience thanks to proximity detection and one-touch call launching capabilities.
Setting up the mobile app
To get the mobile application, search for DisplayNote Launch Control in the app store or visit the iOS App Store or Google Play Store to download the app directly.
Alternatively, you may scan the QR code on a Launch Control enabled Windows device to be directed to the relevant app store for your mobile device.
Follow these steps once the app is downloaded and installed:
- Set background activity preference:
a. Enable to take advantage of the app's proximity detection by allowing nearby Launch Control devices to be discovered while the app is running in the background.
b. Disable to shut off the app's ability to detect nearby Launch Control devices while the app is in the background.
-
Next, press Sign in with Microsoft and follow instructions to authenticate your Microsoft 365 credentials.
-
Set your location services preference by pressing:
a. Allow only while using the app if you wish to allow the mobile app to find nearby Launch Control enabled Windows devices using proximity detection (via Bluetooth).
b. Deny if you do not wish to use the mobile app proximity detection to find nearby Launch Control enabled Windows devices using proximity detection (via Bluetooth).
- When you have arrived on the mobile app home screen labeled Discover, set your camera permissions by pressing:
a. Allow if you wish to use the QR code function as a means of connecting to a Launch Control enabled Windows device.
b. Deny if you do not wish to use the QR code function as a means of connecting to a Launch Control enabled Windows device.
- The mobile app is now fully set up, ready to connect to nearby Launch Control enabled Windows devices.
Connecting to Launch Control
The mobile app allows you to connect to Launch Control devices wirelessly to launch calls from your mobile and wirelessly sign in to Microsoft 365 on the main display.
Connecting to Launch Control is achieved in one of two ways:
- Via Bluetooth Low Energy (Bluetooth 4.0 and above)
- Via QR Code
When connected to a Launch Control enabled Windows device:
- You are signed into Microsoft 365 on the main display, where you may access your Microsoft OneDrive content and Outlook Calendar events.
- You may view your Outlook Calendar events on your mobile device and launch these on the main display wirelessly.
Connecting via Bluetooth
This function is only available if you have allowed location services permissions. See how to set up the mobile app for proximity detection.
Follow these simple steps to connect to Launch Control using Bluetooth:
- Ensure your mobile device Bluetooth setting is On. This is found within your phone's settings, under Bluetooth.
- Ensure the Launch Control device is Bluetooth-enabled and has its Bluetooth setting turned on. You can check the Bluetooth status by pressing Sign in on the Launch Control home screen and looking for the status that reads Bluetooth is enabled on this device.
- Ensure that you are in proximity of a Launch Control enabled Windows device. Then, on your mobile device, open the Launcher app and sign in to Microsoft if prompted to do so.
- The mobile app automatically starts scanning the area for nearby Launch Control devices. Any nearby devices appear on a list.
- Select a device from the list to establish a connection via Bluetooth.
- If successful, you are now connected to Launch Control.
This function is only available if you have allowed relevant camera permissions. See how to set up the mobile app for QR scanner function.
Follow these simple steps to connect to Launch Control using the QR scanner:
- Firstly, ensure that the Launch Control device that you wish to connect to is available. To check, go to your Launch Control enabled Windows device and ensure that Launch Control is open and on the home screen. If no one is signed in, a QR code should be available to the bottom right corner of the interface, as illustrated below.
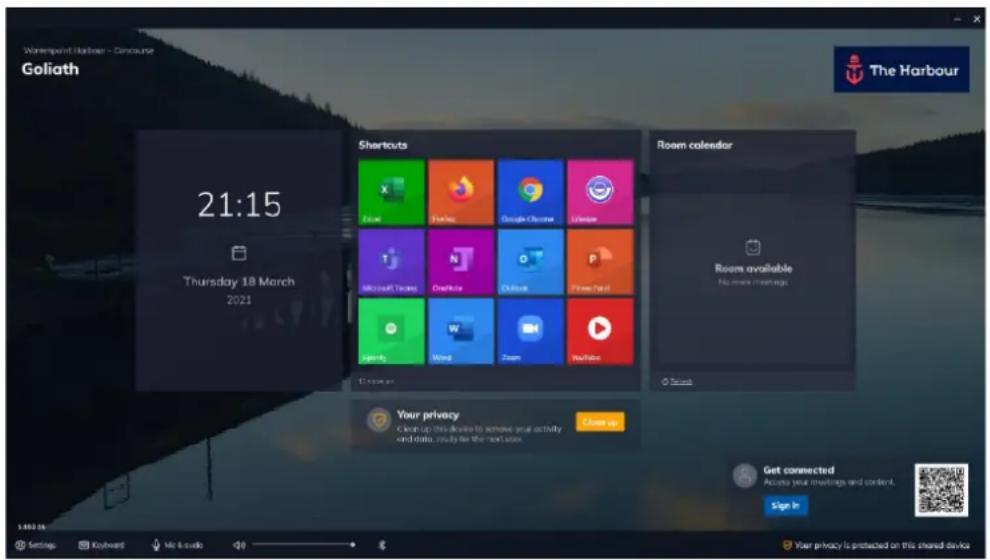
- Once you have identified the QR code on the Launch Control enabled Windows device, open the Launcher app on your mobile.
- While on the Discover screen, press Connect with QR code at the bottom of the screen.
- The mobile app's QR scanner opens. Go to the Launch Control enabled Windows device and scan the QR code you identified in step 1.
- If the scan is successful, you are now connected to Launch Control.
Disconnecting from Launch Control
To disconnect from Launch Control:
- Press the exit button to the top right of the mobile app interface.
- Press Sign out to the bottom right of the Launch Control home screen
Launching calls via mobile
This section assumes that you are already connected to a Launch Control device. See how to connect to Launch Control.
While connected to Launch Control, your mobile app will display your Outlook calendar events on the screen labeled Meetings.
While on the Meetings screen, you may launch a call by following these steps:
- Press Launch on screen. You can find this as follows:
a. If your next meeting has been set up with a video conferencing tool such as Teams, Zoom, or others, you will see a button labeled Launch on screen.
b. If you have other meetings during the day, you may press on the meeting item on the list to view meeting details where a button labeled Launch on screen can be found.
- If your call is scheduled for later in the day, you may be prompted to confirm that you wish to launch your call ahead of time. If this is the case and you want to continue, simply press Launch now. Otherwise, skip to the next step.
- Your call will automatically launch on the Launch Control display.
Using Launch Control Windows
The Launch Control Windows application improves the meeting room experience by making everyday tasks such as launching calls and interacting with applications intuitive and straightforward.
In this section, we'll cover what it means to interact with Launch Control while using a meeting space through the following topics:
- Launching shortcuts
- Microsoft functions
- Launching calls
- Running a device clean up
Launching shortcuts
Shortcuts – configured and added to the Launch Control home screen via the application settings – allow meeting room users to launch applications and web links with one touch.
With Launch Control, the process of launching an application or a web link within a meeting space - unlike traditional Windows desktop environments – is streamlined, as is illustrated in the instructions below:
- On the Launch Control home screen, press any of the shortcuts available in the grid, as illustrated in our example home screen below:

- The application or web link is launched and opens in full screen.
- To return to the Launch Control home screen, press the home button to the left side of the screen, represented by an icon of a house:

natural_image
Two dark rectangular icons with white symbols: a house and a keyboard, set against a solid green background (no text or labels)Microsoft 365 functions
Microsoft 365 users can sign in using their Microsoft credentials to access their calendar items and OneDrive files via Launch Control.
In this section, we'll look at ways you can interact with Launch Control and Microsoft services to simplify your meeting room experience.
Connecting to Launch Control on Windows
There are two methods for accessing Microsoft 365 content:
- By signing manually in via the Launch Control interface.
- By signing in wirelessly via the mobile application. See how to get set up with the mobile app.
This section covers how you can connect by signing in manually via the Launch Control interface. To do this, follow these simple steps:
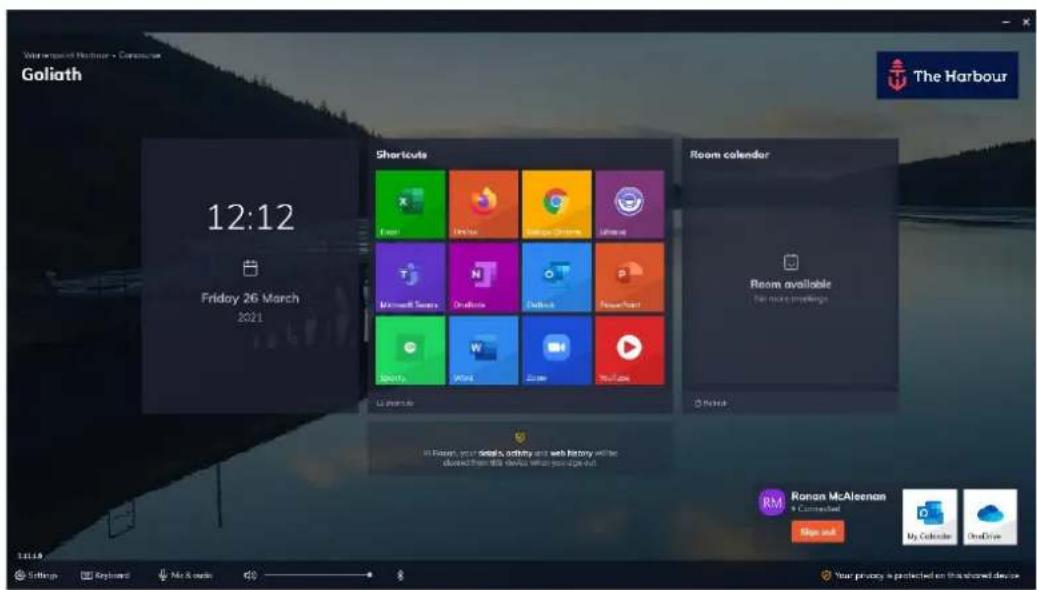
- On the Launch Control, home screen press Sign in, as illustrated in the example home screen below.

-
The sign-in panel appears. Press Sign in with Microsoft.
-
A Microsoft authentication browser window appears to verify your Microsoft 365 account details. Follow instructions by entering the email address and password to complete the authentication.

- When your Microsoft 365 account has been authenticated, you are returned to the Launch Control home screen, and you are now signed in. From here, you may access your Microsoft 365 calendar and OneDrive.
Using My Calendar
When connected to the Launch Control on Windows – see how to get connected – you can access your personal Outlook calendar events. This allows you to launch calls on the Launch Control device with one touch.
Here's how:
- When connected to Launch Control, look to the bottom right of the main meeting room display, where the sign in information is held. Press on the tile with the Outlook icon labeled My Calendar.
- A window appears, showing your Outlook calendar events as follows:
a. Event title, time, and attendees.
b. If your calendar event has been set up with a video call, an option labeled Launch now is shown along with an icon to represent the video conference tool that will be used for the call (i.e., Teams, Zoom, etc.).
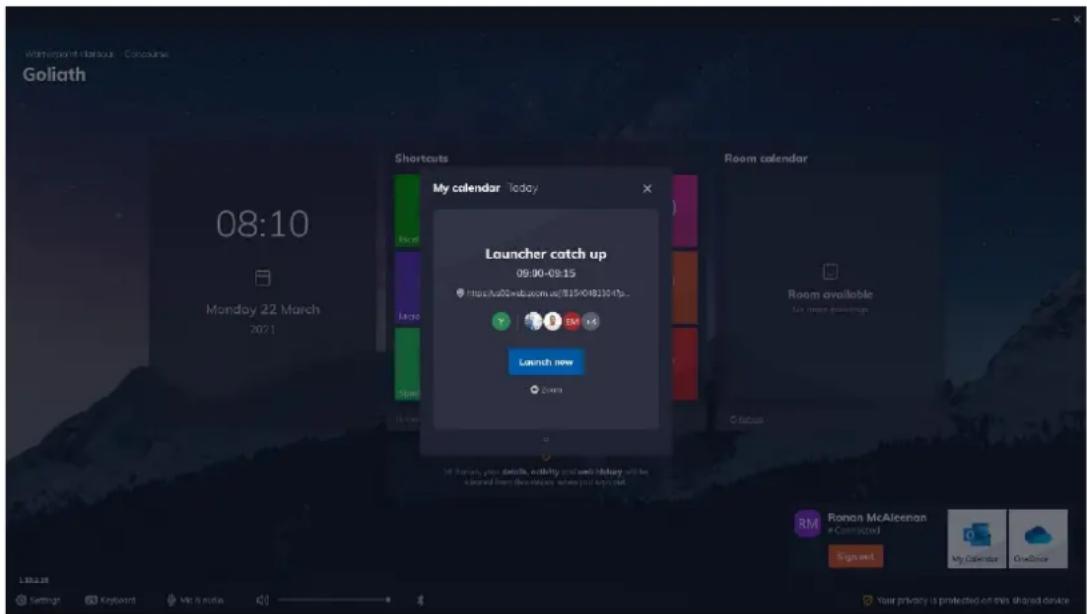
- Press Launch now.
- Your call will automatically start on the meeting room display.
Using OneDrive
When connected to the Launch Control on Windows – see how to get connected – you can access your personal OneDrive files on the Launch Control device to view your content.
Launch Control can only open OneDrive files that have the following sharing permissions in place: Anyone with a link. Note: You can change this permission globally via the Sharepoint admin centre.
Here's how to view your OneDrive files:
- When connected to Launch Control, look to the bottom right of the main meeting room display, where the sign-in information is held. Press on the tile with the OneDrive icon labeled OneDrive.
- A window appears, showing your OneDrive files. Navigate to a file of your choice as follows:
a. Press folder icons to access their contents.
b. Press the back arrow to return to the preview view.

- Press down on a file of your choice to open the file on the default browser set on the system.
Using the room calendar
The Launch Control room calendar allows you to view meeting events scheduled to take place within the room.
The room calendar is broken down as follows:
- The current time slot is labeled Now. This is where any current calendar events appear.
- The next time slot is labeled Next. This is where any future calendar events appear.
- When multiple other calendar events are scheduled for later in the day, these can be viewed in the room calendar day schedule by pressing the option labeled X more meetings later today.
Launching a scheduled meeting call
Launching a scheduled meeting call from the room calendar is very simple:
- On the room calendar Now time slot, press Launch now.
- The meeting will launch automatically.
Launching an unscheduled meeting call
It is possible to start meeting calls ahead of schedule. This can be done using the following steps:
- Tap or click on a meeting event in the Next time slot or tap on a meeting event in the X more meetings later today to view events later in the day.
- A confirmation window appears to notify you that you are about to launch a call for a meeting that is scheduled in the future.
- Confirm that you want to launch the call by pressing Launch Now.
- Your call automatically starts on the Launch Control display.
Call controls for meeting room consoles
You may use a room console in your meeting space (i.e. Logitech Tap). If this is the case, please first ensure that you have met the meeting room requirements.
When you are set up correctly with the meeting room console, any Zoom or Microsoft Teams call will trigger an overlay with call controls and event details on the meeting room console, as illustrated below:
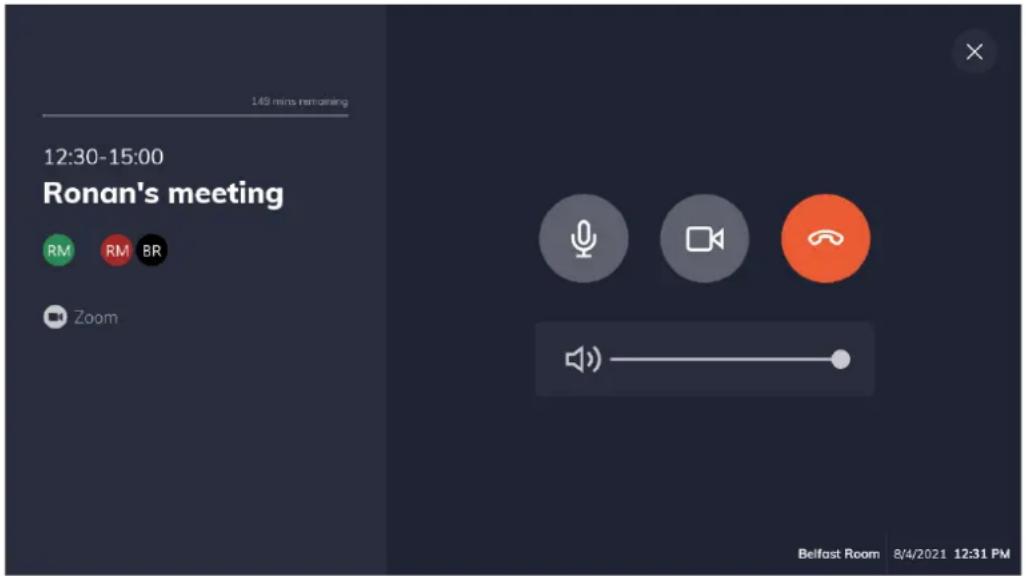
These controls are as follows:
- Toggle microphone on or off.
- Toggle camera on or off.
- End call.
• Control system volume.
Running a device clean up
Launch Control is designed to keep your information safe. Your IT administrator may already have implemented some security measures to ensure that your privacy is maintained.
Thankfully with Launch Control, there's an easy way for you to also do this by using the Device Cleanup function. Get the details on device clean ups and what it does to keep your information secure.
Run a device clean up when signed in
When you are signed in on the Launch Control device using Microsoft, you can simply disconnect from the device to automatically run a device clean up.
You can disconnect from Launch Control using one of these methods:
- Press Sign out via the Launch Control home screen interface.
- If you are connected using the mobile app, press the exit button to the top right of the mobile app interface.
Running a device clean up manually
The manual clean up function is available from the Launch Control home screen and is available to anyone interacting with the application.
To trigger a manual clean up, follow these instructions:
- While on the home screen, press the button towards the center of the screen labeled Clean up.
Your privacy
Clean up this device to remove your activity and data, ready for the next user.

Last clean up was 34m ago.

- The clean up operation will begin, and after a brief moment, a notification appears to notify you that the clean up operation is complete.
- Local data, cached information, and web history data are removed, and open applications are closed.
Setting speaker and microphone defaults
Launch Control provides you with options to change the speaker and microphone system defaults, helping you experience consistency for your audio interactions with the system.
To change the system configuration, follow these steps:
- On the Launch Control home screen, press Mic & audio.
- A new panel appears with options to choose your preferred speaker and microphone from a list of available devices.
- Choose your preferred audio options using the dropdown menu.
- Your new audio system defaults have been set, and you may now close the mic & audio panel.
Scheduling meetings
This section covers scheduling meetings with Launch Control. The following steps ensure your meeting events appear in the room calendar while also being one-touch, should you want to use a video conferencing tool like Microsoft Teams or Zoom.
We'll have a look at how to set up the following meeting types using Outlook on the web and Outlook desktop application:
- Zoom meetings
• Microsoft Teams meetings - GotoMeeting meetings
- Bluejeans meetings
Zoom meetings
To schedule Zoom meetings using Outlook, you'll need:
- The room mailbox email address or name so that you can associate your meeting to a specific space where Launch Control is installed.
- The Zoom add-in. Get the Zoom add-in on the Microsoft Store.
There are two ways to schedule meetings using Outlook:
- Outlook web access
- Outlook for desktop
If you're using a meeting room console, please refer to the requirements for Zoom configuration for meeting room consoles.
Outlook web access (OWA)
Here's a preview of the process, followed by steps on how to schedule a Zoom meeting using Outlook web access:

- Using your web browser, sign in to Outlook and find the calendar section of the web app, located in the bottom left of the interface.
- Create a new event by selecting the New event option located at the top of the interface or by double-clicking on a time slot within your calendar. This will generate a new window.
-
Add a meeting subject and participants for your meeting.
-
Select the Add a Zoom meeting option from your Zoom add-in to generate a meeting URL. The meeting URL will automatically populate into the location field.
-
Add the room mailbox to the location field. The room mailbox must be the room mailbox email address that is set up with your Launch Control room calendar.
-
Send the invitation by pressing Send.
-
Your meeting now appears on the Launch Control room calendar, where you can launch your Zoom meeting with one touch.
Outlook desktop app
Here's a preview of the process, followed by steps on how to schedule a Zoom meeting using Outlook web access:

-
Open Outlook and go to the calendar section located in the bottom left of the interface. Create a new meeting using the New Meeting option from the application ribbon located at the top of the interface. This will generate a new meeting window.
-
Add a meeting subject, participants for your meeting, and a room mailbox (in the location field). The room mailbox must be the room mailbox email address that is set up with your Launch Control room calendar.
-
Select the "Add a Zoom meeting" option from your Zoom add-in to generate a meeting URL.
- Send the invitation by pressing Send.
- Your meeting now appears on the Launch Control room calendar, where you can launch your Zoom meeting with one touch.
Microsoft Teams meetings
To schedule Microsoft Teams meetings using Outlook, you'll need:
- The room mailbox email address or name so that you can associate your meeting to a specific space where Launch Control is installed.
There are two ways to schedule meetings using Outlook:
- Outlook web access
- Outlook for desktop
Outlook web access (OWA)
Here's a preview of the process, followed by steps on how to schedule a Teams meeting using Outlook web access:
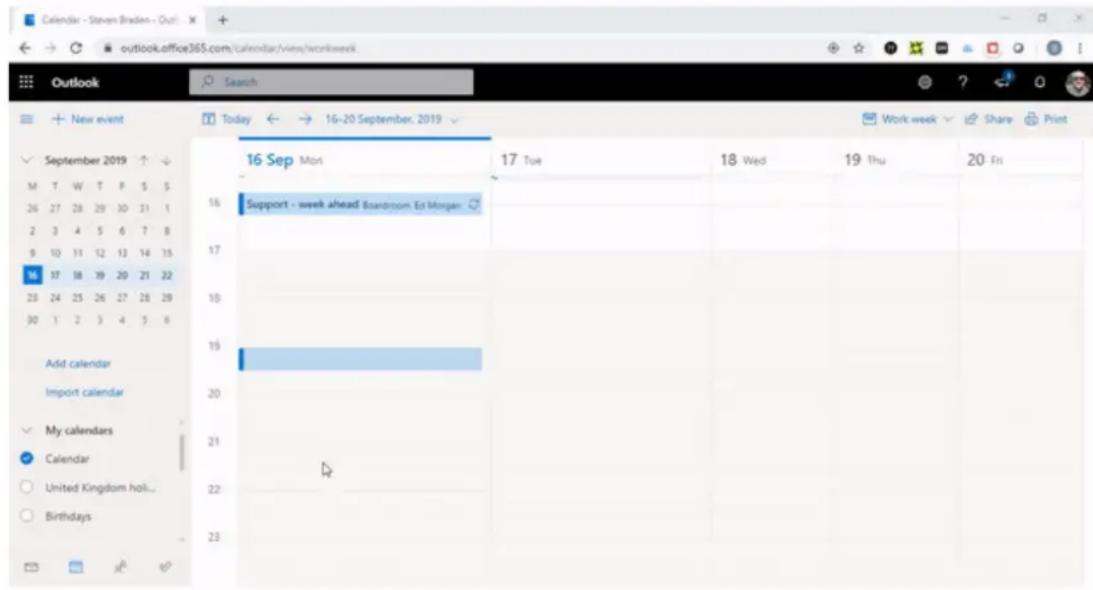
-
Using your web browser, sign in to Outlook and find the calendar section of the web app, located in the bottom left of the interface.
-
Create a new event by selecting the New event option located at the top of the interface or by double-clicking on a time slot within your calendar. This will generate a new window.
- Add a meeting subject, participants for your meeting, and a room mailbox (in the location field). The room mailbox must be the room mailbox account that is set up with your Launch Control room calendar.
- Press Teams meeting option to generate a Teams meeting.
-
When the meeting details have been generated, send the meeting invitation. At this stage, your meeting is scheduled, but you will need to retrieve the teams meeting URL and add it to the location field, as instructed below:
-
On your calendar, right-click or expand the schedule and select the Edit option. This will show the meeting details window.
-
In the body of the email, right-click the Join Microsoft Teams meeting link, copy the URL, and paste it in the location field alongside the room mailbox account.
-
When the Teams meeting URL has been added to the location field, send the meeting.
-
Your meeting now appears on the Launch Control room calendar, where you can launch your Teams meeting with one touch.
Outlook desktop app
Here's a preview of the process, followed by steps on how to schedule a Microsoft Teams meeting using Outlook desktop:

-
Open Outlook and go to the calendar section located in the bottom left of the interface, then create a new meeting using one of the following methods:
-
Select the New Teams Meeting option from the application ribbon, located at the top of the interface. This will generate a new meeting, which includes your Teams meeting details in the body of the email invitation.
- Select the New Meeting option from the application ribbon, located at the top of the interface. This will generate a new meeting window, where you will see a Teams option. Enable this option to generate Teams meeting details. This adds the details to the body of the email invitation.
- Copy the meeting URL from Teams meeting details found in the body of the email invitation. Paste the meeting URL into the location field, replacing the existing Microsoft Teams Meeting entry.
- When the URL has been pasted, add the room mailbox from the list provided. This room mailbox must be the room mailbox email that is set up with your Launch Control room calendar.
- Ensure that you have entered a meeting subject and added participants, then send the meeting invitation by pressing Send.
- Your meeting now appears on the Launch Control room calendar, where you can launch your Teams meeting with one touch.
GoToMeeting meetings
To schedule GoToMeeting events using Outlook, you'll need:
- The room mailbox email address or name so that you can associate your meeting to a specific space where Launch Control is installed.
- The GoToMeeting Outlook add-in. Get the GoToMeeting Outlook Plugin
There are two ways to schedule meetings using Outlook:
- Outlook web access
- Outlook for desktop
Outlook web access (OWA)
Here's a preview of the process, followed by steps on how to schedule a GoToMeeting event using Outlook web access:

- Using your web browser, sign in to Outlook and find the calendar section of the web app, located in the bottom left of the interface.
- Create a new event by selecting the New event option located at the top of the interface or by double-clicking on a time slot within your calendar. This will generate a new window.
-
Add a meeting subject, participants for your meeting, and a room mailbox (in the location field). The room mailbox must be the room mailbox account that is set up with your Launch Control room calendar.
-
Select the GoToMeeting add-in to show the meeting side panel and select the Generate a new meeting link option.
-
In the body of your email invitation, copy the newly generated GoToMeeting meeting URL and paste it into the location field.
-
Send the invitation by pressing Send.
-
Your meeting now appears on the Launch Control room calendar, where you can launch your GoToMeeting meeting with one touch.
Outlook desktop app
Here's a preview of the process, followed by steps on how to schedule a GoToMeeting event using Outlook desktop:

-
Open Outlook and go to the calendar section located in the bottom left of the interface, then create a new meeting using the New Meeting option from the application ribbon located at the top of the interface. This will generate a new meeting window.
-
Add a meeting subject, participants for your meeting, and a room mailbox (in the location field). The room mailbox must be the room mailbox email address that is set up with your Launch Control room calendar.
-
Select the GoToMeeting add-in to show the meeting side panel and select the Generate a new meeting link option.
-
Send the invitation by pressing Send.
-
Your meeting now appears on the Launch Control room calendar, where you can launch your GoToMeeting event with one touch.
Bluejeans meetings
To schedule Bluejeans events using Outlook, you'll need:
- The room mailbox email address or name so that you can associate your meeting to a specific space where Launch Control is installed.
- The Bluejeans Outlook add-in. Get the Bluejeans Outlook Plugin
There are two ways to schedule meetings using Outlook:
- Outlook web access
- Outlook for desktop
Outlook web access (OWA)
Here's a preview of the process, followed by steps on how to schedule a Bluejeans meeting using Outlook web access:
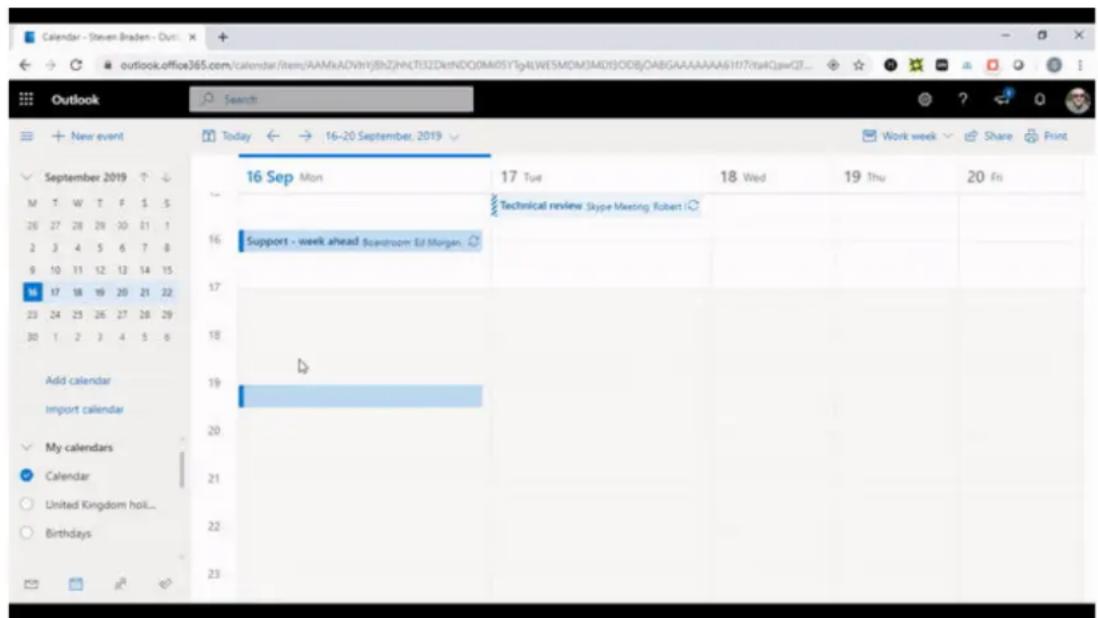
- Using your web browser, sign in to Outlook and find the calendar section of the web app, located in the bottom left of the interface.
- Create a new event by selecting the New event option located at the top of the interface or by double-clicking on a time slot within your calendar. This will generate a new window.
-
Add a meeting subject, participants for your meeting, and a room mailbox (in the location field). The room mailbox must be the room mailbox account that is set up with your Launch Control room calendar.
-
Select the Add a Bluejeans meeting option from your Bluejeans add-in to generate a meeting URL.
-
In the body of your email invitation, copy the newly generated Bluejeans meeting URL and paste it into the location field.
-
Send the invitation by pressing Send.
-
Your meeting now appears on the Launch Control room calendar, where you can launch your Bluejeans meeting with one touch.
Outlook desktop app
Here's a preview of the process, followed by steps on how to schedule a Bluejeans meeting using Outlook desktop:
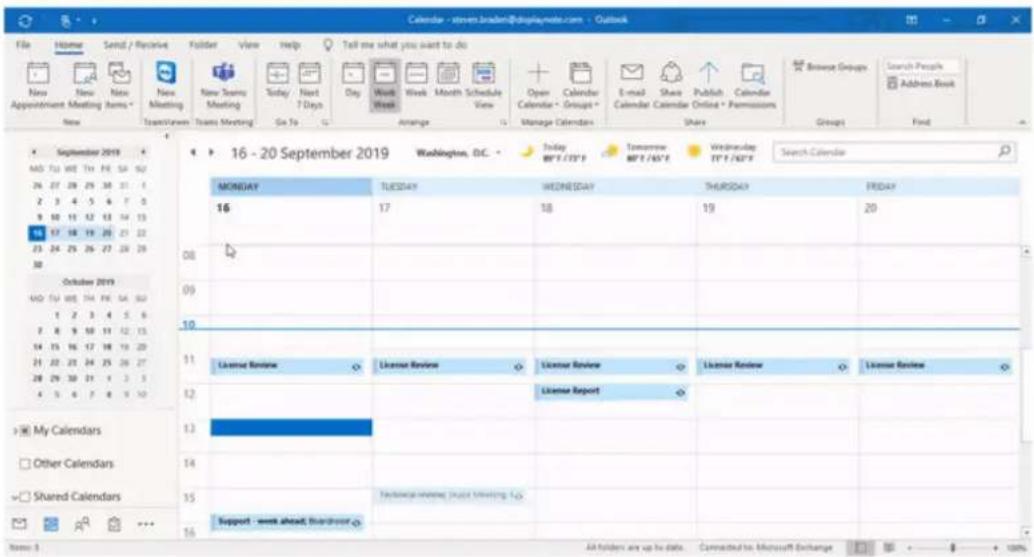
-
Open Outlook and go to the calendar section located in the bottom left of the interface. Create a new meeting using the New Meeting option from the application ribbon, located at the top of the interface. This will generate a new meeting window.
-
Add a meeting subject, participants for your meeting, and a room mailbox (in the location field). The room mailbox must be the room mailbox email address that is set up with your Launch Control room calendar.
-
Select the Add a Bluejeans meeting option from your Bluejeans add-in to generate a meeting URL.
-
Send the invitation by pressing Send.
-
Your meeting now appears on the Launch Control room calendar, where you can launch your Bluejeans meeting with one touch.
- Launch Control user guide
- Pre-requisite set up
- System requirements
- Network requirements
- Ports
- On-screen keyboard requirements
- Local user account
- User Access Control (UAC)
- Mobile app requirements
- Application shortcut requirements
- Room calendar requirements
- Microsoft 365 permissions
- Meeting room console requirements
- Touch display calibration
- Zoom configuration for meeting room consoles
- Getting started
- Installing Launch Control
- Newline Launch Control Installer
- Import settings (optional)
- Setting up Launch Control
- Room calendar set up using Exchange Server (on-premises)
- Room calendar set up using Google account
- Room calendar setup using Google API credentials
- Room details
- Room name
- Room location
- Display controller
- Settings PIN
- Setup complete
- Configuring Launch Control
- Settings
- Exporting settings
- Importing settings
- Display controller configuration
- Home screen appearance
- Managing shortcuts
- Add a new application shortcut using file path
- Add a new web shortcut
- Editing shortcuts
- Command-line arguments
- Network drive shortcuts
- Securing the device
- Configuring Automatic Cleanup triggers
- Kiosk Mode
- Shut down and restart
- Updating Launch Control
- Auto-updates
- Using Launch Control
- Using the mobile app
- Connecting to Launch Control
- Connecting via Bluetooth
- Using Launch Control Windows
- Launching shortcuts
- Microsoft 365 functions
- Connecting to Launch Control on Windows
- Using My Calendar
- Here's how:
- Connected
- Using OneDrive
- Your privacy
- Scheduling meetings
- Zoom meetings
- Outlook web access (OWA)
- Outlook desktop app
- GoToMeeting meetings
- Bluejeans meetings
Brand : Newline
Model : Launch Control
Category : Software