
WDF901WA - Dishwasher WESTINGHOUSE - Free user manual and instructions
Find the device manual for free WDF901WA WESTINGHOUSE in PDF.


| Product Type | Built-in Dishwasher |
| Brand | Westinghouse |
| Model | WDF901WA |
| Width | 60 cm |
| Height | 85 cm |
| Depth | 60 cm |
| Weight | 45 kg |
| Power Supply | 220-240 V, 50 Hz, 10 A |
| Power Consumption | 2100 W |
| Water Connection | Cold water only, 3/4 inch thread |
| Number of Programs | 6 (Eco, Normal, Intensive, Rapid, Glass, Pre-rinse) |
| Delay Start | Yes, up to 24 hours |
| Child Lock | Yes |
| Energy Efficiency Class | A++ |
| Noise Level | 44 dB |
| Capacity | 14 place settings |
| Filter Type | Self-cleaning micro filter |
| Salt and Rinse Aid Indicators | Yes |
| Interior Material | Stainless steel |
| Control Type | Electronic push buttons |
| Display | LED display with program indicators |
| Spare Parts Availability | Filters, spray arms, racks, detergent dispenser |
| Safety Features | Anti-flood system, child lock, overfill protection |
| Included Accessories | Salt funnel, rinse aid cap, installation kit |
Frequently Asked Questions - WDF901WA WESTINGHOUSE
User questions about WDF901WA WESTINGHOUSE
0 question about this device. Answer the ones you know or ask your own.
Ask a new question about this device
Download the instructions for your Dishwasher in PDF format for free! Find your manual WDF901WA - WESTINGHOUSE and take your electronic device back in hand. On this page are published all the documents necessary for the use of your device. WDF901WA by WESTINGHOUSE.
USER MANUAL WDF901WA WESTINGHOUSE
Electrolux. Thinking of you.
Westinghouse. We are part of the Electrolux family.
Share more of our thinking at www.electrolux.com
Contents
| Safety information 2 | Care and cleaning 12 |
| Product description 4 | What to do if... 14 |
| Control panel 5 | Technical data 15 |
| Use of the appliance 6 | Installation 15 |
| Use of rinse aid 6 | Water connection 16 |
| Loading cutlery and dishes 7 | Electrical connection 16 |
| Use of detergent 8 | Environment concerns 17 |
| Select and start a washing program 10 | Warranty 18 |
| Washing programs 11 |

Subject to change without notice

Safety information
For your safety and correct operation of the appliance, read this manual carefully before installation and use. Always keep these instructions with the appliance even if you move or sell it. Users must fully know the operation and safety features of the appliance.
Correct use
- Only use the appliance to clean household utensils that are suitable for dishwashers.
- Do not put solvents in the appliance. Risk of explosion.
- Put the knives and all items with sharp points in the cutlery basket with their points down. If not, put them in a horizontal position in the upper basket.
- Use only products specified for dishwashers (detergent, salt, rinse aid).
- If you open the door while the appliance is in operation, hot steam can escape. Risk of skin burns.
- Do not remove dishes from the dishwasher before the end of the washing program.
- When the washing program is completed, disconnect the mains plug from the mains socket and close the water tap.
- Only an authorised service engineer can repair this appliance. Use only original spare parts.
- Do not do repairs yourself to prevent injury and damage to the appliance. Always contact the Customer Care Centre.
General safety
- Dishwasher detergents are very dangerous. Be careful they do not touch eyes, mouth and skin. Keep the children away from the appliance when the door is open.
- Obey the safety instructions from the manufacturer of the dishwasher detergent to prevent burns to eyes, mouth and throat.
- Only put detergent in the dispenser before you start a washing program. Make sure that the detergent dispenser is empty at the end of the washing program.
- Do not drink the water from the dishwasher. Detergent residues can stay in your appliance.
- Always close the door when you do not use the appliance to prevent injury and not to stumble over the open door.
- Do not sit or stand on the open door.
Child safety
- Children or infirm persons must not use this appliance. They must get supervision to make sure that they do not play with the appliance.
- Keep all the packaging away from children. There is a risk of suffocation.
- Keep all detergents in a safe area. Do not let children touch the detergents.
- Keep the children and pets away from the appliance when the door is open.
Installation
- Make sure that the appliance is not damaged because of transport. Do not connect a damaged appliance. If necessary, contact the supplier.
- Remove all packaging before first use.
- A qualified and competent person must do the electrical installation.
- A qualified and competent person must do the plumbing installation.
- Do not change the specifications or modify this product. Risk of injury and damage to the appliance.
-
Do not use the appliance:
-
if the mains cable or water hoses are damaged,
- if the control panel, worktop or plinth area are damaged so that you can get access to the inner side of the appliance.
Contact your local Customer Care Centre. - Do not drill into the sides of the appliance to prevent damage to hydraulic and electrical components.
Warning! Carefully obey the instructions for electrical and water connections.
Product description
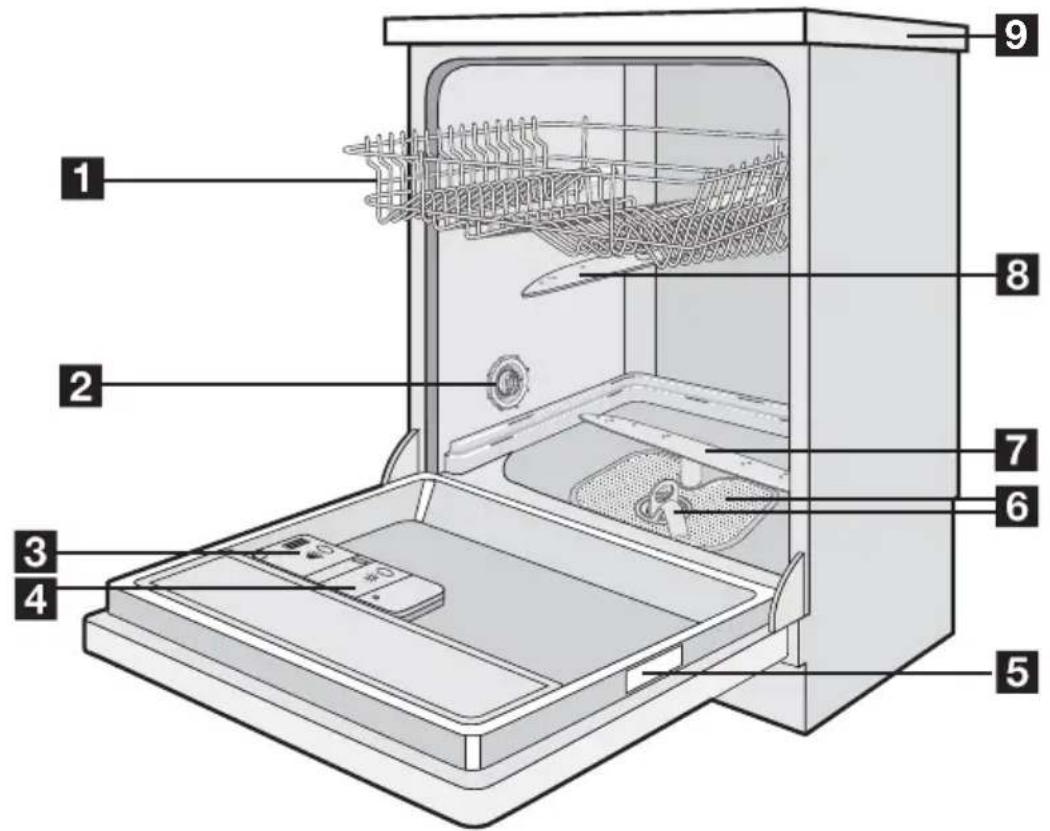
1 Upper basket
2 Air vent and water hardness dial (the dial is only functional for dishwashers with a water softener)
3 Detergent dispenser
4 Rinse aid dispenser
5 Rating plate
6 Filters
7 Lower spray arm
8 Upper spray arm
9 Worktop
Control panel
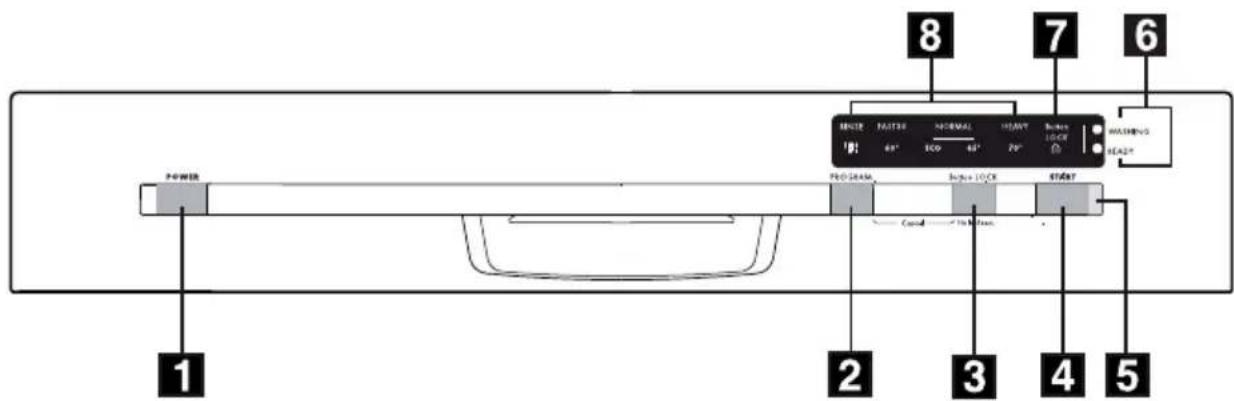
1 On/off button (POWER)
2 Program selection button (PROGRAM)
3 Button lock button (Button LOCK)
4 Start button (START)
5 Start indicator light
6 Indicator lights
7 Button lock indicator light
8 Program indicator lights
| Indicator lights | |
| WASHING | The indicator light comes on when the washing program operates and goes off when the washing program is completed. |
| READY The indicator light comes on when the washing program is completed. It also has the auxiliary functions of alarm if the appliance has a malfunction. | |
| Button LOCK | The indicator light comes on when the button lock function is active. |
Button lock
The button lock function locks all buttons on the control panel while the washing program is in operation.
Follow these steps to set the Button lock function:
- Switch on the appliance.
- Set a washing program.
- Press the Start button to start the washing program.
- Press button lock button for approximately 5 seconds, or until the button lock indicator light flashes.
- Button lock indicator light flashes for approximately 15 seconds.
- When the button lock function is active the indicator light is on with a static light. If you press a button while button lock function is on, an audible signal indicates that buttons are locked.
At the end of a washing program the button lock function is deactivated by opening and closing the door or switching off the appliance.
Important! It is not possible to deactivate the button lock function while a washing program is in progress. To do this you must cancel the set program. Refer to 'Select and start a washing program'.
Setting mode
The appliance is in setting mode when all the program indicator lights are on.
The appliance must be in setting mode to set a washing program.
If a program light is on, cancel the program to go back to the setting mode. Refer to 'Select and start a washing program'.
Use of the appliance
Refer to specified instructions for each step of the procedure.
- Fill the rinse aid dispenser with rinse aid.
-
Load cutlery and dishes into the dishwasher.
-
Set the correct washing program for the type of load and soil.
- Fill the detergent dispenser with the correct quantity of detergent.
- Start the washing program.
Use of rinse aid
Caution! Only use rinse aid specified for dishwashers.
Do not fill the rinse aid dispenser with other products (e.g. dishwasher cleaning agent, liquid detergent). This can cause damage to the appliance.
i Rinse aid makes it possible to dry the dishes without streaks and stains. Rinse aid is automatically added during the last rinsing phase.
Follow these steps to fill the rinse aid dispenser:
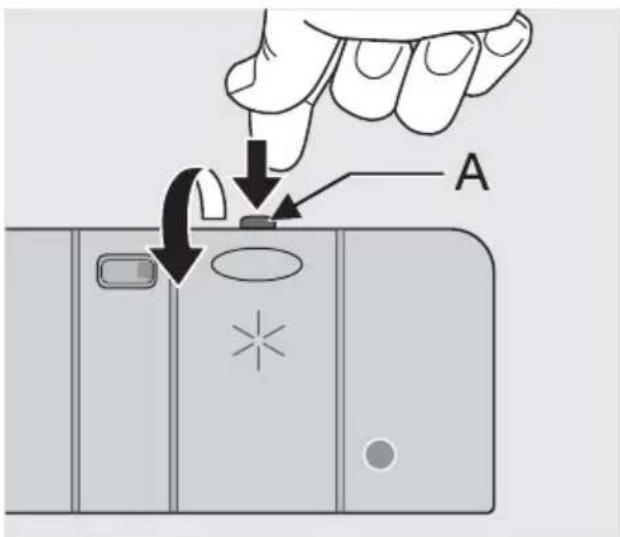
- Press the release button (A) to open the rinse aid dispenser.
- Fill the rinse aid dispenser with rinse aid. The mark 'max.' shows the maximum level.
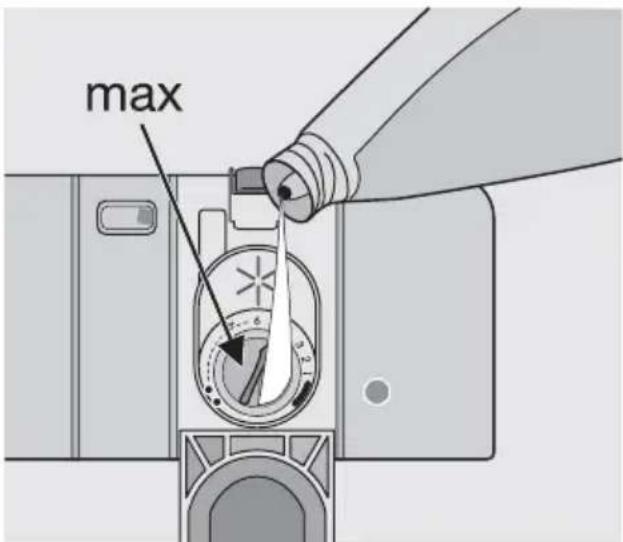
- Remove the spilled rinse aid with an absorbent cloth to prevent too much foam during the subsequent washing program.
- Close the rinse aid dispenser.
Adjusting the rinse aid dosage
Fill the rinse aid container when the indicator (B) becomes clear.
The rinse aid is set at the factory at position 4.
You can set the rinse aid dosage between position 1 (lowest dosage) and position 6 (highest dosage).
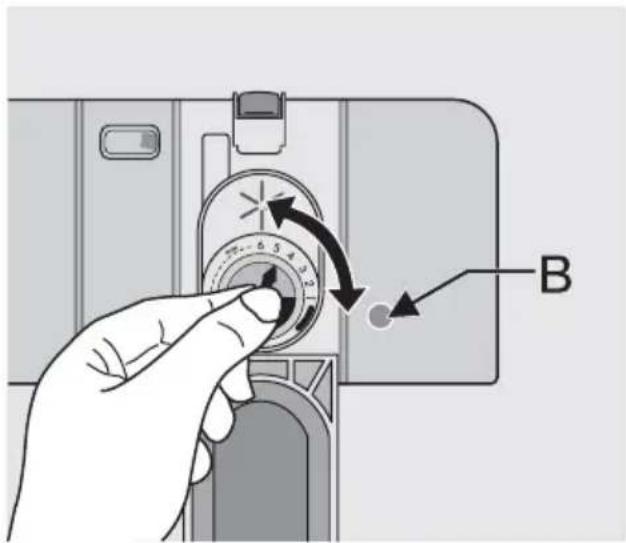
Turn the rinse aid dial to increase or decrease the dosage.
- Increase the dosage if there are water droplets or limescale on the dishes.
– Decrease the dosage if there are streaks, whitish stains or bluish layers on the dishes.
i Wash hands to remove any residue of rinse aid from skin.
Loading cutlery and dishes
Helpful hints and tips
Caution! Only use the appliance for household utensils that are suitable for dishwashers.
Do not use the appliance to clean objects that can absorb water (sponges, household cloths, etc.).
- Before you load cutlery and dishes, do these steps:
- Remove all food remainings and debris.
- Make burnt, remaining food in pans soft.
- While you load cutlery and dishes, do these steps:
- Load hollow items (e.g. cups, glasses and pans) with the opening down.
- Make sure that water does not collect in the container or in a deep base.
- Make sure that cutlery and dishes do not lie inside one another.
- Make sure that cutlery and dishes do not cover other cutlery and dishes.
- Make sure that glasses do not touch other glasses.
- Put small objects in the cutlery basket.
- Plastic items and pans with non-stick coatings can retain water droplets. Plastic items do not dry as well as porcelain and steel items.
- Put light items in the upper basket. Make sure that the items do not move.
Caution! Make sure that the spray arms can move freely before you start a washing program.
Warning! Always close the door after you load or unload the appliance. An open door can be dangerous.
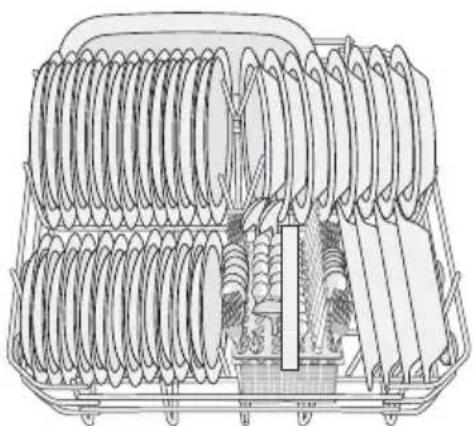
Lower basket
Put saucepans, lids, plates, salad bowls and cutlery in the lower basket. Arrange service dishes and large lids around the edge of the basket.
natural_image
Technical line drawing of a mechanical component with coiled spring and housing (no text or symbols)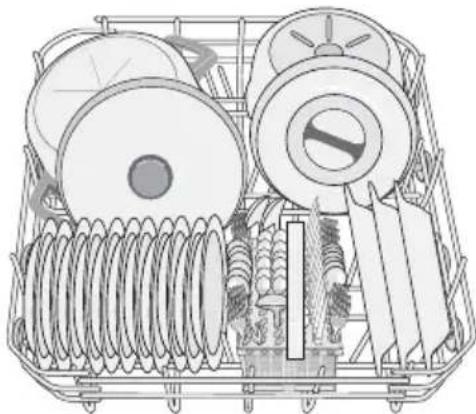
natural_image
Technical line drawing of a mechanical device with coiled springs and rollers (no text or symbols)Cutlery basket
Warning! Do not put long-bladed knives in a vertical position. Arrange long and sharp cutlery horizontally in the upper basket. Be careful with sharp items.
Use the cutlery grid for best washing results. If the dimensions of the cutlery prevent the use of the cutlery grid, you can remove it. Put forks and spoons with the handles down. Put knives with the handles up.
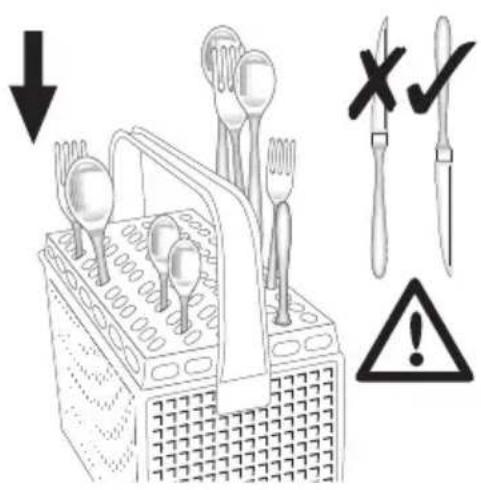
If the points of the knives or other thin items come out from the bottom of the basket, they can prevent the rotation of the lower spray arm. Put knives and other thin items with the handles down.
Mix spoons with other cutlery to prevent them nesting together.
Upper basket
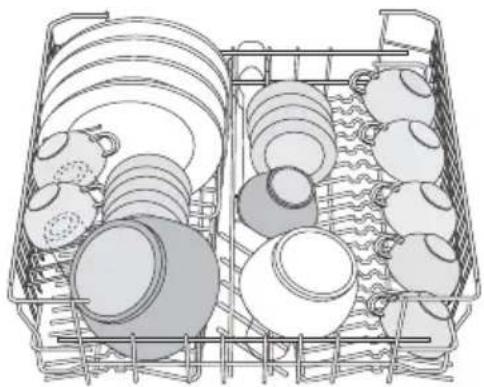
The upper basket is for plates (maximum 24 cm in diameter), saucers, salad bowls, cups, glasses, pots and lids. Arrange the items to let water touch all surfaces.
natural_image
Line drawing of a multi-tiered kitchen appliance basket with various kitchenware (no text or symbols)Put plates only in the rear part of the upper basket. Tilt them forward.
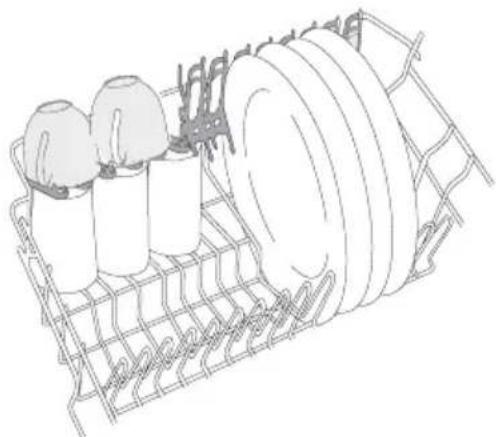
Put glasses with long stems in the cup racks with the stems up. For longer items, fold the cup racks up.
natural_image
Line drawing of a washing machine rack with three cylindrical containers and a coiled roller (no text or symbols)Adjustment of the height of the upper basket
If you put large plates in the lower basket, first move the upper basket to the upper position.

Caution! Adjust the height before you load the upper basket.
Maximum height of the dishes
| upper bas- | ket | lower basket |
| Upper position 20 cm 31 cm | ||
| Lower position 24 cm 27 cm |
Follow these steps to move the upper basket to the upper position:
- Move the front runner stops (A) out.
- Pull the basket out.
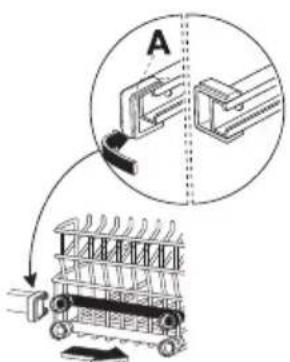
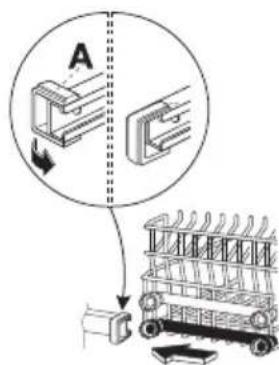
- Put the basket in the upper position.
- Put back the front runner stops (A) in their initial position.
Caution! If the basket is in the upper position, do not put cups on the cup racks.
Use of detergent
Only use detergents (powder, liquid or tablet) that are suitable for dishwashers. Follow the data on the packaging:
- dosage recommended by the manufacturer,
- storage recommendations.

Do not use more than the correct quantity of detergent to decrease pollution.
Follow these steps to fill the detergent dispenser:
- Open the lid of the detergent dispenser.
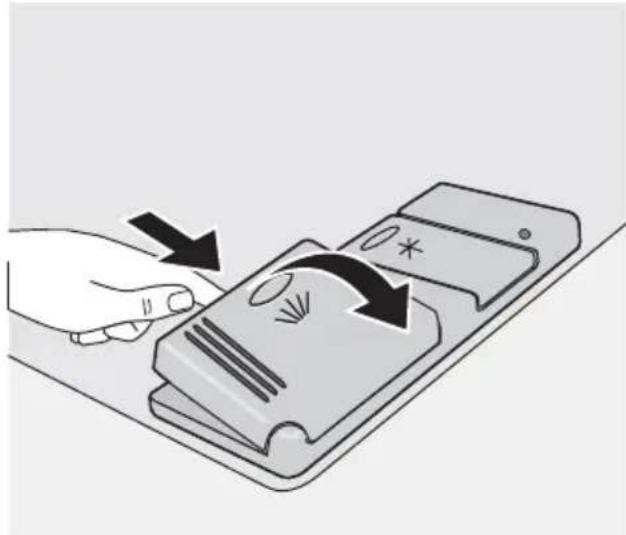
natural_image
Illustration of a hand pressing down on a smartphone screen with arrows indicating motion (no text or symbols)- Fill the detergent dispenser (A) with detergent. The marking shows the dosage: 20 = approximately 20 g of detergent 30 = approximately 30 g of detergent.
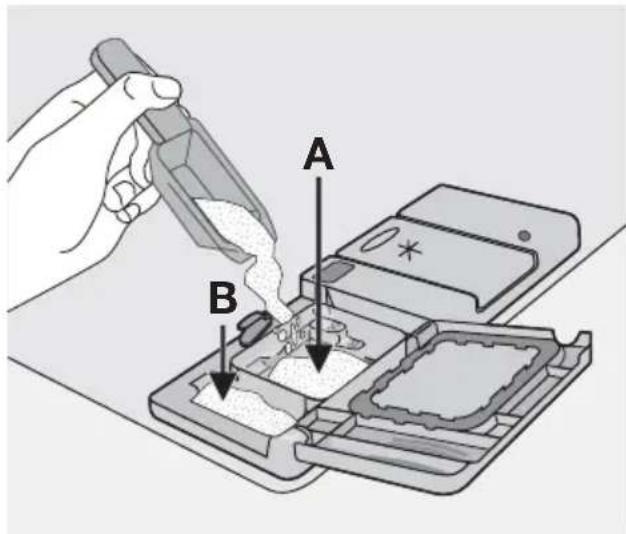
-
If you use a washing program with pre-wash, put more detergent in the prewash detergent compartment (B).
-
If you use detergent tablets, put the detergent tablet in the detergent dispenser (A).
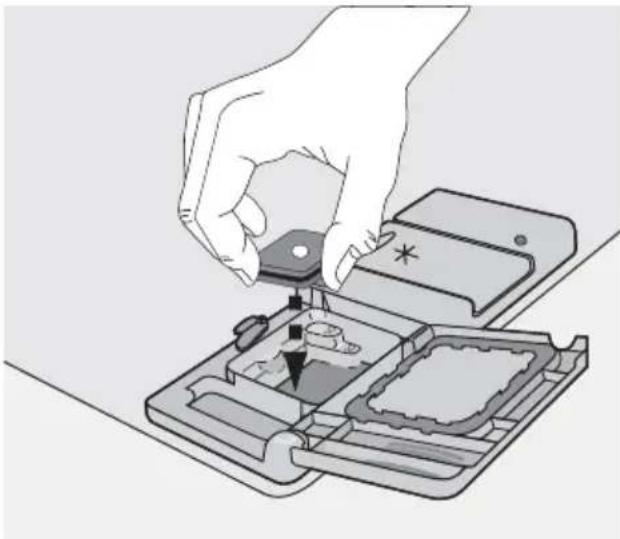
natural_image
Illustration of a hand placing a component into a device casing (no text or symbols visible)- Close the lid of the detergent dispenser. Press the lid until it locks into position.
i Different brands of detergent dissolve in different times. Some detergent tablets do not have the best cleaning results during short washing programs. Use long washing programs when you use detergent tablets to fully remove the detergent.
Use of combi detergent tablets
These products are detergents with a combined cleaning and rinsing functions. They can contain also other cleaning agents. Refer to the instructions from the manufacturer for the use of these products. With tablets that contain rinse aid:
- set the lowest position for the rinse aid dosage,
- do not put rinse aid in the rinse aid dispenser. In this condition rinse aid indicator light is always on when you switch on the appliance.
Do these steps if the drying results are not satisfactory:
-
Fill the rinse aid dispenser with rinse aid.
-
Set the rinse aid dosage to position 2.
If you go back to use normal detergents again, fill the rinse aid dispenser and adjust the rinse aid dosage.
Select and start a washing program
- Close the appliance door.
- Press the on/off button.
- Make sure that the appliance is in setting mode.
- To select a washing program, press the program selection button until the indicator light of the program you want to set comes on. All other program indicator lights go off. Refer to the 'Washing programs' chart for program details.
-
The start indicator light flashes.
-
Press the start button. The washing program starts automatically.
- The WASHING indicator on.
- The start indicator light comes on with a static light.
The washing program only starts after you press the start button. Until then it is possible to modify the settings.
When the washing program operates, you cannot change the program. Cancel the washing program. Refer to 'Cancelling a washing program'.
Warning! Only interrupt or cancel a washing program if necessary. Attention! Open the door carefully. Hot steam and water can escape.
Interrupting a washing program
Open the door.
• The program stops.
Close the door.
- The program continues from the point of interruption.
Cancelling a washing program
-
Press and hold at the same time program selection button and button lock button until all the program indicator lights come on.
-
Release the two buttons, the washing program has been cancelled.
At this point, you can follow these steps:
- Switch off the appliance.
- set a new washing program.
- Fill the detergent dispenser with detergent before you set a new washing program.
End of the washing program
The washing program is complete when:
- The READY indicator light comes on.
-
The WASHING indicator light goes off.
-
Switch off the appliance.
-
Open the door.
- For better drying results, keep the door ajar for some minutes before you remove the dishes.
Let the dishes cool down before you remove them from the appliance. Hot dishes are easily damaged.
Removing the load
- First remove items from the lower basket, then from the upper basket.
- There can be water on the sides and door of the appliance. Stainless steel becomes cool more quickly than the dishes.
Washing programs
| Program | Degree of soil | Type of load | Program description |
| RINSE | Any partial load (to be completed later in the day). | 1 cold rinse (to prevent food scraps to bond).Detergent is not necessary with this program. | |
| FAST30 60°1) | Normal or light soil Crockery and cut- lery | Main wash up to 60°CFinal rinse | |
| NORMAL ECO 2) | Normal soil Crockery and cut- lery | PrewashMain wash up to 50°C1 intermediate rinseFinal rinseDrying | |
| NORMAL 65° Normal soil | Crockery and cut- lery | PrewashMain wash up to 65°C1 intermediate rinseFinal rinseDrying | |
| HEAVY 70° Heavy soil | Crockery, cutlery, | pots and pans | PrewashMain wash up to 70°C2 intermediate rinsesFinal rinseDrying |
1) This is the perfect daily program to clean a partial load. Ideal for a family of 4 persons who only want to load breakfast and dinner crockery and cutlery.
2) Test program for test institutes. Please refer to separate leaflet supplied, for test data.
Consumption values
| Program | Duration (in minutes) | Energy (in kWh) | Water (in litres) |
| RINSE | 12 0,1 4 | ||
| FAST30 60° 30 0,9 9 | |||
| NORMAL ECO | 90 - 95 | 0,8 - 0,88 | 11 - 12 |
| NORMAL 65° | 95 - 105 | 1,4 - 1,6 | 19 - 21 |
| HEAVY 70° | 110 - 120 | 1,8 - 2,0 | 23 - 25 |
i The pressure and temperature of the water, the variations of power supply
and the quantity of dishes can change these values.
Care and cleaning
Warning! Switch the appliance off before you clean it.
Cleaning the filters
Caution! Do not use the appliance without the filters. Make sure that the installation of the filters is correct. Incorrect installation will cause unsatisfactory washing results and damage to the appliance.
If necessary, clean the filters. Dirty filters decrease the washing results.
The dishwasher has three filters:
- coarse filter (A)
- microfilter (B)
- flat filter (C)
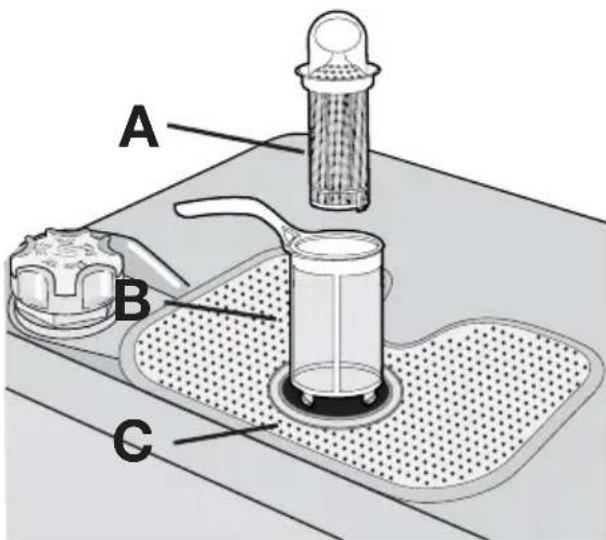
Follow these steps to clean the filters:
- Open the door.
- Remove the lower basket.
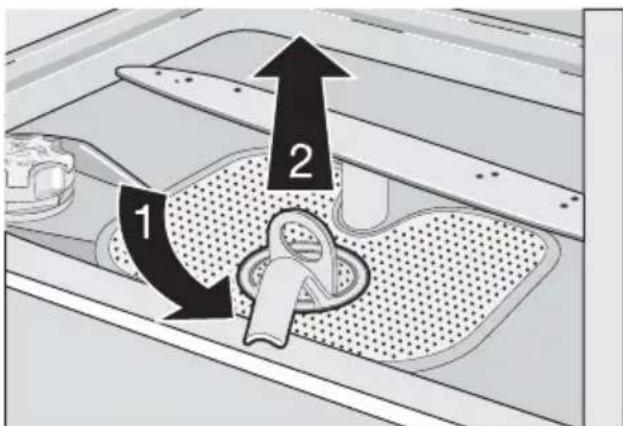
- To unlock the filter system, turn the handle on the microfilter (B) approximately 1/4 anticlockwise.
-
Remove the filter system.
-
Hold the coarse filter (A) by the handle with the hole.
- Remove the coarse filter from the microfilter.
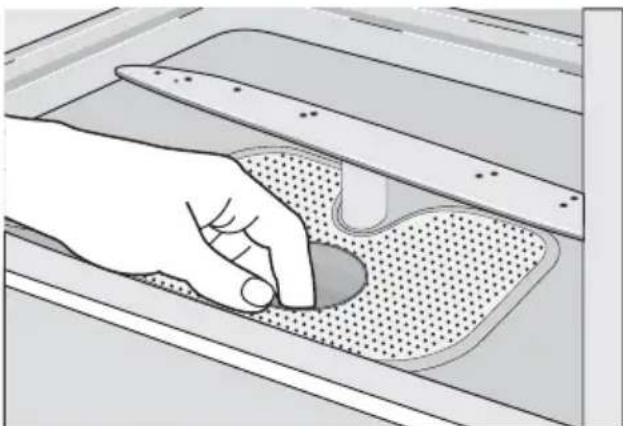
- Remove the flat filter (C) from the bottom of the appliance.
natural_image
Illustration of a hand pressing down on a perforated metal tray (no text or symbols)- Clean the filters below running water.
- Put the flat filter (C) in the bottom of the appliance.
- Put the coarse filter (A) in the microfilter (B) and push the filters together.
- Put the filter system in position.
- To lock the filter system, turn the handle on the microfilter (B) clockwise until it locks in position.
- Install the lower basket.
- Close the door.
Do not remove the spray arms.
If the holes in the spray arms become clogged, remove remaining parts of soil with a cocktail stick.
External cleaning
Clean the external surfaces of the appliance and control panel with a damp soft cloth. Only use neutral detergents. Do not use abrasive products, scouring pads or solvents (acetone, trichloroethylene etc.).
Internal cleaning
Do an inspection at intervals of 3 months. Set a washing program for heavily soiled dishes. Use detergent, but do not put dishes in the appliance.
Long periods of non-operation
Do these steps when you do not use the appliance for a long period:
- Disconnect the mains plug from the mains socket.
- Close the water tap.
- Keep the door open to prevent unpleasant smells.
- Keep the inner side of the appliance clean.
Frost precautions

Caution! Do not install the appliance where the temperature is below 0 °C. The manufacturer is not responsible for damage because of frost.
If not possible, empty the appliance and close the door. Disconnect the water inlet hose and remove water from the water inlet hose.
Moving the machine
Do these steps to move the appliance:
- Disconnect the mains plug from the mains socket.
- Close the water tap.
- Remove the appliance and the hoses.
- Do not tilt the appliance during transport.
What to do if...
The appliance does not start or stops during operation.
If there is a fault, first try to find a solution to the problem yourself. Refer to 'What to do
if...'. If you cannot find a solution to the problem yourself, contact your dealer or the Customer Care Centre.
| Fault code and malfunction Possible cause and solution | |
| The running program light continues to flashThe READY indicator light flashes onceThe appliance does not fill with water | The water tap is blocked or restricted with limescale.Clean the water tap.The water tap is closed.Open the water tap.The filter in the water inlet hose is blocked.Clean the filter.The installation of the water inlet hose is not correct. The hose can be kinked or squashed.Make sure that the installation is correct. |
| The running program light continues to flashThe READY indicator light flashes twiceThe appliance does not drain | There is a blockage in the sink spigot.Clean the sink spigot.The installation of the water drain hose is not correct. The hose can be kinked or squashed.Make sure that the installation is correct. |
| The program does not start • The appliance door is not closed.Close the door.Mains plug is not connected.Plug-in appliance to the mains.The fuse has blown out in the household fuse box.Replace the fuse.Delay start is set.Cancel the delay start to start the program immediately. | |
| After the check, switch on the appliance. The program continues from the point of interruption. If the malfunction shows again, contact your Customer Care Centre.These data are necessary to help you quickly and correctly:Model (Mod.) | Product number (PNC)Serial number (S.N.)For these data, refer to the rating plate.Write the necessary data here:Model description : ......Product number : ......Serial number : ...... |
The cleaning results are not satisfactory
| The dishes are not clean | · The selected washing program is not applicable for the type of load and soil.· The baskets are loaded incorrectly so that water cannot reach all surfaces.· Spray arms do not turn freely because of incorrect arrangement of the load.· The filters are dirty or not correctly installed.· The quantity of detergent is too little or missing. |
| The dishes are wet and dull · No rinse aid has been used.· The rinse aid dispenser is empty. | |
| There are streaks, milky spots or a bluish coating on glasses and dishes | · Decrease the rinse aid dosage. |
| Dry water drop signs on glasses and dishes | · Increase rinse aid dosage.· The detergent can be the cause. |
Technical data
| Dimensions Width cm 60 | ||
| Height cm 85 | ||
| Depth cm 63,5 | ||
| Electrical connection - Voltage - Overall power - Fuse | Information on the electrical connection is given on the rating plate on the inner edge of the dishwasher door. | |
| Water supply pressure Minimum 50 kPa (7 psi) | ||
| Maximum 800 kPa (116 psi) | ||
| Capacity Place settings 12 | ||
Installation
Fitting under a counter

Warning! Make sure that mains plug is disconnected from the mains socket during installation.
Put the appliance adjacent to a water tap and a water drain.
The plinth of a freestanding appliance is not adjustable.
Do not remove the appliance's worktop if you want to use it as a freestanding unit.
It is not necessary to remove the worktop when installing under a standard kitchen bench top.
Only remove the appliance worktop to install it under a close fitting sink unit or kitchen worktop (820mm).
Make sure that the dimensions of the recess agree with the given dimensions.
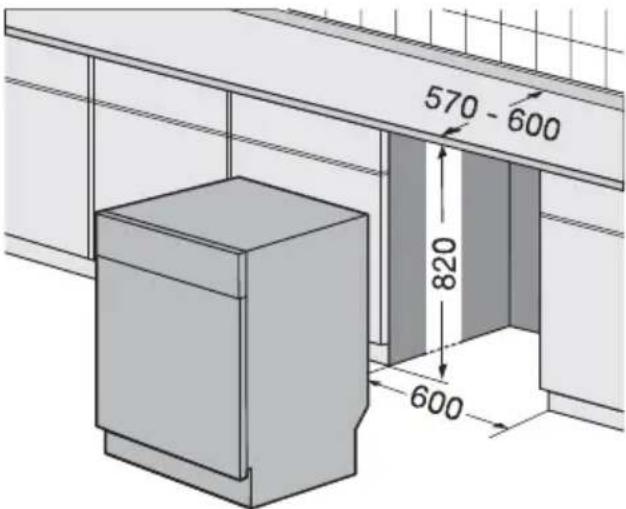
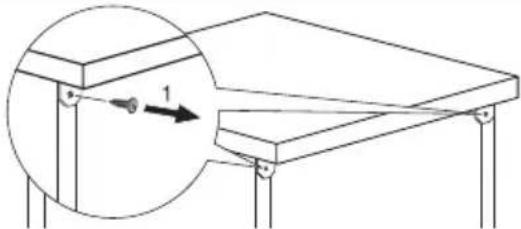
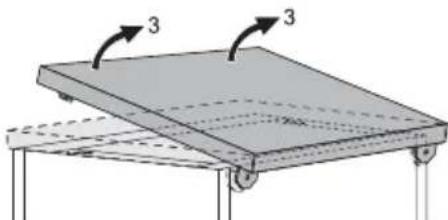
Follow steps listed below to remove the appliance worktop
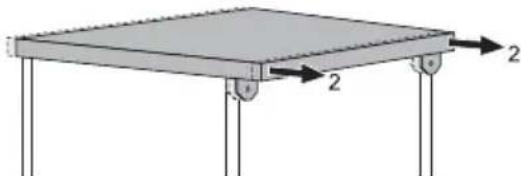
- Remove the rear screws (1).
natural_image
Diagram of a mechanical setup with a bracket and support structure, showing a numbered component (no text or symbols present)- Pull the worktop behind the appliance (2).
natural_image
Simple diagram of a rectangular structure with two vertical supports and a horizontal beam, no text or symbols present.- Lift the worktop and move it from the front slots (3).
natural_image
Diagram of a flatbed platform with three directional arrows indicating orientation (no text or symbols)-
Level of the appliance using the adjustable feet.
-
Install the appliance under the kitchen worktop. Ensure that water hoses are not kinked or squashed.
The appliance must be easily accessible to the technician if a repair is necessary.
Adjusting the level of the appliance
Make sure that the appliance is level to close and seal the door correctly. If the level of the appliance is correct, the door does not catch on the sides of the cabinet. If the door does not close correctly, loosen or tighten the adjustable feet until the appliance is level.
Water connection
Water inlet hose
Connect the appliance to a cold water supply.
Connect the inlet hose to a water tap with an external BSP thread spout of 3/4".
Inlet water supply
- Cold water pressure: 800 kPa max - 50 kPa min.
• Water flow rate 10 L / minute min. - If cold water pressure is in excess of 800 kPa, a pressure reducing valve should be used. Check for leaks.

Caution! Always use new hoses when you connect the appliance to the water mains. Old hoses must not be used. The water inlet hose must be examined at an interval of twelve months for deterioration and replaced if necessary.
The water pressure must be in the limits (refer to 'Technical data'). Make sure that the local water authority gives you the average mains pressure in your area.
Make sure that there are no kinks in the water inlet hose and that the water inlet hose is not squashed or entangled.
Fit the hose nut correctly to prevent water leaks.

Caution! Do not connect the appliance to new pipes or pipes that have been not used for a long time. Let the water run for some minutes, then connect the inlet hose.
Water drain hose
The highest point of the drain hose must be no more than 60 cm from the floor and must have a continuous fall to the plumbing connection.
The drain hose can be lengthened using additional lengths and connectors. These must be purchased from Electrolux Spare Parts. The extension length must not exceed 2 metres.
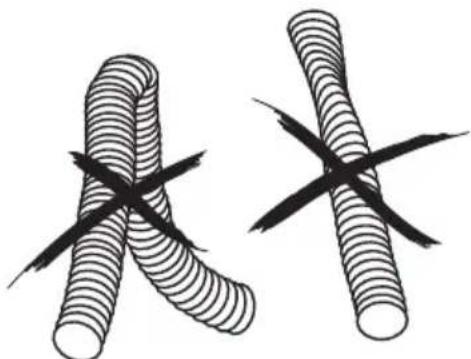
The drain hose must be free of kinks and obstructions.
Electrical connection

Warning! Safety standards require the appliance to be earthed.
Remove the sink plug when the appliance drains the water to prevent that the water goes back into the appliance. If you connect the water drain hose to a trap spigot under the sink, remove the plastic membrane. If you do not remove the membrane, remaining food can cause a blockage in the drain hose spigot.
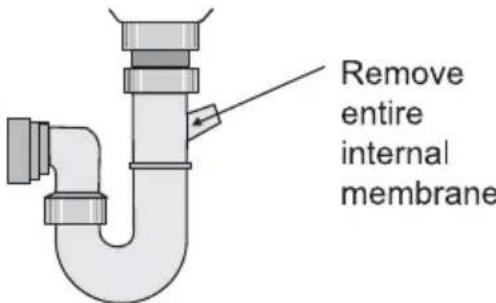
The appliance has a security feature to prevent dirty water going back into the appliance. If, the spigot of the sink has a 'non-return valve', this valve can cause the appliance to drain incorrectly. Remove the non-return valve.
Caution! Make sure that the water couplings are tight to prevent water leakage.
Ensure that hoses are not crushed or kinked under or behind the appliance.
natural_image
Two identical black-and-white line drawings of coiled, twisted tubs with intersecting black lines (no text or symbols)Once connected the inlet hose to the water tap, turn the tap on and check that there are no leaks.
Prior to using the appliance for the first time, ensure that the rated voltage and
type of supply on the rating plate match that of the supply where the appliance is to be installed.
The fuse rating is also to be found on the rating plate.
Always plug the mains plug onto a correctly installed approved socket.
Do not use multi-ways plugs, connectors and extension cables. This can constitute a fire hazard through overheating. If necessary, have the domestic wiring system socket replaced. If the mains cable has to be replaced, contact your local Customer Care centre.
The mains plug must be accessible after the appliance has been installed.
Never unplug the appliance by pulling on the cable. Always pull the plug.
Test the appliance. Run a quick washing programme and ensure that the appliance fills with water, washes and drains with no leaks.
The manufacturer accepts no liability for failure to observe the above safety precautions.
Environment concerns
The packaging materials are environmentally friendly and can be recycled. The plastic components are identified by markings, e.g. >PE<, >PS<, etc. Discard the packaging materials in the applicable container at the community waste disposal facilities.

Warning! To discard the appliance, follow the procedure:
- Pull the mains plug out of the socket.
- Cut off the mains cable and mains plug and discard them.
- Discard the door catch. This prevents children closing themselves inside the appliance and endangering their lives.
Old appliance
Make sure that the appliance goes to the applicable collection point for recycle.
Make sure that this appliance is discarded correctly. Inappropriate waste discard of the appliance causes negative consequences for the environment and human health.
For more information about the recycle of this appliance, contact your local city office, your household waste disposal service or the shop where you purchased the appliance.
Electrolux
FOR SALES IN AUSTRALIA AND NEW ZEA- LAND
APPLIANCE: AEG-ELECTROLUX
This document sets out the terms and conditions of product warranties for Electrolux branded appliances. It is an important document. Please keep it with your proof of purchase documents in a safe place for future reference should you require service for your Electrolux appliance. General Terms and Conditions
- In this warranty
– Electrolux' means Electrolux Home Products Pty Ltd ABN 51 004 762 341 in respect of Appliances purchased in Australia and Electrolux (NZ) Limited in respect of Appliances purchased in New Zealand;
- 'Appliance' means any Electrolux product purchased by you accompanied by this document;
- 'Warranty Period' means i) where you use the Appliance for personal, domestic or household purposes in Australia the period of 24 months and in New Zealand the period of 24 months; ii) where you use the Appliance for commercial purposes, in Australia the period of 3 months and in New Zealand the period of 3 months, (if the period stated is 0 months you are not covered by this product warranty) following the date of original purchase of the Appliance;
- 'you' means the purchaser of the Appliance not having purchased the appliance for re-sale, and 'your' has a corresponding meaning.
-
This warranty only applies to Appliances purchased and used in Australia or New Zealand and is in addition to (and does not exclude, restrict, or modify in any way) any non-excludable statutory warranties in Australia or New Zealand.
-
Electrolux warrants that, when dispatched from an Electrolux warehouse, the Appliance is free from defects in materi-
-
During the Warranty Period Electrolux or its Authorised Service Centre will, at no extra charge if your appliance is readily accessible without special equipment, and subject to these terms and conditions, repair or replace any parts which it considers to be defective. You agree that any replaced Appliances or parts become the property of Electrolux. This warranty does not apply to light globes, batteries, filters or similar perishable parts.
-
Parts and Appliances not supplied by Electrolux are not covered by this warranty.
-
Where you are within an Electrolux service area, this warranty covers the cost of transport of the Appliance to and from Authorised Service Centres of Electrolux and travelling costs for representatives of the Authorised Service Centre to and from your home or business. If you are outside an Electrolux service area, you will bear these costs. For information about whether you are within an Electrolux service area, please phone 13 13 49 in Australia, or 0800 10 66 10 in New Zealand.
-
Proof of purchase is required before you can make a claim under this warranty.
-
You may not make a claim under this warranty unless the defect claimed is due to faulty or defective parts or workmanship. Electrolux is not liable in the following situations (which are not exhaustive):
- The Appliance is damaged by i) accident ii) misuse or abuse, including failure to properly maintain or service iii) normal wear and tear iv) power surges, electrical storm damage or incorrect power supply v) incomplete or improper installation vi) incorrect, improper or inappropriate operation vii) insect or vermin infestation.
– The Appliance is modified without authority from Electrolux in writing.
- The Appliance's serial number or warranty seal has been removed or defaced. - The Appliance was serviced or repaired by anyone other than Electrolux or its Authorised Service Centres.
- This warranty, the contract to which it relates and the relationship between you and Electrolux are governed by the law applicable in the Australian State where the Appliance was purchased or the law applicable in New Zealand if the Appliance was purchased in New Zealand. Where the Appliance was purchased in New Zealand for business purposes the Consumer Guarantee Act does not apply.
Limitation of Liability
- To the extent permitted by law:
- Electrolux excludes all warranties other than as contained in this document; - Electrolux shall not be liable for any loss or damage whether direct or indirect or consequential arising from your purchase, use or non-use of the Appliance.
- Provisions of the Trade Practices Act and State consumer legislation in Australia, and the Consumer Guarantees Act, the Sale of Goods Act and the Fair Trading Act in New Zealand, imply warranties or conditions, or impose obligations, upon Electrolux which cannot be excluded, restricted or modified. To the
extent permitted by law, the liability of Electrolux (if any) arising out of or in relation to the Appliance or any services supplied by Electrolux shall be limited (where it is fair and reasonable to do so),:
- in the case of Appliances, at its option, to the replacement or repair of the Appliances or the supply of equivalent products or the payment of the cost of replacing the Appliances or having the Appliances repaired or of acquiring equivalent Appliances. Upon being replaced, parts and Appliances become the property of Electrolux; or - in the case of services, at its option, to the supply of the services again or the payment of the cost of having the services re-supplied; and in the case of Appliances or services supplied in New Zealand, loss or damage whether direct or indirect or consequential that is reasonably foreseeable.
Privacy
You acknowledge that in the event that you make a warranty claim it will be necessary for Electrolux and its Authorised Service Centres to exchange information in relation to you to enable Electrolux to meet its obligations under this warranty.
Important Notice
Before Calling a Service Technician please check carefully the operating instructions, service booklet and the warranty terms and conditions.
FOR SERVICE
OR TO FIND THE ADDRESS OF YOUR NEAREST STATE SERVICE CENTRE IN AUSTRALIA
Please call 13 13 4 9
For the cost of a local call (Australia only)
SERVICE AUSTRALIA
Electrolux
ELECTROLUX HOME PROD- UCTS
www.electrolux.com.au
FOR SPARE PARTS
OR TO FIND THE ADDRESS OF YOUR NEAREST STATE SPARE PARTS CENTRE IN AUSTRALIA
Please call 13 13 50
For the cost of a local call (Australia only)
FOR SERVICE
OR TO FIND THE ADDRESS OF YOUR NEAREST AUTHORISED SERVICE CENTRE IN NEW ZEALAND
Free call 0800 10 66 10
(New Zealand only)
SERVICE NEW ZEALAND
Electrolux
ELECTROLUX HOME PROD- UCTS
www.electrolux.co.nz
FOR SPARE PARTS
OR TO FIND THE ADDRESS OF YOUR NEAREST SPARE PARTS CENTRE IN NEW ZEA-LAND
Free call 0800 10 66 20
(New Zealand only)
www.electrolux.com
www.westinghouse.com.au
- Electrolux. Thinking of you.
- Safety information
- Correct use
- General safety
- Child safety
- Installation
- Product description
- Control panel
- Button lock
- Follow these steps to set the Button lock function:
- Setting mode
- Use of the appliance
- Use of rinse aid
- Adjusting the rinse aid dosage
- Loading cutlery and dishes
- Helpful hints and tips
- Lower basket
- Cutlery basket
- Upper basket
- Adjustment of the height of the upper basket
- Use of detergent
- Use of combi detergent tablets
- Do these steps if the drying results are not satisfactory:
- Select and start a washing program
- Interrupting a washing program
- Cancelling a washing program
- End of the washing program
- Removing the load
- Care and cleaning
- Cleaning the filters
- External cleaning
- Internal cleaning
- Long periods of non-operation
- Frost precautions
- Moving the machine
- What to do if...
- Technical data
- Fitting under a counter
- Follow steps listed below to remove the appliance worktop
- Adjusting the level of the appliance
- Water connection
- Water inlet hose
- Inlet water supply
- Water drain hose
- Electrical connection
- Environment concerns
- Old appliance
- Electrolux
- Limitation of Liability
- Privacy
- Important Notice
- FOR SERVICE
- Please call 13 13 4 9
- SERVICE AUSTRALIA
- ELECTROLUX HOME PROD- UCTS
- FOR SPARE PARTS
- Please call 13 13 50
- Free call 0800 10 66 10
- SERVICE NEW ZEALAND
- Free call 0800 10 66 20
Brand : WESTINGHOUSE
Model : WDF901WA
Category : Dishwasher