
FV318 - Hardware firewall NETGEAR - Free user manual and instructions
Find the device manual for free FV318 NETGEAR in PDF.


| Product Type | Hardware Firewall / VPN Router |
| Model Number | FV318 |
| Brand | Netgear |
| Form Factor | 1U Rackmount |
| Dimensions (W x D x H) | 17.3 x 10.2 x 1.7 inches (440 x 260 x 44 mm) |
| Weight | 5.5 lbs (2.5 kg) |
| Power Supply | 12V DC, 1.5A adapter included |
| Power Consumption | 18W maximum |
| LAN Ports | 4 x 10/100 Mbps RJ-45 |
| WAN Ports | 2 x 10/100 Mbps RJ-45 |
| Console Port | 1 x RS-232 DB-9 |
| Firewall Features | SPI, DoS protection, content filtering, access control |
| VPN Support | IPSec, PPTP, L2TP; up to 100 tunnels |
| Routing Protocols | Static, RIPv1/v2 |
| NAT Support | Yes, with PAT and port forwarding |
| Management | Web GUI, Telnet, SNMP, console |
| Operating Temperature | 32°F to 122°F (0°C to 50°C) |
| Humidity | 10% to 90% non-condensing |
| Certifications | FCC, CE, UL |
| Maintenance | Keep ventilated, clean with dry cloth; avoid liquids |
| Safety Precautions | Use only supplied power adapter; unplug before cleaning |
| Spare Parts | Power adapter, mounting brackets, console cable |
| Repairability | No user-serviceable parts; contact support |
Frequently Asked Questions - FV318 NETGEAR
User questions about FV318 NETGEAR
0 question about this device. Answer the ones you know or ask your own.
Ask a new question about this device
Download the instructions for your Hardware firewall in PDF format for free! Find your manual FV318 - NETGEAR and take your electronic device back in hand. On this page are published all the documents necessary for the use of your device. FV318 by NETGEAR.
USER MANUAL FV318 NETGEAR
Reference Guide for the Model FR314, FR318 and FV318 Cable/DSL Firewall and VPN Routers
NETGEAR
NETGEAR, Inc.
4500 Great America Parkway
Santa Clara, CA 95054 USA
Phone 1-888-NETGEAR
SM-FR314NA-3
January 2002
© 2001 by NETGEAR, Inc. All rights reserved.
Trademarks
NETGEAR is a trademark of NETGEAR, Inc.
Microsoft, Windows, and Windows NT are registered trademarks of Microsoft Corporation.
Other brand and product names are registered trademarks or trademarks of their respective holders.
Statement of Conditions
In the interest of improving internal design, operational function, and/or reliability, NETGEAR reserves the right to make changes to the products described in this document without notice.
NETGEAR does not assume any liability that may occur due to the use or application of the product(s) or circuit layout(s) described herein.
Federal Communications Commission (FCC) Compliance Notice: Radio Frequency Notice
This equipment has been tested and found to comply with the limits for a Class B digital device, pursuant to part 15 of the FCC Rules. These limits are designed to provide reasonable protection against harmful interference in a residential installation. This equipment generates, uses, and can radiate radio frequency energy and, if not installed and used in accordance with the instructions, may cause harmful interference to radio communications. However, there is no guarantee that interference will not occur in a particular installation. If this equipment does cause harmful interference to radio or television reception, which can be determined by turning the equipment off and on, the user is encouraged to try to correct the interference by one or more of the following measures:
- Reorient or relocate the receiving antenna.
- Increase the separation between the equipment and receiver.
- Connect the equipment into an outlet on a circuit different from that to which the receiver is connected.
- Consult the dealer or an experienced radio/TV technician for help.
EN 55 022 Declaration of Conformance
This is to certify that the Model FR314, FR318 and FV318 Cable/DSL Firewall and VPN Routers are shielded against the generation of radio interference in accordance with the application of Council Directive 89/336/EEC, Article 4a. Conformity is declared by the application of EN 55 022 Class B (CISPR 22).
Certificate of the Manufacturer/Importer
It is hereby certified that the Model FR314, FR318 and FV318 Cable/DSL Firewall and VPN Routers have been suppressed in accordance with the conditions set out in the BMPT-AmtsblVfg 243/1991 and Vfg 46/1992. The operation of some equipment (for example, test transmitters) in accordance with the regulations may, however, be subject to certain restrictions. Please refer to the notes in the operating instructions.
Federal Office for Telecommunications Approvals has been notified of the placing of this equipment on the market and has been granted the right to test the series for compliance with the regulations.
Voluntary Control Council for Interference (VCCI) Statement
This equipment is in the second category (information equipment to be used in a residential area or an adjacent area thereto) and conforms to the standards set by the Voluntary Control Council for Interference by Data Processing Equipment and Electronic Office Machines aimed at preventing radio interference in such residential areas.
When used near a radio or TV receiver, it may become the cause of radio interference.
Read instructions for correct handling.
Customer Support
Refer to the Support Information Card that shipped with your Model FR314, FR318 and FV318 Cable/DSL Firewall and VPN Routers.
World Wide Web
NETGEAR maintains a World Wide Web home page that you can access at the universal resource locator (URL) http://www.netgear.com. A direct connection to the Internet and a Web browser such as Internet Explorer or Netscape are required.
Contents
About This Guide
Typographical Conventions ...... xv
Special Message Formats ......xvi
Technical Support ....xvi
Related Publications ......xvi
Chapter 1 Introduction
About the Netgear Firewall/VPN Router 1-1
Key Features 1-2
A Powerful, True Firewall 1-2
Virtual Private Networking (VPN) 1-2
Content Filtering 1-2
Configurable Ethernet Connection 1-3
Protocol Support 1-3
Easy Installation and Management 1-4
Maintenance and Support 1-4
Chapter 2 Setting Up the Hardware
Package Contents 2-1
Local Network Hardware Requirements 2-2
PC Requirements 2-2
Access Device Requirement 2-2
The Firewall Router's Front Panel 2-3
The Firewall Router's Rear Panel 2-4
Connecting the Firewall Router 2-4
Connecting to Your Local Ethernet Network 2-5
Connecting to Your Internet Access Device 2-6
Connecting the Power Adapter 2-6
Verifying Connections 2-6
Contents v
Chapter 3
Preparing Your Network
Preparing Your Personal Computers for IP Networking 3-1
Configuring Windows 95 or later for IP Networking 3-2
Configuring TCP/IP Properties 3-4
Verifying TCP/IP Properties (Windows) 3-4
Configuring the Macintosh for IP Networking 3-5
Verifying TCP/IP Properties (Macintosh) 3-6
Your Internet Account 3-7
Login Protocols 3-8
Account Information 3-8
Obtaining ISP Configuration Information (Windows) 3-8
Obtaining ISP Configuration Information (Macintosh) 3-9
Ready for Configuration 3-10
Chapter 4
Initial Configuration of the Firewall Router
Accessing the Web Management Interface 4-1
Chapter 5
General Configuration
Status 5-2
Network Settings 5-3
Network Addressing Mode 5-4
LAN Settings 5-4
WAN Settings 5-5
DNS Settings 5-5
MAC Address Proxy 5-6
MTU Settings 5-6
Selecting and Configuring a Network Addressing Mode 5-7
Configuring for a PPPoE Connection 5-7
Configuring for Dynamic Addressing 5-8
Configuring for Fixed Addressing with a Single Address 5-8
Configuring for NAT Disabled 5-9
Additional Notes 5-10
Chapter 6
Content Filtering
Categories 6-1
vi Contents
Restrict Web Features 6-3
Use Filter List (Web/News/FTP/Gopher) 6-3
Time of Day 6-4
Bypassing the Filter 6-5
Updating the Content Filter List 6-5
Customizing the Filter List 6-7
Content Filter List Category Descriptions 6-8
Chapter 7
Network Access Rules
Services 7-2
Network Access Rules Options 7-3
Creating a Public LAN Server (Port Forwarding) 7-4
Notes on DMZ or Bastion Host 7-4
Additional Notes 7-4
Adding a Service 7-5
Adding a Known Service 7-6
Adding a Custom Service 7-6
Disabling Logging 7-7
Deleting a Service 7-7
Stealth Mode 7-7
Node License Count 7-8
Excluding Devices from Node License Count 7-9
Chapter 8
Logging and Alerting
Viewing the Log 8-1
Log Messages 8-2
Log Settings 8-4
Sending the Log 8-5
Automated Sending 8-5
Log and Alert Categories 8-6
Log Categories 8-6
Alert Categories 8-7
Log Reports 8-7
Data Collection 8-8
View Data 8-9
Chapter 9
DHCP Server Configuration
DHCP Server Overview 9-1
Configuring the DHCP Server 9-2
General Setup 9-3
WINS 9-4
Dynamic Ranges 9-4
Static Entries 9-4
Current DHCP Leases 9-5
Chapter 10
Virtual Private Networking
What is a VPN 10-1
Accessing Network Resources from a VPN Client PC 10-2
Linking Two Networks Together 10-3
Initial Setup of the VPN 10-3
Configuring a Security Association 10-5
Deleting a Security Association 10-7
Security Association Notes 10-7
Installing and Configuring the SafeNet VPN Client 10-8
Install the VPN Client Software 10-8
Open the Security Policy Editor 10-9
Create a VPN Connection 10-9
Configure the Security Policy 10-11
Configure the VPN Client Identity 10-12
Configure VPN Client Authentication Proposal 10-14
Configure VPN Client Key Exchange Proposal 10-14
Save the VPN Client Settings 10-15
Monitoring the VPN Connection 10-15
Accessing Remote Resources across a VPN 10-17
Chapter 11
System Maintenance
Restart 11-1
Preferences 11-1
Overview of Settings Files 11-3
Exporting the Settings File 11-3
viii Contents
Importing the Settings File 11-3
Restoring Factory Default Settings 11-3
Launch the Setup Wizard 11-4
Updating Firmware 11-5
Uploading New Firmware 11-6
Upgrade Features 11-7
Diagnostic Tools 11-7
DNS Name Lookup 11-8
Find Network Path 11-8
Ping 11-9
Packet Trace 11-9
Tech Support Report 11-11
Administrator Settings 11-11
Chapter 12
Troubleshooting
Basic Functioning 12-1
PWR LED Not On 12-1
Test LED Stays On 12-2
LNK/ACT LEDs Not On 12-2
Troubleshooting the Web Management Interface 12-3
Troubleshooting the ISP Connection 12-3
Troubleshooting a TCP/IP Network Using a Ping Utility 12-5
Testing the LAN Path to Your Router 12-6
Testing the Path from Your PC to a Remote Device 12-6
Recovering From a Lost Password 12-7
Appendix A
Technical Specifications
General Specifications ...... A-1
Appendix B
Networks, Routing, and Firewall Basics
Basic Router Concepts ...... B-1
What is a Router? B-1
Routing Information Protocol ...... B-2
IP Addresses and the Internet ...... B-2
Netmask B-4
Contents ix
Subnet Addressing B-5
Private IP Addresses ...... B-7
Single IP Address Operation Using NAT B-8
MAC Addresses and Address Resolution Protocol ...... B-9
Domain Name Server B-9
IP Configuration by DHCP B-10
Ethernet Cabling B-10
Uplink Switches and Crossover Cables ......B-11
Cable Quality ......B-11
Internet Security and Firewalls ......B-11
What is a Firewall? B-12
Stateful Packet Inspection B-12
Denial of Service Attack B-12
Glossary
Index
Figures
Figure 2-1. FR314 Front Panel 2-3
Figure 2-2. FR314 Rear Panel 2-4
Figure 4-1. Web Manager Login Window 4-2
Figure 4-2. Setup Wizard, Password Window 4-2
Figure 4-3. Setup Wizard, Time Zone Window 4-3
Figure 4-4. Setup Wizard, Connecting to the Internet Window ......4-4
Figure 4-5. Setup Wizard, PPPoE Window 4-5
Figure 4-6. Setup Wizard, Static Address Window 4-6
Figure 4-7. Setup Wizard, ISP Settings Window 4-7
Figure 4-8. Setup Wizard, Final Window 4-8
Figure 5-1. General Status Window 5-2
Figure 5-2. Network Settings Window 5-3
Figure 6-1. Filter Categories Window 6-2
Figure 6-2. Filter Customize Window 6-7
Figure 7-1. Network Access Rules Window 7-2
Figure 7-2. Add Service Window 7-5
Figure 8-1. View Log Window 8-2
Figure 8-2. Log Settings Window 8-4
Figure 8-3. Log Reports Window 8-8
Figure 9-1. DHCP Server Configuration Window 9-2
Figure 10-1. VPN Summary Window 10-4
Figure 10-2. VPN Configure Window 10-5
Figure 11-1. Preferences Window 11-2
Figure 11-2. Firmware Update Window 11-5
Figure 11-3. Diagnostics Window 11-7
Figure B-1. Three Main Address Classes ...... B-3
Figure B-2. Example of Subnetting a Class B Address ...... B-5
Figure B-3. Single IP Address Operation Using NAT ...... B-8
Figures xi
Tables
Table 2-1. LED Descriptions .....2-3
Table 6-1. Content Filter List Categories ......6-4
Table 8-1. Content Filter List Categories ......8-3
Table B-1. Netmask Notation Translation Table for One Octet ...... B-6
Table B-2. Netmask Formats ...... B-6
Table B-3. UTP Ethernet cable wiring, straight-through ...... B-10
About This Guide
Congratulations on your purchase of the NETGEAR ^™ Model FR314, FR318 or FV318 Cable/DSL Firewall Router. The firewall router is a complete security solution that protects your network from attacks and intrusions, filters objectionable Web content, and logs security threats.
This guide describes the features of the firewall router and provides installation and configuration instructions.
Typographical Conventions
This guide uses the following typographical conventions:
italics Book titles and UNIX file, command, and directory names.
courier font Screen text, user-typed command-line entries.
Initial Caps Menu titles and window and button names.
[Enter] Named keys in text are shown enclosed in square brackets. The notation [Enter] is used for the Enter key and the Return key.
[Ctrl]+C Two or more keys that must be pressed simultaneously are shown in text linked with a plus (+) sign.
ALL CAPS DOS file and directory names.
Special Message Formats
This guide uses the following formats to highlight special messages:
| Note: This format is used to highlight information of importance or special interest. | |
| Caution: This format is used to highlight information that will help you prevent equipment failure or loss of data. | |
| Warning: This format is used to highlight information about the possibility of injury or equipment damage. | |
| Danger: This format is used to alert you that there is the potential for incurring an electrical shock if you mishandle the equipment. |
Technical Support
For help with any technical issues, contact Customer Support at 1-888-NETGEAR, or visit us on the Web at www.NETGEAR.com. The NETGEAR Web site includes an extensive knowledge base, answers to frequently asked questions, and a means for submitting technical questions online.
Related Publications
As you read this document, you may be directed to various RFC documents for further information. An RFC is a Request For Comment (RFC) published by the Internet Engineering Task Force (IETF), an open organization that defines the architecture and operation of the Internet. The RFC documents outline and define the standard protocols and procedures for the Internet. The documents are listed on the World Wide Web at www.ietf.org and are mirrored and indexed at many other sites worldwide.
For more information about address assignment, refer to the IETF documents RFC 1597, Address Allocation for Private Internets, and RFC 1466, Guidelines for Management of IP Address Space.
For more information about IP address translation, refer to RFC 1631, The IP Network Address Translator (NAT).
Chapter 1 Introduction
This chapter describes the features of the NETGEAR Model FR314, FR318 and FV318 Cable/DSL Firewall and VPN Routers.
About the Netgear Firewall/VPN Router
The Model FR314, FR318 or FV318 Cable/DSL Firewall Router is a complete security solution that protects your network from attacks and intrusions. The firewall router prevents theft, destruction, and malicious tampering, filters objectionable Web content, and logs security threats. Unlike simple Internet sharing routers, the firewall router uses stateful packet inspection, widely considered as the most effective method of filtering IP traffic, to ensure secure firewall filtering.
The Netgear Firewall/VPN Router is a flexible, high-performance, easy-to-use firewall router that provides a secure and cost-effective solution for connecting your network of PCs to a single-user broadband line, such as a cable modem or DSL modem. When personal computers (PCs) on the LAN need to communicate with locations on the Internet, the PCs send requests to the firewall router. The firewall router translates those requests so that the requests appear to originate from a single PC, rather than from a network of PCs. The firewall router delivers the requests to the external access device for transmission to the Internet.
The FR314 and FR318 Firewall Routers allow Internet access for up to eight users. Optional upgrades may be purchased for a total of 20 users or 45 users. The FV318 VPN Router allows Internet access for up to 20 users, with an optional upgrade available for a total of 45 users.
A VPN upgrade may be purchased to give the FR318 Firewall Router VPN capability for establishing a single VPN connection. The FV318 VPN Router is capable of five VPN connections.
Key Features
The Netgear Firewall/VPN Router offers the following features.
A Powerful, True Firewall
Unlike simple Internet sharing routers, the Netgear Firewall/VPN Router is a true firewall, using stateful packet inspection to defend against hacker attacks, and lets you define rules for Internet access and content viewing. Its firewall features include:
- Denial of Service (DoS) protection
Automatically detects and thwarts Denial of Service (DoS) attacks such as Ping of Death, SYN Flood, LAND Attack and IP Spoofing.
- Blocks unwanted traffic from the Internet to your LAN.
- Blocks access from your LAN to Internet locations that you specify as off-limits
- Logs and reports attempted breaches of security or access restrictions.
Virtual Private Networking (VPN)
The FR318 (with optional VPN upgrade) and the FV318 provide secure, encrypted communication between your local network and a remote network or client. Once you have created a VPN Security Association to a remote site, the firewall router can automatically encrypt data and send it over the Internet to the remote site, where it will be decrypted and forwarded to the intended destination.
The FR318 and FV318 support the IPSec standard for VPNs, using up to 168 bit encryption for maximum security.
Content Filtering
With its content filtering features, the Netgear Firewall/VPN Router prevents objectionable content from reaching your PCs. Its content filtering features include:
- Content filtering by subscription
The Netgear Firewall/VPN Router uses content filtering to enforce your network's Internet access policies. You can use the Content Filter List to block Web sites by category, such as pornography or racial intolerance. Since content on the Internet is constantly changing, the firewall router automatically updates the Content Filter List every week to ensure that access restrictions to new and relocated sites are properly enforced.
- Content filtering by domain or keyword
In addition to filtering by the Content Filter List, the Netgear Firewall/VPN Router allows you to control access to Internet content by specifying Trusted or Forbidden domains, or by screening for keywords within Web URLs.
- Protocol filtering
In addition to filtering access to Web sites, the Netgear Firewall/VPN Router can also block ActiveX, Java, cookies, and Web proxies.
- Logging of security incidents and inappropriate use
You can configure the Netgear Firewall/VPN Router to log and block access to objectional Web sites, or to log inappropriate usage without blocking access. You can decide how often you want to view the log, or direct the firewall router to send the log to you at a specified e-mail address at specified intervals. You can configure the firewall router to send alert messages to your e-mail address or e-mail pager whenever a high-priority event (including attacks, system errors, and blocked Web sites) occurs.
Configurable Ethernet Connection
With its internal, 4-port (FR314) or 8-port (FR318 and FV318) 10/100 switch, the firewall router can connect to either a 10 Mbps standard Ethernet network or a 100 Mbps Fast Ethernet network. The local LAN interface is autosensing and is capable of full-duplex or half-duplex operation.
The 8-port Netgear Firewall/VPN Routers incorporate Auto Uplink™ technology. Each LOCAL Ethernet port will automatically sense whether the Ethernet cable plugged into the port should have a 'normal' connection (e.g. connecting to a PC) or an 'uplink' connection (e.g. connecting to a router, switch, or hub). That port will then configure itself to the correct configuration. This feature also eliminates the need to worry about crossover cables, as Auto Uplink will accommodate either type of cable to make the right connection.
Protocol Support
The Netgear Firewall/VPN Router supports the Transmission Control Protocol/Internet Protocol (TCP/IP) and Routing Information Protocol (RIP). Relevant features include:
- IP address masquerading by dynamic NAT+ The firewall router allows several networked PCs to share an Internet account using only a single IP address, which may be statically or dynamically assigned by your Internet service provider (ISP). This technique, an extension of Network Address Translation (NAT), is also known as IP address masquerading and allows the use of an inexpensive single-user ISP account.
- Port forwarding (Public Servers) The firewall router performs port-address translation. With this feature, you can direct incoming traffic to be forwarded to specific local PCs, based on the service port of the incoming request.
- Automatic configuration of attached PCs by DHCP The firewall router dynamically assigns network configuration information, including IP, gateway, and domain name server (DNS) addresses, to attached PCs on the LAN using the Dynamic Host Configuration Protocol (DHCP). This feature greatly simplifies configuration of LAN-attached PCs.
- PPP over Ethernet PPP over Ethernet (PPPoE) is a protocol for connecting remote hosts to the Internet over an always-on connection by simulating a dial-up connection. The firewall router incorporates and automatically launches a PPPoE client so that the user does not need to manually log in for Internet access.
Easy Installation and Management
You can install, configure, and operate the Model FR314, FR318 or FV318 firewall router within minutes after connecting it to the network. The following features simplify installation and management tasks:
- Browser-based management Browser-based configuration allows you to easily configure your firewall router from almost any type of personal computer, such as Windows, Macintosh, or Linux. A user-friendly Setup Wizard is provided and online help documentation is built into the browser-based Web Management Interface.
- Visual monitoring The firewall router's front panel LEDs provide an easy way to monitor its status and activity.
Maintenance and Support
NETGEAR offers the following features to help you maximize your use of the firewall router:
- Flash EPROM for firmware upgrade
• Five-year warranty, two years on power adapter
• Free technical support seven days a week, twenty-four hours a day
This chapter describes the Netgear Firewall/VPN Router hardware and provides instructions for installing it.
Package Contents
The product package should contain the following items:
• Model FR314, FR318 or FV318 Cable/DSL Firewall Router
• AC power adapter, 12 V DC output
• Twisted-pair Category 5 (Cat 5) Ethernet cable, straight-through wiring
• Model FR314, FR318 and FV318 Resource CD, including:
— This guide
— Application Notes
— Configuration and Troubleshooting Guides
• FR314, FR318 and FV318 Cable/DSL Firewall and VPN Router Installation Guide
- Registration and Warranty Card
• Support Information Card
If any of the parts are incorrect, missing, or damaged, contact your NETGEAR dealer. Keep the carton, including the original packing materials, in case you need to return the firewall router for repair.
Local Network Hardware Requirements
The Netgear Firewall/VPN Router is intended for use in a network of personal computers (PCs) that are interconnected by twisted-pair Ethernet cables.
PC Requirements
To install and run the firewall router over your network of PCs, each PC must have the following:
• An installed Ethernet Network Interface Card (NIC).
- A connection to the network via a hub or switch. If all PCs on the network will not run at the same speed (10 Mbps or 100 Mbps), you need to use a dual-speed hub or switch. The firewall router provides a 4-port (FR314) or 8-port (FR318 and FV318) switch capable of either 10 Mbps or 100 Mbps operation. Links operating at 100 Mbps must be connected with Category 5 cable.
Access Device Requirement
The shared broadband access device (cable modem or DSL modem) must provide a standard 10BASE-T Ethernet interface.
The Firewall Router's Front Panel
The front panel of the Model FR314, FR318 or FV318 firewall router (Figure 2-1) contains status LEDs.
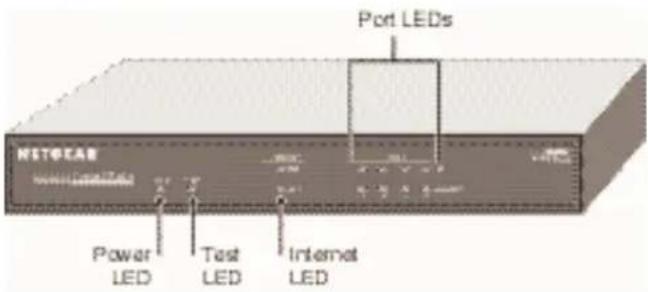
Figure 2-1. FR314 Front Panel
You can use some of the LEDs to verify connections. Table 2-1 lists and describes each LED on the front panel of the firewall router. These LEDs are green when lit, except for the TEST LED, which is amber.
Table 2-1. LED Descriptions
| Label Activity Description | ||
| POWER | On | Power is supplied to the firewall router. |
| TEST | OnOff | The system is initializing.The system is ready and running. |
| INTERNETLINKACT (Activity) | OnBlinking | The Internet port has detected a link with an attached device.Data is being transmitted or received by the Internet port. |
| LOCALLINK/ACT(Link/Activity)100 (100 Mbps) On | OnBlinkingOff | The Local port has detected a link with an attached device.Data is being transmitted or received by the Local port.The Local port is operating at 100 Mbps.The Local port is operating at 10 Mbps. |
The Firewall Router's Rear Panel
The rear panel of the FR314 is shown in Figure 2-2. The FR318 and FV318 differ only in the number of ports and the absence of an Uplink switch. Refer to this diagram to identify the firewall router ports before attempting to make any connections.
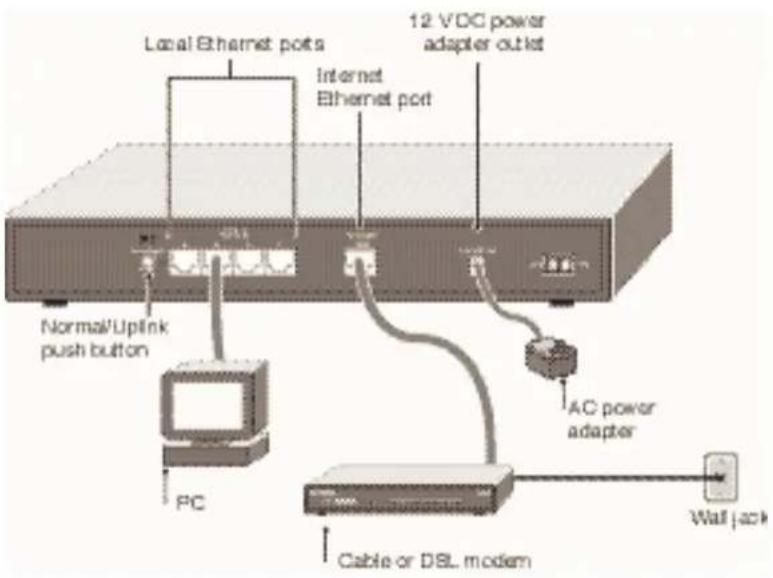
Figure 2-2. FR314 Rear Panel
Connecting the Firewall Router
Before using your firewall router, you need to do the following:
- Connect your local Ethernet network to the LOCAL port(s) of the firewall router (described next).
- Connect your cable or DSL modem to the INTERNET port of the firewall router (see page 2-6).
- Connect the power adapter (see page 2-6).
Connecting to Your Local Ethernet Network
Your local network attaches to the firewall router ports that are marked LOCAL. The LOCAL ports of the firewall router are capable of operation at either 10 Mbps (10BASE-T) or 100 Mbps (100BASE-TX), depending on the Ethernet interface of the attached PC, hub, or switch. If any connection will operate at 100 Mbps, you must use a Category 5 (Cat 5) rated cable, such as the Ethernet cable included with your firewall router.
The Netgear Firewall/VPN Router incorporates a 4-port (FR314) or 8-port (FR318 and FV318) switch for connection to your local network.
To connect the firewall router to your LAN:
-
Connect your PCs directly to any of the LOCAL ports of the firewall router using standard Ethernet cables.
-
(FR314) Verify that the NORMAL/UPLINK switch of the last LOCAL port is set to NORMAL.
If your local network consists of more hosts than LOCAL ports, you need to connect your firewall router to another hub or switch. For the FR314, this can be done using either of the following methods:
Connect the FR314's last LOCAL port to any normal port of an Ethernet hub or switch using standard Ethernet cable. Push in the NORMAL/UPLINK switch of the firewall router to select UPLINK.
OR
Connect any LOCAL port of your FR314 to the UPLINK port of an Ethernet hub or switch.
For the FR318 and FV318, connect any LOCAL port of your firewall router to any port of an Ethernet hub or switch. The LOCAL port will automatically configure itself for the uplink connection.
Note: The Netgear Firewall/VPN Router incorporates Auto Uplink™ technology. Each LOCAL Ethernet port will automatically sense whether the Ethernet cable plugged into the port should have a 'normal' connection (e.g. connecting to a PC) or an 'uplink' connection (e.g. connecting to a router, switch, or hub). That port will then configure itself to the correct configuration. This feature also eliminates the need to worry about crossover cables, as Auto Uplink will accommodate either type of cable to make the right connection.
Connecting to Your Internet Access Device
To connect the firewall router to the Internet (or WAN):
- Connect the firewall router's INTERNET port to the 10BASE-T Ethernet port on your existing Internet access device (your cable modem or DSL modem).
Note: The attached modem device must provide a standard 10BASE-T Ethernet connection. The firewall router does not include a cable for this connection. Instead, use the Ethernet cable provided with your access device or any other standard 10BASE-T Ethernet cable. If you are using a DSL modem, the modem's connection to the phone line remains unchanged.
Note: The Ethernet cable supplied by your ISP for connecting to your cable or DSL modem may be an Ethernet crossover cable rather than a straight-through cable. It is important to use this cable to connect the modem to your router, not to connect your PCs to your router.
Connecting the Power Adapter
To connect the firewall router to the power adapter:
- Plug the connector of the power adapter into the 12 VDC adapter outlet on the rear panel of the firewall router.
- Plug the other end of the adapter into a standard wall outlet.
- Turn the Power switch to the ON position.
- Verify that the POWER LED on the firewall router is lit.
Verifying Connections
After applying power to the firewall router, complete the following steps to verify the connections to it:
- When power is first applied, verify that the POWER LED is on.
- Verify that the TEST LED turns on within a few seconds.
- After approximately 90 seconds, verify that:
a. The TEST LED has turned off.
b. The LOCAL LINK/ACT LEDs are lit for any local ports that are connected.
c. The INTERNET LINK/ACT LED is lit.
If a LINK/ACT LED is lit, a link has been established to the connected device.
- If any LOCAL port is connected to a 100 Mbps device, verify that the 100 LED for that port is lit.
The firewall router is now properly attached to the network. Next, you need to prepare your network to access the Internet through the firewall router. See the following chapter.
Chapter 3
Preparing Your Network
This chapter describes how to prepare your PC network to connect to the Internet through the Model FR314, FR318 and FV318 Cable/DSL Firewall and VPN Routers and how to order broadband Internet service from an Internet service provider (ISP).
Preparing Your Personal Computers for IP Networking
The Netgear Firewall/VPN Router uses the Transmission Control Protocol/Internet Protocol (TCP/IP). In order to access the Internet through the firewall router, each PC on your network must have TCP/IP installed and selected as the networking protocol.
Note: In this chapter, we use the term “PC” to refer to personal computers in general, and not necessarily Windows computers.
Most operating systems include the software components you need to install and use TCP/IP on your PC:
- Windows ^ 95 or later (including Windows NT ^ ) includes the software components for establishing a TCP/IP network.
- Windows 3.1 does not include a TCP/IP component. You need to purchase a third-party TCP/IP application package such as NetManage Chameleon.
- Macintosh Operating System 7 or later includes the software components for establishing a TCP/IP network.
• All versions of UNIX or Linux include TCP/IP components.
Follow the instructions provided with your operating system or networking software to install TCP/IP on your computer. Although TCP/IP is built into the Windows operating system (starting with Windows 95), you need to enable and configure it as described in “Configuring Windows 95 or later for IP Networking” on page 3-2. To configure the Macintosh, see “Configuring the Macintosh for IP Networking on page 3-5.
In your IP network, all PCs and the firewall router must be assigned IP addresses. Each PC must also have certain other IP configuration information such as a subnet mask (netmask), a domain name server (DNS) address, and a default gateway address. In most cases, you should install TCP/IP so that the PC obtains its specific network configuration information from a DHCP server during bootup. For a detailed explanation of the meaning and purpose of these configuration items, refer to “Appendix B, “Networks, Routing, and Firewall Basics.”
The firewall router is shipped preconfigured as a DHCP server. The firewall router assigns the following TCP/IP configuration information automatically when the PCs are rebooted:
• PC or workstation IP addresses—192.168.0.2 through 192.168.0.9
- Subnet mask—255.255.255.0
- Gateway address (the firewall router)—192.168.0.1
These addresses are part of the IETF-designated private address range for use in private networks.
Configuring Windows 95 or later for IP Networking
As part of the PC preparation process, you need to manually install and configure TCP/IP on each networked PC. Before starting, locate your Windows CD; you may need to insert it during the TCP/IP installation process.
To configure Microsoft® Windows 95 or later for IP networking:
- On the Windows taskbar, click the Start button, point to Settings, and then click Control Panel.
- Double-click the Network icon.
The Network window opens, which displays a list of installed components:
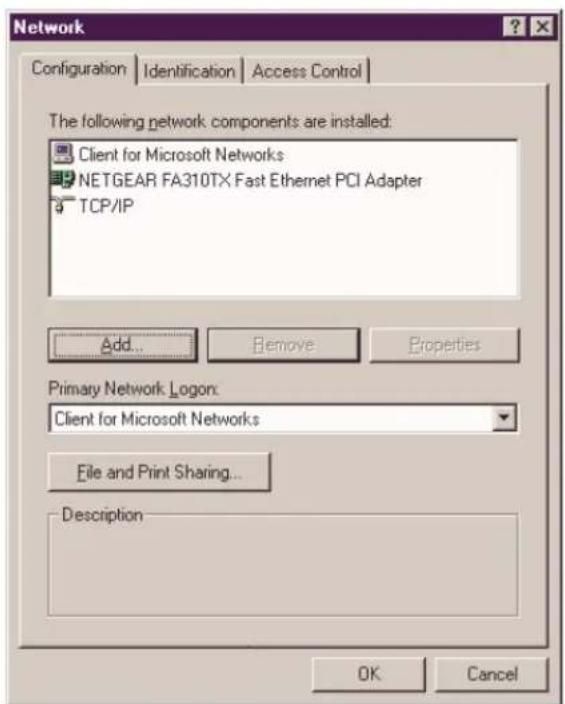
You must have an Ethernet adapter, the TCP/IP protocol, and Client for Microsoft Networks.

Note: It is not necessary to remove any other network components shown in the Network window in order to install the adapter, TCP/IP, or Client for Microsoft Networks.
If you need the adapter:
a. Click the Add button.
b. Select Adapter, and then click Add.
c. Select the manufacturer and model of your Ethernet adapter, and then click OK.
If you need TCP/IP:
a. Click the Add button.
b. Select Protocol, and then click Add.
c. Select Microsoft.
d. Select TCP/IP, and then click OK.
If you need Client for Microsoft Networks:
a. Click the Add button.
b. Select Client, and then click Add.
c. Select Microsoft.
d. Select Client for Microsoft Networks, and then click OK.
- Restart your PC for the changes to take effect.
Configuring TCP/IP Properties
After the TCP/IP protocol components are installed, each PC must be assigned specific information about itself and resources that are available on its network. The simplest way to configure this information is to allow the PC to obtain the information from the internal DHCP server of the firewall router.

Note: If an ISP technician configured your PC during the installation of a broadband modem, or if you configured it using instructions provided by your ISP, you may need to copy the current configuration information for use in the configuration of your firewall router. Refer to “Obtaining ISP Configuration Information (Windows)” on page 3-8 or “Obtaining ISP Configuration Information (Macintosh)” on page 3-9 for further information.
If you are using DHCP with the recommended default addresses, you can configure your PCs by following these steps:
- Install TCP/IP on each PC, leaving the PC configured to obtain configuration settings automatically (by DHCP).
- Physically connect the PCs and the firewall router using a hub or a direct connection.
- Restart the firewall router and allow it to boot.
- Restart each PC.
Verifying TCP/IP Properties (Windows)
After your PC is configured and has rebooted, you can check the TCP/IP configuration using the Windows 95 and 98 utility winipcfg.exe (for Windows NT systems, use ipconfig.exe).
To check your PC's TCP/IP configuration:
- On the Windows taskbar, click the Start button, and then click Run.
The Run window opens.
- Type winipcfg, and then click OK.
The IP Configuration window opens, which lists (among other things), your IP address, subnet mask, and default gateway.
- Select your Ethernet adapter.
The window is updated to show your settings, which should match the values below if you are using the default TCP/IP settings that NETGEAR recommends:
• The IP address is between 192.168.0.2 and 192.168.0.9
• The subnet mask is 255.255.255.0
• The default gateway is 192.168.0.1
At this point, your PCs can communicate with each other and with the firewall router, but they still require DNS Server addresses in order to browse the Internet. The DNS Server addresses are not assigned until after the firewall router is configured and the PCs are rebooted.

Note: Reboot all attached PCs again after your firewall router is configured, or the PCs will not be able to browse the Internet. The firewall router cannot assign DNS addresses to your PCs until after it is configured.
Configuring the Macintosh for IP Networking
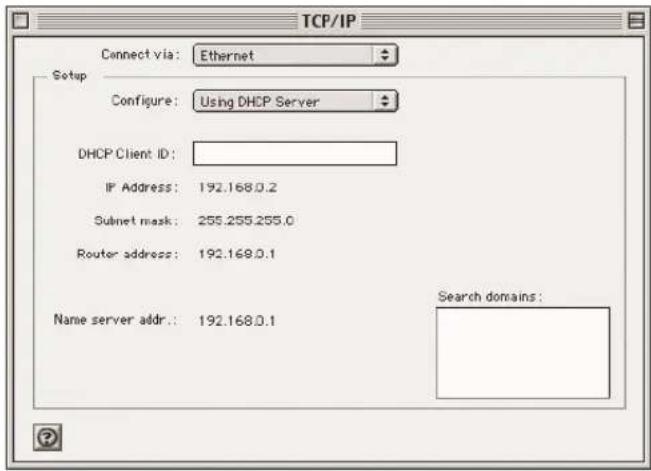
Beginning with Macintosh Operating System 7, TCP/IP is already installed on the Macintosh. On each networked Macintosh, you will need to configure TCP/IP to use DHCP by following these steps:
- From the Apple menu, select Control Panels, then TCP/IP.
The TCP/IP Control Panel opens:
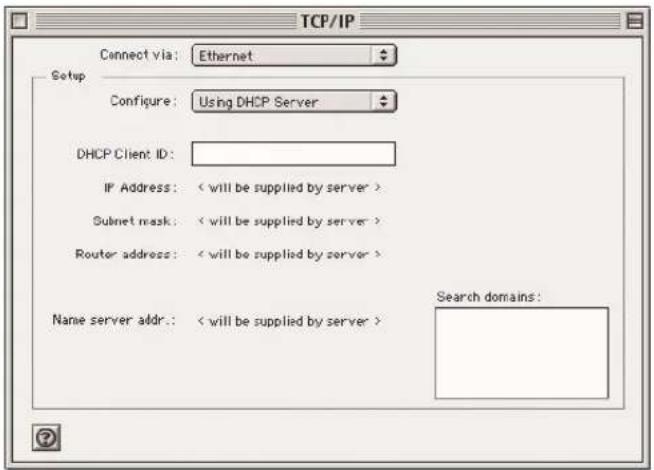
- From the "Connect via" box, select your Macintosh's Ethernet interface.
- From the "Configure" box, select Using DHCP Server.
You can leave the DHCP Client ID box empty.
- Close the TCP/IP Control Panel.
- Repeat this for each Macintosh on your network.
Verifying TCP/IP Properties (Macintosh)
After your Macintosh is configured and has rebooted, you can check the TCP/IP configuration by returning to the TCP/IP Control Panel. From the Apple menu, select Control Panels, then TCP/IP.
3-6 Preparing Your Network
The panel is updated to show your settings, which should match the values below if you are using the default TCP/IP settings that NETGEAR recommends:
• The IP Address is between 192.168.0.2 and 192.168.0.9
• The Subnet mask is 255.255.255.0
• The Router address is 192.168.0.1
If you do not see these values, you may need to restart your Macintosh or you may need to switch the “Configure” setting to a different option, then back again to “Using DHCP Server”.
At this point, your Macintosh computers can communicate with each other and with the firewall router, but they still require Name Server (DNS) addresses in order to browse the Internet. The Name Server addresses are not assigned until after the firewall router is configured and the Macintosh computers are rebooted.
Your Internet Account
For access to the Internet, you need to contract with an Internet service provider (ISP) for a single-user Internet access account using an external broadband access device such as a cable modem or DSL modem. This modem must be a separate physical box (not a card) and must provide an Ethernet port intended for connection to a Network Interface Card (NIC) in a PC.
For a single-user Internet account, your ISP supplies TCP/IP configuration information for one PC. With a typical account, much of the configuration information is dynamically assigned when your PC is first booted up while connected to the ISP, and you will not need to know that dynamic information.
In order to share the Internet connection among several computers, your firewall router takes the place of the single PC, and you need to configure it with the TCP/IP information that the single PC would normally use. When the firewall router's INTERNET port is connected to the broadband modem, the firewall router appears to be a single PC to the ISP. The firewall router then allows the PCs on the local network to masquerade as the single PC to access the Internet through the broadband modem. The method used by the firewall router to accomplish this is called Network Address Translation (NAT) or IP masquerading.
Login Protocols
Some ISPs require a special login protocol, such as PPP over Ethernet (PPPoE). If your ISP requires one, you need a login name and password, and you also need to select PPPoE when you configure the firewall router. After your network and firewall router are configured, the firewall router performs the login task when needed, and you will no longer need to log in from your PC.
Account Information
Unless these items are dynamically assigned by the ISP, your ISP should give you the following basic information for your account:
• An IP address and subnet mask
- A gateway IP address, which is the address of the ISP's router
- One or more domain name server (DNS) IP addresses
• Host name and domain suffix
For example, your account's full server names may look like this:
mail.xxx.yyy.com
In this example, the domain suffix is xxx.yyy.com.
If any of these items are dynamically supplied by the ISP, your firewall router automatically acquires them. If an ISP technician configured your PC during the installation of the broadband modem, or if you configured it using instructions provided by your ISP, you need to copy configuration information from your PC's Network TCP/IP Properties window (or Macintosh TCP/IP Control Panel) before reconfiguring your PC for use with the firewall router. These procedures are described next.
Obtaining ISP Configuration Information (Windows)
As mentioned above, you may need to collect configuration information from your PC so that you can use this information when you configure the firewall router. Following this procedure is only necessary when your ISP does not dynamically supply the account information.
To get the information you need to configure the firewall router for Internet access:
- On the Windows taskbar, click the Start button, point to Settings, and then click Control Panel.
- Double-click the Network icon.
The Network window opens, which displays a list of installed components.
- Select TCP/IP, and then click Properties.
The TCP/IP Properties dialog box opens.
- Select the IP Address tab.
If an IP address and subnet mask are shown, write down the information. If an address is present, your account uses a fixed (static) IP address. If no address is present, your account uses a dynamically-assigned IP address. Click “Obtain an IP address automatically”.
- Select the Gateway tab.
If an IP address appears under Installed Gateways, write down the address. This is the ISP's gateway address. Select the address and then click Remove to remove the gateway address.
- Select the DNS Configuration tab.
If any DNS server addresses are shown, write down the addresses. If any information appears in the Host or Domain information box, write it down. Click Disable DNS.
- Click OK to save your changes and close the TCP/IP Properties dialog box.
You are returned to the Network window.
-
Click OK.
-
Reboot your PC at the prompt. You may also be prompted to insert your Windows CD.
Obtaining ISP Configuration Information (Macintosh)
As mentioned above, you may need to collect configuration information from your Macintosh so that you can use this information when you configure the firewall router. Following this procedure is only necessary when your ISP does not dynamically supply the account information.
To get the information you need to configure the firewall router for Internet access:
- From the Apple menu, select Control Panels, then TCP/IP.
The TCP/IP Control Panel opens, which displays a list of configuration settings. If the “Configure” setting is “Using DHCP Server”, your account uses a dynamically-assigned IP address. In this case, close the Control Panel and skip the rest of this section.
-
If an IP address and subnet mask are shown, write down the information.
-
If an IP address appears under Router address, write down the address. This is the ISP's gateway address.
-
If any Name Server addresses are shown, write down the addresses. These are your ISP's DNS addresses.
- If any information appears in the Search domains information box, write it down.
- Change the "Configure" setting to "Using DHCP Server".
- Close the TCP/IP Control Panel.
Ready for Configuration
After configuring all of your PCs for TCP/IP networking and connecting them to the LOCAL network of your firewall router, you are ready to access and configure the firewall router. Proceed to the next chapter.
Chapter 4
Initial Configuration of the Firewall Router
This chapter describes how to perform the initial configuration of your Model FR314, FR318 and FV318 Cable/DSL Firewall and VPN Routers using the Setup Wizard, which walks you through the configuration process. The Setup Wizard should result in a working and secure configuration, but you will need to use the main menus to download the Content Filter List and set any other desired firewall rules. These procedures are described in subsequent chapters.
Accessing the Web Management Interface
You can manage the Netgear Firewall/VPN Router from any computer connected to the local network of the firewall router. The computer you use to manage the firewall router is called the Management Station.
Your Management Station must have a Web browser (for example, Microsoft Internet Explorer or Netscape Navigator) installed on it. The Netgear Firewall/VPN Router uses Java for security and other functions, so your Web browser must be Java-enabled and support HTTP uploads.
NETGEAR recommends using Netscape Navigator 3.0 or above. Free browser programs are readily available for Windows, Macintosh, or UNIX/Linux.
To perform the initial configuration:
- Turn on the firewall router and wait for initialization to complete.
Allow at least one minute and verify that the TEST LED is off.
-
Reboot your PC to obtain DHCP configuration from the firewall router.
-
Launch your Web browser.
-
Type http://192.168.0.1 in the browser's Address box and press Enter.
A login window opens as shown in Figure 4-1 below:
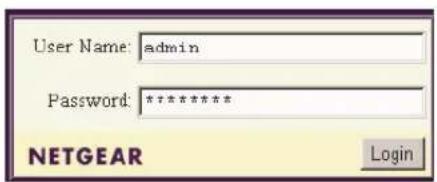
Figure 4-1. Web Manager Login Window
- Type admin in the User Name box, password in the Password box, and then click OK. If your firewall router password was previously changed, enter the current password.
- If the Setup Wizard does not automatically launch when the Web Management Interface appears, select Setup Wizard from the navigation bar on the left.
- In the first Wizard window, as shown in Figure 4-2 below, choose a new Password:
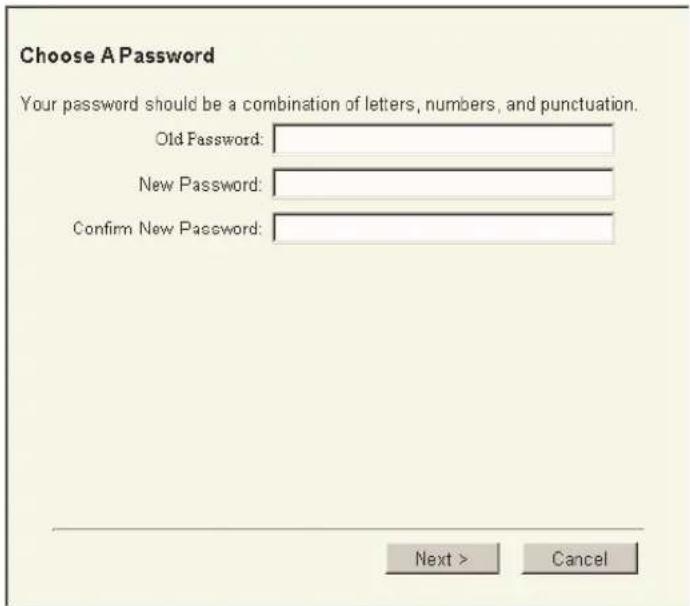
Figure 4-2. Setup Wizard, Password Window
As you complete this step, keep the following in mind:
- This password is only for access to the Web Management Interface, not to your Internet account.
- Choose a password that cannot be easily guessed. First enter the old password, and then enter the new password twice. If you do not enter the new password exactly the same in both New Password boxes, the operation fails. The reason that you must type the new password exactly the same in both boxes is to protect you against accidentally mistyping your password in the future, which would result in your being locked out of the firewall router.
- The first time you set your password, remember that the firewall router's default password is "password".
- The password cannot be recovered if it is lost or forgotten. If you lose the password, you will need to clear the firewall router's software and reload it. See Chapter 11, "System Maintenance" for instructions.
8. Click Next.
The Time Zone window opens:
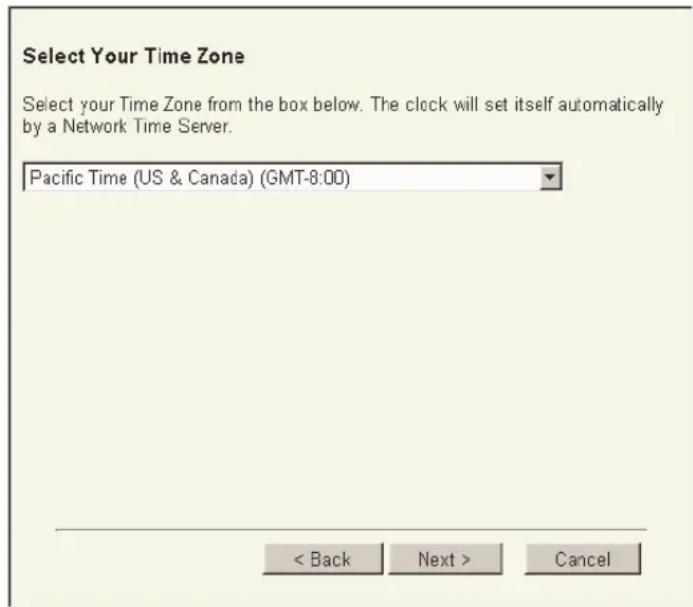
Figure 4-3. Setup Wizard, Time Zone Window
9. Select your time zone from the pull-down menu.
The firewall router's internal clock is automatically set by a Network Time Server on the Internet using the Network Time Protocol (NTP). The firewall router uses the time and date settings to time stamp log events, to automatically update the Content Filter List, and for other internal purposes.
10. Click Next.
The firewall router attempts to automatically determine your network addressing mode. If it cannot automatically determine the mode, the Connecting to the Internet window opens.
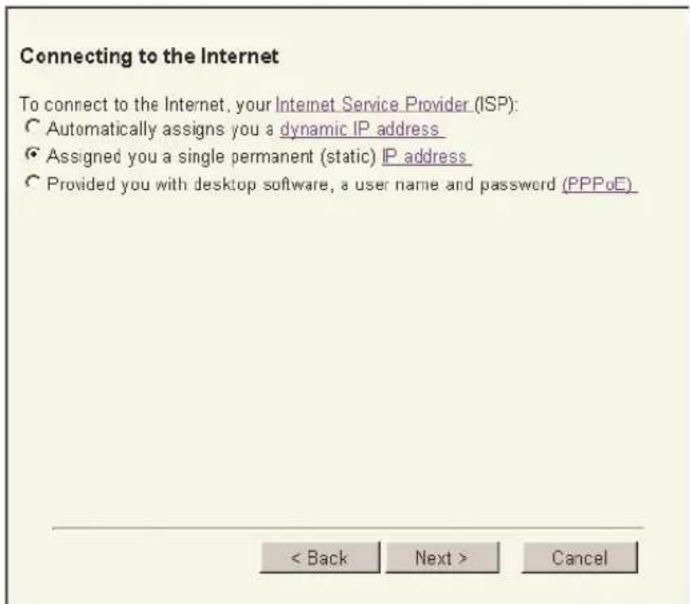
Figure 4-4. Setup Wizard, Connecting to the Internet Window
If this window appears, you must manually select your addressing mode. Unless your ISP account uses a PPPoE login procedure or does not dynamically assign network address information, you can skip the next two steps.
- If your ISP account uses a PPP over Ethernet (PPPoE) login procedure, you are prompted to enter your account's Login Name and Password in the PPPoE window:
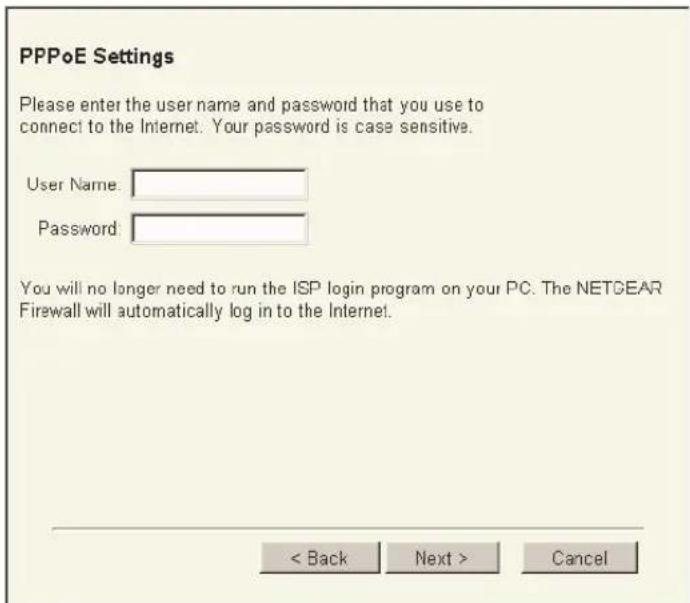
Figure 4-5. Setup Wizard, PPPoE Window
Enter the user name and password provided by your ISP for your Internet account. These entries are case sensitive. This password is for logging into your ISP account. It is not the same as the password you use to access your Netgear Firewall/VPN Router's Web Management Interface.
- If your ISP account does not dynamically assign a network address, you are prompted to enter your static (fixed) address information in the next window.
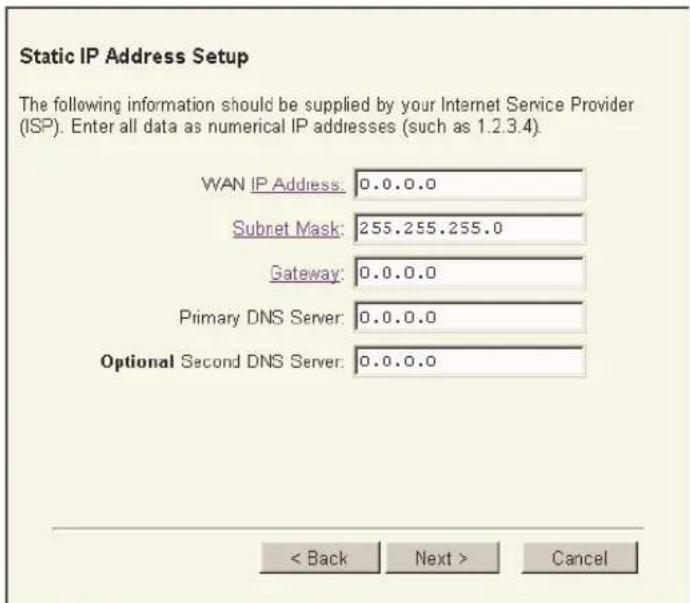
Figure 4-6. Setup Wizard, Static Address Window
Enter the following information for each option:
- WAN IP Address and Subnet Mask Enter the IP Address and Subnet Mask assigned to your account by your ISP.
- Gateway Enter the IP Address of your ISP's gateway router.
-
Primary DNS Server and Optional Second DNS Server A DNS server is a host on the Internet that translates Internet names (such as www addresses) to numeric IP addresses. If you enter DNS addresses here, you should reboot your PCs after configuring the firewall router.
-
Click Next. The ISP Settings window opens:

Figure 4-7. Setup Wizard, ISP Settings Window
Enter your account's Host Name and Domain Name. These parameters may be necessary to access your ISP's services such as mail or news servers. If you leave the Domain Name field blank, the router will attempt to automatically obtain the domain name from the ISP. If the attempt fails, you will need to manually enter this information.
- Click Next. The final Setup Wizard window opens:
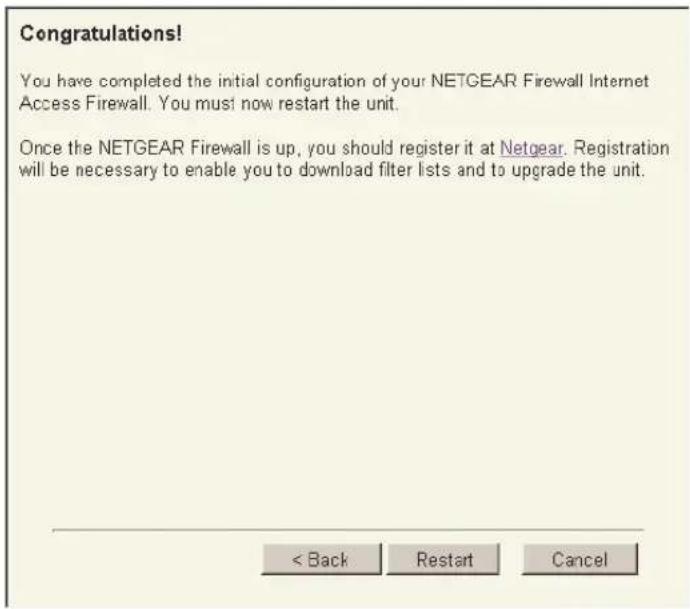
Figure 4-8. Setup Wizard, Final Window
- Reboot your firewall router in order for the configuration to take effect, and then reboot any attached PCs.
Your PCs should now have secure Internet access. You can test this by browsing to any Internet location, such as NETGEAR's Web site at www.NETGEAR.com.
If your PCs are unable to browse the Internet after initial firewall router configuration, refer to Chapter 12, "Troubleshooting."
If you wish to perform further configuration of your firewall router's features, refer to the next three chapters.
Chapter 5
General Configuration
This chapter describes how to interpret current status information and how to configure the Model FR314, FR318 and FV318 firewall routers' network settings, which include the firewall router's IP addressing method and settings.
If you need to configure the firewall's more advanced features, see Chapter 6, "Content Filtering," and Chapter 7, "Network Access Rules."
Status
To view the firewall router's status information, click General from the navigation bar on the left, and then click the Status subtopic. The Status window opens as shown in Figure 5-1 below:
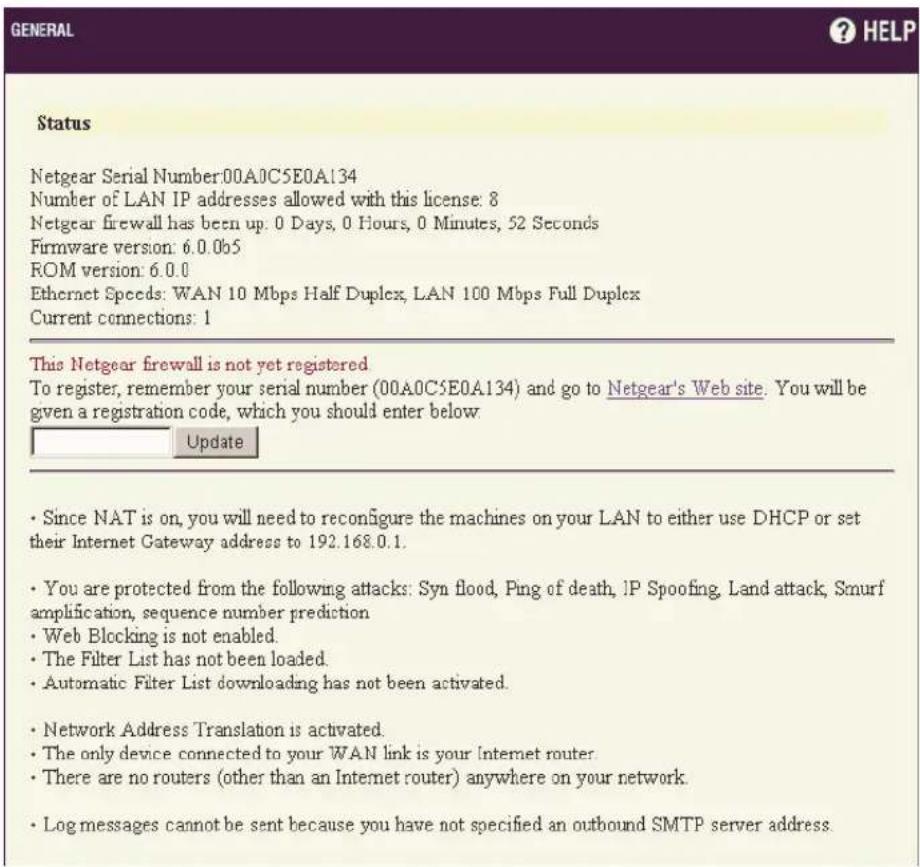
Figure 5-1. General Status Window
The Status window provides information on the current operating conditions of the router. Please view this window periodically for helpful status information."
Network Settings
This section describes how to configure the firewall router's IP address information.
To configure the firewall router's network settings, click General from the navigation bar on the left, and then click the Network subtopic. The Network Settings window opens as shown as shown in Figure 5-2 below:
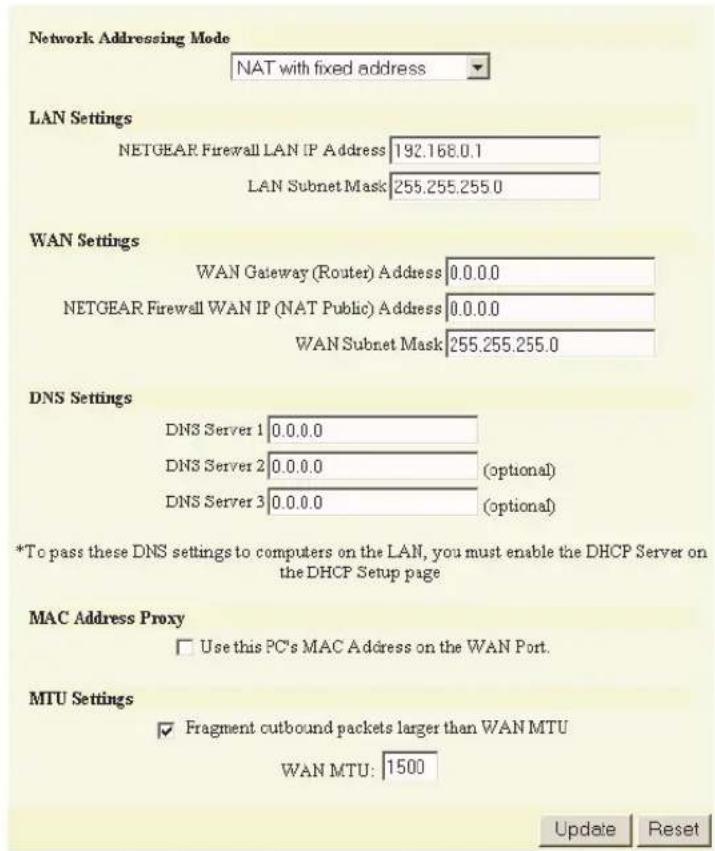
Figure 5-2. Network Settings Window
From here, you can configure network addressing mode options, LAN settings, WAN settings, and DNS settings.
Network Addressing Mode
You can use the Network Addressing Mode menu to configure how the firewall router determines its network address and accesses the network. This section describes each option; for configuration procedures for each option, see “Selecting and Configuring a Network Addressing Mode,” starting on page 5-7.
The Network Addressing Mode options are:
• NAT with Dynamic Addressing (Default)
The firewall router will request TCP/IP settings from a DHCP server on the Internet. This is the most common application in cable and DSL environments where the IP address is dynamically assigned by the ISP's DHCP server. See page 5-8 for instructions on configuring for dynamic addressing.
• NAT with PPPoE
Your ISP requires the installation of desktop login software and a user name and password authentication to connect to the Internet. PPPoE is common in DSL environments. See page 5-7 for instructions on configuring for a PPPoE connection.
• NAT with Static Addressing
Your ISP assigns a single, valid IP address for your account. See page 5-8 for instructions on configuring for static addressing.
• NAT Disabled
Your ISP assigns valid IP addresses for all computers on your network. See page 5-9 for instructions on configuring for NAT disabled mode.
LAN Settings
The LAN Settings options are:
• NETGEAR Firewall LAN IP Address
This is the IP address assigned to the firewall router's LAN port for accessing and managing the firewall router from your local PCs. This IP address should be a unique address within the LAN address range. Unless you have a need to change it, NETGEAR recommends that you use the default address of 192.168.0.1.
• LAN Subnet Mask
The LAN Subnet Mask defines the range of IP addresses that are on the LAN. The default Class C subnet mask of 255.255.255.0 supports up to 254 IP addresses on the LAN. If the Class C subnet mask is used, all local area network addresses should contain the same first three numbers as the firewall router's LAN IP Address (for example, 192.168.0). Unless you have a need to change it, NETGEAR recommends that you use the default subnet mask of 255.255.255.0.
WAN Settings
The WAN Settings options are:
• WAN Gateway (Router) Address
The WAN Gateway (Router) Address is the IP address of the next router or gateway to which your firewall router connects to access the Internet. In cable and DSL environments, the WAN router is located at the ISP. The Gateway (Router) Address is automatically assigned when Dynamic Addressing or PPPoE is selected as your addressing mode.
• NETGEAR Firewall WAN IP Address
This is the IP Address assigned to the WAN port of the firewall router. When NAT is enabled, this will be the only address seen by Internet users, and all activity on the Internet will appear to originate from this address. The WAN IP address is assigned automatically when Dynamic Addressing or PPPoE is selected as your addressing mode. The WAN IP Address is the same as the LAN IP Address when NAT Disabled mode is selected.
- WAN Subnet Mask
The WAN Subnet Mask determines which IP addresses are located on the WAN. This subnet mask should be assigned by your ISP.
The WAN Subnet Mask is assigned automatically when Dynamic Addressing or PPPoE is selected as your addressing mode. The WAN Subnet Mask is the same as the LAN Subnet Mask when NAT Disabled mode is selected.
DNS Settings
There is one DNS Settings option: DNS Servers.
DNS Servers, or Domain Name Servers, resolve descriptive names of network resources (such as www.NETGEAR.com) to numeric IP addresses. One or more DNS Server addresses should be assigned by your ISP for your use. DNS Server addresses are assigned automatically when Dynamic Addressing or PPPoE is selected as your addressing mode. These DNS addresses are used by the firewall router to locate and access the Content Filter List server and for the built-in DNS lookup tool.
Note: The firewall router will not automatically relay these DNS settings to the LAN. You must enable and configure the firewall router's DHCP server or manually configure your computers' DNS settings to obtain DNS name resolution.
MAC Address Proxy
Some ISPs, particularly cable providers, allow a customer to access the Internet from only one specific PC, which is identified by that PC's unique Ethernet MAC (Media Access Control) address. In this case, you can have your firewall router obtain and use (“proxy” or “spoof”) that MAC address from your PC.
To have the firewall router proxy your PC's MAC address, first you must use that PC to access the Network Settings menu. If you are currently configuring the router from a different PC, log off and login from the desired PC.
In the MAC Address Proxy menu section, check the box titled “Use this PC’s MAC Address on the WAN Port.” Then click Update.
MTU Settings
The MTU (Maximum Transmit Unit) is the largest size packet, including all headers and data, that can be transmitted over a given network. You can set the MTU size in the MTU Settings menu section of the Network Settings menu. To set the MTU size, check the box titled “Fragment outbound packets larger than WAN MTU”, enter a new MTU value in the WAN MTU box, then click Update.
Ethernet networks typically use an MTU of 1500 bytes, but some ISPs, particularly DSL providers, add additional bytes to each packet resulting in a packet size of greater than 1500. (These extra bytes typically result from the use of a name-and-password login client such as EnterNet or WinPOET). A downstream router receiving these larger packets may send back an ICMP message asking your router to use a smaller packet size. Since this type of request can be used as a type of DoS attack, your router will discard the request, possibly resulting in a slower or lost connection.
If your ISP requires a user name and password to connect (using a PPPoE client like EnterNet or WinPOET, for example) then you may find it necessary or beneficial to set your MTU to a lower value than the standard 1500. You should try 1492, 1452, or 1404 (subtracting 8, 48, or 96), working from higher to lower to see which results in a higher speed connection.
Selecting and Configuring a Network Addressing Mode
Use the following information to determine which network addressing mode to use:
- If your ISP requires the installation of desktop login software (for example, EnterNet or WinPOET) and provides a login user name and password authentication to access the Internet, select NAT with PPPoE. PPPoE is commonly used in DSL connections.
- If your ISP did not provide you with any valid IP address, but instructed you to obtain an IP address automatically, select NAT with Dynamic Addressing. This is the most common configuration used with home or small office cable and DSL connections.
- If your ISP provided you with one single valid IP address, select NAT with Static Addressing.
- If your ISP provided you with multiple valid IP addresses (one for each PC), select NAT Disabled.
The following sections provide configuration procedures for each mode.
Configuring for a PPPoE Connection
To configure for a PPPoE connection:
- From the Network Addressing Mode window, select NAT with PPPoE.
- NETGEAR recommends that you leave the LAN IP Address field and the LAN Subnet Mask field at their default values of 192.168.0.1 and 255.255.255.0, respectively.
- Under ISP Settings, in the User Name box, type the login user name provided by your ISP. The user name identifies the PPPoE client.
- Under ISP Settings, in the Password box, type the login password provided by your ISP. The password authenticates the PPPoE session. This field is case sensitive.
- Check the Disconnect after _ Minutes of Inactivity checkbox to automatically disconnect the PPPoE connection after a specified period of inactivity.
- In the Minutes box, define a maximum number of minutes of inactivity.
You can enter a number from 1 to 99 minutes.
7. Click Update.
Once the firewall router has been updated, a message confirming the update is shown at the bottom of the browser window.
8. Click Restart for these changes to take effect.
The restart may take up to 90 seconds, during which time the firewall router is inaccessible and all network traffic through the firewall router is halted.
When your firewall router has successfully established a PPPoE connection, the Network page displays the firewall router's WAN IP settings. The WAN Gateway (Router) Address, WAN IP (NAT Public) Address, and DNS Servers are shown.
Configuring for Dynamic Addressing
To obtain IP settings dynamically:
-
From the Network Addressing Mode window, select NAT with Dynamic Addressing.
-
NETGEAR recommends that you leave the LAN IP Address field and the LAN Subnet Mask field at their default values of 192.168.0.1 and 255.255.255.0, respectively.
-
Under DNS Settings, enter the Host Name assigned to your PC by your ISP.
-
Click Update.
Once the firewall router has been updated, a message confirming the update is shown at the bottom of the browser window.
- Click Restart for these changes to take effect.
The restart may take up to 90 seconds, during which time the firewall router is inaccessible and all network traffic through the firewall router is halted.
When your firewall router has successfully received a DHCP lease, the Network page displays the firewall router's WAN IP settings. The WAN Gateway (Router) Address, WAN IP (NAT Public) Address, and DNS Servers are shown.
Configuring for Fixed Addressing with a Single Address
To use NAT with a single valid IP address:
- From the Network Addressing Mode window, select NAT with Fixed Addressing.
-
NETGEAR recommends that you leave the NETGEAR Firewall LAN IP Address field and the LAN Subnet Mask field at their default values of 192.168.0.1 and 255.255.255.0, respectively.
-
In the NETGEAR Firewall WAN IP (NAT Public) Address box, type the single valid IP address assigned by your ISP.
All network activity will appear to originate from this address.
- In the WAN Subnet Mask box, type your WAN subnet mask.
This subnet mask should be assigned by your ISP with your single valid IP address.
- In the WAN Gateway (Router) Address box, type the IP address of the next router or gateway to which your firewall router connects to access the Internet.
In cable and DSL environments, the WAN Gateway is located at the ISP.
- In the DNS Servers box, type the IP address or IP addresses of your DNS servers.
The firewall router will use these DNS servers for diagnostic tests and for upgrade and registration functionality.
- Click Update.
Once the firewall router has been updated, a message confirming the update is shown at the bottom of the browser window.
- Click Restart for these changes to take effect.
The restart may take up to 90 seconds, during which time the firewall router is inaccessible and all network traffic through the firewall router is halted.
Configuring for NAT Disabled
If you plan to disable NAT, you need to assign valid IP addresses to all computers and network devices on your LAN. However, you must begin the firewall router configuration by assigning your Management Station to an address within the factory default address range of the firewall router. After changing the firewall router's LAN IP Address and LAN Subnet Mask, you must reconfigure your Management Station to use the fixed addressing scheme in order to reconnect to the firewall router for further configuration.
To use valid IP addresses throughout your local network:
-
From the Network Addressing Mode window, select NAT Disabled.
-
In the NETGEAR Firewall LAN IP Address box, type a unique, valid IP address from your LAN address range.
The firewall router LAN IP Address is the address assigned to the firewall router's LAN port and is used for management of the firewall router.
-
In the LAN Subnet Mask box, type your network's subnet mask. The LAN Subnet Mask notifies your firewall router which IP addresses are on your LAN. The default value, 255.255.255.0, supports up to 254 IP addresses.
-
In the WAN Gateway (Router) Address box, type the IP address of the next router or gateway to which your firewall router connects to access the Internet.
In cable and DSL environments, the WAN Gateway is located at the ISP.
- In the DNS Servers box, type the IP address or IP addresses of your DNS servers.
The firewall router uses these DNS servers for diagnostic tests and for upgrade and registration functionality.
- Click Update.
Once the firewall router has been updated, a message confirming the update is displayed at the bottom of the browser window.
- Click Restart for these changes to take effect.
The restart may take up to 90 seconds, during which time the firewall router is inaccessible and all network traffic through the firewall router is halted. After the reboot, your firewall router's IP address will be changed to the IP address you entered in Step 2.
- Reconfigure your Management Station's IP address to an address on the same subnet as the firewall router's new LAN IP Address.
You will need to reconfigure all PCs on your LAN to use addresses on the new subnet. In addition, you need to configure all connected PCs to use the firewall router's IP address as their gateway.
Additional Notes
Unless you have selected the NAT Disabled addressing mode, your firewall router uses Network Address Translation (NAT) to share a single-user Internet account among all of your attached PCs.
In addition to the network settings described in this chapter, you must enable and configure the firewall router's DHCP server or manually configure your computers' DNS settings in order to obtain DNS name resolution.
For more information about NAT, DNS, DHCP, and other networking concepts, refer to Appendix B, “Networks, Routing, and Firewall Basics.”
Chapter 6
Content Filtering
This chapter describes how to use the the Model FR314, FR318 and FV318 Cable/DSL Firewall and VPN Routers' content filtering features. With these features, you can prevent objectional content from reaching the PCs on your LAN. You can block access to Web sites by category, domain name, or keyword.
Categories
To configure content filtering and blocking options by category, click Filter from the navigation bar on the left, and then click on the Categories subtopic. The Filter Categories window opens as shown in Figure 6-1 below:
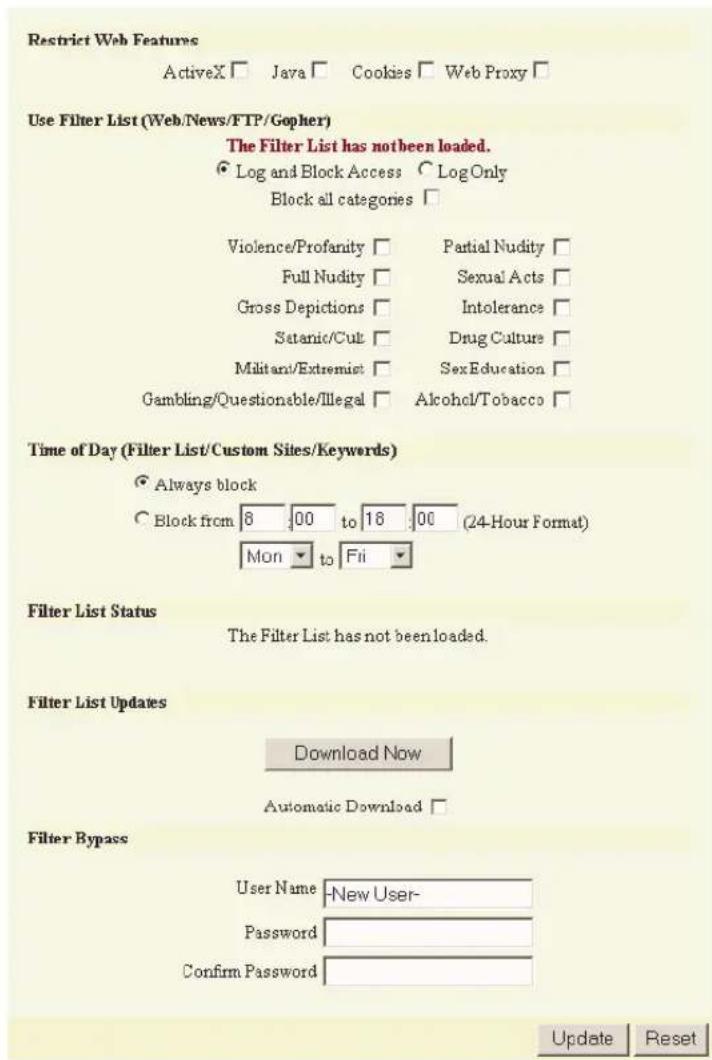
Figure 6-1. Filter Categories Window
Using the options in the Filter Categories window, you can configure content filtering and blocking in three different ways:
- Restrict Web Features
- Use Filter List (Web/News/FTP/Gopher)
• Time of Day
6-2 Content Filtering
Each category and its options are described in the sections that follow.
Restrict Web Features
You can restrict access to the following Web features:
- ActiveX
ActiveX is a programming language that embeds scripts in Web pages. Malicious programmers use ActiveX to delete files or compromise security. Select the ActiveX check box to block ActiveX controls.
• J a v a
Java is used to embed small programs, called applets, in Web pages. It is safer than ActiveX since it has built-in security mechanisms. Select the Java check box to prevent attacks and other threats created by Java applets.
- Cookies
Cookies are used by Web servers to track Web usage and remember user identity. Cookies can also invade users' privacy by tracking Web activities. Select the Cookies check box to disable cookies.
- Disable Web Proxy
When a proxy server is located on the WAN, LAN users can circumvent content filtering by pointing to this proxy server. The Disable Web Proxy check box disables access to proxy servers located on the WAN. It does not block Web proxies located on the LAN.
Use Filter List (Web/News/FTP/Gopher)
You use the options in this category in conjunction with the filter list. You can use these options to block access to certain types of content, log all access attempts, or both:
- Log and Block Access
The firewall router logs access attempts and blocks access to all sites on the Content Filter, custom, and keyword lists.
• L o g O n l y
This option lets you monitor inappropriate usage without restricting access. The firewall router logs and allows access to all sites on the Content Filter, custom, and keyword lists.
- Block all categories
The firewall router uses a Content Filter List to block access to objectional Web sites. The Content Filter List classifies objectional Web sites based upon input from a wide range of social, political, and civic organizations.
When you register the firewall router at http://fr3.netgear.com, you may download a one-month subscription to Content Filter List updates.
The following is a list of the Content Filter List categories:
Table 6-1. Content Filter List Categories
| Violence/Profanity | Partial Nudity |
| Full Nudity | Sexual Acts |
| Gross Depictions | Intolerance |
| Satanic/Cult | Drugs/Drug Culture |
| Militant/Extremist | Sex Education |
| Gambling/Questionable/Illegal | Alcohol/Tobacco |
See “Content Filter List Category Descriptions” on page 6-8 for a detailed description of the criteria used to define Content Filter List categories.
Time of Day
The Time of Day feature allows you to define specific times when content filtering is enforced. For example, you may want to filter your employees' Internet access during normal business hours, but allow unrestricted access at night and on weekends.
Note: Time of Day restrictions only apply to the Content Filter, Customized blocking and Keyword blocking. Restrict Web Features are not affected.
The Time of Day options are:
• A 1 w a y s B 1 o c k
Content filtering is enforced at all times.
- Block Between
Content filtering is enforced during the specified time and days. Enter the time period, in 24-hour format, and select the starting and ending day of the week to enforce content filtering.
Bypassing the Filter
You may allow a trusted user to bypass the content filtering and have access to sites that would otherwise be blocked by the router. This can be done by defining a user name and password in the Filter Bypass section of the Filter Categories menu.
To set up filter bypassing:
- Go to the Filter Categories menu.
- In the Filter Bypass section, enter an arbitrary name and password to be used by the trusted user.
- Click on the Update button.
When the trusted user wishes to access the Internet without being subject to blocking, he should follow these steps:
- Open your browser.
- Enter the router's LAN IP address (usually 192.168.0.1) in the browser's Address (or Location) box. The router's login screen will appear.
- Enter the name and password that you previously defined in the Filter Bypass menu.
- A message box will appear saying "
, you now have access to privileged services." Tip: Set the router's LAN IP address as your browser's default page.
Updating the Content Filter List
Since content on the Internet is constantly changing, the Content Filter List needs to be updated regularly. When you register the Netgear Firewall/VPN Router with NETGEAR, you can activate the Content Filter List and sign up to receive a one-month trial of the Content Filter List subscription at no charge. For information about purchasing a Content Filter List subscription, please contact NETGEAR at http://www.buynetgear.com.
With a Content Filter List subscription, you can download an updated Content Filter List at any time, or configure the firewall router to automatically download a new list every week.
To update the Content Filter List, click Filter from the navigation bar on the left, and then click the Categories subtopic. The Filter Categories window opens as shown in Figure 6-1 above. Scroll to the Filter Updates section at the bottom of the menu.
To configure Content Filter List updates, click one of the following options:
- Download Now
Immediately downloads and installs a new Content Filter List. This process may take several minutes and requires a current subscription to Content Filter List updates. Downloading the Content Filter List interrupts Internet access, so NETGEAR recommends that you download new lists when Internet access is at a minimum.
• Automatic Download
Enables automatic, weekly downloads of the Content Filter List. The default download time and day are determined using a simple algorithm that results in a default time between 10 p.m. to 6 a.m. and can be any day of the week. Once loaded, the creation date of the current active list is displayed at the top of the window. A current subscription to the Content Filter List updates is required.
After configuring these options, click the Update button. Once the firewall router is updated, a message confirming the update is displayed at the bottom of the window.
The Content Filter List expires 30 days after it is downloaded unless you purchase a subscription. The filter list may also be erased if there is a failure downloading a new list. If the filter list has expired or is not loaded, access to your manually-defined forbidden domains and keywords is still blocked. See “Customizing the Filter List” for information on blocking access to specific domains or to Web sites that contain specific keywords.
Customizing the Filter List
To customize the Content Filter List, click Filter from the navigation bar on the left, and then click the Customize subtopic. The Filter Customize window opens as shown in Figure 6-2 below:
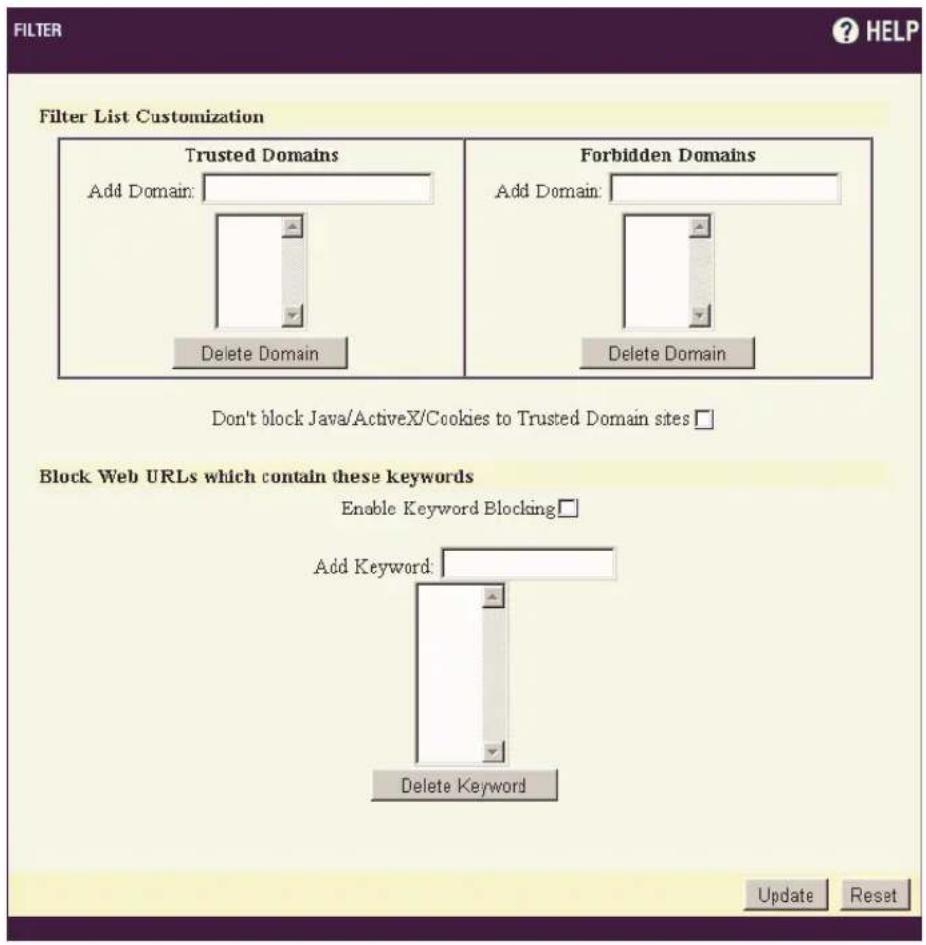
Figure 6-2. Filter Customize Window
You can customize the Content Filter List by specifying trusted domains, forbidden domains, and blocking access to Web sites whose addresses contain specified keywords:
- Trusted Domains
To allow access to a Web site that is blocked by the Content Filter List, enter the host name, such as "www.ok-site.com", into the Trusted Domains boxes. Do not include the prefix "http://". All subdomains are allowed. For example, entering "yahoo.com" will allow "mail.yahoo.com" and "my.yahoo.com". Up to 256 entries are supported in the Trusted Domains list.
- Forbidden Domains
To block a Web site that is not blocked by the Content Filter List, enter the host name, such as "www.bad-site.com" into the Forbidden Domains box. Do not include prefix "http://". All subdomains are blocked. For example, entering "yahoo.com" will also block "mail.yahoo.com" and "my.yahoo.com". Up to 256 entries are supported in the Forbidden Domains list.
- Blocking by Keyword
The Netgear Firewall/VPN Router allows you to block Web URLs containing keywords specified by you. For example, if the keyword "XXX" is specified, the URL http://www.new-site.com/xxx.html is blocked, even if it is not included in the Content Filter List. Up to 100 entries are supported in the Keyword list.
After customizing your Content Filter List, click the Update button. Once the firewall router has been updated, a message confirming the update is displayed at the bottom of the window.
Note: Customized domains do not need to be reentered when the Content Filter List is updated each week and do not require a filter list subscription.
To remove a trusted domain, forbidden domain, or keyword, select it from the appropriate list, and click Delete Domain or Delete Keyword. After you delete an item from one of these lists, a message confirming the change is displayed at the bottom of the window.
Content Filter List Category Descriptions
Violence/Profanity (graphics or text)
Pictures or text exposing extreme cruelty, or physical or emotional acts against any animal or person which are primarily intended to hurt or inflict pain. Obscene words, phrases, and profanity is defined as text that uses, but is not limited to, George Carlin's seven censored words more often than once every 50 messages (Newsgroups) or once a page (Web sites).
Partial Nudity
Pictures exposing the female breast or full exposure of either male or female buttocks except when exposing genitalia. (Excludes all swimsuits, including thongs.)
Full Nudity
Pictures exposing any or all portions of the human genitalia. Excluded from the Partial Nudity and Full Nudity categories are sites containing nudity or partial nudity of a wholesome nature. For example: Web sites containing publications such as National Geographic or Smithsonian Magazine. Or sites hosted by museums such as the Guggenheim, the Louvre, or the Museum of Modern Art.
Sexual Acts
Pictures or text exposing anyone or anything involved in explicit sexual acts and or lewd and lascivious behavior, including masturbation, copulation, pedophilia, and intimacy involving nude or partially nude people in heterosexual, bisexual, lesbian or homosexual encounters. Also includes phone sex ads, dating services, and adult personals, CD-ROM's, and videos.
Gross Depictions
Pictures or descriptive text of anyone or anything which are crudely vulgar or grossly deficient in civility or behavior, or which show scatological impropriety. Includes such depictions as maiming, bloody figures, or indecent depiction of bodily functions.
Intolerance
Pictures or text advocating prejudice or discrimination against any race, color, national origin, religion, disability or handicap, gender, or sexual orientation. Any picture or text that elevates one group over another. Also includes intolerant jokes or slurs.
Satanic/Cult
Pictures or text advocating devil worship, an affinity for evil or wickedness, or the advocacy to join a cult. A cult is defined as: A closed society that is headed by a single individual where loyalty is demanded and leaving is punishable.
Drugs/Drug Culture
Pictures or text advocating the illegal use of drugs for entertainment. Includes substances used for other than their primary purpose to alter the individual's state of mind, such as glue sniffing. This excludes currently illegal drugs legally prescribed for medicinal purposes (for example, drugs used to treat glaucoma or cancer).
Militant/Extremist
Pictures or text advocating extremely aggressive and combative behaviors, or advocacy of unlawful political measures. Topics include groups that advocate violence as a means to achieve their goals. Includes "how to" information on weapons making, ammunition making, or the making or use of pyrotechnics materials. Also includes the use of weapons for unlawful reasons.
Sex Education
Pictures or text advocating the proper use of contraceptives. This topic would include condom use, the correct way to wear a condom and how to put a condom in place. Also included are sites relating to discussion about the use of the Pill, IUDs, and other types of contraceptives. In addition to the above, this category includes discussion sites on discussing diseases with a partner, pregnancy, and respecting boundaries. Excluded from this category are commercial sites wishing to sell sexual paraphernalia.
Questionable/Illegal Gambling
Pictures or text advocating materials or activities of a dubious nature which may be illegal in any or all jurisdictions, such as illegal business schemes, chain letters, copyright infringement, computer hacking, phreaking (using someone's phone lines without permission), and software piracy. Also includes text advocating gambling relating to lotteries, casinos, betting, numbers games, on-line sports, or financial betting, including non-monetary dares.
Alcohol & Tobacco
Pictures or text advocating the sale, consumption, or production of alcoholic beverages and tobacco products.
Chapter 7
Network Access Rules
This chapter describes the Model FR314, FR318 or FV318 Cable/DSL Firewall Router's Network Access Rules. Network Access Rules include inbound and outbound access policy, user authentication and remote management.
Services
To configure inbound and outbound access policies by service, click Firewall from the navigation bar on the left, then Access, and then Services. The Network Access Rules window opens as shown in Figure 7-1 below:
Network Access Rules (By Service)
| LAN Out | Public LAN Server | |
| Web (HTTP) | ☑ | 0.0.0.0 |
| File Transfer (FTP) | ☑ | 0.0.0.0 |
| Send Email (SMTP) | ☑ | 0.0.0.0 |
| Retrieve Email (POP3) | ☑ | 0.0.0.0 |
| Name Service (DNS) | ☑ | 0.0.0.0 |
| News (NNTP) | ☑ | 0.0.0.0 |
| Ping | ☑ | 0.0.0.0 |
| Key Exchange (IKE) | ☑ | 0.0.0.0 |
| Default | ☑ |
Network Connection Inactivity Timeout
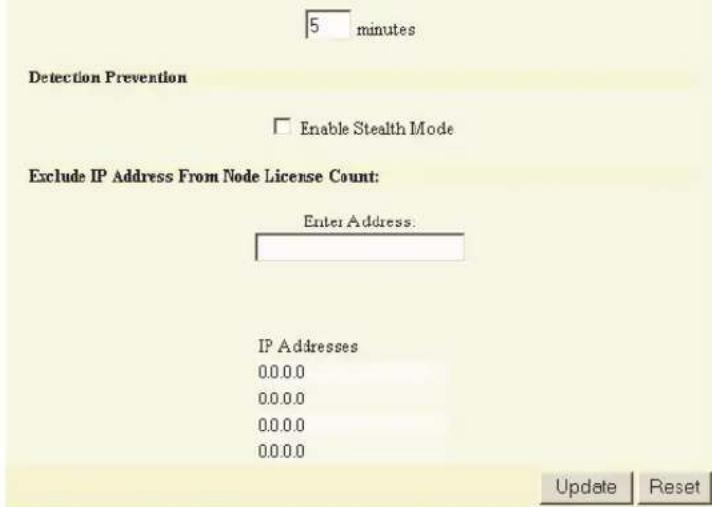
Figure 7-1. Network Access Rules Window
Note: The LAN In column is not displayed if NAT is enabled.
The Services window allows you to customize Network Access Rules by service. The Default rule, at the bottom of the table, encompasses all Services.
Network Access Rules Options
This section describes the options you can configure in the Network Access Rules window. For procedural information, also see “Creating a Public LAN Server (Port Forwarding)” on page 7-4 and “Adding a Service” on page 7-5.
• LAN Out
If a LAN Out check box is checked (the default), users on your LAN are able to access that service on the Internet. Otherwise, they are blocked from accessing that service.
• L A N I n
The LAN In column is not visible when NAT is enabled (the default). If a LAN In check box is checked, users on the Internet may access all computers on your LAN for that service. By default, LAN In check boxes are not checked; use caution when enabling this option.
• Public LAN Server
A Public LAN Server is a server on your network that is designated to receive inbound traffic for a specific service, such as Web access or e-mail. You may define a Public LAN Server by entering the server's IP address in the Public LAN Server box for the appropriate service. If you do not have a Public LAN Server for a service, enter "0.0.0.0" in the box. See "Creating a Public LAN Server (Port Forwarding)," next for more information.
• Network Connection Inactivity Timeout
If a connection to a remote server remains idle for more than five minutes, the firewall router closes the connection. Without this timeout, Internet connections could stay open indefinitely and create potential security holes. You may increase the Inactivity Timeout if applications, such as Telnet and FTP, are frequently disconnected.
• Detection Prevention
To prevent all unforwarded ports from responding to outside requests, check the box titled "Enable Stealth Mode." Please refer to "Stealth Mode" on page 7-7 for details and considerations on the use of this mode.
• Exclude IP Address from Node License count
If your local network contains active IP devices that do not require Internet access, such as print servers, enter those IP addresses here to prevent these devices from being counted toward your maximum node count. Please refer to “Node License Count” on page 7-8 for details and on the use of this feature.
Creating a Public LAN Server (Port Forwarding)
A Public LAN Server is a server on your LAN that is accessible to users on the Internet. Creating a Public LAN Server in the Services window is the easiest way to set up a mail server, Web server, or other public server, on your LAN.
To create a Public LAN Server:
-
Determine what type of service your server uses, such as FTP, Web, or Mail. Locate this service in the Services window. If the service does not appear in the Services window, you need to define it in the Add Service window (see “Adding a Service,” next).
-
Enter the server's IP address in the Public LAN Server box for the appropriate service.
Note: If NAT is enabled, this IP address should be a private LAN address. Users on the Internet will access the Public LAN Server at the WAN IP (NAT Public) Address.
You do not need to select the LAN In checkbox (for NAT Disabled Addressing Mode) to allow inbound access to a Public LAN Server.
- Click Update.
After the firewall router is updated, a message confirming the update is displayed at the bottom of the window.
To configure additional Public LAN Servers, repeat these steps.
Notes on DMZ or Bastion Host
Some routers allow the user to specify one server on the local network to receive all inbound traffic that is not otherwise forwarded. This feature is referred to as Default Server, DMZ (a misnomer in this application), or Bastion Host. By indiscriminately exposing all ports of the designated PC, the user defeats the purpose of a hardware firewall and creates a large security risk. Therefore this feature is not supported in this product. We recommend that the user determine which ports are used by network applications, and only forward those ports that are necessary.
Additional Notes
- In NAT Disabled Network Addressing Mode, users on the Internet will access Public LAN Servers at their valid, LAN IP addresses.
- If NAT is enabled, users on the Internet will access Public LAN Servers at the WAN IP (NAT Public) Address.
- If users on the Internet cannot access Public LAN Servers, make sure that the Public LAN Servers are properly configured and have Internet connectivity. If you are trying to access the servers by name rather than by IP address, confirm that the DNS mx-record points to the correct IP address: the WAN IP (NAT Public) Address, if NAT is enabled.
- If NAT is enabled, you cannot have multiple LAN servers of the same service, such as multiple Web servers.
Adding a Service
To add a service that is not listed in the Services window, click Access from the navigation bar on the left, and then click the Add Service subtopic. The Add Service window opens:
![Access ? HELP Services added here will appear in the "Services" page. Add a known service: [Custom Service] Or, add a custom service: Name Port Range* Protocol TCP(6) Add File Transfer (FTP) [21,6] Key Exchange (KE) [500,17] Name Service (DNS) [53,17] Name Service (DNS) [53,6] News (NNTP) [119,6] Ping [8,1] Ping [0,1] Retrieve Email (POP3) [110,6] Send Email (SMTP) [25,6] Web (HTTP) [60,6] Enable Logging Modify Delete *TCP Port, UDP Port, or ICMP Type](/content/2026/05/1055895/images/33136ebc8bea4889a1a14275dcdb0ab2b80aec09f09f9a49b3f97b4d8285aaaa.jpg)
Figure 7-2. Add Service Window
Currently defined services are listed on the right side. These services also appear in the Services window.
Two numbers appear in brackets next to each service. The first number indicates the service's IP port number. The second number indicates the IP protocol type (6 for TCP, 17 for UDP, or 1 for ICMP).
Note: You may notice multiple entries with the same name. For example, the default configuration has two entries labeled "Name Service (DNS)"--for UDP port 53 and TCP port 53. Multiple entries with the same name are grouped together, and are treated as a single service. Up to 128 entries are supported.
From the Add Service window, you can add a known service or a custom service. You can also use this window to disable logging and to remove services. The following sections provide procedures for each task.
Adding a Known Service
To add a known service:
-
From the "Add a known service" list box, select the name of the service you want.
-
Click Add.
The new service will appear in the listbox on the right side of the window. Note that some services add more than one entry to the list box.
Adding a Custom Service
To add a custom service:
-
From the "Add a known service" list box, select [Custom Service].
-
In the Name box, type a unique name, such as "CC:mail" or "Quake".
-
In the Port Range boxes, type the beginning number of the IP port range and ending number of the IP port range. If the service only requires one IP port, enter the single port number in both Port Range boxes.
Note: Visit http://www.ietf.org/rfc/rfc1700.txt for a list of IP port numbers.
-
In the Protocol box, select the IP protocol type: TCP, UDP, or ICMP.
-
Click Add.
The new service will appear in the listbox on the right side of the window.
Note: If multiple entries with the same name are created, they are grouped together as a single service and may not function as expected.
Disabling Logging
You can disable logging of events in the Event Log. For example, if LINUX's authentication messages are filling up your log, you may disable logging of LINUX authentication.
To disable logging:
- From the list of currently defined services, select the name of the relevant service.
- Clear the Enable Logging check box.
- Click Modify to apply the change.
Deleting a Service
To delete a service:
- In the Network Access Rules window, make sure the LAN In and LAN Out boxes for this service are not checked.
- From the list of currently defined services in the Add Service window, select the name of the relevant service.
- Click Delete Service.
- If multiple entries with the same name exist, delete all entries to remove the service.
Stealth Mode
When a remote computer attempts a connection to your router, the router first checks to see if the requested port is configured for forwarding to a host on the LAN. If not, the router sends a reset packet back to the remote client indicating that the connection is refused. This is the correct behavior based on the IP protocol specifications. However, you may prefer that the router not respond at all, as any response confirms that a device exists at the IP address the client tried to connect to. If no response is made, the router's IP address appears to be unused. This is known as stealth mode.
Stealth mode may cause problems with some applications, such as sending email. If your ISP's mail server runs on UNIX or Linux (common for large ISPs), that mail server will attempt to send you traffic whenever you try to send mail to it. That traffic is called authentication (or Identd) and it uses TCP port 113. If your router is in Stealth mode, it will ignore the incoming authentication packet, and the mail server may not forward your mail. If your router is not in Stealth-mode, it will send a NACK-RST packet, which may allow the ISP's mail server to continue anyway.
If you have enabled stealth mode and you are having difficulties sending regular email or NETGEAR logs or alerts out through a mail server run by your ISP, you may want to enable forwarding of authentication (Identd) traffic in the Add Services menu. Follow these steps:
- Go to the Add Service menu.
- Find Authentication in the "Add a known service" dropdown menu.
- Click the Add button.
- Go to the Services menu.
- Find the Public LAN Server box for Authentication near the bottom.
- Type in the router's LAN IP address.
- Click Update.
This change will allow the router to respond to the ISP mail server's authentication request.
Node License Count
The Netgear Firewall/VPN Routers provide Internet access sharing capability for multiple users. A “User” or “Node” is a networked device with an IP address, most commonly a computer. The FR314 and FR318 firewall routers allow a maximum of 8, 20 or 45 users/nodes, while the FV318 allows 20 or 45 users/nodes. The router’s 'node license' is initially the smallest of these numbers, but can be increased in the amounts shown by purchasing node license upgrades from Netgear.
These node licenses are counted cumulatively, not simultaneously. When the firewall router is powered on or rebooted, it starts counting LAN IP addresses against the license. When a computer or other device connects to the LAN port of the firewall, the router detects it via broadcast, and stores the computer's IP address in memory. Restarting the router will erase the stored IP addresses and start the process all over again. When 8, 20, or 45 IP addresses have been stored in the router's memory, the router will not permit any additional addresses to access the Internet. Therefore, the router restricts the number of IP addresses on the LAN, not the number of simultaneous connections to the Internet.
When the number of IP addresses allowed by your node license is exceeded, the General Status menu will display the message: “License exceeded: too many IP addresses are in use on your LAN.”
Excluding Devices from Node License Count
If you have devices on your network that do not need Internet access, such as print servers or file servers, you should exclude them from counting toward your node license. For example, the FR314 allows Internet access for up to 8 users. If your local network contains 8 PCs and a print server, it is possible that your router will detect the print server and count it toward your node license. Then only 7 of your users will have Internet access. To avoid this situation, use the “Exclude IP Address from Node License count” feature in the Firewall Access Services menu to enter IP addresses to be excluded.
You may also discover that a computer with two NIC cards can take up two IP licenses. You will need to reconfigure your network to avoid these problems. Turn off IP forwarding on Windows NT or 2000 Servers that use two NICs.
Chapter 8
Logging and Alerting
This chapter describes the Model FR314, FR318 or FV318 firewall router's logging, alerting and reporting features.
Viewing the Log
The firewall router maintains an event log that lists potential security threats. You can view this log from the Web Management Interface or you can specify that the log is automatically sent to an e-mail address for convenience and archiving.
You can also configure the firewall router to alert you of important events, such as an attack to the router. The firewall router immediately sends alerts to the specified e-mail address or e-mail pager.
To view the log, click Firewall from the navigation bar at the left and then click the Log subtopic and then the View Log subtopic. The View Log window opens.
| Time / | Message | Source | Destination | Notes |
| 01/00/1900 00:00:00.240 | Netgear activated | |||
| 01/00/1900 00:00:00.432 | Successful administrator login | 192.168.0.4, LAN | 192.168.0.1 |
Figure 8-1. View Log Window
The log is displayed in a table. Each log entry contains the date and time of the event and a brief message describing the event. Some log entries contain additional information such as IP addresses, port numbers, or notes. You can sort the messages by Time, Message, Source address, Destination address, or Notes by clicking on the desired column heading. You can also specify that the sorted messages are displayed in either ascending or descending order by clicking the small arrow to the right of the column heading.
Depending on your Web browser, you should be able to copy entries from the log and paste them into documents. You can also configure the Log Settings (described on page 8-4) to specify that the event log is sent to you via e-mail.
Log Messages
The most common messages are:
• TCP, UDP, or ICMP packets dropped
When IP packets are blocked by the firewall router, dropped TCP, UDP and ICMP messages are displayed. The messages include the source and destination IP addresses of the packet. The TCP or UDP port number or the ICMP code follows the IP address. Log messages usually include the name of the service in quotation marks.
- Web, FTP, Gopher, or Newsgroup blocked
When a PC on your network attempts to connect to a blocked site or newsgroup, a log is displayed. The PC's IP address, Ethernet address, the name of the blocked Web site, and the Content Filter List Code are displayed. Code definitions for the 12 Content Filter List categories are shown below.
Table 8-1. Content Filter List Categories
| Code Category | |
| a | Violence/profanity |
| b Partial nudity | |
| c Full nudity | |
| d Sexual acts | |
| e Gross depictions | |
| f Intolerance | |
| g Satanic/cult | |
| h Drug culture | |
| i Militant/extremist | |
| j Sex education | |
| k Gambling/illegal | |
| l Alcohol/tobacco | |
For descriptions of these categories, see “Content Filter List Category Descriptions” on page 6-8.
• ActiveX, Java, Cookie or Code Archive blocked
When ActiveX, Java or Web cookies are blocked, messages with the source and destination IP addresses of the connection attempt are displayed.
• Ping of Death, IP Spoof, and SYN Flood Attacks
The IP address of the PC under attack and the source of the attack are displayed. In many attacks, the source address shown is forged and does not reflect the real source of the attack.
Note: Varying conditions can produce symptoms that appear as an attack, even when no one is deliberately attacking the LAN. To follow up on a possible attack, contact your ISP to determine the source of the attack. Regardless of the nature of the attack, the LAN is protected; you do not need to take further steps.
Log Settings
To configure log settings, click Firewall from the navigation bar on the left. Click Log, and the click Log Settings. The Log Settings window opens.
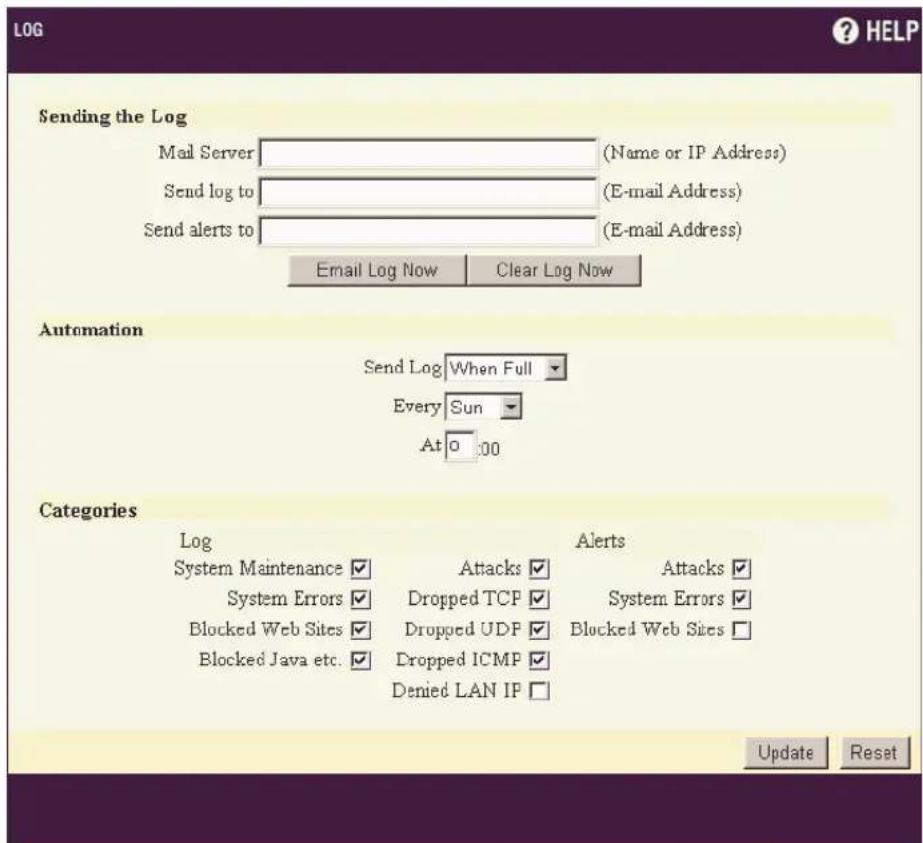
Figure 8-2. Log Settings Window
8-4 Logging and Alerting
The Log Settings options are grouped as follows:
- Sending the Log
These options specify where logs and alerts are sent, and are described on page 8-5.
- Automation
These options specify how often logs are sent to the specified e-mail address, and are described on page 8-5.
- Categories
These options specify what types of messages appear in the log, and are described on page 8-6.
After making any changes to the Log Settings, click Update. Once the firewall router is updated, a message confirming the update is displayed at the bottom of the window.
Sending the Log
You can configure where to send logs and alerts:
- Mail Server
Specifies the name or IP address of your outgoing (SMTP) mail server. If you leave this box blank, log and alert messages are not sent via e-mail to any address.
- S e n d L o g T o
Specifies the e-mail address to which event logs are sent. After the log is sent, the log is cleared from the firewall router's memory. If you leave this box blank, the log is not sent via e-mail to any address.
- S e n d A l e r t s T o
Specifies the e-mail address to which alerts are sent when attacks or system events occur. You can enter a standard e-mail address or the address of an e-mail pager. If you leave this box blank, alerts are not sent via e-mail to any address.
• E - m a i l L o g N o w
Specifies that the log is immediately sent to the address in the Send Log box. After the log is sent, the log is cleared from the firewall router's memory.
- C l e a r L o g N o w
Deletes the contents of the log.
Automated Sending
You can specify that logs are automatically sent to the specified e-mail address with these options:
- S e n d L o g
Specifies how often to send the logs: Daily, Weekly, or When Full.
• E v e r y
Specifies which day of the week to send the log. Relevant when the log is sent weekly or daily.
- At
Specifies the time of day to send the log. Relevant when the log is sent daily.
If the Weekly or Daily option is selected and the log fills up, the log is automatically e-mailed to the specified e-mail address.
Note: If the firewall router cannot e-mail the log file, the log buffer may fill up. In this case, the router overwrites the log and discards its contents.
Log and Alert Categories
You can define which log messages appear in the firewall router's Event Log, and which events trigger an alert message.
Log Categories
Use these check boxes to specify which messages appear in the Event Log.
- System Maintenance
When enabled, log messages showing general system activity, such as administrator logins, automatic downloads of the Content Filter Lists, and system activations, are displayed.
- System Errors
When enabled, log messages showing problems with DNS, E-mail, and automatic downloads of the Content Filter List are displayed.
- Blocked Web Sites
When enabled, log messages showing Web sites or newsgroups blocked by the Content Filter List or by customized filtering are displayed.
- Blocked Java, ActiveX, and Cookies
When enabled, log messages showing blocking of Java, ActiveX, and Cookies are displayed.
- A t t a c k s
When enabled, log messages showing Denial of Service attacks, such as SYN Flood, Ping of Death, and IP spoofing, are generated.
- Dropped TCP
When enabled, log messages showing blocked incoming TCP connections are displayed.
- Dropped UDP
When enabled, log messages showing blocked incoming UDP packets are displayed. - Dropped ICMP
When enabled, log messages showing blocked incoming ICMP packets are displayed.
• D e n i e d L A N I P
When enabled, log messages showing denied LAN IP addresses are displayed.
By default, all messages are shown except Denied LAN IP messages.
Alert Categories
Alerts are events, such as attacks, that warrant immediate attention. When events generate alerts, messages are immediately sent to the e-mail address specified in the Send Alerts to Box (see page 8-5). You can specify which types of events generate alert messages.
- A t t a c k s
When enabled, log entries categorized as Attacks generate an alert message.
- System Errors
When enabled, log entries categorized as System Errors generate an alert message.
- Blocked Web Sites
When enabled, log entries categorized as Blocked Web Sites generate an alert message.
By default, the Attacks and System Errors check boxes are selected, and the Blocked Web Sites check box is cleared.
Log Reports
The firewall router is able to perform a rolling analysis of the event log to show the top 25 most frequently accessed Web sites, the top 25 users of bandwidth by IP address, and the top 25 services consuming the most bandwidth.
To configure log reporting options, click Firewall from the navigation bar on the left. Click Log, and then click Log Reports. The Log Reports window opens.
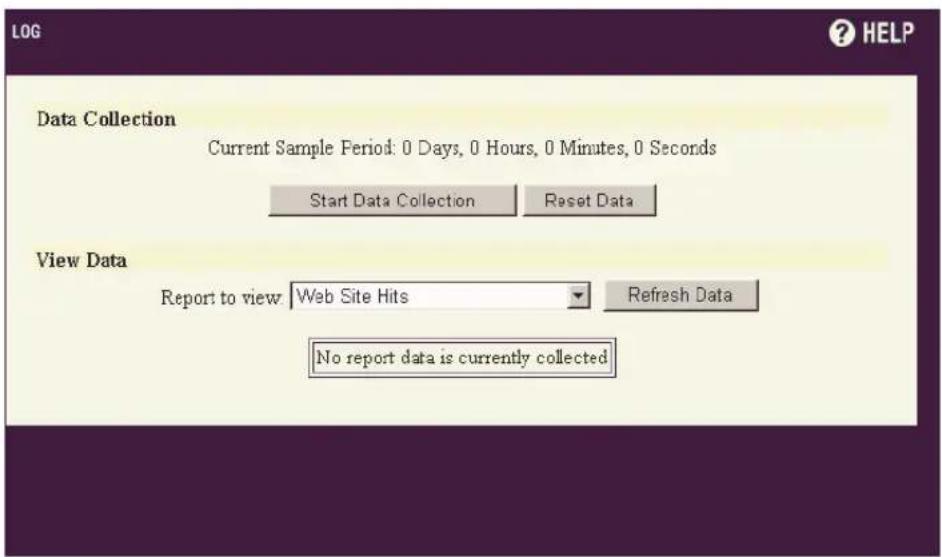
Figure 8-3. Log Reports Window
In this window, you can configure how data is collected and view available reports. The Log Report options are grouped as follows:
- Data Collection
• V i e w D a t a
These options are described in the following sections.
Data Collection
The Data Collection options are:
- Start Data Collection
Click the Start Data Collection button to begin log analysis. When log analysis is enabled, the button reads Stop Data Collection.
- Reset Data
Click the Reset button to clear the report statistics and begin a new sample period. The sample period is also reset when data collection is stopped or started, and when the firewall router is restarted.
View Data
You can select which report to view in the “Report to view” list box. The available reports are:
- Web Site Hits
Lists the URLs for the 25 most frequently accessed Web sites and the number of hits to that site during the current sample period. You can use this report to help ensure that, for the most part, users are accessing appropriate Web sites. If leisure, sports, or other inappropriate sites top this list, you may want to consider changing or more strictly enforcing your Acceptable Use Policy.
• Bandwidth Usage by IP Address
Lists IP addresses of the 25 top users of Internet bandwidth on your network and the number of megabytes transmitted during the current sample period.
• Bandwidth Usage by Service
Lists the names of the 25 top Internet services (for example, HTTP, FTP, or RealAudio) and the number of megabytes received from the service during the current sample period. You can use this report to determine whether services being used are appropriate for your situation. If services such as video or push broadcasts are consuming a large portion of your available bandwidth, you may choose to block these services.
To update the selected report, click Refresh Data.
Chapter 9
DHCP Server Configuration
This chapter describes how to configure the Model FR314, FR318 or FV318 Cable/DSL Firewall Router's DHCP server.
DHCP Server Overview
DHCP, or Dynamic Host Configuration Protocol, is a method for distributing TCP/IP settings from a centralized server to the computers on a network. The firewall router's DHCP server distributes IP addresses, gateway addresses, DNS server addresses, and other IP configuration information to the computers on your LAN.
The firewall router is shipped with its DHCP server enabled and preconfigured to automatically assign the following TCP/IP configuration information to attached PCs on its local network:
• PC or workstation IP addresses—192.168.0.2 through 192.168.0.9
- Subnet mask—255.255.255.0
- Gateway address (the router)—192.168.0.1
These addresses are part of the IETF-designated private address range for use in private networks.
Note: Make sure there are no other active DHCP servers on the LAN before you connect the firewall router.
Configuring the DHCP Server
To modify the configuration of the DHCP server, click General from the navigation bar on the left, and then click the DHCP subtopic. The DHCP Server Configuration window opens.
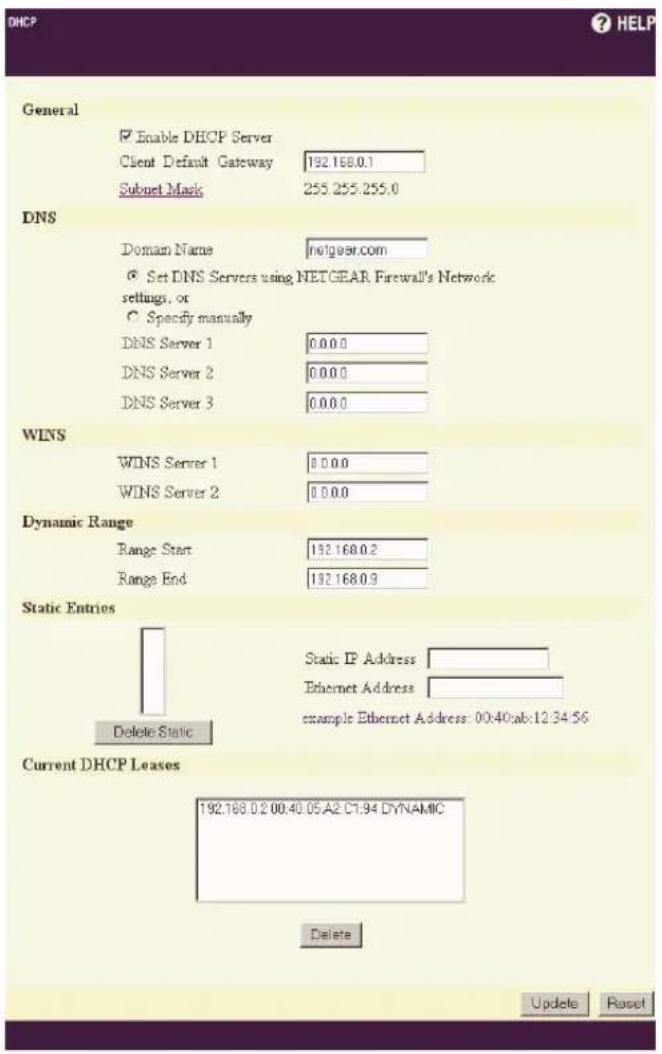
Figure 9-1. DHCP Server Configuration Window
The DHCP Server configuration options are grouped into these categories:
- General Setup
- DNS Setup
• W I N S S e t u p
- Dynamic Ranges
- Static Entries
- Current DHCP Leases
All options are described in the sections that follow.
General Setup
The General Setup options are:
- Enable DHCP Server
By default, the firewall router's DHCP server is enabled. To disable the DHCP server, clear this check box.
- Client Default Gateway
In most cases, the firewall router is the only or primary router on a local network. Therefore, the firewall router assigns its own LAN IP Address as Gateway to the attached PCs on its local network by default. To specify another address, type it in the Client Default Gateway box.
DNS Setup
The DNS Setup options are:
• D o m a i n N a m e
Specifies the registered domain name for your network or Internet service provider. An example of a domain name is "your-domain.com". If you do not have a domain name, leave this box blank.
- Set DNS Servers using NETGEAR Firewall's Network settings
Specifies that the DNS servers that you specified in the Network Settings window are used.
- Specify manually
Specifies that different DNS servers than the ones specified in the Network Settings window are used. If you select this check box, enter the new DNS Server addresses in the DNS Server 1, DNS Server 2, and DNS Server 3 boxes.
DNS servers are used by computers on your LAN to resolve domain names to IP addresses. You only need to enter one DNS Server address, but multiple DNS entries will improve performance and reliability.
WINS
WINS, or Windows Internet Naming Service, is a server process for resolving Windows-based computer names to IP addresses. If a remote network contains a WINS server, your Windows PCs can gather information from that WINS server about its local hosts. This allows your PCs to browse that remote network using Network Neighborhood.
If you will be connecting to a remote network that operates a WINS server, enter the WINS Server address(es) in the WINS Server 1 and WINS Server 2 boxes. Otherwise, leave these boxes blank.
Dynamic Ranges
The Dynamic Range is the range of IP addresses dynamically assigned by the DHCP server. The Dynamic range should be in the same subnet as the firewall router's LAN IP address.
By default, the firewall router assigns addresses from 192.168.0.2 through 192.168.0.9. To specify another range for assigning addresses, type the beginning IP address in the Range Start box, type the ending IP address in the Range End box, and then click Update. When the firewall router is updated, a message confirming the update is displayed at the bottom of the window.
Note: The DHCP server may assign a total of 254 dynamic and static IP addresses. However, only eight addresses are allowed to access the Internet through the firewall router unless you purchase a user-limit upgrade.
Note: The DHCP Server will not assign an IP address from the dynamic range if the address is already being used by a computer on your LAN.
Static Entries
The DHCP Server can also assign Static Entries, or static IP addresses, to computers on the LAN. With a Static Entry, the PC will always receive the same IP address each time it access the DHCP server. Static IP addresses should be assigned to servers that require permanent IP settings.
Note: When assigning a Static Entry, choose an IP address from the firewall router's LAN subnet (such as 192.168.0.n), but do not choose an address within the Dynamic Range defined in the previous section.
To assign static IP addresses:
- In the Static IP Address box, type the IP address to assign to your computer or server.
-
In the Ethernet Address box, type the Ethernet (MAC) address of your computer or server.
-
Click Update.
When the firewall router is updated, a message confirming the update is displayed at the bottom of the window.
- Continue this process until you have added all the necessary static entries.
To remove a static address:
-
Select the address from the list of static entries.
-
Click Delete Static.
When the static entry is deleted, a message confirming the update is displayed at the bottom of the window.
Current DHCP Leases
IP addresses assigned (“leased”) by the DHCP Server are shown in the Current DHCP Leases box. Each entry lists the IP address, the Ethernet MAC address, and whether the entry is Dynamic or Static. To cancel a current lease, select the entry and click the Delete button.
If the firewall router is rebooted after assigning an IP address, the address will not appear in the Current DHCP Leases box until the lease is renewed. Addresses assigned by the firewall router have a lease period of one week.
Chapter 10
Virtual Private Networking
This chapter describes how to use the virtual private networking (VPN) features of the FR318 and FV318. A VPN provides secure, encrypted communication between your local network and a remote network.
Note: In order to perform the VPN function, the FR318 must be upgraded by purchasing the VPN Upgrade Option. The FV318 does not require an upgrade. The FR314 does not support VPN.
What is a VPN
A VPN can be thought of as a secure tunnel passing through the Internet, connecting two devices such as a PC or router, which form the two tunnel endpoints. At one endpoint, data is encapsulated and encrypted, then transmitted through the Internet. At the far endpoint, the data is received, unencapsulated and decrypted. Although the data may pass through several Internet routers between the endpoints, the encapsulation and encryption forms a virtual “tunnel” for the data.
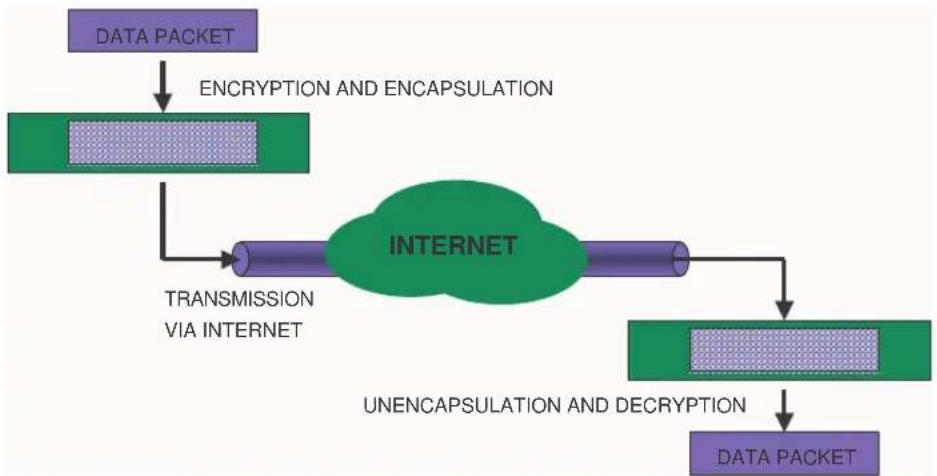
flowchart
graph TD
    A["DATA PACKET"] --> B["ENCRYPTION AND ENCAPSULATION"]
    B --> C["TRANSMISSION VIA INTERNET"]
    C --> D["UNENCAPSULATION AND DECRYPTION"]
    D --> E["DATA PACKET"]
The tunnel endpoint device, which encodes or decodes the data, can either be a PC running VPN client software or a VPN-enabled router or server. Several software standards exist for VPN data encapsulation and encryption, such as PPTP and IPSec. Your Netgear Firewall/VPN Router uses IPSec.
To set up a VPN connection, you must configure each endpoint with specific identification and connection information describing the other endpoint. This set of configuration information defines a security association (SA) between the two points. The FR318 with the VPN option installed is capable of creating one security association. The FV318 is capable of five Security Associations.
Two common applications of VPN are
- secure access from a remote PC, such as a telecommuter connecting to an office network
• secure access between two networks, such as a branch office and a main office
These applications are described below.
Accessing Network Resources from a VPN Client PC
VPN client remote access allows a remote PC to connect to your network from any location on the Internet. In this case, the remote PC is one tunnel endpoint, running VPN client software. The Netgear VPN-enabled router on your network is the other tunnel endpoint, as shown below.
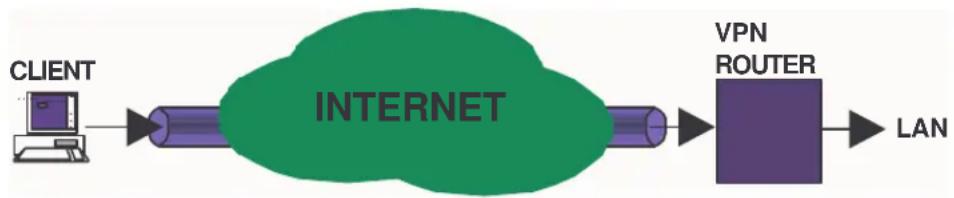
flowchart
graph LR
    A["CLIENT"] --> B["INTERNET"]
    B --> C["VPN ROUTER"]
    C --> D["LAN"]
In some cases, the client PC may connect to the Internet through a local non-VPN-enabled router, as shown below:

flowchart
graph LR
    A["CLIENT"] --> B["SIMPLE ROUTER"]
    B --> C["INTERNET"]
    C --> D["VPN ROUTER"]
    D --> E["LAN"]
If the non-VPN router is performing NAT, it must support “VPN-passthrough” of IPSec-encoded data.
For a PC to act as a tunnel endpoint to your Netgear Firewall/VPN Router, the PC must run a VPN client program based on the IPSec protocol. Netgear recommends that you use the SafeNet Soft-PK (or SoftRemote) VPN client program, which is available from SafeNet (www.safenet-inc.com). Installation and configuration instructions for the SafeNet client program are provided on page 10-8.
Linking Two Networks Together
A VPN between two Netgear VPN-enabled routers is a good way to connect branch offices and business partners over the Internet, offering an affordable, high-performance alternative to leased site-to-site lines. The VPN also provides access to remote network resources when NAT is enabled and remote computers have been assigned private IP addresses.

flowchart
graph LR
    LAN --> A["VPN ROUTER"]
    A --> B["INTERNET"]
    B --> C["VPN ROUTER"]
    C --> LAN
In order for the routers to route between the two locations, the two LANs must use different IP address ranges. You must change one of the two Netgear VPN-enabled routers to use a range other than 192.168.0.x.
Initial Setup of the VPN
In order to perform the VPN function, the FR318 must be upgraded by purchasing the VPN Upgrade Option. With the upgrade, it will be capable of one security association. The FV318 supports up to five security associations. These can be a mixture of other Netgear VPN-enabled routers and VPN PC clients, but must not exceed five.
To configure a VPN, click the link labeled VPN on the left side of the browser window and then click the link labeled Summary. The VPN Summary window opens as shown in Figure 10-1 below:
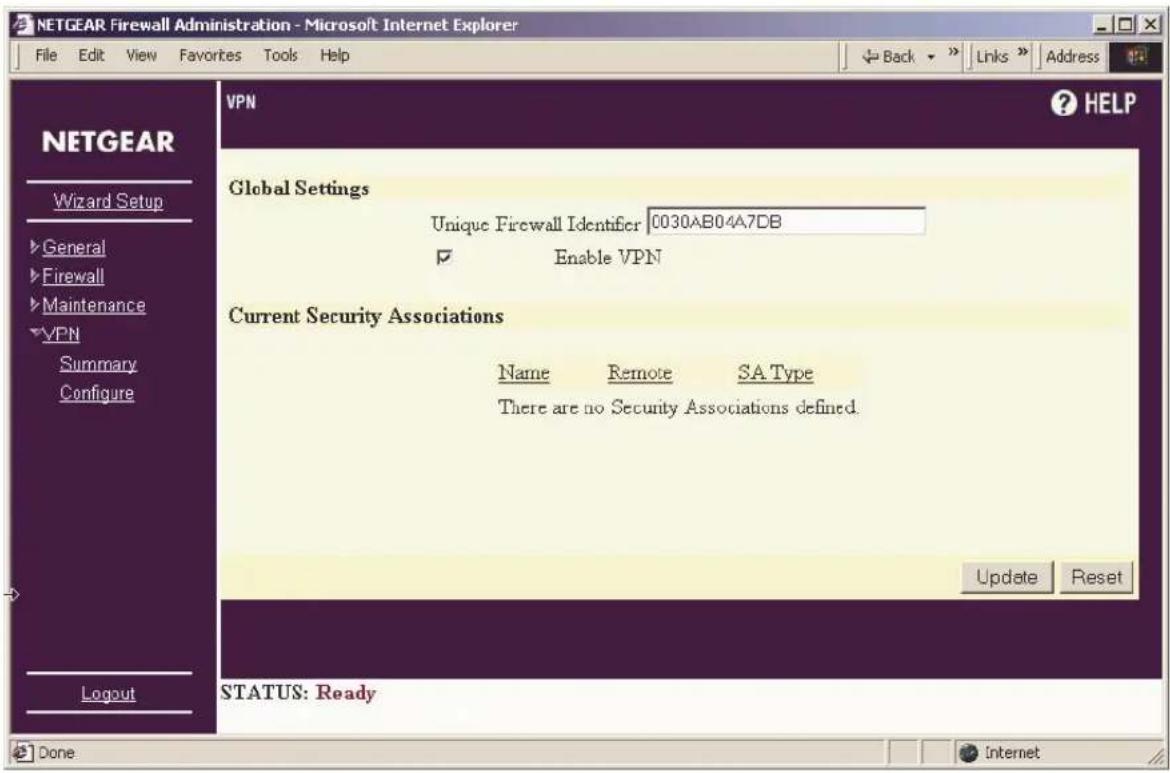
Figure 10-1. VPN Summary Window
If you have an FR318 and have not purchased and installed the VPN Upgrade Option, you will see a screen directing you to purchase and install the option.
Under Global Settings:
- Enter an alphanumeric name for your FR318 or FV318 in the Unique Firewall Identifier field or use the default value, the firewall router's Ethernet MAC address.
This Unique Firewall Identifier will identify your firewall router in the case where the firewall router has a dynamic IP address. The alphanumeric Unique Firewall Identifier may range from 4 to 31 characters in length.
- Check the Enable VPN checkbox.
The checkbox allows the user to enable or disable the VPN without deleting the security associations.
- Click the Update button on the bottom of the menu.
10-4 Virtual Private Networking
The VPN Summary window also displays a list of currently configured security associations, showing the name of the SA, The Destination Network Address and the type of SA that is configured. The two types are Peer Netgear Router (router to router) and VPN Client (client to router).
Configuring a Security Association
To configure a security association, click the link labeled VPN on the left side of the browser window and then click the link labeled Configure. The VPN Configure window opens as shown in Figure 10-2 below:
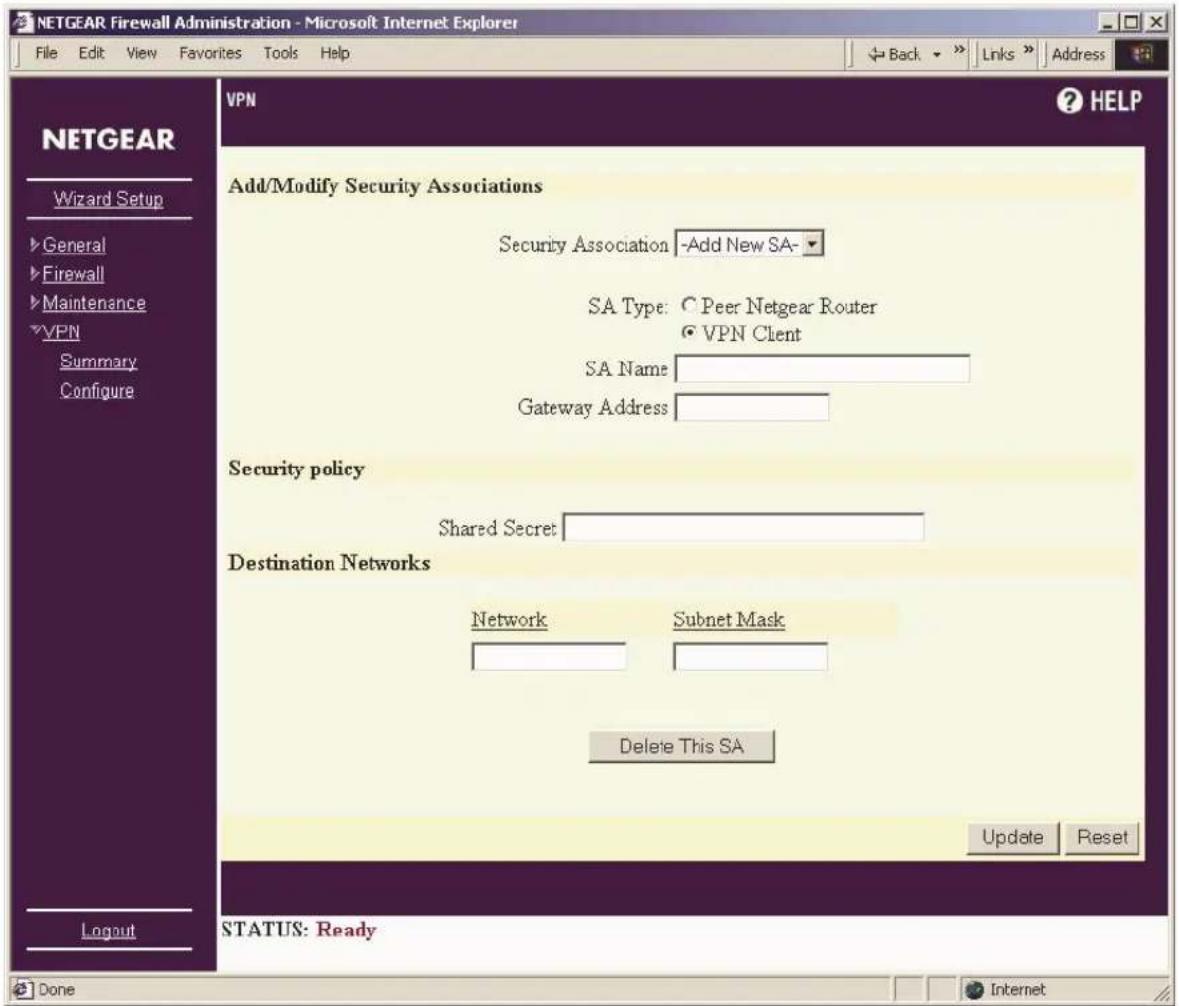
Figure 10-2. VPN Configure Window
If you have an FR318 with the VPN Upgrade Option, you can configure one security association. If you have an FV318, you can configure up to five security associations. A security association is configured as follows:
- In the Security Association pull-down menu, select "Add New SA" to define a new security association, or select the name of an existing security association to modify its configuration.
-
SA Type: Select whether this security association will be between two Netgear VPN routers (Peer Netgear Router) or between a remote PC and your Netgear VPN router (VPN Client). This option selects the necessary encryption method for each type of VPN connection.
-
SA Name: Enter a descriptive name for this Security Association.
If the other endpoint is a Netgear VPN router and it does not have a fixed (permanent, static) IP address, enter the other router's Unique Firewall Identifier as the SA Name.
- Gateway Address: If the remote endpoint (VPN router or client) to which you will be connecting has a fixed IP address, enter it here.
If the remote endpoint has a dynamically-assigned IP address, enter "0.0.0.0" in the Gateway Address field. In this case, the remote endpoint must initiate the connection.
Note: At least one of the two endpoints must have a fixed IP address.
- Security Policy: Select the Encryption Algorithm that will be used for encoding data to be transferred over this tunnel.
The content of this box differs depending on whether you have selected a connection to a Peer Netgear Router or to a VPN Client PC. In either case, you are offered the choice of a faster 56-bit payload encryption or a stronger 168-bit encryption.
For connection to a Peer Netgear Router, your encryption choices are:
— Fast Encrypt (ESP ARCFour) – uses ARCFour encryption, which is similar to Single DES but faster.
— Strong Encrypt (ESP 3DES) – uses Triple DES (3DES) for maximum security with a slower throughput.
For connection to a VPN Client PC, your encryption choices are:
— Encrypt and authenticate (ESP DES HMAC MD5) – uses Single DES encryption.
— Strong Encrypt and authenticate (ESP 3DES HMAC MD5) – uses Triple DES (3DES) for maximum security with a slower throughput.
- Security Policy: Enter the Shared Secret that will match the secret used by the remote endpoint.
The Shared Secret must be between 8 and 128 characters. For greater security, enter a combination of letters, numbers and symbols, such as "Aa8^Hjj@e\$FF#." Letters are case sensitive.
- Destination Network Address: Enter the network IP address and subnet mask for the remote network to which your VPN will connect.
The two endpoint networks must have different LAN IP address ranges. For example, if both ends are using the Netgear default address range of 192.168.0.x, the connection will not work. Change one router's LAN IP Address and DHCP range to a different range such as 192.168.1.x.
If the remote endpoint is a VPN PC client, its destination address must be a single IP address, with a subnet mask of 255.255.255.255. If its address is dynamically-assigned (or assigned by DHCP), Netgear recommends that you enter a “virtual fixed” IP address in the range of 172.16.0.x, with a subnet mask of 255.255.255.255, and enter this address in the configuration of the VPN client software. If you are creating multiple VPN client SAs (FV318 only), select a different “virtual fixed” IP address for each SA.
Deleting a Security Association
To delete a security association:
- Go to the VPN Configure window.
- In the Security Association drop-down box, select the security association to be deleted.
- Click on the Delete This SA button.
- Click on the Update button.
Security Association Notes
- Internet Key Exchange (IKE) with pre-shared secrets will be used.
• VPN Client connections will use HMAC MD5 authentication
• SA Life Time is 8 Hours.
A finite SA Life Time increases security by forcing the two VPN endpoints to update the encryption and authentication keys. However, every time the VPN tunnel renegotiates, users accessing remote resources are disconnected.
- For increased reliability, Keep Alive will always be enabled for router to router SA's (Peer Netgear Router)
Installing and Configuring the SafeNet VPN Client
Netgear recommends and supports the SafeNet Soft-PK (or SoftRemote) Secure VPN Client for Windows, Version 5 or later. The SafeNet VPN Client can be purchased from SafeNet at www.safenet-inc.com.
Note: Netgear recommends that you use Windows98 Second Edition or a later release of Windows with this VPN Client software.
To install and configure the Secure VPN Client, follow the instructions below:
Install the VPN Client Software
-
Purchase and download the Secure VPN Client installation software to your PC and decompress it using an unzip utility such as WinZip.
-
Go to the folder where you saved the installation files and run SETUP.EXE.
You may need to insert your Windows CD to complete the installation.
If you do not have a modem or dial-up adapter installed in your PC, you may see the warning message stating “The SafeNet VPN Component requires at least one dial-up adapter be installed.” You can disregard this message.
-
You may have the option to install either or both of the VPN Adapter or the IPSec Component. Install the IPSec Component. The VPN Adapter is not necessary.
-
Reboot your PC after installing the client software.
OpentheSecurityPolicyEditor
To launch the VPN client, click on the Windows Start button, then select Programs, then SafeNet Soft-PK (or SoftRemote), then Security Policy Editor. The Security Policy Editor window window will appear:.
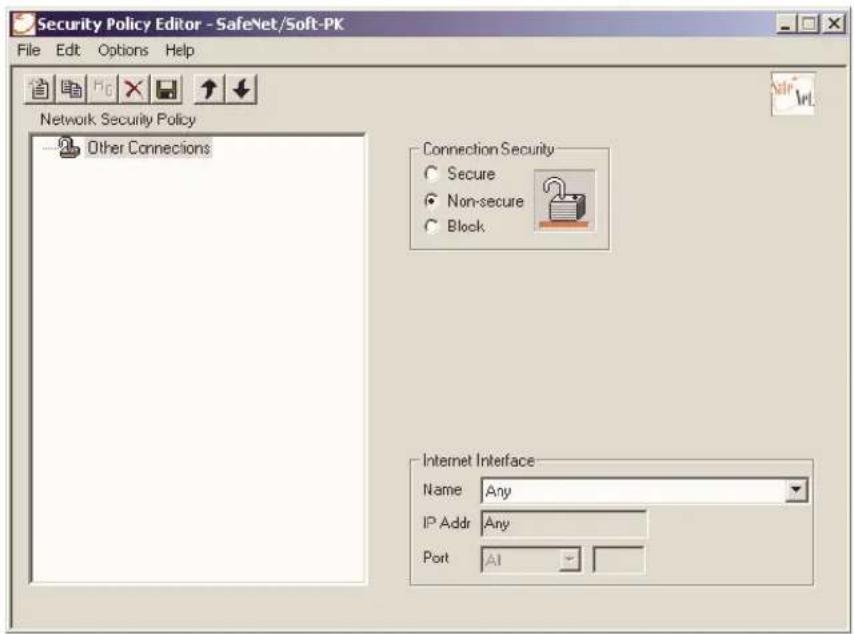
Create a VPN Connection
In this step you will need to provide information about the VPN router to which you will be connecting. You will need to provide:
• A descriptive name for the connection
• The network address range of the router (its LAN IP address and netmask)
• The Unique Firewall Identifier of the router
• The WAN IP address of the router
From the Edit menu at the top of the Security Policy Editor window, click Add, then Connection. A "New Connection" listing will appear in the list of policies..
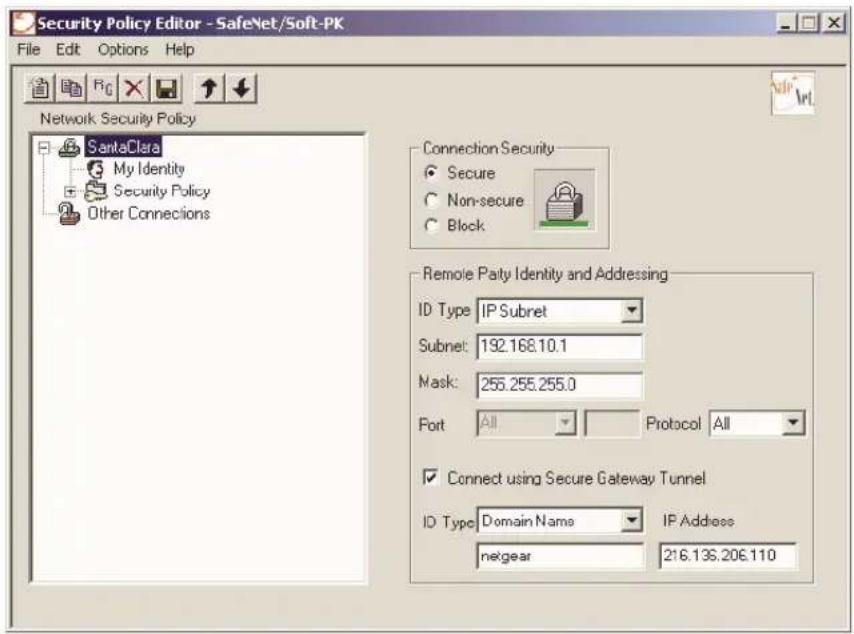
- Click and rename the "New Connection" list item to a descriptive name such as "SantaClara"
- In the Connection Security box on the right side of the Security Policy Editor window, select Secure.
- In the ID Type menu, select IP Subnet.
- In the Subnet field, type the NETGEAR Firewall LAN IP Address of the router to which you will be connecting.
- In the Mask field, type the NETGEAR Firewall LAN Subnet Mask.
- In the Protocol menu, Select All to allow all traffic through the VPN tunnel.
- Check the Connect using Secure Gateway Tunnel checkbox.
- In the ID Type menu below the checkbox, select Domain Name.
- Enter the NETGEAR Firewall's Unique Firewall Identifier in the field directly below the ID Type menu. Note that this field is case sensitive.
- Enter the NETGEAR Firewall WAN IP Address in the IP Address field. (If NAT is enabled on the firewall router, this is the firewall router's NAT Public Address).
Configure the Security Policy
These settings do not depend on your network information.
- In the Network Security Policy list on the left side of the Security Policy Editor window, expand the new connection by double clicking its name or clicking on the “+” symbol.
My Identity and Security Policy subheadings should appear below the connection name.
- Click on the Security Policy subheading to show the Security Policy menu.
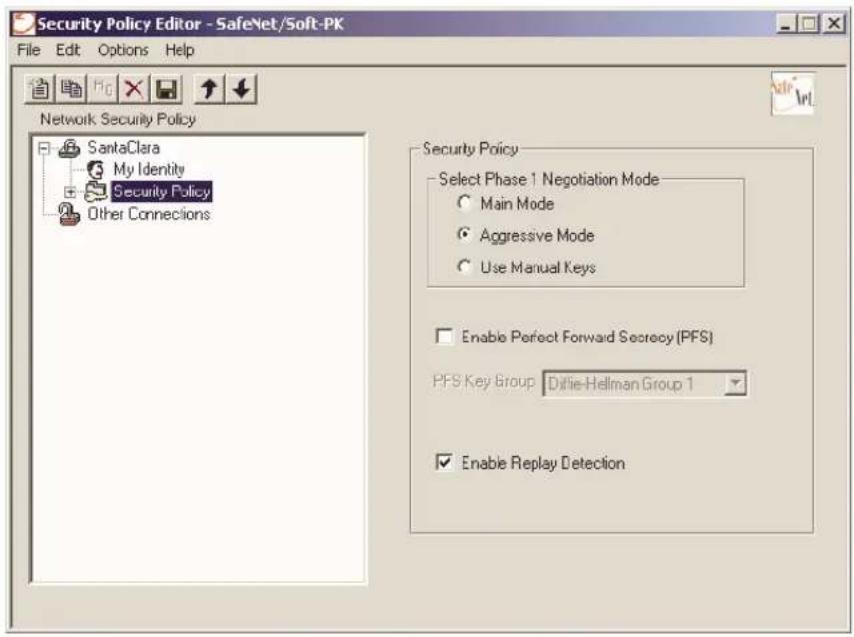
- In the Select Phase 1 Negotiation Mode box, select Aggressive Mode.
- Leave the Enable Perfect Forward Secrecy (PFS) checkbox unchecked.
-
Check the Enable Replay Detection checkbox to redisplay auditing messages.
-
From the Options menu at the top of the Security Policy Editor window, select Global Policy Settings.
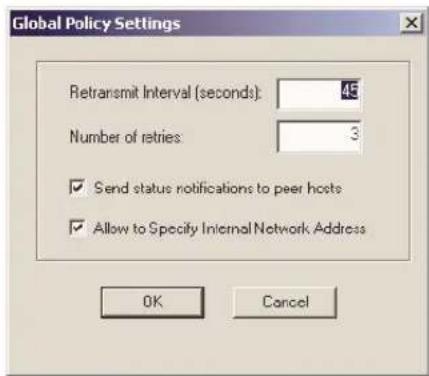
-
Increase the Retransmit Interval (seconds) period to 45.
-
Check the Allow to Specify Internal Network Address checkbox and click OK.
Configure the VPN Client Identity
In this step, you will provide information about the remote VPN client PC. You will need to provide:
• The Security Association name that you configured in the router.
- The fixed IP address or the "fixed virtual" IP address of the VPN client PC.
- In the Network Security Policy list on the left side of the Security Policy Editor window, click on My Identity.
![Security Policy Editor - SafeNet/Soft-PK File Edit Options Help Network Security Policy SantaClara My Identity Security Policy Other Connections My Identity Select Certificate Pre-Shared Key None ID Type Internal Network IP Address Domain Name 172.16.0.1 Cambridge02139 Port All Internet Interface Name [1] NETGEAR FA311 Fast Ethernet PCI Ada IP Addr 192.168.0.2](/content/2026/05/1055895/images/2bfbd65a11c3f9047de334b84d86f66b3b9ca75be3367f155fd0a7e06a87bc3b.jpg)
- In the Select Certificate menu, choose None.
- In the ID Type menu, select Domain Name.
- In the field below the ID Type menu, enter the name of the Security Association. Note that this field is case sensitive and must exactly match the SA Name entry that you configured in the router.
- If you are using a "virtual fixed" IP address, enter this address in the Internal Network IP Address box. Otherwise, leave this box empty.
The “virtual fixed” IP address is discussed in “Configuring a Security Association” on page 10-7, under Destination Network Address. If you are following Netgear’s recommendation, this address will be in the range of 172.16.0.x. - In the Internet Interface box, select the adapter you use to access the Internet. Select PPP Adapter in the Name menu if you have a dial-up Internet account. Select your Ethernet adapter if you have dedicated Cable, ISDN or DSL line. You may also choose Any if you will be switching between adapters.
- Click the Pre-Shared Key button.
-
In the Pre-Shared Key dialog box, click the Enter Key button.
-
Enter the NETGEAR Firewall's Shared Secret in the Pre-Shared Key field and click OK. Note that this field is case sensitive.
Configure VPN Client Authentication Proposal
These settings do not depend on your network information.
- In the Network Security Policy list on the left side of the Security Policy Editor window, expand the Security Policy heading by double clicking its name or clicking on the “+” symbol.
- Expand the Authentication subheading by double clicking its name or clicking on the “+” symbol. Then select Proposal 1 below Authentication.
- In the Authentication Method menu, select Pre-Shared key.
- In the Encrypt Alg menu, select DES.
- In the Hash Alg menu, select MD5.
- In the SA Life menu, select Unspecified.
- In the Key Group menu, select Diffie-Hellman Group 1.
Configure VPN Client Key Exchange Proposal
In this step, you will provide the type of encryption (DES or 3DES) to be used for this connection.
- Expand the Key Exchange subheading by double clicking its name or clicking on the “+” symbol. Then select Proposal 1 below Key Exchange.
- In the SA Life menu, select Unspecified.
- In the Compression menu, select None.
- Check the Encapsulation Protocol (ESP) checkbox.
- In the Encrypt Alg menu, select the type of encryption to correspond with what you configured for the Security Policy Encryption Algorithm in the router on page 10-6.
— If you selected Fast Encrypt in the router, select DES.
— If you selected Strong Encrypt in the router, select 3DES.
- In the Hash Alg menu, select MD5.
- In the Encapsulation menu, select Tunnel.
- Leave the Authentication Protocol (AH) checkbox unchecked.
Save the VPN Client Settings
From the File menu at the top of the Security Policy Editor window, select Save Changes.
After you have configured and saved the VPN client information, your PC will automatically open the VPN connection when you attempt to access any IP addresses in the range of the remote VPN router's LAN. To test this, open your browser and enter the Firewall LAN IP Address of the remote VPN router. You should see the login screen of the router.
Monitoring the VPN Connection
Information on the progress and status of the VPN client connection can be viewed by opening the SafeNet Connection Monitor or Log Viewer. To launch these functions, click on the Windows Start button, then select Programs, then SafeNet Soft-PK, then either the Connection Monitor or Log Viewer.
The Log Viewer screen for a successful connection is shown below:
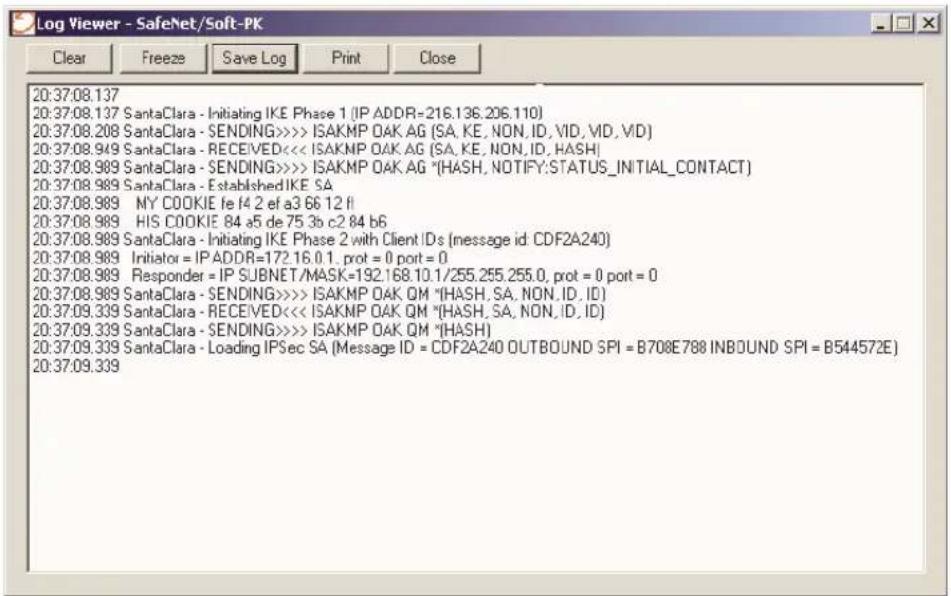
In this example:
- The VPN client PC is using a “virtual fixed” IP address of 172.16.0.1.
- The VPN client PC has been assigned a LAN IP address of 192.168.0.2 by its local router or ISP.
• The local router or ISP gateway has a public IP address of 216.39.102.9.
• The remote VPN router has a public IP WAN address of 216.136.206.110.
• The remote VPN router has a LAN IP address of 192.168.10.1.
The Connection Monitor screen for this connection is shown below:
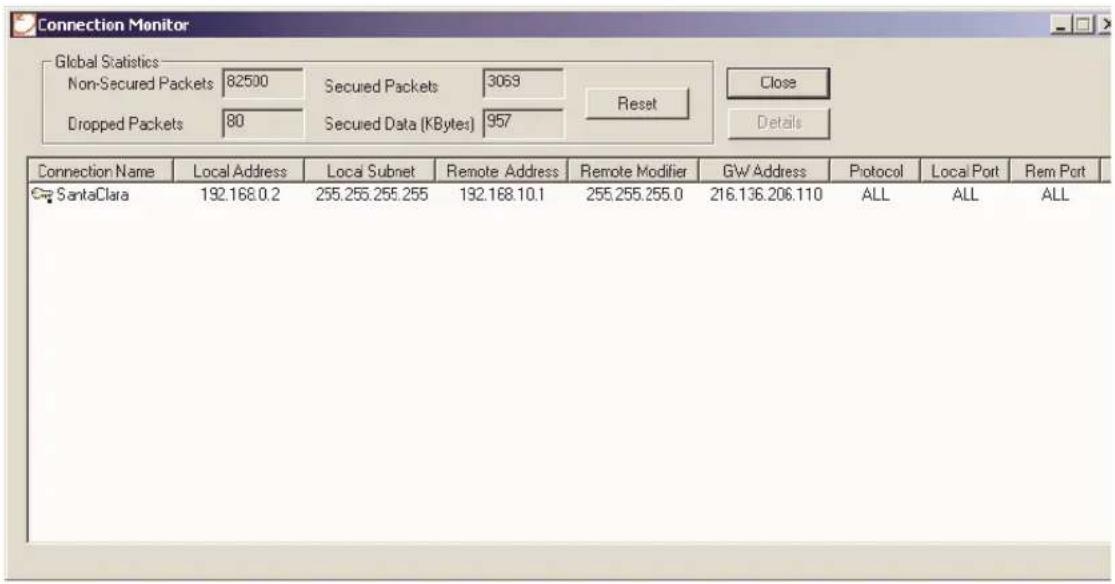
While the connection is being established, the Connection Name field in this menu will say “SA” before the name of the connection. When the connection is successful, the “SA” will change to the yellow key symbol shown in the illustration above.
You can also monitor the progress of the connection on the log screen of the remote VPN router, as shown below:
| LOG ? HELP | ||||
| Time / | Message | Source | Destination | Notes |
| 08/24/2001 20:37:57.864 | Log Cleared | |||
| 08/24/2001 20:38:10.656 | IKE Responder: Begin Aggressive Mode Phase 1 | |||
| 08/24/2001 20:38:11.080 | IKE Initiator: Begin Aggressive Mode Phase 1 | |||
| 08/24/2001 20:38:11.432 | IKE Responder: Aggressive Mode Phase 1 Done | |||
| 08/24/2001 20:38:11.448 | IKE Responder: Begin Phase 2 | |||
| 08/24/2001 20:38:11.448 | IKE Responder: Accepting IPSec proposal | 216.39.102.9 | 216.136.206.110 | |
| 08/24/2001 20:38:11.752 | IKE negotiation complete. Adding IPSec SA. Phase 2 Done | 216.136.206.110 | 216.39.102.9 | remote range: (172.16.0.1 - 172.16.0.1) |
| 08/24/2001 20:40:49.800 | Login screen timed out | 172.16.0.1, WAN | 0.00.0 | admin |
| 08/24/2001 20:41:09.224 | Successful administrator login | 172.16.0.1, TEXAN | 192.168.10.1 | |
| STATUS: Ready | ||||
When the connection has been successfully established, the log message will say “IKE negotiation complete. Adding IPSec SA. Phase 2 Done.”
Accessing Remote Resources across a VPN
Only non-broadcast IP traffic will pass over the VPN tunnel. This prevents browsing with Network Neighborhood (which relies on broadcast traffic), or using LAN protocols (such as IPX, AppleTalk, NetBEUI, etc.) to establish connections to machines at the other end of the VPN tunnel.
Some methods by which a VPN client may access remote resources across a VPN are:
- Use the IP address.
For example, if a remote office operates a Microsoft SQL server, users at your office will be able to access the SQL server at the server's private IP address.
- Use Windows' Find Computer tool to locate a remote workstation.
• Create an LMHOSTS file in a local computer's registry. - Configure a WINS server to resolve a name to a remote IP address.
Refer to Windows documentation for information on using Find Computer, LMHOSTS files, and WINS servers.
Chapter 11
System Maintenance
This chapter describes the maintenance and diagnostic tools included with the Model FR314, FR318 and FV318 Cable/DSL Firewall and VPN Routers. These tools allow you to save and restore configuration settings, perform diagnostic tests, and upgrade your system software.
Restart
After making configuration changes or performing other tasks, you may need to restart the firewall router.
To restart the firewall router:
-
From the navigation bar on the left, click Maintenance.
-
Click Restart.
The Restart window opens.
- Click the Restart button and click Yes to confirm the restart.
It takes approximately 90 seconds for the firewall router to restart, during which time Internet access for all users on the LAN is interrupted and the Test LED is lit.
Preferences
You can use the options in the Preferences window to export the firewall router configuration settings to a disk file, or import the settings from the file at a later time. The Preferences window also provides options to restore the firewall router's factory default settings and to launch the Setup Wizard.
To configure these options, click Maintenance from the navigation bar on the left, and then click Preferences.
The Preferences window opens.
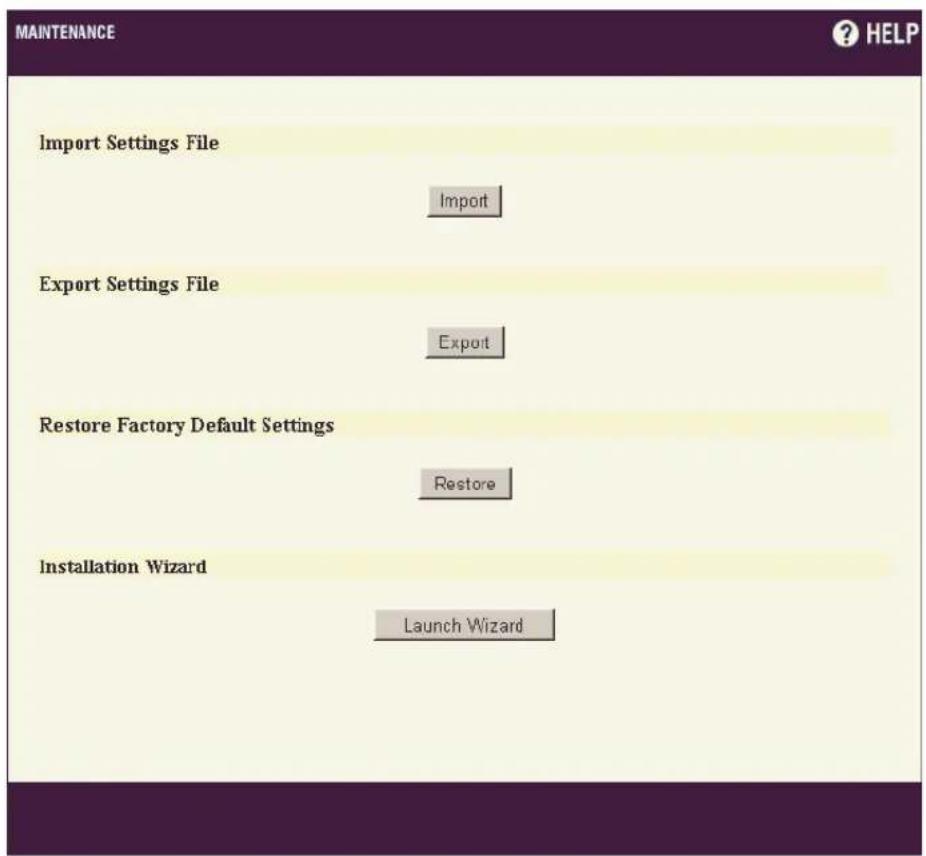
Figure 11-1. Preferences Window
These options are described in the sections that follow.
Overview of Settings Files
A settings file contains information about your firewall router's configuration. NETGEAR highly recommends that you back up your settings file once your firewall router is up and running, and then again whenever you upgrade the firmware. Saving and restoring the firewall router configuration lets you restore the firewall router to working order if the configuration information in the firewall router is lost or damaged. You can also use the configuration file to configure a new router of the same type if it becomes necessary to replace the firewall router.
Exporting the Settings File
To save the firewall router's configuration information to a "preferences file" on your computer:
- From the Preferences window, click Export.
- Click Export again for confirmation and to begin downloading the settings file.
- Choose the location to save the settings file.
The file is named "netgearprefs.exp" by default, but you can rename it. - Click Save to save the file.
This process may take up to a minute to complete.
Importing the Settings File
After exporting a settings file, you can later import it back to the firewall router. To import a settings file:
- From the Preferences window, click Import.
- Select a settings file, and then click Import.
- Restart the firewall router for the settings to take effect.
Note: The Web browser used to import settings must support HTTP uploads. NETGEAR recommends Netscape Navigator 3.0 and above, which is available for downloading at www.netscape.com.
Restoring Factory Default Settings
To erase the firewall router's configuration settings and restore the factory default state:
-
From the Preferences window, click Restore.
-
Click Yes to confirm the action.
- Restart the firewall router for the settings to take effect.
Note: The LAN IP Address and LAN Subnet Mask, configured in the Network window in the General section, is not reset. Also, the management password is not reset.
Launch the Setup Wizard
To launch the Setup Wizard, click the Launch Wizard button in the Preferences window.
Updating Firmware
The firewall router has flash memory and you can easily upgrade it with new firmware. You can obtain current firmware from NETGEAR's Web site to your Management Station and then upload the firmware to the firewall router.
To configure firmware options, click Maintenance from the navigation bar on the left, and then click Firmware. The Firmware Update window opens.
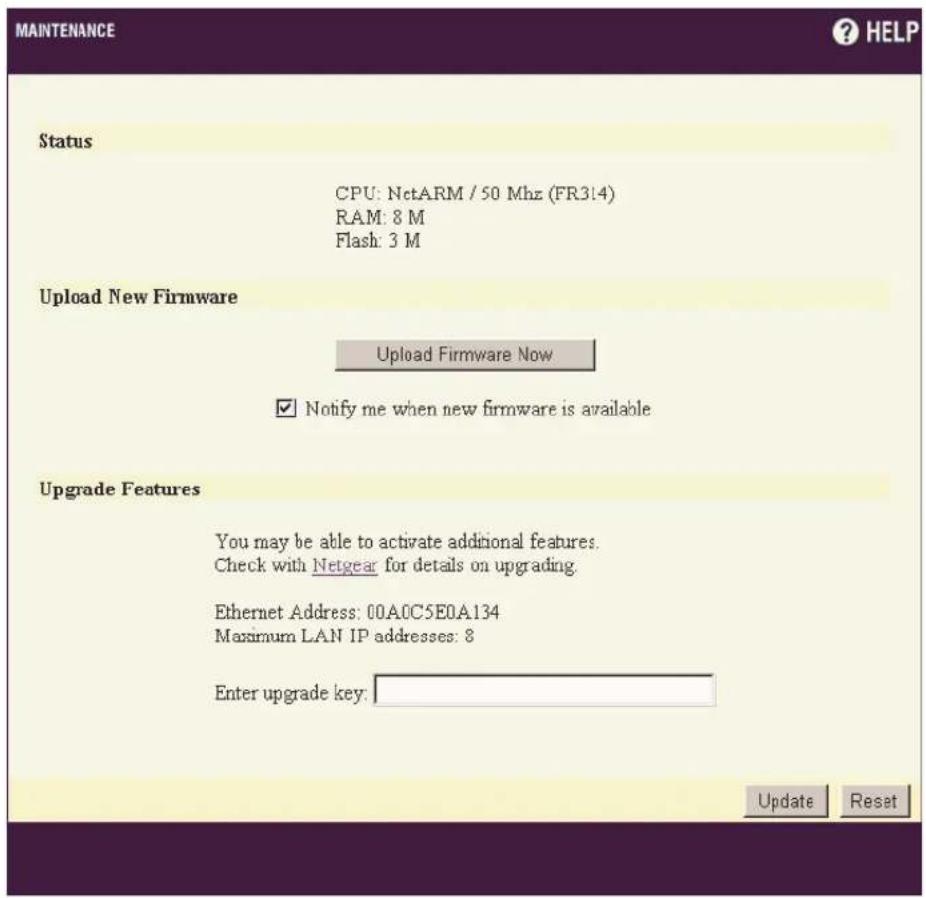
Figure 11-2. Firmware Update Window
Uploading New Firmware
Note: The Web browser used to upload new firmware into the firewall router must support HTTP uploads. NETGEAR recommends using Netscape Navigator 3.0 or above.
To upload new firmware:
- Disconnect all LAN and WAN connections from your firewall router except for the connection to the Management Station PC.
-
Export your preferences as described on page 11-3.
When firmware is uploaded, the firewall router's settings could be altered or erased. NETGEAR recommends that you save your preferences so that they can be restored later. -
In the Firmware Update window, click Upload Firmware Now.
-
Confirm that your preferences have been saved by clicking Yes.
-
Click the Browse button and select the firmware file from the local hard drive or from the Model FR314, FR318 and FV318 Resource CD.
-
Click Upload.
Note: When uploading firmware to the firewall router, it is important not to interrupt the Web browser by closing the window, clicking a link, or loading a new page. If the browser is interrupted, it may corrupt the firmware. When the upload is complete, your firewall router will automatically restart.
-
After the firewall router has rebooted, reconnect your LAN and WAN connections.
-
Restore (import) your preferences as described on page 11-3.
Automatic Notification
If you want to be notified when new firmware is available, select the “Notify me when new firmware is available” box and then click Update.
When this option is enabled, your firewall router checks NETGEAR's FTP site for new firmware once a week. When new firmware is available, a message is e-mailed to the address specified on the Log Settings window. In addition, the Status window includes notification of new firmware availability. This notification includes links to firmware release notes and to a firmware update wizard.
Upgrade Features
The firewall router may be upgraded to support new or optional features, such as increasing the limit on the number of users. For information about purchasing firewall router options and upgrades, or a Content Filter List subscription, please contact NETGEAR at http://www.buynetgear.com or at NETGEAR's main website at http://www.NETGEAR.com.
When a feature upgrade is purchased, an Upgrade Key is issued. Enter this key in the Enter upgrade key field and click the Update button. Follow the instructions that are included with the feature upgrade for configuration.
Diagnostic Tools
The firewall router has several built-in tools to help you troubleshoot network problems. To use them, click Maintenance from the navigation bar on the left, and then click Diagnostics. The Diagnostics window opens.
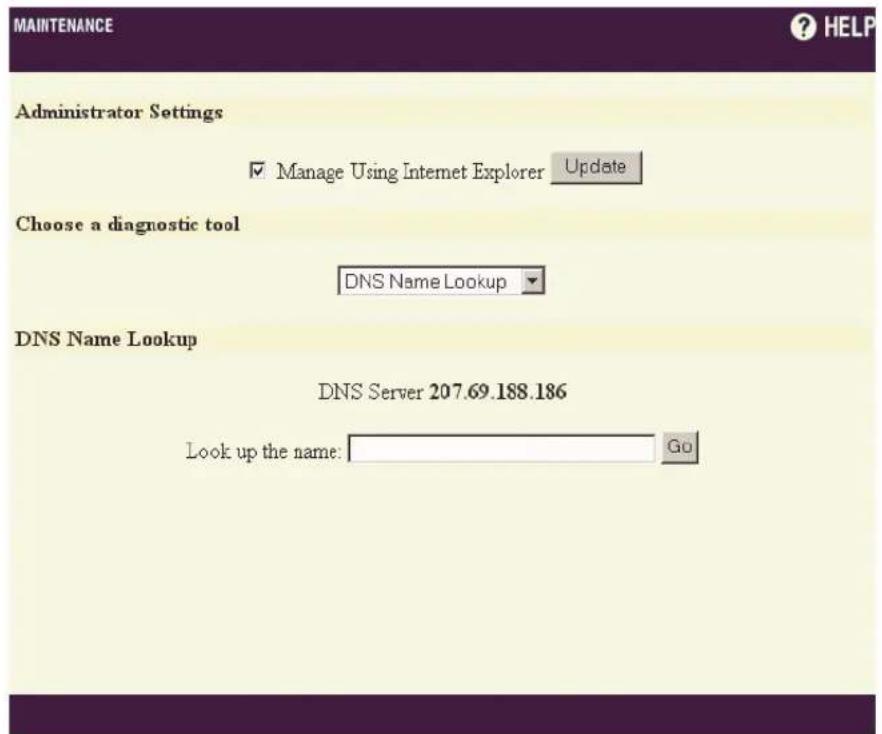
Figure 11-3. Diagnostics Window
The available diagnostic tools are:
- DNS Name Lookup
- Find Network Path
- P i n g
- Packet Trace
• Tech Support Report
These reports are described in the sections that follow.
DNS Name Lookup
The DNS lookup tool returns the numerical IP address of a domain name. To perform a DNS name lookup:
- From the "Choose a diagnostic tool" box, select DNS Name Lookup.
-
In the box provided, enter the name of the host to look up.
Do not add the prefix "http://". -
Click Go.
The firewall router will then query the DNS server and display the result at the bottom of the screen.
Note: To perform a DNS Name Lookup, you must have already defined a DNS server IP address in the General Setup Network window.
Find Network Path
The Find Network Path tool shows whether an IP host is located on the LAN or the WAN. This is helpful information in determining whether the firewall router is properly configured. For example, if the firewall router concludes that a host on the Internet is located on the LAN port, there may be a problem with the configuration of the Network settings. Find Network Path also shows if the target is behind a firewall router, and it displays the Ethernet address of the target computer or firewall router. Find Network Path also shows which router a computer is using, which can help isolate router configuration problems.
To find the network path to a host:
-
From the "Choose a diagnostic tool" box, select Find Network Path.
-
Enter the IP address of the host.
- Click Go.
The test takes a few seconds to complete. Once completed, a message showing the results is displayed in the window.
If the network path is incorrect, check your router's Network settings.
Note: Find Network Path requires an IP address for the target host. You can use the DNS Name Lookup tool to find the IP address of a host.
Ping
The Ping test bounces a packet off a machine on the Internet back to the sender. This test shows if the firewall router is able to contact the remote host. If users on the LAN are having problems accessing services on the Internet, try pinging the DNS server or another machine at the ISP's location. If this test is successful, try pinging devices outside the ISP. This will show if the problem lies with the ISP's connection.
To ping a remote host:
- From the "Choose a diagnostic tool" box, select Ping.
-
Enter the IP address of the host and click Go.
-
The test will take a few seconds to complete. Once completed, a message showing the results will be displayed in the window.
Note: Ping requires an IP address for the target host. The DNS Name Lookup tool may be used to find the IP address of a host.
Packet Trace
The Packet Trace tool tracks the status of a communications stream as it moves from source to destination. This is a useful tool to determine if a communications stream is being stopped at the firewall router, or is lost on the Internet.
To execute a packet trace to a remote host:
- From the "Choose a diagnostic tool" box, select Packet Trace.
- In the "Trace on IP address" box, type the IP address of the remote host.
-
Click Start.
-
From a local PC, initiate an IP session with the remote host using an IP client, such as Web, FTP, or Telnet.
Do not enter a host name, such as "www.yahoo.com"; instead, type the same IP address entered in the "Trace on IP address" box.
- Click Refresh.
The packet trace information is displayed.
- Click Stop to terminate the packet trace, and Reset to clear the results.
Note: Packet Trace requires an IP address for the target host. You can use the DNS Name Lookup tool to find the IP address of a host.
To interpret the results of this tool, it is necessary to understand the three-way handshake that occurs for every TCP connection. A typical three-way handshake initiated by a host on the firewall router's LAN to a remote host on the WAN is shown below.
1 TCP received on LAN [SYN]
From 192.168.0.3 / 1282 (00:a0:4b:05:96:4a)
To204.71.200.74 / 80 (02:00:cf:58:d3:6a)
The firewall router receives SYN from LAN client.
2 TCP sent on WAN [SYN]
From 207.88.211.116 / 1937 (00:40:10:0c:01:4e)
To204.71.200.74 / 80 (02:00:cf:58:d3:6a)
The firewall router forwards SYN from LAN client to remote host.
3 TCP received on WAN [SYN,ACK]
From 204.71.200.74 / 80 (02:00:cf:58:d3:6a)
To 207.88.211.116 / 1937 (00:40:10:0c:01:4e)
The firewall router receives SYN, ACK from remote host.
4 TCP sent on LAN [SYN,ACK]
From 204.71.200.74 / 80 (02:00:cf:58:d3:6a)
To 192.168.0.3 / 1282 (00:a0:4b:05:96:4a)
The firewall router forwards SYN, ACK to LAN client.
5 TCP received on LAN [ACK]
From 192.168.0.3 / 1282 (00:a0:4b:05:96:4a)
To204.71.200.74 / 80 (02:00:cf:58:d3:6a)
Client sends a final ACK, and waits for start of data transfer.
6 TCP sent on WAN [ACK]
From 207.88.211.116 / 1937 (00:40:10:0c:01:4e)
To204.71.200.74 / 80 (02:00:cf:58:d3:6a)
The firewall router forwards the client's ACK to the remote host and waits for start of data transfer.
When using packet traces to isolate network connectivity problems, look for the location where the three-way handshake is breaking down. This helps to determine if the problem resides with the firewall router configuration, or if there is a problem on the Internet.
Tech Support Report
The Tech Support Report generates a detailed report of the firewall router's configuration and status, and saves it to the local hard disk. If requested, you can then e-mail this file to NETGEAR Technical Support to help assist with a problem.
Before e-mailing the Tech Support Report to NETGEAR's Technical Support team, please contact Tech Support so that a case number can be assigned. Use this case number in all correspondence to help NETGEAR better service the request.
To generate a Tech Support Report:
- From the "Choose a diagnostic tool" box, select Tech Support Report.
- Click Save Report to save the report as a text file to the local disk.
Administrator Settings
In the Diagnostic Tools screen is a checkbox labeled “Manage Using Internet Explorer”. This checkbox enables the Internet Explorer (IE) web browser to quickly load the Web Management Authentication page. With the IE checkbox enabled, the firewall router’s LAN port responds to NetBIOS name requests on port 137. Users can disable the LAN port response to port 137 by unchecking the IE checkbox, but doing so will slow down the login process into the Web Manager.
Chapter 12
Troubleshooting
This chapter provides troubleshooting information for your Model FR314, FR318 and FV318 Cable/DSL Firewall and VPN Routers. Each problem description includes instructions for helping you diagnose and solve the problem.
Basic Functioning
After you turn on power to the router, the following sequence of events should occur:
- The PWR LED is on.
- The Test LED is on while the router performs its self-test, which takes about 90 seconds to complete. After the self-test completes, the Test LED turns off.
- Each connected port's LNK/ACT LEDs are on to indicate that the Local and Internet Ethernet connections are correctly made to the operational devices.
- The 100 LED is on if a Local Ethernet port is connected to a device that operates at 100 Mbps.
If any of these conditions do not occur, refer to the appropriate following section.
PWR LED Not On
If the PWR and other LEDs are off when your router is turned on:
- Make sure that the power cord is properly connected to your router and that the power supply adapter is properly connected to a functioning power outlet.
- Check that you are using the 12 V DC power adapter supplied by NETGEAR for this product.
If the error persists, you have a hardware problem. Contact NETGEAR technical support.
Test LED Stays On
When the router is turned on, the Test LED should illuminate for about 90 seconds and then turn off. If the Test LED stays on, there is a fault within the router.
If you experience problems with the Test LED:
- Turn off the router for a few seconds, and then turn it back on to see if the router recovers, and if the LED turns off after the correct amount of time.
If the error persists, you might have a hardware problem. Contact NETGEAR technical support.
LNK/ACT LEDs Not On
If either the Local or Internet LNK/ACT LED does not light when the Ethernet connection is made, check the following:
• Make sure that the Ethernet cable connections are secure at the router and at the hub or PC.
• Make sure that power is turned on to the connected hub or PC.
- Be sure you are using the correct cable:
— When connecting the router's INTERNET port to a cable or DSL modem, use the cable that was supplied with the cable or DSL modem.
Note: The Ethernet cable supplied by your ISP for connecting to your cable or DSL modem may be an Ethernet crossover cable rather than a straight-through cable. It is important to use this cable to connect the modem to your router, not to connect your PCs to your router.
— If you are connecting one of the router's LOCAL ports to a PC, use a standard straight-through Ethernet cable like the one provided with your router.
— (FR314 only) If you are connecting the FR314's LOCAL port 4 to a PC, set the NORMAL/UPLINK switch to the NORMAL position.
— (FR314 only) If you are connecting the FR314's LOCAL port 4 to another hub or switch, set the router's NORMAL/UPLINK switch to the UPLINK position unless you are connecting to the other hub's UPLINK port.
Troubleshooting the Web Management Interface
If you are unable to access the router's Web Management Interface from a PC on your local network, check the following:
- Check the Ethernet connection between your PC and the router as described in the previous section.
- Make sure your PC's IP address is on the same subnet as the router. If you are using the recommended addressing scheme, your PC's address should be in the range of 192.168.0.2 to 192.168.0.254. Refer to "Verifying TCP/IP Properties (Windows)" on page 3-4 or "Verifying TCP/IP Properties (Macintosh)" on page 3-6 to find your PC's IP address. Follow the instructions in Chapter 3 to configure your PC.
Note: Recent versions of Windows and MacOS will generate and assign an IP address if the computer cannot reach a DHCP server. These auto-generated addresses are in the range of 169.254.x.x. If your IP address is in this range, check the Ethernet connection from the PC to the router and reboot your PC. You may have to manually configure your PC's TCP/IP settings in order to remove this 169.254.x.x IP address.
- Make sure your browser has Java, JavaScript, or ActiveX enabled. If you are using Internet Explorer, click Refresh to be sure the Java applet is loaded.
- Make sure you are using the correct login information. The factory default login name is “admin” and the password is “password”. Note that these are both lower case. Make sure that CAPS LOCK is off when entering this information.
• Try quitting the browser and launching it again.
If the router does not save changes you have made in the Web Management Interface, check the following:
- When entering configuration settings, be sure to click the Update button before moving to another menu or tab, or your changes are lost.
- Click the Refresh or Reload button in the Web browser. The changes may have occurred, but the Web browser may be caching the old configuration.
Troubleshooting the ISP Connection
If your router is unable to access the Internet, you should first determine whether the router is able to obtain a WAN IP address from the ISP. Unless you have been assigned a static IP address, your router must request an IP address from the ISP.
To check the WAN IP address:
- Launch your browser and select an external site such as www.NETGEAR.com
Although you may not have success in accessing the Web site, this step is necessary because it causes your router to request an IP address from the ISP. - In your browser's Address box, type http://192.168.0.1 and press Enter.
- Log in to the Web Management Interface by typing "admin" in the Name box and "password" (or the current password) in the Password box.
- In the navigation bar on the left, click General and then select Network.
- Check that an WAN IP address is shown under WAN Settings.
If your router is unable to obtain an IP address from the ISP, you may need to force your cable or DSL modem to recognize your new router by performing the following procedure:
- Turn off power to the cable or DSL modem.
- Turn off power to your router.
- Wait five minutes and reapply power to the cable or DSL modem.
- When the modem's LEDs indicate that it has reacquired sync with the ISP, reapply power to your router.
If your router is still unable to obtain an IP address from the ISP, the problem may be one of the following:
- Your ISP may require a login program.
Ask your ISP whether they require a PPP over Ethernet (PPPoE) login.
• If you selected a login program, you may have incorrectly set the login name and password. - Your ISP only allows one Ethernet MAC address to connect to Internet, and may check for your PC's MAC address.
Inform your ISP that you have a new network device, and ask them to use your router's Ethernet MAC address, which can be found on the bottom label of the router.
OR
Use the MAC Address Proxy feature of the Network Settings menu to force your router to use your PC's MAC address.
If your router can obtain an IP address, but your PC is unable to load any web pages from the Internet:
- Your PC may not recognize any DNS server addresses.
A DNS server is a host on the Internet that translates Internet names (such as “www” addresses) to numeric IP addresses. Typically, your ISP provides the addresses of one or two DNS servers for your use. If you entered a DNS address during the router’s configuration, reboot your PC and verify the DNS address as described in “Verifying TCP/IP Properties (Windows)” on page 3-4 or “Verifying TCP/IP Properties (Macintosh)” on page 3-6. Alternatively, you can manually configure your PC with DNS addresses, as explained in your operating system documentation.
- Your PC may not have the router configured as its TCP/IP gateway.
If your PC obtains its information from the router by DHCP, reboot the PC and verify the gateway (router) address as described in “Verifying TCP/IP Properties (Windows)” on page 3-4 or “Verifying TCP/IP Properties (Macintosh)” on page 3-6.
If some PCs have Internet access but not others, the problem may be one of the following:
• You may have exceeded the number of PCs supported by your firewall router.
The firewall router provides Internet access for up to eight PCs (20 PCs for FV318). You can increase this number by purchasing a user-limit upgrade. Refer to “Upgrade Features” on page 11-7.
• Other devices on your network may have used up your user limit.
If you have devices on your network that do not need Internet access, such as print servers or file servers, you should exclude them from counting toward your user node license. Refer to "Node License Count" on page 7-8.
If your Internet access works, but your PC or router is unable to send mail through your ISP, the problem may be one of the following:
- If you have enabled Stealth Mode on your router, you may need to allow your router to respond to 'identd' authentication messages from your ISP's mail server. Refer to "Stealth Mode" on page 7-7.
Troubleshooting a TCP/IP Network Using a Ping Utility
Most TCP/IP terminal devices and routers contain a ping utility that sends an echo request packet to the designated device. The device then responds with an echo reply. The ping utility (available in the Web Management Interface's Diagnostics window or from your operating system) makes it easy to troubleshoot any TCP/IP network problems.
Testing the LAN Path to Your Router
You can ping the router from your PC to verify that the LAN path to your router is set up correctly.
To ping the router from a Windows PC:
- On the Windows taskbar, click the Start button and then click Run.
The Run window opens.
- Type ping, followed by the IP address of the router, as shown in the following example:
ping 192.168.0.1
- Click OK.
You should see a message like this one:
Pinging
If the path is working, you see this message:
Reply from < IP address>: bytes=32 time=NN ms TTL=xxx
If the path is not working, you see this message:
Request timed out
If the path is not functioning correctly, you could have one of the following problems:
- Wrong physical connections
— Make sure the Local LNK/ACT LED is on. If the LNK/ACT LED is off, follow the instructions in “LNK/ACT LEDs Not On” on page 12-2.
— Check that the corresponding Link LEDs are on for your network interface card and for the hub ports (if any) that are connected to your PC and router.
- Wrong network configuration
— Verify that the Ethernet card driver software and TCP/IP software are both installed and configured on your PC.
— Verify that the IP address for your router and your workstation are correct and that the addresses are on the same subnet.
Testing the Path from Your PC to a Remote Device
After verifying that the LAN path works correctly, test the path from your PC to a remote device:
From the Windows run menu, type PING -n 10 followed by the IP address of a remote device such as your ISP's DNS server.
If the path is functioning correctly, replies as those described in the previous section are displayed. If you do not receive replies:
- Check that your PC has the IP address of your router listed as the default gateway. If the IP configuration of your PC is assigned by DHCP, this information is not visible in the control panel network utility. Open the Run window and type winipcfg. The IP address of the router should appear as the Default Gateway. For more information on the winipcfg utility, see page 3-4.
- Check to see that the network address of your PC (the portion of the IP address specified by the netmask) is different from the network address of the remote device.
- Check the General Status window to verify the WAN status. If the the WAN status is down, check that your cable or DSL modem is connected and functioning.
- Your ISP could be rejecting the Ethernet MAC addresses of all but one of your PCs. Most broadband ISPs restrict access by only allowing traffic from the MAC address of your broadband modem, but some ISPs also restrict access to the MAC address of a single PC connected to that modem. If this is the case, inform your ISP that you have a new network device, and ask them to use your router's Ethernet MAC address, which can be found on the bottom label of your router.
Recovering From a Lost Password
If you lose the router's management password, you must erase the entire router software and reload it. This procedure will also erase your configuration information.
Note: This procedure will erase your router's software. Do not proceed unless you have an Netgear Firewall/VPN Router software file available for reloading. Router software files can be downloaded from NETGEAR's website.
To perform this procedure:
-
Obtain an Netgear Firewall/VPN Router software file for reloading, and store it on your PC's hard drive. A current Netgear Firewall/VPN Router software file can be downloaded from NETGEAR's website.
-
Disconnect all LAN and WAN connections from your firewall router except for the connection to the Management Station PC.
-
On the rear panel of the router, locate the small hole to the left of the Normal/Uplink button. A small pushbutton is accessible through this hole.
- With the router powered off, use a thin tool such as a pencil point to press and hold the pushbutton.
- While holding the pushbutton, turn on the router.
- Within about 5 seconds, the Test LED begins to blink. Release the pushbutton.
The Test LED will blink for approximately 90 seconds while the software is erased, and it will then stay on. - When the Test LED stops blinking and stays on, launch your browser and access the Web Management Interface at http://192.168.0.1.
- In the Web Management Interface, click Browse and locate the router software file from your hard drive.
- Click Upload.
Note: When uploading firmware to the firewall router, it is important not to interrupt the Web browser by closing the window, clicking a link, or loading a new page. If the browser is interrupted, it may corrupt the firmware. When the upload is complete, your router will automatically restart. - After the router has rebooted, reconnect your LAN and WAN connections.
This procedure restores the Web Management Interface password to “password” and restores all configuration settings to factory defaults.
Appendix A Technical Specifications
This appendix provides technical specifications for the Model FR314, FR318 and FV318 Cable/DSL Firewall and VPN Routers.
General Specifications
Network Protocol and Standards Compatibility
Data and Routing Protocols:
TCP/IP, NAT, DHCP, IPSec
PPP over Ethernet (PPPoE)
Power Adapter
North America: 120V, 60 Hz, input
United Kingdom, Australia: 240V, 50 Hz, input
Europe: 230V, 50 Hz, input
Japan: 100V, 50/60 Hz, input
All regions (output):
12 V DC @ 1.2A output, 30W maximum
Physical Specifications
| Dimensions: | 253 by 181 by 35 mm |
| 9.95 by 7.1 by 1.4 in. |
| Weight: 1.1 kg | 2.5 lb. |
Environmental Specifications
| Operating temperature: | 0° to 40°C |
| Operating humidity: | 90% maximum relative humidity, non-condensing |
Electromagnetic Emissions
| Meets requirements of: | FCC Part 15 Class B |
| VCCI Class B | |
| EN 55 022 (CISPR 22), Class B |
Interface Specifications
| LAN: 10BASE-T or 100BASE-TX, RJ-45 |
| WAN: 10BASE-T, RJ-45 |
Appendix B Networks, Routing, and Firewall Basics
This chapter provides an overview of IP networks, routing, and firewalls.
Basic Router Concepts
Large amounts of bandwidth can be provided easily and relatively inexpensively in a local area network (LAN). However, providing high bandwidth between a local network and the Internet can be very expensive. Because of this expense, Internet access is usually provided by a slower-speed wide-area network (WAN) link such as a cable or DSL modem. In order to make the best use of the slower WAN link, a mechanism must be in place for selecting and transmitting only the data traffic meant for the Internet. The function of selecting and forwarding this data is performed by a router.
What is a Router?
A router is a device that forwards traffic between networks based on network layer information in the data and on routing tables maintained by the router. In these routing tables, a router builds up a logical picture of the overall network by gathering and exchanging information with other routers in the network. Using this information, the router chooses the best path for forwarding network traffic.
Routers vary in performance and scale, number of routing protocols supported, and types of physical WAN connection they support. The Model FR314, FR318 and FV318 Cable/DSL Firewall and VPN Routers is a small office router that routes the IP protocol over a single-user broadband connection.
Routing Information Protocol
One of the protocols used by a router to build and maintain a picture of the network is the Routing Information Protocol (RIP). Using RIP, routers periodically update one another and check for changes to add to the routing table.
The Netgear Firewall/VPN Router supports both the older RIP-1 and the newer RIP-2 protocols. Among other improvements, RIP-2 supports subnet and multicast protocols. RIP is not required for most home applications.
IP Addresses and the Internet
Because TCP/IP networks are interconnected across the world, every machine on the Internet must have a unique address to make sure that transmitted data reaches the correct destination. Blocks of addresses are assigned to organizations by the Internet Assigned Numbers Authority (IANA). Individual users and small organizations may obtain their addresses either from the IANA or from an Internet service provider (ISP). You can contact IANA at www.iana.org.
The Internet Protocol (IP) uses a 32-bit address structure. The address is usually written in dot notation (also called dotted-decimal notation), in which each group of eight bits is written in decimal form, separated by decimal points.
For example, the following binary address:
11000011 00100010 00001100 00000111
is normally written as:
195.34.12.7
The latter version is easier to remember and easier to enter into your computer.
In addition, the 32 bits of the address are subdivided into two parts. The first part of the address identifies the network, and the second part identifies the host node or station on the network. The dividing point may vary depending on the address range and the application.
There are five standard classes of IP addresses. These address classes have different ways of determining the network and host sections of the address, allowing for different numbers of hosts on a network. Each address type begins with a unique bit pattern, which is used by the TCP/IP software to identify the address class. After the address class has been determined, the software can correctly identify the host section of the address. The follow figure shows the three main address classes, including network and host sections of the address for each address type.
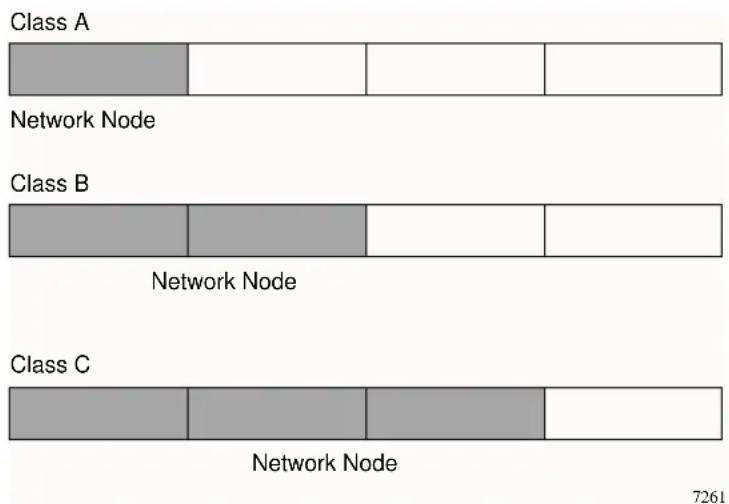
Figure B-1. Three Main Address Classes
The five address classes are:
• C 1 a s s A
Class A addresses can have up to 16,777,214 hosts on a single network. They use an eight-bit network number and a 24-bit node number. Class A addresses are in this range:
1.x.x.x to 126.x.x.x.
• C 1 a s s B
Class B addresses can have up to 65,354 hosts on a network. A Class B address uses a 16-bit network number and a 16-bit node number. Class B addresses are in this range:
128.1.x.x to 191.254.x.x.
• C l a s s C
Class C addresses can have 254 hosts on a network. Class C addresses use 24 bits for the network address and eight bits for the node. They are in this range:
192.0.1.x to 223.255.254.x.
• C l a s s D
Class D addresses are used for multicasts (messages sent to many hosts). Class D addresses are in this range:
224.0.0.0 to 239.255.255.255.
• C l a s s E
Class E addresses are for experimental use.
This addressing structure allows IP addresses to uniquely identify each physical network and each node on each physical network.
For each unique value of the network portion of the address, the base address of the range (host address of all zeros) is known as the network address and is not usually assigned to a host. Also, the top address of the range (host address of all ones) is not assigned, but is used as the broadcast address for simultaneously sending a packet to all hosts with the same network address.
Netmask
In each of the address classes previously described, the size of the two parts (network address and host address) is implied by the class. This partitioning scheme can also be expressed by a netmask associated with the IP address. A netmask is a 32-bit quantity that, when logically combined (using an AND operator) with an IP address, yields the network address. For instance, the netmasks for Class A, B, and C addresses are 255.0.0.0, 255.255.0.0, and 255.255.255.0, respectively.
For example, the address 192.168.170.237 is a Class C IP address whose network portion is the upper 24 bits. When combined (using an AND operator) with the Class C netmask, as shown here, only the network portion of the address remains:
11000000 10101000 10101010 11101101 (192.168.170.237)
combined with:
1111111 1111111 1111111 00000000 (255.255.255.0)
Equals:
11000000 10101000 10101010 00000000 (192.168.170.0)
As a shorter alternative to dotted-decimal notation, the netmask may also be expressed in terms of the number of ones from the left. This number is appended to the IP address, following a backward slash (/), as "/n." In the example, the address could be written as 192.168.170.237/24, indicating that the netmask is 24 ones followed by 8 zeros.
Subnet Addressing
By looking at the addressing structures, you can see that even with a Class C address, there are a large number of hosts per network. Such a structure is an inefficient use of addresses if each end of a routed link requires a different network number. It is unlikely that the smaller office LANs would have that many devices. You can resolve this problem by using a technique known as subnet addressing.
Subnet addressing allows us to split one IP network address into smaller multiple physical networks known as subnetworks. Some of the node numbers are used as a subnet number instead. A Class B address gives us 16 bits of node numbers translating to 64,000 nodes. Most organizations do not use 64,000 nodes, so there are free bits that can be reassigned. Subnet addressing makes use of those bits that are free, as shown below.
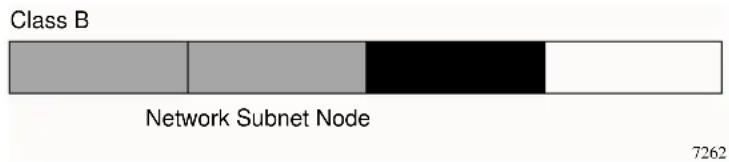
Figure B-2. Example of Subnetting a Class B Address
A Class B address can be effectively translated into multiple Class C addresses. For example, the IP address of 172.16.0.0 is assigned, but node addresses are limited to 255 maximum, allowing eight extra bits to use as a subnet address. The IP address of 172.16.97.235 would be interpreted as IP network address 172.16, subnet number 97, and node number 235. In addition to extending the number of addresses available, subnet addressing provides other benefits. Subnet addressing allows a network manager to construct an address scheme for the network by using different subnets for other geographical locations in the network or for other departments in the organization.
Although the preceding example uses the entire third octet for a subnet address, note that you are not restricted to octet boundaries in subnetting. To create more network numbers, you need only shift some bits from the host address to the network address. For instance, to partition a Class C network number (192.68.135.0) into two, you shift one bit from the host address to the network address. The new netmask (or subnet mask) is 255.255.255.128. The first subnet has network number 192.68.135.0 with hosts 192.68.135.1 to 129.68.135.126, and the second subnet has network number 192.68.135.128 with hosts 192.68.135.129 to 192.68.135.254.

Note: The number 192.68.135.127 is not assigned because it is the broadcast address of the first subnet. The number 192.68.135.128 is not assigned because it is the network address of the second subnet.
The following table lists the additional subnet mask bits in dotted-decimal notation. To use the table, write down the original class netmask and replace the 0 value octets with the dotted-decimal value of the additional subnet bits. For example, to partition your Class C network with subnet mask 255.255.255.0 into 16 subnets (4 bits), the new subnet mask becomes 255.255.255.240.
Table B-1. Netmask Notation Translation Table for One Octet
| Number of Bits Dotted-Decimal Value | |
| 1 | 128 |
| 2 | 192 |
| 3 | 224 |
| 4 | 240 |
| 5 | 248 |
| 6 | 252 |
| 7 | 254 |
| 8 | 255 |
The following table displays several common netmask values in both the dotted-decimal and the masklength formats.
Table B-2. Netmask Formats
| Dotted-Decimal Masklength |
| 255.0.0.0 /8 |
| 255.255.0.0 /16 |
| 255.255.255.0 /24 |
| 255.255.255.128 /25 |
| 255.255.255.192 /26 |
| 255.255.255.224 /27 |
| 255.255.255.240 /28 |
| 255.255.255.248 /29 |
Table B-2. Netmask Formats
| 255.255.255.252 /30 |
| 255.255.255.254 /31 |
| 255.255.255.255 /32 |
NETGEAR strongly recommends that you configure all hosts on a LAN segment to use the same netmask for the following reasons:
• So that hosts recognize local IP broadcast packets
When a device broadcasts to its segment neighbors, it uses a destination address of the local network address with all ones for the host address. In order for this scheme to work, all devices on the segment must agree on which bits comprise the host address.
• So that a local router or bridge recognizes which addresses are local and which are remote
Private IP Addresses
If your local network is isolated from the Internet (for example, when using NAT), you can assign any IP addresses to the hosts without problems. However, the IANA has reserved the following three blocks of IP addresses specifically for private networks:
10.0.0.0 - 10.255.255.255
172.16.0.0 - 172.31.255.255
192.168.0.0 - 192.168.255.255
NETGEAR recommends that you choose your private network number from this range. The DHCP server of the Netgear Firewall/VPN Router is preconfigured to automatically assign private addresses.
Regardless of your particular situation, do not create an arbitrary IP address; always follow the guidelines explained here. For more information about address assignment, refer to RFC 1597, Address Allocation for Private Internets, and RFC 1466, Guidelines for Management of IP Address Space. The Internet Engineering Task Force (IETF) publishes RFCs on its Web site at www.ietf.org.
Single IP Address Operation Using NAT
In the past, if multiple PCs on a LAN needed to access the Internet simultaneously, you had to obtain a range of IP addresses from the ISP. This type of Internet account is more costly than a single-address account typically used by a single user with a modem, rather than a router. The Netgear Firewall/VPN Router employs an address-sharing method called Network Address Translation (NAT). This method allows several networked PCs to share an Internet account using only a single IP address, which may be statically or dynamically assigned by your ISP.
The router accomplishes this address sharing by translating the internal LAN IP addresses to a single address that is globally unique on the Internet. The internal LAN IP addresses can be either private addresses or registered addresses. For more information about IP address translation, refer to RFC 1631, The IP Network Address Translator (NAT).
The following figure illustrates a single IP address operation.
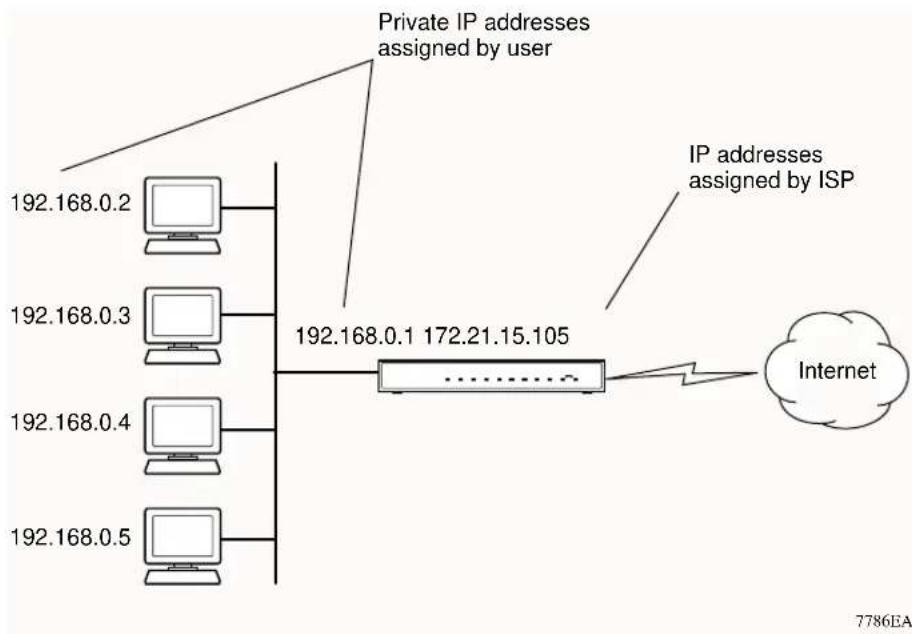
flowchart
graph LR
    A["192.168.0.2"] --> B["192.168.0.1 172.21.15.105"]
    C["192.168.0.3"] --> B
    D["192.168.0.4"] --> B
    E["192.168.0.5"] --> B
    B --> F["Internet"]
    style B fill:#f9f,stroke:#333
    note right of B: Private IP addresses assigned by user
    note right of B: IP addresses assigned by ISP
Figure B-3. Single IP Address Operation Using NAT
This scheme offers the additional benefit of firewall-like protection because the internal LAN addresses are not available to the Internet through the translated connection. All incoming inquiries are filtered out by the router. This filtering can prevent intruders from probing your system. However, using port forwarding, you can allow one PC (for example, a Web server) on your local network to be accessible to outside users.
MAC Addresses and Address Resolution Protocol
An IP address alone cannot be used to deliver data from one LAN device to another. To send data between LAN devices, you must convert the IP address of the destination device to its media access control (MAC) address. Each device on an Ethernet network has a unique MAC address, which is a 48-bit number assigned to each device by the manufacturer. The technique that associates the IP address with a MAC address is known as address resolution. Internet Protocol uses the Address Resolution Protocol (ARP) to resolve MAC addresses.
If a device sends data to another station on the network and the destination MAC address is not yet recorded, ARP is used. An ARP request is broadcast onto the network. All stations on the network receive and read the request. The destination IP address for the chosen station is included as part of the message so that only the station with this IP address responds to the ARP request. All other stations discard the request.
The station with the correct IP address responds with its own MAC address directly to the sending device. The receiving station provides the transmitting station with the required destination MAC address. The IP address data and MAC address data for each station are held in an ARP table. The next time data is sent, the address can be obtained from the address information in the table.
Domain Name Server
Many of the resources on the Internet can be addressed by simple descriptive names such as www.NETGEAR.com. This addressing is very helpful at the application level, but the descriptive name must be translated to an IP address in order for a user to actually contact the resource. Just as a telephone directory maps names to phone numbers, or as an ARP table maps IP addresses to MAC addresses, a domain name system (DNS) server maps descriptive names of network resources to IP addresses.
When a PC accesses a resource by its descriptive name, it first contacts a DNS server to obtain the IP address of the resource. The PC sends the desired message using the IP address. Many large organizations, such as ISPs, maintain their own DNS servers and allow their customers to use the servers to look up addresses.
IP Configuration by DHCP
When an IP-based local area network is installed, each PC must be configured with an IP address. If the PCs need to access the Internet, they should also be configured with a gateway address and one or more DNS server addresses. As an alternative to manual configuration, there is a method by which each PC on the network can automatically obtain this configuration information. A device on the network may act as a Dynamic Host Configuration Protocol (DHCP) server. The DHCP server stores a list or pool of IP addresses, along with other information (such as gateway and DNS addresses) that it may assign to the other devices on the network. The Netgear Firewall/VPN Router has the capacity to act as a DHCP server.
The Netgear Firewall/VPN Router also functions as a DHCP client when connecting to the ISP. The router can automatically obtain an IP address, subnet mask, DNS server addresses, and a gateway address if the ISP provides this information by DHCP.
Ethernet Cabling
Although Ethernet networks originally used thick or thin coaxial cable, most installations currently use unshielded twisted pair (UTP) cabling. The UTP cable contains eight conductors, arranged in four twisted pairs, and terminated with an RJ45 type connector. A normal "straight-through" UTP Ethernet cable follows the EIA568B standard wiring as described in Table B-3.
Table B-3. UTP Ethernet cable wiring, straight-through
| Pin Wire color Signal | ||
| 1 Orange | White Transmit (Tx) + | |
| 2 Orange | Transmit (Tx) - | |
| 3 Green | White Receive (Rx) + | |
| 4 | Blue | |
| 5 | Blue/White | |
| 6 Green | Receive (Rx) - | |
| 7 Brown | White | |
| 8 | Brown | |
Uplink Switches and Crossover Cables
In the wiring table, the concept of transmit and receive are from the perspective of the PC. For example, the PC transmits on pins 1 and 2. At the hub, the perspective is reversed, and the hub receives on pins 1 and 2. When connecting a PC to a PC, or a hub port to another hub port, the transmit pair must be exchanged with the receive pair. This exchange is done by one of two mechanisms. Most hubs provide an Uplink switch which will exchange the pairs on one port, allowing that port to be connected to another hub using a normal Ethernet cable. The second method is to use a crossover cable, which is a special cable in which the transmit and receive pairs are exchanged at one of the two cable connectors. Crossover cables are often unmarked as such, and must be identified by comparing the two connectors. Since the cable connectors are clear plastic, it is easy to place them side by side and view the order of the wire colors on each. On a straight-through cable, the color order will be the same on both connectors. On a crossover cable, the orange and blue pairs will be exchanged from one connector to the other.
Cable Quality
A twisted pair Ethernet network operating at 10 Mbits/second (10BASE-T) will often tolerate low quality cables, but at 100 Mbits/second (10BASE-Tx) the cable must be rated as Category 5, or "Cat 5", by the Electronic Industry Association (EIA). This rating will be printed on the cable jacket. A Category 5 cable will meet specified requirements regarding loss and crosstalk. In addition, there are restrictions on maximum cable length for both 10 and 100 Mbits/second networks.
Internet Security and Firewalls
When your LAN connects to the Internet through a router, an opportunity is created for outsiders to access or disrupt your network. A NAT router provides some protection because by the very nature of the Network Address Translation (NAT) process, the network behind the NAT router is shielded from access by outsiders on the Internet. However, there are methods by which a determined hacker can possibly obtain information about your network or at the least can disrupt your Internet access. A greater degree of protection is provided by a firewall router.
What is a Firewall?
A firewall is a device that protects one network from another, while allowing communication between the two. A firewall incorporates the functions of the NAT router, while adding features for dealing with a hacker intrusion or attack. Several known types of intrusion or attack can be recognized when they occur. When an incident is detected, the firewall can log details of the attempt, and can optionally send email to an administrator notifying them of the incident. Using information from the log, the administrator can take action with the ISP of the hacker. In some types of intrusions, the firewall can fend off the hacker by discarding all further packets from the hacker's IP address for a period of time.
Stateful Packet Inspection
Unlike simple Internet sharing routers, a firewall uses a process called stateful packet inspection to ensure secure firewall filtering to protect your network from attacks and intrusions. Since user-level applications such as FTP and Web browsers can create complex patterns of network traffic, it is necessary for the firewall to analyze groups of network connection "states". Using Stateful Packet Inspection, an incoming packet is intercepted at the network layer and then analyzed for state-related information associated with all network connections. A central cache within the firewall keeps track of the state information associated with all network connections. All traffic passing through the firewall is analyzed against the state of these connections in order to determine whether or not it will be allowed to pass through or rejected.
Denial of Service Attack
A hacker may be able to prevent your network from operating or communicating by launching a Denial of Service (DoS) attack. The method used for such an attack can be as simple as merely flooding your site with more requests than it can handle. A more sophisticated attack may attempt to exploit some weakness in the operating system used by your router or gateway. Some operating systems can be disrupted by simply sending a packet with incorrect length information.
Glossary
| 10BASE-T | IEEE 802.3 specification for 10 Mbps Ethernet over twisted pair wiring. |
| 100BASE-Tx | IEEE 802.3 specification for 100 Mbps Ethernet over twisted pair wiring. |
| ARCFour | A data encryption algorithm used for communications with secure Web sites using the SSL protocol. A newer scheme than the common DES method, ARCFour is faster, resulting in improved VPN throughput. |
| Authenticated Header | AH. An IPSec protocol component that provides strong integrity and authentication by encrypting header data as well as payload data. |
| Denial of Service attack | A hacker attack designed to prevent your computer or network from operating or communicating. |
| DES | Data Encryption Standard. An encryption algorithm for data communications using a shared key to encrypt data for sending between two points. Standard DES uses a 56-bit key, while “triple DES” (3DES) uses a 168 bit key. 3DES is dramatically more secure than DES, but requires a great deal more processing power, resulting in increased latency and decreased throughput. |
| DHCP | See Dynamic Host Configuration Protocol. |
| DNS | See Domain Name Server. |
| domain name | A descriptive name for an address or group of addresses on the Internet. Domain names are of the form of a registered entity name plus one of a number of predefined top level suffixes such as .com, .edu, .uk, etc. For example, in the address mail.NETGEAR.com, mail is a server name and NETGEAR.com is the domain. |
| Domain Name Server | A Domain Name Server (DNS) resolves descriptive names of network resources (such as www.NETGEAR.com) to numeric IP addresses. |
| Dynamic Host Configuration Protocol | DHCP. An Ethernet protocol specifying how a centralized DHCP server can assign network configuration information to multiple DHCP clients. The assigned information includes IP addresses, DNS addresses, and gateway (router) addresses. |
| Encapsulated Secure Payload | ESP. An IPSec protocol component that provides confidentiality and integrity of data by encrypting the data and encapsulating it into IP packets. Encryption may be in the form of ARCFour (similar to the popular RC4 encryption method), DES, etc. |
| encryption | A mathematical operation that transforms data from "clear text" (something that a human or a program can interpret) to "cipher text" (something that cannot be interpreted). Usually the mathematical operation requires that an alphanumeric "key" be supplied along with the clear text. Decryption is the opposite of encryption. |
| IKE | Internet Key Exchange. An IPSec protocol component to transparently negotiate encryption and authentication keys between two VPN endpoints. |
| IP | See Internet Protocol. |
| IP Address | A four-byte number uniquely defining each host on the Internet. Ranges of addresses are assigned by Internic, an organization formed for this purpose. Usually written in dotted-decimal notation with periods separating the bytes (for example, 134.177.244.57). |
| IPSec | Internet Protocol Security. IPSec is a set of protocols developed by the IETF to support secure exchange of private information transmitted over public networks. IPSec is a VPN method providing a higher level of security than PPTP. |
| IPX | See Internet Packet Exchange. |
| ISP | Internet service provider. |
| Internet Packet Exchange | Novell's internetworking protocol. |
| Internet Protocol | The main internetworking protocol used in the Internet. Used in conjunction with the Transfer Control Protocol (TCP) to form TCP/IP. |
| LAN | See local area network. |
| local area network | LAN. A communications network serving users within a limited area, such as one floor of a building. A LAN typically connects multiple personal computers and shared network devices such as storage and printers. Although many technologies exist to implement a LAN, Ethernet is the most common for connecting personal computers. |
| MAC address | Media Access Control address. A unique 48-bit hardware address assigned to every Ethernet node. Usually written in the form 01:23:45:67:89:ab. |
| MSB | See Most Significant Bit or Most Significant Byte. |
| MRU | See Maximum Receive Unit. |
| MTU | See Maximum Transmit Unit. |
| Maximum Receive Unit | The size in bytes of the largest packet that can be received. |
| Maximum Transmit Unit | The largest size packet, including all headers and data, that can be transmitted over a given network. Ethernet networks typically use an MTU of 1500 bytes. |
| Most Significant Bit or Most Significant Byte | The portion of a number, address, or field that is farthest left when written as a single number in conventional hexadecimal ordinary notation. The part of the number having the most value. |
| NAT | See Network Address Translation. |
| netmask | A number that explains which part of an IP address comprises the network address and which part is the host address on that network. It can be expressed in dotted-decimal notation or as a number appended to the IP address. For example, a 28-bit mask starting from the MSB can be shown as 255.255.255.192 or as /28 appended to the IP address. |
| Network Address Translation | A technique by which several hosts share a single IP address for access to the Internet. |
| packet | A block of information sent over a network. A packet typically contains a source and destination network address, some protocol and length information, a block of data, and a checksum. |
| PPP | See Point-to-Point Protocol. |
| PPP over Ethernet | PPPoE. PPP over Ethernet is a protocol for connecting remote hosts to the Internet over an always-on connection by simulating a dial-up connection. |
| PPTP | Point-to-Point Tunneling Protocol. A method for establishing a virtual private network (VPN) by embedding Microsoft's network protocol into Internet packets. |
| PSTN | Public Switched Telephone Network. |
| Point-to-Point Protocol | PPP. A protocol allowing a computer using TCP/IP to connect directly to the Internet. |
| RFC | Request For Comment. Refers to documents published by the Internet Engineering Task Force (IETF) proposing standard protocols and procedures for the Internet. RFCs can be found at www.ietf.org. |
| RIP | See Routing Information Protocol. |
| router | A device that forwards data between networks. An IP router forwards data based on IP source and destination addresses. |
| Routing Information Protocol | A protocol in which routers periodically exchange information with one another so that they can determine minimum distance paths between sources and destinations. |
| security association | A Security Association (SA) is the group of security settings defining a specific VPN tunnel. A Security Association requires a specified Encryption Method, IPSec Gateway Address and Destination Network Address. |
| subnet mask | See netmask. |
| UTP | Unshielded twisted pair. The cable used by 10BASE-T and 100BASE-Tx Ethernet networks. |
| VPN | Virtual Private Network. A method for securely transporting data between two private networks by using a public network such as the Internet as a connection. |
| WAN | See wide area network. |
| wide area network | WAN. A long distance link used to extend or connect remotely located local area networks. The Internet is a large WAN. |
| Windows Internet Naming Service | WINS. Windows Internet Naming Service is a server process for resolving Windows-based computer names to IP addresses. If a remote network contains a WINS server, your Windows PCs can gather information from that WINS server about its local hosts. This allows your PCs to browse that remote network using Network Neighborhood. |
| WINS | See Windows Internet Naming Service. |
Numerics
3DES 10-6
A
ActiveX
blocking 6-3
Address Resolution Protocol B-9
Administrator Settings IE checkbox 11-11
alerts
categories 8-7
ARCFour 10-6
B
Bastion Host 7-4
blocking
ActiveX controls 6-3
by domain 6-8
by keyword 6-8
cookies 6-3
Java applets 6-3
C
Cabling B-10
Cat5 cable 2-2, 2-5, B-11
configuration
automatic by DHCP 1-4
router, initial 4-1
configuring
network addressing mode 5-7
connecting
router 2-4
Connection Monitor 10-15
connections
Index 1
verifying 2-6
Content Filter List 6-3
categories 6-1
customizing 6-7
downloading 6-6
subscription service 1-3, 6-5
updating 6-5
content filtering 1-2
conventions
typography xv
cookies
blocking 6-3
crossover cable 1-3, 2-6, 12-2, B-11
customer support iii
D
Denial of Service (DoS) protection 1-2
denial of service attack B-12
DES 10-6
Destination Network Address 10-7
DHCP 1-4, 5-10, B-10
DHCP Client ID 3-6
DHCP Server
address ranges 9-1
Current DHCP Leases 9-5
DNS setup options 9-3
dynamic ranges 9-4
general setup options 9-3
overview 9-1
static entries 9-4
WINS options 9-4
diagnostic tools 11-7
DMZ 7-4
DNS name lookup 11-8
DNS name resolution 5-10
DNS server 3-9, 3-10, 5-5
DNS settings 5-5
domain 3-9
domain name server (DNS) B-9
domains
forbidden 6-8
trusted 6-8
DoS attack B-12
dynamic NAT. See Network Address Translation
E
email problems 7-8
Encryption Algorithm 10-6
endpoint 10-1
EPROM, for firmware upgrade 1-5
Ethernet 1-3
Ethernet cable B-10
Ethernet MAC address 5-6, 12-4
event log
viewing 8-1
exporting settings files 11-3
F
factory defaults
restoring 11-3
features 1-2
Filter Bypass 6-5
filter list 6-3
customizing 6-7
downloading 6-6
updating 6-5
find network path tool 11-8
firewall features 1-2
firmware
updating 11-5
forbidden domains
specifying 6-8
front panel 2-3
G
Gateway Address 10-6
gateway address 3-9
H
HMAC 10-7
Host Name 5-8
|
IANA
contacting B-2
identd 7-8
IETF xvi
Web site address B-7
IKE 10-7
importing settings files 11-3
In 1-3
installation 1-4
Internet account
address information 3-8
establishing 3-7
IP addresses 3-9
and NAT B-8
and the Internet B-2
assigning xvii, B-2
auto-generated 12-3
masquerading 1-4
private B-7
translating xvii
IP configuration by DHCP B-10
IP networking
for Macintosh 3-5
for Windows 3-2
IPSec 10-2
J
Java
blocking 6-3
K
Keep Alive 10-7
L
LAN IP address 5-4
LAN settings 5-4
LAN subnet mask 5-4
LEDs
description 2-3
troubleshooting 12-2
Log Viewer 10-15
logging
disabling 7-7
login protocols 3-8
logs
automated sending 8-5
categories 8-6
reports 8-7
sending 8-5
settings 8-4
types of messages 8-2
viewing 8-1
M
MAC address 12-4, 12-7, B-9
MAC Address Proxy 5-6
Macintosh 3-8
configuring for IP networking 3-5
DHCP Client ID 3-6
Obtaining ISP Configuration Information 3-9
MD5 authentication 10-7
MTU Setting 5-6
N
NAT Disabled 5-9, 5-10
NAT. See Network Address Translation
NETGEAR
contacting xvi
netmask
translation table B-6
Index 3
Network Address Translation 1-4, B-8
Network Address Translation (NAT)
network addressing modes
configuring for dynamic addressing 5-8
configuring for fixed addressing 5-8
configuring for NAT disabled 5-9
configuring for PPPoE 5-7
overview 5-4
selecting 5-7
network settings 5-3
Node License Count 7-8
Node License count, excluding addresses 7-3
number of users 11-7
P
package contents 2-1
packet trace 11-9
password
for the Configuration Manager 4-2
restoring 12-7
PC, using to configure 3-10
Peer Netgear Router 10-6
ping 11-9, 12-5
port
forwarding 1-4, 7-4
locations 2-4
port forwarding behind NAT B-9
PPP over Ethernet (PPPoE) 1-4, 4-5
PPTP 10-2
print server, excluding from node count 7-9
protocols
Address Resolution B-9
DHCP 1-4, B-10
filtering 1-3
login 3-8
Routing Information 1-3, B-2
support 1-3
TCP/IP 1-3
Public LAN server 7-4
publications, related xvi
R
rear panel 2-4
reports
logging 8-7
requirements
access device 2-2
browser 4-1
hardware 2-2
restarting the firewall router 11-1
restoring defaults 11-3
restrict Web features 6-3
RFC
1466 xvii, B-7
1597 xvii, B-7
1631 xvii, B-8
finding B-7
router concepts B-1
Routing Information Protocol 1-3, B-2
S
SA 10-2
SA Life Time 10-7
SA Name 10-6
SafeNet Secure VPN Client 10-8
security association 10-2
Security Policy 10-6
services
adding 7-5
deleting 7-7
settings files 11-3
exporting 11-3
importing 11-3
Setup Wizard 4-1, 11-4
Shared Secret 10-6
specifications
technical A-1
stateful packet inspection 1-2, B-12
status
viewing 5-2
Stealth Mode 7-3
4 Index
stealth mode 7-7
stealth mode, email problems 7-8
subnet addressing B-5
subnet mask 3-9, B-5
subscription, purchasing 6-5
T
TCP/IP
configuring 3-1
network, troubleshooting 12-5
TCP/IP properties
verifying for Macintosh 3-6
verifying for Windows 3-4
technical specifications A-1
technical support xvi
technical support report 11-11
Triple DES 10-6
troubleshooting 12-1
trusted domains
specifying 6-8
trusted user 6-5
tunnel 10-1
typographical conventions xv
U
Unique Firewall Identifier 10-4
updating firmware 11-5
upgrade, user 1-1
upgrade, VPN 1-1
upgrades 11-7
Uplink switch 2-5, B-11
user upgrade 1-1
user-limit 9-4, 11-7
V
VPN 1-2
VPN client 10-3, 10-6
VPN upgrade 1-1
W
WAN gateway (router) address 5-5
WANIPaddress5-5
WAN settings 5-5
WAN/DMZ subnet mask 5-5
warranty 1-5
Web Management Interface 4-1
Web proxy 6-3
Windows, configuring for IP routing 3-2
winipcfg utility 3-4, 12-7
World Wide Web iii
- Reference Guide for the Model FR314, FR318 and FV318 Cable/DSL Firewall and VPN Routers
- NETGEAR
- Trademarks
- Statement of Conditions
- Federal Communications Commission (FCC) Compliance Notice: Radio Frequency Notice
- EN 55 022 Declaration of Conformance
- Certificate of the Manufacturer/Importer
- Voluntary Control Council for Interference (VCCI) Statement
- Customer Support
- World Wide Web
- Contents
- About This Guide
- Chapter 1 Introduction
- Chapter 2 Setting Up the Hardware
- Contents v
- Chapter 3
- Preparing Your Network
- Chapter 4
- Initial Configuration of the Firewall Router
- Chapter 5
- General Configuration
- Chapter 6
- Content Filtering
- vi Contents
- Chapter 7
- Network Access Rules
- Chapter 8
- Logging and Alerting
- Chapter 9
- DHCP Server Configuration
- Chapter 10
- Virtual Private Networking
- Chapter 11
- System Maintenance
- Chapter 12
- Troubleshooting
- Appendix A
- Technical Specifications
- Appendix B
- Networks, Routing, and Firewall Basics
- Contents ix
- Glossary
- Index
- Figures
- Figures xi
- Tables
- Typographical Conventions
- Special Message Formats
- Technical Support
- Related Publications
- About the Netgear Firewall/VPN Router
- Key Features
- A Powerful, True Firewall
- Virtual Private Networking (VPN)
- Configurable Ethernet Connection
- Protocol Support
- Easy Installation and Management
- Maintenance and Support
- Package Contents
- Local Network Hardware Requirements
- PC Requirements
- Access Device Requirement
- The Firewall Router's Front Panel
- The Firewall Router's Rear Panel
- Connecting the Firewall Router
- Connecting to Your Local Ethernet Network
- OR
- Connecting to Your Internet Access Device
- Connecting the Power Adapter
- Verifying Connections
- Preparing Your Personal Computers for IP Networking
- Configuring Windows 95 or later for IP Networking
- Configuring TCP/IP Properties
- Verifying TCP/IP Properties (Windows)
- Configuring the Macintosh for IP Networking
- Verifying TCP/IP Properties (Macintosh)
- 3-6 Preparing Your Network
- Your Internet Account
- Login Protocols
- Account Information
- Obtaining ISP Configuration Information (Windows)
- Obtaining ISP Configuration Information (Macintosh)
- Ready for Configuration
- Accessing the Web Management Interface
- Click Next.
- Select your time zone from the pull-down menu.
- Click Next.
- Status
- Network Settings
- Network Addressing Mode
- LAN Settings
- WAN Settings
- • WAN Gateway (Router) Address
- • NETGEAR Firewall WAN IP Address
- - WAN Subnet Mask
- DNS Settings
- MAC Address Proxy
- MTU Settings
- Selecting and Configuring a Network Addressing Mode
- Configuring for a PPPoE Connection
- Click Update.
- Click Restart for these changes to take effect.
- Configuring for Dynamic Addressing
- Configuring for Fixed Addressing with a Single Address
- Configuring for NAT Disabled
- Additional Notes
- Categories
- 6-2 Content Filtering
- Restrict Web Features
- Use Filter List (Web/News/FTP/Gopher)
- Time of Day
- Bypassing the Filter
- Updating the Content Filter List
- Customizing the Filter List
- Content Filter List Category Descriptions
- Violence/Profanity (graphics or text)
- Partial Nudity
- Full Nudity
- Sexual Acts
- Gross Depictions
- Intolerance
- Satanic/Cult
- Drugs/Drug Culture
- Militant/Extremist
- Sex Education
- Questionable/Illegal Gambling
- Alcohol & Tobacco
- Services
- Network Access Rules Options
- • LAN Out
- • L A N I n
- • Public LAN Server
- • Network Connection Inactivity Timeout
- • Detection Prevention
- • Exclude IP Address from Node License count
- Creating a Public LAN Server (Port Forwarding)
- Notes on DMZ or Bastion Host
- Adding a Service
- Adding a Known Service
- Adding a Custom Service
- Disabling Logging
- Deleting a Service
- Stealth Mode
- Node License Count
- Excluding Devices from Node License Count
- Viewing the Log
- Log Messages
- • TCP, UDP, or ICMP packets dropped
- - Web, FTP, Gopher, or Newsgroup blocked
- • ActiveX, Java, Cookie or Code Archive blocked
- • Ping of Death, IP Spoof, and SYN Flood Attacks
- Log Settings
- 8-4 Logging and Alerting
- Sending the Log
- Automated Sending
- Log and Alert Categories
- Log Categories
- Alert Categories
- Log Reports
- Data Collection
- View Data
- DHCP Server Overview
- Configuring the DHCP Server
- General Setup
- DNS Setup
- WINS
- Dynamic Ranges
- Static Entries
- Current DHCP Leases
- What is a VPN
- Accessing Network Resources from a VPN Client PC
- Linking Two Networks Together
- Initial Setup of the VPN
- Under Global Settings:
- 10-4 Virtual Private Networking
- Configuring a Security Association
- Deleting a Security Association
- Security Association Notes
- Installing and Configuring the SafeNet VPN Client
- Install the VPN Client Software
- OpentheSecurityPolicyEditor
- Create a VPN Connection
- Configure the Security Policy
- Configure the VPN Client Identity
- Configure VPN Client Authentication Proposal
- Configure VPN Client Key Exchange Proposal
- Save the VPN Client Settings
- Monitoring the VPN Connection
- Accessing Remote Resources across a VPN
- Restart
- Preferences
- Overview of Settings Files
- Exporting the Settings File
- Importing the Settings File
- Restoring Factory Default Settings
- Launch the Setup Wizard
- Updating Firmware
- Uploading New Firmware
- Automatic Notification
- Upgrade Features
- Diagnostic Tools
- DNS Name Lookup
- Find Network Path
- Ping
- Packet Trace
- Tech Support Report
- Administrator Settings
- Basic Functioning
- PWR LED Not On
- Test LED Stays On
- LNK/ACT LEDs Not On
- Troubleshooting the Web Management Interface
- Troubleshooting the ISP Connection
- To check the WAN IP address:
- Troubleshooting a TCP/IP Network Using a Ping Utility
- Testing the LAN Path to Your Router
- Testing the Path from Your PC to a Remote Device
- Recovering From a Lost Password
- Appendix A Technical Specifications
- General Specifications
- Network Protocol and Standards Compatibility
- Power Adapter
- Appendix B Networks, Routing, and Firewall Basics
- Basic Router Concepts
- What is a Router?
- Routing Information Protocol
- IP Addresses and the Internet
- Netmask
- Subnet Addressing
- Private IP Addresses
- Single IP Address Operation Using NAT
- MAC Addresses and Address Resolution Protocol
- Domain Name Server
- IP Configuration by DHCP
- Ethernet Cabling
- Uplink Switches and Crossover Cables
- Cable Quality
- Internet Security and Firewalls
- What is a Firewall?
- Stateful Packet Inspection
- Denial of Service Attack
- Numerics
- A
- B
- C
- D
- E
- F
- G
- H
- |
- J
- K
- L
- M
- N
- Index 3
- P
- R
- S
- Index
- T
- U
- V
- W
Brand : NETGEAR
Model : FV318
Category : Hardware firewall