
Monster 659 ABS (2013) - Motorcycle DUCATI - Free user manual and instructions
Find the device manual for free Monster 659 ABS (2013) DUCATI in PDF.


| Brand | Ducati |
| Model | Monster 659 ABS (2013) |
| Category | Motorcycle |
| Engine Type | L-Twin, 4-stroke, 2 valves per cylinder |
| Displacement | 659 cc |
| Bore x Stroke | 88.0 x 54.2 mm |
| Compression Ratio | 10.7:1 |
| Cooling System | Air-cooled |
| Fuel System | Electronic fuel injection, 50 mm throttle body |
| Ignition | Electronic |
| Starting | Electric |
| Max Power | 50 hp (37 kW) @ 8,750 rpm |
| Max Torque | 49 Nm (36 lb-ft) @ 6,500 rpm |
| Transmission | 6-speed, chain drive |
| Clutch | Wet multi-plate, hydraulic actuation |
| Frame | Tubular steel trellis |
| Front Suspension | 43 mm upside-down forks, adjustable |
| Rear Suspension | Progressive linkage with adjustable monoshock |
| Front Brakes | 2 x 320 mm discs, 4-piston calipers, ABS |
| Rear Brakes | 245 mm disc, 2-piston caliper, ABS |
| Front Tire | 120/70 ZR17 |
| Rear Tire | 160/60 ZR17 |
| Wheelbase | 1,450 mm (57.1 in) |
| Seat Height | 800 mm (31.5 in) |
| Overall Length | 2,100 mm (82.7 in) |
| Overall Width | 800 mm (31.5 in) |
| Overall Height | 1,100 mm (43.3 in) |
| Dry Weight | 182 kg (401 lb) |
| Fuel Capacity | 15 L (4.0 US gal) |
| Maintenance Interval | Every 6,000 miles (10,000 km) or 12 months |
| Valve Adjustment | Every 18,000 miles (30,000 km) |
| Oil Type | SAE 10W-40, API SG or higher |
| Oil Capacity | 3.0 L (3.2 qt) with filter |
| Coolant Capacity | N/A (air-cooled) |
| Spark Plug | NGK DCPR8E or equivalent |
| Battery | 12V, 10 Ah (sealed, maintenance-free) |
| Fuse Box Location | Under the seat |
| Headlight Bulb | H7 12V 55W |
| Tail Light Bulb | LED (integrated) |
| Chain | 520 pitch, 118 links |
| Chain Slack | 25-30 mm (1.0-1.2 in) |
| Fuel Type | Unleaded gasoline (91 RON or higher) |
| Rev Limiter | At 10,000 rpm (approx.) |
| Emissions | Euro 3 compliant |
Frequently Asked Questions - Monster 659 ABS (2013) DUCATI
User questions about Monster 659 ABS (2013) DUCATI
0 question about this device. Answer the ones you know or ask your own.
Ask a new question about this device
Download the instructions for your Motorcycle in PDF format for free! Find your manual Monster 659 ABS (2013) - DUCATI and take your electronic device back in hand. On this page are published all the documents necessary for the use of your device. Monster 659 ABS (2013) by DUCATI.
USER MANUAL Monster 659 ABS (2013) DUCATI
We would like to welcome you among Ducati enthusiasts, and congratulate you on your excellent choice of motorcycle. We are sure that you will use your Ducati for longer journeys as well as short daily trips, but however you use your motorcycle, Ducati Motor Holding S.p.A. wishes you an enjoyable ride.
We are continuously working to improve our Technical Assistance service. For this reason, we recommend that you strictly follow the instructions in this manual, especially those regarding the running-in period. In this way, your Ducati motorbike will surely give you unforgettable emotions.
For any servicing or suggestions you might need, please contact our authorised service centres.
We also provide an information service for all Ducati owners and enthusiasts for any advice and suggestions you might need.
Enjoy your ride!

Note
Ducati Motor Holding S.p.A. cannot accept any liability for errors that may have occurred in the preparation of this manual. All information in this manual is valid at the time of going to print. Ducati Motor Holding S.p.A. reserves the right to make any modifications required due to the ongoing development of their products.
For your safety, as well as to preserve the warranty, reliability and worth of your motorcycle, use original Ducati spare parts only.

Warning
This manual is an integral part of the product and, if ownership is transferred to a third party, must always be passed to the new owner.

Table of contents
General indications 7
Warranty 7
Symbols 7
Useful information for safe riding 8
Carrying the maximum load allowed 9
Identification data 10
Instrument panel (Dashboard) 11
Instrument panel 11
LCD unit functions 14
LCD - How to set/display parameters 16
Total distance covered indicator: "Odometer" 19
Vehicle "speed" indicator 20
"TRIP" meter 21
Distance travelled on fuel reserve: "TRIP FUEL" 22
Clock display indicator 23
Air temperature indicator 24
Oil temperature indicator 25
Service indicator 28
Battery voltage indicator (BATT) 29
Engine idle RPM setting (RPM) 31
Backlighting adjustment 32
LAP timer 33
Stored data display (LAP Memory) 35
DDA data acquisition 36
ABS disabling function (for Monster 659 ABS only) 38
Clock setting function 39
Instrument panel diagnostics 40
Headlight "smart" auto-off 44
Intelligent headlight switch-on 44
The Immobilizer system 45
Code Card 46
Immobilizer override procedure 47
Duplicate keys 49
Controls 50
Position of motorcycle controls 50
Ignition switch and steering lock 51
Left-hand switch 52
Clutch lever 53
Cold start control lever. 54
Right-hand switch 55
Throttle twistgrip 56
Front brake lever 56
Rear brake pedal 57
Gear change pedal 57
Adjusting the position of the gearchange and rear brake
pedals 58
Main components and devices 59
Position on the vehicle 59
Tank filler plug 60
Seat lock and helmet holder 61
Helmet cable 62
Side stand 63
Rear shock absorber adjusters 64
Riding the motorcycle 65
Running-in recommendations 65
Pre-ride checks 66
Starting the engine 68
Moving off 70
Braking 71
Stopping the motorcycle 72
Refuelling 72
Parking 73
Tool kit and accessories 74
Main maintenance operations 75
Changing the air filter 75
Checking brake and clutch fluid level 75
Checking brake pads for wear 76
Lubricating cables and joints 77
Adjusting the throttle cable 78
Charging and maintenance of the battery during winter
storage 78
Removal of the battery 79
Refitting the battery 87
Tensioning the drive chain 98
Chain lubrication 99
Changing bulbs 100
Headlight aim 101
Tyres 103
Checking the engine oil level 105
Cleaning and replacing the spark plugs 106
Cleaning the motorcycle 107
Storing the bike away 108
Important notes 108
Maintenance 109
Scheduled maintenance chart: operations to be performed by the dealer 109
Scheduled maintenance chart: operations to be performed by the customer 112

Technical data 113
Overall dimensions (mm) 113
Weights 113
Engine 115
Timing system 115
Performance data 116
Spark plugs 116
Fuel system 116
Brakes 117
Transmission 118
Frame 119
Wheels 119
Tyres 119
Suspensions 119
Exhaust system 120
Available colours 120
Electric system 120
Routine maintenance record 126
General indications
Warranty
In your own interest, and in order to guarantee product reliability, you are strongly advised to refer to a Ducati Dealer or Authorised Service Centre for servicing that requires any particular technical expertise.
Our highly skilled staff have access to the implements required to perform any servicing job at best, and use Ducati original spare parts only as the best guarantee for full interchangeability, smooth running and long life.
All Ducati motorcycles come with a "Warranty Card". The warranty does not apply to motorcycles used in competitions or in cases where there is evidence of poor maintenance. No motorcycle part may be tampered with, altered, or replaced with parts other than original Ducati spare parts during the warranty period, or the warranty right will be automatically invalidated.
Symbols
Ducati Motor Holding S.p.A. advises you to read this manual carefully in order to become familiar with your motorcycle. In case of any doubts, please call a Dealer or authorised Service Center. The information contained herein will prove useful on your trips - and Ducati Motor Holding S.p.A. wishes you smooth, enjoyable riding - and will help you keep the performance of your motorcycle unchanged for a long time. This manual contains some special remarks:

Warning
Failure to comply with these instructions may put you back and lead to severe injury or death.

Important
Possibility of damaging the motorcycle and/or its onents.

Note
Additional information concerning the job being carried
References to the RIGHT or LEFT side of the motorcycle assume you are sitting on the seat, facing forward.

Useful information for safe riding

Warning
Read this section before riding your motorcycle.
Accidents are frequently due to inexperience. Always make sure you have your licence with you when riding; you need a valid licence to be entitled to ride your motorcycle.
Do not lend your motorcycle to inexperienced riders or who do not hold a valid licence.
Both rider and pillion passenger must ALWAYS wear a safety helmet.
Wear proper clothing, with no loose items or accessories that may become tangled in the controls or limit your zone of vision.
Never start or run the engine indoors. Exhaust gases are poisonous and may lead to loss of consciousness or even death within a short time.
Both rider and pillion passenger should keep their feet on the footpegs when the motorcycle is in motion.
ALWAYS hold the handlebars firmly with both hands so you will be ready for sudden changes in direction or in the road surface. The pillion passenger should ALWAYS hold on to the grabhandles under the seat with both hands.
Ride within the law and observe national and local rules.
Always respect speed limits where these are indicated and ALWAYS adapt your speed to suit the current visibility, road and traffic conditions.
ALWAYS signal your intention to turn or pull to the next lane in good time using the suitable turn signals.
Be sure you are clearly visible and do not ride within the blind spot of vehicles ahead.
Be very careful when tackling road junctions, or when riding in the areas near exits from private grounds, car parks or on slip roads to access motorways.
ALWAYS turn off the engine when refuelling.
Be extremely careful not to spill fuel on the engine or on the exhaust pipe when refuelling.
Do not smoke when refuelling.
While refuelling, you may inhale noxious fuel vapours.
Should any fuel drops be spilled on your skin or clothing, immediately wash with soap and water and change your clothing.
ALWAYS remove the key when you leave your motorcycle unattended.
The engine, exhaust pipes, and silencers stay hot for a long time.

Warning
The exhaust system might be hot, even after engine is switched off; take special care not to touch exhaust system with any part of your body and do not park the motorcycle next to inflammable material (wood, leaves etc.).
Park your motorcycle where no one is likely to hit it and use the side stand.
Never park on uneven or soft ground, or your motorcycle may fall over.
Carrying the maximum load allowed
Your motorcycle is designed for long-distance riding, carrying the maximum load allowed in full safety.
Even weight distribution is critical to preserving these safety features and avoiding trouble when performing sudden manoeuvres or riding on bumpy roads.
Information about carrying capacity
The total weight of the motorcycle in running order including rider, pillion passenger, luggage and additional accessories should not exceed 390 kg.
Arrange your luggage or heavy accessories in the lowest possible position and close to motorcycle centre.
Be sure to secure the luggage to the supports provided on the motorcycle as firmly as possible. Luggage incorrectly secured may cause the motorcycle to become unstable.
Never fix bulky or heavy objects to the handlebar or to the front mudguard as this would affect stability and cause danger.
Do not insert any objects you may need to carry into the gaps of the frame as these may foul moving parts.
Make sure the tyres are inflated to the proper pressure indicated at page 103 and that they are in good condition.

Identification data
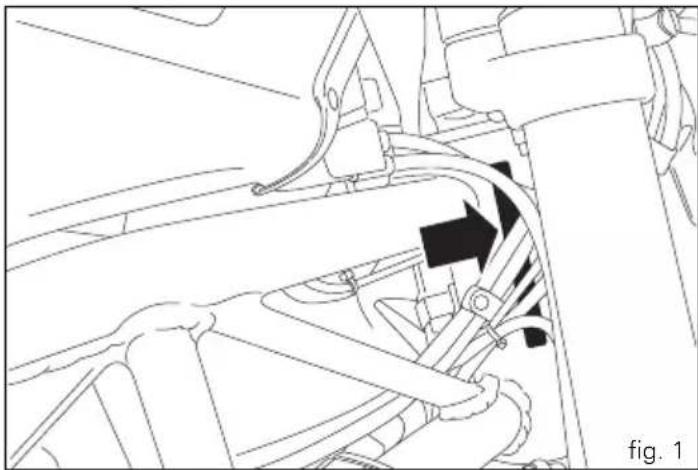
All Ducati motorcycles have two identification numbers, for the frame (fig. 1) and for the engine (fig. 2).
Frame number
Engine number

Note
These numbers indicate the motorcycle model and should be quoted when ordering spare parts.
natural_image
Technical line drawing of a mechanical assembly with no visible text or symbols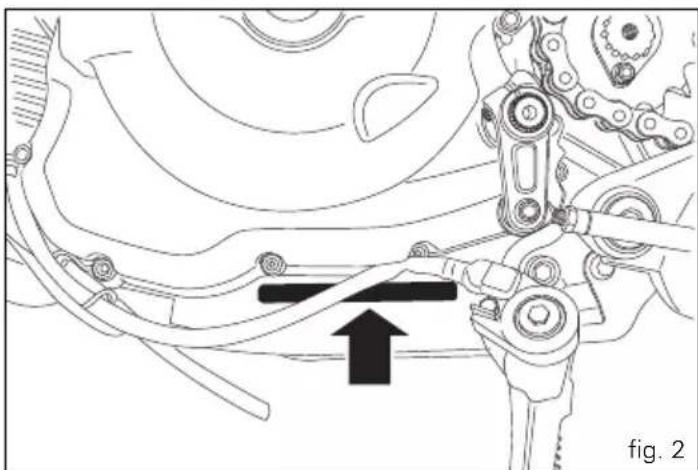
natural_image
Mechanical assembly diagram showing linkage mechanism with no visible text or symbolsInstrument panel (Dashboard)
Instrument panel
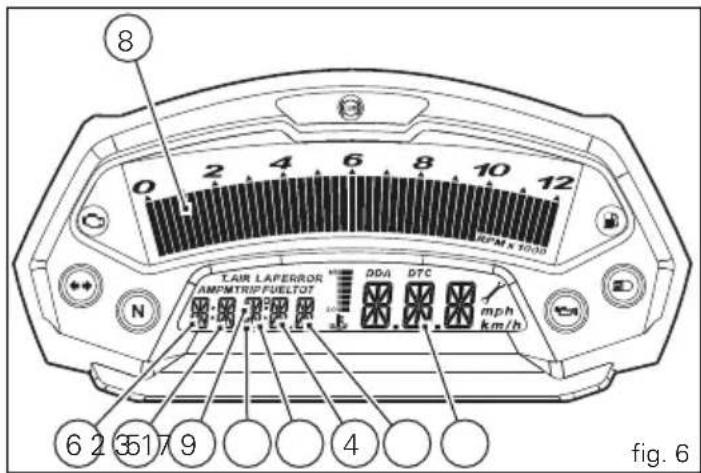
1) LCD, (see page 14).
2) REVOLUTION COUNTER (rpm).
Shows the engine rotation speed/minute.
3) NEUTRAL LIGHT N (GREEN).
Comes on when in neutral position.
4) FUEL WARNING LIGHT (AMBER YELLOW).
Comes on when fuel is low and there are about 3.5 litres of fuel left in the tank.
5) TURN SIGNAL LIGHTS (GBEEN).
Illuminates and flashes when the turn signal is in operation. If a turn signal does not work (ex. burnt out bulb) its incorrect operation is signalled by making the light flash twice as fast as in comparison to correct operation.
6) ENGINE OIL PRESSURE LIGHT (RED).
Comes on when engine oil pressure is too low. It briefly comes on when the ignition is switched to ON and normally goes out a few seconds after engine starts.
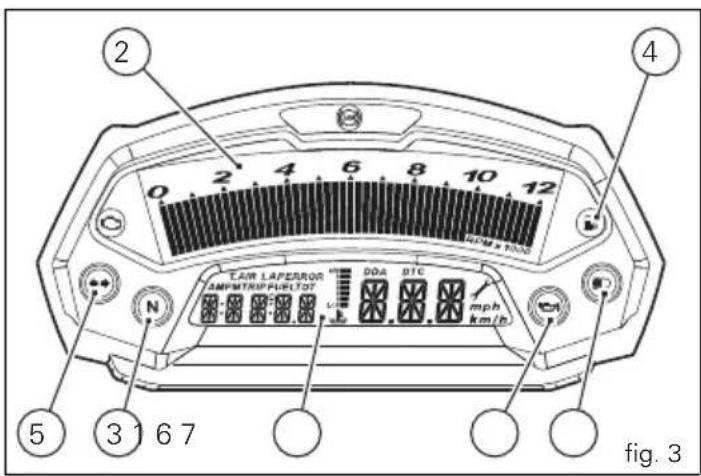
It may shortly come on when the engine is hot, however, it should go out as the engine revs up.
Important
If this light (6) stays on, stop the engine or it may suffer severe damage.
The case may occur that the light turns on briefly if the engine is very hot; it will turn off as the engine rpms increase.
7) HIGH BEAM LIGHT (BDUE).
Comes on when high beam is on.
8) "VEHICLE/ENGINE DIAGNOSIS - EOBD" LIGHT (AMBER YELLOW).

It turns on in the case of an engine or motorcycle error; in some cases the engine will be locked.
9) OVER REV. INDICATOR LIGHTS.
It comes on steady when the first rev limiter threshold (*) is reached. Starts flashing when the rev limiter is reached.
10) ABS LIGHT (AMBER YELLOW).
(for Monster 659 ABS only).
| Engine off / speed below 5 Km/h | ||
| Light off Light flashing Light steady | ||
| - | ABS disabled with the menu function “DISAB ABS” (**) | ABS enabled but not functioning yet |
| Engine on / speed below 5 Km/h | ||
| Light off Light flashing Light steady | ||
| - | ABS disabled with the menu function “DISAB ABS” | ABS enabled but not functioning yet |
| Engine on / speed above 5 Km/h | ||
| Light off Light flashing Light steady | ||
| ABS enabled and functioning | ABS disabled with the menu function “DISAB ABS” | ABS disabled and not functioning due to a problem |
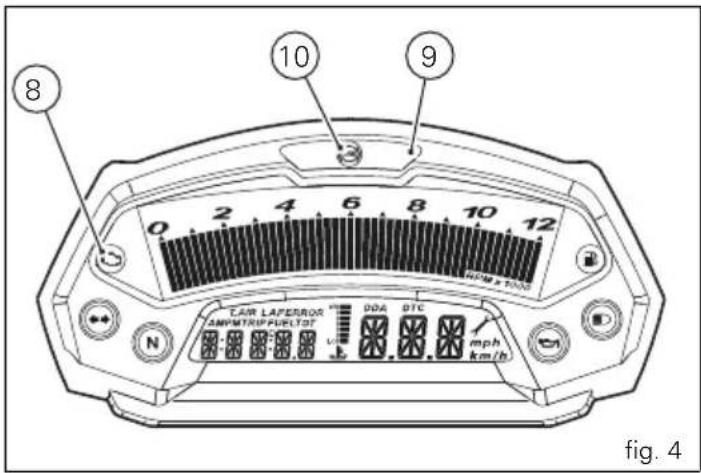
(*) depending on the model, each calibration of the Engine Control Unit may have a different "setting" for the thresholds that precede the rev limiter and the rev limiter itself.
(**) the ABS should be considered actually disabled only if the light continues to flash after starting the engine.
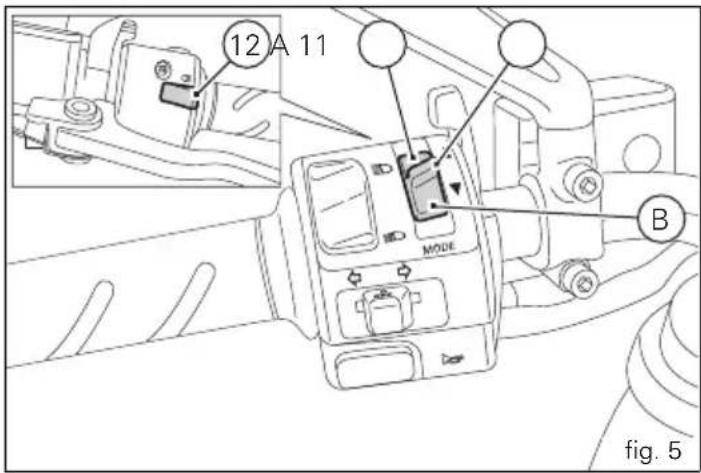
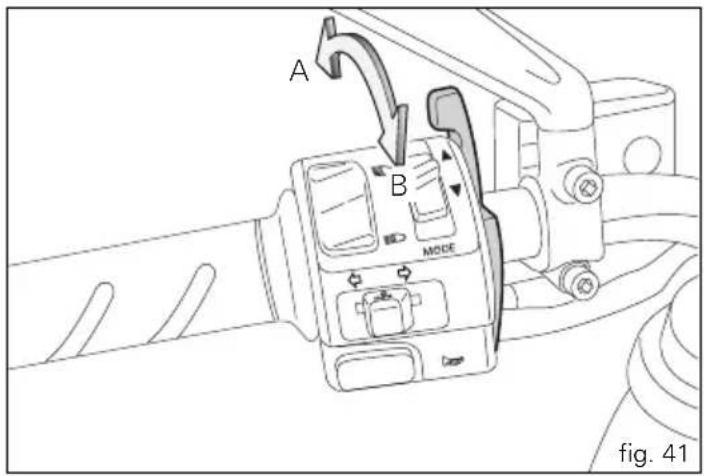
11) CONTROL SWITCH.
Button used to display and set instrument panel parameters.
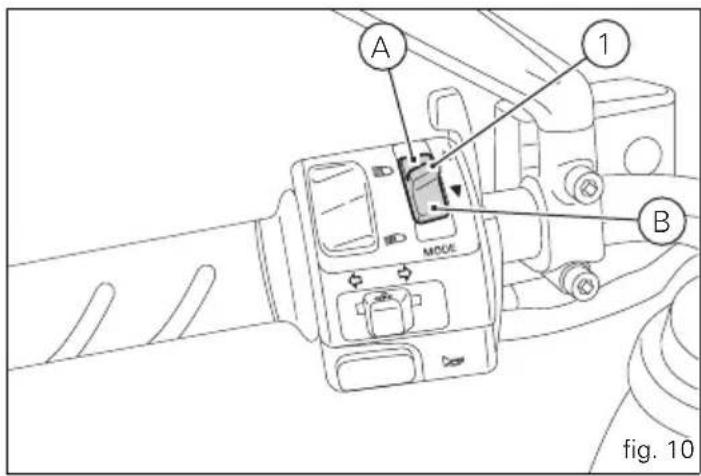
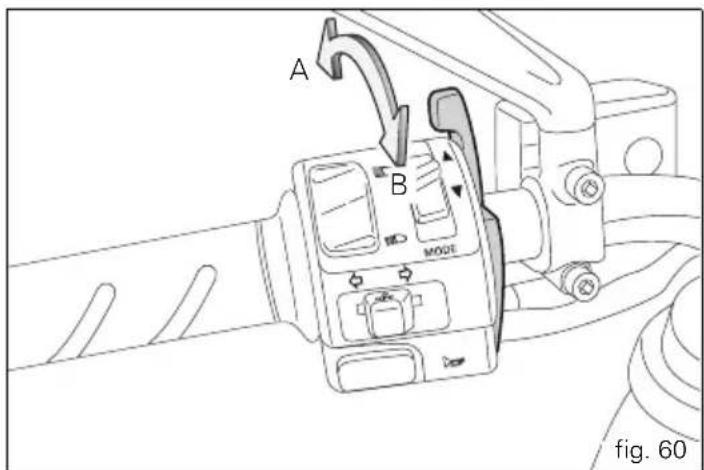
It has two positions: A "▲" and B "▼".
The high beam headlight flasher switch is also used for the
LAP and USB data acquisition functions.


LCD unit functions

Warning
Stop the motorcycle before using the instrument panel controls. Never operate the instrument panel controls while riding.
1) SPEEDOMETER.
Gives road speed.
2) ODOMETER.
Gives total distance covered.
3) TRIP METER.
Indicates the distance travelled since last reset.
4) TRIP FUEL METER.
Gives total distance travelled on fuel reserve.
5) CLOCK.
6) AIR TEMPERATURE INDICATOR.
7) LAP TIMER.
8) ENGINE RPM INDICATOR (RPM).
9) LAP TIME (LAP).
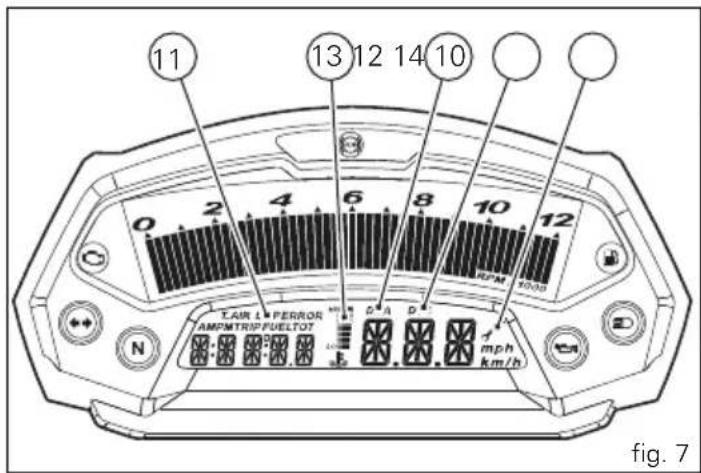
10) MAINTENANCE COUNTER INDICATOR.
This indicator comes on to indicate that the vehicle is due for service.
It stays on until it is reset at a Ducati Dealer or authorised Service Centre as part of the service procedure.
11) LAP FUNCTION.
Indicates activation of the LAP function.
12) DDA FUNCTION.
Indicates that the DDA data acquisition has been activated.

Important
The instrument panel allows the diagnosis of the electronic ignition/injection system. Never use the menus reserved for trained personnel for any reason. If this function is accidentally accessed, turn the key to OFF and contact a Ducati Dealer or Authorised Service Centre for the necessary checks.
13) ENGINE OIL TEMPERATURE INDICATOR.

Important
Never use the vehicle when the temperature reaches max. value or the engine might damage.
Indicates activation of the DTC control unit (if present).


LCD - How to set/display parameters
At key-on (key turned from OFF to ON) the instrument panel activates all the digits of the LCD for 1 second and switches on the indicator lights in sequence.
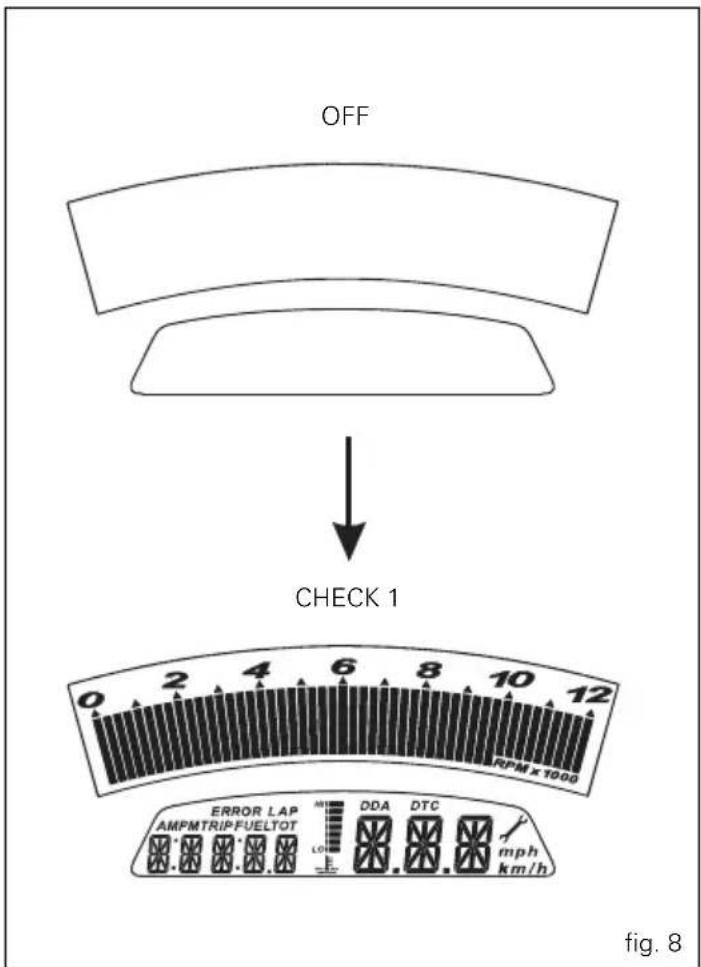
It then reverts to "normal" mode and, in place of the motorcycle speed, shows the model and, for 2 seconds, also the version (EU, UK, USA, CND, FRA, JAP). The model is scrolled on the display once only.
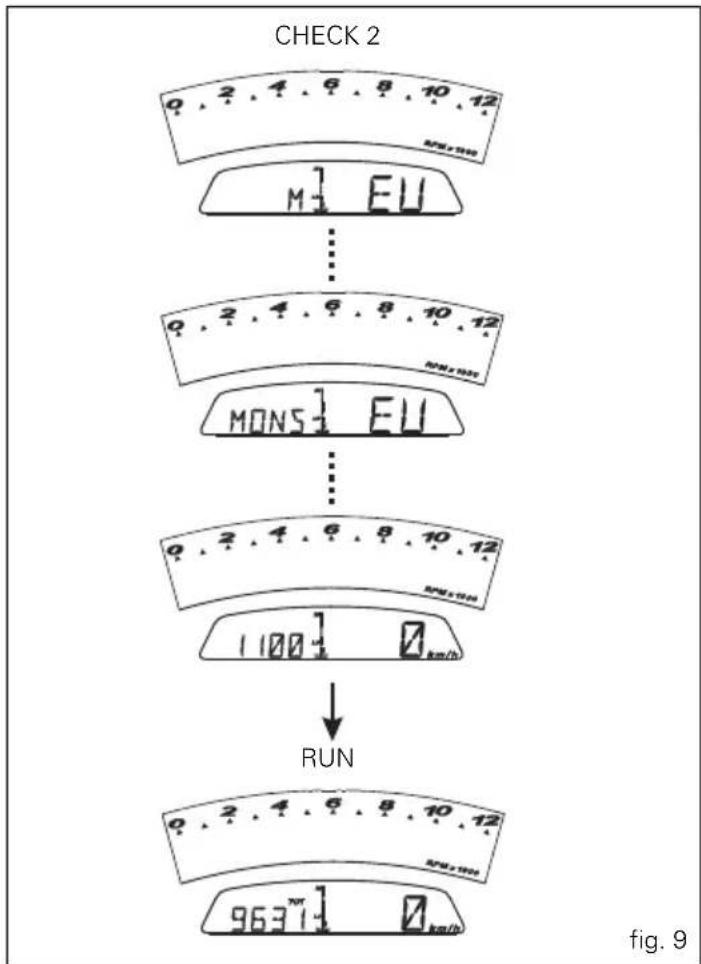
flowchart
graph TD
    A["CHECK 2"] --> B["M7 EU"]
    B --> C["MONS7 EU"]
    C --> D["1100"]
    D --> E["RUN"]
    E --> F["96371"]


At Key-On, the instrument panel always shows the following information (de-activating any previously activated functions):
ODOMETER
SPEED
RPM BARGRAPH
ENGINE OIL TEMPERATURE BARGRAPH
With the switch (1, fig. 10) in position B "▼" the Odometer readout (TOT) will cycle through the following functions: TRIP
TRIP FUEL (only if active)
CLOCK
T AIR
before returning to TOT (odometer function).
Pressing switch (1, fig. 10) in position A “▲” gives access to the MENU and the following functions are displayed one after another:
ERROR (only if active)
BATT
RPM
LIGHT SET
LAP (OFF or ON)
LAP MEM
DDA (OFF or ON)
ERASE DDA
DISAB ABS
CLOCK SETTING
CODE (only if active)
Important This menu is active only if the speed of the motorcycle is less than 20 km/h. If this menu is open and the speed of the motorcycle exceeds 20 km/h, the instrument panel automatically exits the menu and returns to the initial display. It is possible to exit the menu at any time, however, by pressing switch (1, fig. 10) in position A "▲" for 3 seconds.
Total distance covered indicator: "Odometer"
This function shows the total distance covered by the vehicle.
Upon Key-On, the system automatically enters this function.
The reading is saved permanently and cannot be reset under any circumstances.
If the distance travelled exceeds 99999 km (or 99999 miles), the value "99999" will be displayed permanently.
EU, CND, FRA, JAP versions
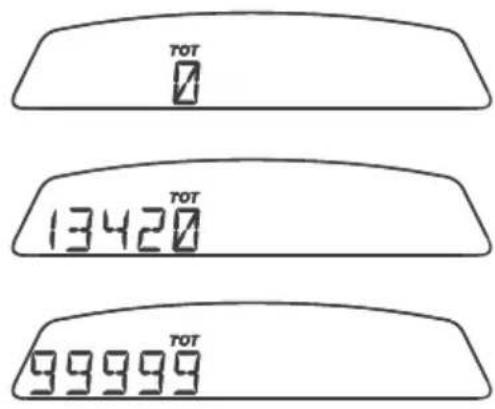
other
| Temperature (Tota) | | :--- | | 0 | | 13420 | | 99999 |UK, USA versions
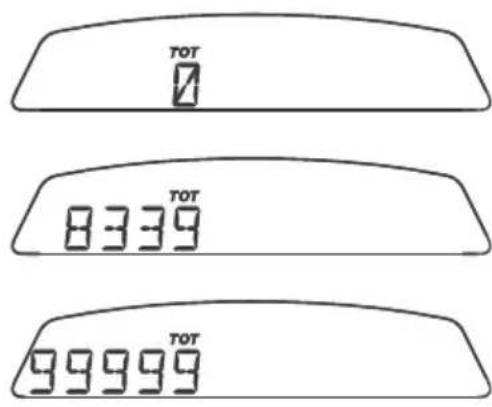
other
| Display | Value | | :--- | :--- | | 0 | TOT | | 8339 | TOT | | 99999 | TOT |fig. 11

Vehicle "speed" indicator
This function shows vehicle speed.
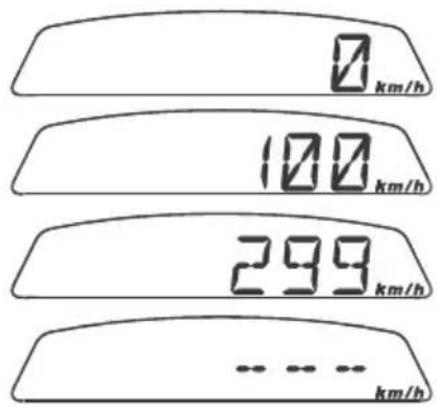
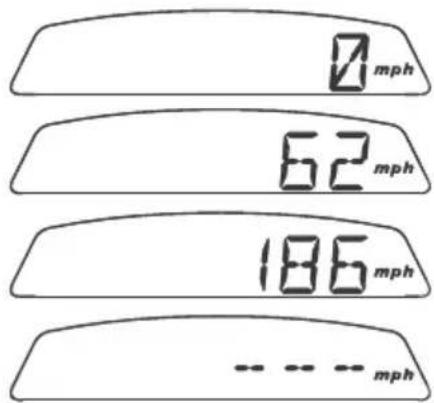
The dashboard receives the actual speed value (expressed in km/h) from the ECU and displays the value increased by 8%. Maximum speed displayed is 299 km/h (186 mph).
Over 299 km/h (186 mph) the display will show a series of dashes “---” (not flashing).
EU, CND, FRA, JAP versions
other
| Measurement | Value (km/h) | | :--- | :--- | | 0 km/h | 0 | | 100 km/h | 100 | | 299 km/h | 299 | ... ... km/h | ... ... |UK, USA versions
bar
| Speed (mph) | | :--- | | 0 | | 62 | | 186 |fig. 12
"TRIP" meter
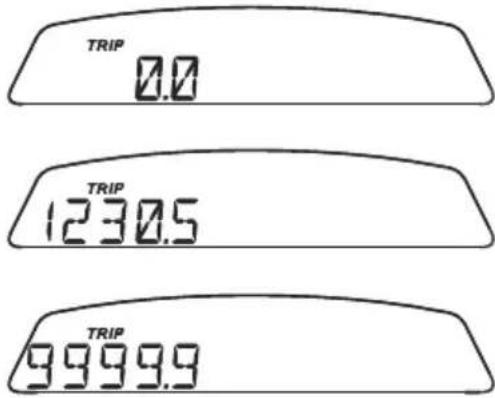
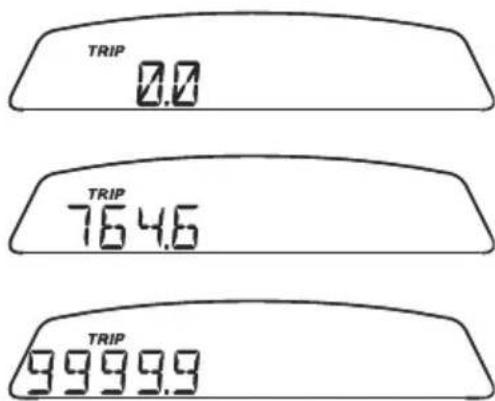
This function shows the distance travelled since the trip meter was last reset.
Holding button (1, fig. 10) pressed in position B "▼" for 3 seconds when this function is displayed resets the trip meter.
If the reading exceeds 999.9, it is reset to zero and the count restarts automatically.
EU, CND, FRA, JAP versions
UK, USA versions
other
| Metric | Value | |---|---| | TRIP | 0.0 | | TRIP | 764.6 | | TRIP | 9999.9 |fig. 13

Distance travelled on fuel reserve: "TRIP FUEL"
This function shows the distance travelled on fuel reserve. When the fuel warning light comes on, the TRIP FUEL mete is activated automatically, regardless of the function displayed. Trip fuel reading remains stored even after Key-Off until the vehicle is refuelled.
Count is interrupted automatically as soon as fuel is topped up to above minimum level.
When the reading exceeds 999.9, distance travelled is reset and the meter automatically starts counting from 0 again.
EU, CND, FRA, JAP versions
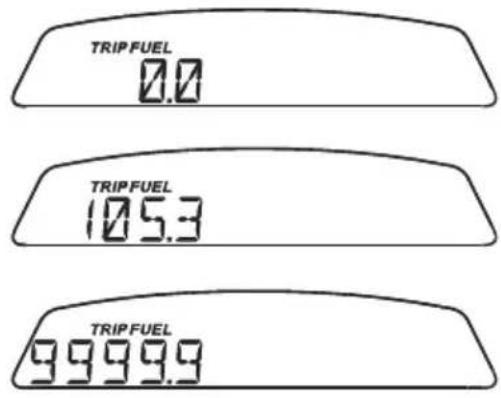
other
| Category | Value | |---|---| | TRIP FUEL | 0.0 | | TRIP FUEL | 105.3 | | TRIP FUEL | 9999.9 |UK, USA versions
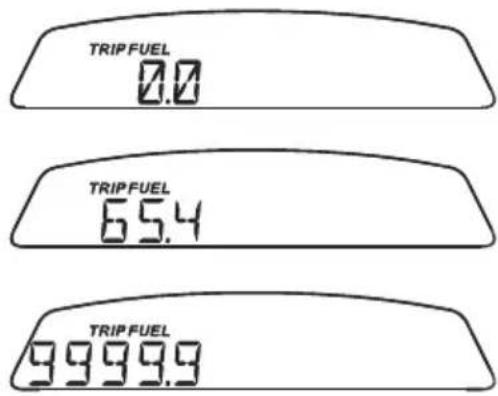
bar
| Category | Value | |---|---| | TRIP FUEL | 0.0 | | TRIP FUEL | 65.4 | | TRIP FUEL | 9999.9 |Clock display indicator
This function shows the time.
Time is always displayed as follows:
AM from 0:00 to 11:59
PM from 12:00 to 11:59
If battery power is suddenly cut off (Batt-OFF), when battery power is restored and upon next Key-On, the clock is reset and restarts operating from "0:00".

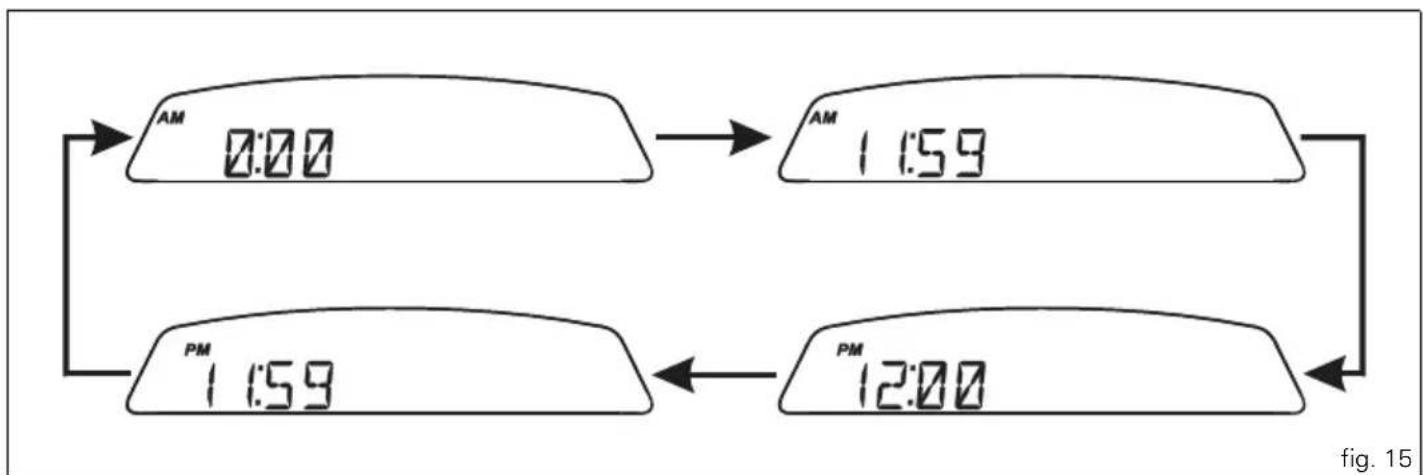
flowchart
graph TD
    A["AM 0:00"] --> B["AM 1:59"]
    C["PM 1:59"] --> D["PM 12:00"]

Air temperature indicator
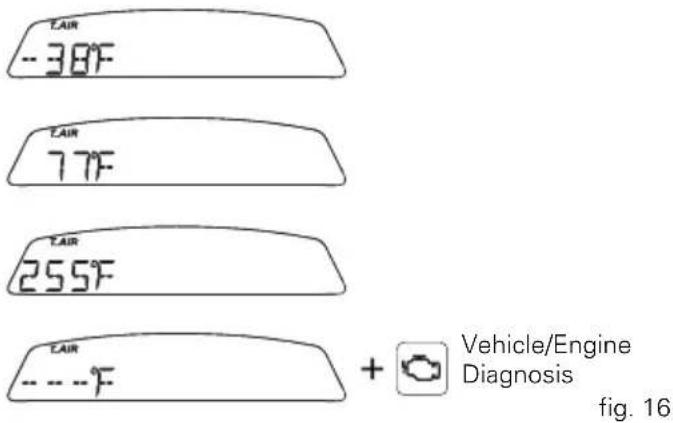
Shows the outside air temperature.
Display limits: -39^ ÷ +124^
In the event of a sensor FAULT (-40°C, +125°C or disconnected), a string of dashes “---” (not flashing) is displayed and the "Vehicle/Engine diagnosis - EOBD" light comes on (8, fig. 4).
EU, CND, FRA, JAP versions
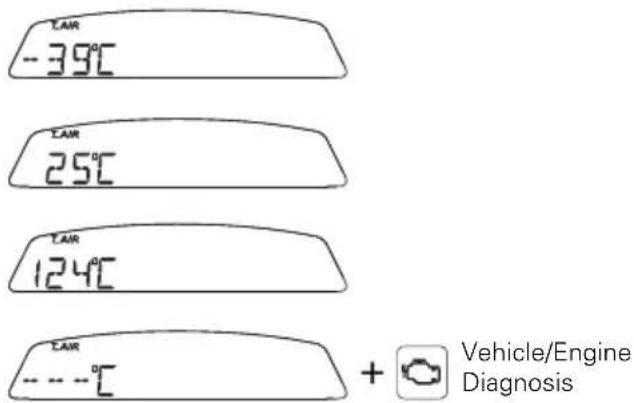
UK, USA versions
Oil temperature indicator
This function describes the engine oil temperature indicator.
Display indications:
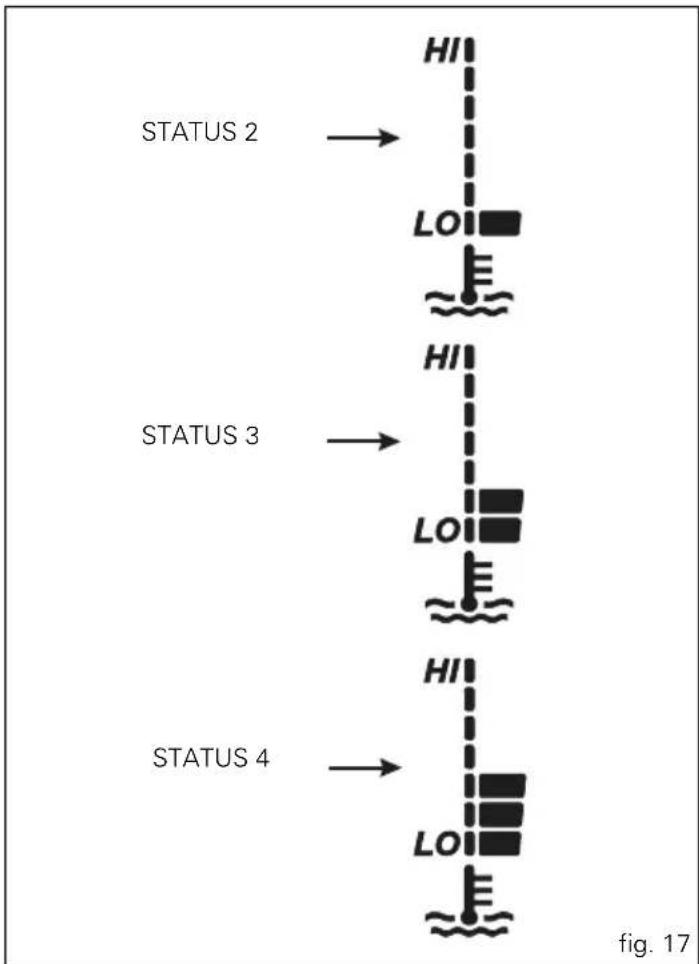
- if the temperature is between -40°C and +80°C the display shows "STATUS 2";
- if the temperature is between +81°C and +110°C the display shows "STATUS 3";
- if the temperature is between +111°C and +135°C the display shows "STATUS 4";
flowchart
graph TD
    A["STATUS 2"] --> B["HI"]
    B --> C["LO"]
    C --> D[" thermometer"]
    D --> E["STATUS 3"]
    E --> F["HI"]
    F --> G["LO"]
    G --> H[" thermometer"]
    H --> I["STATUS 4"]
    I --> J["HI"]
    J --> K["LO"]
    K --> L[" thermometer"]


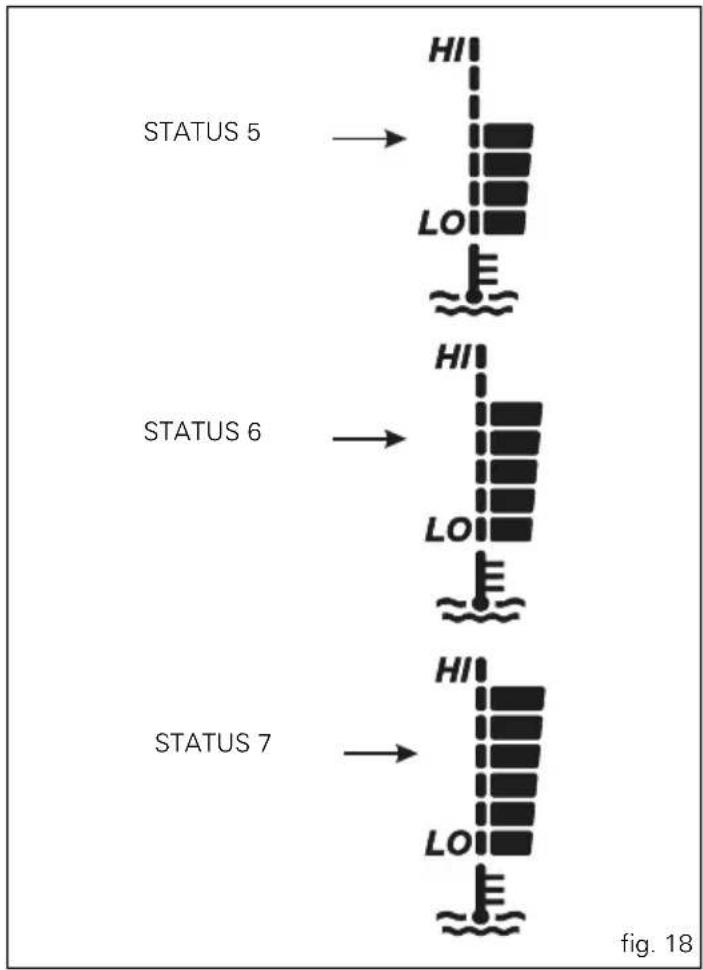
- if the temperature is between +136°C and +160°C the display shows "STATUS 5";
- if the temperature is between +161°C and +175°C the display shows "STATUS 6";
- if the temperature is between +176°C and +190°C the display shows "STATUS 7";
flowchart
graph TD
    A["STATUS 5"] --> B["HI"]
    B --> C["LO"]
    C --> D[" thermometer"]
    D --> E["STATUS 6"]
    E --> F["HI"]
    F --> G["LO"]
    G --> H[" thermometer"]
    H --> I["STATUS 7"]
    I --> J["HI"]
    J --> K["LO"]
    K --> L[" thermometer"]
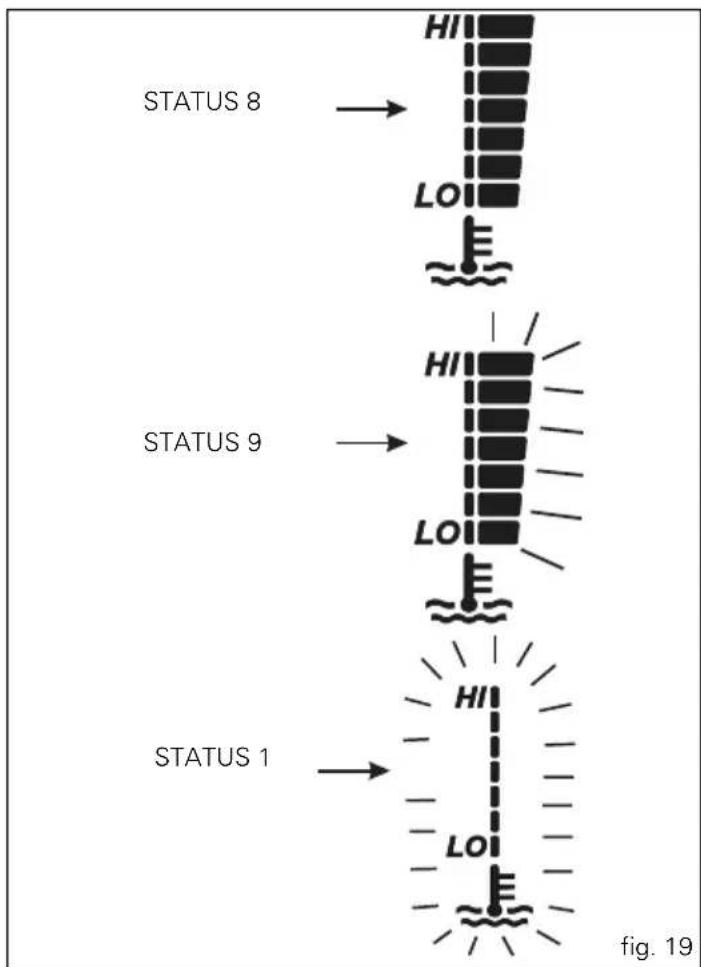
- if the temperature is between +191°C and +200°C the display shows "STATUS 8";
- if the temperature is ≥ 201^ the display shows "STATUS 9" with the series of flashing marks.
- In case of sensor FAULT, "STATUS 1" is displayed flashing.
flowchart
graph TD
    A["STATUS 1"] --> B["HI"]
    B --> C["LO"]
    C --> D["HO"]
    D --> E["HEX"]
    E --> F["HO"]
    F --> G["HO"]
    G --> H["HO"]
    H --> I["HO"]
    I --> J["HO"]
    J --> K["HO"]
    K --> L["HO"]
    L --> M["HO"]
    M --> N["HO"]
    N --> O["HO"]
    O --> P["HO"]
    P --> Q["HO"]
    Q --> R["HO"]
    R --> S["HO"]
    S --> T["HO"]
    T --> U["HO"]
    U --> V["HO"]
    V --> W["HO"]
    W --> X["HO"]
    X --> Y["HO"]
    Y --> Z["HO"]
    Z --> AA["HO"]
    AA --> AB["HO"]
    AB --> AC["HO"]
    AC --> AD["HO"]
    AD --> AE["HO"]
    AE --> AF["HO"]
    AF --> AG["HO"]
    AG --> AH["HO"]
    AH --> AI["HO"]
    AI --> AJ["HO"]
    AJ --> AK["HO"]
    AK --> AL["HO"]
    AL --> AM["HO"]
    AM --> AN["HO"]
    AN --> AO["HO"]
    AO --> AP["HO"]
    AP --> AQ["HO"]
    AQ --> AR["HO"]
    AR --> AS["HO"]
    AS --> AT["HO"]
    AT --> AU["HO"]
    AU --> AV["HO"]
    AV --> AW["HO"]
    AW --> AX["HO"]
    AX --> AY["HO"]
    AY --> AZ["HO"]
    AZ --> BA["HO"]
    BA --> BB["HO"]
    BB --> BC["HO"]
    BC --> BD["HO"]
    BD --> BE["HO"]
    BE --> BF["HO"]
    BF --> BG["HO"]
    BG --> BH["HO"]
    BH --> BI["HO"]
    BI --> BJ["HO"]
    BJ --> BK["HO"]
    BK --> BL["HO"]
    BL --> BM["HO"]
    BM --> BN["HO"]
    BN --> BO["HO"]
    BO --> BP["HO"]
    BP --> BQ["HO"]
    BQ --> BR["HO"]
    BR --> BS["HO"]
    BS --> BT["HO"]
    BT --> BU["HO"]
    BU --> BV["HO"]
    BV --> BW["HO"]
    BW --> BX["HO"]
    BX --> BY["HO"]
    BY --> BZ["HO"]


Service indicator
It shows service intervals (service).
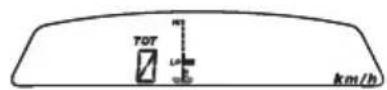
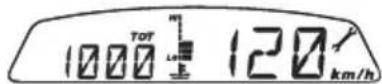
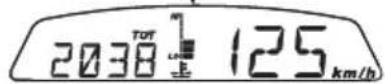
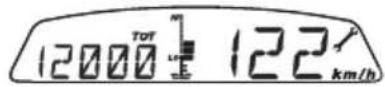
Indicator () comes on to indicate that the vehicle is due for service.
The display shows the service reminder at the following intervals:
after the first 1000 km on the odometer;
every 12000 km on the odometer.
The service indicator will remain on the display until reset.

Warning
This message can only be reset by the Ducati Dealer or
Authorised Service Centre that performs the maintenance.
EU, CND, FRA, JAP versions
ON (MAINT)
Reset
ON (MAINT)
UK, USA versions
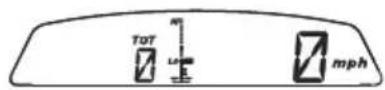
ON (MAINT)
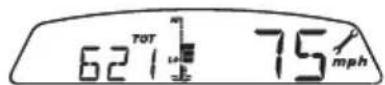
Reset
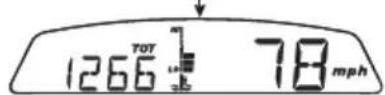
ON (MAINT)
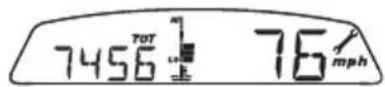
fig. 20
Battery voltage indicator (BATT)
This function describes the battery voltage indicator.
To view this function, access the "BATT" page of the menu.
The battery voltage reading is displayed as follows:
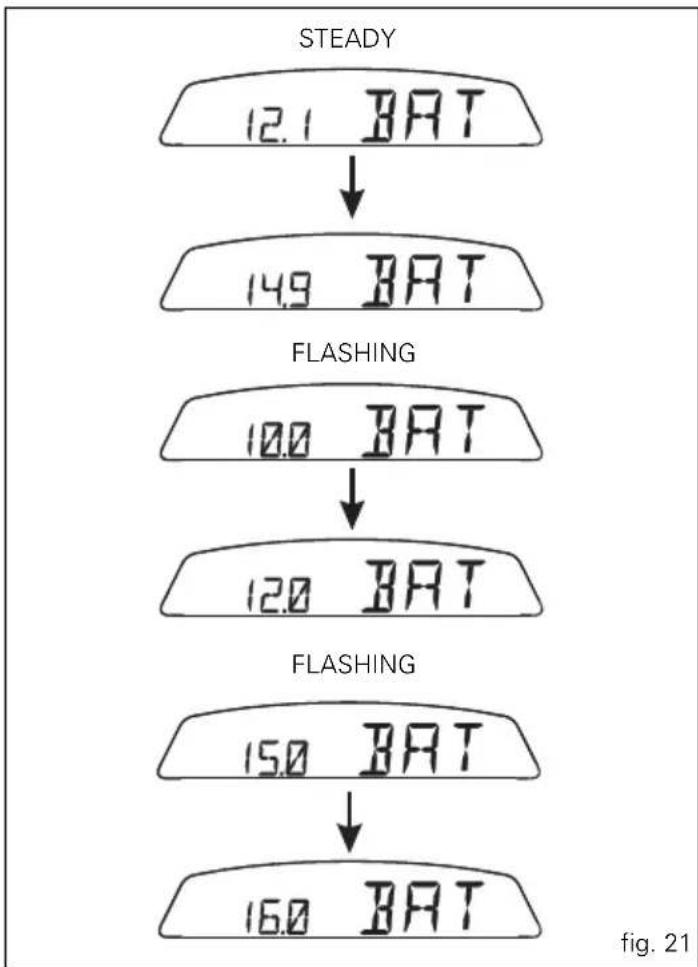
if voltage is between 12.1 and 14.9 Volt, the reading is on steady;
if voltage is between 10.0 and 12.0 Volt or between 15.0 and 16.0 Volt, the reading will be flashing.
flowchart
graph TD
    A["STEADY"] --> B["12.1 BAT"]
    B --> C["14.9 BAT"]
    C --> D["FLASHING"]
    D --> E["10.0 BAT"]
    E --> F["12.0 BAT"]
    F --> G["FLASHING"]
    G --> H["15.0 BAT"]
    H --> I["16.0 BAT"]


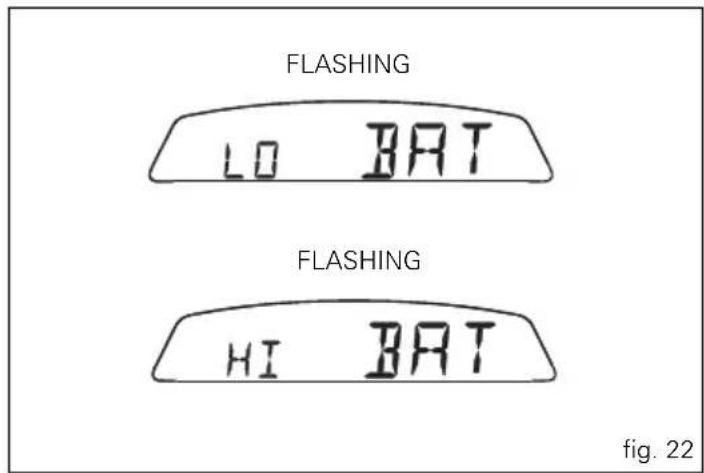
If voltage is 9.9 Volt or less, the word "LO" is shown flashing and the Vehicle/Engine Diagnosis light (EOBD) (8, fig. 4) comes on;
if voltage is = 16.1 Volt or higher, the word "HI" is shown flashing and the "Vehicle/Engine Diagnosis-EOBD" light (8, fig. 4) comes on.
Engine idle RPM setting (RPM)
This function describes engine idle setup.
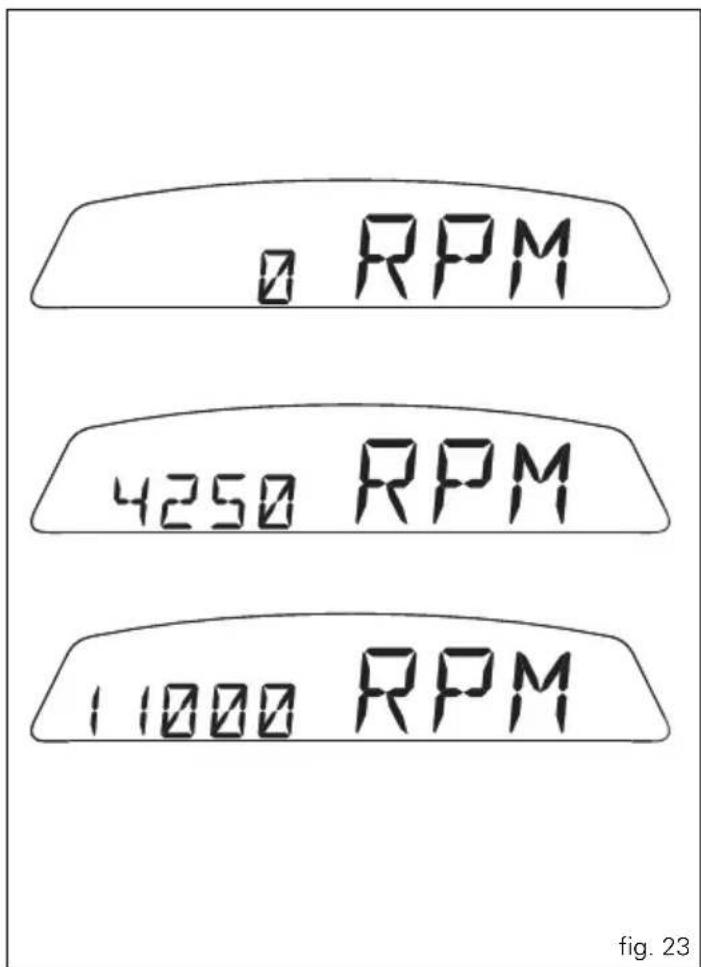
To display the function, go into the menu and call up the "RPM" page.
In addition to the upper rev counter scale, the display also shows engine rpm numerically so that you can adjust the idle speed more precisely.
bar
| Value | | --------- | | RPM | | 4250 | | RPM | | 11000 |

Backlighting adjustment
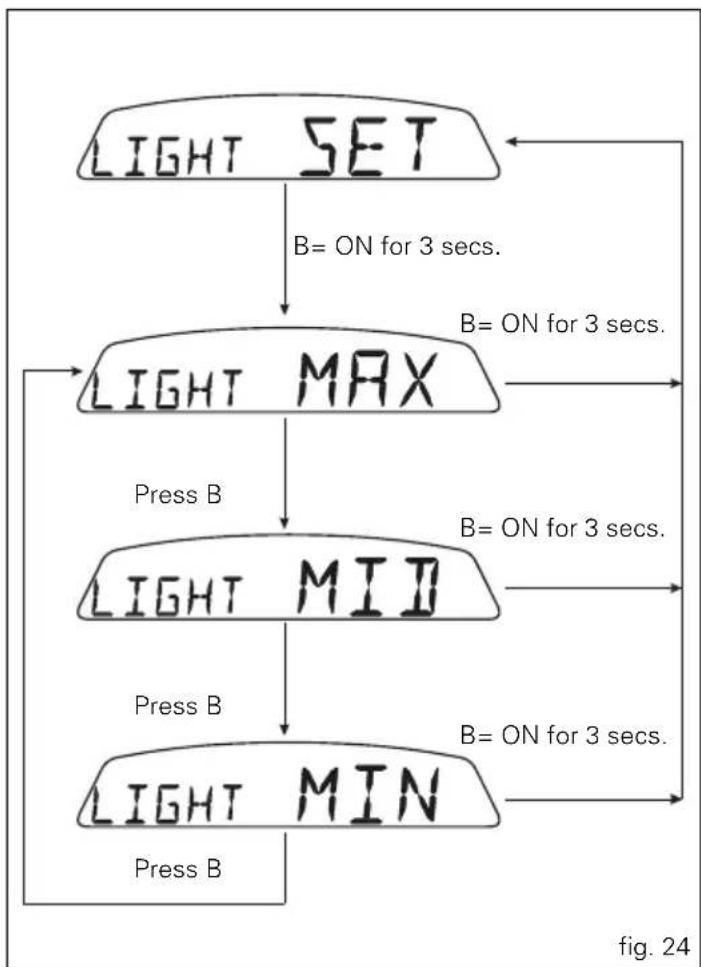
This function allows dashboard backlighting power setting. To set the backlighting, access the "LIGHT SET" page of the menu.
Press the switch (1, fig. 10) in position B "▼" for 3 sec in this page to access the setup mode and the following pages will be displayed in sequence:
- page 1 - "LIGHT MAX" setting:
This page sets backlighting to maximum brightness; press switch (1, fig. 10) in position B "▼" to go to page 2.
- page 2 - "LIGHT MID" setting:
This page reduces the backlighting by approximately 30% relative to maximum brightness; press switch (1, fig. 10) in position B “▼” to go to page 3.
- page 3 - "LIGHT MIN" setting:
This page reduces the backlighting by approximately 70% relative to maximum brightness; press switch (1, fig. 10) in position B “▼” to go to page 1.
If you press the button (1, fig. 10) in position B "▼" for 3 seconds in one these three pages, the instrument panel goes back to the "LIGHT SET" page and stores the selected backlighting setup.
In the event of an interruption of the power supply from the battery, when power is restored at the next Key-On, the backlighting will be set by default to maximum brightness.
flowchart
graph TD
    A["LIGHT SET"] -->|B= ON for 3 secs.| B["LIGHT MAX"]
    B -->|Press B| C["LIGHT MID"]
    C -->|Press B| D["LIGHT MIN"]
    D -->|Press B| E["Output"]
    style A fill:#f9f,stroke:#333
    style B fill:#ccf,stroke:#333
    style C fill:#cfc,stroke:#333
    style D fill:#fcc,stroke:#333
LAP timer
This function lets you display lap times.
To enable this function, enter the menu and set the "LAP" function to "On" by holding switch (1, fig. 10) pressed in position B "▼" for 3 seconds.
The lap timer is started and stopped using the high-beam flasher button FLASH (12, fig. 5) on the LH switch.
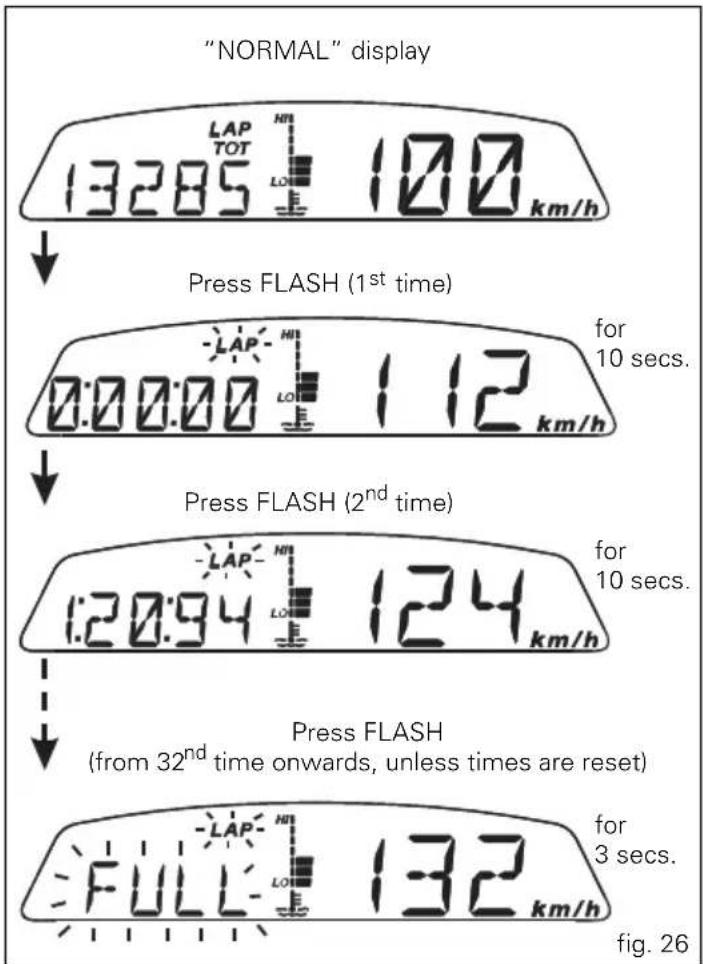
When the LAP function is active, each time you press the FLASH button, the display will show the lap time for 10 seconds, before reverting to normal mode.
Up to 30 lap times can be stored.
If the memory is full, each time you press the FLASH button, no more lap times can be saved and the display will show the flashing message "FULL" for 3 seconds until the memory is reset.
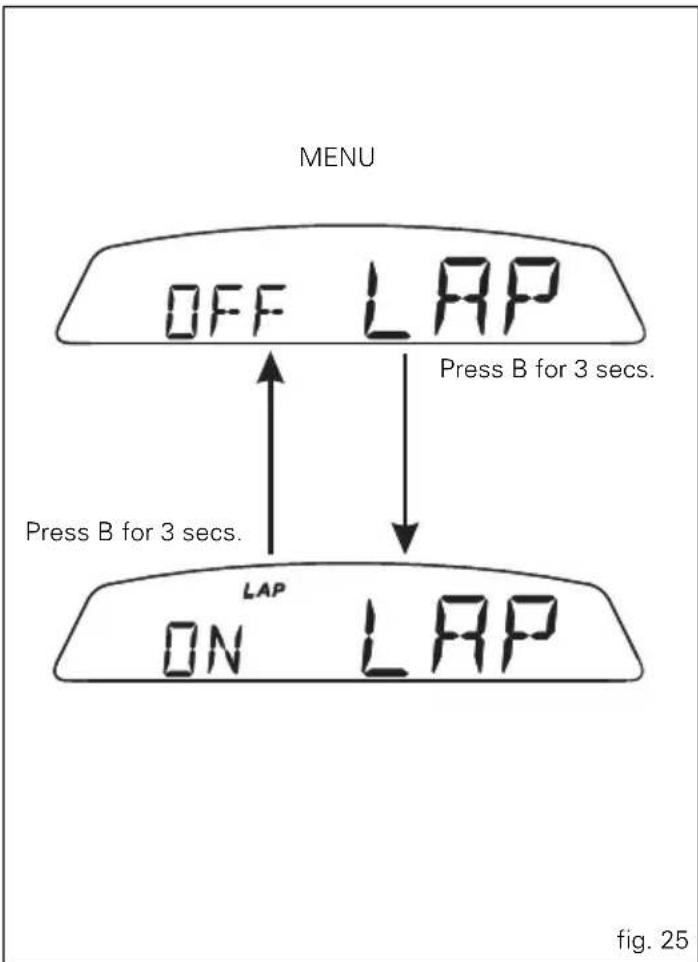
When the LAP function is set to Off in the menu, the current "lap" is not stored.
If the LAP function is active and the display is suddenly switched off (Key-Off), the LAP function is switched off automatically (even if the timer was ON, the lap in progress is not saved).
If the lap timer is not stopped, it will roll over upon reaching 9 minutes, 59 seconds and 99 hundredths; the lap timer starts counting from 0 (zero) and will keep running until the function is disabled.
If the LAP function is enabled without resetting the "memory" and there are less than 30 laps stored in the memory (for instance: 18 laps), the display will store any remaining laps until the memory is full (in this case, it will store an additional 12 laps).
This function only displays lap times; however, lap times are saved for subsequent display in the Lap Memory function.
Stored data display (LAP Memory)
Displays data stored using the LAP function: lap number and time.
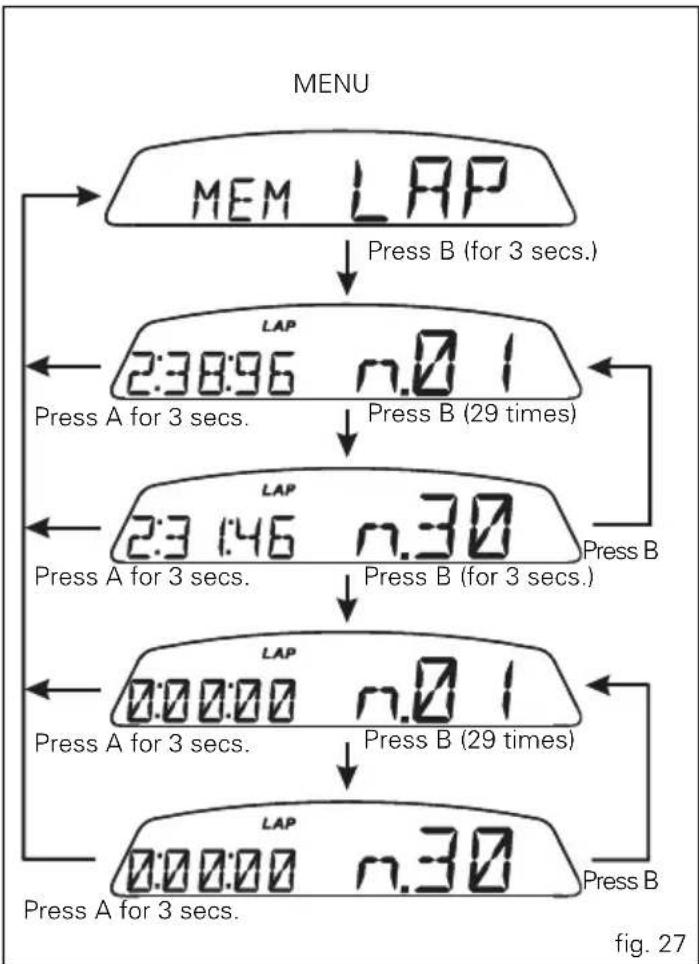
To view stored lap times, enter the menu and go to page "LAP MEM".
Holding switch (1, fig. 10) pressed in position B "▼" for 3 seconds in this menu page accesses the "1st lap" view mode. The display will show the lap number, lap time, MAX speed and the MAX rpm reached for the lap in question.
Press switch (1, fig. 10) in position B “▼” repeatedly to scroll through the 30 laps stored until returning to the 1 ^st lap.
If you press switch (1, fig. 10) in position B “▼” for 3 seconds while the saved times are displayed, the display immediately resets all the saved times; and the LAP function is disabled automatically if active.
The MAX speed saved is the maximum speed indicated on the display in Lap function.
To exit display of the lap times memory press switch (1, fig. 10) in position A "▲".
If no lap times are saved in memory, all 30 lap times will be displayed as "0.00.00".
If the engine trips the rev limiter during a lap, the "REV LIMITER-OVER REV." (9, fig. 4) light will come on during the display of the lap time.
flowchart
graph TD
    A["MEM LAP"] -->|Press B (for 3 secs.)| B["2:38:96 n.01"]
    B -->|Press A for 3 secs.| C["2:3:46 n.30"]
    C -->|Press B (for 3 secs.)| D["0:00:00 n.01"]
    D -->|Press A for 3 secs.| E["0:00:00 n.30"]
    E -->|Press B| F["Press A for 3 secs."]

DDA data acquisition
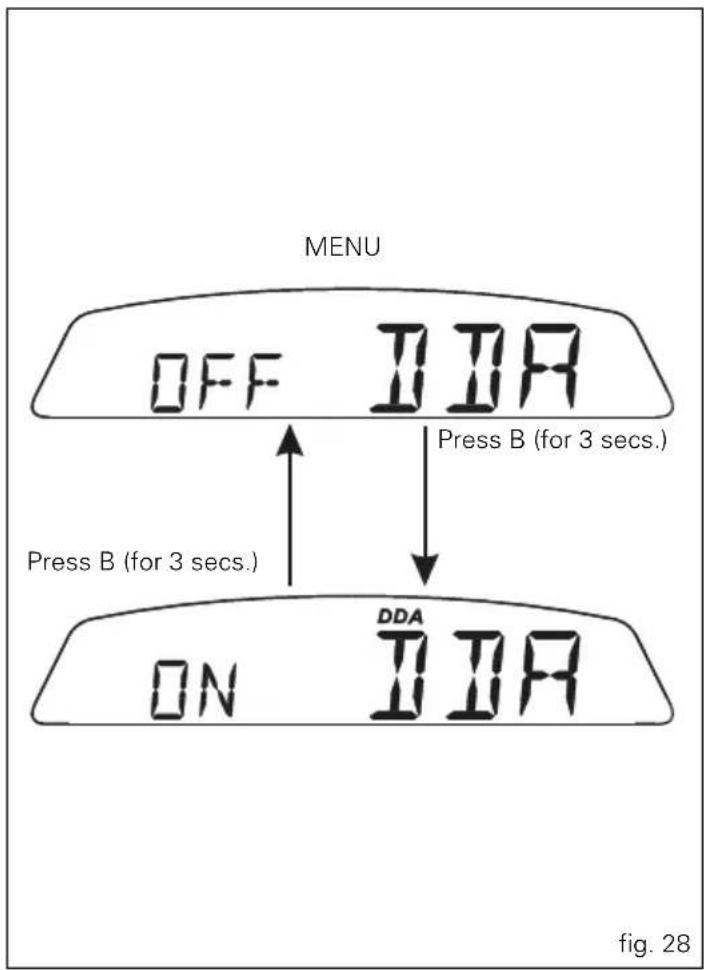
This function serves to activate the DDA (Ducati Data Analyzer): the data logger must be connected to vehicle wiring.
To enable this function, enter the menu and set "DDA" data logger to "On" by holding switch (1, fig. 10) pressed in position B "▼" for 3 seconds.
The START/STOP control for the data logger lap separator is the high-beam flasher button FLASH (9, fig. 4) on the LH switch.
If the DDA function is active and the display is suddenly switched off (Key-Off), the function is switched off automatically.

Note
Online assistance is available to Ducati Data Analyzer
(DDA) owners (http://dda.prosa.com). This service will provide anything necessary to correctly use the DDA with your PC: both for the device and the software for analysing the recorded data.

Warning
After use, disconnect the DDA from the main wiring
harness.
Erase DDA
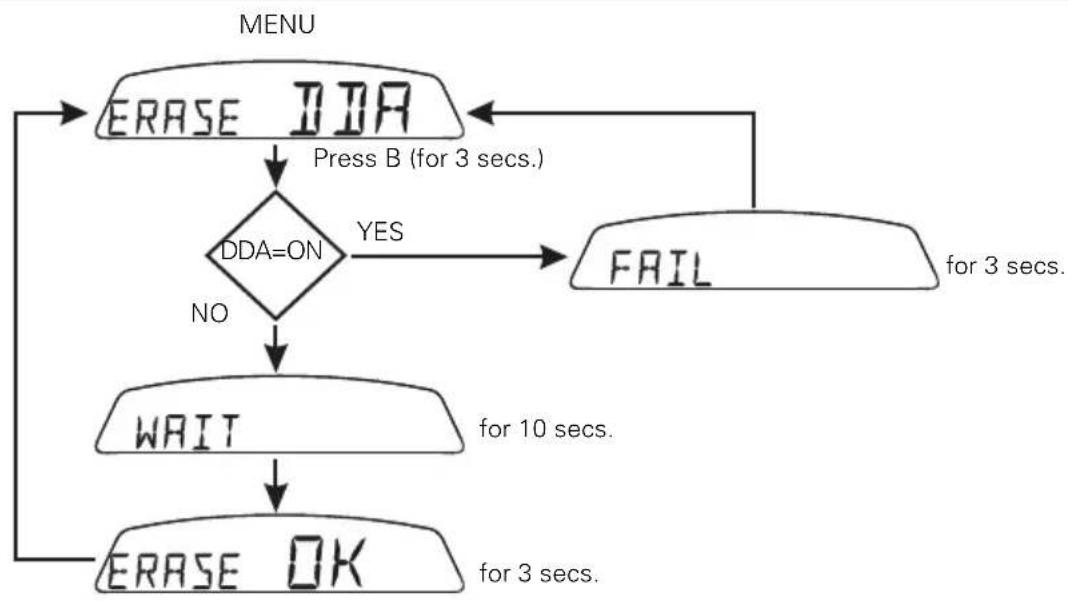
This function lets you erase the data saved to the DDA data logger: the data logger must be connected to vehicle wiring. To erase data, enter the menu page "Erase DDA". If you press switch (1, fig. 10) in position B "▼" for 3 seconds and the DDA is not acquiring data, the message "WAIT..." is shown on the display for 10 seconds. After 10 seconds, the message "ERASE OK" appears for 3 seconds, to confirm that the data has been deleted.
If switch (1, fig. 10) is pressed in the B "▼" position for 3 seconds while the DDA data logger is acquiring data, the data logger memory is not erased and the display shows message "FAIL" for 3 seconds.
flowchart
graph TD
    A["ERASE DDA"] -->|Press B (for 3 secs.)| B{DDA=ON}
    B -->|YES| C["FAIL"]
    B -->|NO| D["WAIT"]
    C -->|for 3 secs.| D
    D -->|for 10 secs.| E["ERASE OK"]
    E --> F["END"]
    G["MENU"] --> A
fig. 29


ABS disabling function (for Monster 659 ABS only) This function disables the ABS control unit.
Warning This operation must be carried out with the vehicle stopped (key ON).
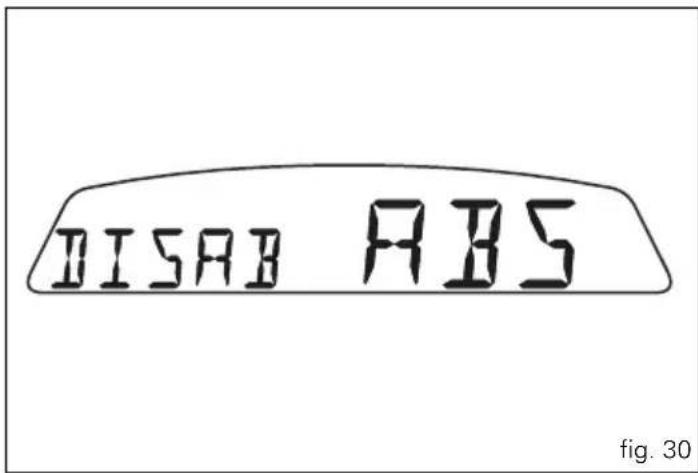
To disable the ABS control unit, access the menu on the "DISAB ABS" page and hold down switch (1, fig. 10) in position B "▼" for 3 seconds. At the end of the 3 seconds, the flashing ABS light (10, fig. 4) on the instrument panel indicates the disabling. From this moment, the ABS control unit is disabled; it is automatically restarted at the next Key-Off / Key-On.
At the next Key-On the instrument panel indicates that it is operative by keeping the ABS light (10, fig. 4) off.
If there are problems with the ABS system, the instrument panel indicates its malfunction by keeping the ABS light (10, fig. 5) on steady, the EOBD light (8, fig. 4) on steady and the ABS error in the menu.
Important This indicator is activated only at a speed above or equal to 10km / h ; at a speed lower than 10km / h the ABS control unit does not perform the diagnostics.
Clock setting function
This function is used to set the clock time.
To set the clock, access the "SET" page in the menu.
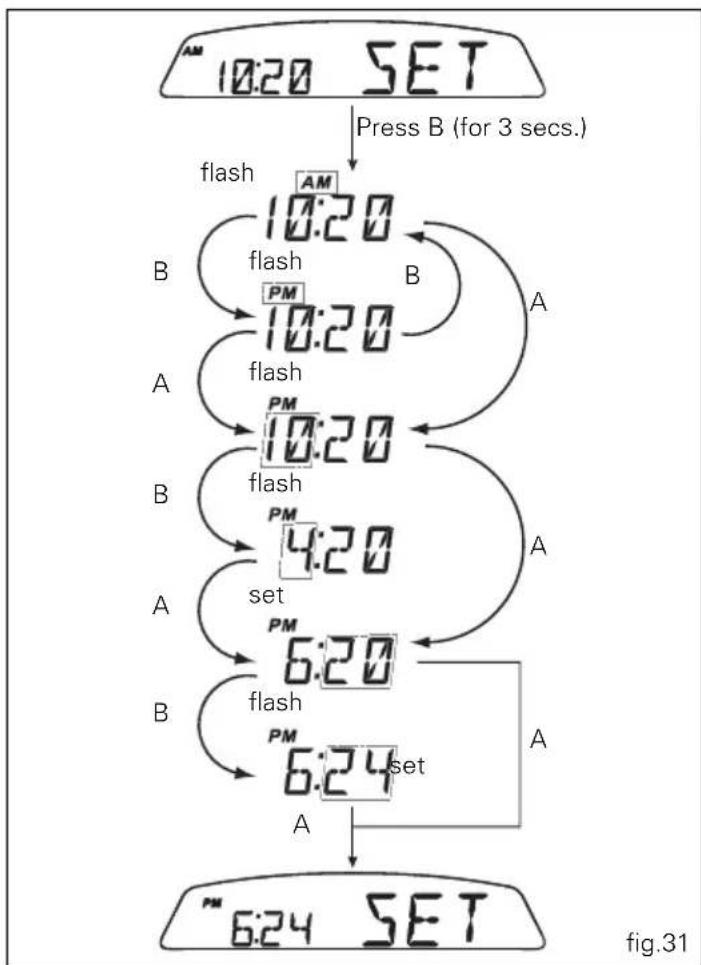
Setting the time:
Holding switch (1, fig. 10) pressed in position B "▼" for 3 seconds in this menu page gives access to the setup mode. When you access this function, the word "AM" flashes; if you press switch (1, fig. 10) in position B "▼" the message "PM" flashes; if you press switch (1, fig. 10) in position B "▼" the mode will go back to previous setting (if it is 00:00, when toggling from "AM" to "PM", 12:00 will be displayed). Pressing switch (1, fig. 10) in position A "▲" gives access to the hour setting mode; hours start to flash. Each time you press the button in position B "▼", the digit will increase by one hour. If the switch is held pressed in position B "▼" the number increases cyclically in steps of one hour every second (when the switch is held depressed, the hours do not flash).
Pressing switch (1, fig. 10) in position A "▲" gives access to the minute setting mode; minutes start to flash. Each time you press the button in position B "▼", the digit will increase by one minute. If you hold the switch down in position B "▼", the count increases cyclically in steps of 1 minute every second. If the button is held depressed in position B "▼" for over 5 seconds, minutes will increase by 1 minute every 100 ms (while the button is held depressed in position B "▼", seconds will not flash).
Pressing the button in position A "▲", exits setup mode and the new time is displayed.
flowchart
graph TD
    A["10:20 SET"] -->|Press B (for 3 secs.)| B["AM"]
    B --> C["10:20"]
    C --> D["PM"]
    D --> E["10:20"]
    E --> F["A"]
    F --> G["PM"]
    G --> H["10:20"]
    H --> I["A"]
    I --> J["PM"]
    J --> K["4:20"]
    K --> L["A"]
    L --> M["PM"]
    M --> N["6:20"]
    N --> O["A"]
    O --> P["PM"]
    P --> Q["6:24 set"]
    Q --> R["A"]
    R --> S["SET 6:24"]

Instrument panel diagnostics

Important
The instrument panel runs system diagnostics after 60
seconds from the last Key-Off.
This function allows you to display and identify malfunctions of the motorcycle and, where possible, renew components identified as faulty.
To view this function, access the "Error" page of the menu.
This menu is only active when at least one error is present, otherwise the page will NOT appear.
If there are several errors, they are displayed in rolling mode every 3 seconds.
In any case, a more detailed diagnosis can be obtained using the Ducati Diagnostic System.

Warning
When an error is displayed, always contact a Ducati
Dealer or authorised Service Centre.
WARNING LIGHT ERROR MESSAGE ERROR
 | TPS 01 Throttle position sensor short circuit Volt DC or AC | |
 | TPS 01 Throttle position sensor short circuit GND | |
 | PRESS 02 Throttle position sensor short circuit Volt DC | |
 | PRESS 02 Throttle position sensor short circuit GND or AC | |
 | OIL 03 Oil NTC sensor short circuit Volt DC or AC | |
 | OIL 03 Oil NTC sensor short circuit GND | |
WARNING LIGHT ERROR MESSAGE ERROR
| T AIR 04 Air temperature sensor short circuit GND or AC | |
| T AIR 04 Air temperature sensor short circuit Volt DC | |
| BATT 05 LOW battery voltage level | |
| BATT 05 HIGH battery voltage level | |
| LAMB 06 Lambda sensor (rim runout) | |
| LAMB 06 Lambda sensor heater short circuit Volt DC | |
| LAMB 06 Lambda sensor heater short circuit GND or AC | |
| FUEL 07 Fuel reserve NTC sensor short circuit Volt DC or AC | |
| FUEL 07 Fuel reserve NTC sensor short circuit GND | |
| COIL 09 Vertical coil (2) short circuit Volt DC | |
| COIL 09 Vertical coil (2) short circuit Volt DC or AC | |
| COIL 09 Horizontal coil (1) short circuit Volt DC |
WARNING LIGHT ERROR MESSAGE ERROR
 | COIL 09 Horizontal coil (1) short circuit Volt DC or AC | |
 | INJE 10 Vertical injector (2) short circuit Volt DC | |
 | INJE 10 Vertical injector (2) short circuit Volt DC or AC | |
 | INJE 10 Horizontal injector (1) short circuit Volt DC | |
 | INJE 10 Horizontal injector (1) short circuit Volt DC or AC | |
 | START 12 Solenoid starter short circuit Volt DC | |
 | START 12 Solenoid starter short circuit GND or AC | |
 | R INJ 13 Injection relay AC | |
 | ECU 16 ECU (generic error) | |
 | PKUP 17 Pickup sensor | |
 | SPEED 18 Speed sensor | |
WARNING LIGHT ERROR MESSAGE ERROR
| IMMO 19 Immobilizer (key missing) | ||
| IMMO 19 Immobilizer (antenna disconnected) | ||
| IMMO 19 Immobilizer (key not recognised) | ||
| CAN 20 CAN line | ||
| LIGHT 21 Light relay | ||
| ABS 22 ABS control unit error |
E

Headlight "smart" auto-off
This function helps reduce battery use by automatically switching off the headlight. The device is enabled in three instances:
- 1) When the key is turned from OFF to ON and the engine is not started within 60 seconds, the headlight is turned off and will be turned back on next time you start the engine.
- in case 2, after the vehicle has been running with the headlights on and the engine is stopped using the RUN-STOP button on the RH switch.
In this case, 60 seconds after stopping the engine, the headlight is turned off and will be turned back on next time you start the engine. - 3) While starting up the engine, the headlight is turned off and back on as soon as the engine is started.
Intelligent headlight switch-on
This function allows programmed activation of the headlight even with the motorcycle off (Key-Off).
The instrument panel stays active for 60 seconds soon after Key-Off, and the headlight can be switched on by pressing switch (1, fig. 10) in position A "▲" or B "▼".
During these 60 seconds, each time switch (1, fig. 10) is pressed in position A “▲” or B “▼”, the instrument panel will activate the headlight for 30 seconds; each press of the switch will add to the headlight activation time, up to a maximum of 6 presses (equivalent to a maximum activation time of 180 seconds).
After the first time you press switch (1, fig. 10) in position A “▲” or B “▼”, the period of 30 seconds starts, thus switching on the headlight. Further switch-on time can be added only if you press the switch again within these 30 seconds. If the 30 seconds have elapsed, no further multiples of 30 seconds can be added, and the instrument panel will switch off the headlight.
To reset this function, you must perform at least one Key-On/Key-Off.
If the battery power is interrupted at any time while this function is active, when power is restored, the instrument panel will deactivate the function (the instrument panel does not remain active for 60 seconds).
The Immobilizer system
For additional antitheft protection, the motorcycle is equipped with an IMMOBILIZER, an electronic system that locks the engine automatically whenever the ignition switch is turned off.
Accommodated in the handgrip of each ignition key is an electronic device that modulates an output signal. This signal is generated by a special antenna incorporated in the switch when the ignition is turned on and changes every time. The modulated signal represents the "password" (which is changed at each start-up) by which the ECU recognizes the ignition key. The ECU will only allow the engine to start if it recognises this password.
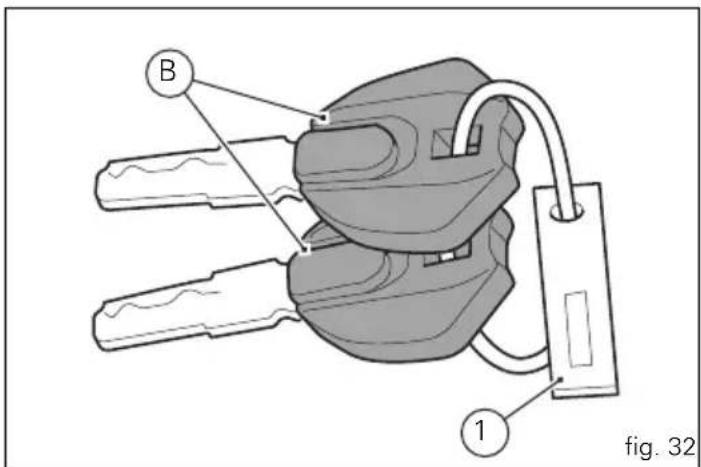
Keys (fig. 32)
The Owner receives a set of keys comprising:
- 2 (BLACK) keys B
These keys contain the "immobilizer system code"

Note
Your Ducati dealer might ask you to submit the Code
Card for some service operations.
The black keys (B) are regular ignition keys and are used to:
- start up the engine.
- open the fuel tank filler plug.
- open the seat lock.

Note
The two keys have a small plate (1) attached that is their identification number.

Warning
Keep the keys separately and use only one of the black keys to start the motorcycle.

E
Code Card
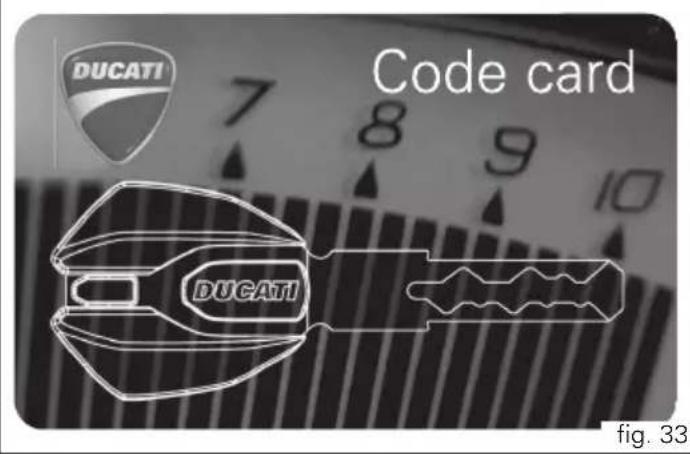
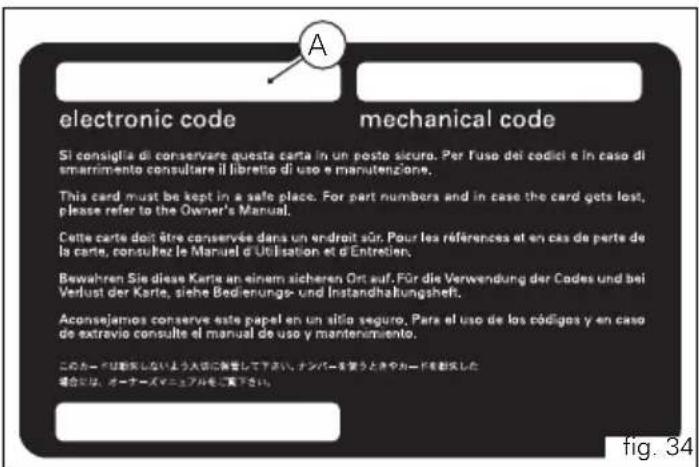
The CODE CARD (fig. 33) supplied with the keys reports an electronic code (A, fig. 34) to start the engine in the event it fails to start after KEY-ON because the immobilizer system inhibited the ignition.

Warning
Keep the CODE CARD in a safe place. However, it is advisable to keep the electronic code printed on the CODE CARD handy when you ride your motorcycle, in case it is necessary to enable the engine through the procedure described below. This procedure lets you disable the "engine block" function - indicated by the amber yellow "Vehicle/ engine Diagnosis EOBD" light (8, fig. 3) coming on - in the event of problems with the immobilizer system. But this operation can be carried out only if the electronic code indicated on the code card is known.

Warning
Your dealer will ask you to produce the Code Card in order to reprogram or replace a key.
Immobilizer override procedure
In the event of an "Immobilizer BLOCK", you will have to perform the "Immobilizer override procedure" from the instrument panel; enter the corresponding function as described below:
Enter the menu and go to page "COD".

Note
This menu should only be active when at least one
Immobilizer error is present.
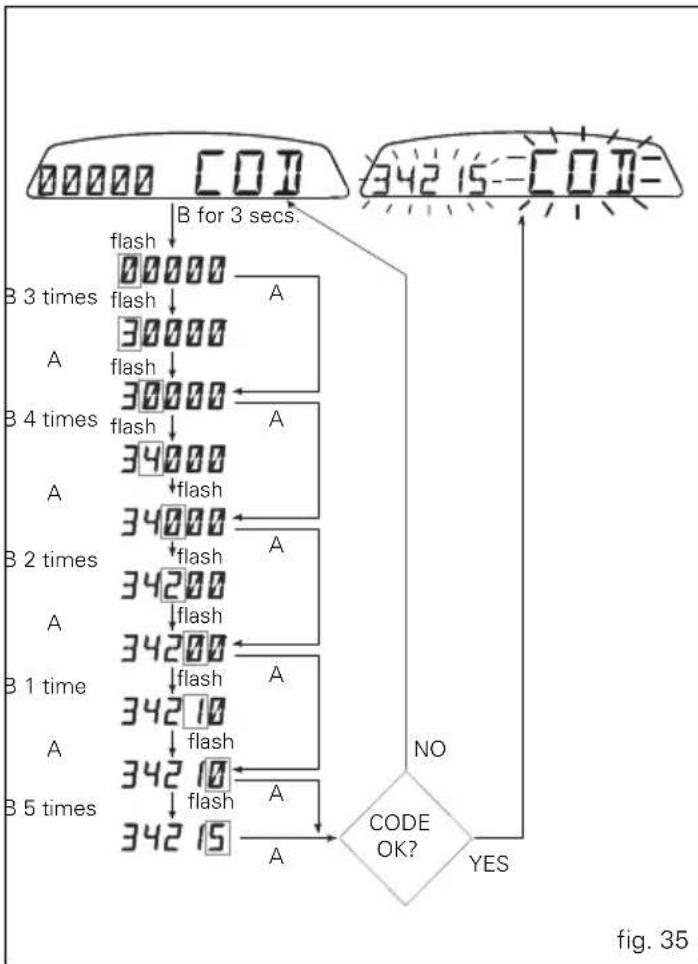
With this page selected, the initial code is always displayed as "00000". If you hold pressed switch (1, fig. 10) in position B "▼" for 3 seconds, you will access the procedure for entering the electronic code given on the Code Card.
flowchart
graph TD
    A["00000 CO"] --> B["B for 3 secs."]
    B --> C1["flash"]
    C1 --> D1["00000"]
    D1 --> E1["A"]
    E1 --> F1["flash"]
    F1 --> G1["30000"]
    G1 --> H1["A"]
    H1 --> I1["flash"]
    I1 --> J1["30000"]
    J1 --> K1["A"]
    K1 --> L1["flash"]
    L1 --> M1["34000"]
    M1 --> N1["A"]
    N1 --> O1["flash"]
    O1 --> P1["34000"]
    P1 --> Q1["A"]
    Q1 --> R1["flash"]
    R1 --> S1["34200"]
    S1 --> T1["A"]
    T1 --> U1["flash"]
    U1 --> V1["34200"]
    V1 --> W1["A"]
    W1 --> X1["flash"]
    X1 --> Y1["34210"]
    Y1 --> Z1["A"]
    Z1 --> AA["flash"]
    AA --> AB["34210"]
    AB --> AC["34215"]
    AC --> AD["A"]
    AD --> AE{CODE OK?}
    AE -->|NO| F
    AE -->|YES| AF["34215-3000"]
Entering the code:
when you access this function, the first digit on the left will flash.
Switch (1, fig. 10):
each time you press the switch in position B “▼”, the number increases cyclically in steps of one digit every second;
if you press the switch in position A “▲”, you can set the second digit, which will start flashing. Each time you press the switch in position B “▼”, the number increases cyclically in steps of one digit every second;
if you press the switch in position A “▲”, you can set the third digit, which will start flashing. Each time you press the switch in position B “▼”, the number increases cyclically in steps of one digit every second;
if you press the switch in position A “▲”, you can set the fourth digit, which will start flashing. Each time you press the switch in position B “▼”, the number increases cyclically in steps of one digit every second;
if you press the switch in position A “▲”, you can set the fifth digit, which will start flashing. Each time you press the switch in position B “▼”, the number increases cyclically in steps of one digit every second;
press in position A "▲" to confirm the code.
If the code has been entered correctly, the message CODE and the code itself will flash simultaneously for 4 seconds.
The "Vehicle/engine diagnosis EOBD" light (8, fig. 4) will turn off; The instrument panel then automatically exits the menu, thus allowing "temporary" starting of the motorcycle. If the error is still present, at the next Key-On the instrument panel error and the inhibited status will persist.
If the code is not entered correctly, the instrument panel returns automatically to the "COD" menu, displaying code "00000".
Operation
When the ignition key is turned to OFF, the immobilizer inhibits engine operation. When the ignition key is turned back to ON to start the engine, the following happens: 1) if the code is recognised, the immobilizer enables engine ignition. Press the START button (2, fig. 42), to start the engine; 2) if the "Vehicle/Engine Diagnosis - EOBD" light (8, fig. 4) comes on and the page with the "Error" message is displayed when you press switch (1, fig. 10) in position B "▼" it means that the code was not recognised. When this is the case, turn the ignition key back to OFF and then to ON again. If the engine still does not start, try with another black key. If the other key does not work out either, contact the Ducati Service network.

Warning
Any important shock might damage the electronic onents fitted into the key.
Use only one key during the procedure. Using different keys could prevent the system from recognising the code in the key.
Duplicate keys
If you need additional keys, contact your DUCATI Service Centre with all the keys you have in your possession and your CODE CARD.
Ducati Service network will program new keys and reprogram your original keys.
You may be asked to provide proof that you are the legitimate owner of the motorcycle.
The codes of any keys not submitted will be wiped off from the memory to make those keys unserviceable in case they have been lost.

Note
If you sell your motorcycle, it is essential to transfer all
keys and the CODE CARD to the new owner.

Controls
Warning This section shows the position and function of the controls used to drive the motorcycle. Be sure to read this information carefully before you use the controls.
Position of motorcycle controls (fig. 36)
1) Instrument panel.
3) Left-hand switch.
4) Clutch lever.
5) Right-hand switch.
6) Throttle twistgrip.
7) Front brake lever.
8) Gear change pedal.
9) Rear brake pedal.
2) Key-operated ignition switch and steering lock.
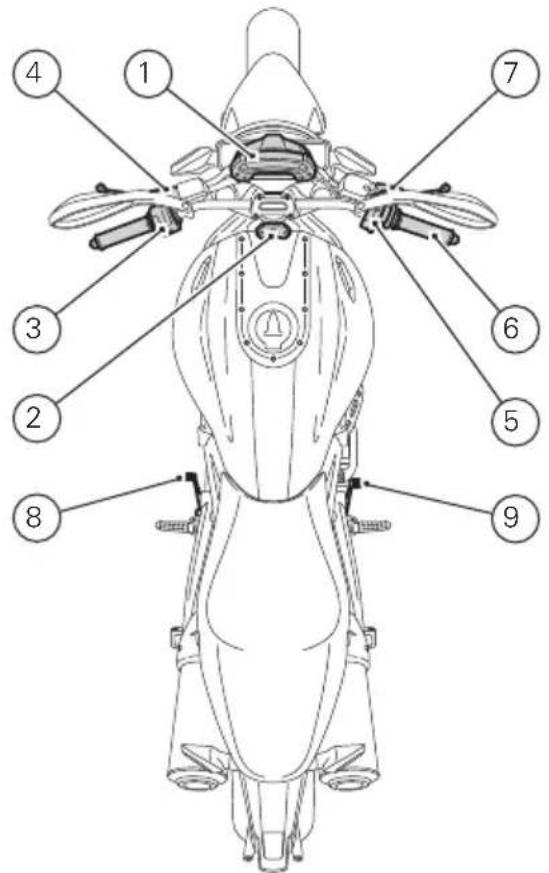
fig. 36
Ignition switch and steering lock
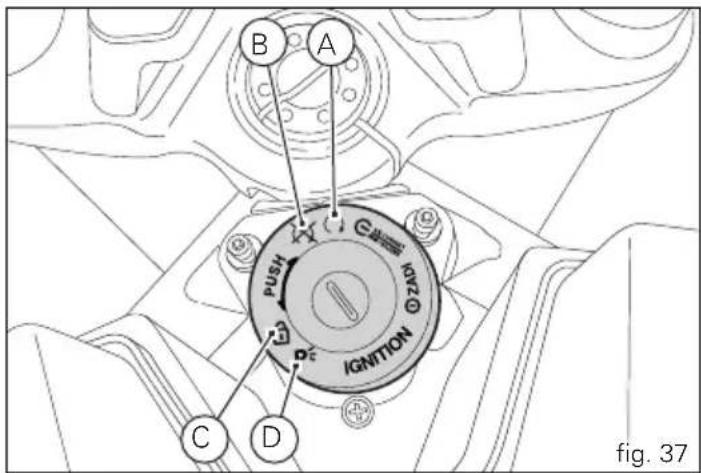
It is located in front of the fuel tank and has four positions:
A) : enables lights and engine operation;
B) : disables lights and engine operation;
C): the steering is locked;
D): parking light and steering lock.

Note
To move the key to the last two positions, press it down before turning it. Switching to (B), (C) and (D), you will be able to take the key out.


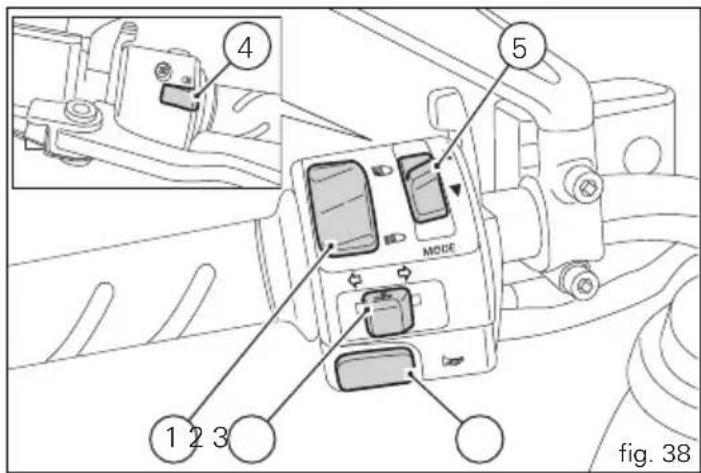
Left-hand switch
1) Dip switch, two-position light selector switch: position ☐low beam on; position ☑high beam on.
2) Switch 3-position turn indicator:
centre position = off;
position left turn;
position right turn.
To cancel the turn signal, press the lever once it has returned to the central position.
3) Button ▶ warning horn.
4) Button ≡ high beam flasher.
5) Two-position instrument panel control switch:
position "▲";
position "▼".
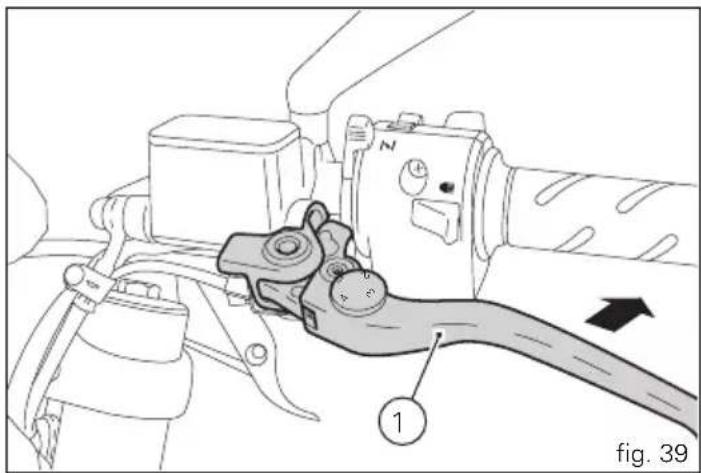
Clutch lever
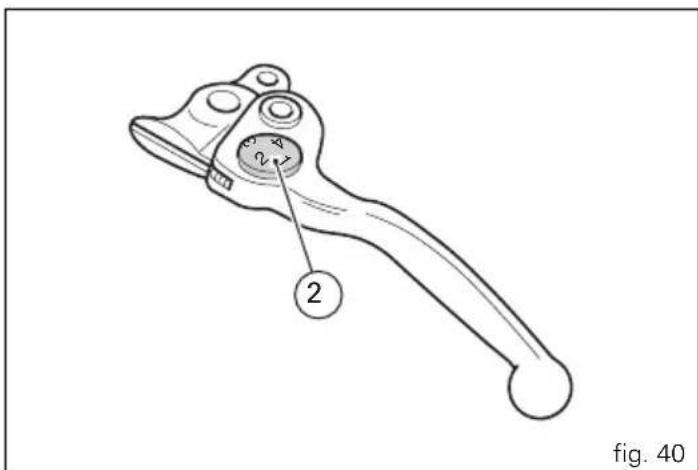
Lever (1) disengages the clutch. It features a dial adjuster (2) for lever distance from the twistgrip on handlebar. To adjust it, keep lever (1) fully extended, and turn knob (2), turning it in correspondence of one of the four foreseen positions.
Keep in mind that:
position no. 1 corresponds to the maximum distance between the lever and the knob, whereas position no. 4 corresponds to the minimum distance.
When you pull in the lever (1), you will disengage the engine from the gearbox and therefore from the driving wheel.
Using the clutch properly is essential to smooth riding, especially when moving off.

Warning
Set clutch lever when motorcycle is stopped.

Important
Using the clutch properly will avoid damage to
transmission parts and spare the engine.

Note
It is possible to start the engine with side stand down and the gearbox in neutral. When starting the bike with a gear engaged, pull the clutch lever (in this case the side stand must be up).


Cold start control lever.
The choke control is used to favour the engine cold start and increase the number of rpm at idle, after start-up.
Use the cold start lever while the engine is cold (1 or max. 2 T-oil bars with the engine on). The start lever is adjusted during engine warm-up so as to guarantee approximately 1500 rpm at idle.
Operating positions of the control:
A) = control not active
B) = control fully active
The lever may be set also at intermediate positions in order to follow the gradual warming up of the engine (see page 68).

Important
Do not use this device if the engine is warm.
Do not travel with the cold start control active.
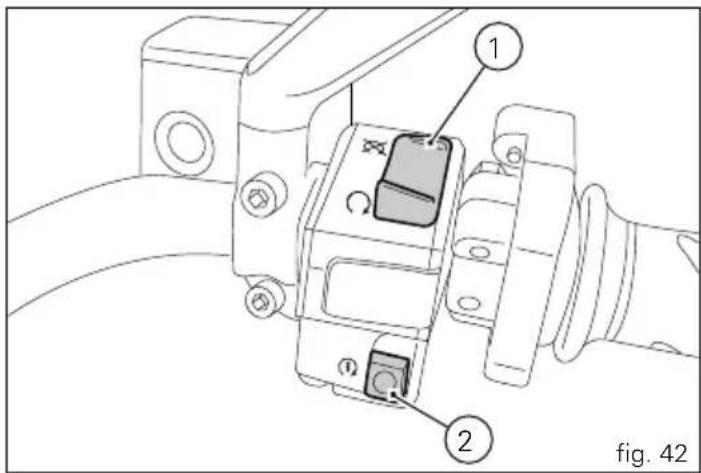
Right-hand switch
1) ENGINE STOP switch, two positions:
position (RUN) = run.
position (OFF) = stop.

Warning
This switch is mainly intended for use in emergency cases when you need to stop the engine quickly. After stopping the engine, return the switch to the "position to enable starting.

Important
Riding with the headlight on and then shutting the engine off with the switch (1) while leaving the ignition key in the ON position can cause the battery to discharge, as the headlight stays on.
2) Button ☑ engine start.


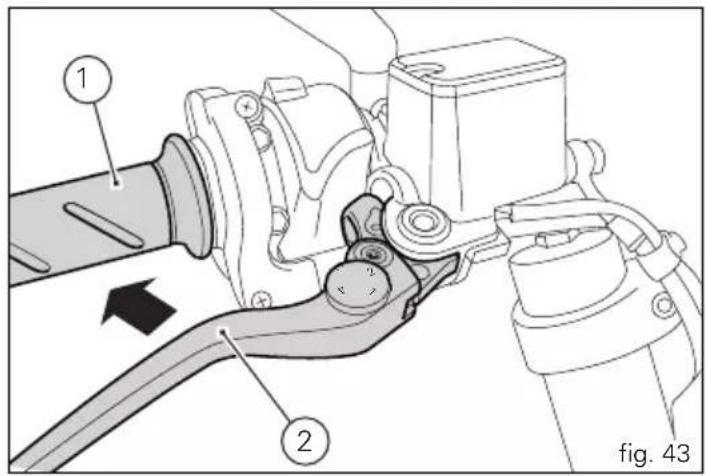
Throttle twistgrip (fig. 43)
The twistgrip (1) on the right handlebar opens the throttles. When released, the twistgrip returns automatically to the initial position (idling speed).
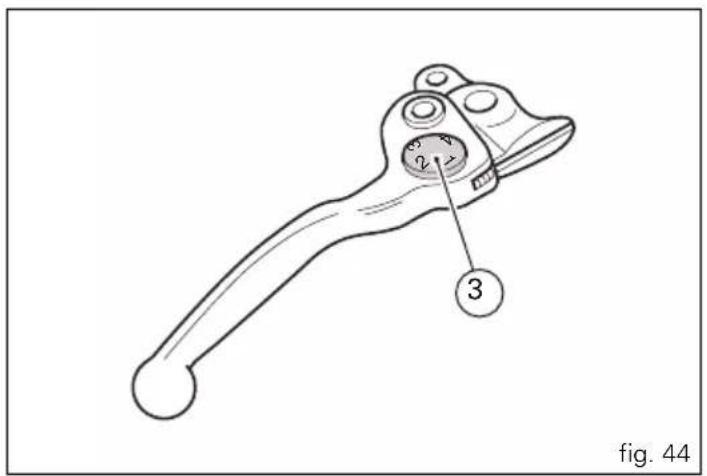
Front brake lever (fig. 43 and fig. 44)
Pull the lever (2) towards the twistgrip to operate the front brake. The system is hydraulically assisted and you only need to pull the lever gently.
The brake lever has a knob (3, fig. 44) for adjusting the distance between lever and twistgrip on the handlebar. To adjust it, keep lever (2) fully extended, and turn knob (3), turning it in correspondence of one of the four foreseen positions.
Keep in mind that: position no. 1 corresponds to the maximum distance between the lever and the knob, whereas position no. 4 corresponds to the minimum distance.

Warning
Before using these controls, read the instructions on page 70.

Warning
The front brake lever must be adjusted when the motorcycle is stationary.
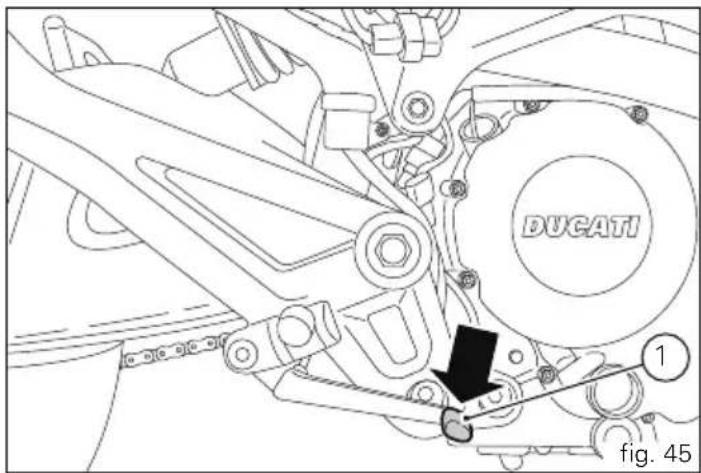
Rear brake pedal (fig. 45)
Push down on the pedal (1) to apply the rear brake. The system is hydraulically operated.
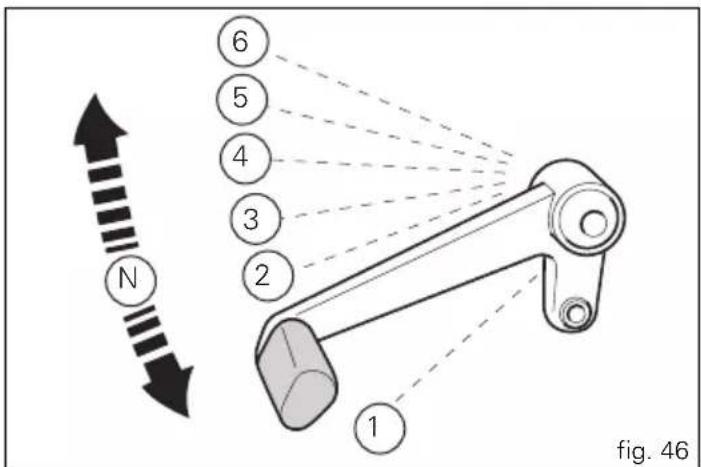
Gear change pedal (fig. 46)
The gearchange pedal has a central position N, with automatic return, and two directions of movement: down = press down the pedal to engage the 1^st gear and to shift down. At this point the N warning light on the instrument panel will go out; upwards= lift the pedal to engage 2^nd gear and then 3^rd , 4^th , 5^th and 6^th gears.
Each time you move the pedal you engage the next gear up, one gear at a time.


Adjusting the position of the gearchange and rear brake pedals
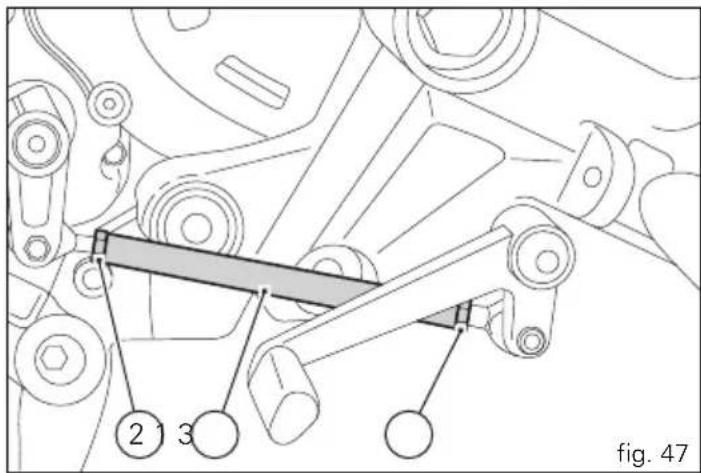
The gear change and rear brake pedals can be adjusted to suit the preferred riding position of each rider.
To adjust the position, proceed as follows:
hold the rod (1) and loosen the counter nuts (2) and (3).

Note
Nut (2) has a left-hand thread.
Turn the rod (1) using an open-ended wrench on the flats to move the gear change pedal to the required position.
Tighten both counter nuts onto the rod.
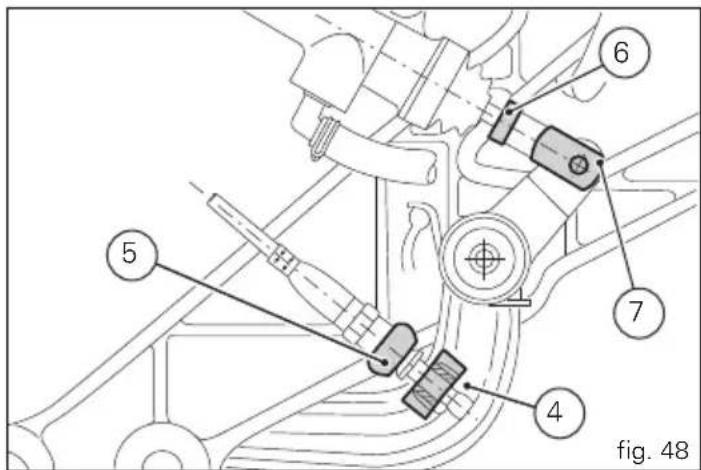
To adjust the position of the rear brake pedal, proceed as follows:
loosen counter nut (4).
Turn pedal travel adjusting screw (5) until pedal is in the desired position.
Tighten the counter nut (4).
Operate the pedal by hand to check that there is 1.5 to 2 mm of freeplay before the brake bites.
If not, adjust the length of the master cylinder pushrod as follows.
Slacken off the counter nut (6) on the pushrod.
Tighten the pushrod into fork (7) to increase play, or unscrew it to reduce it.
Tighten the counter nut (6) and recheck the pedal freeplay.
Main components and devices
Position on the vehicle
1) Tank filler plug.
2) Seat lock.
3) Helmet cable pin.
4) Side stand.
5) Rear-view mirrors.
6) Rear shock absorber adjusters.
7) Catalytic converter.
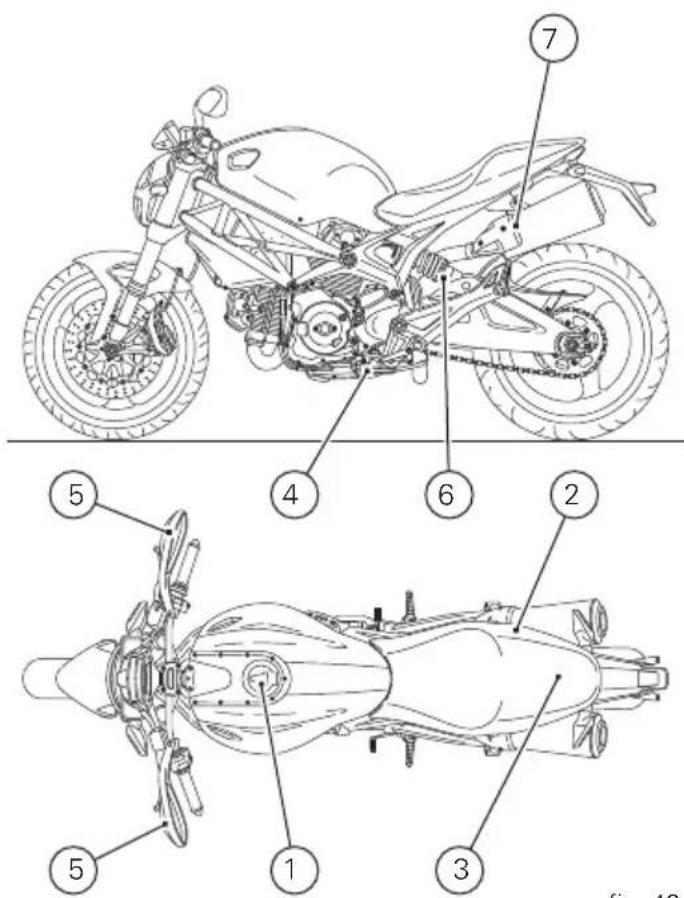
fig. 49

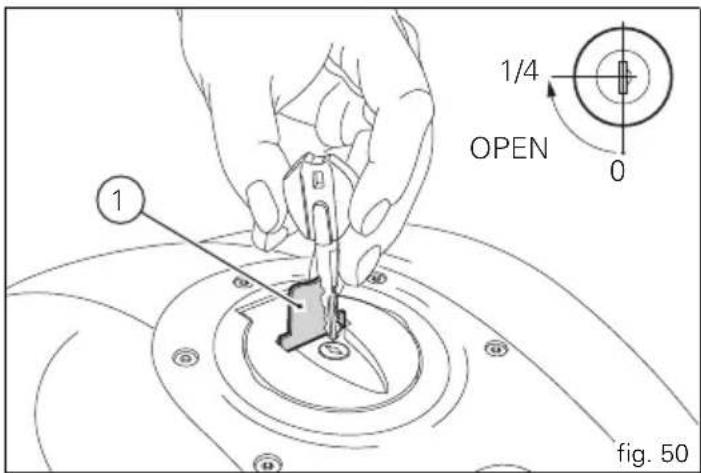
Tank filler plug
Opening
Lift the protection lid (1) and fit the ignition key into the lock. Turn the key clockwise 1/4 turn to unlock. Lift the plug.
Closing
Close the cap with the key inserted and push it into its seat. Turn the key anticlockwise to its initial position and take it out. Close the lock protection lid (1).

Note
The plug can only be closed with the key in.

Warning
Always make sure you have properly refitted (see page
72) and closed the plug after each refuelling.
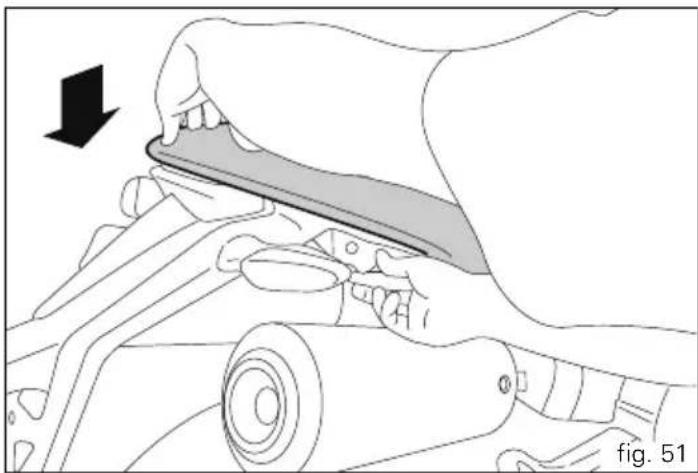
Seat lock and helmet holder
Opening
Insert the key in the lock and simultaneously apply downward pressure in the area of the catch to release the pin. Pull the seat backwards to release it from the front catches.
Closing
Make sure all parts are correctly arranged and secured in the underseat compartment. Insert the front ends of the seat base under the U bolt in the frame, then push the rear end of the seat until you hear the bolt in the lock click into place. Make sure that the seat is firmly secured to the frame and remove the key from the lock.
natural_image
Medical illustration showing a surgical procedure on a patient's neck and shoulder (no text or labels)

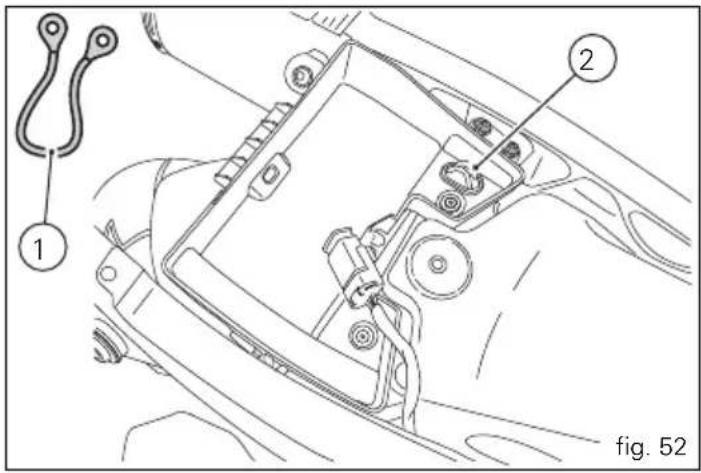
Helmet cable

Note
Helmet cable (1, fig. 52) can be found inside the tool kit, see "Tool kit and accessories," on page 81.
Pass the cable through the helmet and insert the end of the cable in the pin (2, fig. 52). Leave the helmet hanging and refit the seat to hold it in place.

Warning
This device protects the helmet against theft when the motorcycle is parked. Do not leave the helmet attached when riding the motorcycle; it could interfere with your movements and cause loss of control of the motorcycle.
Side stand

Important
Before lowering the side stand, make sure that the starting surface is hard and flat.
Do not park on soft ground, gravel or on asphalt softened by the sun etc. or the motorcycle may fall over.
When parking in downhill road tracts, always park the motorcycle with its rear wheel facing downhill.
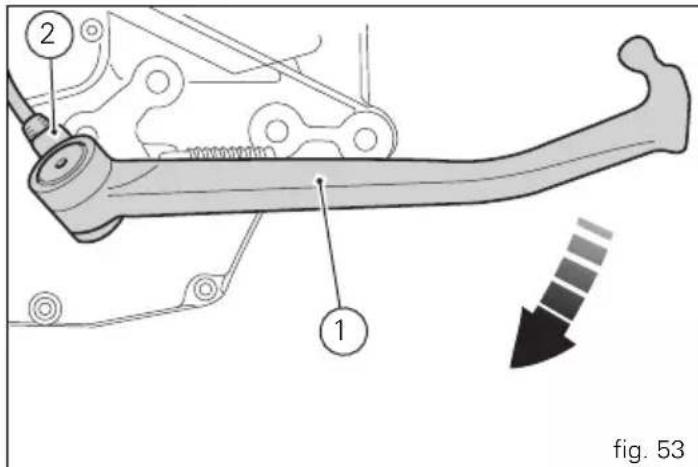
To pull down the side stand, hold the motorcycle handlebars with both hands and push down on the thrust arm (1) with your foot until it is fully extended. Tilt the motorcycle until the side stand is resting on the ground.

Warning
Do not sit on the motorcycle when it is supported on
the side stand.
To raise the sidestand to rest position (horizontal position), tilt the motorcycle to the right and, at the same time, lift the stand (1) with your foot.

Note
Check for proper operation of the stand mechanism
(two springs, one inside the other) and the safety sensor (2) at regular intervals.

Note
It is possible to start the engine with side stand down and the gearbox in neutral. When starting the bike with a gear engaged, pull the clutch lever (in this case the side stand must be up).

Rear shock absorber adjusters
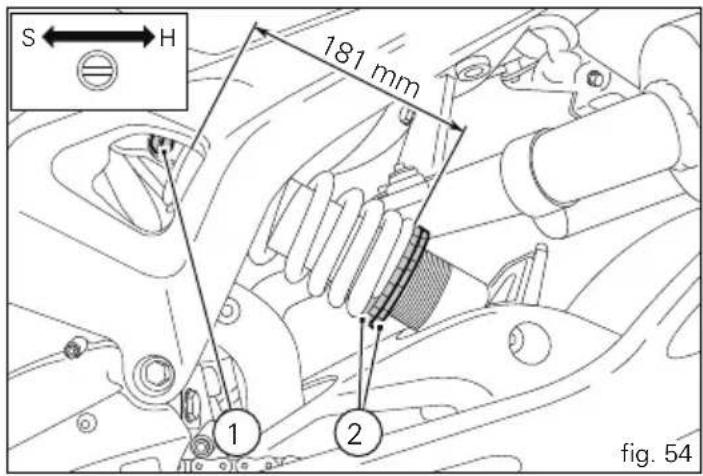
The shock absorber has external adjusters that enable you to adapt the set up to suit the load conditions. Adjuster (1), located on the left-hand side at the point at which the top of the shock absorber is fixed to the rear sub-frame, controls rebound damping. Turn the adjuster (1) clockwise to increase damping H; or anticlockwise to reduce damping S.
The two nuts (2) on the lower part of the shock absorber serve to adjust the preload on the external spring.
To change spring preload, turn the upper ring nut. Then tighten or slacken the lower ring nut to increase or decrease spring preload.
STANDARD setting from fully closed position (clockwise): - unscrew adjuster (1) by 8 clicks from Max (fully closed). Spring preload: 20 mm from Min (fully unloaded).
STANDARD length of the preloaded spring on the shock absorber with the rear wheel raised off the ground: 150 ± 1 mm.

Warning
When adjusting the spring preload, do not exceed a spring length of 181 mm to avoid damaging the swingarm.

Warning
Use a specific pin wrench to turn the preload adjusting nut. Be careful when turning the nut with the wrench, as the pin may slip out of the ring nut recess and you may hurt your hand hitting motorcycle parts.

Warning
The shock absorber is filled with gas under pressure and may cause severe damage if taken apart by unskilled persons.
When carrying a passenger and luggage, set the rear shock absorber spring to proper preload to improve motorcycle handling and keep safe clearance from the ground. You may find that rebound damping needs adjusting as well.
Riding the motorcycle
Running-in recommendations
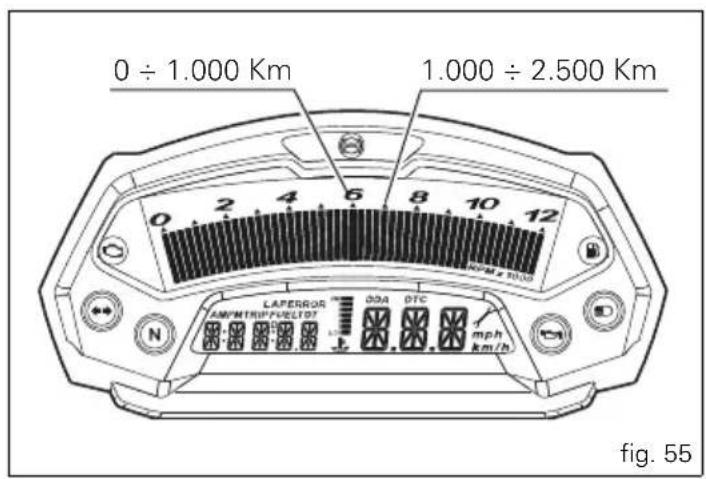
Maximum rpm (fig. 55)
Rotation speed for running-in period and during standard use (rpm):
1) Up to 1000 km
2) From 1000 to 2500 km
Up to 1000 km
During the first 1000 km, keep an eye on the rev counter. It should never exceed 5,500-6,000 rpm.
During the first hours of riding, it is advisable to continuously vary the load on the engine and the rpm, though still keeping within the above limits.
To this end, roads with plenty of bends and even slightly hilly areas are ideal for a most efficient running-in of engine, brakes and suspensions.
For the first 100 km, use the brakes gently. Do not brake violently or keep brake applied for too long. This will enable a correct break-in of the friction material on the brake pads against the brake discs.
For all mechanical parts of the motorcycle to adapt to one another and above all not to adversely affect the life of basic engine parts, it is advisable to avoid harsh accelerations and not to run the engine at high rpm for too long, especially uphill.
Furthermore, the drive chain should be inspected frequently. Lubricate as required.
From 1000 to 2500 km
At this point, you can ask for more power from the engine, being careful, however, never to exceed 7,000 rpm.

Important During the whole running-in period, the maintenance and service rules recommended in the Warranty Card should be observed carefully. Failure to comply with these rules will release Ducati Motor Holding S.p.A. from any liability whatsoever for resulting engine damage or shorter engine life.
Strict observance of running-in recommendations will ensure longer engine life and reduce the likelihood of overhauls and tune-ups.
Pre-ride checks
Warning Failure to carry out these checks before riding, may lead to motorcycle damage and injury to rider and passenger.
Before riding, perform a thorough check-up on your bike as follows:
FUEL LEVEL IN THE TANK
Check fuel level in the tank. Fill tank if needed (page 72).
ENGINE OIL LEVEL
Check the oil level in the sump through the sight glass.
Top up if needed (page 105).
Check the fluid levels in the respective reservoirs.
TYRE CONDITION
Check tyre pressure and condition (page 103).
CONTROLS
Operate the brake, clutch, gearchange and throttle controls (lever, pedal and twistgrip) and check that they function correctly.
LIGHTS AND INDICATORS
Make sure lights, indicators and horn work properly. Replace any burnt-out bulbs (page 100).
KEY LOCKS
Check that the fuel filler cap and the seat are locked.
SIDESTAND
Make sure side stand operates smoothly and is in the correct position (page 63).
ABS light (for Monster 659 ABS only)
After Key-On, the ABS light (10, fig. 4) stays on. When the vehicle speed exceeds 5 km/h, the warning light switches off to indicate the correct operation of the ABS system.
Warning In case of malfunction, do not ride the motorcycle and contact a Ducati Dealer or authorised Service Center.
ABS device (for Monster 659 ABS only)
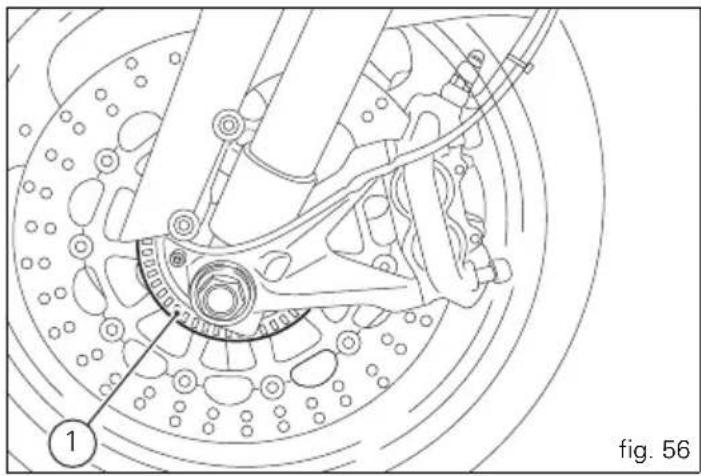
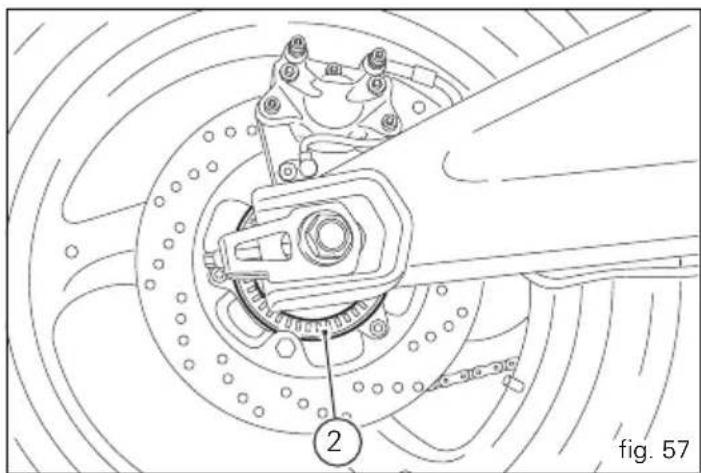
Check that the front (1) and rear (2) phonic wheels are clean.

Warning
Clogged reading slots would compromise system
proper operation.
It is recommended to disable ABS system in case of muddy road surface because under this condition the system might be subject to sudden failure.

Warning
Prolonged rearing could deactivate the ABS system.
natural_image
Technical line drawing of a mechanical assembly with labeled component (1), no readable text or symbols beyond label and figure markerE
natural_image
Technical diagram of a car brake system showing components like wheel, brake caliper, and suspension ring (no text or labels)
Starting the engine

Note
Follow the "High ambient temperature" procedure to start the engine when it is already warm.

Warning
E Before starting the engine, familiarise yourself with the controls that you will use when riding.
Normal ambient temperature
(between 10 °C/50 °F and 35 °C/95 °F):
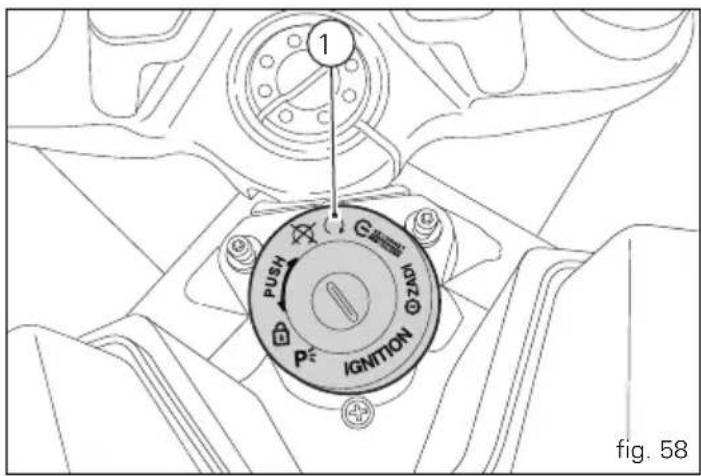
1) Move the ignition switch to (1). Make sure both the green light N and the red light on the instrument panel come on.

Important
The oil pressure light should go out a few seconds after the engine has started (page 11).

Warning
The side stand must be fully up (in horizontal position) as its safety sensor prevents engine start when down.

Note
It is possible to start the engine with side stand down and the gearbox in neutral. When starting the bike with a gear engaged, pull the clutch lever (in this case the side stand must be up).
2) Shift the cold-start lever to position (B, fig. 60).
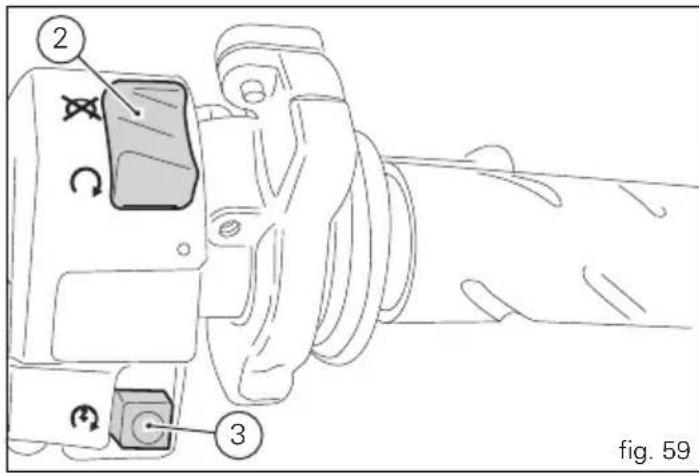
3) Check that the stop switch (2) is positioned to (RUN), then press the starter button (3).
Allow the engine to start on its own, without turning the throttle twistgrip.

Note
If the battery is flat, the system automatically disables operation of the starter motor.
4) Set the start lever in the vertical position (A) to reach the idle condition of approx. 1,400 ÷ 1,500 rpm.

Important
Do not rev up the engine when it is cold. Allow some time for the oil to warm up and reach all points that need lubricating.
5) Subsequently, move the cold start lever (A) gradually towards its vertical position as the engine warms up. Once the engine is at normal running speed it should idle smoothly with the cold start lever completely closed.
High ambient temperature (over 35 °C/95 °F):
Follow the same procedure described for "Normal ambient temperature" without using the cold start control.
Cold ambient temperature
(less than 10^ C/50°F):
Follow the procedure described for "Normal ambient temperature" extending the time for engine warming up (point 5) to 5 minutes.

Moving off
1) Disengage the clutch squeezing the control lever.
2) Push down on gear change lever sharply with the tip of your foot to engage the first gear.
3) Speed up the engine, turn the throttle twistgrip, gradually release the clutch lever at the same time; the motorcycle will start moving.
4) Let go of clutch lever and speed up.
5) To shift up, close the throttle to slow down engine, disengage the clutch, lift the gear change lever and let go of clutch lever.
To shift down, proceed as follows: release the twistgrip, pull the clutch lever, increase engine speed for a moment to allow the gears to synchronise, shift down and release the clutch.
Use the controls intelligently and promptly: when riding uphill, do not hesitate to shift down as soon as the motorcycle starts to slow down, so you will avoid stressing the engine and the motorcycle abnormally.

Important
Avoid harsh accelerations, as this may lead to misfiring and transmission snatching. The clutch lever should not be held in longer than necessary after a gear is engaged, otherwise friction parts may overheat and wear out.

Warning (for Monster 659 ABS only)
Prolonged rearing could deactivate the ABS system.
Braking
Slow down in time, shift down to engine-brake first and then brake applying both brakes. Pull in the clutch lever before the motorcycle comes to a stop to prevent the engine stalling.
ABS device (for Monster 659 ABS only)
Using the brakes correctly under adverse conditions is the hardest – and yet the most critical – skill to master for a rider. Braking is one of the most difficult and dangerous moments when riding a two wheeled vehicle: the possibility of falling or having an accident during this difficult moment is statistically higher than any other moment. A locked front wheel leads to loss of traction and stability, resulting in loss of control.
The Anti-Lock Brake System (ABS) has been developed to enable riders to use the vehicles braking force to the fullest possible amount in emergency braking or under poor pavement or adverse weather conditions.
ABS uses hydraulics and electronics to limit pressure in the brake circuit when a special sensor mounted to the wheel signals the electronic control unit that the wheel is about to lock up.
This avoids wheel lockup and preserves traction. Pressure is raised back up immediately and the control unit keeps controlling the brake until the risk of a lockup disappears. Normally, the rider will perceive ABS operation as a harder feel or a pulsation of the brake lever and pedal.
The front and rear brakes use separate control systems, meaning that they operate independently. Likewise, the ABS is not an integral braking system and does not control both the front and rear brake at the same time.
If desired, the system can be deactivated from the instrument panel, using the “ABS disabling function” (see page 38).
Warning With the AB
With the ABS system deactivated, the vehicle maintains the characteristics of the standard braking system, therefore the use of only one of the brakes reduces the motorcycle's braking efficiency. Using only one of the brakes will give you less braking power, as you may lock the wheels and lose control of the motorcycle. When riding in the rain or on slippery surfaces, braking capacity is significantly reduced. Always use the brakes very gently and carefully when riding under these conditions. Any sudden manoeuvres may lead to loss of control.
When tackling long, steep downhill road tracts, shift down gears to use engine braking. Apply one brake at a time and use brakes sparingly. Keeping the brakes applied all the time would cause the friction material to overheat and reduce braking power dangerously. Tyre inflation pressures below the specified value will reduce braking efficiency, and compromise steering precision and roadholding on bends.

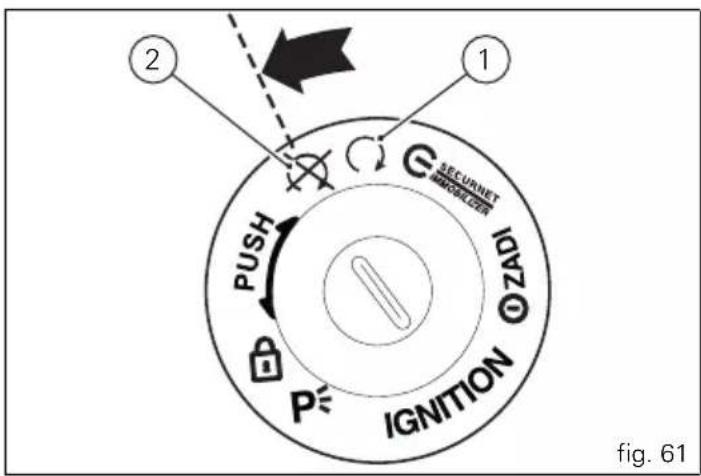
Stopping the motorcycle (fig. 61)
Reduce speed, shift down and release the throttle twistgrip. Then, shift down releasing the clutch, and finally change from first to neutral. Apply the brakes and bring the motorcycle to a complete stop. To switch the engine off, simply turn the key to (2).

Important
Never leave the key in the ON position (1) when engine
is stopped, or this will damage the electric components.
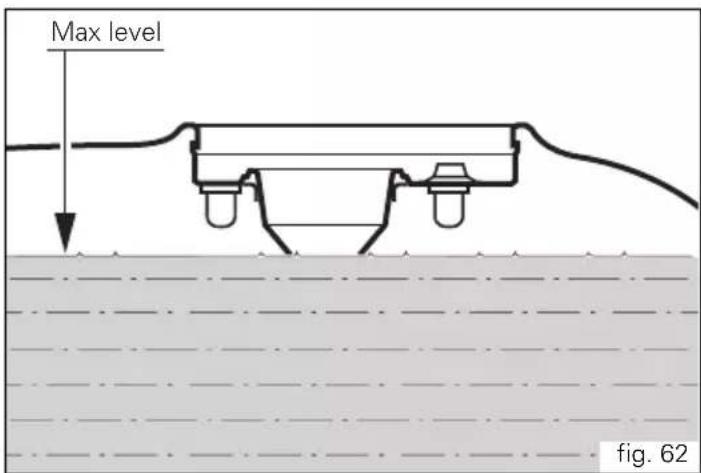
Refuelling (fig. 62)
Never overfill the tank when refuelling. Fuel should never be touching the rim of filler recess.

Warning
Use fuel with low lead content and an original octane
number of at least 95.
Be sure there is no fuel trapped in the filler recess.
Parking
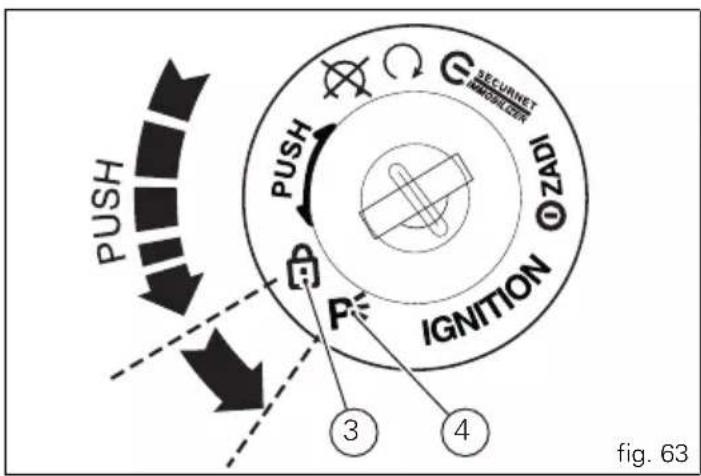
Stop the motorcycle, then put it on the side stand (see page 63).
To prevent theft, turn the handlebar fully left and turn the ignition key to (3).
If you park in a garage or other indoor area, make sure that there is proper ventilation and that the motorcycle is not near a source of heat.
You may leave the parking lights on by turning the key to (4).

Important
Do not leave the key turned to position (4) for long
periods or the battery will run down. Never leave the ignition key in the switch when you are leaving your bike unattended.

Warning
The exhaust system might be hot, even after engine is switched off; take special care not to touch exhaust system with any part of your body and do not park the motorcycle next to inflammable material (wood, leaves etc.).

Warning
Using padlocks or other locks designed to prevent
movement of the motorcycle (such as brake disc locks, rear sprocket locks, and so on) is very dangerous, and may impair motorcycle operation and the safety of rider and passenger.
flowchart
graph TD
    A["PUSH"] --> B["PUSH"]
    B --> C["IGNITION ① ZADZ"]
    C --> D["SECURNET MANAGEMENT"]
    style A fill:#f9f,stroke:#333
    style B fill:#ccf,stroke:#333
    style C fill:#cfc,stroke:#333
    style D fill:#fcc,stroke:#333
    note right of C: ③
    note right of D: ④
    note right of C: ①
    note right of D: ②
    note right of C: ③
    note right of D: ④
    note right of C: ⑤
    note right of D: ⑥
    note right of C: ⑦
    note right of D: ⑧
    note right of C: ⑨
    note right of D: ⑩
    note right of C: ⑪
    note right of D: ⑫
    note right of C: ⑬
    note right of D: ⑭
    note right of C: ⑮
    note right of D: ⑯
    note right of C: ⑰
    note right of D: ⑱
    note right of C: ⑲
    note right of D: ⑳
    note right of C: ㉑
    note right of D: ㉒
    note right of C: ㉓
    note right of D: ㉔
    note right of C: ㉕
    note right of D: ㉖
    note right of C: ㉗
    note right of D: ㉘
    note right of C: ㉙
    note right of D: ㉚
    note right of C: ㉛
    note right of D: ㉜
    note right of C: ㉝
    note right of D: ㉟
    note right of C: ㉟a
    note right of D: ㉟b
    note right of C: ㉟c
    note right of D: ㉟d
    note right of C: ㉟e
    note right of D: ㉟f
    note right of C: ㉟g
    note right of D: ㉟h
    note right of C: ㉟i
    note right of D: ㉟j
    note right of C: ㉟k
    note right of D: ㉟l
    note right of C: ㉟m
    note right of D: ㉟n
    note right of C: ㉟o
    note right of D: ㉟p
    note right of C: ㉟q
    note right of D: ㉟r
    note right of C: ㉟s
    note right of D: ㉟t
    note right of C: ㉟u
    note right of D: ㉟v
    note right of C: ㉟w
    note right of D: ㉟x
    note right of C: ㉟y
    note right of D: ㉟z


Tool kit and accessories
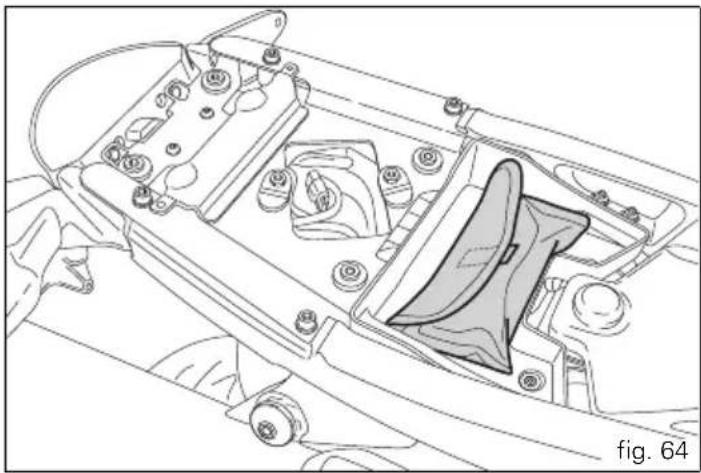
The tool kit for normal check and maintenance operations is located in the underseat compartment.
To access the underseat compartment, remove the seat (page 61).
The tool kit includes:
Contains:
- fuse pliers;
- 8/10 double-ended wrench;
- helmet lock cable;
- screwdriver;
- screwdriver handle;
- 16 mm box wrench;
- 8 mm rod;
- 3 mm Allen wrench;
- 5 mm Allen wrench;
- 6 mm Allen wrench.
natural_image
Technical line drawing of a vehicle interior frame with no visible text or symbolsMain maintenance operations
Changing the air filter

Important
Have the air filter maintenance performed at a Ducati
Dealer or authorised Service Centre.
Checking brake and clutch fluid level
The levels should not fall below the MIN marks on the respective reservoirs.
If level drops below the limit, air can get into the circuit and make the system ineffective.
Brake and clutch fluid must be topped up and changed at the intervals specified in the scheduled maintenance table reported in the Warranty Booklet; please contact a Ducati Dealer or authorised Service Centre.

Important
It is recommended that all brake and clutch hoses be
renewed every 4 years.
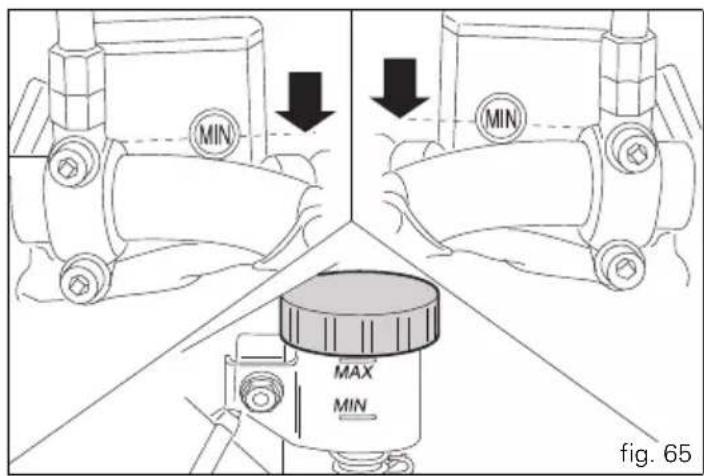

Clutch system
If the control lever has excessive play and the transmission snatches or jams when engaging a gear, this indicates that air is in the circuit. Contact your Ducati Dealer or authorised Service Centre to have the system inspected and air drained out.

Warning
The level of clutch fluid tends to increase in the reservoir as the friction material on the clutch plates wears out. Do not exceed the specified level (3 mm above the minimum level).

Brake system
If you find excessive play on brake lever or pedal and brake pads are still in good condition, contact your Ducati Dealer or Authorised Service Centre to have the system inspected and any air drained out of the circuit.

Warning
Brake and clutch fluid can damage paintwork and
plastic parts, so avoid contact.
Hydraulic oil is corrosive; it may cause damage and lead to severe injuries.
Never mix fluids of different qualities.
Check seals for proper sealing.
Checking brake pads for wear
Check brake pads wear through the inspection hole in the callipers. Change both pads if friction material thickness of even just one pad is about 1 mm.

Warning
Friction material wear beyond this limit would lead to support contact with the brake disc thus
compromising braking efficiency, disc integrity and rider safety.

Important
Have the brake pads replaced at a Ducati Dealer or
authorised Service Centre.
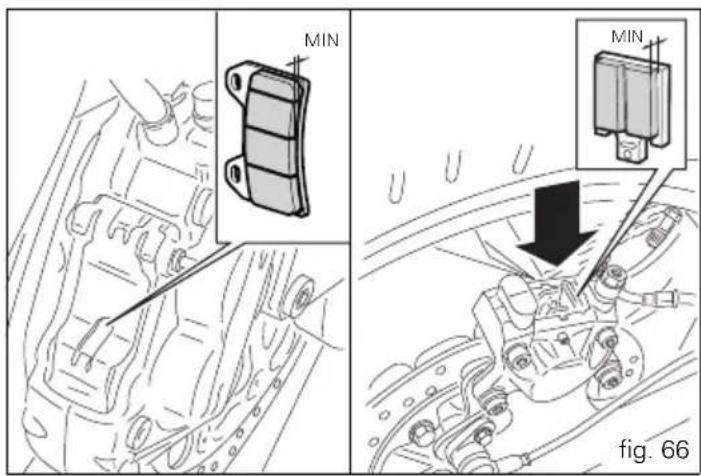
Lubricating cables and joints
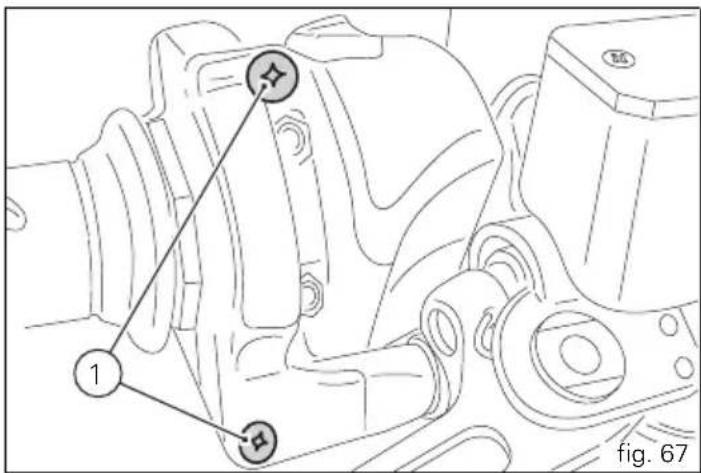
The condition of the throttle cables and choke cable sheaths should be checked at regular intervals. There should be no signs of pinching or cracking on the outer plastic sheath. Operate the control to check that the inner cable slides smoothly: if you feel any friction or catching, have the cable replaced by a Ducati Dealer or Authorised Service Centre. To avoid this kind of problem, periodically lubricate the ends of each control cable with SHELL Advance Grease or Retinax LX2.
Concerning the throttle cable, it is advised to open the housing, unscrewing the two fastening screws (1) and then grease the cable end and the pulley.

Warning
Close the twistgrip housing carefully, inserting the in the race.
Refit the housing and tighten the screws (1) to 1.8 Nm.
To ensure smooth operation of the side stand pivot, remove dirt and apply SHELL Alvania R3 grease to all friction points.


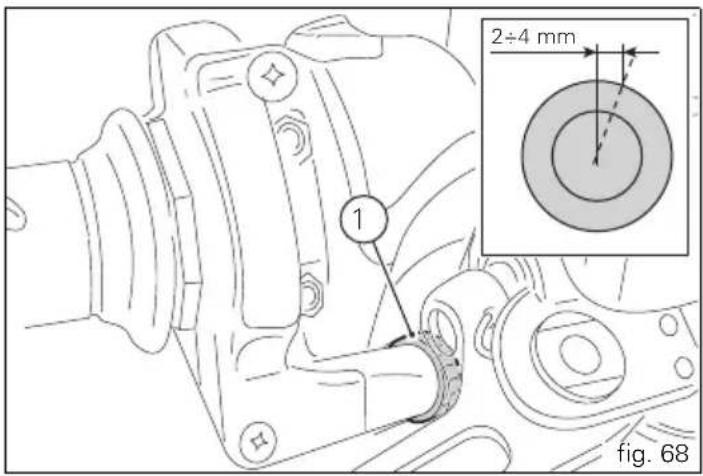
Adjusting the throttle cable
In all steering positions, the throttle twistgrip should have about 2 to 4 mm of free travel, measured at the outer edge of the twistgrip housing. If necessary, adjust it with the adjuster (1) located on the twistgrip.
Charging and maintenance of the battery during winter storage
Your motorcycle is equipped with a connector to which you can connect a special battery charger available from our sales network.
Removal of the battery

Important
For battery removal, ALWAYS contact a Ducati Dealer or authorised Service Centre.
Remove the seat (page 61).
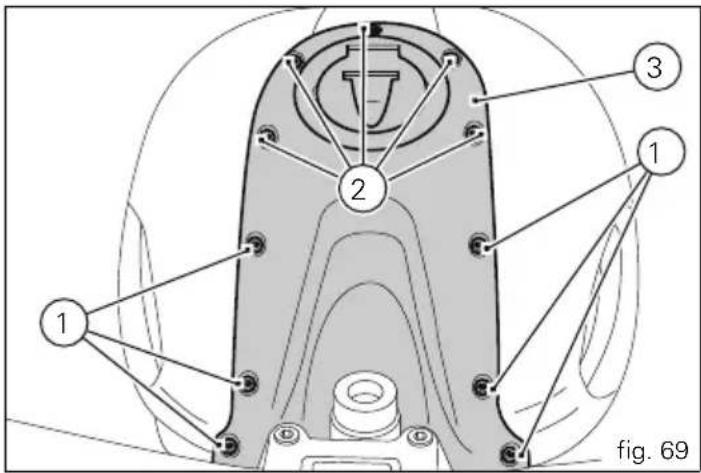
Unscrew the screws (1) and (2) securing the front tank cover (3) but do not remove the cover.
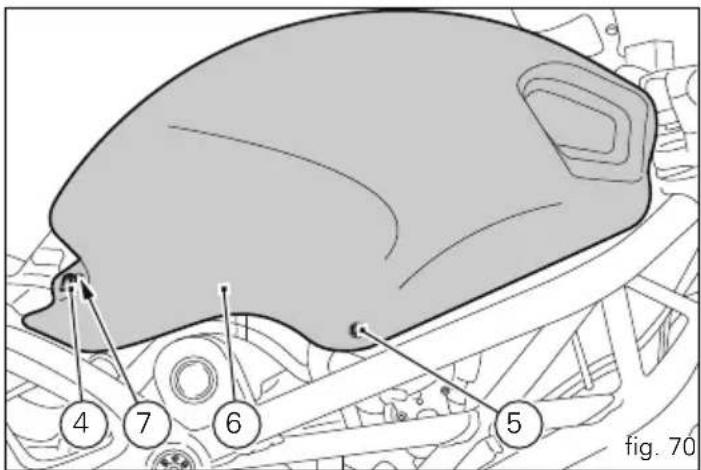
Unscrew the screws (4) and (5) and recover the nylon washers (7).


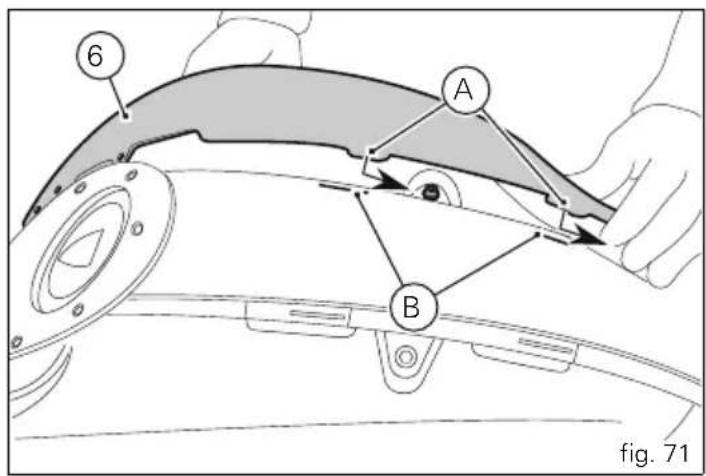
Slide off the right-hand tank cover (6), releasing the tabs (A) in the corresponding slots (B) in the rear cover.
Repeat the above operations to remove the left-hand tank A cover.
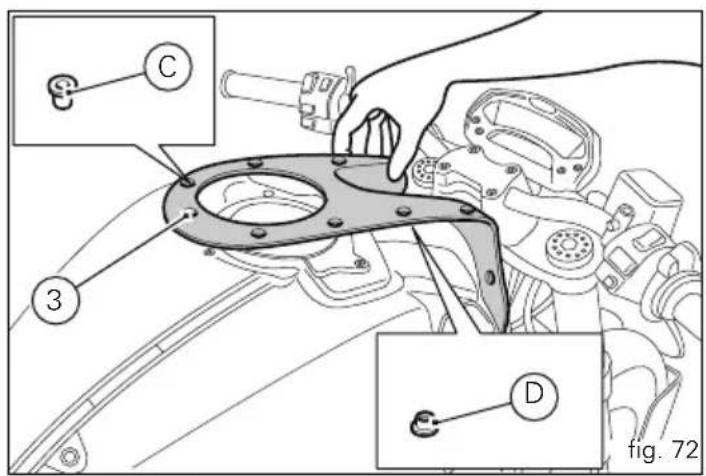
Remove the front tank cover (3) and recover the bushes (C) and the spacers (D).
Unscrew the two retaining screws (9) and release the cover (8).
Withdraw the breather hose (10) from the cover (8).
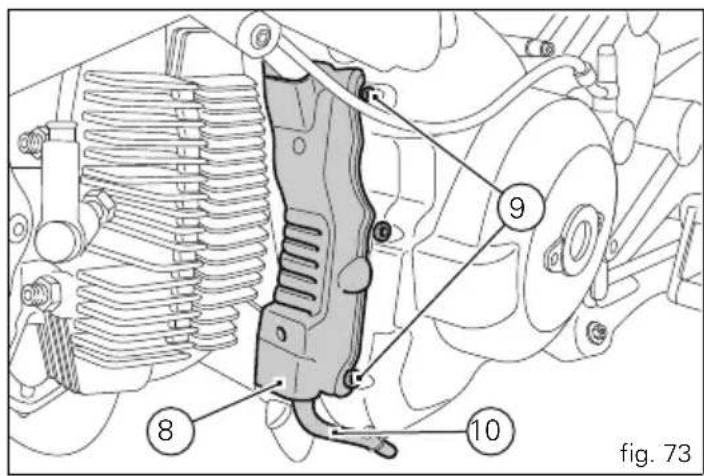

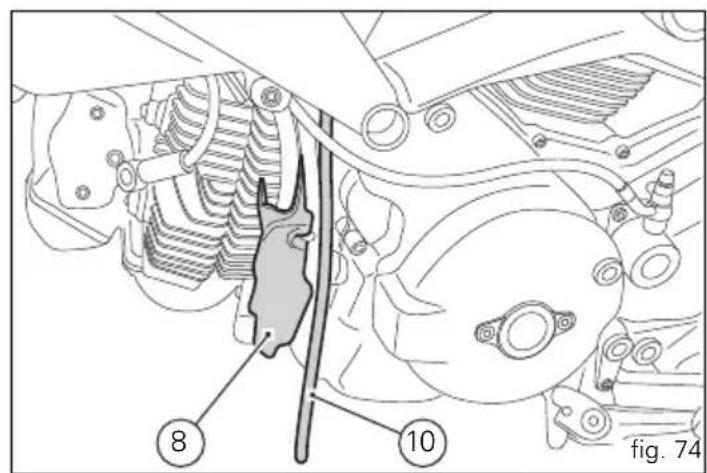

Withdraw the hose (10) upwards, leaving it attached to the tank breather and drain hose unions.
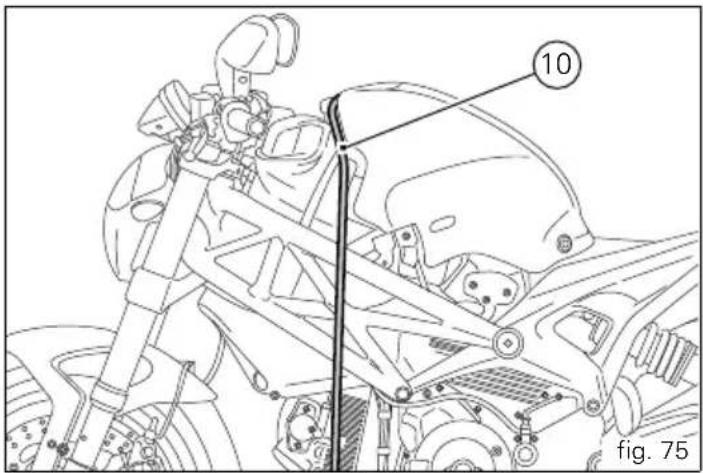
Working on the right-hand side of the motorcycle, disconnect the wiring connector (11) of the fuel level sensor from the main wiring harness, unscrew the screw (12) securing the side of the tank to the frame and recover the washer (13).
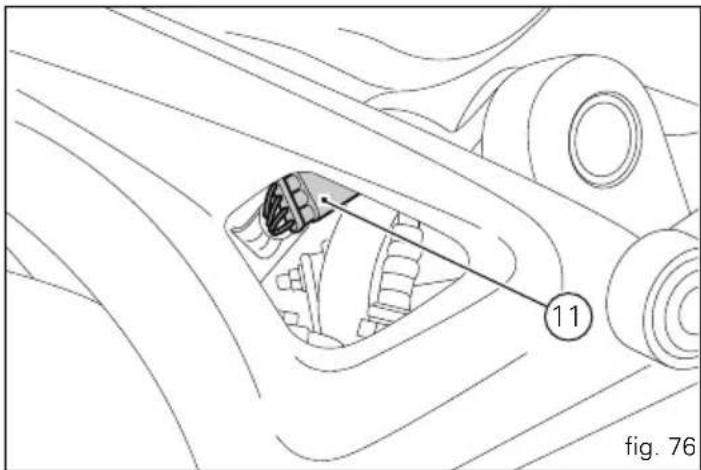

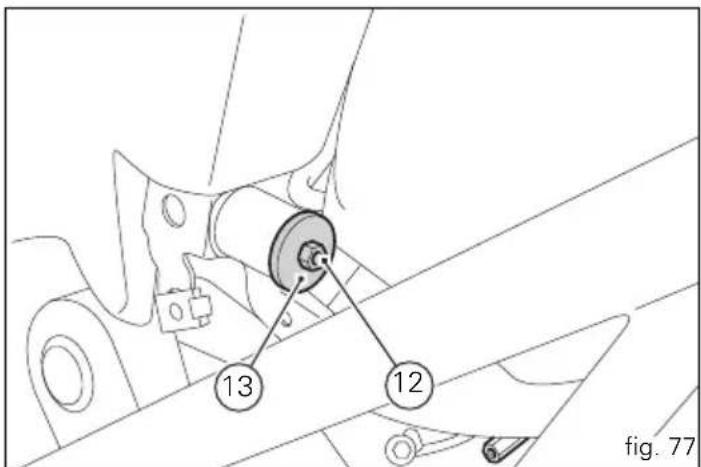

Unscrew the screw (14) and recover the washer (15). Release the fuel hoses (E) from the clips (F).
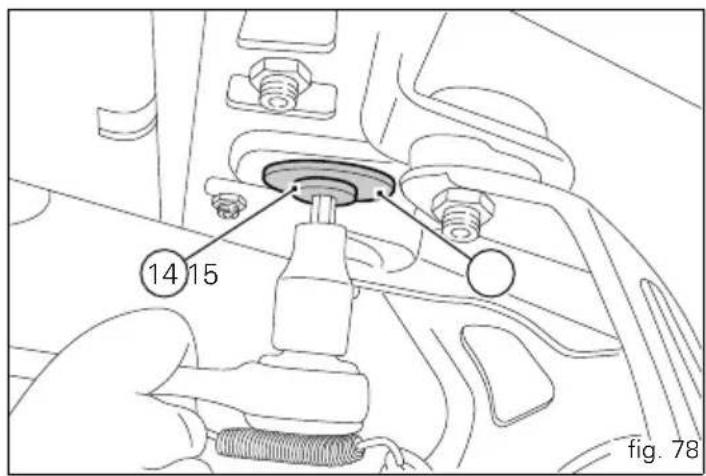
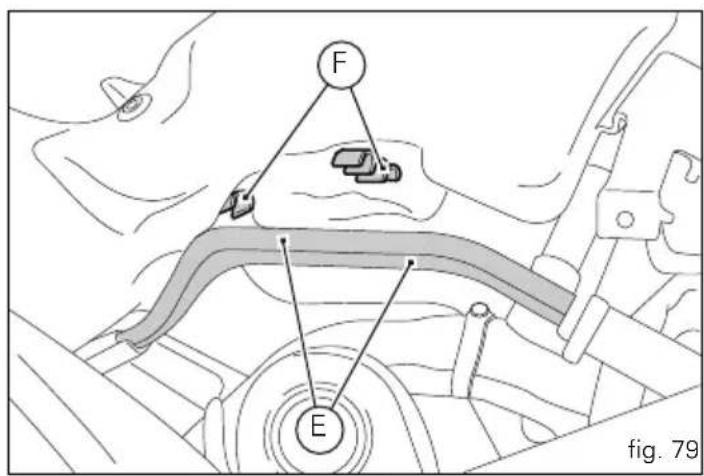
Release the lambda sensor cable (G) from the tab (H) on the tank flange cover.

Warning
Before removing the flange cover (16), make sure the
tank is empty and position a rag to collect any spilt fuel.
Hold the fuel tank in a raised position and remove the flange cover (16) by unscrewing the nuts (17).
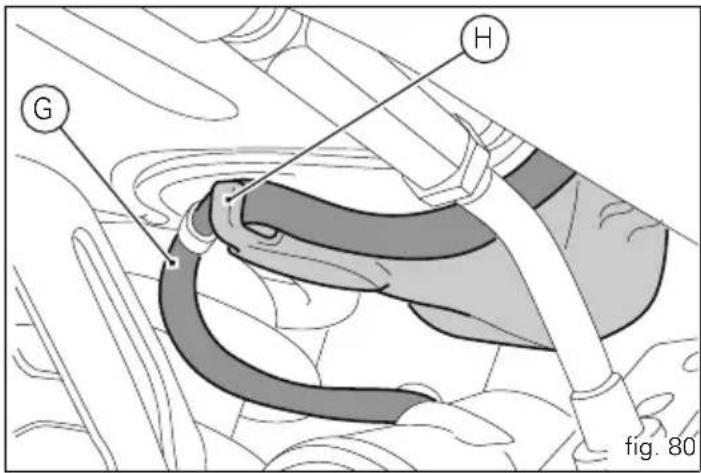

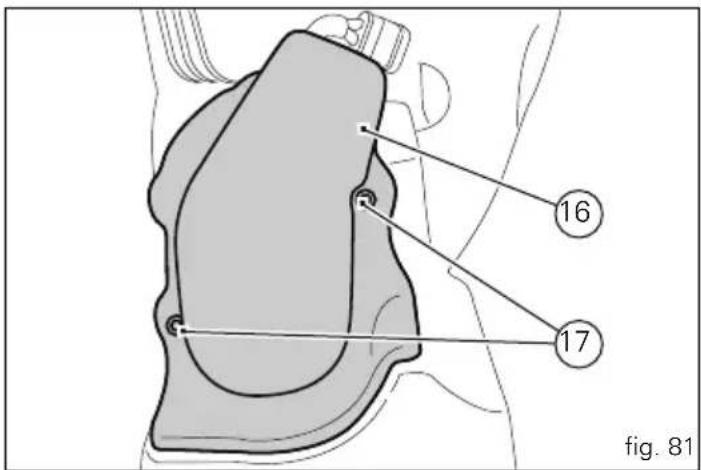

Disconnect the quick-release fittings (18) from the flange. Remove the elastic retaining strap (19), remove the caps from the terminals, unscrew the screws (22) on terminal clamps (20) and (21), always starting with the negative terminal, then remove the battery from its seating.
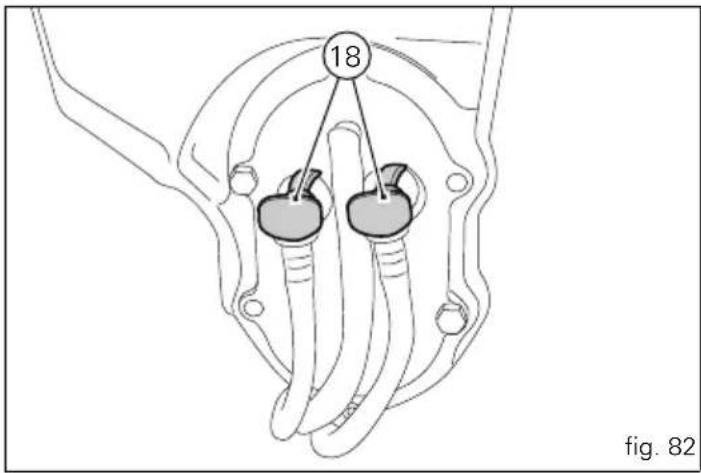
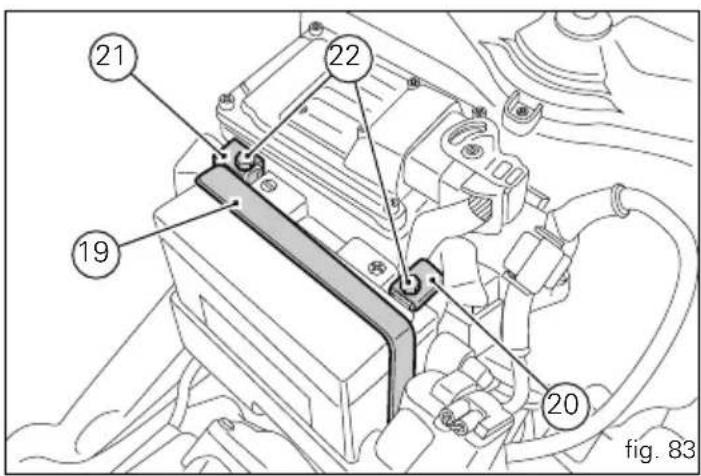
Refitting the battery

Important
To refit the battery, ALWAYS contact a Ducati Dealer or authorised Service Centre.
Install the battery in the battery support and secure it with the elastic retaining strap (19).

Warning
Connect the positive lead (20) and the ABS positive lead (23) to the positive terminal and the negative lead (21) to the negative terminal, as shown in the photo.
Insert the screws (22) in the terminals (20) and (21), always starting with the positive terminal (red lead).

Warning
Position the leads (20), (21) and (23) as shown in the photo.
Tighten the screws (22) to a torque of 10 Nm ±10%.
Apply grease around the battery terminal clamps to prevent oxidation.
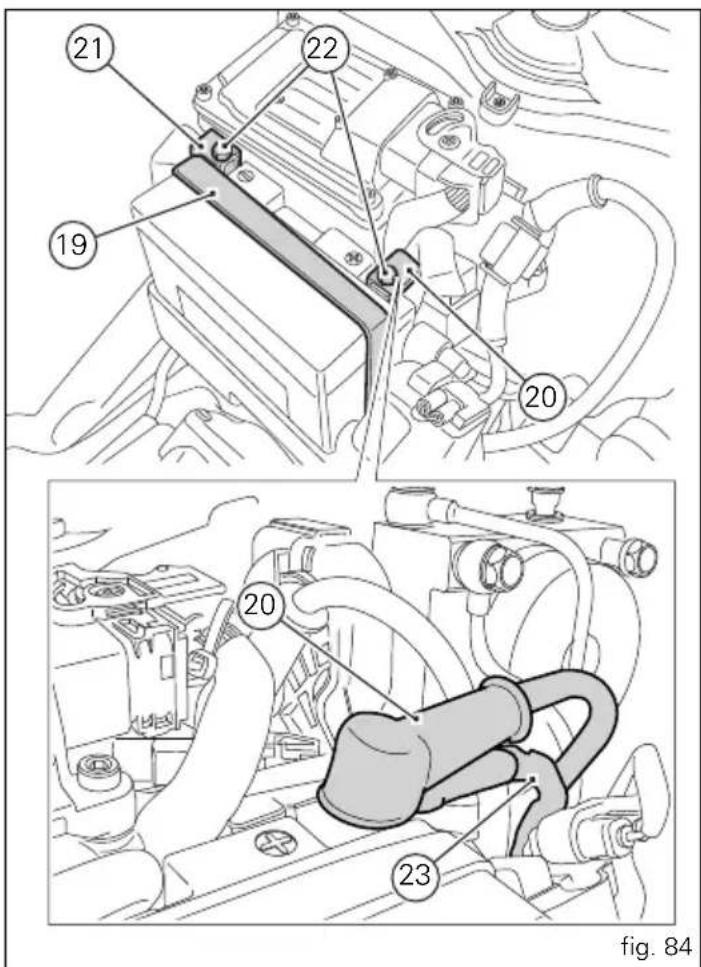


Warning If it was necessary to remove the tank from the vehicle, refit it by inserting the front pins (L) into their seats in the frame.
Important To refit the battery, ALWAYS contact a Ducati Dealer or authorised Service Centre.
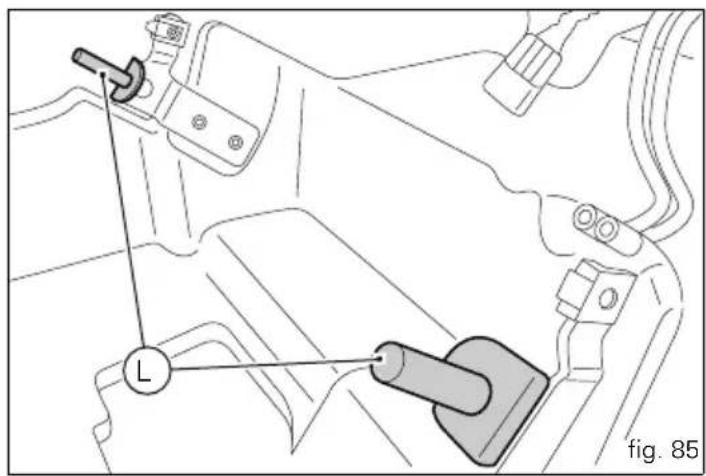
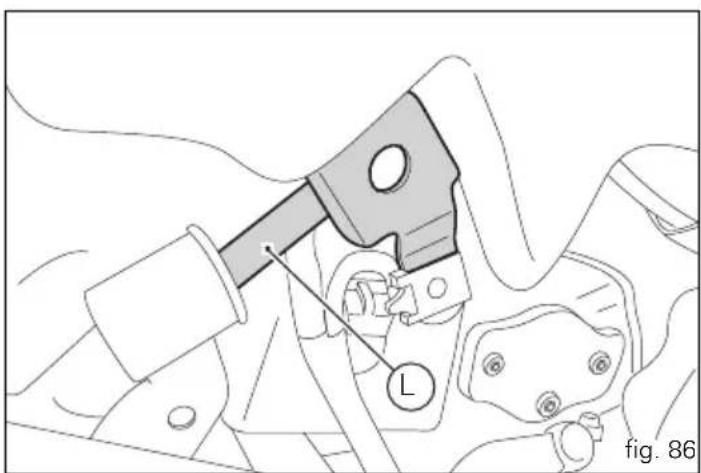
natural_image
Technical diagram of a mechanical assembly with labeled component 'L' and part number 'fig. 86' (no readable text or symbols beyond labels)While holding the tank in the raised position, connect the quick-release fittings (18) to the flange and refit the flange cover (16) inserting and tightening the nuts (17) to a torque of 3 Nm ±0.3%.
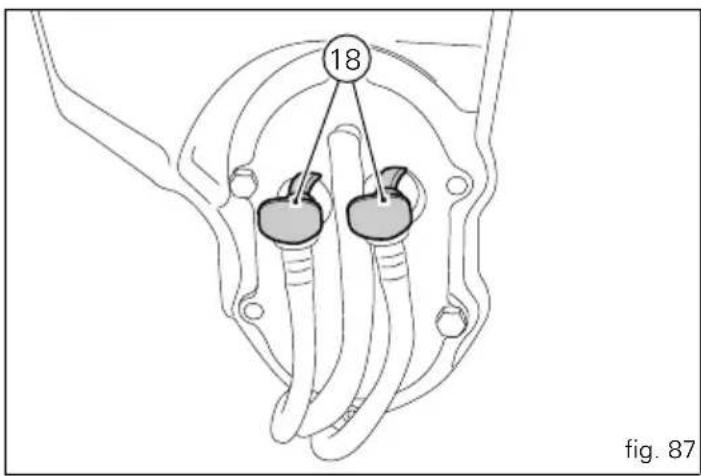

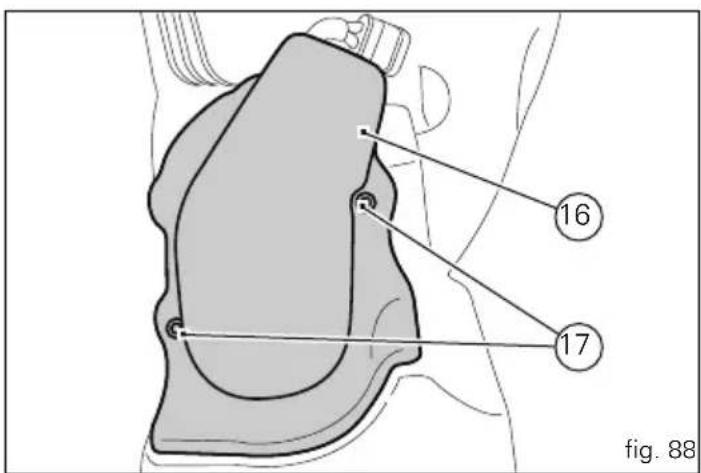

Connect the fuel sensor (11) to the main wiring harness. Position the lambda sensor cable (G) in the specific tab (H) on the tank flange cover and secure it with a clamp.

Important
With the fuel tank lowered, the fuel level sensor connector (11) should rest on the vertical cylinder head, as shown in the figure.
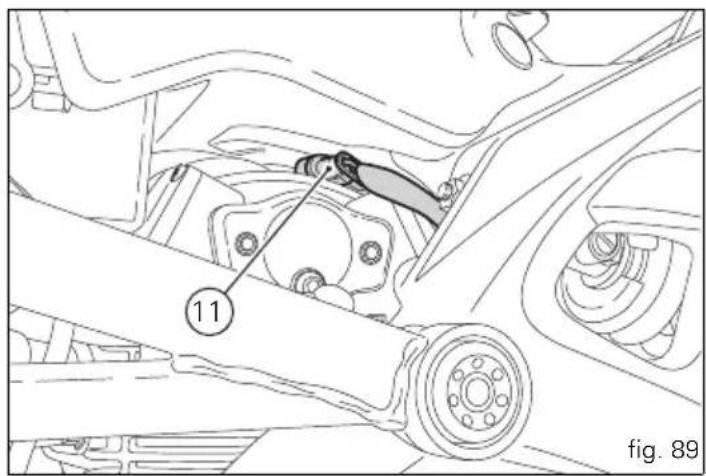
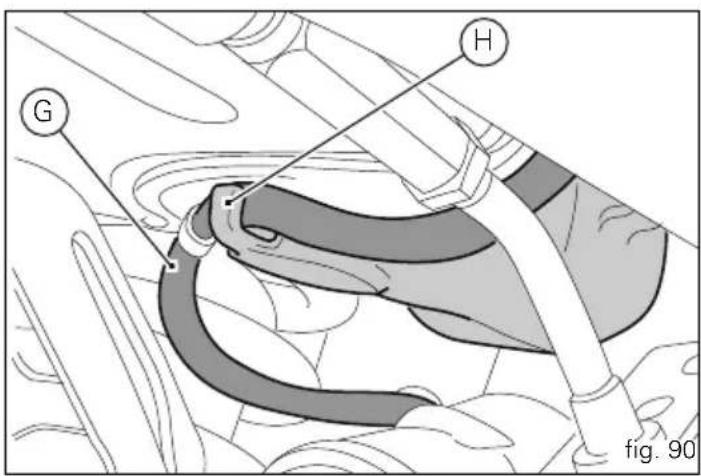
Connect the fuel hoses (E) on the clips (F).
Secure the tank to the frame with the screw (12) and the washer (13).
Tighten the screw (12) to a torque of 10 Nm ±10%.
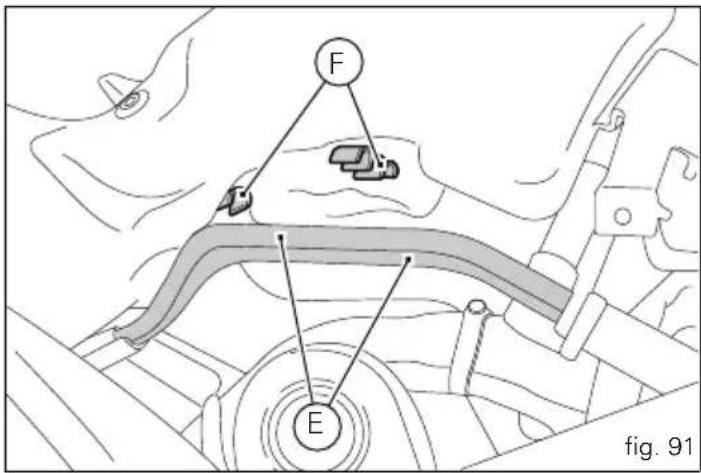

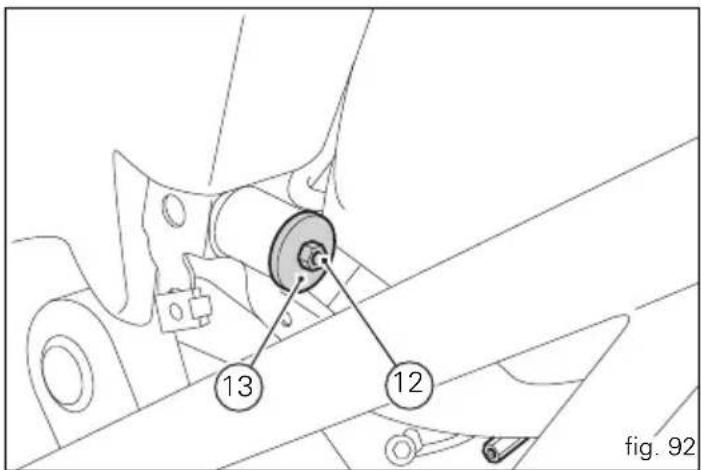

Secure the tank to the subframe with the screw (14) and the washer (15).
Tighten the screw (14) to a torque of 10 Nm ±10%, using a 5 mm Allen wrench to counterhold the threaded insert (M) located on the upper part of the tank.

Important
The threaded insert (M) is not present in the USA
version.
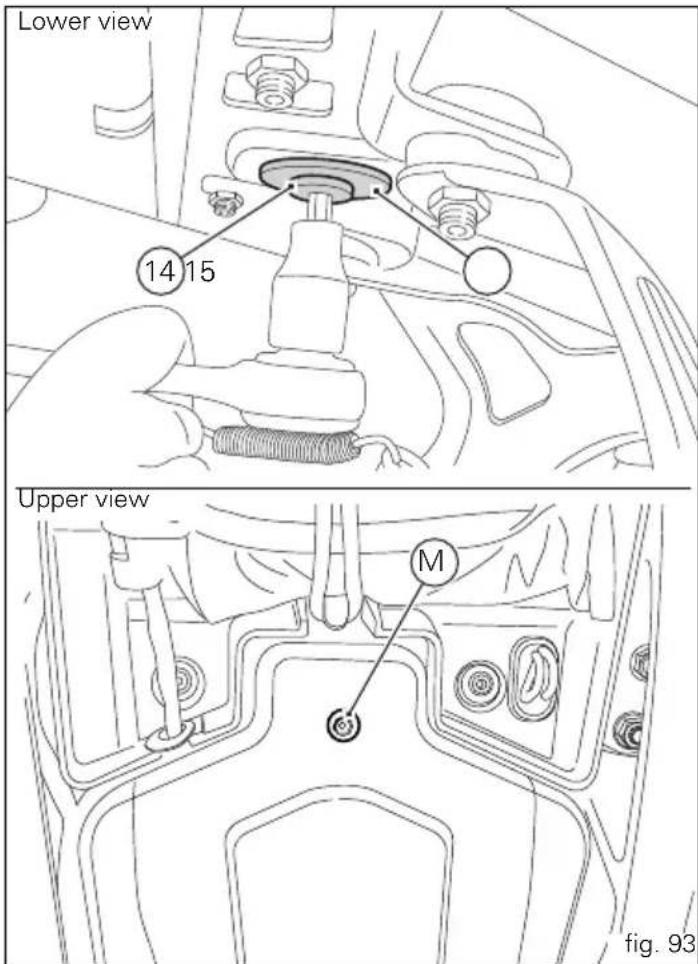
Locate the breather/drain hose (10) on the motorcycle and secure it in position by refitting the cover (8). Fit the two screws (9), remembering to fit the longest screw in the lower hole, and tighten to a torque of 10 Nm.
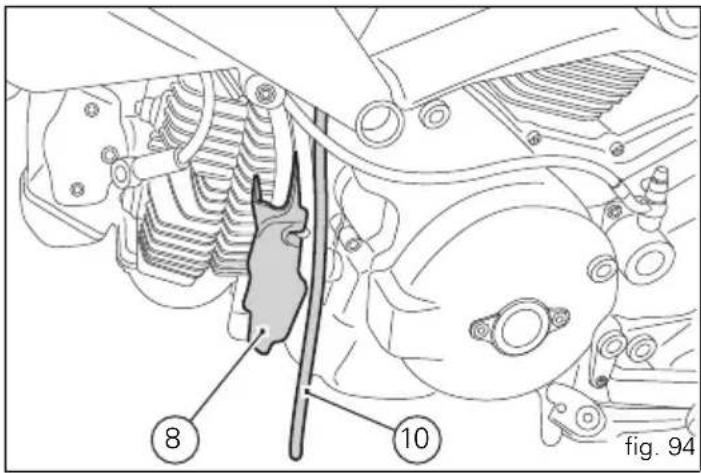

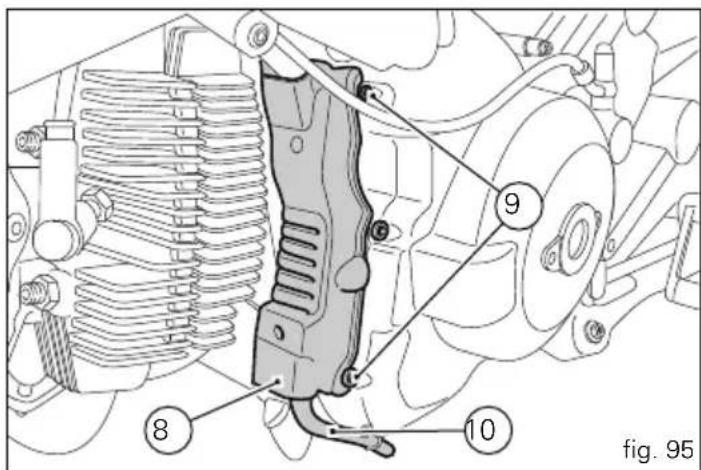

Check that the four bushes (C) are installed on the front tank cover (3) with the larger diameter side facing upwards and the six spacers (D).
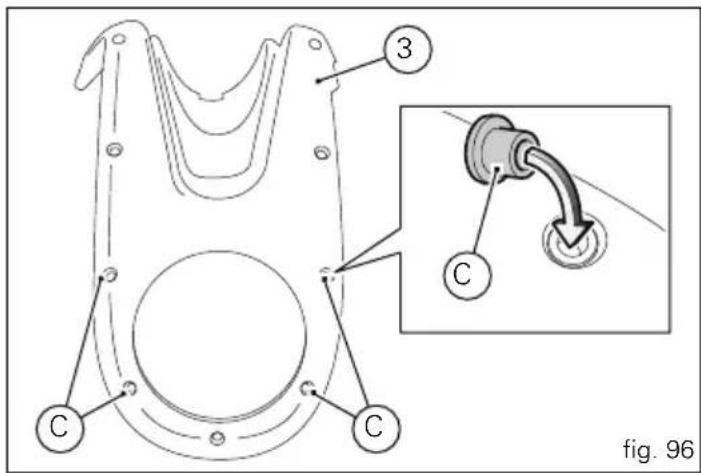
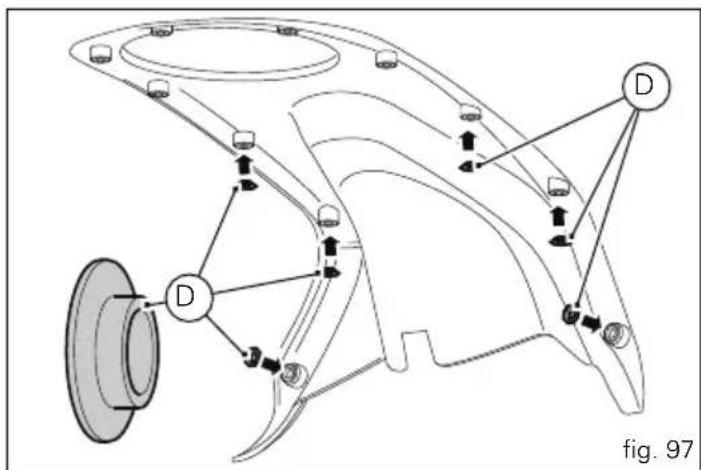
Locate the front tank cover (3) on the fuel tank. Insert the spacer (23) in the holes in the right tank cover (6).
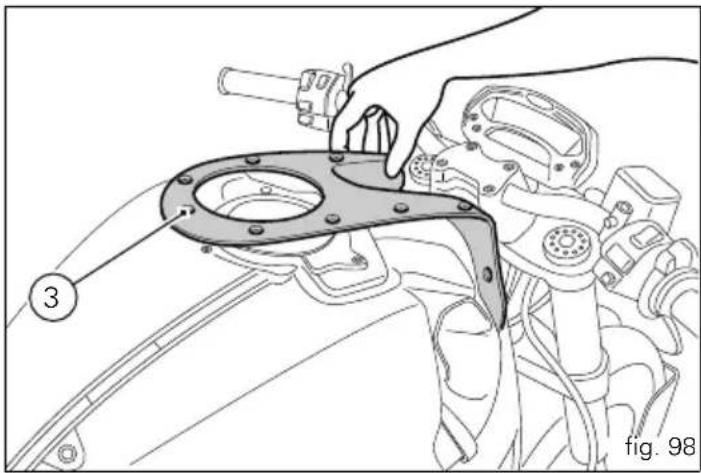
natural_image
Technical line drawing of a mechanical assembly with a hand operating a tool, no visible text or symbols
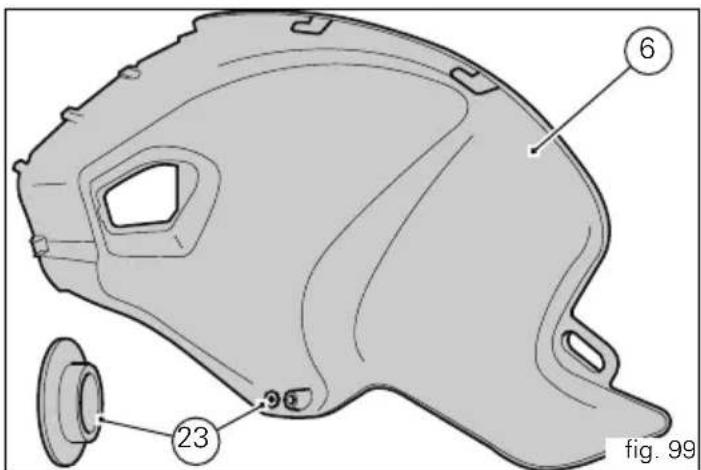

Refit the right-hand tank cover (6), inserting the tabs (A) in the corresponding slots (B) in the rear cover.

Note
Insert the lugs (M) under the front tank cover (3).
Repeat the above operations to refit the left-hand tank cover. Insert the screws (1) and (2) in the front tank cover (3), starting with the front screws (1).
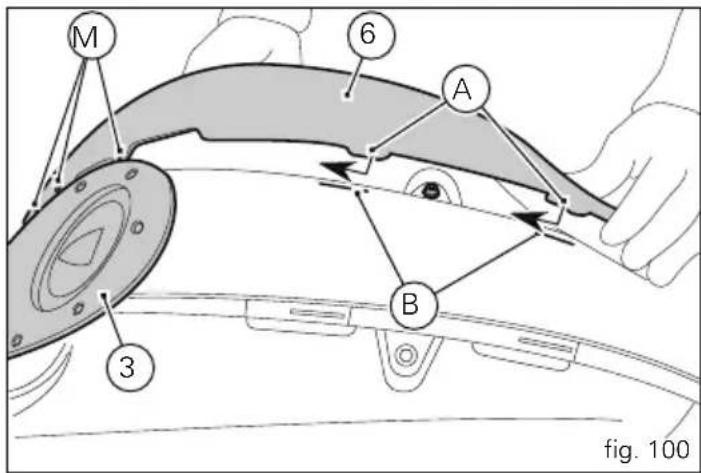
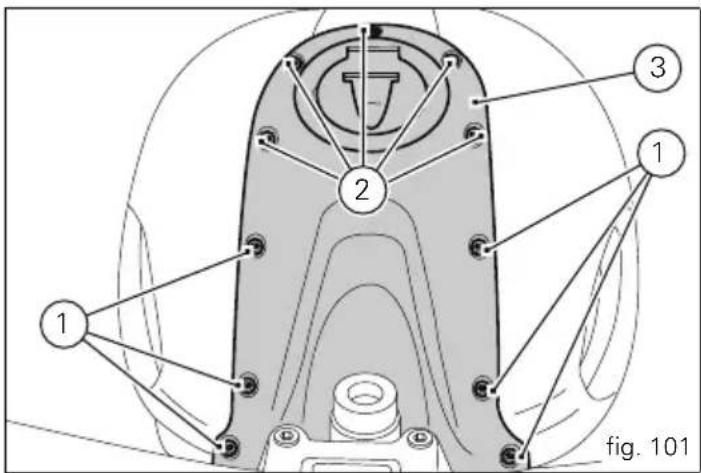
Insert the right (6) and left tank retaining screws (4), with nylon washers (7), and (5).
Tighten the screws (1) and (2) to a torque of 2 Nm ±10%, starting from the screws (2) around the cap.
Tighten the screws (4) and (5) to a torque of 2 Nm ±10%. Refit the seat (page 61).
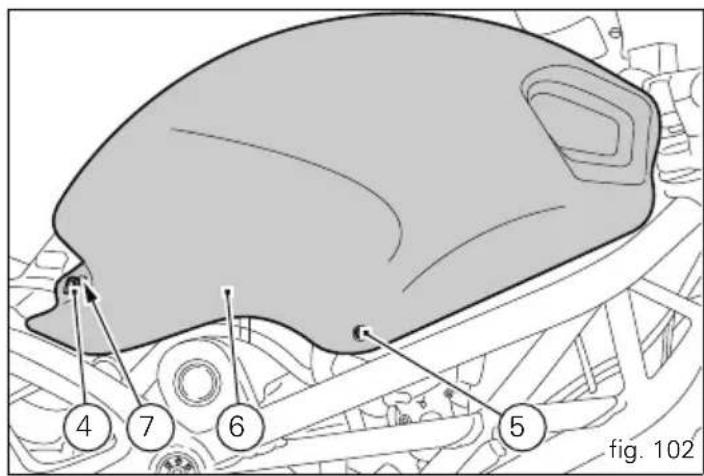

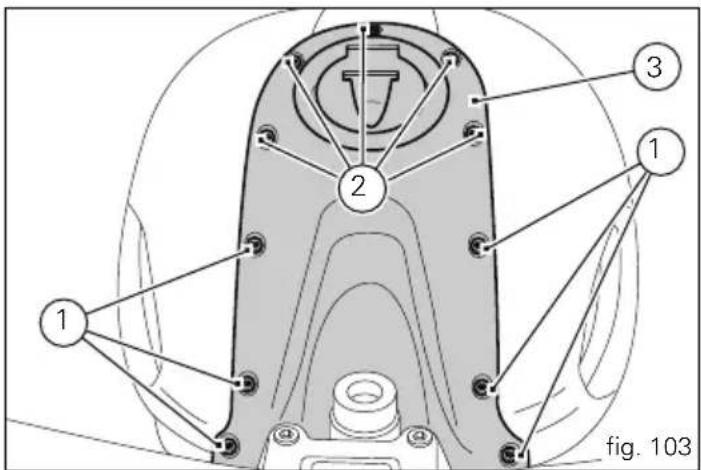

Tensioning the drive chain
Turn the rear wheel slowly to find the position at which the chain is at its most taut. With the motorcycle on its sidestand, press with a finger in the centre of the bottom run of the chain and measure the distance between the centres of chain link pins and the aluminium swingarm. The distance should be within 46 to 48 mm. To adjust the tension loosen the wheel shaft nut (1), tighten the screw (2) to the same torque in the opposite direction on both sides of the swingarm in order to increase the tension or loosen to reduce it. In the latter case, you will need to push the wheel forward.

Important
Have chain tension adjusted by a Ducati Dealer or rised Service Centre.

Important
An incorrectly tensioned chain will lead to accelerated of the transmission components.
Check the positioning marks on both sides of the swingarm, to guarantee the perfect wheel alignment. Grease the wheel shaft nut (1) thread with SHELL Retinax HDX2 and tighten to a torque of 145 Nm. Grease the adjusting screws (2) thread with SHELL Alvania R3 and tighten them to a torque of 10 Nm.

Warning
Correct tightening of swinging arm screws (1) is critical or and passenger safety.
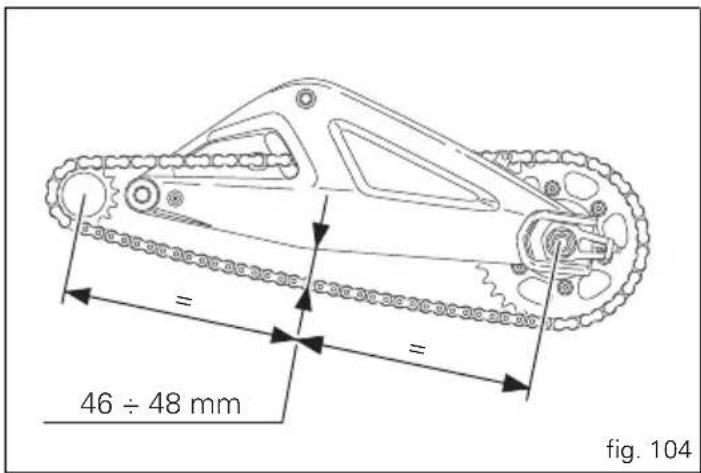
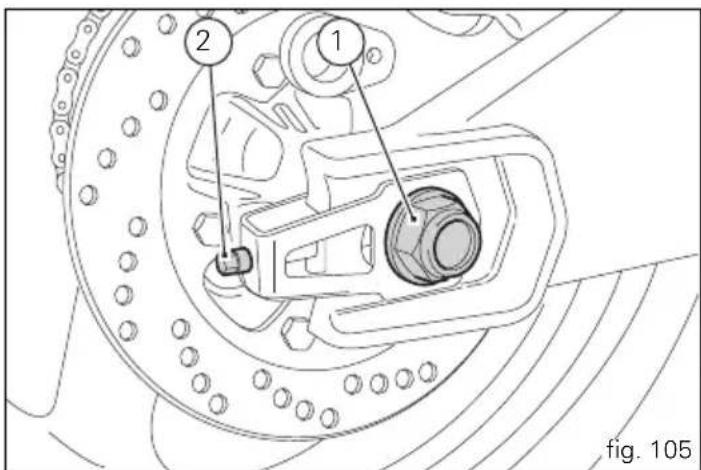
Chain lubrication
The chain fitted on your motorcycle has O-rings to protect its moving parts from dirt, and to hold the lubricant inside.
So as not to damage these seals when cleaning the chain, use special solvents and avoid aggressive washing with high-pressure steam cleaners. After cleaning, blow the chain dry with compressed air or wipe with an absorbent material, then lubricate each link with SHELL Advance Chain or Advance Teflon Chain.

Important
Using non-specific lubricants may cause severe
damage to the chain and the front and rear sprocket.


Changing bulbs
Before replacing a burnt-out bulb, make sure that the new one matches the voltage and wattage specifications in the "Electric System" paragraph on page 120.

Important
Have the bulbs changed at a Ducati Dealer or
authorised Service Centre.
Turn signals (fig. 106)
Loosen the screw (1) and detach the lens (2) from the turn signal support.
The bulb is of the banjo-type: press and rotate anticlockwise to remove; Fit the spare bulb by pressing and turning clockwise until it clicks. Refit the cup by inserting the tab into the corresponding slot in the turn signal support.
Refit and tighten the screw (1).
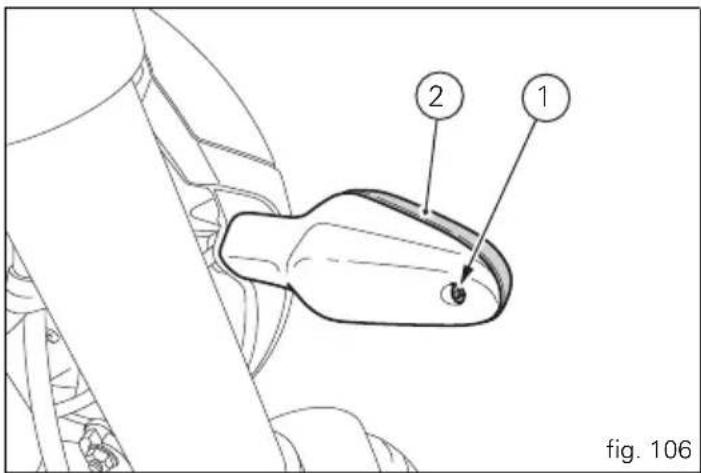
Headlight aim
To check the headlight aim, place the motorcycle upright with the tyres inflated to the correct pressure and one person sitting astride the motorcycle. The motorcycle should be perfectly vertical, with its longitudinal axis at right angles to a wall or screen at a distance of 10 metres. Draw a horizontal line at the height of the centre of the headlamp and a vertical one at the longitudinal axis of the motorcycle.
If possible, perform this check in dim light.
Switch on the low beam.
The height of the upper limit between the dark area and the lit area must not be more than nine tenths of the height of the centre of the headlamp from the ground.

Note
This is the procedure specified by Italian regulations for ing the maximum height of the light beam.
Owners in other countries will adapt said procedure to the provisions in force in their countries.
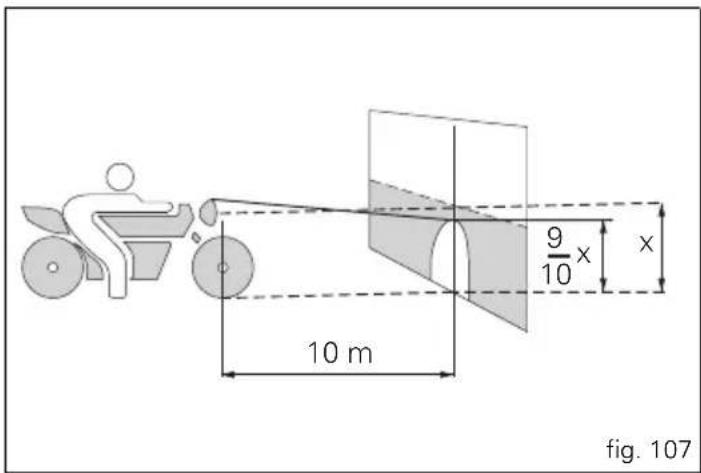

To adjust the headlight beam vertically, turn the screws (1), for horizontal adjustment, turn the screw (2).

Warning
The headlight might fog up if the vehicle is used under
the rain or after washing.
Switch headlight on for a short time to dry up any condensate.
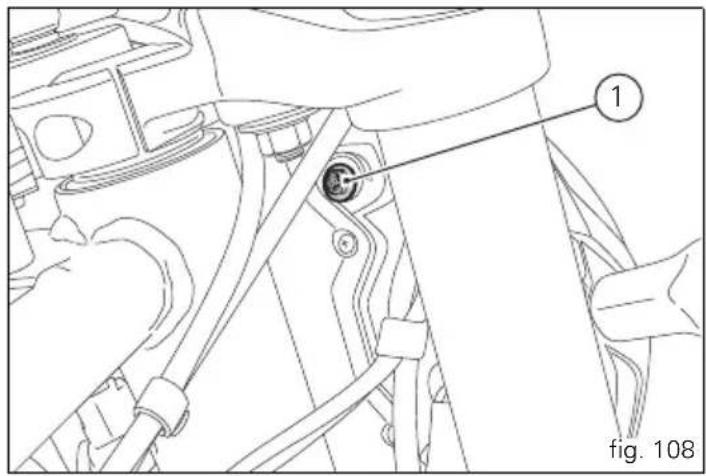
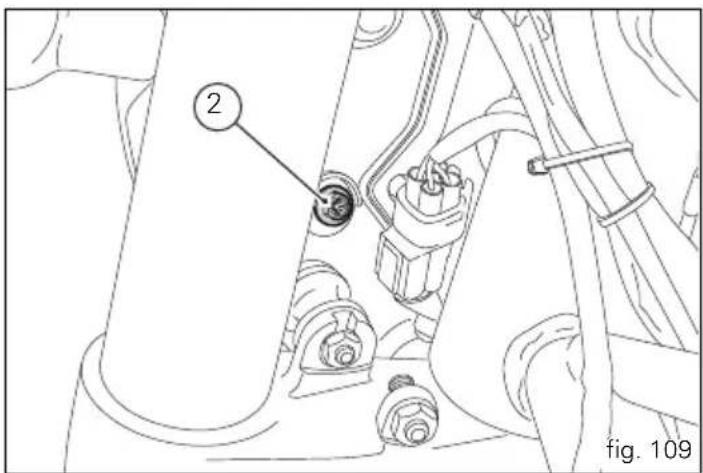
Tyres
Front tyre pressure:
2.25 bar - 2.29 Kg/sq. cm
Rear tyre pressure:
2.50 bar - 2.55 Kg/sq. cm
As tyre pressure is affected by changes in temperature and altitude; you are advised to check and adjust it whenever you are riding in areas where ample variations in temperature or altitude occur.

Important
Check and adjust the pressures with the tyres cold.
To avoid front wheel rim distortion, when riding on bumpy roads, increase front tyre pressure by 0.2 - 0.3 bar.
Repairing or renewing tyres
In the event of a tiny puncture, tubeless tyres will take a long time to deflate, as they tend to keep air inside. If you find low pressure on one tyre, check the tyre for punctures.

Warning
A tyre must be replaced when punctured.
Replace tyres with recommended standard tyres only. Be sure to tighten the valve caps securely to avoid leaks when riding. Never use tube type tyres. Failure to heed this warning may lead to sudden tyre bursting and to serious danger to rider and passenger.
After replacing a tyre, the wheel must be balanced.

Important
Do not remove or shift the wheel balancing weights.

Note
Have the tyres replaced at a Ducati Dealer or
authorised Service Center. Correct removal and installation of the wheels is essential.
as some parts of the ABS (such as sensors and phonic wheels) are mounted to the wheels and require specific adjustment.

Minimum tread depth
Measure tread depth (S) at the point where tread is most worn down;
It should not be less than 2 mm, and in any case not less than the legal limit.

Important
Visually inspect the tyres at regular intervals for detecting cracks and cuts, especially on the side walls, bulges or large spots that are indicative of internal damage. Replace them if badly damaged.
Remove any stones or other foreign bodies caught in the tread.
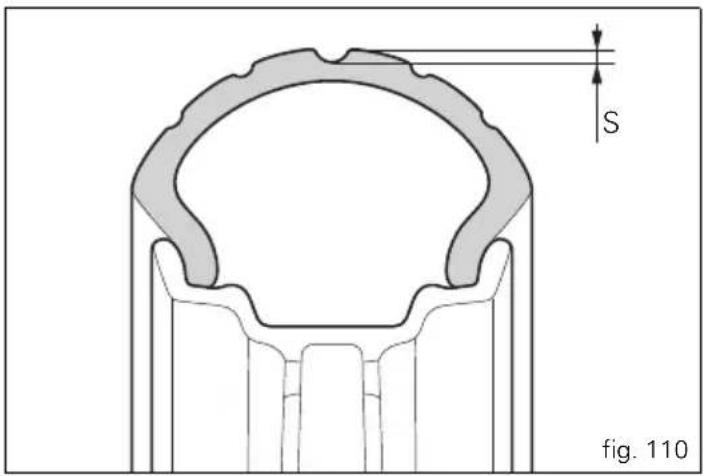
Checking the engine oil level
Check the engine oil level through the sight glass (1) on the clutch cover.
Check the oil level with the motorcycle upright and the engine cold. Allow a few minutes for the oil level to stabilize after stopping the engine.
Oil level should be between the marks near the sight glass. If the level is low, top up with SHELL Advance 4T Ultra engine oil.
Remove the oil filler cap (2) and top up until the oil reaches the required level. Refit the plug.

Important
Engine oil and oil filters must be changed by a Ducati
Dealer or Authorised Service Centre at the intervals specified in the scheduled maintenance table reported in the Warranty Card.
Viscosity
SAE 15W-50
The other viscosity degrees indicated in the table can be used if the local average temperature is within the limits of the specified range.
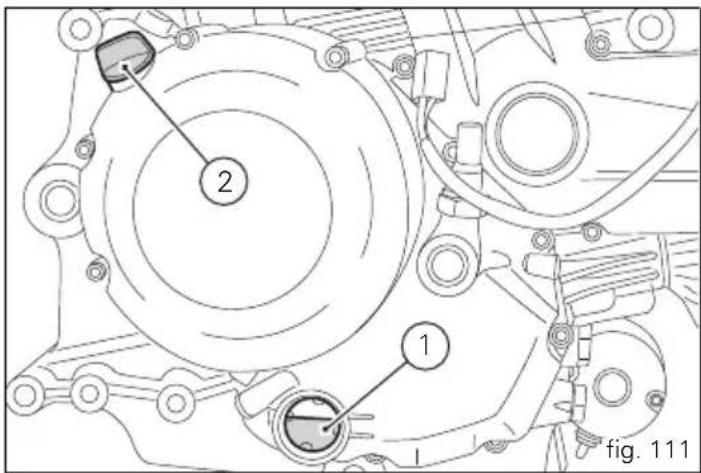

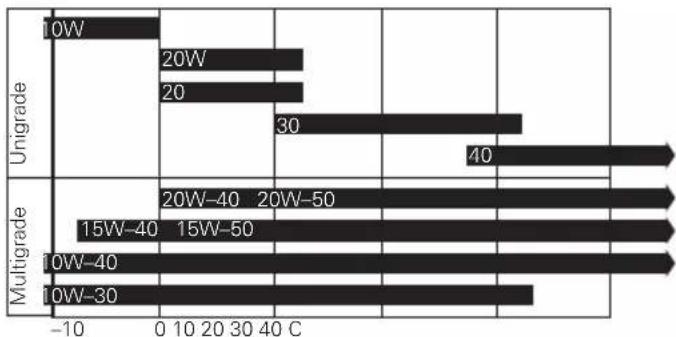
bar
| Category | Value | |---|---| | Unigrade | 10W | | Unigrade | 20W | | Unigrade | 20 | | Unigrade | 30 | | Multigrade | 40 | | Multigrade | 20W-40 20W-50 | | Multigrade | 15W-40 15W-50 | | Multigrade | 10W-40 | | Multigrade | 10W-30 |
Cleaning and replacing the spark plugs
Spark plugs are essential to smooth engine running and should be checked at regular intervals.
This is a relatively simple operation and provides a good indication of how well the engine is running.
Pull the spark plug caps off the spark plugs and remove the plugs from the cylinder heads using the wrench supplied in the toolkit.
Check the colour of the ceramic insulation around the central electrode: a uniform light brown colour indicates good engine condition.
If the insulation is any other colour, or if there are dark deposits, replace the spark plug and describe the condition of the old plug to a Ducati dealer or Authorized Ducati Service Centre.
Also check the central electrode; if it is worn or glazed, replace the spark plug.
Check the distance between the electrodes, which must be: 0.7 - 0.8 mm.

Important
If adjustment is required, bend the side electrode carefully. If gap is too wide or too close, engine performance will be affected. This could also cause difficult starting or irregular idling.
Thoroughly clean the electrode and insulation using a wire brush, and check the condition of the gasket.
Carefully clean the seat in the cylinder head and be careful not to let any foreign material fall into the combustion chamber.
Insert the spark plug in the cylinder head and screw in fully by hand. Tighten to a torque of 20 Nm.
If you do not have a torque wrench, after hand-tightening the spark plug, turn it an additional half turn with the wrench provided in the tool kit.

Important
Do not use spark plugs with an unsuitable heat rating
or incorrect reach.
The spark plug must be tightened correctly.
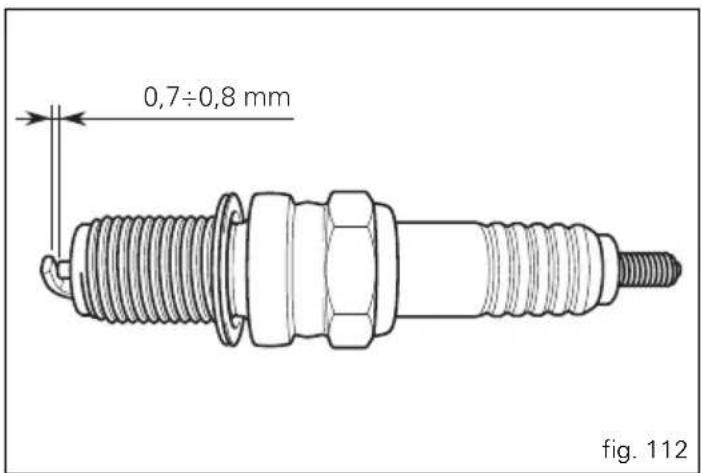
Cleaning the motorcycle
To preserve the finish of metal parts and paintwork, wash and clean your motorcycle at regular intervals, anyway according to the road conditions you ride in.
Use specific products only. Prefer biodegradable products. Avoid aggressive detergents or solvents.
Only use water and neutral soap to clean the Plexiglas and the seat.
Clean the aluminium components regularly and by hand. Use specific detergents for aluminium that do NOT contain abrasive substances or caustic soda.

Note
Do not use abrasive or steel wool sponges, use only a soft cloth.
The warranty does not apply to motorcycles where there is evidence of poor maintenance.

Important
Do not wash your motorcycle immediately after use, as marks can form due to evaporation of the water on hot surfaces.
Never clean the motorcycle using hot or high-pressure water jets.
Cleaning the motorcycle with a high pressure water jet may lead to seizure or serious faults in the front fork, wheel hub assembly, electric system, headlight (fogging), front fork seals, air inlets or exhaust silencers, with consequent loss of safety.
If parts of the engine are unusually dirty or greasy, use a degreasing agent, avoiding contact with transmission components (chain, front and rear sprockets, etc.).
Rinse with warm water and dry all surfaces with chamois leather.

Warning
Braking performance may be impaired immediately
after washing the motorcycle. Never grease or lubricate the brake discs as this would cause loss of braking effectiveness.
Clean the discs with an oil-free solvent.

Warning
The headlight might fog up due to washing, rain or
moisture.
Switch headlight on for a short time to dry up any condensate.
Carefully clean the phonic wheels of the ABS so to ensure system efficiency. Do not use aggressive products so to avoid damaging the phonic wheels and the sensors.

Storing the bike away
If the motorcycle is to be left unridden over long periods, it is advisable to carry out the following operations before storing it away:
clean the motorcycle;
empty the fuel tank by removing the drain plug and gasket; pour a few drops of engine oil into the cylinders through the spark plug bores, then turn the engine over by hand a few times to form a protective film of oil on the inner walls of the cylinder;
place the motorcycle on the service stand;
disconnect and remove the battery. If the motorcycle has been left unused for more than a month, the battery should be checked and re-charged if necessary.
Protect the motorcycle with a suitable canvas. This will protect paintwork and let condensate breathe out.
The canvas is available from Ducati Performance.
Important notes
The legislation in some countries (France, Germany, Great Britain, Switzerland, etc.) sets certain noise and pollution standards.
It is the Owner's responsibility to have any parts not in compliance with the standards in force in his/her country replaced with genuine Ducati spare parts and parts complying with local law.
Maintenance
E
Scheduled maintenance chart: operations to be performed by the dealer
| List of operations and type of intervention[set mileage (km/mi) or time interval *] | Km. x1000 | 1 | 12 24 | 36 48 | 60 | |||
| mi. x1000 | 0.6 | 7.5 | 15 22.5 | 30 37 | 5 | |||
| Months | 6 | 12 24 | 36 48 | 60 | ||||
| Change engine oil | ● | ● | ● | ● | ● | ● | ||
| Change engine oil filter | ● | ● | ● | ● | ● | ● | ||
| Clean engine oil filter at intake | ● | |||||||
| Check engine oil pressure | ● | ● | ||||||
| Check/adjust the valve clearances (1) | ● | ● | ● | ● | ● | |||
| Check the tension of the timing belts (1) | ● | ● | ● | |||||
| Change timing belts | ● | ● | ||||||
| Check and clean spark plugs. Change, if necessary | ● | ● | ||||||
| Check and clean the air filter (1) | ● | ● | ● | |||||

| List of operations and type of intervention [set mileage (km/mi) or time interval *] | Km. x1000 | 1 12 24 | 36 48 | 60 | |||
| mi. x1000 | 0.6 7.5 | 15 22.5 | 30 37 | 5 | |||
| Months | 6 12 24 | 36 48 | 60 | ||||
| Changing air filter | ● | ● | |||||
| Check throttle body synchronisation and idle speed setting (1) | ● | ● | ● | ● | ● | ||
| Check brake and clutch fluid level | ● | ● | ● | ● | ● | ● | |
| Change brake and clutch fluid | ● | ||||||
| Check and adjust brake and clutch controls | ● | ● | ● | ● | ● | ||
| Check / lubricate throttle / cold start controls | ● | ● | ● | ● | ● | ||
| Check tyre pressure and wear | ● | ● | ● | ● | ● | ● | |
| Check brake pads. Change, if necessary | ● | ● | ● | ● | ● | ● | |
| Check steering bearings | ● | ● | |||||
| Check chain tension, alignment and lubrication | ● | ● | ● | ● | ● | ● | |
| Check clutch plates pack. Renew if necessary (1) | ● | ● | ● | ● | ● | ||
| Check rear wheel flexible coupling | ● | ● | |||||
| Check wheel hub bearings | ● | ● | |||||
| Check the indicators and lighting | ● | ● | ● | ● | ● | ||
| Check tightening of nuts securing engine-to-frame screws | ● | ● | ● | ● | ● | ||
| Check the side stand | ● | ● | ● | ● | ● | ||
| Check front wheel nut tightening | ● | ● | ● | ● | ● | ||
| Check rear wheel nut tightening | ● | ● | ● | ● | ● | ||
| Check external fuel lines | ● | ● | ● | ● | ● | ||
| List of operations and type of intervention [set mileage (km/mi) or time interval *] | Km. x1000 | 1 | 12 24 | 36 48 | 60 | |||
| mi. x1000 | 0.6 | 7.5 | 15 22.5 | 30 37 | 5 | |||
| Months | 6 | 12 24 | 36 48 | 60 | ||||
| Change front fork fluid | ● | |||||||
| Check front fork and rear shock absorber for leakage | ● | ● | ● | ● | ● | |||
| Check front sprocket fasteners | ● | ● | ● | ● | ● | |||
| Lubricate and grease | ● | ● | ● | ● | ● | |||
| Check battery and recharge | ● | ● | ● | ● | ● | |||
| Road test of the motorcycle | ● | ● | ● | ● | ● | ● | ||
| Cleaning the motorcycle | ● | ● | ● | ● | ● | |||
* Service operation to be carried out in accordance with the specified distance or time intervals (km or months), whichever occurs first.
(1) Operation to be performed only if set distance interval is reached

Scheduled maintenance chart: operations to be performed by the customer
| List of operations and type of intervention [set mileage (km/mi) or time interval *] | Km. x1000 1 |
| mi. x1000 0.6 | |
| Months 6 | |
| Check engine oil level | ● |
| Check brake and clutch fluid level | ● |
| Check tyre pressure and wear | ● |
| Check the drive chain tension and lubrication | ● |
| Check brake pads. If necessary, have replacement performed by a dealer | ● |
* Service operation to be carried out in accordance with the specified distance or time intervals (km or months), whichever occurs first.
Technical data
Overall dimensions (mm)
Weights
In running order without fluids and battery: 163 Kg (659 ABS)
Dry weight in running order without fuel: 176 Kg (659 ABS)
In running order without fluids and battery: 161 Kg (659)
Dry weight in running order without fuel: 174 Kg (659)
Fully laden: 390 Kg
Warning Failure to ob
Failure to observe weight limits could result in poor handling and impair the performance of your motorcycle, and you may lose control of the motorcycle.
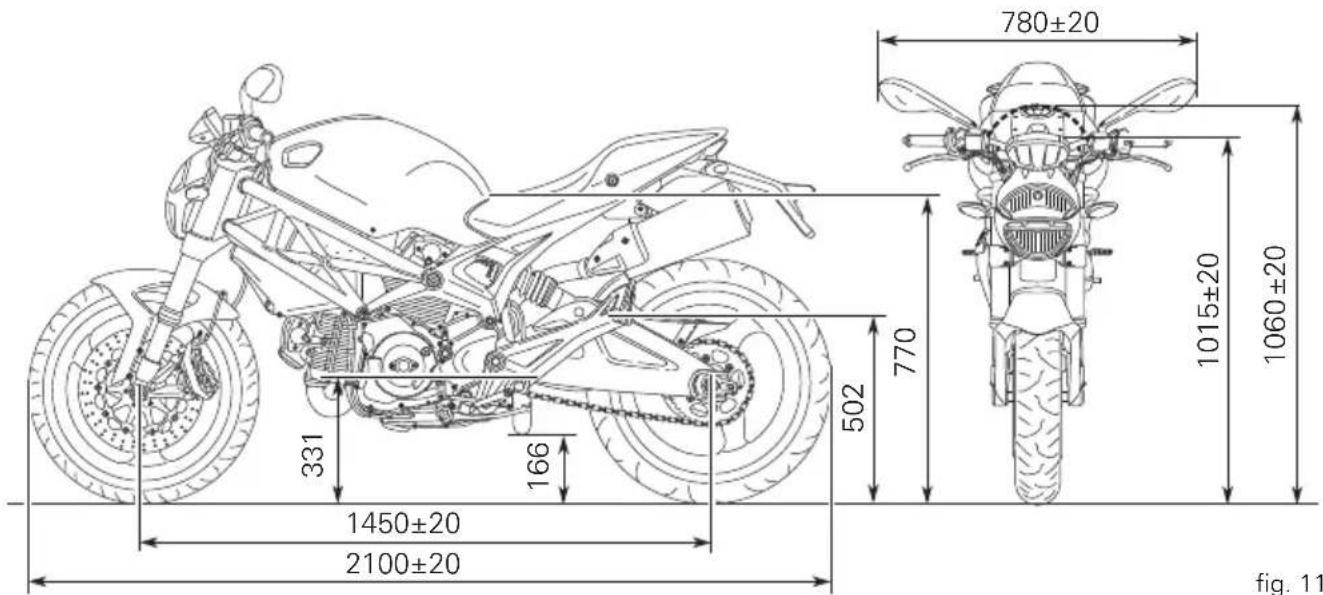
fig. 113
| FUEL, LUBRICANTS AND OTHER FLUIDS TYPE CU DM (LITRES) | |
| Fuel tank, including a reserve of 3.5 dm ^3 (litres) Unleaded fuel with 95 fuel octane rating (at least) 13.5 | |
| Sump and filter SHELL - Advance 4T Ultra 3.4 | |
| Front/rear brake and clutch circuits SHELL Advance Brake DOT 4 — | |
| Protectant for electric contacts SHELL Advance Contact Cleaner — | |
| Front fork (Marzocchi) SHELL Advance Fork 7.5 or Donax TA 500cm | ^3 (for left leg) 470 cm^3 (for right leg) |
| Front fork (Kayaba) SHELL Advance Fork 7.5 or Donax TA 349 cm | ^3 (for left leg) 474 cm^3 (for right leg) |

Important
Do not use any additives in fuel or lubricants.
Engine
Longitudinal 90° "L" twin cylinder, four-stroke.
Bore (mm):
88
Stroke (mm):
54.2
Total displacement cm ^3 :
656
Compression ratio:
10.2 ±0.5:1
Max power at crankshaft (95/1/EC):
38 kW/- 52 HP at 8,500 rpm
Max torque at crankshaft (95/1/EC):
7.8 kgm - 46.5 Nm at 7,500 rpm.
Maximum rpm:
9,500 rpm.
Timing system
DESMODROMIC (type) with two valves per cylinder, operated by four rocker arms (2 opening rocker arms and 2 closing rocker arms) and one overhead camshaft. It is operated by the crankshaft through spur gears, belt rollers and toothed belts.
Desmodromic timing system
1) Opening (or upper) rocker.
2) Opening rocker shim.
3) Split rings.
4) Closing (or lower) rocker shim.
5) Return spring for lower rocker.
6) Closing (or lower) rocker.
7) Camshaft.
8) Valve.
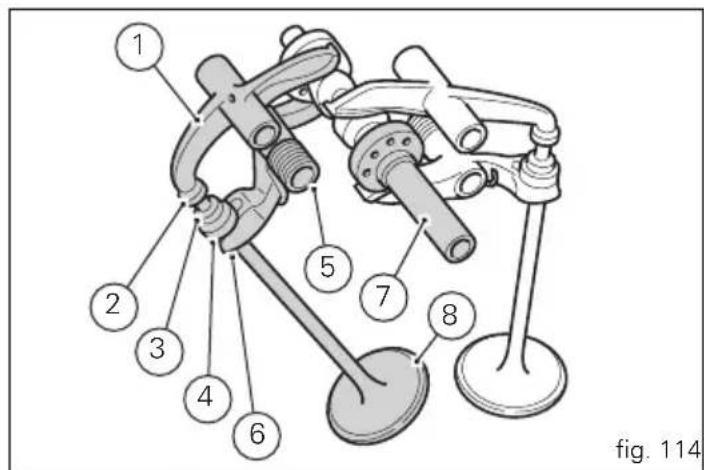


Performance data
Maximum speed in any gear should be reached only after a correct running-in period with the motorcycle properly serviced at the recommended intervals.

Important
Failure to follow these instructions will release Ducati
Motor Holding S.p.A. from any liability for any engine damage or shortened engine life.
Spark plugs
Make:
NGK
Type:
DCPR8E.
Alternative:
Make:
CHAMPION
Type:
RA 4 HC
Fuel system
SIEMENS indirect electronic injection.
Throttle body diameter:
45 mm
Injectors per cylinder: 1
Firing points per injector: 8
Fuel specifications: 95-98 RON.
Brakes
Separate-action anti-lock brake system operated by hall-type sensors mounted to each wheel with phonic wheel detection: ABS can be disabled.
Front
Type:
with drilled steel disc.
2 discs.
Disc diameter:
320 mm.
Hydraulically operated by a control lever on right handlebar.
Differential bore brake callipers.
Make and type:
BREMBO P4.32 K 4 pistons.
Friction material:
FERIT I/D 450 FF
Master cylinder type:
PS 16/22.
Rear
Type:
with fixed drilled steel disc.
Disc diameter:
245 mm.
Hydraulically operated by a pedal on RH side.
Brake caliper:
34 mm ∅ piston.
Make and type:
P 34 C
Friction material:
SBS S40 GF+sheet.
Master cylinder type:
PS 11.

Brake fluid can dissolve paintwork In the event of accidental contact with eyes or skin, wash the affected area with abundant running water.

Transmission
Clutch:
wet multiplate;
controlled by means of a lever on the LH side of the handlebar.
Drive is transmitted from engine to gearbox main shaft via spur gears.
Front chain sprocket/clutch gearwheel ratio: 33/61
Gearbox:
6-speed;
with constant mesh gears, gearchange pedal on left.
Gearbox output sprocket/rear chain sprocket ratio: 15/45
Total gear ratios:
1 ^st gear 13/32
2^nd gear 18/30
3^rd gear 21/28
4^th gear 23/26
5^th gear 22/22
6^th gear 26/24
Drive chain from gearbox to rear wheel:
Make:
DID
Type:
520 V6
Dimensions:
5/8" × 1/4"
No. of links:
108 open

Important
The above gear ratios are the homologated ones and under no circumstances must they be modified.
However, if you wish to tune up your motorcycle for competitions or special tracks, Ducati Motor Holding S.p.A. will be pleased to provide information about the special ratios available. Please contact a Ducati Dealer or Authorised Service Centre.

Warning
If the rear sprocket needs replacing, contact a Ducati Dealer or authorised Service Centre.
Incorrect replacement of this component could seriously endanger rider and passenger safety and cause irreparable damage to the motorcycle.
Frame
Chromium-molybdenum tubular trellis frame, cast aluminium rear subframe
Steering angle (on each side):
32^
Steering head angle:
24°
Trail mm:
87
Wheels
Three-spoke, light-alloy rims.
Front
Make:
BREMBO
Dimensions:
MT3.50×17".
Rear
Make:
BREMBO
Dimensions:
MT4.50x17"
Both wheels have removable axles.
Tyres
Front
Radial tubeless tyre.
Size:
120/60-ZR17"
Rear
Radial tubeless tyre.
Size:
160/60-ZR17"
Suspensions
Front
Hydraulic upside-down fork.
Leg diameter: 43 mm.
Travel along fork leg axis: 120 mm
Rear
Progressive monoshock with adjustable rebound, compression and spring preload:
Shock absorber stroke: 59.5 mm.
Rear wheel travel: 148 mm.

Note
Do not carry out any operations on the motorcycle that could modify the technical characteristics for which approval was obtained.

Exhaust system
Equipped with catalytic converter.
Available colours
Ducati Anniversary red 473.101 (PPG);
Clear coat 228.880 (PPG);
Red frame and black rims.
Black Stealth;
Matt black frame with black rims
Pearl White code 490.019 (PPG);
Clear coat 228.880 (PPG);
Matt black frame with black rims
Electric system
Basic electric items are:
HEADLIGHT:
low beam: H7 (12 V-55 W).
high beam: H7 (12 V-55 W).
parking light: H6 (12 V-6 W).
Electrical controls on handlebars:
Turn indicators:
bulb type: RY10W (12 V-10 W).
Horn.
Stop light switches.
Battery, 12 V-10 Ah.
ALTERNATOR, 12 V-480 W.
ELECTRONIC VOLTAGE REGULATOR, protected with a
30 A fuse located to the side of the control unit (10, fig. 117).
Starter motor, 12 V-0.7 kW
Tail light and brake signal:
LED 13.5V 3.2W/0.1W.
Number plate light:
bulb type: C5W (12 V-5 W).

Note
To replace the bulbs, refer to the paragraph "Changing
bulbs" on page 100.
Fuses
The electric system components are protected by eight fuses located in the fusebox. Only six fuses are connected to the system, two are spares.
Refer to the table below to identify the circuits protected by the various fuses and their ratings.
KEY TO THE FUSEBOX
| Pos. El. item Rat. | |||||
| 1 Key ON 10 A | |||||
| 2 Side lights, high/low beam 15 A | |||||
| 3 El. item 15 A | |||||
| 4 Instrument panel 5 A | |||||
| 5 Injection 20 A | |||||
| 6 | E | C | U | 5 | A |
| 7 Spare 20 A | |||||
| 8 Spare 15 A | |||||
The main fuse box (9) is located on the right side of the frame.
Remove the protective cover (A) to access the fuses. In addition to the fuse box, the two ABS fuses (11) are located near the regulator fuse.
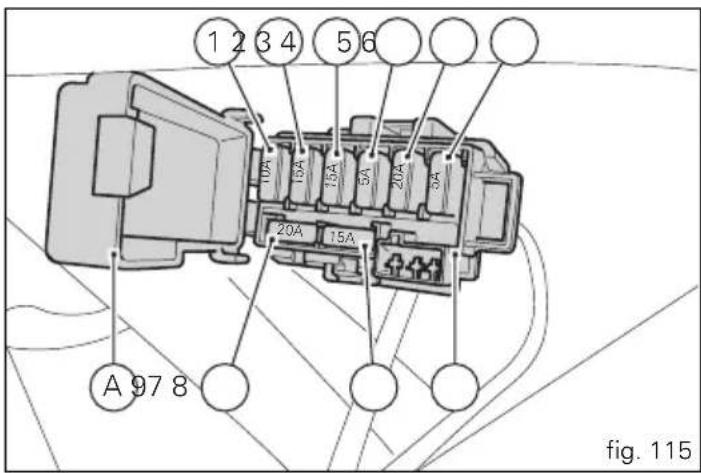
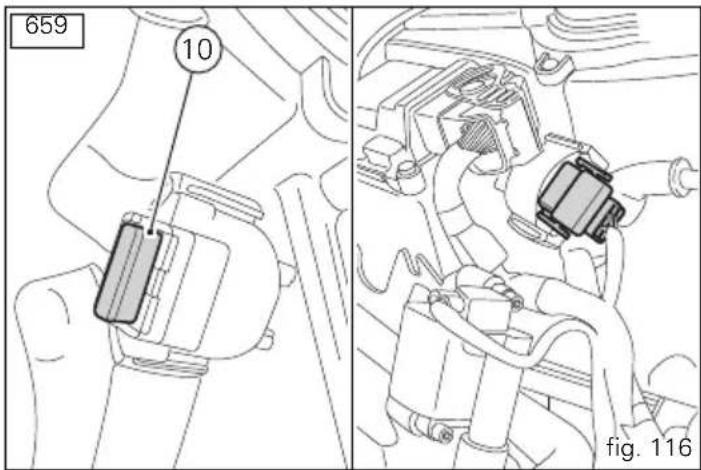

A blown fuse is identified by a broken filament (12).

Important
Switch the ignition key to OFF before replacing the
fuse to avoid possible short-circuits.

Warning
Never use a fuse with a rating other than specified.
Failure to observe this rule may damage the electric system or even cause fire.
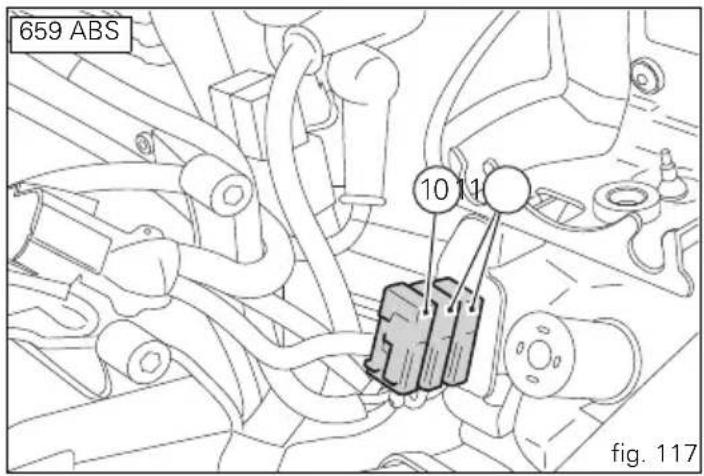
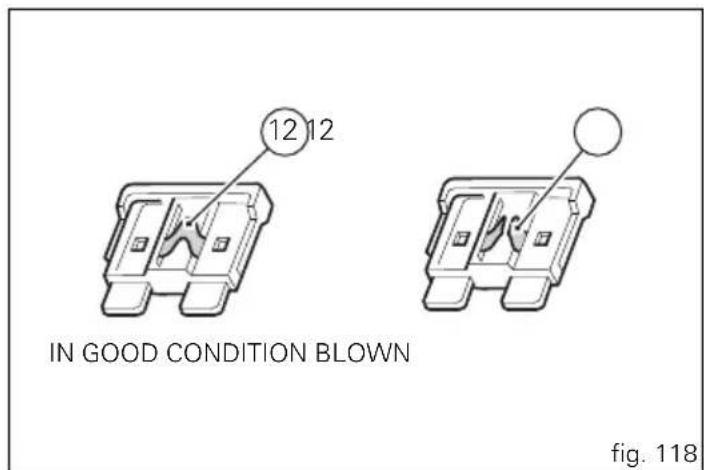
Injection /electric system diagram key 659
1) Right-hand switch
2) Ignition switch
3) Horizontal cylinder spark plug
4) Vertical cylinder spark plug
5) Starter motor
6) Solenoid starter
7) Battery
8) Main fuse
9) Regulator
10) Generator
11) RH rear turn indicator
12) Rear tail light
13) Number plate light
14) LH rear turn indicator
15) Fuel tank
16) Horizontal cylinder exhaust lambda sensor
17) Injection relay
18) Self-diagnosis/DDA
19) Horizontal cylinder coil
20) Vertical cylinder coil
21) Headlight
22) MAP sensor
23) Horizontal cylinder injector
24) Vertical cylinder injector
25) Throttle position sensor
26) Timing/rpm sensor
27) Cylinder sensor
28) Speed sensor
29) Side stand
30) Horn
31) Neutral switch
32) Oil pressure switch
Injection /electric system diagram key 659 ABS
1) Right-hand switch
2) Ignition switch
3) Horizontal cylinder spark plug
4) Vertical cylinder spark plug
5) Starter motor
6) Solenoid starter
7) Battery
8) Main fuse
9) Regulator
10) Generator
11) RH rear turn indicator
12) Rear tail light
13) Number plate light
14) LH rear turn indicator
15) Fuel tank
16) Horizontal cylinder exhaust lambda sensor
17) Injection relay
18) Self-diagnosis/DDA
19) Horizontal cylinder coil
20) Vertical cylinder coil
21) Headlight
22) MAP sensor
23) Horizontal cylinder injector
24) Vertical cylinder injector
25) Throttle position sensor
26) Timing/rpm sensor
27) Cylinder sensor
The system wiring diagram is at the end of this manual.

Routine maintenance record
| KM DUCATI SERVICE MILEAGE DATE |
| 1000 |
| 12000 |
| 24000 |
| 36000 |
| 48000 |
| 60000 |
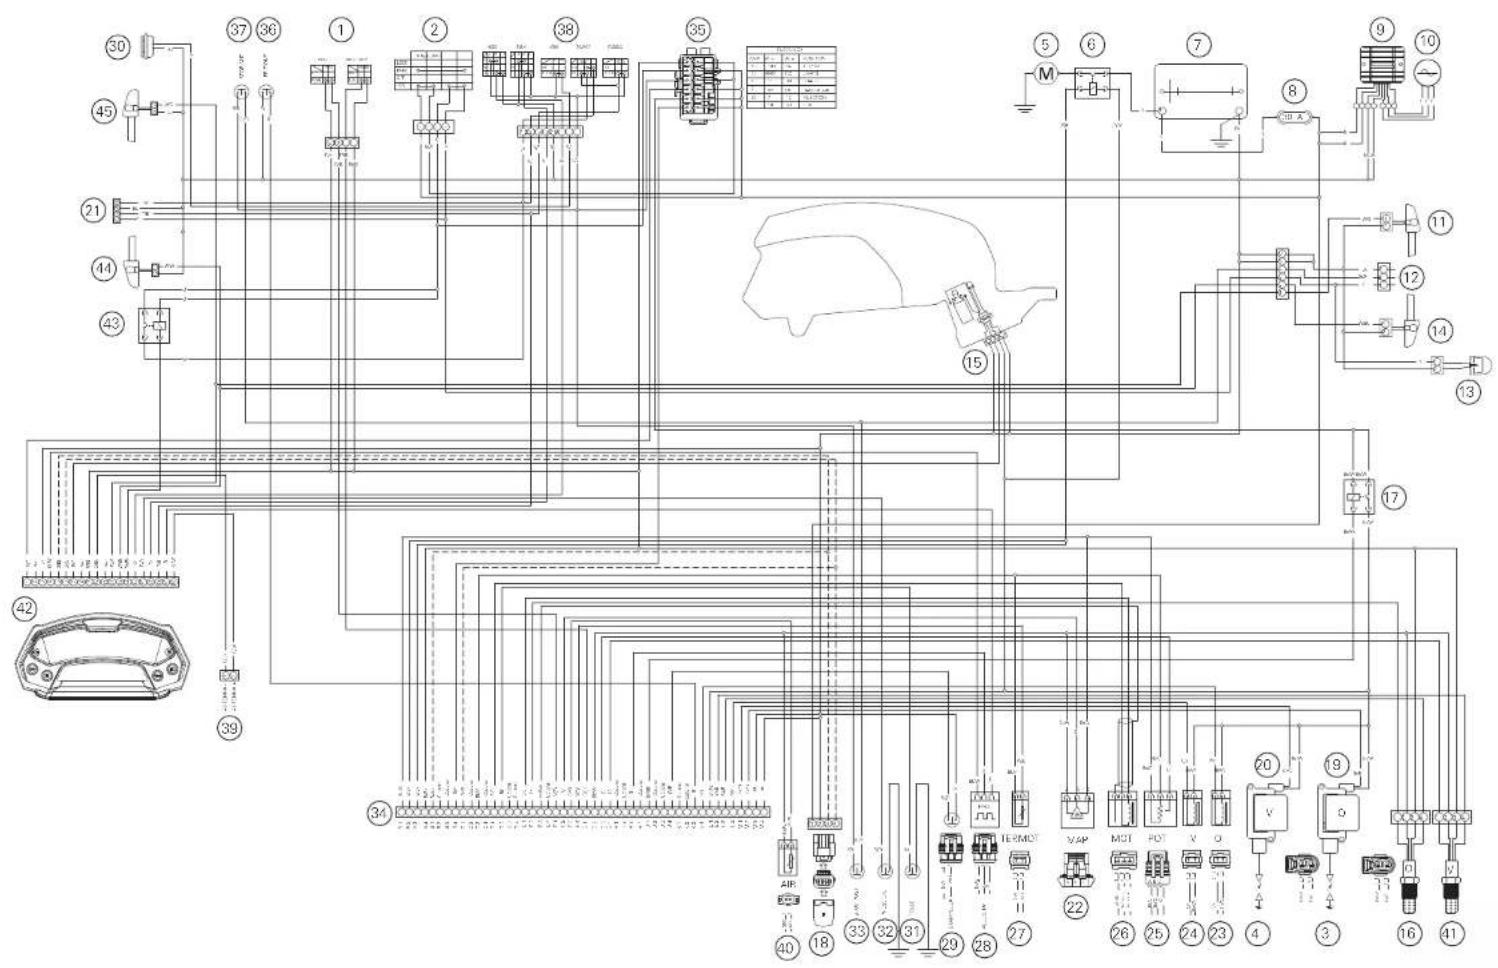
Monster 659
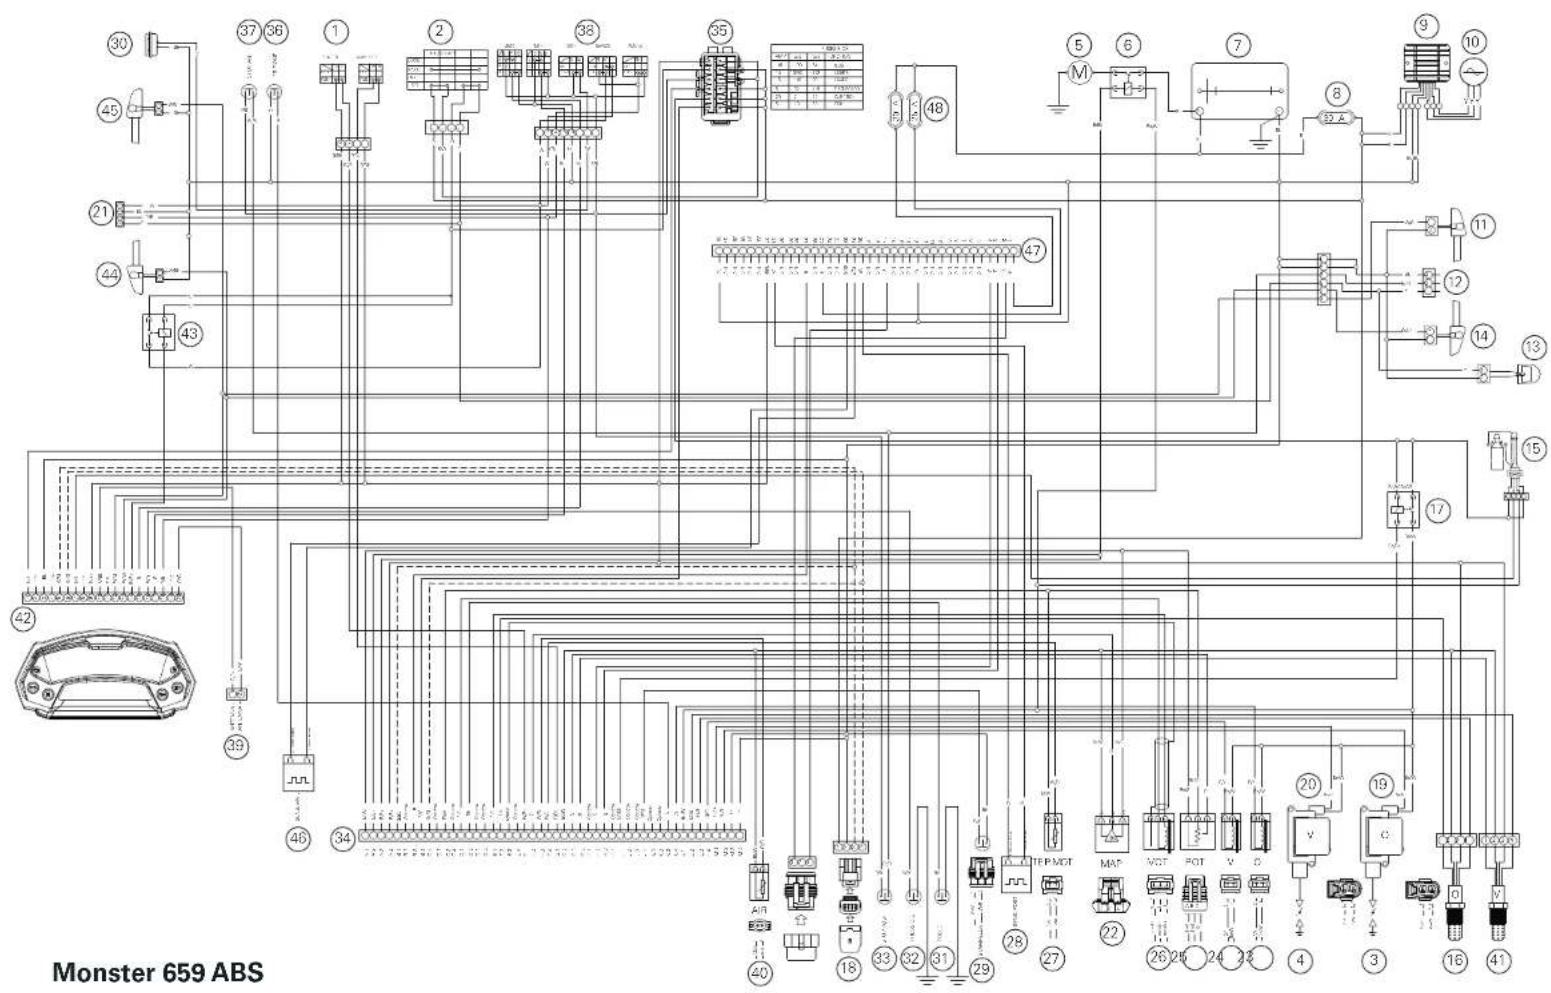
Ducati Motor Holding spa
www.ducati.com
Via Cavalieri Ducati, 3
40132 Bologna, Italia
Tel.+39 051 6413111
Fax +39 051 406580
cod 913.1.172.1A
- Note
- Warning
- Table of contents
- General indications 7
- Instrument panel (Dashboard) 11
- Controls 50
- Main components and devices 59
- Riding the motorcycle 65
- Main maintenance operations 75
- Maintenance 109
- Technical data 113
- General indications
- Warranty
- Symbols
- Important
- Useful information for safe riding
- Carrying the maximum load allowed
- Information about carrying capacity
- Identification data
- Instrument panel (Dashboard)
- Instrument panel
- LCD unit functions
- LCD - How to set/display parameters
- Total distance covered indicator: "Odometer"
- Vehicle "speed" indicator
- "TRIP" meter
- Distance travelled on fuel reserve: "TRIP FUEL"
- Clock display indicator
- Air temperature indicator
- Oil temperature indicator
- Display indications:
- Service indicator
- Battery voltage indicator (BATT)
- Engine idle RPM setting (RPM)
- Backlighting adjustment
- LAP timer
- Stored data display (LAP Memory)
- DDA data acquisition
- Erase DDA
- Clock setting function
- Instrument panel diagnostics
- Headlight "smart" auto-off
- Intelligent headlight switch-on
- The Immobilizer system
- Keys (fig. 32)
- E
- Code Card
- Immobilizer override procedure
- Operation
- Duplicate keys
- Controls
- Position of motorcycle controls (fig. 36)
- Ignition switch and steering lock
- Left-hand switch
- Clutch lever
- Cold start control lever.
- Right-hand switch
- Throttle twistgrip (fig. 43)
- Front brake lever (fig. 43 and fig. 44)
- Rear brake pedal (fig. 45)
- Gear change pedal (fig. 46)
- Adjusting the position of the gearchange and rear brake pedals
- Main components and devices
- Position on the vehicle
- Tank filler plug
- Opening
- Closing
- Seat lock and helmet holder
- Helmet cable
- Side stand
- Rear shock absorber adjusters
- Riding the motorcycle
- Running-in recommendations
- Maximum rpm (fig. 55)
- Up to 1000 km
- From 1000 to 2500 km
- Pre-ride checks
- ABS light (for Monster 659 ABS only)
- ABS device (for Monster 659 ABS only)
- Starting the engine
- Normal ambient temperature
- Cold ambient temperature
- Moving off
- Warning (for Monster 659 ABS only)
- Braking
- Warning With the AB
- Stopping the motorcycle (fig. 61)
- Refuelling (fig. 62)
- Parking
- Tool kit and accessories
- Main maintenance operations
- Changing the air filter
- Checking brake and clutch fluid level
- Clutch system
- Brake system
- Checking brake pads for wear
- Lubricating cables and joints
- fig. 67
- Adjusting the throttle cable
- Charging and maintenance of the battery during winter storage
- Removal of the battery
- Refitting the battery
- Tensioning the drive chain
- Chain lubrication
- Changing bulbs
- Turn signals (fig. 106)
- Headlight aim
- Tyres
- Repairing or renewing tyres
- Minimum tread depth
- Checking the engine oil level
- Viscosity
- Cleaning and replacing the spark plugs
- Cleaning the motorcycle
- Storing the bike away
- Important notes
- Maintenance
- Scheduled maintenance chart: operations to be performed by the customer
- Technical data
- Overall dimensions (mm)
- Weights
- Warning Failure to ob
- Engine
- Timing system
- Desmodromic timing system
- Performance data
- Spark plugs
- Fuel system
- Brakes
- Front
- Rear
- Transmission
- Frame
- Wheels
- Suspensions
- Exhaust system
- Available colours
- Electric system
- Fuses
- Injection /electric system diagram key 659
- Injection /electric system diagram key 659 ABS
- Routine maintenance record
Brand : DUCATI
Model : Monster 659 ABS (2013)
Category : Motorcycle