M7P - Vacuum Cleaner PULLMAN - Free user manual and instructions
Find the device manual for free M7P PULLMAN in PDF.


| Product Type | Canister Vacuum Cleaner |
| Brand | Pullman |
| Model | M7P |
| Dimensions (L x W x H) | 30 cm x 25 cm x 20 cm |
| Weight | 3.2 kg |
| Power Consumption | 1200 W |
| Power Supply | 230 V, 50 Hz (mains-powered) |
| Cord Length | 5 m |
| Dust Capacity | 2 L (bagged) |
| Filtration System | HEPA filter |
| Suction Power Control | Mechanical slider on handle |
| Noise Level | 78 dB(A) |
| Accessories Included | Floor nozzle, crevice tool, dusting brush |
| Bag Type | Pullman M7P disposable bag |
| Filter Replacement | Every 3-6 months (HEPA filter) |
| Maintenance | Empty bag and clean filter regularly |
| Safety Features | Thermal overload protection |
| Spare Parts Available | Yes (bags, filters, nozzles, belts) |
| Repairability | Modular design for easy repair |
| Warranty | 2 years |
Frequently Asked Questions - M7P PULLMAN
User questions about M7P PULLMAN
0 question about this device. Answer the ones you know or ask your own.
Ask a new question about this device
Download the instructions for your Vacuum Cleaner in PDF format for free! Find your manual M7P - PULLMAN and take your electronic device back in hand. On this page are published all the documents necessary for the use of your device. M7P by PULLMAN.
USER MANUAL M7P PULLMAN
QUALITY CLEANING SOLUTIONS
IDEAL FOR:

Car Cleaning

Garages

Motels & Hotels

Restaurants & Cafes
M7P
SPRAY
EXTRACTOR
1200W (10AMP)
IMPORTANT
Always switch off the cleaner and remove the plug from the electricity power supply before cleaning your appliance, when not in use, or attempting any maintenance task. The cleaner must only be connected to an AC power supply at the voltage shown on the rating label. This cleaner should only be used for its intended purpose as described in this instruction manual.
SAFETY PRECAUTIONS AND WARNING:
WHEN USING YOUR VACUUM CLEANER BASIC PRECAUTIONS SHOULD ALWAYS BE OBSERVED, INCLUDING THE FOLLOWING;
- This appliance is not intended for use by persons (including children) with reduced physical, sensory or mental capabilities, or lack of experience and knowledge, unless they have been given supervision or instruction concerning use of the appliance by a person responsible for their safety
- Children should be supervised to ensure that they do not play with the appliance.
- If the power cord is damaged it must be replaced by an authorized service agent or similarly qualified persons.
- Carpets should be dry vacuumed thoroughly before washing. Use a vacuum cleaner with a power brush for best results.
- If using an extension cord please make sure that it is of an approved type and that it is fully extended. Failure to do so could cause your cleaner to overheat and damage it.
- Do not run the appliance over the power cable and power socket on the floor.
- Do not place cleaner on stairs or furniture, as it may result in injury or damage Do not handle the plug or carpet washer with wet hands.
- Do not put any objects into the openings or
operate with the openings blocked. Keep them free of anything that may reduce air flow.
- Keep hair, loose clothing, fingers and all parts of the body away from openings and moving parts.
- Do not use this cleaner and accessories on hard floors. Using this machine on hard floors may scratch or damage your floor.
- Do not use the carpet washer on any glowing, burning or smoking particles.
- Do not use without the solution tank and dirty water tank in place.
- Turn off all controls before unplugging.
- Do not store cleaner with solution in tanks.
- Do not use to pick up flammable or combustible liquids such as petrol or use in areas where they may be present.
- Only use a cleaning solution recommended by an authorised Pullman Representative.
- Do not use any high-foaming solutions as an excessive amount of foam impairs the functioning of the shampooer. If unsuitable cleaning solutions are used, this will void warranty
FAULTS
Consult the trouble shooting guide in this manual if your carpet washer fails to operate properly.
Do not continue to use this appliance if it appears to be faulty or the supply cord is damaged. If a fault can't be rectified, please return to the point of purchase.
CAUTION!
The cover (Part 36 in Fig.19) head contains electrical connections. It is not a serviceable part. Please return the product to your nearest Godfreys store if it is faulty.
Do not wash the cover with water or immerse the top cover water.
BEFORE YOU BEGIN

- Do not operate the vacuum cleaner too close to heaters, radiators, and other hot surfaces.

- Before inserting the plug into the wall, make sure your hand is dry.

- Before turning on the vacuum cleaner, remove any large or sharp objects from the floor or cleaning surface in order to prevent damage to the filter.

-
When you want to pull the plug from the wall, do not use the power cable, gently pull the plug from the power socket.
-
If the hose inlet or telescopic tube are blocked, you should switch off the cleaner straight away and remove from mains power. Clear the blockage before attempting to start the vacuum cleaner again.
This machine is equipped with a cord and plug. In the event that either of these parts get damaged, it must be repaired by a qualified technician.
Warning:
For your safety, disconnect the cleaner from the power supply before you refill the water tank, empty the bin or change the accessories.
PULLMAN
KNOW YOUR PRODUCT
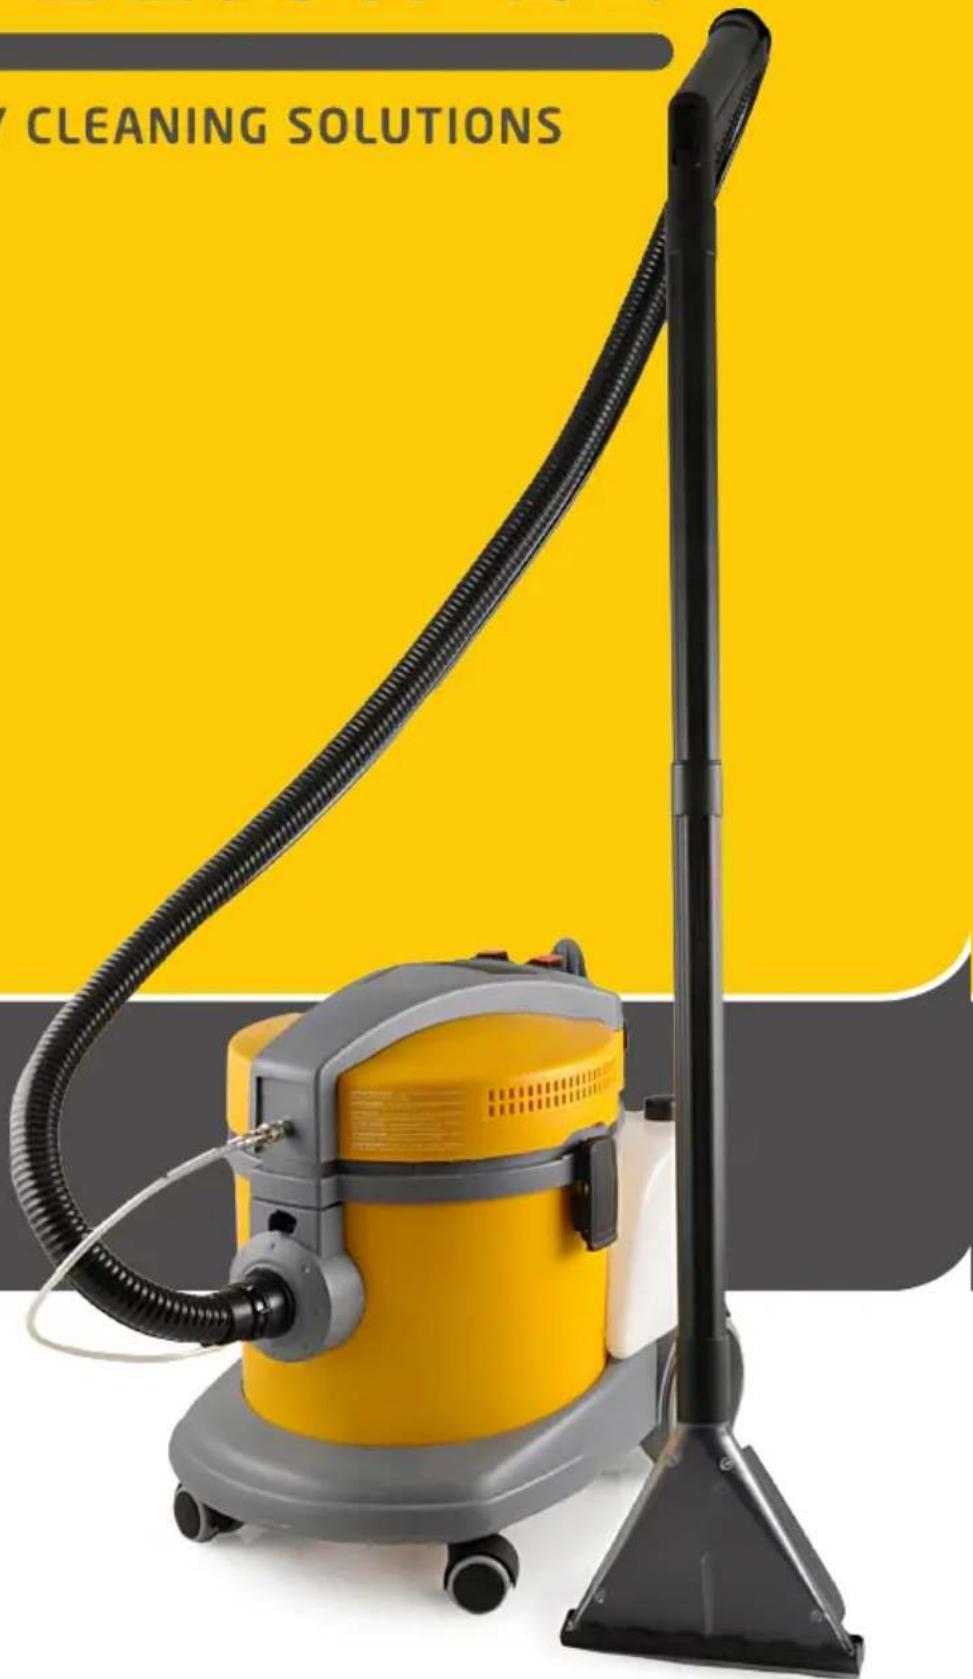
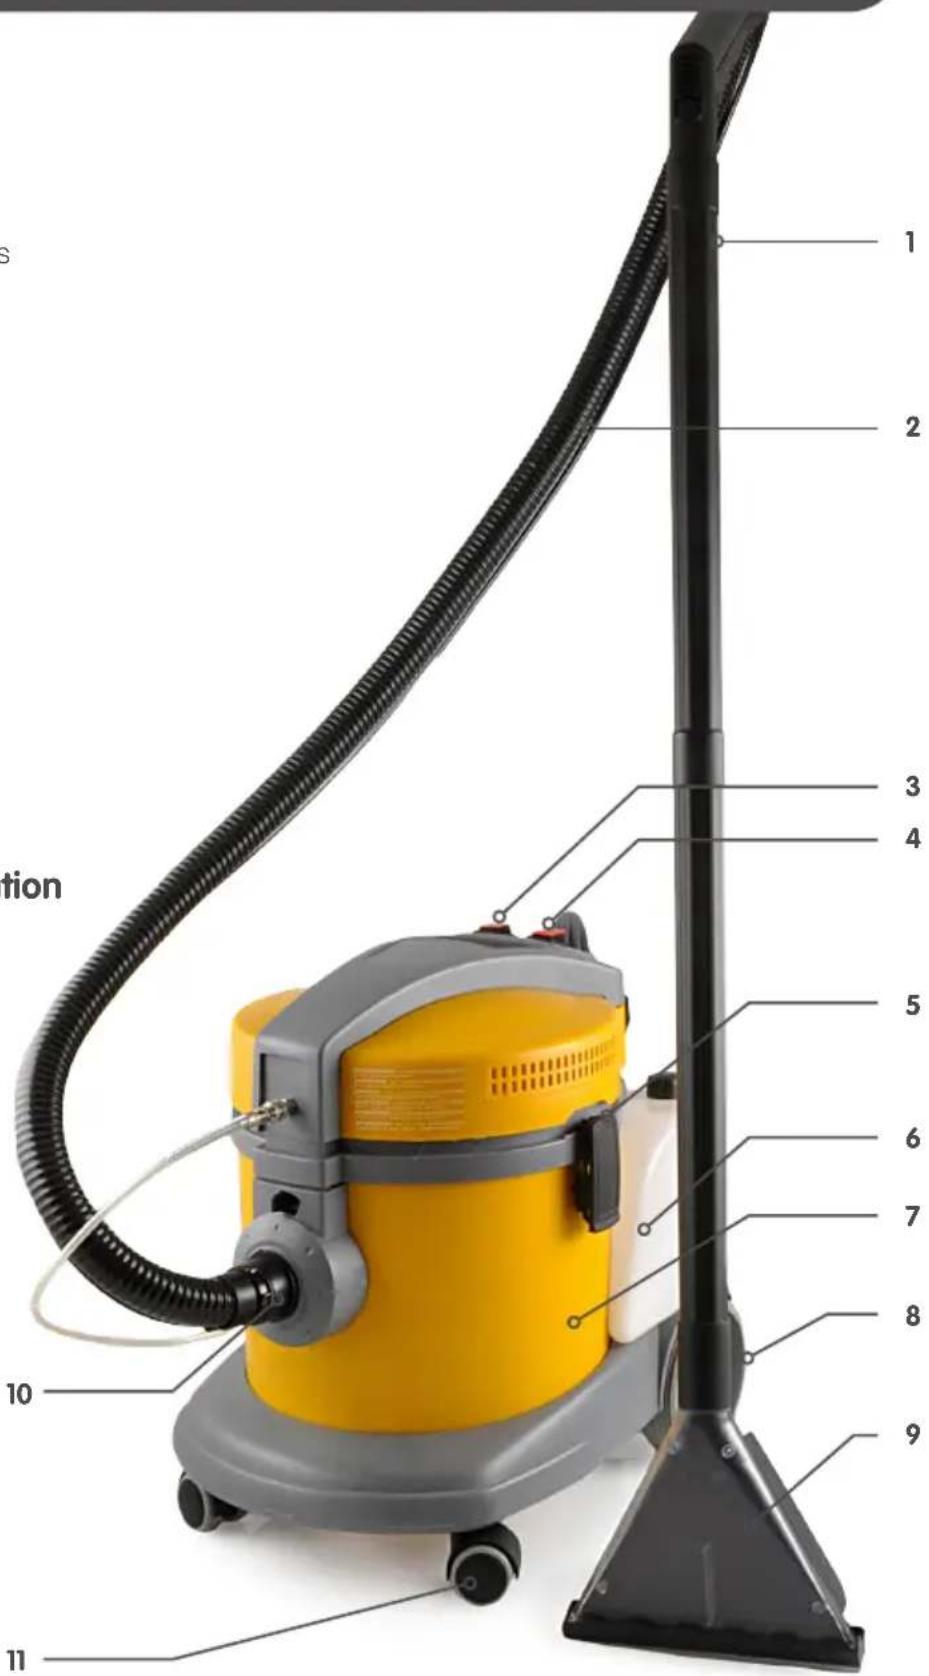
- 2pc Tubes
- Hose
- Vacuum Switch
- Pump Switch
- Connection Latches
- Solution Tank
- Canister
- Rear Wheel on Axle
- Floor Tool
- Hose Inlet
- Castor Wheel
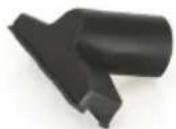
- Uphostery Tool
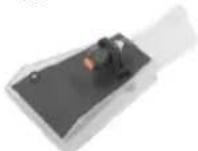
- Fabric Nozzle
Technical Information
Model: M7P
Voltage: 240V
Max Power: 1200W

12
13
PULLMAN
natural_image
Illustration of a hand using a spray gun to spray particles onto a device, labeled '40' and 'Fig. 24' (no text or symbols on the diagram itself)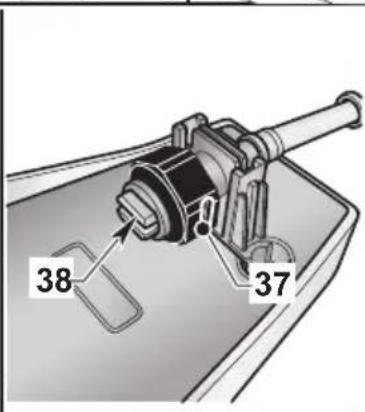
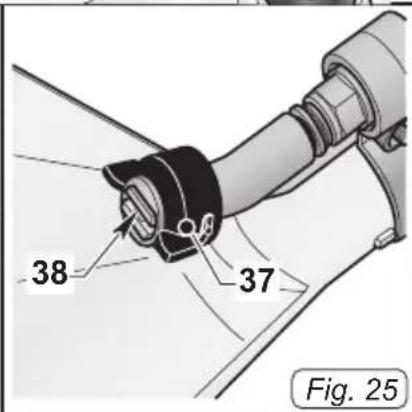
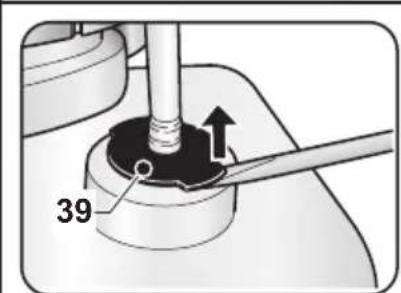
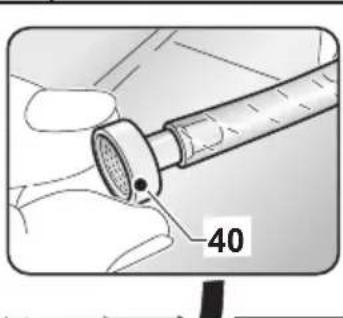
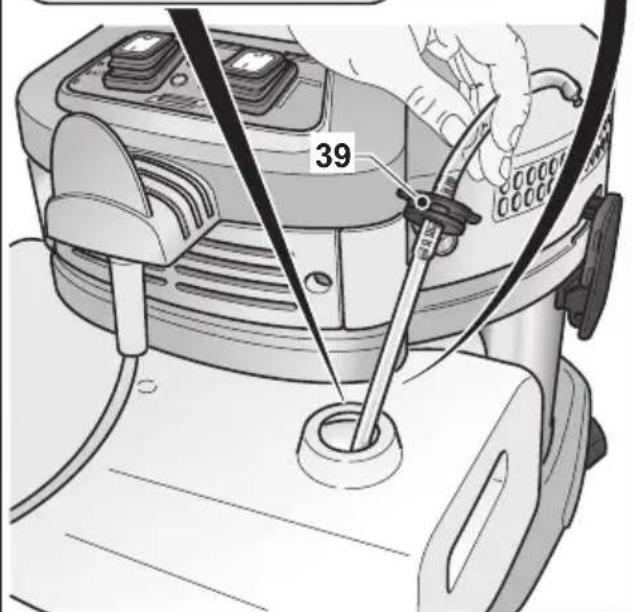
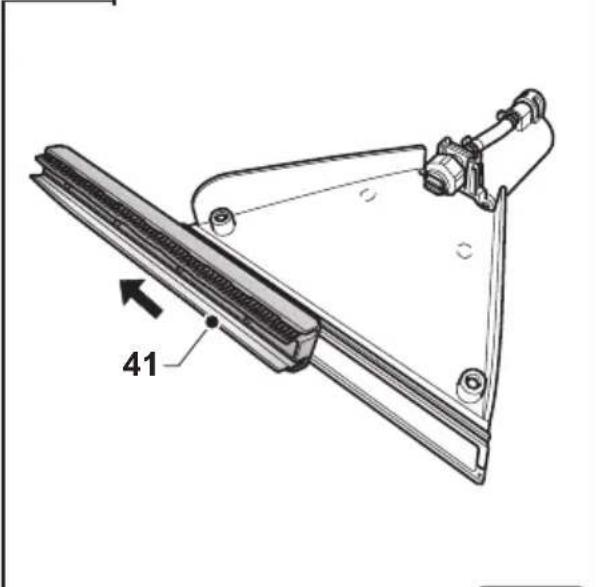
Fig. 26
Fig. 27
PREPARING THE APPLIANCE
Assembling the hoses
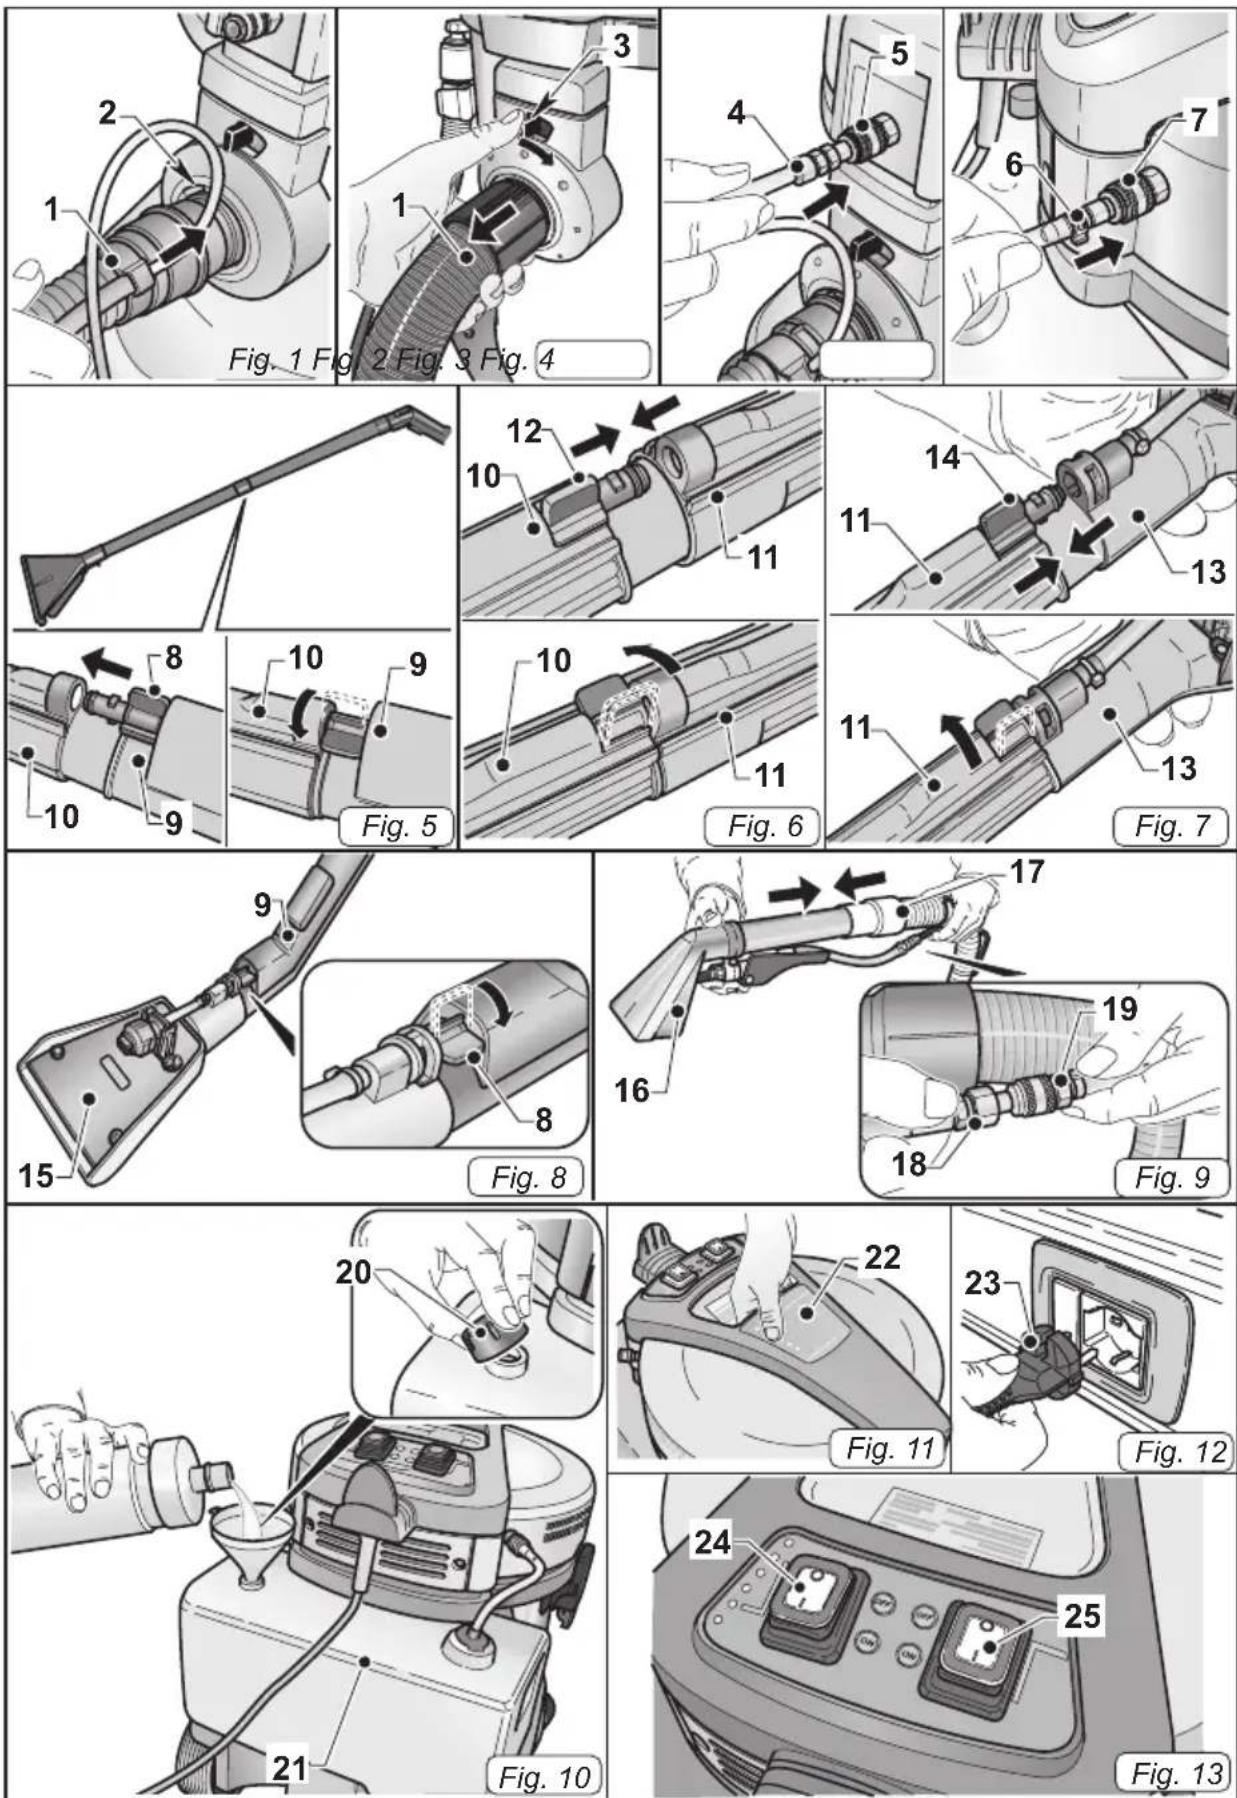
- Insert, as far as possible, the sleeve (1 Fig. 1) of the suction hose into the nozzle (2 Fig. 1) on the drum.
- To release the sleeve (1 Fig. 2) move the lever (3 Fig. 2) clockwise then pull the sleeve outwards (1 Fig. 2).
- Connect the (4 Fig. 3) detergent delivery hose to the quick coupling (5 Fig.3); to release it push the quick coupling (5 Fig.3) inwards.
- Connect the detergent suction (6 Fig. 4) hose to the quick coupling (7 Fig.4); to release it push the quick coupling (7 Fig.4) inwards.
Rigid pipe assembly for washing carpets or floors (if present)
After connecting the suction hose to the outlet the drum, do as follows:
- Make sure the lever (8 Fig.5) is in vertical position then attach the first extension (10 Fig.5) to the ergonomic handle (9 Fig.5) of the flexible hose and lock it in place by turning the lever (8 Fig.5) to the horizontal position.
- Attach the first extension (10 Fig. 6) to the second extension (11 Fig.6) and lock it in place using the lever (12 Fig.6) as described previously for the first extension.
- Attach the floor nozzle (13 Fig.7) to the second extension (11 Fig.7) and lock it in place using the lever (14 Fig.7) as described above.
Hose assembly for fabric washing (if present)
After connecting the suction hose to the outlet the drum, do as follows:
- Make sure the lever (8 Fig.8) is in vertical position then attach the fabric nozzle (15 Fig.8) to the ergonomic handle (9 Fig.8) and lock it in place by turning the lever (8 Fig.8) to the horizontal position.
Professional hose assembly for fabric washing (if present)
After connecting the suction hose to the outlet the drum, do as follows:
- Insert the fabric nozzle (16 Fig.9) into the flexible hose (17 Fig.9).
- Connect the detergent hose (18 Fig.9) to the quick coupling (19 Fig.9) on the flexible hose; to release it push the quick coupling (19 Fig.9) towards the hose.
Filling the detergent tank
- Remove the cap (20 Fig.10) and pour the detergent liquid (suitable for the surfaces to be washed) into the tank (21 Fig.10).
NOTE: For detergent dosing refer to the manufacturer's instructions.
- Put the cap back on (20 Fig.10)
USING THE APPLIANCE
- The appliance is fitted with wheels and can therefore be pulled along using the flexible hose.
- To lift it up, insert your fingers under the handle (22 Fig. 11) on the top of the cover.
Starting up the appliance
- Insert the plug (23 Fig.12) into the electrical socket.
- Push the switch (24 Fig.13) on "I" to start the suction motor; the switch lights up.
- Push the switch (25 Fig.13) on "I" to start the detergent pump; the switch lights up.
NOTE: The suction motor and the detergent pump operate independently; therefore, it is possible to:
- wash fabrics or floors/ carpets by starting only the detergent pump;
- wash and suction liquid simultaneously by starting up the detergent pump and suction motor at the same time;
- suction liquids by only starting the suction motor.
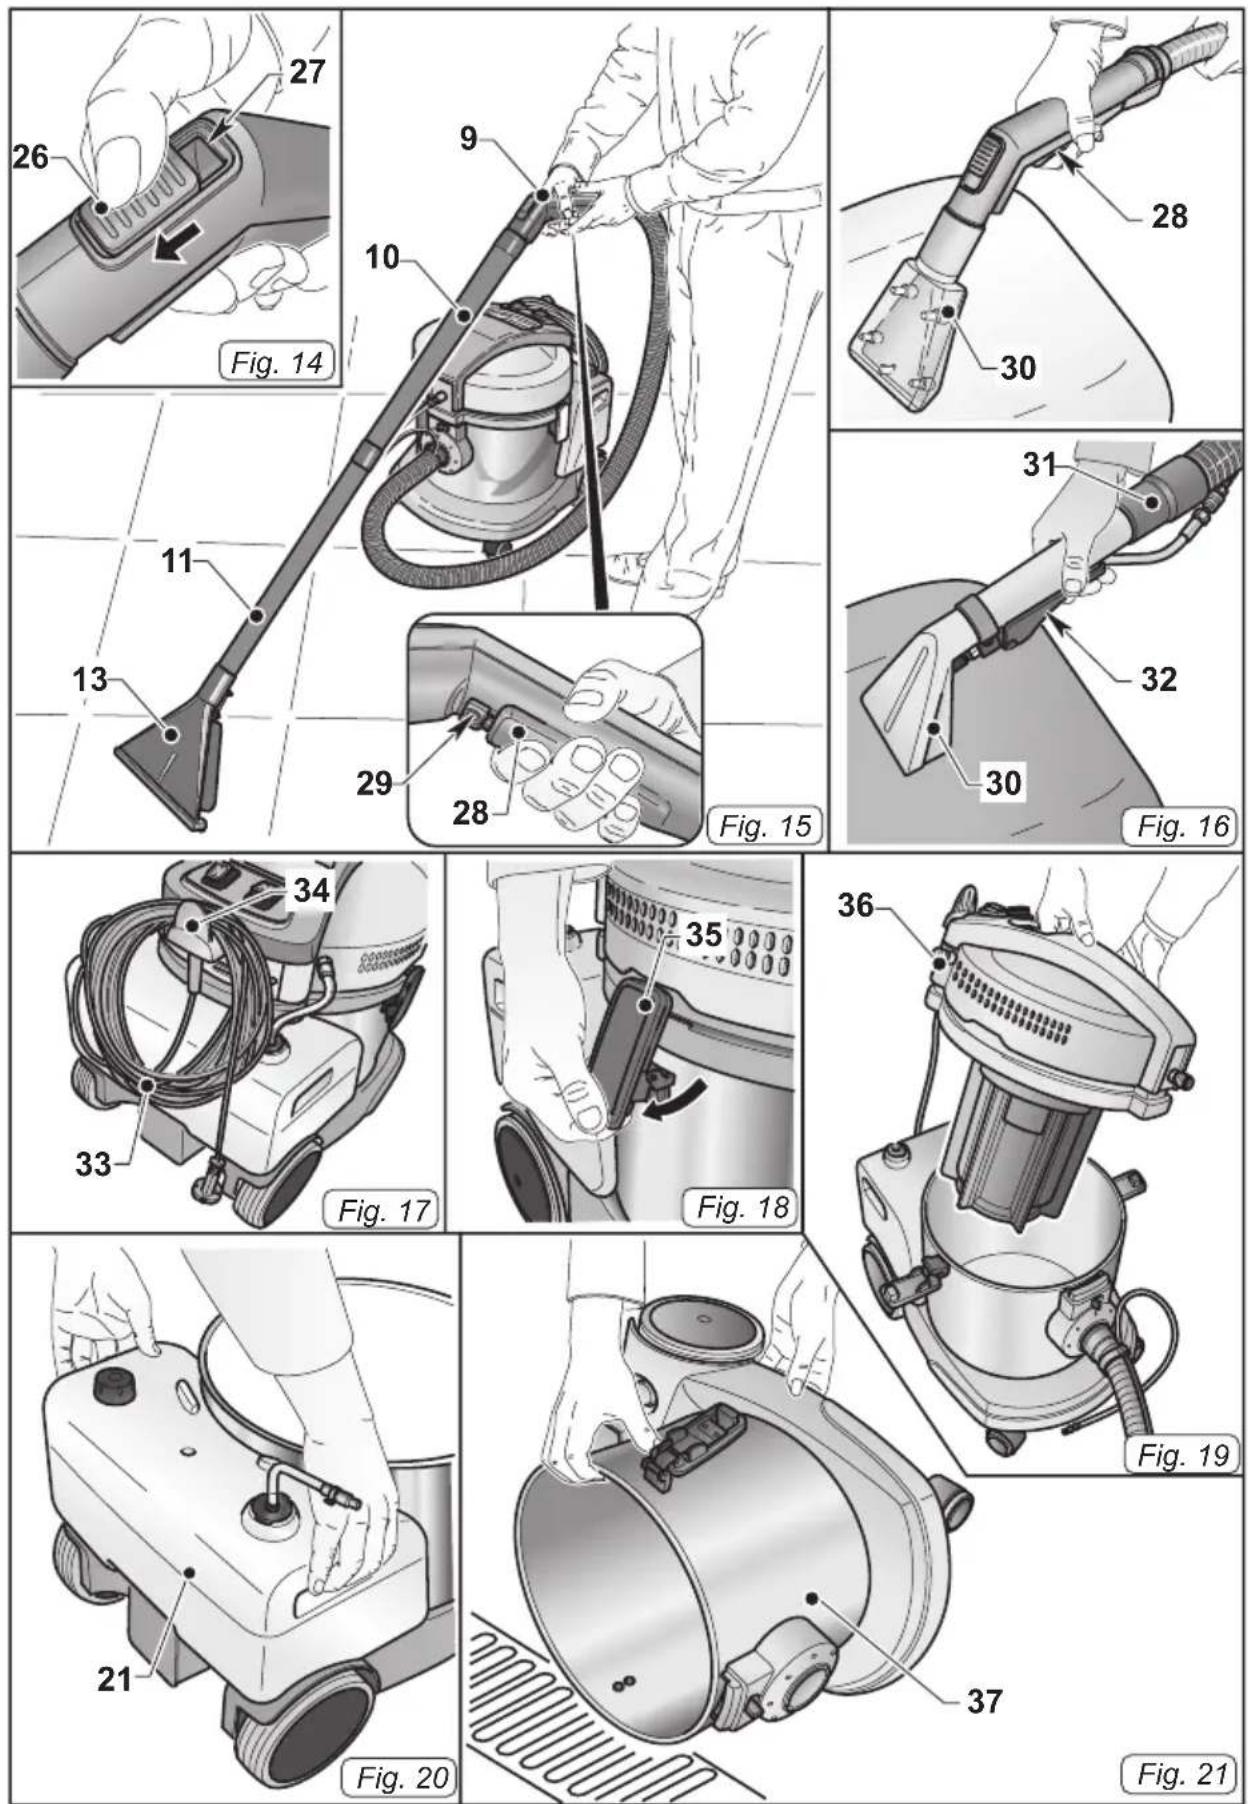
NOTE: For the ergonomic handle (if present) it is possible to adjust the suction force using the selector (26 Fig.14). The suction force is decreased by opening the window (27 Fig.14).
Washing floors or carpets
- To wash floors or carpets it is necessary to mount the hose with ergonomic handle (9 Fig.15), the rigid extensions (10 and 11 Fig.15) and the floor nozzle (13 Fig.15), if present.
- Start the suction motor and the detergent pump by pressing the relative switches (24 - 25 Fig.13).
- Press the switch (28 Fig.15) to dispense the detergent, release the button to stop dispensing. The switch (28 Fig.15) can be
blocked in the pushed position (continuous detergent dispensing) by moving the slide (29 Fig.15) towards the switch (28 Fig.15). When the slide (29 Fig.15) is moved back to its original position the switch is released and detergent dispensing stops.
- The detergent released washes the floor/ carpet / and the dirty liquid is suctioned into the tank of the appliance. For very dirty areas it is recommended you apply detergent to the dirty area without suctioning it; leave the detergent allowing it to work for several seconds and then wash the area and suction the dirt.
NOTE: To prevent the detergent pump from breaking, it is recommended that you stop its operation, pushing the relative switch, when dosing has not occurred for several minutes
NOTE: When the recovery tank is full, noise increases and the appliance does not suction; therefore, switch it off and empty the tank as described in the relevant paragraphs.
Cleaning chairs
- Mount the fabric nozzle (30 Fig.16) on the relative hose (31 Fig.16).
- Start the suction motor and the detergent pump by pressing the relative switches (24 - 25 Fig.13).
- Place the nozzle on the fabric pressing slightly then press the switch (28 Fig.15) or the lever (32 Fig.15), depending on the nozzle type, to dispense the detergent, release to stop dispensing.
For very dirty areas it is recommended you apply detergent to the dirty area without suctioning it; leave the detergent allowing it to work for several seconds and then wash the area and suction the dirt.
PULLMAN
NOTE: To prevent the detergent pump from breaking, it is recommended that you stop its operation, pushing the relative switch, when dosing has not occurred for several minutes.
NOTE: When the recovery tank is full, noise increases and the appliance does not suction; therefore, switch it off and empty the tank as described in the relevant paragraphs.
Switching off the appliance
- Press the switches (24 and 25 Fig.13) to "0" to switch off the appliance; the lamps on the switches will go out.
- Remove the plug (23 Fig.12) from the electrical socket.
- Wind up the cable (33 Fig.17) and hook it onto its housing (34 Fig.17).
CLEANING AND MAINTENANCE
DANGER: Before performing any maintenance operations, unplug the appliance from the electrical socket.
DAILY CLEANING
Emptying the recovery tank
- Disconnect the detergent delivery hose (4 Fig.3) and the flexible hose (1 Fig.2).
- Disconnect the detergent suction hose (6 Fig.4).
- Lift up the levers (35 Fig.18) and remove the cover (36 Fig. 19) complete with motor.
- Remove the detergent container (21 Fig.20) lifting it by the handles.
- Place yourself over a floor drain and empty the liquid in the recovery tank (37 Fig.21)
- Clean the inside of the tank with running water and then reassemble everything proceeding in the reverse order.
Cleaning the detergent dosing circuit
At the end of each workday, clean the detergent dosing circuit as follows to prevent clogging:
- Disconnect the detergent delivery hose (4 Fig.3).
- Disconnect the detergent suction hose (6 Fig.4).
- Lift up the levers (35 Fig.18) and remove the cover (36 Fig. 19) complete with motor.
- Remove the detergent container (21 Fig.20) lifting it by the handles.
- Remove the cap (20 Fig.10) of the detergent container and empty the residual liquid into a suitable container.
- Wash the inside of the detergent container with running water.
- Reassemble all of the parts performing these operations in the reverse order.
- Pour clean water into the detergent container,
electrically connect the appliance and start the dosing pump by pressing the switch (25 Fig.13).
- Clean the circuit by pressing the switch (28 Fig.15) or the lever (32 Fig.15), depending on the type of nozzle.
- Dispense the liquid from the nozzle until clean water comes out.
- Empty the water in the detergent tank as described above.
Cleaning the appliance body
- Clean the unit body with a cloth dampened with water or a mild detergent;
DANGER: Do not wash the appliance using jets of water.
PERIODIC CHECKS
Checking the air outlet filter
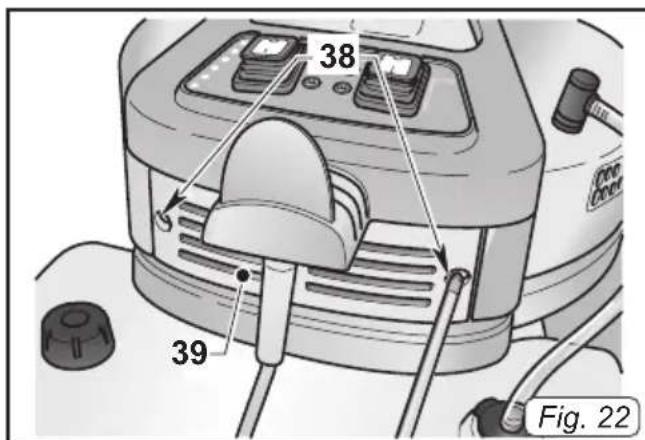
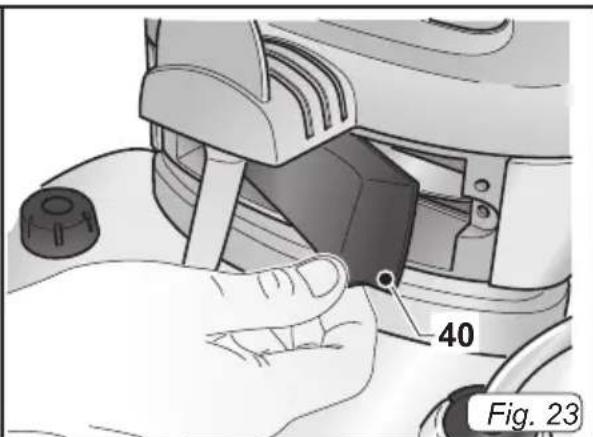
- Loosen the screws (38 Fig.22) and remove the cover (39 Fig.22)
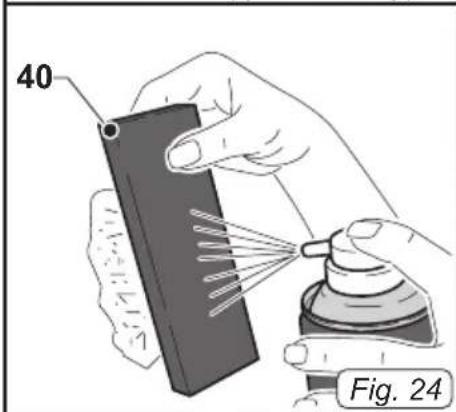
- Remove the filter sponge (40 Fig.23) and clean it with a blast of air (Fig.24). The filter sponge can be washed in warm water and must only be replaced once it is completely dry. If it is too dirty, replace it with a new one.
- Reassemble all the parts by following the dismantling process steps in the reverse order.
Cleaning the detergent dispensing nozzle
If you note that the detergent is not dispensed evenly, clean the nozzle as described below:
- Remove the ring nut (37 Fig.25).
- Remove the nozzle (38 Fig.25) and clean it with running water, if it is clogged use a pin being careful not to distort the shape of the nozzle.
- Reassemble all of the parts performing these operations in the reverse order.

Cleaning the detergent suction filter
If you note that the detergent is not being suctioned properly, check and clean the suction filter located inside the detergent tank.
- Using a screw driver, loosen the suction cap (39 Fig.26) and remove it from the tank with the relative suction hose.
- Remove the filter (40 Fig.26) and wash it under running water; if it is too clogged it should be replaced.
- Reassemble all of the parts performing these operations in the reverse order.
Replacing the floor nozzle squeegee (if present)
If when washing the floors the washing liquid is not suctioned properly and the floor or carpet remains wet, check the condition of the squeegee (41 Fig.27).
If the squeegee is worn or damaged replace it by slipping the squeegee and its bristles off the nozzle as shown in figure 27.
SPECIFICATIONS
Voltage: 240V
Max Power: 1200 W
Sound level: 81 dB(A)
Suction Power: 22 Kpa
Useful capacity tank: 10L
Detergent tank capacity: 8L
Weight: 12 kg
Accessories: ∅ 36 mm
TROUBLESHOOTING
| TROUBLE POSSIBLE CAUSE REMEDY | ||
| The vacuum cleaner does not work. | Switch not pressed.Plug not inserted.Power cut. | Press the switch.Insert the plug into the socket.Check the power line. |
| Suction is not satisfactory. | Accessories or tubes clogged.Suction nozzle squeegee worn or damaged. | Check and clean the flexible hose and the suction nozzle.Check and replace the squeegee |
| Detergent dispensing not even | Nozzle clogged.Filter clogged. | Clean nozzle.Clean suction filter. |
| Detergent dispensing not working | Switch not pressed Press the switch | |
CUSTOMER CARE
For customer service or product enquiries please contact 1800 815 270 (AU) or 0800 282 288 (NZ)
| PRODUCT NUMBER PRODUCT DESCRIPTION | |
| 33500114 Small Castor Wheels | |
| 31150055 Squeegee Replacement | |
| 33200762 On/Off Switch (Vacuum) | |
| 31110211 Carpet Floor Tool | |
| 31220444 Hose Assembly | |
| 31300548 2-Piece Tube | |
| 31150321 Upholstery Tool | |
| 33200763 On/Off Switch (Pump) | |
Conditions of warranty

Your Pullman cleaner has a one year parts and labour warranty against product defects and failures when the product is used in accordance with the terms and conditions of this warranty statement.
The cleaner must be operated in accordance with these instructions. This cleaner is not designed for the collection of vitreous building material including particle board, construction products and similar products such as wood/fibres, cement, fillers, fibre glass etc or excessive or frequent sand. The infrequent pick-up of these materials in these circumstances may be harmful to your cleaner and may void the manufacturer's warranty.
Accessories and consumables including dust bags and filters, unless defective in manufacture, are not subject to this warranty. In order to prolong the life of accessories and consumables, regular care and maintenance is recommended.
When properly used and cared for, your cleaner will render excellent service; refer to the instruction manual for further details, as misuse or failure to follow the instructions makes this warranty void. In the event of service or advice being needed, please contact Electrical Home-Aids Pty Ltd, ABN 62 007 539 577, Ground Level, Building 3 Brandon Business Park, 530 Springvale Rd, Glen Waverley, VIC 3150. Customer Care: 1800 815 270.
The decision to repair or replace the cleaner is at the sole discretion of Electrical Home-Aids Pty Ltd. If International Cleaning Solutions Pty Ltd decide to repair or replace the cleaner, it will do so at its own cost.
Electrical Home-Aids Pty Ltd is unable to accept responsibility under this warranty for any repair work not carried out by an authorised Electrical Home-Aids Service Agent or from the use of non-genuine parts. If any part is no longer available or manufactured, International Cleaning Solutions will replace it with a genuine functional replacement part. This warranty does not apply to the cost of replacing any parts of the product due to normal wear and tear, alterations, improper installation, physical abuse, misuse or accidental damage. Any transportation costs involved in the repair of defective parts shall be borne by the claimant.
If proof of purchase cannot be provided at the time of a warranty claim or service, any work carried out on the cleaner is chargeable. The repair or replacement of the cleaner under this warranty does not extend the original period of warranty.
The benefits conferred by this warranty are in addition to all other rights and remedies in respect of the product as outlined under the Competition and Consumer Act and other State and Territory laws.
"Our goods come with guarantees that cannot be excluded in the Australian Consumer Law. You are entitled to a replacement or refund for a major failure and for compensation for any other reasonably foreseeable loss or damage. You are also entitled to have the goods repaired or replaced if the goods fail to be of acceptable quality and the failure does not amount to a major failure."

QUALITY CLEANING SOLUTIONS
Electrical Home-Aids Pty. Ltd.
ABN 62 007 539 577
Ground Level, Building 3, Brandon Business Park 530 Springvale Road, Glen Waverley, Victoria 3150
Pullman is a registered trademark.
Contact Electrical Home-Aids Pty. Ltd. for your nearest authorised service centre on 1800 815 270 (AU) or 0800 282 288 (NZ).
customerservice@godfreys.com.au
- IMPORTANT
- SAFETY PRECAUTIONS AND WARNING:
- WHEN USING YOUR VACUUM CLEANER BASIC PRECAUTIONS SHOULD ALWAYS BE OBSERVED, INCLUDING THE FOLLOWING;
- FAULTS
- CAUTION!
- BEFORE YOU BEGIN
- Warning:
- PULLMAN
- KNOW YOUR PRODUCT
- Technical Information
- PREPARING THE APPLIANCE
- Assembling the hoses
- Rigid pipe assembly for washing carpets or floors (if present)
- Hose assembly for fabric washing (if present)
- Professional hose assembly for fabric washing (if present)
- Filling the detergent tank
- NOTE: For detergent dosing refer to the manufacturer's instructions.
- USING THE APPLIANCE
- Starting up the appliance
- Washing floors or carpets
- Cleaning chairs
- Switching off the appliance
- CLEANING AND MAINTENANCE
- DAILY CLEANING
- Emptying the recovery tank
- Cleaning the detergent dosing circuit
- Cleaning the appliance body
- PERIODIC CHECKS
- Checking the air outlet filter
- Cleaning the detergent dispensing nozzle
- Cleaning the detergent suction filter
- Replacing the floor nozzle squeegee (if present)
- SPECIFICATIONS
- TROUBLESHOOTING
- CUSTOMER CARE
- Conditions of warranty
- Electrical Home-Aids Pty. Ltd.
Brand : PULLMAN
Model : M7P
Category : Vacuum Cleaner