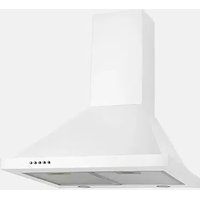
RWJ3CL9BK - Range hood Robinhood - Free user manual and instructions
Find the device manual for free RWJ3CL9BK Robinhood in PDF.


| Product Type | Range Hood |
| Brand | Robinhood |
| Model | RWJ3CL9BK |
| Mounting Type | Canopy (Wall-Mounted) |
| Width | 90 cm |
| Depth | 50 cm |
| Height (Min-Max) | 10 - 30 cm |
| Weight | Approx. 15 kg |
| Rated Voltage | 220-240 V ~ 50 Hz |
| Motor Power | 200 W |
| Extraction Rate (Max) | 700 m³/h |
| Noise Level | 55 dB (A) |
| Lighting | LED, 2 x 3 W |
| Controls | Push Button |
| Number of Speeds | 3 |
| Filter Type | Aluminum Grease Filter |
| Ducting Option | Recirculation (with Charcoal Filter) or Ducted |
| Charcoal Filter Included | No (sold separately) |
| Grease Filter Cleaning | Monthly in warm soapy water or dishwasher |
| Charcoal Filter Replacement | Every 3-6 months |
| Safety Feature | Thermal Cut-Off |
| Spare Parts Availability | Filters, bulbs, motor available from Robinhood service |
Frequently Asked Questions - RWJ3CL9BK Robinhood
User questions about RWJ3CL9BK Robinhood
0 question about this device. Answer the ones you know or ask your own.
Ask a new question about this device
Download the instructions for your Range hood in PDF format for free! Find your manual RWJ3CL9BK - Robinhood and take your electronic device back in hand. On this page are published all the documents necessary for the use of your device. RWJ3CL9BK by Robinhood.
USER MANUAL RWJ3CL9BK Robinhood
Installation and Operating Instructions
Model Number: RWJ3CL9BK
Description: Wall Canopy Rangehood

natural_image
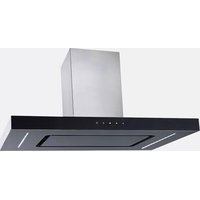
Modern stainless steel kitchen range hood with black ventilation cover (no text or symbols visible)Contents
Congratulations!
Thank you for choosing one of our appliances. Before you use the appliance, we strongly recommend that you read through the whole user manual which provides important safety instructions and description of the product and the proper use of its functions.
To avoid the ever-present risks involved with using an electrical appliance it is vital that the oven is installed correctly and that you read the safety instructions carefully to avoid misuse and hazards. It is important that you retain these instructions and your proof of purchase along with any other important documents about this product for future reference.
Due to continual product development, Robinhood reserves the right to alter specifications or appearances without notice.
Important Safety Instructions....1
Appliance Details....2
Pre-Installation 3
Installation 4-5
Operating Instructions....6
Cleaning and Maintenance....7
Troubleshooting ....7
Warranty Certificate (New Zealand)......8
Warranty Certificate (Australia) 9
DISPOSAL INFORMATION
- Most of the packing materials are recyclable. Please dispose of these materials through your local recycling depot or by placing them in appropriate collection containers.
- If you wish to discard this product, please contact your local authorities and ask for the correct method of disposal.
Important Safety Instructions
IMPORTANT: Read the assembly instruction section and safety precautions of this booklet carefully before removing the contents of this carton.
- In certain circumstances electrical appliances may be a safety hazard.
- This appliance is not intended for use by persons (including children) with reduced physical, sensory or mental capabilities, or lack of experience or knowledge, unless they have been given supervision or instruction concerning the use of the appliance by a person responsible for their safety. Young children should be supervised to ensure that they do not play with the appliance.
- Do not check the status of the filters whilst the cooker hood is operating.
- Do not touch the light bulbs after use.
- Do not disconnect the appliance with wet hands.
- Do not disconnect the power supply by pulling on the cable.
- Do not flambé underneath the range hood.
- Avoid free flame, as it may cause damage to the filters and can be a fire hazard.
- Unplug the appliance before carrying out maintenance, cleaning or replacing lamps.
-
If the power cord is damaged, it must be replaced by the manufacturer, an authorised service centre or similarly qualified persons to avoid a hazard.
-
For indoor use only.
-
It is recommended to operate the range hood prior to cooking.
-
It is recommended to leave the range hood in operation for 15 minutes after cooking is terminated in order to completely eliminate cooking vapours and odours.
-
Turn off the range hood when not in use.
-
Do not use the range hood if it is damaged, especially the supply cord and the case.
-
Do not immerse the range hood in liquid.
-
The exhaust air must not be discharged into a flue which is used for exhausting fumes from an appliance burning gas or other fuels (not applicable to appliances that only discharge the air back into the room).
-
Regulations concerning the discharge of air have to be fulfilled.
-
There shall be adequate ventilation of the room when the range hood is used at the same time as appliances burning gas of other fuels (not applicable to appliances that only discharge the air back into the room).
-
Clean the surface of the cooker hood regularly using a cloth moistened with denatured alcohol or a non-abrasive liquid detergent.
-
There is a fire risk if cleaning is not carried out in accordance with the instructions.
-
The 600mm units are intended for use above hobs that are 600mm wide and the 900mm units are intended for use above hobs that are 900mm wide.
-
The range hood must be mounted at a minimum distance of 65cm above the cooking surface.
-
CAUTION: Accessible parts may become hot when used with cooking appliances.
-
Warning: Failure to install the screws or fixing device in accordance with these instructions may result in electrical hazards.
Appliance Details
| Voltage and Frequency: | 220-240V 50Hz |
| Lamp Max: RWJ3CL9BK: 1 x | 7W LED Strip |
| Rated Input Power: | RWJ3CL9BK: 272W |
General Information
Before installing and operating the rangehood, carefully read the following important information regarding installation safety and maintenance. Keep this information booklet accessible for further consultations.
The appliance has been designed to exhaust cooking fumes externally. Before installation, please ensure that the following have been supplied and that the tools listed below are readily available.
Contents of packaging:
- 1 x Rangehood
• 1 x 150mm Ducting adaptor - 9 x Wall plugs
- 7 x ST4x40mm screws
- 2 x ST4x30mm screws
- 8 x ST4x8mm screws
• 2 x Chimney pieces (upper and lower)
• 2 x Chimney bracket - 1 x Fixing bracket
Typical equipment required:
- Electric drill
- Screwdriver
- Tape measure
- Spirit level
• Duct tape (if ducting)
• Jig saw and ladder(if ducting)
Dimensions

All dimensions in mm
Model may vary slightly from images pictured
Pre-Installation
Installation position
Minimum height from the cooktop surface to the underside face of the rangehood is 650mm.
Note: If the instructions for the cooktop specify a greater distance, this has to be taken into account.
Any installation above 750mm will compromise performance.
Ducting Options
The method of ducting should be carefully considered before installing the rangehood. The guide below recommends the ducting components to use for all common ducting configurations - through the top of the home (for the roof and soffit) and through the rear of the home.

150mm round ducting should be used in conjunction with this model rangehood. Alternatively this rangehood can be operated in recirculation mode.
The highlighted area in the table below gives the recommended Uniduct item numbers for different mounting and outlet options.
Duct mounting option

Uniduct item numbers
| 150mm diameter round outlet | 1688 | 1634 and 1635 | 1634 and 1688 |
Extra lengths and/or bends may be required, depending on the length required and whether there is any structural material in the run e.g. rafters.
Please note that this chart is designed as a guide. Please consult Robinhood customer services if unsure. For NZ phone (09) 415 6000 or www.robinhood.co.nz. For AUS phone 1800 648 556 or www.robinhood.com.au.
Installation
Mounting to a stud is recommended. However, if fitted to other wall linings (plasterboard, concrete etc) suitable fixings will be required. Before drilling any holes check that the wall and ceiling are clear of any electrical cables, pipes etc. It is recommended that at least two people are used to install this appliance.

-
Mark the correct height of the rangehood base on the wall and check that it is level using a spirit level. Measure up 22mm from the line. Place the fixing bracket with the line through the mounting holes (hooks facing upwards) and mark the position of the three holes in the fixing bracket against the wall. Check the holes will be in line and be level. Drill the three holes and (for brick walls) place the wall plugs in the holes. Fix the bracket in place with three ST4x40mm screws and tighten in place.
-
Insert the upper chimney piece into the lower chimney piece. Assemble the lower chimney bracket onto the lower chimney using two ST4x8mm screws and ensure the bracket holds both chimney pieces. Do not fully tighten the screws as some adjustment is required in step 9.

natural_image
Isometric line drawing of a brick wall with embedded electrical meters and arrows indicating direction (no text or symbols)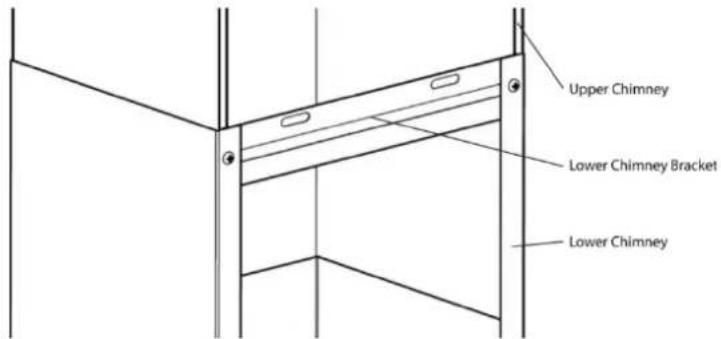
- Screw the one way outlet to the top of the appliance using the four ST4x8mm screws, and fit the ∅150mm exhaust tube to the top of the outlet.

Installation
natural_image
Diagram showing brick wall and a mechanical component with curved arrows indicating motion (no text or symbols)-
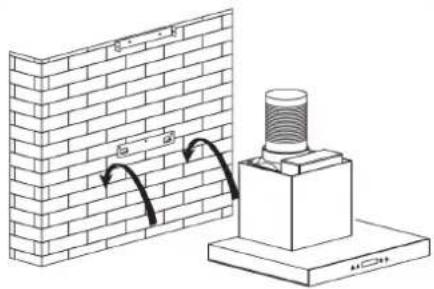
P ick up the appliance and place it onto the hooks. Remove the filters. Mark the two safety screws hole positions (in the back wall of the appliance) against the wall. Place the chimney assembly on the top of the main body. Mark the positions of the lower chimney bracket holes. Raise the upper chimney to the final fixing height (cut the cornice moulding away if required, to enable the chimney to sit flush against the wall and ceiling). Mark the upper edges of the chimney against the wall. Lower the upper chimney down and place the upper chimney bracket between the lines (mounting holes to the top) and mark the two mounting hole positions against the wall. Remove the bracket and chimney assembly, and remove the appliance from the wall.
-
Drill the holes for the two chimney brackets and the two safety holes. Place wall plugs in each hole. Fix the upper chimney bracket to the wall using two ST4x40mm screws. Place the appliance back on the fixing bracket and fasten in place using two ST4x30mm safety screws.
-
O nly if ducting - Mark and cut out the hole in the ceiling / wall to fit the ducting (160mm diameter max). Warning: Chimney depth is 270mm. Ensure no part of the hole is greater than 265mm from the wall.
-
C onnect and secure the ducting (use duct tape if required).
-
Place the chimney assembly back onto the appliance (take care the power cord is accessible & not trapped by the chimney). Fix the lower chimney to the wall using two ST4x40mm screws.
-
Extend the upper chimney to the ceiling and secure in place with two ST4x8mm screws (take care to tighten all screws when lined up).

natural_image
Diagram of a brick wall with a vertical container and directional arrows, no text or symbols present- Replace the filters. Remove any protective plastic (including from the filters). Connect to the power source.
Recirculation mode
-
This unit can be installed to operate in recirculation mode where ducting is not a chosen/desired or practical option. There are recirculation grilles fitted on each side of the upper chimney which allow the cleansed air to return to the kitchen. Ensure that the side outlet grilles are not obstructed. Even a partial obstruction will restrict the efficiency of the rangehood.
-
Replace aluminium filters with charcoal filters.
Operating Instructions
Controls

Low Speed

Medium Speed

High Speed

Light On / Off

Timer
Power
Once the appliance is connected to the power source, the backlight of the control panel will turn on for 5 seconds, and then turn off, leaving the appliance in stand-by mode. Pressing a control button will light up an indicator light while the function is active, and then turn off when the function is deactivated.
Lights
The light can be operated independently from the fan. Press the fan button once and the LED lights will turn on. Press a second time and they will turn off.
Fan speed
The exhaust fan is operated by the three fan speed buttons. Pressing the button once will turn on the fan (low, medium and high speeds) and pressing a second time will turn the fan off.
Timer
When the exhaust fan is in use, pressing the Timer button will set up a 5 minute delay, after which the appliance will return to stand-by mode.
NOTE: if the lights are on, these will turn off as well, but the function will not work if only the lights are on.
Filter
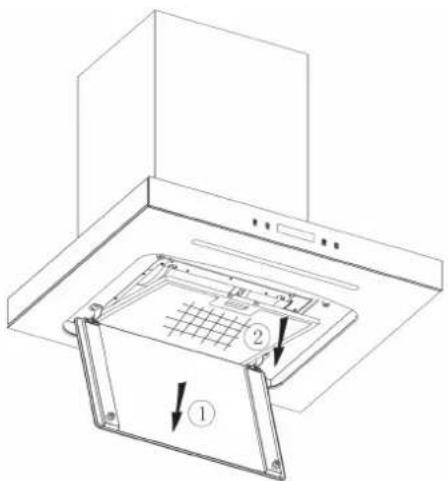
To remove the filter, pull down the front panel and let it hang down. Press in the handle of the filter to release the fixing tabs and rotate the filter down. Pull the filter out.
To replace the filter, fit in the opposite order as above.
Cleaning and Maintenance
General Maintenance
Switch off the rangehood before cleaning or maintenance.
To prevent surface damage never use abrasive or oil based liquid cleaners. To clean the surfaces of the appliance, use mild detergent and warm water. In areas of high humidity and coastal environments cleaning should be carried out frequently.
Warning: A buildup of oil may occur if the compact canopy is not cleaned regularly.
Filter Maintenance
To maintain efficiency, the filters should be removed regularly (approximately monthly), and washed using hot soapy water or the dishwasher.
Some discolouration of the filter frame may occur if washed in the dishwasher.
Rangehoods fitted with charcoal filters are designed to remove grease and odours from cooking vapours prior to the cleansed air re-entering the kitchen (when the rangehood is in recirculation mode). Charcoal filters should be replaced every two to four months depending on use.
! Fully saturated charcoal filters can become a barrier to air movement therefore limiting rangehood performance. In the event of fire, grease laden filters could be flammable and therefore regular replacement is recommended. In ducted installations, conventional aluminium filters are recommended.
Replacement of LED Lamps
The LED lamps cannot be replaced by the consumer. If any faults occur, please call your nearest Service Department.
Replacement parts
Charcoal filter
RWJ9CF590
For any other problems please call help line on NZ 0800 760 667 or AUS 1800 648 556
Troubleshooting
| Fault | Cause | Solution |
| Lights do not work, but fan works | The LED damaged | Contact Service Department |
| LED wiring connection poor | ||
| LED switch damage | ||
| Lights work, but fan does not work | Motor bearings damage | Contact Service Department |
| Motor burn out | ||
| Motor control switch damage | ||
| Light does not work, motor does not work | Plug contact outlet bad | Fix or change |
| Power wire cut off | Change power wire | |
| Switch damage | Contact Service Department | |
| Appliance vibrates violently | Motor screw loosen | Contact Service Department |
| Fixing brackets loose | Tighten the fixing brackets | |
| Insufficient suction | The distance between the body and the cooktop too long | Readjust the distance |
| Cross-ventilation too strong or too closed in the kitchen | Reduce cross-ventilation or open the window | |
| Exhaust pipe too long | Adjust the length of pipe | |
| Air outlet valve not open | Check the valve if flexible | |
| The outside wind is too strong | Shield outlet from wind |
Warranty Certificate (New Zealand)
Terms and Conditions
The following conditions apply in respect of the warranty given in this certificate:
- Monaco Corporation Limited ("Monaco") warrants the following Robinhood products against manufacturing defects and faulty materials, under normal use and subject to the exclusions in this certificate, for a period of:
• Rangehood, Ovens, Cooktops, Dishwashers, Refrigeration - 24 months from date of original purchase for domestic use.
• Uniduct – 12 months from date of original purchase for domestic use.
- Ironing centre – 12 months from date of original purchase for domestic use.
- Sinks sets—5 years on stainless steel sink including draining bench from date of original purchase for domestic use, 6 months on all stainless steel accessories, including wire rack, colander and tray from date of original purchase for domestic use.
- Laundry Tub - 5 years on stainless bowl, 24 months on Tap, Cabinet and other components from the date of original purchase for domestic use.
"Original purchase", when used in this certificate, means purchase by the customer directly from Monaco or one of its approved suppliers.
-
This warranty is limited to the repair or replacement, at our option, within the warranty period of any component part which we at our discretion determine to contain faulty materials or a manufacturing defect in breach of this warranty. This warranty is subject to terms and conditions set out in this certificate.
-
The warranty only applies within New Zealand.
-
The customer must produce the original invoice or other purchase documentation as proof of the original purchase date.
Warranty exclusions
-
The warranty does not apply where, in Monaco's opinion:
-
The defect is caused by misuse, wear and tear, dirt, fire or accidental damage. The product has been repaired or serviced by an unauthorised person.
• The product was not installed in accordance with our instructions. -
The product was purchased overseas or was not designed for use in New Zealand. The product was not used, cleaned or cared for in accordance with our instructions.
• The product was used outdoors. -
In addition, this warranty does not extend to damage or defects which in our opinion, directly or indirectly arise from or are due to:
-
Exposing the product to acidic or corrosive materials or chemicals such as dyes, solvents, denture cleaner or acetone; Using inappropriate household cleaning products such as abrasive cream or powder cleansers, furniture polish, bleach, mentholated spirits, drain cleaners, sugar soap, metal pads and strongly alkaline or acidic cleaners;
• Heat damage, including from washing the product at high temperatures; - Impact or mishandling the product, including the impact caused by objects scraped along, thrown or dropped on the product surface or excessive weight being placed on the product;
• Structural or support changes in or affecting the building or the application where the product has been installed; -
Failure to clean or maintain the product as recommended; or any other causes specified in the product information as being excluded from this warranty.
-
Variations with the colour or gloss within the product or any ageing or fading of colour, shine or gloss level over time are not covered by this warranty. The warranty does not cover visual imperfections or blemishes in the surface and edges of the product that were not brought to your supplier's attention at the time you inspected the product.
-
Costs incurred on installation or removal of a product, or any reinstallation of a product, or any associated costs, are not covered by this warranty.
-
Monaco will not be liable for consequential or indirect loss or damage whatsoever and however arising out of or in connection with the supply, performance or removal of the product, including (but not limited to) loss of profit, loss of revenue, loss of contract, loss of goodwill or increased cost of workings, even if due to the negligence of Monaco or any of its approved suppliers, employees or agents.
-
Charcoal filters and light bulbs are not covered by this warranty
-
This warranty and the statements contained in this certificate or other documents given to you do not exclude, restrict or modify the application of any term implied into this warranty by statute, provided that (to the extent any statutory provision permits Monaco to limit its liability for a breach of an implied condition or warranty) Monaco's liability for such breach is limited to the payment of the cost of replacing the product, repairing the product or acquiring an equivalent product.
-
Subject to clause 5, our obligations under this warranty are limited to those set out in this certificate, and this warranty is expressly instead of all other warranties, express or implied, including any implied warranty of merchantability or fitness for a particular purpose and notwithstanding any course of dealing between the parties or custom and usage in trade to the contrary.
Terms and conditions are subject to change.
Warranty Certificate (Australia)
Terms and Conditions
If you are a consumer under the Australian Consumer Law, our goods come with guarantees that cannot be excluded under the Australian Consumer Law. You are entitled to a replacement or refund for a major failure and for compensation for any other reasonably foreseeable loss or damage. You are also entitled to have the goods repaired or replaced if the goods fail to be of acceptable quality and the failure does not amount to a major failure.
- Shriro Australia Pty Limited ("Shriro") also warrants the following Robinhood products against manufacturing defects and faulty materials, under normal use and subject to the exclusions in this certificate, for a period of:
• R angehood, Ovens, Cooktops, Dishwashers, Refrigeration - 24 months from date of original purchase for domestic use.
- U niduct – 12 months from date of original purchase for domestic use.
- Ironing centre – 12 months from date of original purchase for domestic use.
- Sinks sets—5 years on stainless steel sink including draining bench from date of original purchase for domestic use, 6 months on all stainless steel accessories, including wire rack, colander and tray from date of original purchase for domestic use.
- L aundry Tub -5 years on stainless bowl, 24 months on Tap, Cabinet and other components from the date of original purchase for domestic use. "Original purchase", when used in this certificate, means purchase by the customer directly from Shriro or one of its approved suppliers.
-
This warranty is limited to the repair or replacement, at our option, within the warranty period of any component part which we at our discretion determine to contain faulty materials or a manufacturing defect in breach of this warranty. This warranty is subject to terms and conditions set out in this certificate.
-
The warranty only applies within Australia.
-
For warranty service outside of capital city metropolitan area or 30 km from nearest authorised service agent you will be liable for reasonable travelling expenses and the cost of transport of the product or parts to and from the service agent
-
To make a claim under this warranty, you must produce the original invoice or other purchase documentation as proof of the original purchase date. You must send your claim to Shriro Australia Pty Limited, 104 Vanessa Street, Kingsgrove, NSW, 2208, within 7 days of any alleged defect or failure of the product first becoming apparent. You are responsible for the expense of making a claim under this warranty.
This warranty is given by: Shriro Australia Pty Ltd ABN 28 002 386 129
Telephone: 1800 648 556
Facsimile: 1800 628 577
Email: customercare@robinhood.com.au
www.robinhood.com.au
Attention: Customer Services Manager
Warranty exclusions
-
The warranty does not apply where, in Shriro's opinion:
-
The defect is caused by misuse, wear and tear, dirt, fire or accidental damage. The product has been repaired or serviced by an unauthorised person.
- The product was not installed in accordance with our instructions.
-
The product was purchased overseas or was not designed for use in Australia.
• The product was not used, cleaned or cared for in accordance with our instructions.
• The product was used outdoors. -
All Robinhood Rangehoods are suitable for indoor use only and not suitable over BBQs or charcoal cookers designed for outdoor use.
- In addition, this warranty does not extend to damage or defects which in our opinion, directly or indirectly arise from or are due to: exposing the product to acidic or corrosive materials or chemicals such as dyes, solvents, denture cleaner or acetone; using inappropriate household cleaning products such as abrasive cream or powder cleansers, furniture polish, bleach, mentholated spirits, drain cleaners, sugar soap, metal pads and strongly alkaline or acidic cleaners; heat damage, including from washing the product at high temperatures; impact or mishandling the product, including the impact caused by objects scraped along, thrown or dropped on the product surface or excessive weight being placed on the product; structural or support changes in or affecting the building or the application where the product has been installed; failure to clean or maintain the product as recommended; or any other causes specified in the product information as being excluded from this warranty.
- Variations with the colour or gloss within the product or any ageing or fading of colour, shine or gloss level over time are not covered by this warranty. The warranty does not cover visual imperfections or blemishes in the surface and edges of the product that were not brought to your supplier's attention at the time you inspected the product.
- We will not be responsible under this warranty for, nor pay the costs of, removing the existing product, or reinstalling the new product, or any associated costs or damages.
- Charcoal filters and light bulbs are not covered by this warranty.
The benefits given by this warranty are in addition to other rights and remedies of consumers under any law in relation to the goods which cannot be excluded.
This warranty certificate is not intended to create a contract between Shriro Australia Pty Limited and the purchaser.
New Zealand
Monaco Corporation Ltd
Telephone: (09) 415 6000
Facsimile: (09) 415 7400
Email: customercare@robinhood.co.nz
www.robinhood.co.nz
Australia
Shriro Australia Pty Ltd
ABN 28 002 386 129
Telephone: 1800 648 556
Facsimile: 1800 628 577
Email: customercare@robinhood.com.au
www.robinhood.com.au
- Installation and Operating Instructions
- Contents
- Congratulations!
- DISPOSAL INFORMATION
- Important Safety Instructions
- Appliance Details
- General Information
- Contents of packaging:
- Typical equipment required:
- Dimensions
- Pre-Installation
- Installation position
- Ducting Options
- Installation
- Recirculation mode
- Operating Instructions
- Controls
- Power
- Lights
- Fan speed
- Timer
- Filter
- Cleaning and Maintenance
- General Maintenance
- Filter Maintenance
- Replacement of LED Lamps
- Replacement parts
- Warranty Certificate (New Zealand)
- Terms and Conditions
- Warranty exclusions
- Warranty Certificate (Australia)
Brand : Robinhood
Model : RWJ3CL9BK
Category : Range hood