
MR-WX470F - Freezer MITSUBISHI - Free user manual and instructions
Find the device manual for free MR-WX470F MITSUBISHI in PDF.


| Product Type | Upright Freezer |
| Brand | Mitsubishi |
| Model | MR-WX470F |
| Dimensions (H x W x D) | 1800 mm x 800 mm x 700 mm |
| Weight | 80 kg |
| Power Supply | 220-240 V, 50 Hz |
| Power Consumption | 200 W (approx.) |
| Energy Class | A+ |
| Noise Level | 40 dB (approx.) |
| Defrost Type | Automatic (No Frost) |
| Temperature Control | Electronic, adjustable range -18°C to -24°C |
| Fast Freeze Function | Yes |
| Door Alarm | Yes, if left open |
| Child Lock | Yes |
| Interior Light | LED |
| Shelves | Adjustable glass shelves (4 pcs) |
| Drawers | 2 large freezer drawers |
| Condenser Cleaning | Clean annually with vacuum or brush |
| Door Gasket Replacement | Available as spare part |
| Spare Parts Availability | Authorized Mitsubishi service centers |
Frequently Asked Questions - MR-WX470F MITSUBISHI
User questions about MR-WX470F MITSUBISHI
0 question about this device. Answer the ones you know or ask your own.
Ask a new question about this device
Download the instructions for your Freezer in PDF format for free! Find your manual MR-WX470F - MITSUBISHI and take your electronic device back in hand. On this page are published all the documents necessary for the use of your device. MR-WX470F by MITSUBISHI.
USER MANUAL MR-WX470F MITSUBISHI
Refrigerator-Freezer
MODEL
MR-WX470F
OPERATING INSTRUCTIONS
Store food in the best way for consumption/
Place food and drinks in the compartments suitable for preserving them.
Convenient functions can be easily set by simply touching icons on the operation panel.
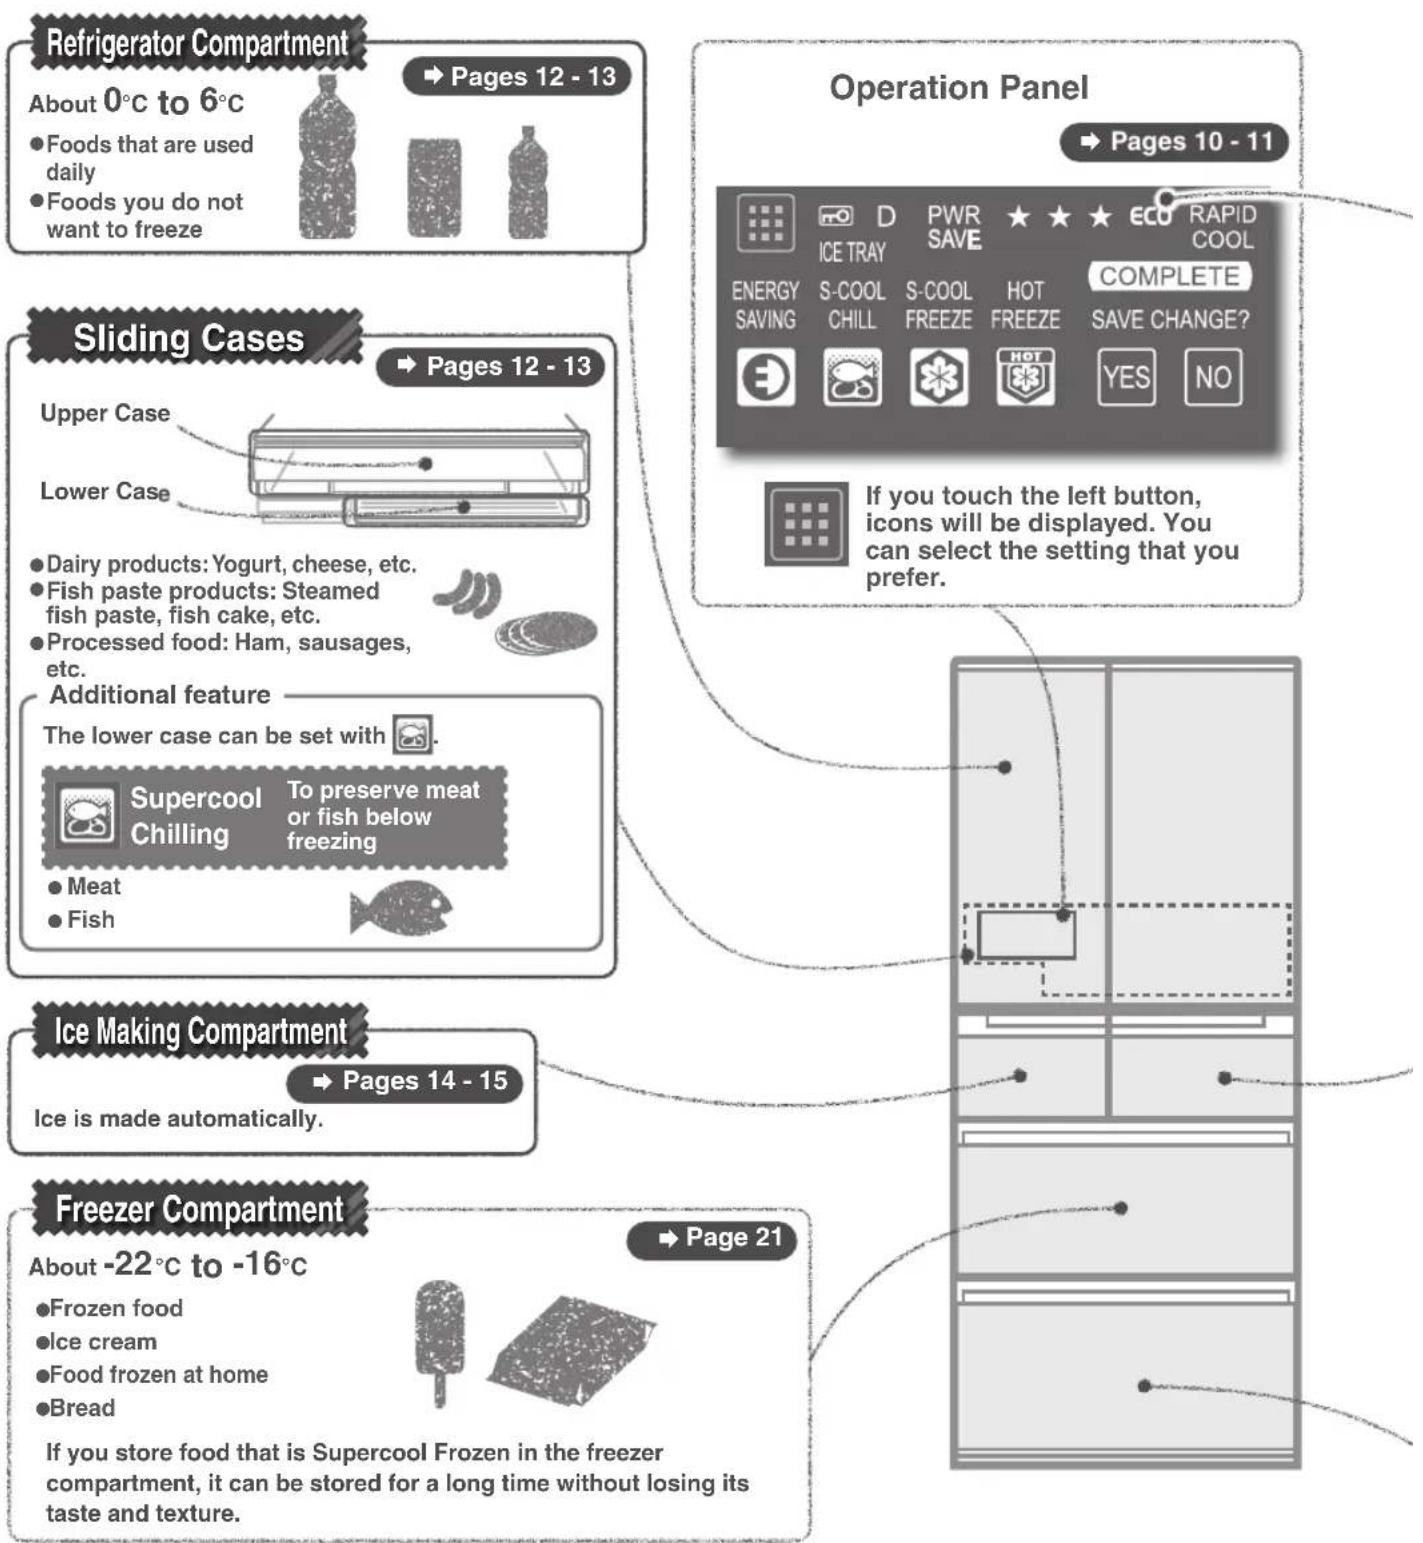
flowchart
graph TD
    A["Refrigerator Compartment"] --> B["About 0°C to 6°C"]
    B --> C["Foods that are used daily"]
    B --> D["Foods you do not want to freeze"]
    E["Operation Panel"] --> F["ICE TRAY PWR SAVE ★ ★ ★ RAPID COOL"]
    F --> G["ENERGY S-COOL S-COOL HOT COMPLETE"]
    F --> H["SAVING CHILL FREEZE FREEZE SAVE CHANGE?"]
    I["Sliding Cases"] --> J["Upper Case"]
    I --> K["Lower Case"]
    I --> L["Dairy products: Yogurt, cheese, etc."]
    I --> M["Fish paste products: Steamed fish paste, fish cake, etc."]
    I --> N["Processed food: Ham, sausages, etc."]
    I --> O["Additional feature"]
    O --> P["The lower case can be set with Supercool Chilling To preserve meat or fish below freezing"]
    O --> Q["Meat"]
    O --> R["Fish"]
    S["Ice Making Compartment"] --> T["Pages 14 - 15"]
    S --> U["Ice is made automatically"]
    V["Freezer Compartment"] --> W["About -22°C to -16°C"]
    V --> X["Frozen food"]
    V --> Y["Ice cream"]
    V --> Z["Food frozen at home"]
    V --> AA["Bread"]
    V --> AB["If you store food that is Supercool Frozen in the freezer compartment, it can be stored for a long time without losing its taste and texture."]
    AC["Operation Panel"] --> AD["If you touch the left button, icons will be displayed. You can select the setting that you prefer."]
Refrigerator Compartment
About 0°C to 6°C
● Foods that are used daily
● Foods you do not want to freeze
→ Pages 12 - 13

Sliding Cases
Upper Case
Lower Case

natural_image
Pure technical line drawing of a mechanical component with no text or symbols→ Pages 12 - 13

● Dairy products: Yogurt, cheese, etc.
● Fish paste products: Steamed fish paste, fish cake, etc.
● Processed food: Ham, sausages, etc.
Additional feature
The lower case can be set with


Supercool Chilling
To preserve meat or fish below freezing

- Meat
Fish
Ice Making Compartment
Pages 14 - 15
Ice is made automatically.
Freezer Compartment
About -22°C to -16°C
●Frozen food
-ice cream
●Food frozen at home
●Bread
If you store food that is Supercool Frozen in the freezer compartment, it can be stored for a long time without losing its taste and texture.
→ Page 21

Notice
The temperatures described here are measured in the lower centre of the refrigerator after the temperature has stabilized when the surrounding temperature is 32°C and the doors are closed without any food inside. The temperature fluctuates with factors such as food storage conditions and how often the doors are opened and closed.
- "S-COOL CHILL button" is "off" as the default setting.
- "S-COOL CHILL button" is additional feature to keep the food fresh for a longer time without freeze foods.
Energy Saving Mode
→ Page 22

ENERGY SAVING
energy saving mode


ECO
With the ECO guide, you can check your refrigerator's ECO level.
Supercool Freezing Compartment
→ Pages 16 - 17
Soft-Freezing: About -9°C to -5°C
(Can also switch to freezer)

Supercool Freezing
To supercool freeze foods such as meat, fish, and dessert
- Blocks of meat
●Ground meat
● Fillets


Hot Freezing
To use Supercool Freezing on hot cooked foods such as freshly cooked rice, curry, and sauces
●Freshly cooked rice
• Curry
●Sauces
Soft-Freezing / Supercool Freezing
→ Pages 18 - 20
Vegetable Compartment
→ Page 21
About 3°C to 9°C
●Vegetables
Fruits
- Drinks

natural_image
Illustration of a cabbage and two carrot slices (no text or symbols)The water that evaporates from the food is kept inside the compartment to maintain the moisture. Storing fruits and vegetables in plastic wrap keeps them even fresher.
Contents
(Pages)
Safety Precautions.... 4-7
From Installation to Operation ..... 8-9
How to Use the Operation Panel ... 10-11
Compartment Introduction
Refrigerator Compartment / Sliding Cases ... 12-13
Ice Making Compartment ... 14-15
Supercool Freezing Compartment...16-17
Soft-Freezing / Supercool Freezing ... 18-20
Freezer Compartment ..... 21
Vegetable Compartment ... 21
Energy Saving Mode 22
Detail setting
Performing Temperature Adjustment ... 23-24
Rapid Cool....25
Power Save Mode 26-27
Cleaning 28-32
Other Issues 33-36
Power Outages 33
To Prevent Accidental Button Operation (Child Safety Lock) 33
To Reset Settings 33
Alarm Sounds 34
When Not Using the Refrigerator for a Long Time 34
To Move or Carry the Refrigerator 35
To Control the Temperature More Precisely... 36 etc.
Troubleshooting 37-40
Specifications 41
Accessories 42
This refrigerator is manufactured for refrigerating and freezing foods in general households. For industrial use, please use a commercial refrigerator.
The material names are indicated on the main plastic parts to facilitate recycling.
This refrigerator uses non-freon refrigerant (isobutane) and non-freon foam insulation material (cyclopentane).
Safety Precautions
The following describes the safety precautions to follow in order to prevent injury to the user and others, as well as to prevent damage to property.

Warning
Improper handling that can result in grave consequences such as death or serious injury.

Caution
Improper handling that can result in personal injury or damage to your house, household furnishings, etc.
■ Meaning of symbols.
 | Prohibited |  | Follow the instructions |
 | Water prohibited |  | Remove the power plug. |

Warning
When Installing the Refrigerator

Water prohibited
Do not install the refrigerator outdoors or in places exposed to water or excessive humidity
Water may cause insulation failure, resulting in an electric shock or fire.
→ Page 8
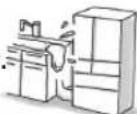

Follow the instructions
Leave space around the refrigerator.
If refrigerant leaks, it may accumulate and catch fire or explode. → Page 8
Prepare for earthquakes by taking fall prevention measures
Otherwise an injury may result. → Page 9

Prohibited
Power and Power Plug
Do not crush the power plug with the rear of the refrigerator.
Do not damage the power cord.
Pressing, folding, bundling, or placing heavy objects on the power cord may cause an electric shock or fire.

Do not use damaged cords or plugs, or loose sockets.
Doing so may cause an electric shock or fire.
Do not pull the cord when unplugging the power plug.
The cord may be damaged, resulting in an electric shock or fire.
Do not plug in or out the power plug with wet hands.
Doing so may cause an electric shock.

Follow the instructions
Use a dedicated outlet for the power supply that meets the rating specified on the rating label. (The rating label is located on the refrigerator compartment.)
Using extension cords and plugging too many leads into a single socket can cause heat build-up or fire. → Page 8
Insert the power plug with the cord
facing down, and fully insert the prongs.
Inserting the plug upside-down places stress on the cord and may cause heat generation or fire.

If the power cord is damaged, contact MITSUBISHI ELECTRIC SERVICE CENTRE or its service agent for the replacement.
If the power cord is damaged, purchase a new cord from MITSUBISHI ELECTRIC SERVICE CENTRE or its service agent. Make sure that the power cord is designed for this model.
Power and Power Plug

Follow the instructions
Remove dust periodically from the power plug.
Dust may cause insulation failure, resulting in fire.


Remove plug
Remove the power plug before cleaning.
Otherwise an electric shock or injury may result.
When Using

Prohibited
Do not damage or drive screws into the refrigerator's refrigerant circuit (pipes).
Because flammable refrigerant is used, this may result in fire or an explosion.
Do not use electrical appliances inside the refrigerator.
The refrigerant gas leaking into the compartment with sparks from an electrical contact may cause fire and explosion.
Do not place volatile, inflammable objects inside the refrigerator.
Benzene, cosmetics and hair dressing products may catch fire or explode.
Do not store chemicals or scientific specimens in the refrigerator.
Substances that require strict control must not be stored in household refrigerators.
Do not place objects on top of the refrigerator.
Objects may fall when the doors are opened or closed and cause injury.

Do not hang from the door or handle. Do not climb on an open door.
Do not apply a heavy load.
The refrigerator may tip over and cause injury.
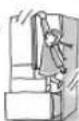
Do not apply excessive force to glass doors or shelves.
An impact can cause the glass to crack and may result in injury.
Do not touch the mechanical area of the automatic ice maker (area above the ice storage box).
Doing so may result in injury.
Do not use flammable sprays near the refrigerator.
Sparks from an electrical contact may cause an ignition and fire.
When Using

Prohibited
Do not use in a shed or garage.
Small animals may damage the electrical wiring and cause an electric shock or fire.

Water prohibited
Do not place water containers on top of the refrigerator.
Exposing electrical parts to water may cause an electric shock or fire.
Do not wash with water or spill soup or juice onto the refrigerator.
Water or other liquid may cause an electric shock or fire. Wipe off any liquid immediately.

Follow the instructions
If you notice a gas leak, do not touch the refrigerator. Open windows to ventilate.
Sparks from an electrical contact may cause an explosion or fire.
When the doors are opened or closed, beware not to hit any furniture.
The door or furniture may be damaged and cause injury.
Malfunctions and Long-Term Storage

Prohibited
Do not disassemble, repair, or alter. Do not use while parts are damaged
Doing so may cause injury, electric shock or fire.

Follow the instructions
If the refrigerant circuit (pipe) is damaged, do not touch the refrigerator and avoid using flames.
Open windows to ventilate.
If the refrigerant circuit is damaged, contact the retail store.
Failing to do so may cause a fire.

When not using the refrigerator for a long time, unplug the power plug and open the doors to dry the refrigerator.
If the refrigerator is not dried sufficiently, refrigerant may leak due to condenser corrosion and cause a fire or explosion.

Remove plug
If an abnormality occurs (such as a burning odor), unplug the power plug and stop refrigerator operation.
Continuing to operate with an abnormality may cause an electric shock or fire.
When Recycling

Follow the instructions
For storing the refrigerator, make sure to pull out and remove the door packing.
There is a possibility of a child getting trapped in the refrigerator during storage.

Contact the retail store or municipal government for details about correct refrigerator disposal.
Improper disposal may cause refrigerant leaks, resulting in a fire or explosion if exposed to a flame.
When Installing/Carrying the Refrigerator

Follow the instructions
Anchor the refrigerator to a strong and level floor by adjusting the adjustable supports.
Otherwise, the refrigerator may move and cause injury.
→ Pages 8 - 9
Use the carrying handles or the parts instructed when carrying the refrigerator.
Holding other parts may result in injury.
→ Page 35
When moving the refrigerator, lay a protective sheet on the floor and move the refrigerator slowly.
Failing to do so may result in floor damage or injury.

When Using

Prohibited
Do not pack in excessive amounts of food. Do not pull the shelves with excessive force.
Food may fall and cause an injury.
Do not place glass bottles in the freezer, ice making, and supercool freezing compartments.
The bottle may break if the liquid inside freezes, causing an injury.
Do not put your hands or feet under the refrigerator.
The steel plates or other parts may cause injury.
Do not eat food that is discolored or has a bad odor.
It may result in food poisoning or illness.
Observe the following when opening and closing the doors.
- Do not open or close the doors when another person is touching the refrigerator.
- Do not put your fingers on the top edge of a drawer-type door while closing it.
- Do not open or close the doors with excessive force. (Food may fall out.)
- Be careful not to trap your fingers or any other part of your body.
- Be careful not to hit a part of your body.
- Do not trap your feet with the bottom drawer. (Danger of your toes caught by the drawer.)
Failing to follow the precautions above may result in injury.
Do not touch food or containers in the freezer compartment with wet hands.
It may cause a cold injury.


Follow the instructions
Be careful when attaching and removing the glass shelf and pocket.
If it is attached improperly, it could come loose and fall, causing injury. → Page 31
Be very careful when crushing ice that has joined together.
There is a risk of injury. → Page 15
Safety Precautions (Continued)
■ If the power cord is damaged, contact MITSUBISHI ELECTRIC SERVICE CENTRE or its service agent for the replacement.
■ WARNING: fill with potable water only.
For Installation, Handling & Servicing of the appliance, please refer to section “From Installation to operation”, “How to Use the Operational Panel” & “Cleaning”.
■ WARNING: Keep ventilation openings, in the appliance enclosure or in the built-in structure, clear of obstruction.
■ WARNING: Do not use mechanical devices or other means to accelerate the defrosting process, other than those recommended by the manufacturer.
■ WARNING: Do not damage the refrigerant circuit.
■ WARNING: Do not use electrical appliances inside the food storage compartments of the appliance, unless they are of the type recommended by the manufacturer.
■ Contact the retail store or municipal government for details about correct refrigerator disposal.
This appliance is not intended for use by persons (including children) with reduced physical, sensory or mental capabilities, or lack of experience and knowledge, unless they have been given supervision or instruction concerning use of the appliance by a person responsible for their safety.
■ Children should be supervised to ensure that they do not play with the appliance.
■ Donot store explosive substances such as aerosol cans with a flammable propellant in this appliance.
■ This appliance is intended to be used in household application only.
■ WARNING: When positioning the appliance, ensure the supply cord is not trapped or damaged.
■ WARNING: Do not locate multiple portable socket-outlets or portable power supplies at the rear of the appliance.
R600a Refrigerant Warning
- This appliance contains a small quantity of R600a refrigerant which is flammable.
- During transportation and installation, ensure that the tubing of the refrigerant circuit is not damaged.
- Leaking refrigerant can ignite and may damage the eyes.
- In the event any damage does occur, avoid exposure to open fires and any device which creates a spark. Disconnect the appliance from the mains power.
- Thoroughly ventilate the room in which the appliance is located for several minutes.
- Notify MITSUBISHI ELECTRIC SERVICE CENTRE or its service agent for necessary action and advice.
- The room for installing the appliance must be at least 1 cubic metre per 8 grams of refrigerant.
The refrigerant quantity contained in this appliance is noted on the Rating Label of the appliance.
- If your Mitsubishi Electric Refrigerator should require service, please contact MITSUBISHI ELECTRIC SERVICE CENTRE or its service agent.
NOTE: THIS REFRIGERATOR CONTAINS FLAMMABLE HYDROCARBON REFRIGERANT. ONLY SUITABLY QUALIFIED TECHNICIANS SHOULD ATTEMPT ANY SERVICE TO THE REFRIGERATION CIRCUIT OF THIS APPLIANCE. SOME JURISDICTIONS REQUIRE A SPECIFIC HYDROCARBON HANDLING LICENCE FOR SERVICING. PLEASE CONTACT MITSUBISHI ELECTRIC SERVICE CENTRE OR ITS SERVICE AGENT FOR ASSISTANCE.
From Installation to Operation
1 Installation

Install the refrigerator in the following kind of location.
● A place with good ventilation and not exposed to direct sunlight or hot air
To keep good cooling performance and reduce power costs.
● A place with low humidity
To prevent it from rusting.
A strong and level place
To prevent vibration, noise, and ajar or tilting doors.
To pre vent deformation or discoloration of the floor materials due to the weight or heat.
*If the floor materials are carpets, tatami mats, wooden floors, PVC floors, etc. and may deform or discolor, lay a strong plate or board underneath.
● A place away from other devices
To prevent noise or video interference with devices such as televisions.
There should be at least 0.5 cm of space on both the left and right sides, and at least 2.5 cm of space above.
To allow heat to dissipate from the top and the sides of the refrigerator.
*The rear can be placed directly against the wall. Leave some space if sound or stain is a concern.

Water prohibited
Do not install the refrigerator outdoors or in places exposed to water or excessive humidity.
Water may cause insulation failure, resulting in an electric shock or fire.

Follow the instructions
Leave space around the refrigerator.
If refrigerant leaks, it may accumulate and catch fire or explode.
2 Connect the Power Supply
* Connect power supply soon after installing the refrigerator
Dedicated outlet that meets the specified rating.
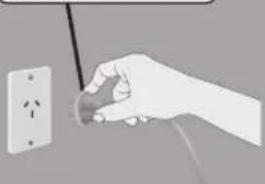
natural_image
Hand holding a black screwdriver inserted into an electrical outlet (no text or symbols visible)
Turn on the power of the refrigerator as soon as possible.
Use a dedicated outlet
Use a dedicated outlet for the power supply that meets the rating specified on the rating label. (The rating label is located on the refrigerator compartment.)
Warning
Using outlets that do not meet the specified rating or plugging in too many leads into a single socket can cause heat buildup or fire.
The refrigerator will not be damaged even if the power is supplied soon after installation. It takes a while for the refrigerator to cool, therefore supply power as soon as possible.
ElectricalConnections
Make sure this unit is properly grounded.
-
The refrigerator should always be plugged into its dedicated electrical outlet.
This will provide the best performance and prevent electrical circuits from being overloaded and causing a fire.
Make sure that the electrical outlet provides the proper voltage.
Extension cords are not recommended. -
If your refrigerator is installed in the high humidity location, not only ground connection but also installation of the earth leakage breaker is recommended.
- If the power cord is damaged, purchase a new cord from MITSUBISHI ELECTRIC SERVICE CENTRE or its service agent. Make sure that the power cord is designed for this model, in order to avoid a hazard.
- If the power cord is damaged, contact MITSUBISHI ELECTRIC SERVICE CENTRE or its service agent for the replacement, in order to avoid a hazard.
3 Adjustment and Anchoring
Turn the adjustable supports to the floor and anchor them so that the refrigerator will not move.
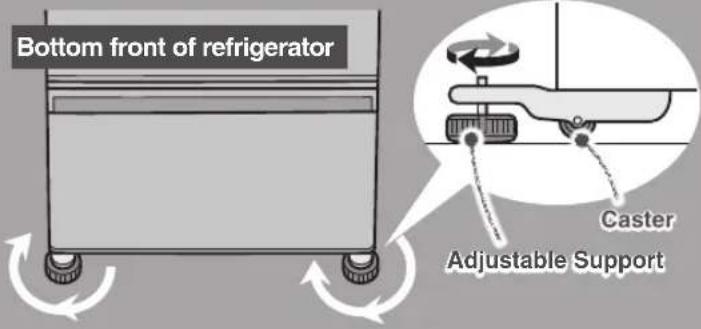
(To prevent vibration, noise, movement, and doors left ajar)
Turn the adjustable supports in the arrow direction until they touch the floor.

Follow the instructions
Anchor the refrigerator to a strong and level floor by adjusting the adjustable supports.
Otherwise, the refrigerator may move and cause injury.
- Adjust the tilt with the adjustable supports.
① Turn the right adjustable support in the direction of the arrow to lower the refrigerator.
2 If the door is still tilted after adjusting the adjustable support, place a strong board *1 under the adjustable support on the left rear side to make it level.
A few days after installation, the floor may sink due to the refrigerator's weight. Readjust the tilt with the adjustable supports.
*1 Normally, use a board with a thickness of 2 to 3 mm.
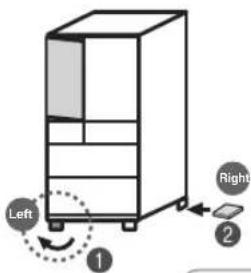
① Turn the left adjustable support in the direction of the arrow to lower the refrigerator.
2 If the door is still tilted after adjusting the adjustable support, place a strong board *1 under the adjustable support on the right rear side to make it level.
If you find it difficult to turn the adjustable supports,
use the supplied adjustable support tool kit.
The adjustable support tool kit is stored inside the refrigerator compartment at shipment.
Adjust the supports to make the refrigerator level. If the front of the refrigerator is slightly raised, the doors are easier to close.

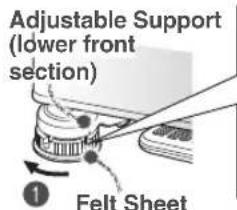
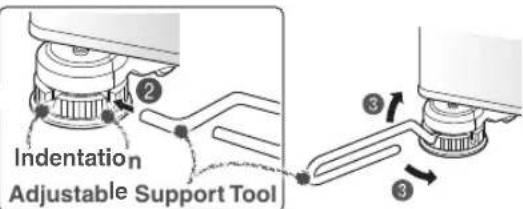
* The figure shows the left adjustable support as an example. The right adjustable support looks the same.
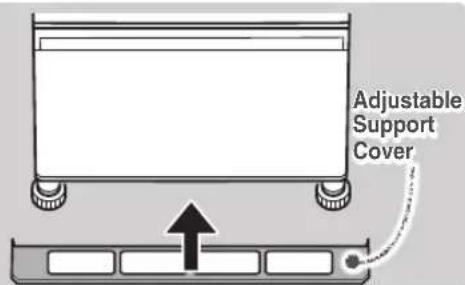
- After adjustment, attach the adjustable support cover.
(The adjustable support cover is stored inside the refrigerator compartment at shipment)
① Turn the adjustable support in the direction of the arrow to lower the refrigerator, and insert a felt sheet between the support and the floor.
② Insert the tool as far as it goes into the indentation of the adjustable support.
③ Turn the tool to adjust the tilt of the refrigerator.
Fully insert the adjustable support cover horizontally until it touches the rear side.

Prepare for Earthquakes
It is recommended to pass 2 strong belts through the handles on the top rear of the refrigerator and anchor them to a strong location, such as a wall or post.


Do not damage the refrigerant circuit (pipes) or drive screws into it.
Because flammable refrigerant is used, this may result in fire or an explosion.
Use in hot spring and geothermal areas
Corrosion control treatment may be required for the refrigerant circuit (pipes) due to generation of corrosive gases.
Contact the retail store where you purchased the refrigerator.

natural_image
Simple line drawing of a refrigerator with no text or symbolsHow to Use the Operation Panel
Touching will cause the operable icons to light up.
To save power, all displays other than ☐ are usually turned off (it turns off if there is no operation for about 30 seconds).

When operating, be sure to touch the buttons with your fingers.
ECO GUIDE
The refrigerator's ECO level is indicated with the number of ★ marks. → Page 22
Child Safety Lock → Page 33
Detail Setting
Touch to go to compartment selection;
Touch SELECT to go to various settings. → Pages 23 - 27
Example: When setting the refrigerator compartment to "M"


Touch an icon to display its setting details.
When setting or cancelling settings (or cancelling in the middle), touch one of these.

If you touch the operation panel, icons will be displayed. You can select the setting that you prefer.

Energy Saving Mode To successfully save power

Supercool Chilling To preserve meat or fish below freezing

Supercool Freezing To supercool freeze foods such as meat, fish, and dessert

Hot Freezing To use Supercool Freezing on hot cooked foods such as freshly cooked rice, curry, and sauces
Beginning Use
The refrigerator takes time to cool completely.
- Wait until the refrigerator has sufficiently cooled before storing ice cream and foods cooler than room temperature.
- Do not open the doors more than necessary, and close them as soon as possible.
- In summertime, it may take more than 24 hours to make ice immediately after installation.
There may be a plastic odor.
This odor will gradually disappear. Ventilate the room to prevent any odors from being trapped.
The refrigerator will be powerfully cooled (this is the same for summertime).
- Because heat will radiate out of the refrigerator in order to cool its contents, the sides will become hot.
- Because the compressor will enter high-speed operation, the operation sound will grow loud.
Operation Example (When Setting Supercool Chilling)


Touch
When you keep the door of the refrigerator open, touch 📄 for about 1 second. (until the buzzer sounds once)

Touch the icon to set
Here touch

natural_image
Blank gray image with a small icon in the top-left corner (no text or symbols)Operable icons light up.
Detail Setting
→Pages 23 - 27
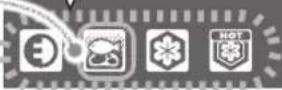


Confirm the setting details and compartment, then touch YES.
The text above the touched icon lights up.

Operation Panel
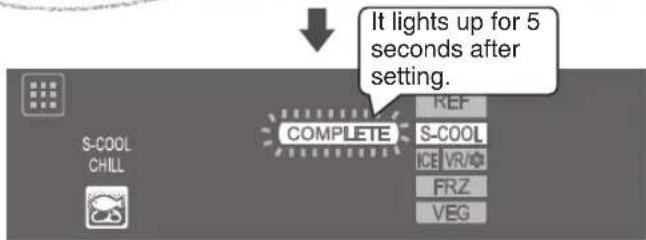
In ② and ③, touching 📄 returns the display to the previous state.
To Cancel the Setting/Cancel in the Middle

Touch


Touch the icon to cancel

Touch

natural_image
Gray rectangular shape with a small grid icon and wavy border, no text or symbols present.
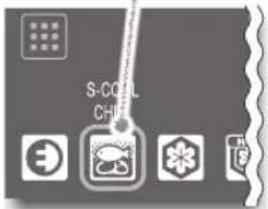

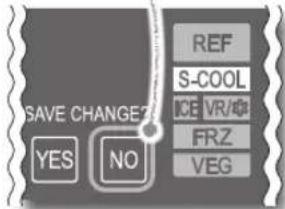

The text above the icon will disappear.

natural_image
Simple icon set with grid, square, cloud, and wavy line (no text or symbols)In the following cases, the display may not change even when you touch it.
The operation panel or your fingers are wet or dirty.

You are wearing gloves or have sticking plaster on your finger.

The interval between touches is too short. (Pressing repeatedly may cause a misdetection)

- Wipe the moisture and dirt off your fingers.
Perform operations with your hands. After you have touched an icon, confirm that the display has changed before touching again.
The response may vary, depending on the surrounding temperature, humidity, the health condition of the person who operates it, and the operating condition of neighboring electric appliances.
natural_image
Illustration of a cabinet with open doors and shelves (no text or symbols)Compartment Introduction
Refrigerator Compartment / Sliding Cases
Use the refrigerator compartment when storing foods that will be consumed soon. Foods such as meat, fish, dairy products, and processed food can be kept fresh longer in the sliding cases at a temperature lower than the refrigerator compartment.
Refrigerator Compartment About 0°C to 6°C
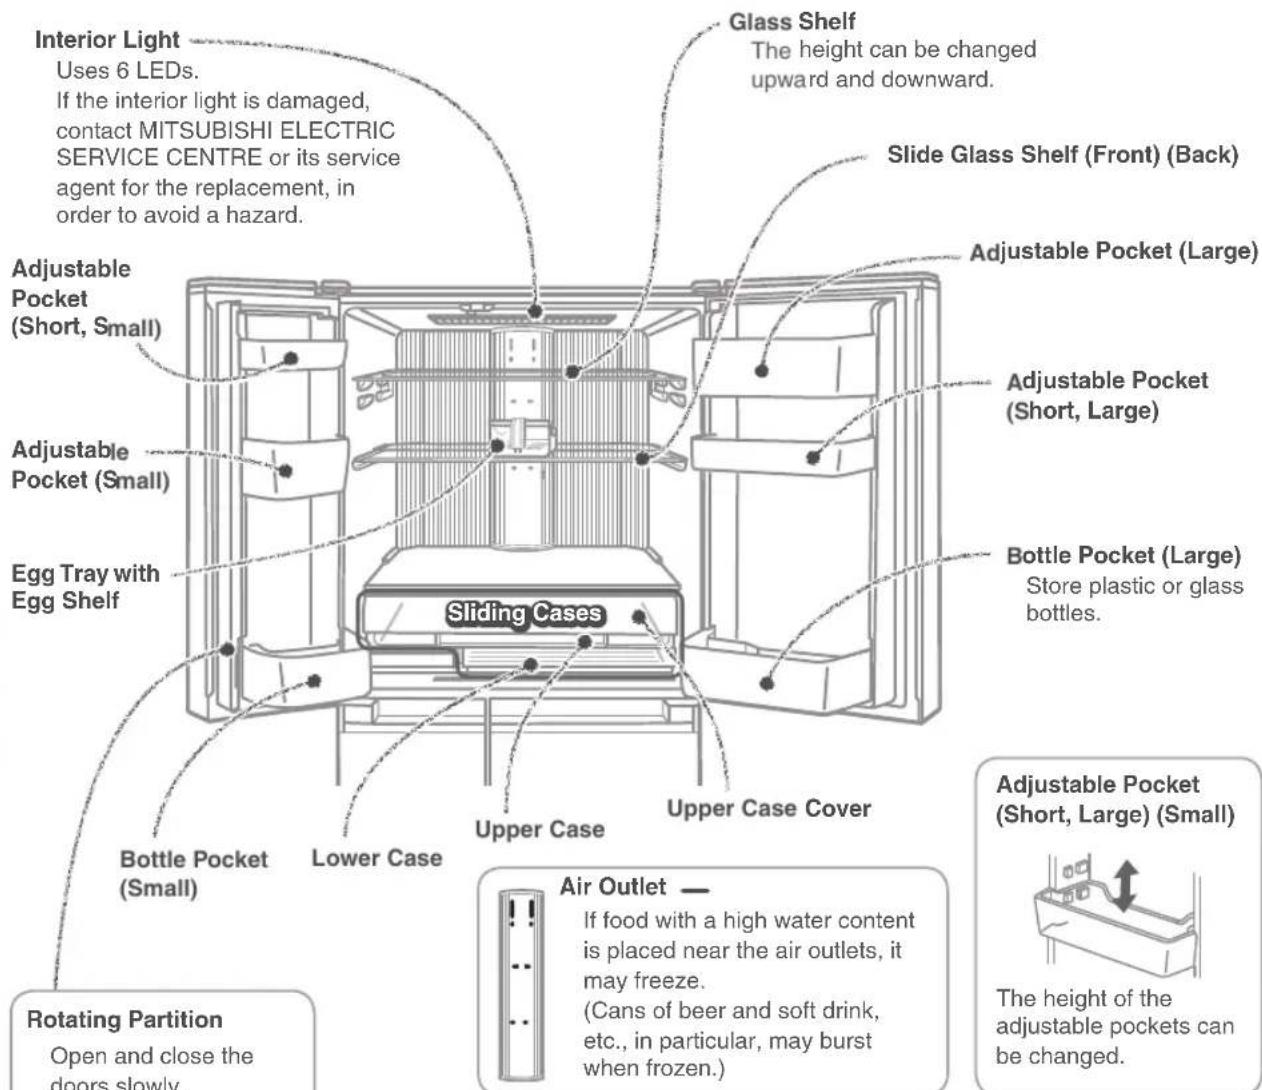
Rotating Partition
Open and close the doors slowly. If you open or close the doors with force, the rotating partition may open to the front. Return the partition to its regular position before closing the door. (Otherwise it may be damaged.)
Air Outlet —

If food with a high water content is placed near the air outlets, it may freeze.
(Cans of beer and soft drink, etc., in particular, may burst when frozen.)

The height of the adjustable pockets can be changed.
Preventing the Transfer of Odors

It is recommended that foods that have strong odors or easily absorb odor are either wrapped thoroughly or stored in an airtight container.
Kimchi, pot stickers, sardines (seafood), beef, etc. Food that transfers odors easily

Rice, potato salad, etc. Food that may easily absorb odors

The door will automatically close from halfway with the Auto closer
With the door of the refrigerator compartment open at an angle of about 20 degrees or less, the door will close automatically.
The door may stop before closing completely if you swing the door too softly.
If the door stops (ajar), it will not close automatically. The speed of the closing door may change according to the amount of food stored.
When a door is open, you will be informed with the door alarm.
Sliding Cases

natural_image
Pure technical diagram of a mechanical component with no text, numbers, or symbolsAt the time of purchase, the lower case is not set to Supercool Chilling.
When setting Supercool Chilling, use the following settings.
Upper Case
- Processed food such as sausage, ham and dairy products can be preserved.
- Do not store food that is easily frozen.
• The temperature cannot be adjusted.
Lower Case
Supercool Chilling can be set with
- Food will not freeze, even below the freezing point
- The freshness of meat and fish can be prolonged without freezing.
Preserving Meat or Fish Below Freezing

Supercool Chilling

flowchart
graph TD
    A["Input Icon"] --> B["Step 1"]
    B --> C["Output Icon"]
    C --> D["Battery Icon"]
    C --> E["Fish Icon"]
    C --> F["Medical Cross Icon"]
    C --> G["Hot Symbol"]
Supercool Chilling stores and preserves meat or fish for a longer time at a temperature lower than the refrigerator compartment or upper case without freezing them.
Once it has been set, Supercool Chilling will be the default setting until it is disabled.
To Set
① Touch on the operation panel
②Touch
The text above the icon will light up.
③Touch YES
The settings are finished.
It doesn't matter whether you put food in before or after the settings.
To cancel the setting
→ Page 11
* If you disable the setting, the lower case can be used in the same way as the upper case.
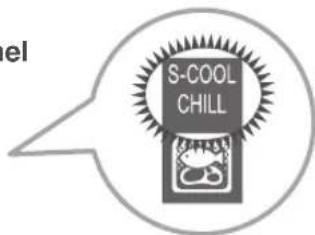
Supercool Chilling Is Very Useful
Tastes good
Because the food doesn't freeze, the fresh flavor lasts longer!
Keep fresh
Meat and fish last longer and are fresher than in the refrigerator compartment or upper case!
Estimated Preservation Period
Tips
- Do not leave food hanging over shelves or pockets.
- Do not place bottles that cannot fit all the way to the bottom of the bottle pocket.
- Do not attach a case that you purchased separately onto the outside of a pocket.
- Do not heat the glass surfaces of the glass shelves or place hot objects on them.
- Do not close the door while food is in front of the upper case or the lower case.
- Fully stow away the cases. Otherwise they may keep a door ajar and reduce the cooling performance, or food may fall and cause damage to a case.
Do not pile food to the top. Leave a gap so that cold air can flow to the ceiling and between food.

Notice
Because sliding cases cannot guarantee the quality of foods that easily freeze (such as tofu, konjac, raw eggs, vegetables, etc.), storing such foods is not suitable. Depending on the type and amount of food, as well as its condition at the time it is placed in the refrigerator, food may freeze.

natural_image
Simple 3D illustration of a cabinet or rack with a square latch (no text or symbols)Compartment Introduction
Ice Making Compartment
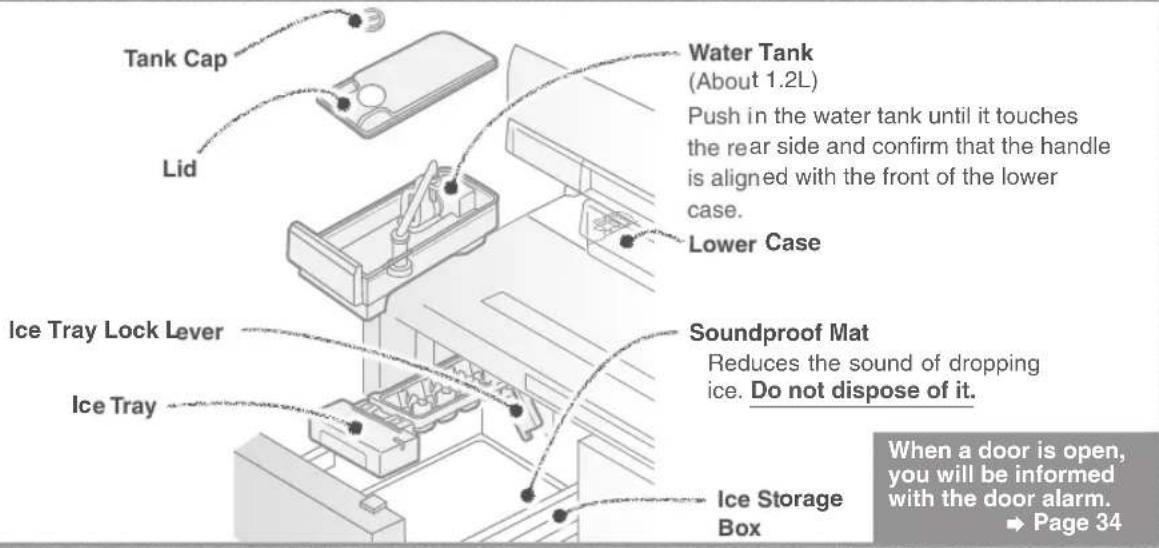
If water is put into the refrigerator compartment's water tank, ice will be made in the ice making compartment.
Clean the ice maker periodically to ensure that the ice is pure and delicious. ➔ Pages 28 - 29
Making Ice
Wash the water tank, water supply pipe, and ice tray before making ice for the first time, or if you have not made ice for more than a week.
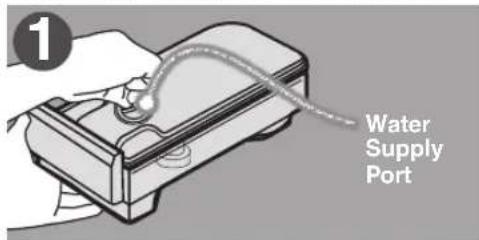
Remove the water tank from the refrigerator compartment, remove the tank cap by twisting it, and supply water.
Do not pour water above the full position (▲).
- Water will easily spill when you carry the tank.
Further, it may cause the ice to join together or form a protrusion.
*WARNING-Fill with potable water only.

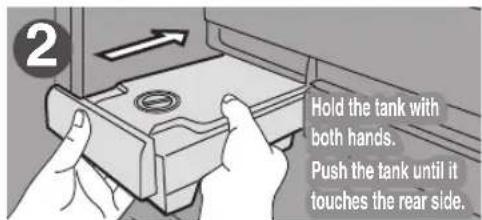
Close the water tank cap and return the water tank to its original position.
- Push in the water tank until it touches the rear side.
Setting the water tank incorrectly may pre vent ice from forming.
- Tilting the tank will cause the water to spill.
Tips

- Do not place food inside when making ice.
Stop the ice making and then place the food below the reference line on the side. (Not doing so may result in a half-shut door or malfunction and
→ Pages 23 - 24
Do not pour anything other than cold water into the water tank, such as warm water, juice, tea, soft drinks, or other liquids (the tank can resist heat up to 60irc C). Pouring anything other than cold water into the tank may cause damage.
Do not pour water directly into the ice tray to make ice. Unfrozen water in the ice tray may fall into the ice storage box, and the ice may not form cubes.
The level of the ice storage is checked automatically by the sensor lever, and ice making is stopped when the ice reaches a certain level (about 70 to 140 ice cubes). To detect the ice storage level correctly, make sure that the ice is flat and that the ice server is kept in its storage position in the front of the ice storage box as shown in the left diagram.
Open and shut the door of the ice making compartment slowly. There is a risk of the ice spilling.
Rapid Ice (Quick Ice Making)
The ice making time for a single batch can be shortened.

flowchart
graph TD
    A["Input"] --> B["REF"]
    B --> C["S-COOL"]
    C --> D["ICE VR/★"]
    D --> E["FRZ"]
    E --> F["VEG"]
    G["RAPID ICE"] --> H["2"]
    H --> I["3"]
    I --> J["SELECT"]
① Touch on the operation panel
② Repeatedly touch to display

→ Pages 23 - 24
③ Repeatedly touch set to light up

The display changes each time the button is touched.

The settings are finished.
To cancel Rapid Ice, select ICE or ICE STOP.
- In the following cases, quick ice making is stopped automatically, and regular ice making will begin.
- When about 10 hours have passed since the quick ice making is set.
- When the ice storage box is full (about 70 to 140 ice cubes)
- When there is no water in the water tank
The sound of the refrigerator running gets louder during Rapid Ice, because it is operating at high speed. Also, the ice may split or crack because it freezes in a short time.
How much time does it take to make Ice?

Ice making time will differ according to ice making compartment settings. Regular ice making is set at the time of purchase.
| Operation Panel Display | Setting | Ice Making Time for 1 Batch |
| ICE | Regular Ice Making | About 2 hours |
| RAPID ICE | Quick Ice Making | 80 to 100 minutes |
| ICE STOP | Ice Making Stopped | Ice will not be made. |
To switch between ICE, RAPID ICE, and ICE STOP → Page 24.
In addition to the surrounding temperature, water type, and water volume and temperature in the water tank, ice making times may vary with the following conditions, and be longer than those in the table.
•In winter or at other times when the surrounding temperature is low
- When the door is often opened and closed
- When the freezer compartment is set to "L"
- When Energy Saving Mode is set → Page 22
- When the ice tray is pulled out and reinserted during ice making
- When PWR isplayed, ice cannot be made. Cancel the setting.
→ Page 26
About the Ice
About 10 to 12 ice cubes can be made each time. The ice cube size and the number of ice cubes in one batch depend on various factors, such as the amount of water in the water tank. When few ice cubes are being made, pour water into the water tank.
- When ice is made using water with a high mineral content, such as mineral water, white deposits (white crystals) may form in the ice. This is the crystallized mineral content and is not harmful.
● The water channels in the ice tray may freeze, joining the ice together or forming a protrusion.
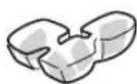
- If the ice is stored inside the ice storage box for a long time, ice cubes may join together or shrink (due to a phenomenon called sublimation).
The sound of the refrigerator running gets louder during RAPID ICE, because it is operating at high speed. Also, the ice may split or crack because it freezes in a short time.

Follow the instructions
Be very careful when crushing ice that has joined together.
There is a risk of injury.

natural_image
Simple 3D illustration of a cabinet with a handle (no text or symbols)Compartment Introduction
Supercool Freezing Compartment
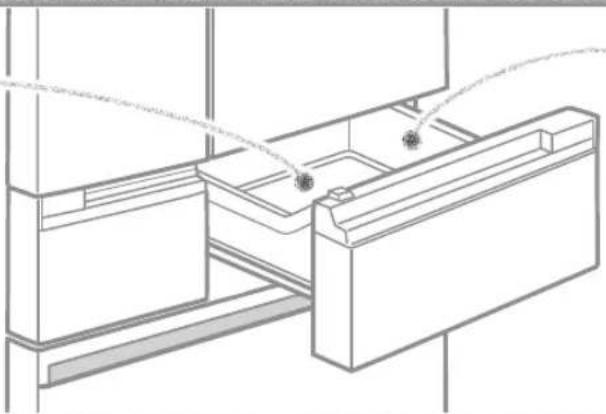
The supercool freezing compartment can be switched between "Soft-Freezing" and "Freezer." Placing food in the supercool freezing compartment and using 📋-COOL FREEZE" or 🌐 "HOT FREEZE" mode allows food to be frozen without losing its taste and texture.
Soft-Freezing / Supercool Freezing → Pages 18 - 20
Aluminum Tray
The cold tray quickly cools the food.
natural_image
Technical line drawing of a mechanical assembly with no visible text or symbolsSupercool Freezing Compartment Case
Do not stack food higher than the case. Doing so may result in the door being unable to close, food melting, or food being damaged.
When a door is open, you will be informed with the door alarm. → Page 34
What can the supercool freezing compartment do?
The temperature in the supercool freezing compartment can be adjusted by switching between Soft-Freezing and Freezing.
With Soft-Freezing, to freeze food, use 📄. For freshly cooked rice or other warm food,

Performing temperature adjustment
→ Pages 23 - 24

Operation Panel Display Supercool Freezing Compartment Condition

Soft-Freezing
Food can be cooked immediately after being taken out.
Meat, fish, etc. can be stored for 2 to 3 weeks *1 .
This is set at the time of purchase.
With and food can be frozen even more deliciously.

Freezing
Meat, fish, etc. can be stored for about 1 month.
For storing frozen foods, use "FRZ•H".
*1 The preservation period varies depending on the types of food and the condition when food was placed inside.
To supercool freeze such as meat, fish, and dessert

Supercool Freezing

flowchart
graph TD
    A["①"] --> B["②"]
    B --> C["②"]
    C --> D["②"]
When Soft-Freezing is set
Foods such as meat, fish, and dessert can be deliciously frozen. Place food in the supercool freezing compartment before setting. Reset if placing new food inside even it was already set.
To Set
① Touch □ on the operation panel
② Touch
The letters above the icon will light up.
③ Touch YES
The settings are finished.
This ends automatically after about 8 hours.
After it ends, the food will be stored in Soft-Freezing mode.
Selecting will cancel .

To cancel in the middle
To Use Supercool Freezing on Hot Cooked Foods such as Freshly Cooked Rice, Curry, and Sauces
Hot Freezing


When Soft-Freezing is set
Hot or warm cooked foods such as freshly cooked rice, curry, and sauces can be deliciously frozen. It can also be used to cool the food just after cooking.
Place food in the supercool freezing compartment before setting. Reset if placing new food inside even it was already set.
To Set
① Touch □ on the operation panel
② Touch
The text above the icon will light up.
③ Touch YES
The settings are finished.
This ends automatically after about 9 hours.
The letters above the icon will light up until it ends.
After it ends, the food will be stored in Soft-Freezing mode.
Selecting will cancel.
To Cancel
→ Page 11
Tips
With “Supercool Freezing” and “Hot Freezing” (both referred to as “Supercool Freezing”)...
- At times such as storing new food, please set ✝ or 📁 again, and reduce the opening and closing of the doors as much as possible.
- If you want to store food frozen with Supercool Freezing for a long time, move it to the freezer compartment quickly. Because food moved to the freezer compartment will freeze and harden, please thaw out food before using it.
- Please do not store food that is hotter than 80°C.
With Soft-Freezing...
- When you have frozen a food too hard, leave it at room temperature for about 5 to 15 minutes. It will become easy to cut.
- Adjust the temperature according to how the food is frozen. → Pages 23 - 24
- If the temperature setting of food is switched from freezing to Soft-Freezing, the food should be consumed as soon as possible (within 1 to 2 weeks).
- Even if fruit is thawed, it does not return to its original condition. Eat frozen fruit without thawing it.
- If fruit is stored for more than a week with Soft-Freezing, its taste may change. We recommend eating within 2 to 3 days.
Notice
Supercool Freezing cannot be performed during Power Save Mode.
- When performing operations with or in ② if a continuous beeping sound occurs and the setting cannot be performed, the temperature setting is set to "Freezing."
It can be set when Soft-Freezing.
- You can use Supercool Freezing even when other foods are still inside.
Even after Supercool Freezing has finished, the food may not be completely frozen. (When the temperature is set to Supercool Freezing or Soft-Freezing, because food is frozen at about -7ircC , it may take about 24 hours for the food to freeze completely.)
The degree of freezing or freezer burn may vary depending on the food type, cooking method, storage arrangement (stacking, storage location), the amount of food, and the storage time.
● Depending on how much sugar, salt, moisture, or fat the food contains, freezing may not be possible or the food may harden when frozen (cannot be cut immediately with a kitchen knife).
- Use for food that is warmer than body temperature.
Freeze foods with their original flavors. The frozen foods do not have to be thawed before being consumed.
Food can be frozen, while preserving its taste and texture.
Supercool Freezing
Significantly reduces dripping during thawing and the loss of nutrients, preserving flavor

Cut steak meat and blocks of meat into 100 to 200 grams and use "Supercool Freezing" prevent dripping and preserve the taste and nutrients of food through Supercool Freezing.
Hot Freezing
Things unsuitable for freezing such as potatoes and bamboo shoots can be frozen

Use "Hot Freezing" to keep potatoes in curry fresh. Just thaw the curry out for that fresh-cooked potato texture. There is none of the bother to remove potatoes before freezing them.
Hot Freezing
Freshly cooked rice can also be frozen while hot

Use Hot Freezing" to preserve the flavor of freshly cooked rice. Thaw it to enjoy its glutinous texture.
Since food can be easily cut even when frozen, it can be cooked without thawing \*1.
Meat
Ground meat / Blocks of me at
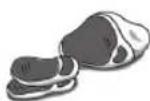
It can be cut with a kitchen knife easily without thawing. Because it can be cut while frozen, whatever you will not use can be returned to the supercool freezing compartment. Food can be used without being wasteful.

Thinly sliced meat / Bacon
You can easily separate them one by one and slice them finely without thawing. They will thaw while basting.
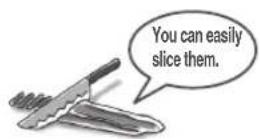
Fish
Cutlets
You can easily separate them. No need for dividing them by the amount per serving before freezing. Purchased packs can be frozen as it is. Bake them at low heat without thawing and there is no trouble.

Sauces
Meat sauce
If there is sauce left over, place it in a storage container and use "Hot Freezing" Scoop out only the necessary amount and dress the pasta with it to easily make a meat sauce pasta.
Scoop the amount you need

Freezer Compartment and Supercool Freezing Compartment: Using them properly

Supercool Freezing Compartment
(Soft-Freezing setting)

Freezer Compartment
Make a large batch of simmered foods that are delicious when cooked in a large batch, then use "Hot Freezing" on the excess amount. Move the supercool frozen food to the freezer compartment to preserve for a long period of time. This can also save the time and labor of cooking every day.
* Meat and fish can be preserved in a freezer compartment for about 1 month, but the preservation period will differ according to the freshness of food before storing it.

Freezer Compartment

Supercool Freezing Compartment (Soft-Freezing setting)
This is recommended for when you would like to consume food without thawing.
Food that has been moved to the supercool freezing compartment (set to Soft-Freezing) can be cut to just the portions necessary, so food is not wasted.
Although this differs depending on the size of the food, most food can be cut in about 2 to 5 hours.
* Use food within a short period of time (about 1 to 2 weeks).
Soft-Freezing / Supercool Freezing
Handy Tricks for Supercool Freezing

Convenient Preservation
Can preserve for 2 to 3 weeks Plus it is easy to use
Whitebait
Because it is frozen in a crumbly state, you can scoop out just as much as you need with a spoon.
Cod Roe / Squid Salted Fish-guts
At -7°C, food containing a large amount of salt will not freeze. It can be eaten right out of the refrigerator.

Boiled vegetables
Keep boiled vegetables together with

"Hot Freezing." The vitamins of boiled vegetables will keep even
after thawing, making for a tasty meal.

* The preservation period will differ according to the food type and the condition of the food when it is placed in the freezer compartment.
Easy to Cut
Raw food that is difficult to cut can be easily cut
Lemon Slices
Slicing extremely thin lemons is very easy!

Squid
Even slippery difficult-to-cut squid can be cut easily.
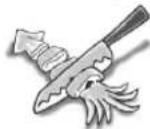
Carpaccio
Red sea bream and Tuna can very thinly be sliced. It can be prepared deliciously.
Easy to Make Meals
Make meals quickly when you are busy in the morning
Karaage/Teriyaki
If you use 📄 Supercool Freezing" on meat marinated in seasoning liquid such as karaage or teriyaki chicken meat, you can use just as much as you want whenever you want.
Easy Desserts
Enjoy fruit with a new texture
Frozen fruits
Cut fruits into bite-size pieces and use ☐ "Supercool
Freezing" on them for fruit sorbet. Try it out on a variety of fruits.


Tips for Supercool Freezing

Put Foods at the Same Time.

If more food is added in the middle, the Supercool Freezing may not work.
Do not store in a glass container. It may break.
Lay the Food out Flat on Top in the Supercool Freezing Compartment.

natural_image
Illustration of a drawer containing a small object and a container with a label (no text or symbols visible)Place food level and side by side.
Separate hot food from frozen food. The hot food may touch and thaw the frozen food.
Foods Unsuitable for Supercool Freezing
● Foods that cannot be frozen
(Konjac (devil's tongue), tofu, milk, raw eggs, etc.)
Preservation of the pre-freezing texture and quality cannot be guaranteed.

● Groceries like frozen foods and ice cream.

● Food that has already thawed once
The texture and quality cannot be guaranteed.
Soft-Freezing / Supercool Freezing (Continued)
Easy Dessert Recipes with Supercool Freezing
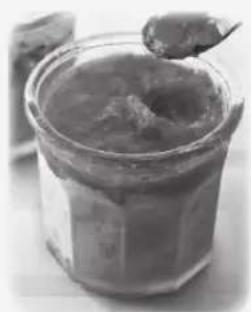
Strawberry and Kiwi Fresh Jam
Ingredients (For an easy-to-make amount)
| Strawberries | 1 Pack (About 300g) |
| Kiwis | 4 to 5(About 300g) |
| Sugar | 60g to 100g |
| (Respectively for the strawberries and for the kiwis) |
natural_image
Close-up of a glass jar filled with granular food, topped with a spoon (no visible text or symbols)Procedure
① Remove strawberry stems and peel off kiwi skin.
② Place the ingredients from ① in separate bowls and carefully mash them.
③ Add sugar according to the desired sweetness, then use 📋 "Supercool Freezing"
④ After leaving it overnight, it's ready. Scoop out the amount you'd like to use.
Important Point!
Because no heat is used, it is very easy to make and produces beautiful colors. Also, because it can be made with a small amount of sugar, it is very healthy. It can even be casually made in small amounts when you have left-over fruit.
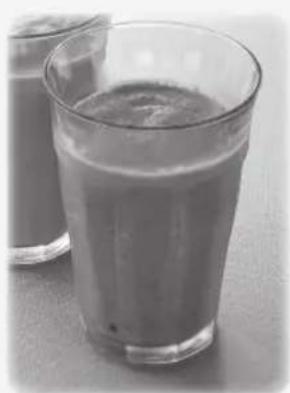
Green Smoothie
Ingredients (1 serving)
| Frozen with Supercool Freezing" | |
| Boiled cabbage | About 1 leaf (About 50g) |
| Boiled spinach | About 1 root clump (About 30g) |
| Peeled apple | 1/2 apple |
| Yogurt (no sugar) | 1/3 cup |
Honey 1 tablespoon
natural_image
Black and white photo of a glass filled with light-colored beverage, no visible text or symbolsProcedure
①Cut the frozen cabbage, spinach, and apples while still crunchy, and put in a mixer together with all other ingredients.
Important Point!
Vegetables and fruits frozen with Supercool Freezing are broken up by the mixer very quickly.

natural_image
3D illustration of a cabinet with a rectangular drawer (no text or symbols)Compartment Introduction
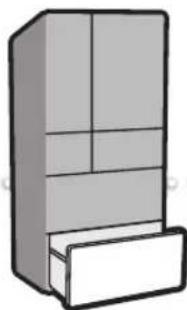
Freezer Compartment
Store frozen food and ice cream. Store bread, meat, and fish through freezing.
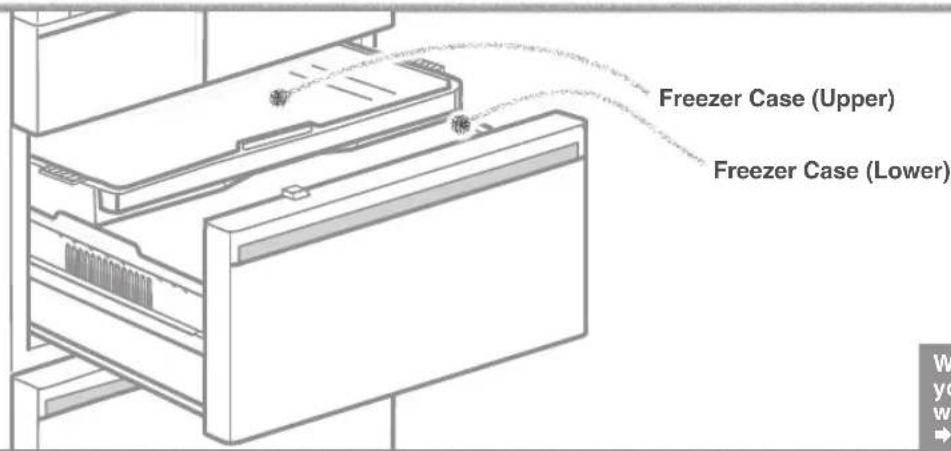
When a door is open, you will be informed with the door alarm. → Page 34
Tips
- Do not place tall objects in the freezer case (lower).
Food or the freezer case (upper) may become damaged or the door may not close, causing the accumulation of frost or lowering the cooling performance.
- Do not put in plastic drink bottles other than those meant for freezing.
The frozen contents may break the bottle.
natural_image
3D illustration of a cabinet with a drawer, no text or symbols presentCompartment Introduction
Vegetable Compartment
Place vegetables, fruits, and beverages in this compartment. It preserves food, maintaining the moisture that would normally go away over time. Storing fruits and vegetables in plastic wrap keeps them even fresher.

Bathed in light to increase the nutrients! Vitamins boosted up The orange LED *1 is always on.


• Vegetables stay alive even after harvest. Being bathed in light, their nutrients are boosted up.
• There is almost no vegetable, fruit, drink or seasoning that cannot be preserved or stored being exposed to light.
•The vegetable nutrients are increased even with a weak light, so packaging does not need to be removed (except when the packaging completely blocks off the light).
•The vegetable nutrients are not increased forever. The preservation also depends on the freshness at the time of purchase. Eat vegetables when they are as fresh as possible.
* 1 If the orange LED is damaged, contact MITSUBISHI ELECTRIC SERVICE CENTRE or its service agent for the replacement, in order to avoid a hazard.
When a door is open, you will be informed with the door alarm. → Page 34
Tips
- Do not pile food higher than the height of the vegetable case (lower) or vegetable case (upper).
Food or the vegetable case (upper) may become damaged or the door may not close, causing the accumulation of condensation or lowering the cooling performance.
Because the vegetable compartment has a high humidity depending on the amount or types of vegetables, frost or condensation may form on the roof of the vegetable compartment or the surface of the cases. When condensation forms, wipe it off with a dry cloth.
To prevent discoloration of the plastic parts, store cut citrus fruits in plastic wrap or containers.
Energy Saving Mode
This mode learns each family's method of use and operates with the optimal state for each compartment.

Energy Saving Mode
An appropriate timing is selected for each compartment and the energy saving mode is performed automatically with a slightly high temperature setting.
To Set
① Touch

on the operation panel
② Touch

The text above the icon will light up.
3 Touch

The settings are finished.
To Cancel the Setting
→ Page 11

To Confirm with the ECO GUIDE
The refrigerator's ECO level for the last 24 hours is indicated by the number of ★ marks judged from such things as the temperature settings in each compartment and the frequency of opening and closing the doors in "how to use, etc."
Operate the Operation Panel
The compartment display switches each time is touched.
You can confirm which compartments are in energy saving mode with the eco display.
Example: When the freezer compartment and the refrigerator compartment are in energy saving mode (ECO level 3)

Close the Door
After a door is closed, the ECO GUIDE and ENERGY SAVING will light up (after about 30 seconds it will turn off).
Example: When the refrigerator compartment and the freezer compartment are in energy saving mode

How to View the ECO GUIDE

- At the time of purchase, level 1 is displayed.
- If energy is being saved, the ECO level will increase (it is updated about once every hour).
- The ECO GUIDE is displayed even when Energy Saving Mode is not set.
eco Lights-Out
In the following cases, energy saving mode will be cancelled and the light will turn off.
- When the doors are frequently opened and closed
● When Rapid Cool is operating
● After defrosting
● When set to Supercool Chilling.
(After the freezer compartment is sufficiently cold and stable, energy saving mode will automatically restart.)

natural_image
Simple line drawing of a cabinet or rack unit with no text, numbers, or symbols present.Detail Setting
Performing Temperature Adjustment
The temperature of each compartment can be adjusted.
Use the refrigerator, freezer, and vegetable compartments set to "M" usually.
Use the supercool freezing compartment in your preferred setting.
Temperature Adjustment
At the time of purchase, the settings are as follows.
Refrigerator, Freezer, and Vegetable Compartments ..... "M"
Supercool Freezing Compartment ....."SOFT FRZ M"

This is a display example of when the supercool freezing compartment is set to "SOFT FRZ M"
This is displayed when setting the temperature of the supercool freezing compartment.

The set temperature lights up.
① Touch □ on the operation panel
② Repeatedly touch to light up the compartment that you want to set the temperature for.
The display changes in the order shown in the right each time the button is touched.
VR/ Israel displayed at the time of purchase.
When a compartment is displayed, that compartment's temperature setting will also be displayed.
③ Repeatedly touch SELECT to set the temperature.
In ② and ③, touching ☐ not performing any operations for about 30 seconds will return the display to its initial state. ➔ Page 10

flowchart
graph TD
    A["REF\nS-COOL\nICE VR/Φ\nFRZ\nVEG"] --> B["REF\nS-COOL\nICE VR/Φ\nFRZ\nVEG"]
    B --> C["REF\nS-COOL\nICE VR/Φ\nFRZ\nVEG"]
    C --> D["REF\nS-COOL\nICE VR/Φ\nFRZ\nVEG"]
    D --> E["RAPID COOL"]
    E --> F["REF\nS-COOL\nICE VR/Φ\nFRZ\nVEG"]
    F --> G["REF\nS-COOL\nICE VR/Φ\nFRZ\nVEG"]
    G --> H["REF\nS-COOL\nICE VR/Φ\nFRZ\nVEG"]
    H --> I["REF\nS-COOL\nICE VR/Φ\nFRZ\nVEG"]
    I --> J["*1"]
    J --> K["*2"]
    K --> L["REF\nS-COOL\nICE VR/Φ\nFRZ\nVEG"]
    L --> M["REF\nS-COOL\nICE VR/Φ\nFRZ\nVEG"]
    M --> N["REF\nS-COOL\nICE VR/Φ\nFRZ\nVEG"]
    N --> O["REF\nS-COOL\nICE VR/Φ\nFRZ\nVEG"]
* 1 Can only be selected when Supercool Chilling is set.
→Page 13
* 2 When set to Rapid Cool →Page 25
Refrigerator/Freezer Compartment Temperature
The display changes each time SELECT is touched and the temperature can be set to 5 different levels.

Lower Case (When Supercool Chilling is set) Temperature
Can be adjusted to 📊 only when Supercool Chilling is set. → Page 13
Make this setting when food freezes.
The display changes each time is touched.
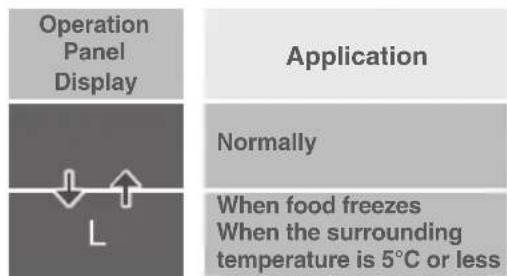
Performing Temperature Adjustment (Continued)
Ice Making Compartment Settings
The display changes each time is touched.

flowchart
graph TD
    A["ICE"] --> B["RAPID ICE"]
    B --> C["ICE STOP"]
When you want to make ice quickly (Rapid Ice)
Application
When you want to make ice
When you want to make ice quickly
When not using the refrigerator for a long time* For cleaning When you want to use as a freezer compartment
→ Page 15
For short term storage of frozen food. Not to be used for long term storage of frozen food or ice cream.
* Clean in the same manner as in③ of "When Not Using the Refrigerator for a Long Time (When the Power Plug Is Unplugged)" (→ Page 34).
Vegetable Compartment Temperature Settings
The display changes each time is touched and temperature can be set to 5 different levels to keep vegetables moist.

flowchart
graph TD
    A["L"] --> B["M"]
    B --> C["H"]
    C --> D["•"]
    style A fill:#f9f,stroke:#333
    style B fill:#ccf,stroke:#333
    style C fill:#cfc,stroke:#333
    style D fill:#fcc,stroke:#333

When keeping vegetables moist, the vegetables can be freshly kept for a long time in the temperature suitable for cooling leaf vegetables.
Supercool Freezing Compartment Temperature
The display changes each time [SELECT] is touched and the temperature can be set to 6 different levels.

other
Compartment Operation Panel Display | Operation Panel Display | Compartment | VR/★ | | :--- | :--- | :--- | | SOFT FRZ | L | About -5°C | | SOFT FRZ | M | About -7°C | | SOFT FRZ | H | About -9°C | | FRZ | L | About -13°C | | FRZ | M | About -15°C | | FRZ | H | About -17°C |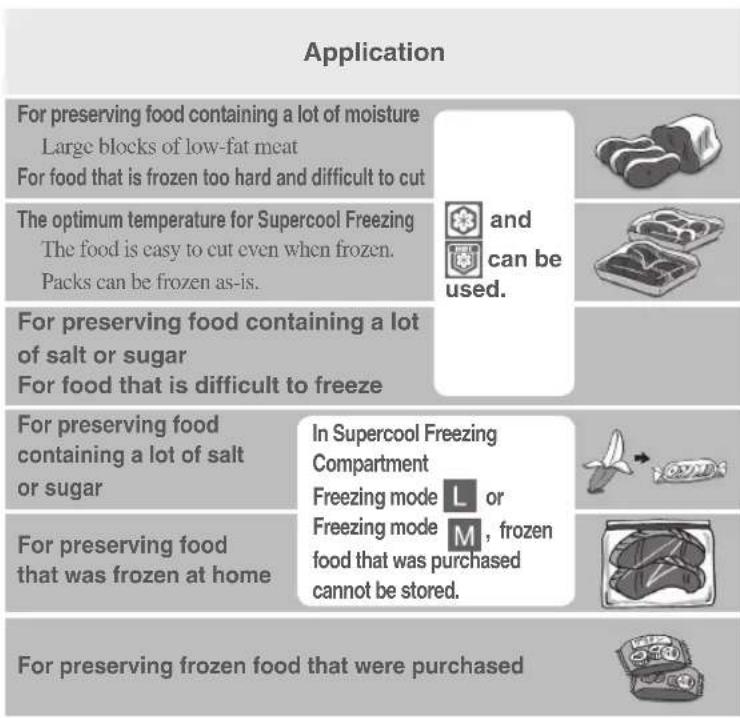
The freezer compartment temperature is different from the freezing temperature of the supercool freezing compartment.
After changing from freezing to Soft-Freezing, it takes some time for the temperature inside the refrigerator to stabilize (about 2 hours).
Notice
The temperatures described here are measured in the lower centre of the refrigerator after the temperature has stabilized when the surrounding temperature is 32irc C and the doors are closed without any food inside. The temperature fluctuates with factors such as food storage conditions and how often the doors are opened and closed.
Before and after defrosting, the temperature inside the refrigerator may drop or rise temporarily.
- When food freezes in the refrigerator compartment or lower case, set the refrigerator temperature setting to M - L and the lower case temperature setting (when Supercool Chilling is set) to L.
- If supercool freezing compartment is set as Freezing mode H, then the temperature in the Freezer compartment will be automatically set as M (L or Settings will not be available).
Rapid Cool
When storing a large amount of food, protect the food's freshness by rapidly cooling it.
Rapid Cool
Swiftly cool compartments (Refrigerator, Freezer, and Vegetable Compartments). when their doors are opened and closed
When set: Blinking→Light on
When cancelled: Light on→Blinking


To Set
① Touch □ on the operation panel
② Repeatedly touch 📋 to display 🅐 → Page 23
→ Page 23

will blink.
③ Touch SELECT

will change from blinking to staying lit, and then the setting is finished.
This ends automatically about 2 hours after setting.
It doesn't matter whether you put food in before or after the settings.
To Cancel in the Middle
① Touch □ on the operation panel
② Repeatedly touch 📋 to display 🅐 → Page 23
→ Page 23

will light up.

③ Touch SELECT

will change from lit to blinking, then will be cancelled.
Notice
The sound of the refrigerator running gets louder during Rapid Cool, because it is operating at high speed.
Power Save Mode
The cold air in unused compartments is saved, allowing energy to be positively saved.
Power Save Mode
This function reduces freezing capability of the ice making compartment and supercool freezing compartment for the purpose of power saving.
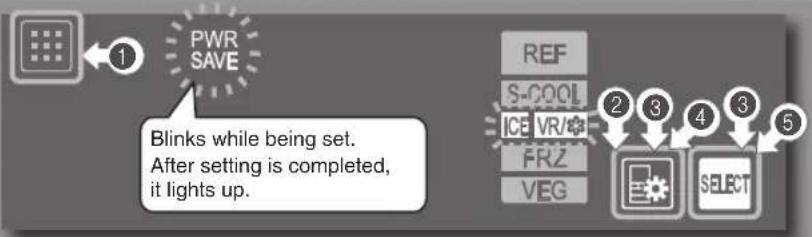
flowchart
graph TD
    A["1"] --> B["PWR SAVE"]
    B --> C["2"]
    C --> D["3"]
    D --> E["4"]
    E --> F["5"]
    G["REF"] --> H["S-COOL"]
    H --> I["ICE VR/★"]
    I --> J["FRZ"]
    J --> K["VEG"]
    K --> L["SELECT"]
    style A fill:#f9f,stroke:#333
    style G fill:#f9f,stroke:#333
    style B fill:#ccf,stroke:#333
    note right of G: Blinks while being set. After setting is completed, it lights up.
If the ice making compartment is set to Power Save Mode, ice making will stop and ice will no longer be able to be stored. Empty the water from the water tank as well as the water and ice from the ice tray and the ice storage box. ➔ Pages 28 - 29
To Set
① Touch 📋 on the operation panel
② Repeatedly touch 📄 to light up 📆 or . VR/
③ Touch and seat the same time for at least 3 seconds until the buzzer sounds.
PWR SAVE will blink.
④ Repeatedly touch to light up the compartment to set
The lit compartment is set to Power Save Mode.
The display changes in the order shown in the right each time the button is touched.
- represents a blinking display.
● Power Save Mode is disabled at the time of purchase.
⑤ Touch SELECT
The buzzer will sound and change from blinking to staying lit, and then the setting is finished.
If the ice making compartment is set, ICE STOP is displayed.
* If 30 seconds pass without touching SELECT, the display will return to ② without performing any settings.

flowchart
graph TD
    A["Blinking"] --> B["ICE"]
    B --> C["VR/★"]
    C --> D["ICCE"]
    D --> E["Set to ice making compartment"]
    E --> F["VR/★"]
    F --> G["Set to supercool freezing compartment"]
    G --> H["ICE"]
    H --> I["VR/★"]
    I --> J["Set to ice making compartment and supercool freezing compartment"]
To Cancel the Setting
Example of when cancelling Power Save Mode for the ice making compartment

flowchart
graph TD
    A["PWR SAVE"] --> B["It will disappear if cancelled."]
    B --> C["REF"]
    C --> D["S-COOL"]
    C --> E["ICE/VR/"]
    C --> F["FRZ"]
    C --> G["VEG"]
    D --> H["②"]
    E --> I["③"]
    F --> J["SELECT"]
    G --> J
① Touch 📋 on the operation panel
② Repeatedly touch to light up the compartment to cancel
③ Touch SELECT
PWR SAVE goes off when the setting is cancelled.
The setting will also be cancelled during the procedure to enable the setting if the step 5 is performed while
ICE and VR linking in the step
4.
Food that Can be Stored in Power Save Mode
In Power Save Mode, food will be preserved between about -10ircC and 0ircC , so it is well suited to the preservation of foods such as dry goods and grains.
Dry goods....Coffee beans, seaweeds, nuts, dry noodles (pasta, vermicelli, fine noodles, etc.) etc.
Seasonings....Salt, sugar, spice powder, etc.
Grains....Rice, wheat, potato starch, etc.
Confectioneries and cakes.....Dry confectioneries, chocolates, cookies, etc.
Functions that Cannot be Used in Power Save Mode
There are functions that cannot be used when the refrigerator is set to Power Save Mode.
Unusable functions will not light up on the operation panel and will not be operational. To use these functions, cancel
Power Save Mode before operation.→ Page 26
| Compartment set to Power Save Mode | Supercool Freezing Compartment | |||
| Functions that Cannot be Used |  | Supercool Freezing | ||
 | Hot Freezing | |||
| Operation Panel Display[252W] indicates that it is not lit. Icons that are not lit cannot be used. |  | |||
 |  |  |  | |
Operation Panel Display
Successfully Saving Power
Open and close doors as quickly as possible
If doors are opened frequently or are kept open for a long time, cold air escapes and more power is consumed.
Don't cram too much food into the fridge
If too much food is crammed into the refrigerator, the flow of cold air can deteriorate, making it difficult for food to cool down.

Leave space
Do not cover up air outlets or air inlets
Blocking the flow of cold air can make it difficult for food in the refrigerator to cool down. The temperature around the air outlets can drop, making foods with significant moisture freeze easily.
Cool hot foods before placing them inside
Placing hot foods in the refrigerator will lower the temperature, also affecting the freshness of other foods.
(excluding Hot Freezing)
Tips
- In Power Save Mode, it is not suitable to store ice, fresh food, frozen food, ice cream, and food frozen at home. Move food from the supercool freezing compartment to the freezer compartment in advance.
- Check the items in the compartment before setting.
- When placing food in the ice making compartment, store food below the reference line of the ice storage box (because it may cause an ajar door, malfunction, or damage).
Notice
Temperature may be lower when the ambient temperature is low, such as during winter, or when the freezer compartment is set to high.
Cleaning the Automatic Ice Maker
To prevent the growth of limescale and mold, clean periodically. Do not use a dishwashing machine, because it may deform the parts. Do not use the following for cleaning
- Items such as sponges or scrubbers that may damage surfaces
- Cleaners such as alkaline detergents, scouring powder, boiling water, petroleum, or acid
Once a week Water Tank / Water Supply Pump
If mold forms easily in certain types of water, clean about 2 or 3 times a week.
* When not making ice, remove the water.

Remove the water tank, remove the lid, and wash it.

Remove the tank cap by twisting it.
When using bleaching agents to clean the water tank and lid, follow the instructions of the agents.
2

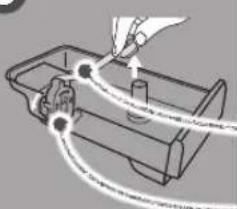
Pull out the tank packing from the water tank.
3
natural_image
Diagram of a mechanical setup with a hand holding a tool and connecting wires to a tray (no text or symbols visible)Pull out the tank pipe and rotate and remove the water supply pump.
Wash the water tank. Tank Pipe
Water Supply Pump
4

Disassemble the water supply pump and wash it.
Cap Lid
Remove the cap lid while opening the tab.

Impeller
The impeller is made from a magnet. Wash it thoroughly to remove any foreign objects.
Chlorine-Cleaning Filter
Wash by lightly rubbing.
*Do not use cleaners such as kitchen detergents (neutral), benzene, or bleach. Doing so may result in odors of the ice.

⑤ Assemble the water supply pump.
1 Fit the filter onto the cap.


2 Fit the of the cap.
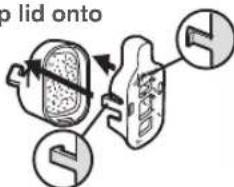

3 Attach the imp to the impeller holder.
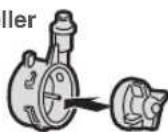

4 Rotate and fix the tab (1) of the cap into the projection (2) on the impeller holder.
Make sure that the impeller is inside.

After Assembly

5 Rotate and set the water supply pump onto the water tank.
Align the triangle mark on the bottom of the water tank with the triangle mark on the cap lid and push in while making sure that there is no gap.
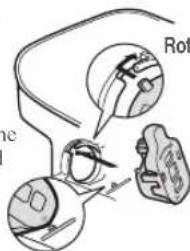
Once a month Water Supply Pipe and Tank Holder

Pull out the water supply pipe and wipe the tank holder with a clean cloth.
Do not pour water into the tank holder. Doing so may cause a malfunction.

Disassemble and wash the parts.
Twist and remove the water supply pipe.
White minerals or chlorine accumulation may adhere to the parts, this is not abnormal. Wash off such substances and reuse the parts.
Easier to disassemble/assemble when wetted
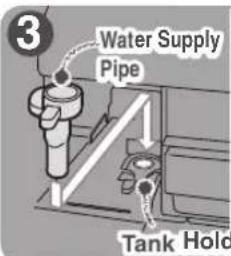
Follow the procedure in reverse to return the parts to their original positions.
Push in the water supply pipe firmly so there are no gaps.
If there are gaps or looseness, it may cause a malfunction.

Check whether there are any foreign objects between the water supply pipe, tank packing, and tank holder.
Insert it horizontally so that there are no gaps.
Failing to do so may cause noises to occur, ice to not freeze, and may also cause the water in the water tank or food in the refrigerator compartment to freeze.
1 to 2 times a year Ice Tray
Before cleaning, make sure to set "Stop Ice
Making."
→ Pages 23 - 24

Open the door of the ice making compartment and unlock the ice tray lock lever.
Ice Tray Lock Lever
ICE TRAY will appear on the operation panel.
If the alarm sounds continuously when the ice tray lock lever is unlocked, lock the lever, close the door, wait for the blinking ICE to turn off, and then try again.

natural_image
Illustration of a hand holding a mechanical device with an arrow indicating direction (no text or symbols)Pull the ice tray towards the front and then remove it.
There is a risk of the water spilling. Pull out the tray slowly.
3 Empty the ice tray and wash it.
Do not use a sponge or scrubber. A damage may cause malfunction.
After washing the tray, dry off any moisture.
4 Attach the ice tray.
Push in the ice tray until it makes a clicking sound, and then lock the ice tray lock lever.
ICE TRAY will disappear. If the lamp does not disappear, check the position of the ice tray lock lever and the up and down orientation of the ice tray.


When making ice, set the ice making compartment's setting to ICE
→ Pages 23 - 24
Notice
- If the water supply pipe and tank packing are not installed, they may cause the water in the water tank or food in the refrigerator compartment and sliding cases to freeze.
Replacement is not usually required for the Chlorine-Cleaning filter. However, it may require replacement in the following cases.
· When it clogs because something other than water was put in the tank · When it has broken · When mold has grown
To purchase a new filter, contact the retail store where you purchased the refrigerator.
* If mold forms easily in certain types of water, clean about 2 or 3 times a week.
6 Install the tank pipe.
Insert the tank pipe into the water tank.
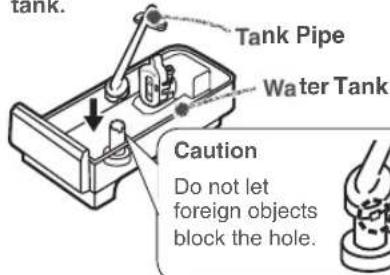
2 Connect the tank pipe to the water supply pump.
Check that there are no foreign objects between the tank pipe and the water supply pump.

3 Install the tank packing
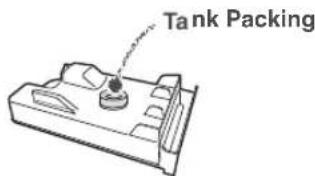
Cleaning Removing and Cleaning the Parts

Remove plug
Remove the power plug before cleaning.
Otherwise an electric shock or injury may result.

Prohibited
Do not disassemble, repair, or alter.
Do not use while parts are damaged.
Doing so may cause injury, electric shock, or fire.
* After cleaning, wait at least 10 minutes before reinserting the power plug into the socket.
If you insert the plug immediately, there will be an o verload on the machine.
How to Clean Q&A

Q. What should I do if I notice the refrigerator is dirty?
A. Before the dirt becomes hard, wipe it off.
● Wipe with a soft cloth soaked in warm water.
● For stubborn dirt, wipe using water mixed with a weak concentration of kitchen detergent (neutral).
● In particular, oil may lead to cracks and citrus fruit juices to discoloration, so be sure to wipe them off right away.
- If dirty door packing is ignored, it can be damaged and cause cold air to leak. After wiping with a soft wet cloth, if there is still moisture, finish wiping with a dry cloth.
Q. Can the shelves, cases, and pockets be removed?
A. For information on which parts can be removed,
refer to
→ Pages 31 - 32.
Q. What should I do with doors and shelves made of glass?
A. Wipe with a soft cloth soaked in warm water.
- If a door or shelf made of glass has cracked or shattered, do not touch the broken glass, but contact the retail store where you purchased the refrigerator immediately.
● Magnets will not adhere to a glass door.
● Wipe any leftover moisture with a dry cloth.
Tips
Do not use the following items.
Alkaline or low alkaline kitchen detergents, undiluted neutral kitchen detergents, scouring powder, powdered soap, alcohol, benzene, thinner, petroleum, acid, scrubbers, boiling water, or similar substances.
Doing so may cause the plastic parts (such as the door
handles, caps, cases, etc.) to split, or damage or rust the glass doors, shelves, or painted surfaces.

Power Plug
For safety, clean the power plug and cord periodically.
① Remove the power plug from the socket.
② Check for damage or abnormal heating on the power plug and cord.
③ Remove any dust from the power plug and surrounding area, and then wipe with a dry cloth.
④ Firmly insert the power plug into the socket.

Replace

Clean

Follow the instructions
Remove dust periodically from the power plug.
Dust may cause insulation failure, resulting in fire.
Refrigerator Rear Side and Floor
This is a place where, because of the convection current of the air, dust tends to gather and can easily turn black. Also for the purpose of saving energy, clean periodically.
① Remove the adjustable support cover.
② Tun the adjustable supports to raise them from the floor, and pull out the refrigerator.
We recommend laying out protective material on the floor to prevent the floor from being damaged. Also, be careful not to injure yourself.
③ Remove dust from the refrigerator's rear side, the wall, and floor, and wipe off all dirt.
④ Check for water dripping on the floor.

Prohibited
Dust, etc.

natural_image
Diagram of a mechanical device with pulleys and a circular inset showing internal components (no text or symbols)When attaching parts, use the backward procedures of removal.
Glass Shelf
① Lift the front of the shelf using both hands.
② Pull out to the front.
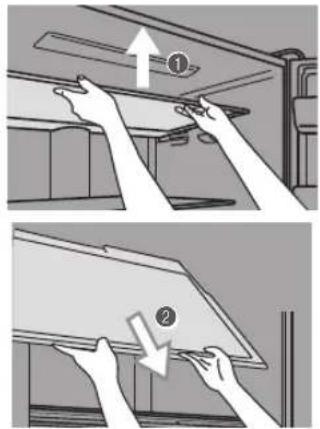
* Swiftly pulling out the part to the front can damage the side of the door. Pull out the part slowly to remove it.
③ Using the gap between the refrigerator compartment and door, rotate the glass shelf and remove from the refrigerator.

Follow the instructions
Be careful when attaching and removing the glass shelf.
If it is attached improperly, it could come loose and fall, causing injury.
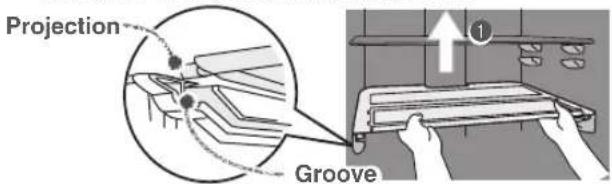
Slide Glass Shelf (Front) (Back)
① Slide out the projections on the front and back of the slide glass shelf (front) along the grooves.
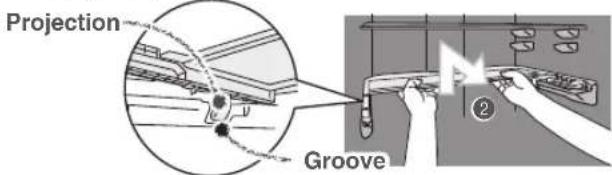
② Use both hands and lift up the slide glass shelf (back) while pulling it toward you, sliding out the projections along the grooves.
③ Grasp the front side and back side of the slide glass shelf (back), and pull it out while lifting the front side up.
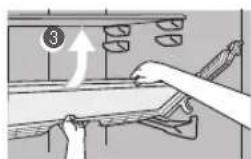
4 Under the conditions in ③, pull the slide glass shelf (back) out one side at a time and remove it from the refrigerator.

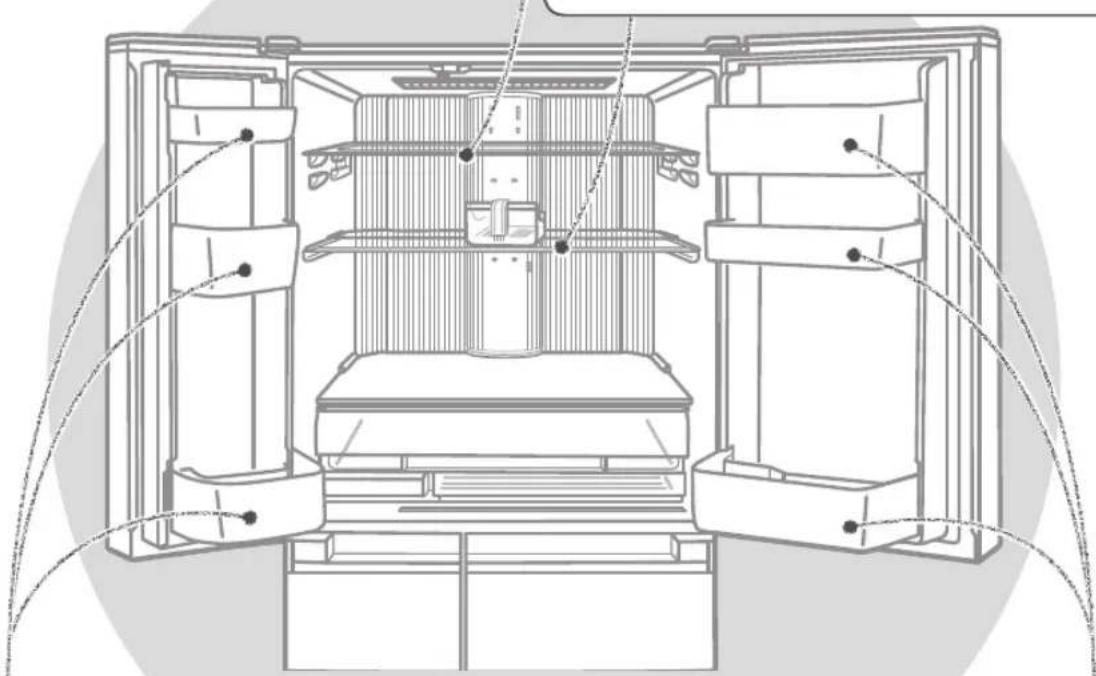
natural_image
Technical line drawing of an open refrigerator interior with doors and shelves (no text or symbols)Adjustable Pocket (Large) (Short, Large) (Small) (Short, Small) / Bottle Pocket (Large) (Small)
1 Lift up the left and right of the pocket alternately.
* The pockets are firmly installed.
② Pull out to the front.

Follow the instructions
Be careful when attaching and removing the pocket.
If it is attached improperly, it could come loose and fall, causing injury.
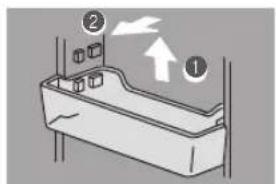

Adjustable Pocket Bottle Pocket
Cleaning Removing and Cleaning the Parts (Continued)
Lower Case
① Fully pull out the lower case.
② Lift the lower case out to the front.


natural_image
Line drawing of a refrigerator interior with drawers and doors, showing no text or symbolsRecessed Portion of the Drip Gutters
Wipe off any dirt, dripping or condensation.

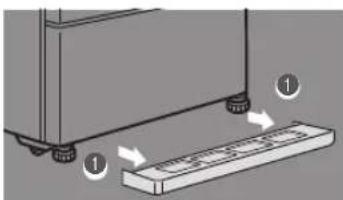
Adjustable Support Cover
① Pull the left and right sides of the support covers to the front to remove them.
Upper Case / Upper Case Cover
① Lift up the upper case cover.
② Press on the tip of the △ on the right side while pushing the upper case cover to the left to flex it and remove it.

③ Lift the upper case while pulling it all the way out.
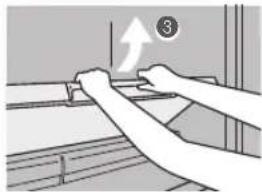
4 Pull out the lower case one side at a time and remove it from the refrigerator.
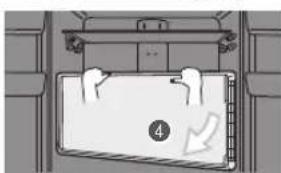
natural_image
Diagram of a door with a label '4' and an arrow indicating direction (no text or symbols on the diagram itself)* If removal is difficult, first remove the adjustable pocket and then remove the lower case.
Ice Making Compartment / Supercool Freezing Compartment Case
① Fully pull out the door.
② Lift the case out to the front.
• The illustration represents the supercool freezing compartment. Remove the ice making compartment in the same manner.

* If the soundproof mat in the ice making compartment freezes and cannot be removed, remove the case of this compartment (the ice storage box), and then melt the ice with water.
Freezer Compartment / Vegetable Compartment Case
① Fully pull out the door.
② Lift the upper case out to the front.

natural_image
Illustration of a hand pressing down on a mechanical device with labeled parts (no text or symbols present)③ Pull out while slightly lifting up the door, and then tilt.
4 Lift the lower case out to the front. *Theillustration represents the freezer compartment. Remove the vegetable compartment in the same manner.

natural_image
Illustration of a hand placing a file into a drawer with numbered arrows (no text or symbols)Other Issues (Power Outages, Child Safety Lock, Setting Reset, When Lights Up)
Power Outages
- Minimize the frequency of opening the doors, and avoid adding more food.
● Operation panel settings other than the temperature settings may change. Check the settings. (Child Safety Lock, etc.)
To Prevent Accidental Button Operation (Child Safety Lock)
Locks the operation panel to prevent accidental icon operation by children.
① Touch 📄 for about 5 seconds or more when the door is closed (until the buzzer sounds).

lights up when the setting is finished.
- Setting cannot be changed during Child Safety Lock.
To Cancel
① Again, touch 📋 about 5 seconds or more when the door is closed (until the buzzer sounds).

goes off when the setting is cancelled.
To Reset Settings
Returns the settings to their initial conditions (at the time of purchase), for example if you have forgotten the settings.
① Touch to light up an icon.
② Touch for about 10 seconds (until the buzzer sounds twice).
The follo wing settings will be reset.
• Energy Saving Mode
- Hot Freezing
- Power Save Mode

- Supercool Chilling
- Rapid Ice


- Supercool Freezing
- Rapid Cool


● The temperature setting of the supercool freezing compartment (Freezing and Soft-Freezing) does not change.
● The "ICE STOP" setting for ice making will not be reset.
When D Lights Up
When D lights up, the refrigerator is in demonstration mode. The refrigerator does not cool in this mode. Contact the retail store where you purchased the refrigerator, or cancel the demonstration operation with the following procedure.
To Cancel
① Keep the doors of the supercool freezing compartment open.
② Light up the icons and press, and at the same time for at least 5 seconds.
③ Check that D is turned off.
● The demonstration mode was not cancelled if it lights up.
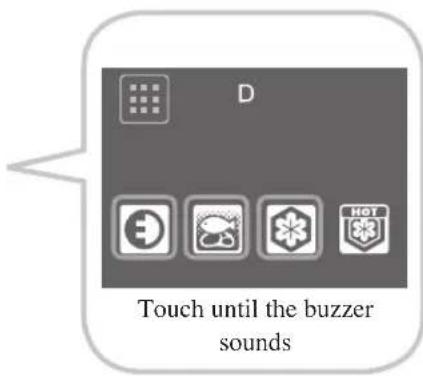
Other Issues (Door Alarm, 📞 Mark, When Not Using the Refrigerator for a Long Time)
When the Door Alarm Sounds and the Interior Light of the Refrigerator Compartment Blinks (Door Alarm)
The door alarm (with alarm sound, interior light, and compartment display) is activated when a door is open for 1 minute or longer.
The pattern of the door alarm sound and the action of the interior light and compartment display area are as follows depending on how long the door has been left open.
| Time the door was left open | 1 minute 2 minutes 3 minutes 4 minutes | 5 minutes or longer | 60 minutes or longer | |||
| Alarm sound | 2 x 2 short beeps + 2 long beeps | 2 x 2 short beeps + 3 long beeps | 2 x 2 short beeps + 4 long beeps | 2 x 2 short beeps + Continuous beep | Continuous short beeps | |
| Interior lights On Blink twice per minute. Off | ||||||
| Operation panel compartment display | The operation panel compartment display blinks in time with the alarm sound. | |||||
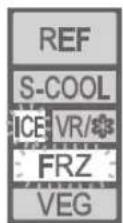
Operation panel compartment display
Blinks in time with the alarm sound.
- Check that the doors are not left ajar or do not have any food trapped (the packing, the back of the drawer cases). (Check at least once a month.)
● All doors have an opening and closing sensor. - Check the refrigerator compartment door rotating partition. → Page 12
Example: When the doors of the ice making compartment and freezer compartment are open
When the Alarm Cannot be Turned Off
Check that there are no gaps between the door.
When the alarm cannot be turned off, there may be a malfunction and an inspection is required.
Contact the retail store where you purchased the refrigerator.
-To Stop the Alarm (Continuous Short Beeps)
The alarm can be temporarily stopped in the time before the refrigerator is repaired.
Press Ⓔ for at least 5 seconds.
* If performing the above operation does not turn off the alarm, or the alarm periodically sounds, check peripheral machinery as well.
When the Mark Blinks Rapidly (About 5 Times per Second)
When the refrigerator will not cool, there may be a malfunction and an inspection is required.
Contact the retail store where you purchased the refrigerator.
When Not Using the Refrigerator for a Long Time (When the Power Plug Is Unplugged)
① Set to the "STOP" ice making mode. ➔ Pages 23 - 24
- Check that ICE STOP
② Empty any water or ice from the water tank, ice tray, and ice storage box and clean.
Wash the water tank, water supply pump, tank pipe, tank cap, lid, water supply pipe, ice storage box, soundproof mat, ice tray and ice server, dry them completely, and then return them to their original positions.
→ Pages 28 - 29
- Do not dispose of the soundproof mat.
③ Remove the power plug.
④ Clean the interior of the refrigerator and open the doors for 2 to 3 days to dry the inside.
* If the refrigerator is not dried sufficiently, it may cause mold, odors, or refrigerant (gas) leaks due to condenser corrosion.
Notice
- Wash the water tank, water supply pipe, and ice tray before making ice for the first time, or if you have not made ice for more than a week. Odors or dust may be adhering to the parts.
Other Issues (To Move or Carry the Refrigerator)
To Carry the Refrigerator
① Empty any water or ice from the water tank, ice tray, and ice storage box. ➔ Pages 28 - 29
② Wear protective gear (gloves).
③ Remove the adjustable support cover, and then rotate and raise the adjustable supports. ➔ Page 9
4 Remove the power plug.
⑤ Lay towels under the drainage port and the lower rear edge of the refrigerator, and position a container or tray with a height of about 3 cm on the towels to collect the water.
* The towels prevent floor damage, and water from being spilled on the floor.
6 Tilt the refrigerator slowly to the rear by about 30 degrees, and drain the water from the evaporation tray via the drainage port on the lower rear side. (The evaporation tray is not visible from the outside.)
* Because the refrigerator is heavy, the work must be performed by at least 2 persons.
* The work must not be performed by small children or people who are not capable of doing heavy work. Ask a specialist transportation company.
⑦ 2 or 4 persons should grasp the front lower inside and the handles on rear upper side, and carry the refrigerator slowly.
- Do not lay down the refrigerator on its side. (The compressor may be damaged.)
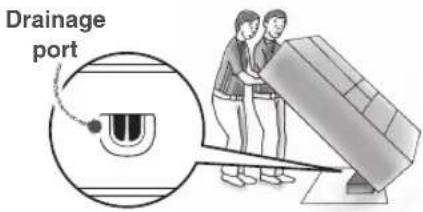
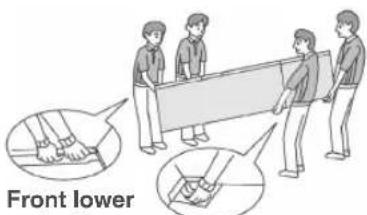
Handles on rear upper side
-When the Transportation Time Is Long, for Example When Moving House
- Frost from the condenser inside the freezer compartment will melt, and may spill water when the refrigerator is carried. It may take 1 day to defrost after unplugging the power plug.

Prohibited
Do not damage the refrigerator's refrigerant circuit (pipes).
Because flammable refrigerant is used, this may result in fire or an explosion.

Follow the instructions
Wear protective gear when you install the refrigerator.
Do not use any tools other than the adjustable support tool kit.
Not following these instructions may result in floor damage or injury.
Trouble-shooting
To Move the Refrigerator in Forward and Backward Directions
① Wear protective gear (gloves).
② Remove the adjustable support cover, and then rotate and raise the adjustable supports.→ Page 9
③ Lay protective material under the casters and rear supports to prevent damaging the floor.
④ Move the refrigerator in the forward and backward directions.
* Moving in any direction other than forward and backward may damage the floor. Please make sure to lay protective material such as a plate or board on the floor.
Other Issues (Temperature Fine Adjustment Mode)
To Control the Temperature More Precisely (Temperature Fine Adjustment Mode)
The temperature can be set to 19 different levels for the refrigerator compartment and freezer compartment, while it can be set to 24 different levels for the supercool freezing compartment (5 levels when set to Soft-Freezing and 19 different levels for Freezing).
- When temperature fine adjustment mode is set, the compartment display blinks about every 10 seconds.
Setting the Temperature Fine Adjustment Mode
① Touch to light up icons.
② Touch 📋 and select the compartment you would like to set to temperature fine adjustment mode.
③ Touch for at least 5 seconds (until the buzzer sounds).
● The refrigerator compartment, freezer compartment, and supercool freezing compartment can all be set with a single operation.
To Cancel
The same operation as above.
- If the setting is reset, it will be cancelled.
Performing the Temperature Fine Adjustment
① Touch to light up icons.
② Touch 📄 to select the compartment to perform temperature fine adjustment.
③ Repeatedly touch SELECT to perform temperature fine adjustment.
Display Example: When the refrigerator compartment is set to Temperature Setting 5.
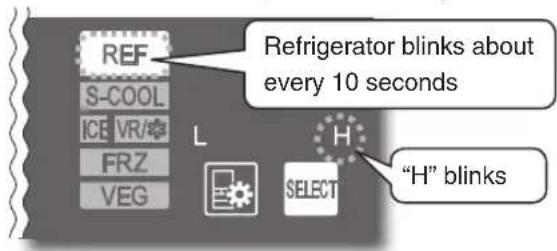
Refrigerator Compartment / Freezer Compartment / Supercool Freezing Compartment (Freezer Setting)
| Temperature setting | |
| 1 | L |
| 2 | L |
| 3 | L M |
| 4 | L |
| 5 | L H |
| 6 | L |
| 7 | L M |
| 8 | L • |
| 9 | L • H |
| 10 | M |
| 11 | L • H |
| 12 | • • H |
| 13 | M • H |
| 14 | • • H |
| 15 | L • H |
| 16 | H |
| 17 | M H |
| 18 | H |
| 19 | H |
Supercool Freezing Compartment (Soft-Freezing Setting)
| Temperature setting | |
| 1 | L |
| 2 | L • |
| 3 | M |
| 4 | • H |
| 5 | H |
* represents a blinking display.
* The supercool freezing compartment can be consecutively set to the Soft-Freezing setting and the Freezing Setting.
Notice
- If supercool freezing compartment is set as "19" of freezer setting, then the temperature in the Freezer compartment will be automatically set as "10" ("1" to "9" setting will not be available).
Troubleshooting
Before contacting MITSUBISHI ELECTRIC SERVICE CENTRE or its service agent or making a repair request, check the following.
If the problem persists, contact the retail store where you purchased the refrigerator as soon as possible.
Frequently asked questions in the initial period and in summer
The refrigerator does not cool at all!
● The refrigerator takes time to cool when you first start using it. In summer, it may take up to 24 hours for the inside to be fully cooled. ➔ Page 10
- If D shown on the operation panel, cancel demonstration mode. → Page 33
- Check if the power plug is disconnected or the circuit breaker has tripped.
The outer walls heat up!
● The outer walls heat up significantly (to about 50 to 60°C) immediately after installation and in summer. This is because the heat discharging and condensation prevention pipes are located on the sides and the top of the refrigerator. They are required for cooling and the heat is not an abnormality.
● The refrigerator compartment rotating partition also has a condensation prevention heater that heats up.
● A heat discharging fan is located under the refrigerator. Warm air may be discharged from here.


natural_image
Diagram of a refrigerator with a hanging basket and a curved line indicating motion or movement (no text or symbols)In Supercool Freezing Compartment...
Ice cream melts
●Store ice cream in the freezer compartment, not the supercool freezing compartment.
Food does not quickly freeze
- With Soft-Freezing, food freezes at about -7ircC , so it may take up to about 24 hours for food to completely freeze.
● Supercool Freezing takes time (about 8 to 9 hours) to uniformly freeze food from the core.
Soft-Freezing freezes food
● Food appears to freeze just as when it freezes in the freezer.
The operation panel turns off automatically!
- If 30 seconds pass without any operation panel button operations, the display turns off. When lighting,
touch
→ Page 10
 | Check |  | Explanation and Action | |
| Cooling Performance | Does not cool wellIce melts | 1 Has enough time passed after installation? | It takes 4 to 5 hours for the refrigerator to cool, and may take 24 hours in summer to fully cool. | |
| 2 Is the temperature setting set to “L”? Is the compartment set to Power Save Mode? | Set to “M” or “H”, or set the supercool freezing compartment to “FRZ•H” or to the setting of your liking. ➔ Pages 23 - 24 Cancel Power Save Mode. ➔ Page 26 | |||
| 3 Is the flow of cold air being blocked? Are the doors being opened frequently, or left ajar? Is food blocking them? | Make space between foods and remove any food that is sticking out of shelves or touching the ceiling of the drawers. Avoid opening and shutting the door for a while.[IMAGE] | |||
| 4 Is heat discharging being blocked? Check if there is no gap around the refrigerator and the refrigerator is exposed to direct sunlight. | Check that there is enough space around the refrigerator and that it is properly installed. ➔ Page 8 | |||
| Food freezes in the refrigerator and vegetable compartments | 1 Is the temperature on the operation panel set to “H”? | Set the temperature to “M”. Also, the temperature with each setting may temporarily decrease. | ||
| 2 Is food with a lot of moisture stored at the rear of the shelf? | Place drinks and food containing a lot of water, such as tofu, vegetables and fruits, at the front of the shelf or in a door pocket. Low-fat and low-sugar foods are likely to freeze easily when they are stored at the rear of the shelf. | |||
| 3 Is the surrounding temperature 5°C or less? | Food in the refrigerator compartment or vegetable compartment may freeze. Freezing is less likely when the temperature settings are set to “L”. ➔ Pages 23 - 24 | |||
| 4 Is the water supply pipe installed correctly without any gaps or looseness? | If there are foreign objects loosening the pipe or if there is a gap, strong cold air can flow into the refrigerator compartment. Make sure that it is securely set. ➔ Page 29 | |||
Trouble-shooting
Troubleshooting (Continued)
| Problem |  | Check |  | Explanation and Action | |
| Supercool Chilling | Overcooling in the freezer compartment, though the temperature setting of freezer compartment is set to “L or “L●”. | 1 | Is the temperature setting of supercool freezing compartment set to “FRZ•H”? | Set the temperature of supercool freezing compartment to “FRZ•L” or “FRZ•M”. ➔ Pages 23 - 24 | |
| Food in the lower case freezes | 1 | Is the lower case set to Supercool Chilling? | Perform the Supercool Chilling setting. At the time of purchase, the lower case is not set to Supercool Chilling. ➔ Page 13 | ||
| 2 | Is the surrounding temperature 5°C or less? | Set the temperature of the lower case (when Supercool Chilling is set) to “L”. ➔ Page 23 | |||
| 3 | Is the refrigerator compartment's temperature set to “H”? | Set the temperature of the refrigerator compartment to “M” or “L”, or set the temperature of the lower case (when Supercool Chilling is set) to “L”. ➔ Page 23 | |||
| 4 | Have you placed easily frozen food containing a considerable amount of moisture in the compartment? | Place food containing a lot of water at the front of the refrigerator compartment or in a door pocket. Low-fat and low-sugar foods are likely to freeze easily when they are stored at the rear of the shelf. | |||
| 5 | Are you piling frozen food onto other food? | Food that touches frozen food may freeze. | |||
| The lower case does not cool | 1 | Is a high temperature set for the refrigerator compartment? | Set the temperature of refrigerator compartment to “M” or “H”. ➔ Page 23 | ||
| 2 | Is the flow of cold air being blocked? | Do not block the area near the air outlet with food. Also, do not stack items higher than the case. | |||
| 3 | Has the Supercool Chilling been set? | Set the Supercool Chilling. At the time of purchase, the lower case is not set to Supercool Chilling. ➔ Page 13 | |||
| 4 | Set the lower case compartment temperature? | In order to store the food at Supercool Chilling without freezing it, the compartment temperature may rise temporarily. | |||
| Supercool Freezing Compartment | Food in the supercool freezing compartment melts | 1 | When storing frozen foods, did you set the refrigerator to “FRZ•H”? | Set to “FRZ•H”. Store ice cream in the freezer compartment, not the supercool freezing compartment. ➔ Pages 23 - 24 | |
| 2 | Did you set Hot Freezing after placing hot food inside? | When placing hot food in the compartment, use Hot Freezing. ➔ Page 17 | |||
| 3 | Is the supercool freezing compartment set to Power Save Mode? | Cancel Power Save Mode. ➔ Page 26 | |||
| 4 | When placing hot food in the compartment, did you place it away from other food? | Frozen food may thaw if it makes contact with hot food. Leave space. | |||
| 5 | Is food piled up in the upper area? | Leave a gap so that cold air can flow to the ceiling and between food. | |||
| 6 | Has enough time passed after installation? | The refrigerator takes time to cool completely. | |||
| Soft-Freezing freezes food too hard | 1 | Is the supercool freezing compartment set to “FRZ”? | Set the supercool freezing compartment to “SOFT FRZ”. ➔ Pages 23 - 24 | ||
| 2 | Does the food contain a lot of moisture? | Foods containing a considerable amount of moisture may freeze too hard. We recommend leaving the food for about 5 to 15 minutes, placing the other hand on the back of a knife, and cutting the food by pushing on it. Also, use the setting “SOFT FRZ•L”. | |||
| 3 | Is food freezing the same way as with “Freezing”? | Food appears to freeze in the same way as with “Freezing”. | |||
| Problem | Check | Explanation and Action | |||
| Automatic Ice Making | Cannot make ice Water in the tank stays at the same level | 1 Has enough time passed after installation? | It takes 4 to 5 hours for the refrigerator to cool, and 24 hours or more in summer to make ice. | ||
| 2 Has food, the ice server, or another object been left in the ice storage box? Also, has the ice been leveled? | Remove food or other objects from the ice storage box. The ice storage box is judged to be full of ice. Also, spread the ice out flat all the way to the front. | ||||
| 3 Is the ice making setting for the ice making compartment set to “ICE STOP”? | Set the ice making compartment's setting to ICE \\ → Pages 23 - 24 | ||||
| 4 Are the ice tray and ice tray lock level installed correctly? | Set the ice tray lock lever to the correct position and check the installation status of the ice tray. Page 29 | ||||
| 5 Is the water supply pipe installed correctly in the tank holder area? | Remove any foreign objects creating gaps and install the pipe so that it is not loose. Page 29 | ||||
| 6 Are the water supply pump and tank pipe installed correctly onto the water tank? | Check that they are correctly installed. In particular, ensure that the opening of the tank pipe inside the tank is installed firmly to the tank. Pages 28 - 29 | ||||
| Makes only a small amount of ice Making ice takes a long time | 1 Is the door opened or the ice tray removed frequently? | Ice making takes longer. Do not open and close the door or remove the ice tray frequently. Page 15 | |||
| 2 Is the temperature of the freezer compartment set to “L”? Is the energy saving mode set for the freezer compartment? | Making ice may take longer. Set the temperature of the freezer compartment to “M”, and cancel energy saving mode. Page 23 | ||||
| Water tank or water supply pipe freezes | 1 Are the water supply pipe and water tank installed to the refrigerator without any gaps? Additionally, is the tank pipe installed to the water tank without any internal gaps? | Check the installation around the water tank. If there are gaps, the cold air may escape and water may freeze. Pages 28 - 29 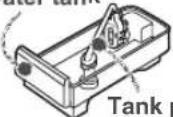 pipe pipe | |||
| Ice is small or joined together | 1 Has ice been stored inside the ice storage box for a long time? | Ice stored inside the ice storage box for a long time may shrink or join together (due to a phenomenon called sublimation). When not using ice, it is recommended that you remove the water and stop the ice making. | |||
| 2 Does it occur when the water in the water tank is decreasing? | As the water in the water tank decreases, the amount of supply water is slightly reduced. | ||||
| Sound | There is a rattling sound | 1 Are any nearby objects in contact with the refrigerator? | Leave space around the refrigerator. When objects or walls are in contact with the refrigerator, sounds may be heard. | ||
| 2 Make sure that the water tank and water supply pipe are properly installed. | Push in the water tank until it touches the rear side. If it is out of position, the sound of the water supply pipe can grow loud. If there are any gaps or looseness, the water may freeze, causing sounds to be heard. | ||||
| Loud noises Worrisome noises (Noises described on the right are normal) | 1 The noise gets louder suddenly or the tone changes. | Immediately after beginning use, when the weather is hot, when the doors are frequently opened and closed, and in similar situations, the refrigerator switches to high-speed operation and cools with high power. | |||
| 2 A whistling sound is made after closing a door. | This is the sound of the cooling fan motor starting. | ||||
| 3 A whipping or dripping sound is sometimes heard from inside the refrigerator after a door is opened. | This is the creaking sound as warm air enters and expands the plastic. | ||||
| 4 Sometimes the sound of flowing or boiling water can be heard. | This is the sound of the refrigerant (gas) flowing. | ||||
| 5 A rattling or squeaking sound is made sometimes (every 1 to 2 hours). | This is the sound of the automatic ice maker. Even when there is no water in the water tank, the automatic ice maker and pump make a sound about every 100 minutes. | ||||
| 6 After turning on the power, a thumping or creaking sound may be heard in the ice making “ICE STOP” mode (every 1 to 2 hours). | This is the sound of the operation check. The check is performed even in the “ICE STOP” ice making mode. | ||||
| Door | Doors do not close Doors open easily | 1 Is a door making contact with food or a case? Is too much food packed inside? | Store food so that the door does not make contact with the food when closed. In the refrigerator compartment, store food on the shelves and in the drawer doors store food so that it does not make contact with the ceiling when doors are shut and opened. Do not attach a case that you purchased separately onto the outside of a pocket. | ||
| 2 Has food fallen behind a case in a drawer door, or is the power cord or another object trapped between the refrigerator and a door? | Remove any objects. Make sure that the door does not trap objects such as food, power cords or plastic bags. | ||||
| 3 Is the refrigerator installed stably? Are the adjustable supports making contact with the floor? | Lower the adjustable supports to raise the front side slightly and make the doors easier to close. Page 9 | ||||
| The alarm will sound | 1 Check if the doors are closed. | Refer to “When the door alarm sounds” and “When the alarm cannot be turned off”. Page 34 | |||
Troubleshooting (Continued)
| Problem | Check | Explanation and Action |
The operation panel does not respond | 1 Is [IMAGE] | Cancel the Child Safety Lock. ➔ Page 33 |
| 2 Are the user's fingers or the operation panel wet or dirty? | Wipe off the moisture and dirt on the operation panel and fingers. | |
| 3 Are you repeatedly touching it? | Let your finger off the operation panel once and then touch it again. It will respond when you let you finger off. | |
| 4 Are seals and tapes put on the operation panel? | Remove the seals and tapes. | |
| Reacts without a touch | 1 Are there any towels, plastic bags, papers, etc. over the operation panel? | Remove the towel, plastic bag, paper, etc. |
| Some icons do not light up | 1 Is it set to Power Save Mode? | The icons that cannot be set during Power Save Mode are off. ➔ Page 27 |
| ICE is blinking and won't go off | 1 Is the ice tray lock lever not locked? | If you release the ice tray lock lever while the ice tray is operating, ICE will blink. Lock the ice tray lock lever and close the ice making compartment's door. |
| There are no longer 3 ★ marks lighted on the power saving monitor. | 1 Has the temperature setting been modified? | Setting each compartment to "H" will lower the power saving level. |
| 2 Is there any increase in the time the door is left open or the amount of food, or a rise in the compartment temperature? | More energy is used in cooling, resulting in a lowered power saving level. | |
| Condensation forms on the outer walls and inside the refrigeratorFrost forms in the freezer compartmentWater drips onto the floor | 1 Are the doors being opened frequently, or are there any gaps? | Close the doors so that there are no gaps.When moisture in the air cools, it forms frost or condensation.When there is high humidity, condensation or frost will form even in very small gaps.Regarding the Vegetable Compartment ➔ Page 21 |
| 2 Is the humidity high, for example is it raining? | Condensation may form temporarily. Wipe off with a dry cloth. Condensation may cause frost to form in the freezer compartment. Please minimize the time when doors are kept open. | |
| There are lines like scratches on the clear parts | 1 Is it a thin line without level difference on its both sides? | This is a mark created at the time the plastic is molded. It is created at the joint where resin flows. This is not a flaw. |
| There are holes in the door and the refrigerator walls | 1 Are there small holes in the door or in the refrigerator walls? | These are holes that let air escape for the injection of foam heat insulating materials in the manufacturing process. These are not flaws or abnormalities. |
| The surface of the sides or doors is warped | 1 Does the light reflected on the surface appear distorted? | Warping and surface waviness occurs in the manufacturing process. When light hits the surface, it may appear warped, but this is not an abnormality. |
| Noise interferes with televisions or other devices | 1 Is the refrigerator installed near an electronic device such as a television? | Install the refrigerator away from electronic devices such as televisions. |
| 2 Is the power to the refrigerator supplied from a socket near the entry hole of the antenna cable? | Use separate power. When using a 2 pin plug, use grounding. | |
| There is a bothersome smell (Food / Ice) | 1 Have you placed food with strong odor inside the refrigerator without sealing it in a container? | Store food with strong odor in packaging.The odor may not be removed with a deodorizing apparatus. |
| 2 Do you periodically clean the water tank? | Clean periodically. ➔ Pages 28 - 29 | |
| The adjustable support cover comes off. | 1 Are the adjustable supports touching the floor? | When the adjustable supports are raised, the adjustable support cover cannot be inserted fully. Turn the adjustable supports to lower the refrigerator until the supports touch the floor. ➔ Page 9 |
| 2 Is the adjustable support cover fully inserted? | Open the door of the vegetable compartment and insert the adjustable support cover into the refrigerator while checking it from above. |
Specifications
This appliance is designed for use in Australia and New Zealand only and cannot be used in any other country. No servicing is available outside of Australia and New Zealand.
| Model MR-WX470F | ||
| Compartment type Volume (Litres) | ||
| Refrigerator compartment (R) | Fresh food compartment | 230 |
| Ice making compartment (I) | Two-star compartment | 23 |
| Supercool freezing compartment (S) | One-star & Two-star compartment | 30 |
| Freezer compartment (F) | Four-star compartment | 89 |
| Vegetable compartment (V) | Cellar compartment | 98 |
| Total | 470 | |
Type of the defrost controller: Variable Maximum possible defrost interval: 72 hours Minimum possible defrost interval: 12 hours
Table - Heater wattages (Rotating partition) at 16°C, 22°C and 32°C for each relative humidity
| Relative Humidity | RH band mid-point | MR-WX470F | ||
| Heater W at 16°C | Heater W at 22°C | Heater W at 32°C | ||
| 0-10% 5% | 0.000 0.000 | 0.000 | ||
| 10-20% 15% | 0.000 0.000 | 0.000 | ||
| 20-30% 25% | 0.000 0.000 | 0.000 | ||
| 30-40% 35% | 0.000 0.000 | 0.000 | ||
| 40-50% 45% | 0.000 0.774 | 1.462 | ||
| 50-60% 55% | 0.688 1.806 | 3.182 | ||
| 60-70% 65% | 1.462 2.838 | 4.816 | ||
| 70-80% 75% | 2.150 4.042 | 5.590 | ||
| 80-90% 85% | 2.666 4.816 | 6.450 | ||
| 90-100% 95% | 3.268 5.504 | 7.310 | ||
Trouble-shooting
Accessories
| Model MR-WX470F | ||
| Parts Quantity | ||
| Refrigerator compartment | Glass Shelf | 1 |
| Slide Glass Shelf (Front) | 1 | |
| Slide Glass Shelf (Back) | 1 | |
| Upper Case Cover | 1 | |
| Upper Case | 1 | |
| Lower Case | 1 | |
| Water Tank(with Chlorine-Cleaning Filter) | 1 | |
| Adjustable Pocket (Large) | 1 | |
| Adjustable Pocket (Short, Large) | 1 | |
| Adjustable Pocket (Small) | 1 | |
| Adjustable Pocket (Short, Small) | 1 | |
| Egg Tray | 1 | |
| Egg Shelf | 1 | |
| Bottle Pocket (Large) | 1 | |
| Bottle Pocket (Small) | 1 | |
| Ice making compartment | Ice Tray | 1 |
| Ice Storage Box | 1 | |
| Soundproof Mat | 1 | |
| Ice Server | 1 | |
| Supercool freezing compartment | Supercool Freezing Compartment CaseAluminium Tray | 1 |
| 1 | ||
| Freezer compartment | Freezer Case (Upper) | 1 |
| Freezer Case (Lower) | 1 | |
| Vegetable compartment | Vegetable Case (Upper) | 1 |
| Vegetable Case (Lower) | 1 | |
| Adjustable Support Cover | 1 | |
| Adjustable Support Tool Kit | 1 |
MEMO

If an abnormality or malfunction occurs, stop operation immediately and contact the retail store where you purchased the refrigerator or MITSUBISHI ELECTRIC SERVICE CENTRE or its service agent.
SOLE AGENT in Australia
MITSUBISHI ELECTRIC AUSTRALIA PTY LTD.
(Incorporated in New South Wales) ABN 58 001 215 792
348 Victoria Road, Rydalmere NSW 2116
For more information and support contact
www.mitsubishielectric.com.au
Call 1300 651 808
SOLE AGENT in New Zealand
BLACK DIAMOND TECHNOLOGIES LIMITED (BDT)
Wellington Office (Head Office)
1 Parliament Street, Lower Hutt, PO Box 30772, Lower Hutt 5040
Ph: (04) 560 9147, Fax: (04) 560 9133
Auckland Office
Unit 1, 4 Walls Road, Penrose, PO Box 12726, Penrose, Auckland 1642
Ph: (09) 526 9347, Fax: (09) 526 9348
Christchurch Office
44 Halwyn Drive, Hornby, PO Box 16904, Hornby, Christchurch 8441
Ph: (03) 341 2837, Fax: (03) 341 2838
- MR-WX470F
- Store food in the best way for consumption/
- Refrigerator Compartment
- Sliding Cases
- Ice Making Compartment
- Freezer Compartment
- Notice
- Energy Saving Mode
- Supercool Freezing Compartment
- Vegetable Compartment
- Contents
- Compartment Introduction
- Detail setting
- Safety Precautions
- Warning
- When Installing the Refrigerator
- Power and Power Plug
- When Using
- Malfunctions and Long-Term Storage
- When Recycling
- When Installing/Carrying the Refrigerator
- Safety Precautions (Continued)
- R600a Refrigerant Warning
- From Installation to Operation
- Installation
- Install the refrigerator in the following kind of location.
- Do not install the refrigerator outdoors or in places exposed to water or excessive humidity.
- Leave space around the refrigerator.
- Connect the Power Supply
- Adjustment and Anchoring
- - Adjust the tilt with the adjustable supports.
- If you find it difficult to turn the adjustable supports,
- - After adjustment, attach the adjustable support cover.
- Prepare for Earthquakes
- Use in hot spring and geothermal areas
- How to Use the Operation Panel
- When operating, be sure to touch the buttons with your fingers.
- ECO GUIDE
- Beginning Use
- Operation Example (When Setting Supercool Chilling)
- Touch
- Touch the icon to set
- To Cancel the Setting/Cancel in the Middle
- In the following cases, the display may not change even when you touch it.
- Refrigerator Compartment / Sliding Cases
- Rotating Partition
- Air Outlet —
- Preventing the Transfer of Odors
- Upper Case
- Lower Case
- Preserving Meat or Fish Below Freezing
- Supercool Chilling
- To Set
- To cancel the setting
- Supercool Chilling Is Very Useful
- Tastes good
- Keep fresh
- Estimated Preservation Period
- Tips
- Making Ice
- Rapid Ice (Quick Ice Making)
- How much time does it take to make Ice?
- About the Ice
- Be very careful when crushing ice that has joined together.
- Aluminum Tray
- Supercool Freezing Compartment Case
- What can the supercool freezing compartment do?
- Operation Panel Display Supercool Freezing Compartment Condition
- To supercool freeze such as meat, fish, and dessert
- Supercool Freezing
- To Use Supercool Freezing on Hot Cooked Foods such as Freshly Cooked Rice, Curry, and Sauces
- Hot Freezing
- When Soft-Freezing is set
- To Cancel
- Freeze foods with their original flavors. The frozen foods do not have to be thawed before being consumed.
- Food can be frozen, while preserving its taste and texture.
- Since food can be easily cut even when frozen, it can be cooked without thawing \*1.
- Meat
- Ground meat / Blocks of me at
- Thinly sliced meat / Bacon
- Fish
- Cutlets
- Sauces
- Meat sauce
- Freezer Compartment and Supercool Freezing Compartment: Using them properly
- Supercool Freezing Compartment (Soft-Freezing setting)
- Soft-Freezing / Supercool Freezing
- Handy Tricks for Supercool Freezing
- Convenient Preservation
- Can preserve for 2 to 3 weeks Plus it is easy to use
- Whitebait
- Cod Roe / Squid Salted Fish-guts
- Boiled vegetables
- Easy to Cut
- Raw food that is difficult to cut can be easily cut
- Lemon Slices
- Squid
- Carpaccio
- Easy to Make Meals
- Make meals quickly when you are busy in the morning
- Karaage/Teriyaki
- Easy Desserts
- Enjoy fruit with a new texture
- Frozen fruits
- Tips for Supercool Freezing
- Put Foods at the Same Time.
- Lay the Food out Flat on Top in the Supercool Freezing Compartment.
- Foods Unsuitable for Supercool Freezing
- Soft-Freezing / Supercool Freezing (Continued)
- Easy Dessert Recipes with Supercool Freezing
- Strawberry and Kiwi Fresh Jam
- Procedure
- Important Point!
- Green Smoothie
- Bathed in light to increase the nutrients! Vitamins boosted up The orange LED *1 is always on.
- To Confirm with the ECO GUIDE
- Operate the Operation Panel
- Close the Door
- eco Lights-Out
- Performing Temperature Adjustment
- Temperature Adjustment
- Refrigerator/Freezer Compartment Temperature
- Lower Case (When Supercool Chilling is set) Temperature
- Performing Temperature Adjustment (Continued)
- Ice Making Compartment Settings
- Application
- Vegetable Compartment Temperature Settings
- Supercool Freezing Compartment Temperature
- Rapid Cool
- To Cancel in the Middle
- Power Save Mode
- Food that Can be Stored in Power Save Mode
- Functions that Cannot be Used in Power Save Mode
- Operation Panel Display
- Successfully Saving Power
- Open and close doors as quickly as possible
- Don't cram too much food into the fridge
- Do not cover up air outlets or air inlets
- Cool hot foods before placing them inside
- Cleaning the Automatic Ice Maker
- Once a week Water Tank / Water Supply Pump
- Impeller
- Chlorine-Cleaning Filter
- ⑤ Assemble the water supply pump.
- Once a month Water Supply Pipe and Tank Holder
- to 2 times a year Ice Tray
- Install the tank pipe.
- Cleaning Removing and Cleaning the Parts
- Remove the power plug before cleaning.
- Do not disassemble, repair, or alter.
- Do not use while parts are damaged.
- How to Clean Q&A
- What should I do if I notice the refrigerator is dirty?
- Before the dirt becomes hard, wipe it off.
- Can the shelves, cases, and pockets be removed?
- For information on which parts can be removed,
- What should I do with doors and shelves made of glass?
- Wipe with a soft cloth soaked in warm water.
- Do not use the following items.
- Power Plug
- For safety, clean the power plug and cord periodically.
- Remove dust periodically from the power plug.
- Refrigerator Rear Side and Floor
- This is a place where, because of the convection current of the air, dust tends to gather and can easily turn black. Also for the purpose of saving energy, clean periodically.
- Glass Shelf
- Slide Glass Shelf (Front) (Back)
- Adjustable Pocket (Large) (Short, Large) (Small) (Short, Small) / Bottle Pocket (Large) (Small)
- Cleaning Removing and Cleaning the Parts (Continued)
- Recessed Portion of the Drip Gutters
- Adjustable Support Cover
- Upper Case / Upper Case Cover
- Ice Making Compartment / Supercool Freezing Compartment Case
- Freezer Compartment / Vegetable Compartment Case
- Other Issues (Power Outages, Child Safety Lock, Setting Reset, When Lights Up)
- Power Outages
- To Prevent Accidental Button Operation (Child Safety Lock)
- To Reset Settings
- When D Lights Up
- Other Issues (Door Alarm, 📞 Mark, When Not Using the Refrigerator for a Long Time)
- When the Door Alarm Sounds and the Interior Light of the Refrigerator Compartment Blinks (Door Alarm)
- When the Alarm Cannot be Turned Off
- -To Stop the Alarm (Continuous Short Beeps)
- When the Mark Blinks Rapidly (About 5 Times per Second)
- When Not Using the Refrigerator for a Long Time (When the Power Plug Is Unplugged)
- Other Issues (To Move or Carry the Refrigerator)
- To Carry the Refrigerator
- -When the Transportation Time Is Long, for Example When Moving House
- Do not damage the refrigerator's refrigerant circuit (pipes).
- Wear protective gear when you install the refrigerator.
- Do not use any tools other than the adjustable support tool kit.
- To Move the Refrigerator in Forward and Backward Directions
- Other Issues (Temperature Fine Adjustment Mode)
- To Control the Temperature More Precisely (Temperature Fine Adjustment Mode)
- Setting the Temperature Fine Adjustment Mode
- Performing the Temperature Fine Adjustment
- Refrigerator Compartment / Freezer Compartment / Supercool Freezing Compartment (Freezer Setting)
- Troubleshooting
- The refrigerator does not cool at all!
- The outer walls heat up!
- In Supercool Freezing Compartment...
- Ice cream melts
- Food does not quickly freeze
- Soft-Freezing freezes food
- The operation panel turns off automatically!
- Troubleshooting (Continued)
- Specifications
- Accessories
- MEMO
Brand : MITSUBISHI
Model : MR-WX470F
Category : Freezer