
HPC1000 - Frying Pan Heller - Free user manual and instructions
Find the device manual for free HPC1000 Heller in PDF.

| Product Type | Frying Pan |
| Brand | Heller |
| Model | HPC1000 |
| Material | Aluminum with non-stick coating |
| Diameter | 28 cm (approx.) |
| Depth | 5 cm |
| Weight | 0.8 kg |
| Handle Material | Stainless steel with silicone grip |
| Handle Heat Resistance | Up to 180°C |
| Suitable for Induction | Yes |
| Suitable for Gas | Yes |
| Suitable for Electric | Yes |
| Oven Safe | Yes, up to 180°C (without cover) |
| Dishwasher Safe | No, hand wash recommended |
| Coating Type | PTFE-free non-stick |
| Color | Black |
| Cleaning Instructions | Wash with warm soapy water and soft sponge; avoid abrasive cleaners |
| Maintenance Tips | Use wooden or silicone utensils; avoid overheating; let cool before washing |
| Safety Warnings | Do not use metal utensils; do not leave empty on heat; keep handle away from burner |
| Warranty | 2 years |
| Country of Origin | China |
| Package Contents | 1 frying pan |
Frequently Asked Questions - HPC1000 Heller
User questions about HPC1000 Heller
0 question about this device. Answer the ones you know or ask your own.
Ask a new question about this device
Download the instructions for your Frying Pan in PDF format for free! Find your manual HPC1000 - Heller and take your electronic device back in hand. On this page are published all the documents necessary for the use of your device. HPC1000 by Heller.
USER MANUAL HPC1000 Heller
READ AND SAVE THESE INSTRUCTIONS
BEFORE FIRST USE
Read and follow the instructions in this user manual even if you feel you are familiar with the product, and find a place to keep it handy for future reference.
For your convenience record the complete model number (located on the product identification plate) and the date you received the product, together with your purchase receipt and attach to the warranty and service information. Retain in the event that warranty service is required.
NOTE: The rating of this product (as marked on the product identification plate) is based on specific loading tests. Normal use or the use of other recommended attachments may draw significantly less power.
IMPORTANT SAFEGUARDS
When using any electrically powered product, basic safety precautions should always be followed, including the following:
PLEASE READ ALL INSTRUCTIONS CAREFULLY BEFORE USING THIS PRODUCT
WARNING!: - to reduce the risk of fire, electrical shock or injury to persons or property:
- Carefully read all instructions before operating your new product for the first time and keep handy for future reference.
- Remove and safely discard any packaging material and promotional labels before using the product for the first time.
- Before using, check that the voltage of the wall outlet corresponds to that shown on the rating plate.
- Do not operate any appliance with a damaged cord or plug or after the appliance malfunctions, or is dropped or damaged in any manner. Return appliance to the nearest authorized service facility for examination, repair or electrical or mechanical adjustment.
• Always ensure the appliance is switched OFF, prior to plugging into the power outlet. - If the supply cord is damaged, it must be replaced by the manufacturer, an authorized service agent or a qualified technician in order to avoid a hazard.
- Do not touch hot surfaces. Use handle.
- To protect against electrical shock, do not immerse cord, plugs, or the unit in water or other liquid.
- Avoid making contact with moving parts.
- Unplug from outlet when not in use, before putting on or taking off parts, and before cleaning. Allow the unit to cool down first before putting on or taking off parts.
- Do not operate any unit with a damaged cord or plug, after the unit malfunctions or it has been damaged in any manner.
• Always use the appliance on a secure, dry level surface. - Never place this appliance on or near a hot gas or an electric burner or where it could touch a heated appliance.
- Do not leave this appliance unattended during use.
- To reduce the risk of injury to persons or property, never use this appliance in an unstable position.
-
Do not use outdoors.
-
Do not let the cord hang over the edge of a bench, table or to touch hot surfaces.
- Do not operate product with damp or wet hands.
• Extreme caution must be used when moving a unit containing hot oil or other hot liquids. - Always attach the plug to the unit first, and then plug the cord into the wall outlet. To disconnect, turn any control "OFF", then remove plug from the wall outlet.
• Always check the pressure release devices for clogging before use. - Close supervision is necessary when the appliance is being used by or near children or infirm persons.
- The use of accessories not recommended by the manufacturer may cause injuries to persons.
- This appliance is not intended for used by persons (including children) with reduced physical, sensory or mental capabilities, or lack of experience and knowledge, unless they have been given supervision or instruction concerning use of the appliances by a person responsible for their safety.
• Children should be supervised to ensure that they do not play with the appliance. - Do not operate the appliance other than for its intended use. This appliance is for household use only.
- Do not operate the appliance by means of an external timer or separate remote-control system.
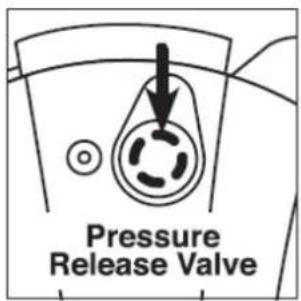
- CAUTION: Do not place any object above the pressure release valve as this is steam being released from the pressure cooker.
- The installation of a residual current device (safety switch) is recommended to provide additional safety protection when using electrical appliances. It is advisable that a safety switch with a rated residual operating current not exceeding 30mA be installed in the electrical circuit supplying the appliance. See your electrician for professional advice.
- If you cook meat with skin, such as sausage, swelling can occur when cooked under pressure. Piercing skin after cooking can lead to burst of hot liquid.
- Do not lean over the pressure cooker appliance at any time while it is cooking or operating.
- Do not use the appliance for any medical purposes. It is not designed to reach the required temperature for sterilization.
- The Silicon Gasket creates a pressure seal between lid and pot. Keep the gasket completely clean and free from any cracks or deterioration.
- IMPORTANT NOTE: It is extremely important to fill the pressure cooker with liquid prior to operation. Never cook without liquid as doing so can cause it to overheat and damage the safety mechanisms. In case of overheating, never remove the pressure cooker from the heat source. Instead, shut it off immediately and allow it to cool.
- Make sure all parts of the pressure regulator and ventilated pipe are clean and properly assembled.
- Do not alter the safety mechanisms or attempt to repair the appliance as this will void the warranty. Please adhere to the Maintenance Instructions specified for use.
- Use only the appropriate replacement parts of the appliance to maintain proper functionally and safety. Please call up spare parts for replacement parts or pieces.
- Do not place the unit close to flammable materials and heating units or wet environments.
- Height of ingredients that is to be put into inner pot should comply with “Operation Instructions”.
- Do not break the Silicone Gasket. Do not replace it with other rubber gaskets, nor use a tension belt to make it seal.
-
Check and wash anti-clog filter and pressure release valve regularly, to avoid being blocked.
-
Do not open the lid when the Floater Valve is down.
- Do not put anything on or use other object(s) to replace the Pressure Release Valve.
- Never use a towel to clog the gap between the lid and the edge of the Housing.
- The bottom of the inner pot and heating plate should be kept clean. Do not put the inner pot on other heat sources. Do not replace the inner pot with other containers.
- Only use wood or plastic ladle spoons so not to wear the non-stick coating in the inner pot.
- Do not attempt to move the unit while it is cooking. Only after the unit cools down completely can the appliance be moved. Move the unit using the body handles, do not try to hold in from the lid handle.
- Do not disassemble on your own or try to replace with non-special worn parts.
• Make sure the air/ pressure discharges completely before opening the lid. - Fit on water collection box before use and add clean lid each use.
- NOTE: You may experience some smoke coming out the unit during the first few uses, this is normal.
- Do not place the unit close to flammable materials heating units or wet environments.
- Height of ingredients placed in the inner pot should comply with the directions listed under "Operation Instructions".
- Do not break the Silicone Gasket. Do not replace it with other parts that are not designed specifically for the pressure cooker.
- Check and wash anti-clog filter and pressure release valve regularly to avoid blockage.
- Do not attempt to open the lid when the floater is down.
- Do not put anything on or use other objects to replace the pressure release valve.
- Never use a towel to clog the gap between eh lid and edge of Housing.
- The cooking pot and heating plate should always be kept clean.
- Do not put any other cooking pots on the heating plate. Do not replace any parts with other containers.
- Do not use metal utensils with the coated cooking pot as this can damage the surface.
- Keep hands and face away from the venting outlet or where pressure is being released.
- Depending on the functions, when cooking is complete, the pressure cooker will automatically go to “Warm” mode. Avoid letting ingredients sit in “Warm” mode for more than 4 hours as this could affect the taste.
- If a lot of smoke is escaping the lid during operation, unplug the unit immediately and contact customer service.
- Do not move the unit while in operations. Only after pressure cooker has completely cooled down, should you attempt to move it. When moving the pressure cooker, use the handle. Do not lift from the lid.
- If any troubles arise during operation, any necessary service must be done by an authorized service person from the manufacturer.
- Do not disassemble the unit n your own or replace any parts.
- Keep the unit out of reach of children when the unit is operating or cooling down.
- Place the water collection box in the pressure cooker before every use. Make sure it is always cleaned prior to cooking.
READ AND SAVE THESE INSTRUCTIONS
PRODUCT FEATURES:
The pressure cooker combines the advantages of a pressure cooker, rice cooker and slow cooker all in one. These advantages including structure, vanguard shape, enhanced safety settings, multiple functions, easy operation, saving time and energy and lock nutrition of food. It is an ideal unit for any modern home.
Benefits
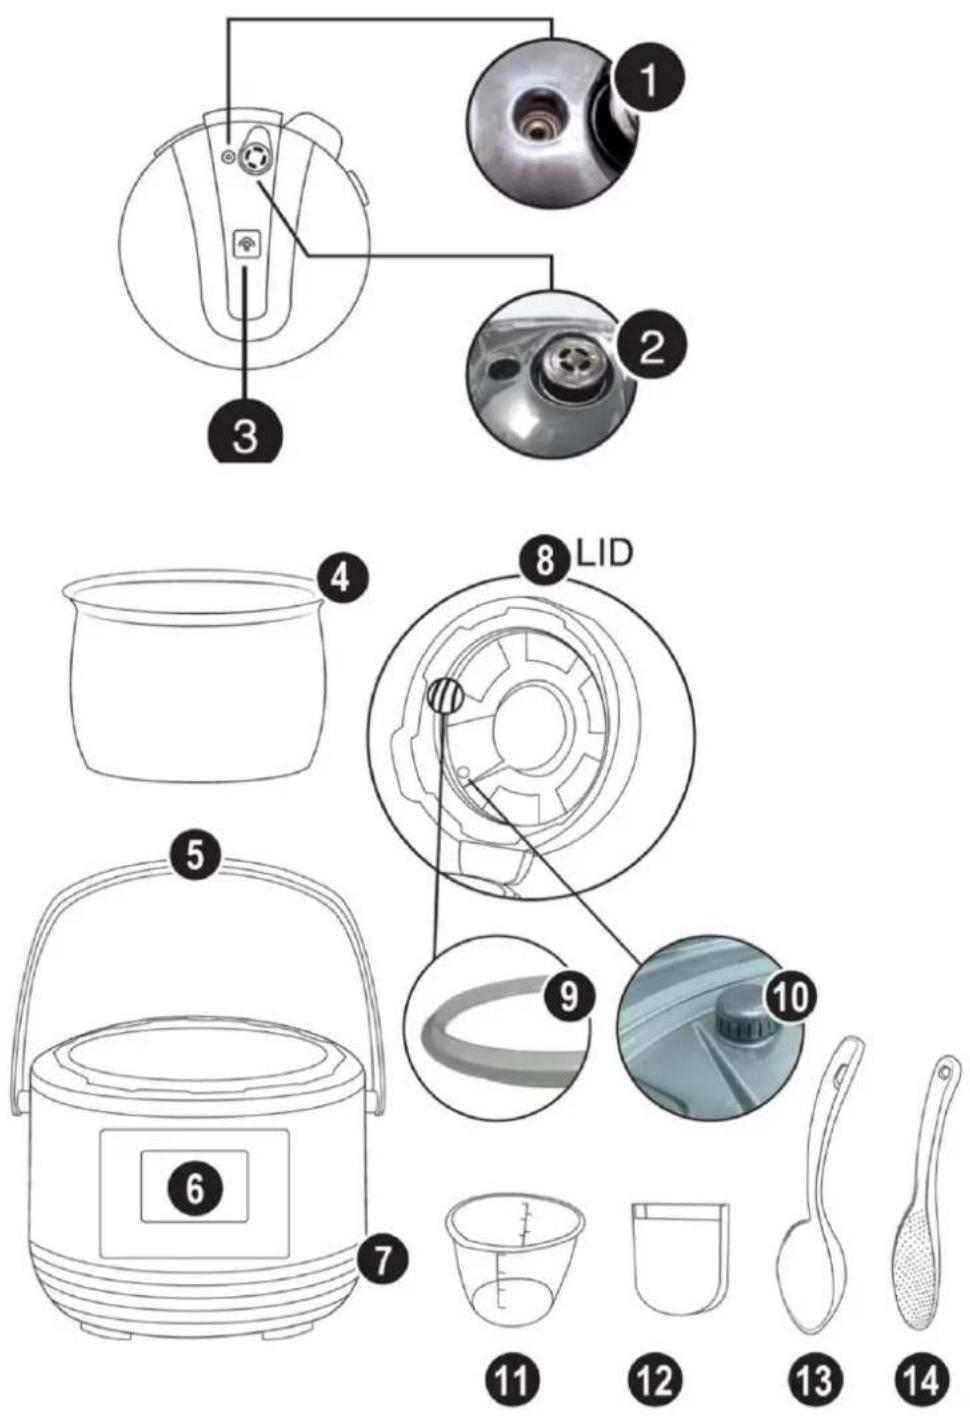
The pressure cooker consists of a cooking pot and a special lid that locks into place on the top of the pot. When it is heated, steam is sealed inside, which creates pressure. With this high pressure, the
-
Floater Valve
-
Pressure Release Valve
Part #: 34107
-
Pressure Release Button
-
Inner Pot
Part #: 34109
-
Pressure Cooker Handle
-
Control Panel
-
Housing
-
Inner Lid
-
Silicone Gasket
Part #: 34110
- Anti-Clog Filter
Part #: 34108
- Measuring Cup
Part #: 34103
- Water – Collection Box
Part #: 34104
- Soup Ladle
Part #: 34102
- Rice Spoon
Part #: 34101
internal temperature of the pressure cooker is raised above the normal boiling point of water. The cooking process is thus expedited leading to healthier meals made faster.
Multiple Cooking Functions
Now you can sear, stew, steam, simmer, bake, can, slow cook and keep your foods warm all by the push of a button.
Microcomputer
Ingredients are automatically cooked to the right specifications. During operation, the pressure cooker will indicate which cooking function it is performing. Once finished, depending on the function, it will automatically switch to the 'Warm' setting until you're ready to eat.
Preset Time Function
The pressure cooker includes a delay feature so you can start cooking exactly when you want.
Saved Memory
If the pressure cooker is disconnected from its power supply and reconnected within 20 minutes, all programmed settings will be retained.
High Efficiency
Cooking in the pressure cooker saves you time and energy.
Perfect Seal
The Silicon Gasket locks in the taste and nutrients of your favourite foods.
Easy to Clean
The inner pot is a non-stick so it's easy to clean. The stainless steel lid is durable and detachable for easy cleaning.
Innovative Design
The pressure cooker features a user friendly design that releases any excess steam away from the unit, ensuring peace of mind.
Faster Cooking
On average, pressure cookers prepare food faster than traditional cooking methods and the Heller pressure cooker is no exception.
Tastier Meals
Pressure cooking allows food to retain its full flavour by cooking quickly and efficiently. With the natural flavour intact, less seasoning is required, enabling you to craft your meals precisely to your taste.
Healthier Results
More vitamins and minerals are retained in food prepared with the pressure cooker compared to conventional stove top cooking. In addition, pressure cooking utilizes water in lieu of additional unhealthy oils or fat, virtually eliminating the need to add extra, unnecessary calories to your diet.
Multifunctional
The pressure cooker can be used for steaming, simmering and stewing fresh of even frozen foods. You can even use it for canning or baking. Prepare everything from delicate soups or desserts to hearty meat dishes.
MULTIPLE SAFETY DEVICES:
Lid Safety Device
If the lid does not fasten to the housing, the pressure will not build. If there is pressure already built inside the pot, the lid will not be able to open.
Pressure Control
During operation, if pressure exceeds the default pressure, the pressure cooker will automatically shut off to prevent any pressure from leaking.
Maintaining Pressure
If the thermostat and pressure controller are broken, and the pressure exceeds the maximum level; excess pressure will automatically discharge from the pressure relief valve.
Anti-Block Device
Ensures the pressure vents smoothly.
Pressure Release Safety Device
If the pressure cooker fails to maintain the proper pressure, and the pressure exceeds the maximum level; the excess pressure will automatically discharge from another area to avoid explosion.
Temperature Controller
If the inner pot heats up while empty or if the inner pot exceeds the setting temperature, the pressure cooker will automatically shut off.
Thermostat:
Once the inner pot exceeds the maximum temperature limit, the pressure cooker will automatically shut off.
PRESSURE COOKING NOTES
Tip
The pressure cooker will beep to indicate that the cooking time is complete.
Pressure
The function selected will determine the amount of pressure time. In this example, the display will show "P0:10" (pressure time). The colon ":" will flash to indicate the pressure cooker is under pressure and the timer is counting down.
Auto Warm Feature
When pressure cooking is complete, the pressure cooker will automatically switch to the warm function. This allows the pressure to naturally release while your food remains warm. The times for the presets are listed on page 12.
What is quick release?
To quickly release the pressure, simply press the Quick Release Button. This will rapidly release the steam, and when the pressure indicator is down; this allows you to safely open your pressure cooker. By releasing the steam this way, you can quickly open the pressure cooker without cooling off the pot and stopping the cooking process.
What is natural release?
To naturally release the pressure, simply wait for the pressure indicator to go down, allowing the pressure cooker to naturally release steam as it slowly cools. This allows you to finish the cooking process as the pressure cooker gradually releases steam. The natural release method takes up to 15
minutes. If the pressure remains in the pressure cooker, simply press the Quick Release Button to release any remaining pressure.
OPERATING INSTRUCTIONS
natural_image
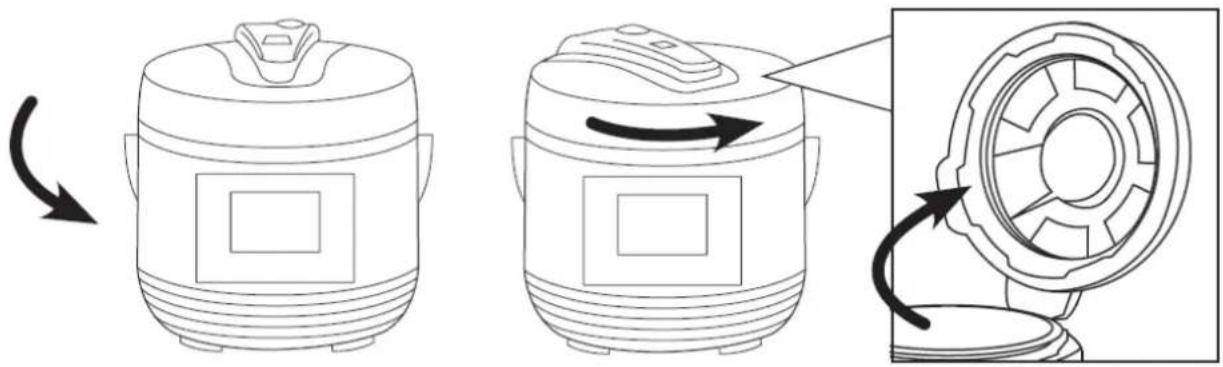
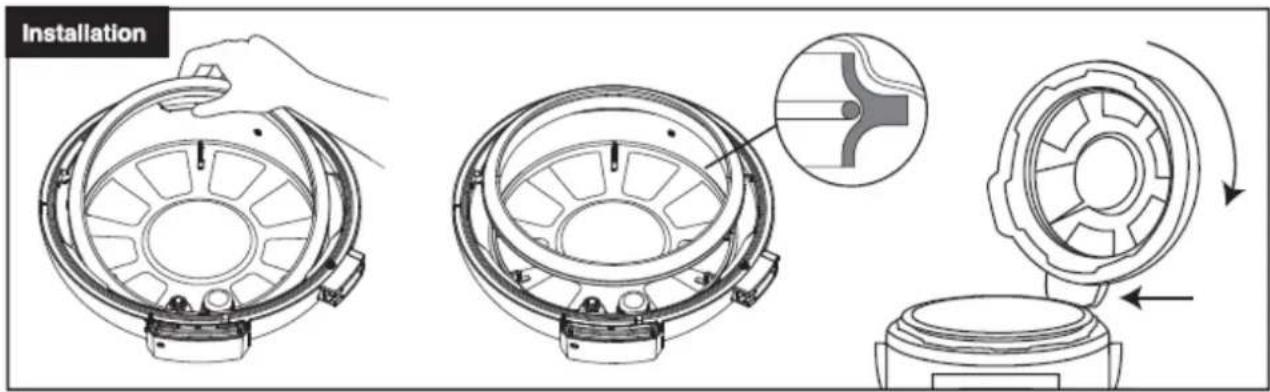
Line drawing showing three stages of a cooking pot: adding heat, rotating with arrows indicating rotation, and finally adding a mechanical component (no text or symbols)- Open lid: Hold the lid handle. Turn the lid counter clockwise to open position the raise it (See above).

- Place ingredients and water in the inner pot. Ingredients and water should not exceed 4/5 height of the inner pot. If the ingredients expand easily in water, then the total amount should not exceed 3/5 height on the inner pot. The minimum amount of ingredients and water is normally 1/5 height of the inner pot. (See above)
- Place the inner pot in the Housing; clean the bottom of the inner pot and surface of heating place before inserting the inner pot. (See below)
- Close Lid:
a. Check that the Silicone Gasket is secured in the lid before closing,
b. Hold the lid handle. Lower the lid, and then turn the lid clockwise to close. A sound will confirm that the lid has been closed properly. (See below).

flowchart
graph TD
    A["The push rod on side of the lid needs to align properly to the base in order for the lid to lock into place."] --> B["Step 1: Lid should press down"]
    B --> C["Step 2: Lock moves to form a ring with a handle"]
    C --> D["Step 3: Lock moves to form a pot with a handle"]
    D --> E["Step 4: Lock moves to form a pot with a handle"]
- Once the lid is locked in place, the Pressure Release Valve should be level.
- Plug the appliance into an electric power supply. The LCD display will show “--:--” and the unit will go on standby mode.
SILICONE GASKET INSTALLATION
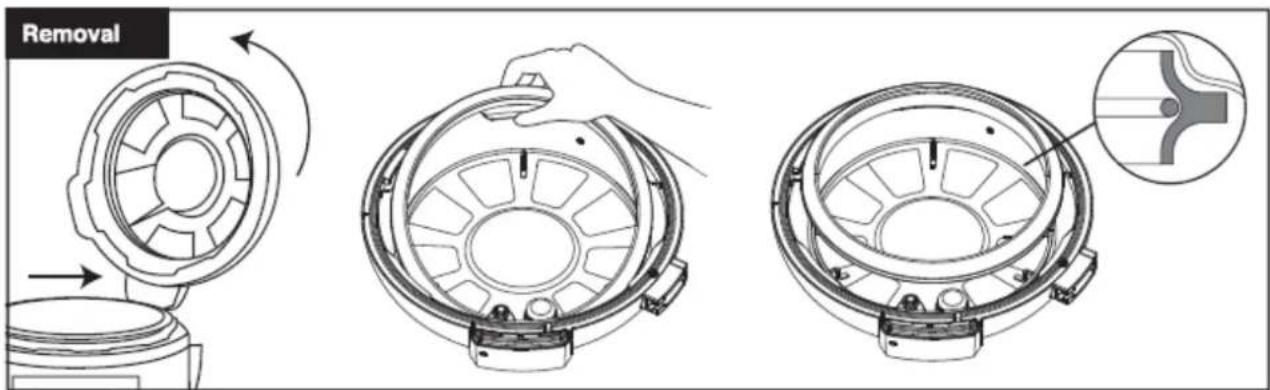
CAUTION: MAKE SURE THE SILCONE GASKT HAS NO CRACKS OR IS IN ANYWAY DAMAGED.
-
Remove Inner Lid from the Pressure Cooker
-
Rotate counter clockwise, this will detach the inner lid.
-
With one hand holding the inner lid down, gently pull the Silicone Gasket up.
-
Installing the Silicone Gasket
-
Line up the Silicone Gasket on top of the metal ring.
- Gently push the Silicone Gasket making sure you see the metal ring is inside the Silicone Gasket's grove. Continue pushing the Silicone Gasket all around.
CONTROL PANEL
Main Display Interface
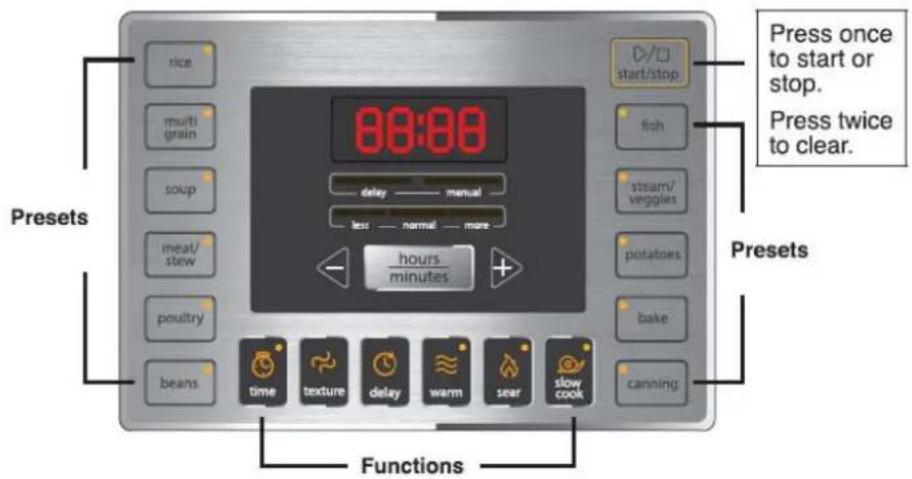


When unit is not cooking, or when no function has been selected, the LED screen will display “-:-” indicating that the unit is not in operation.

The "delay" bar will light up once the delay button has been pressed. This function will allow you to delay the start time of each preset function.


The "manual" bar will light up only when the time button has been pressed or when the cooking time has been changed manually. This will allow you to manually set your time for each function.


The "less", "normal" and "more" bars light up individually indicating your current setting. The "texture" function applies to these displays with "normal" being the default setting. "texture" is a function that has 3 times pre-programmed for our select presets. This also affects the consistency of your food. All functions default to "normal".
Figure 1
When making rice using our "rice" function, you can make sticky rice by setting the "texture" to "more" and if you want fluffier rice, set the "texture" to "less".
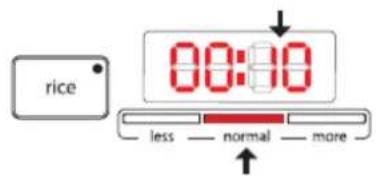
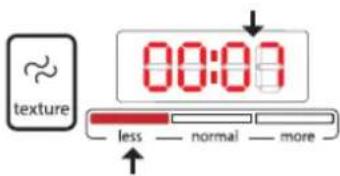
Press "rice", it will default to "normal" (00:10). Press "texture" to change to "more" (00:13). Press the "texture" button again to change to "less" (00:07). The bar will light up indicating what mode you are in. Press "start/stop" to begin.
NOTE (Applies to all):
- Pressing the "-"or "+" buttons will switch to "manual" mode.
- Press "start/stop" twice to clear.
- The pressure cooker will clear out in 30 seconds if the "start/stop" button is not pressed.
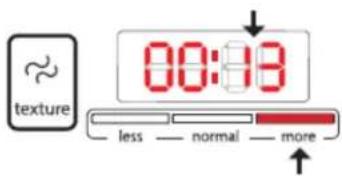
hours/minutes
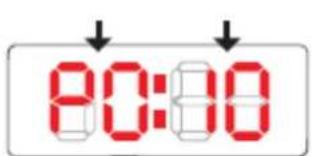
This button will let you manually adjust the time. When the "hours/minutes" button is pressed, the 2 digits on the left will flash to indicate these are selected. Pressing the "+" and "-" buttons will increase and decrease the time.


Figure 2
minutes
hours
Pressure:
The function selected will determine the amount of pressure time. In this example, the display will show "P0:10" (pressure time). The colon or ":" will flash to indicate that the pressure cooker is under pressure and the timer is counting down.
Example:


Refer to the PRESET TIMES CHART ON PAGE 13 for default times for each function.
Auto Warm Feature:
When pressure cooking is complete, the Pressure Cooker will automatically switch to the warm function. This allows the pressure to naturally release while your food remains warm. The times for the presets are listed below.
| Auto Warm Feature | |||
| Presets | Unlimited | Auto Shutoff | TimeHours:Minutes |
| Rice | |||
| Multi Grain | |||
| Soup | 04:00 | ||
| Meat/Stew | 02:00 | ||
| Poultry | 01:00 | ||
| Beans | 04:00 | ||
| Fish | 00:30 | ||
| Steam/Veggies | 00:30 | ||
| Potatoes | 01:00 | ||
| Bake | |||
| Canning | |||
| Time (Function) | 04:00 | ||
Example:
When the "rice" preset is complete, the Pressure Cooker will keep your "rice" warm indefinitely, until you press the "start/stop" button.
NOTE:
Food can be prepared at an earlier time and kept warm inside the Pressure Cooker using the "warm" function. Food can be kept warm for up to 4 hours. Additional time may cause a change in flavor, appearance and cause food to spoil.
PRESETS
| Default Time | Texture (minutes) | Time (minutes & hours) | ||||
| Presets & Functions | Hrs:Min | Less | Normal | More | Min.* | Max |
| Rice | 00:10 | 00:07 | 00:10 | 00:13 | 00:01 | 01:40 |
| Multi Grain | 00:27 | 00:22 | 00:27 | 00:32 | 00:01 | 01:40 |
| Soup | 00:15 | 00:10 | 00:15 | 00:20 | 00:01 | 01:40 |
| Meat/Stew | 00:40 | 00:20 | 00:40 | 00:50 | 00:01 | 01:40 |
| Poultry | 00:20 | 00:15 | 00:20 | 00:25 | 00:01 | 01:40 |
| Beans | 00:20 | 00:15 | 00:20 | 00:25 | 00:01 | 01:40 |
| Fish | 00:08 | 00:06 | 00:08 | 00:10 | 00:01 | 01:40 |
| Steam/Veggies | 00:05 | 00:03 | 00:05 | 00:07 | 00:01 | 01:40 |
| Potatoes | 00:06 | 00:04 | 00:06 | 00:10 | 00:01 | 01:40 |
| Bake | 00:40 | 00:30 | 00:40 | 00:50 | 00:01 | 01:40 |
| Canning | 00:20 | 00:01 | 01:40 | |||
| Delay | 00:05 | 24:00 | ||||
| Warm ≈ | 04:00 | 01:00 | 24:00 | |||
| Sear ≈ | 00:05 | 00:01 | 00:20 | |||
| Slow Cook ≈ | 04:00 | 02:00 | 09:00 | |||
| *Minimum Time | ||||||
The pressure cooker is programmed to a set pressure of 70kPa.
kPa as a unit pressure measurement, is widely used throughout the world instead of the “Pounds per Square Inch, (PSI)” method. kPa to PSI ratio is approximately 7kPa to 1PSI.
For Example: 2PSI is equal to 14 kPa

- Press the preset button (Ex: "rice"). The main display will show the default time for this preset (Ex: 00:10). The digits to the right of the colon (":") display the minutes and the digits left of the colon displays the hours. On the main panel, an LED bar will light up to indicate that the preset is on "normal" mode, which is the default.
- To begin cooking, close the lid, then press the "start/stop" button.
- See "hours/minutes" and "texture" sections for instructions on adjusting the time.
Example:

Follow these simple steps for each preset. On this example P0:10 is the default pressure time. The pressure time will vary depending on the preset you choose.
FUNCTIONS
Example:
flowchart
graph TD
A["time"] --> B["delay"]
B --> C["manual"]
C --> D["00:00"]
D --> E["00:00"]
E --> F["hours/minutes"]
F --> G["+"]
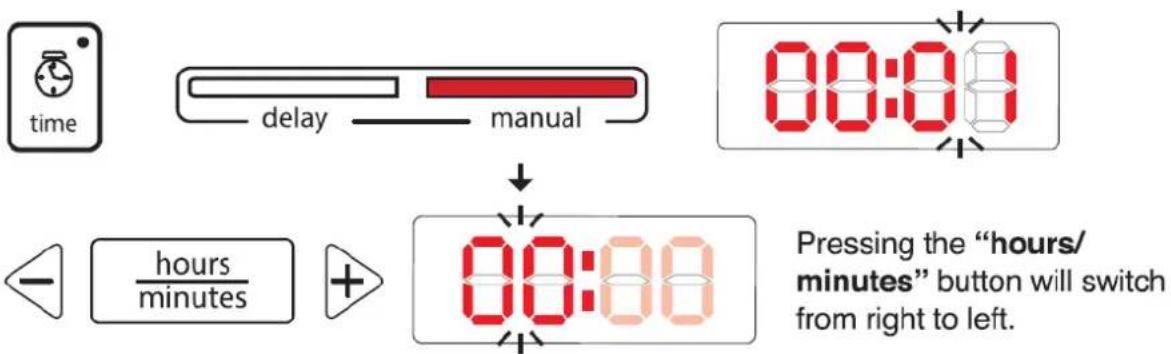
G --> H["Pressing the "hours/minutes" button will switch from right to left."]

This function used to help change the consistency of your foods. "less", "normal" and "more" are selected guides that increase or decrease the cooking time while under pressure.
DIRECTIONS:
- Press a desired preset button. The display will default to "normal" time.
(Ex: Press "rice" and the display will show 00:10).
- To change the consistency of the food (less, normal, more), simply press "texture". The appropriate light will display, indicating that the time has been changed. The time in the display will automatically adjust accordingly. (Ex: for the "rice" function, less is 7 minutes, normal is 10 minutes and more is 13 minutes).
- Close the lid and press the "start/stop" button.
- See page 11 for times for each function.
Example:


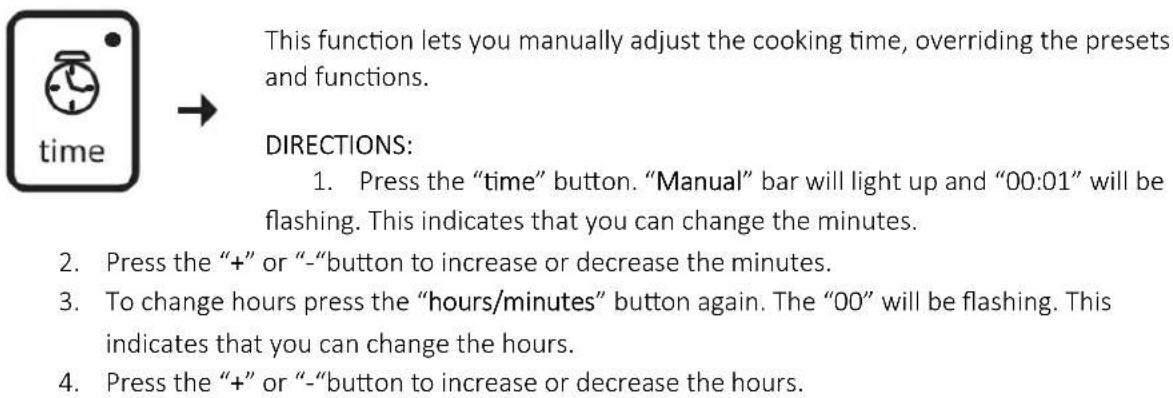
This function allows you to set a specific time you would like to start cooking.
DIRECTIONS:
-
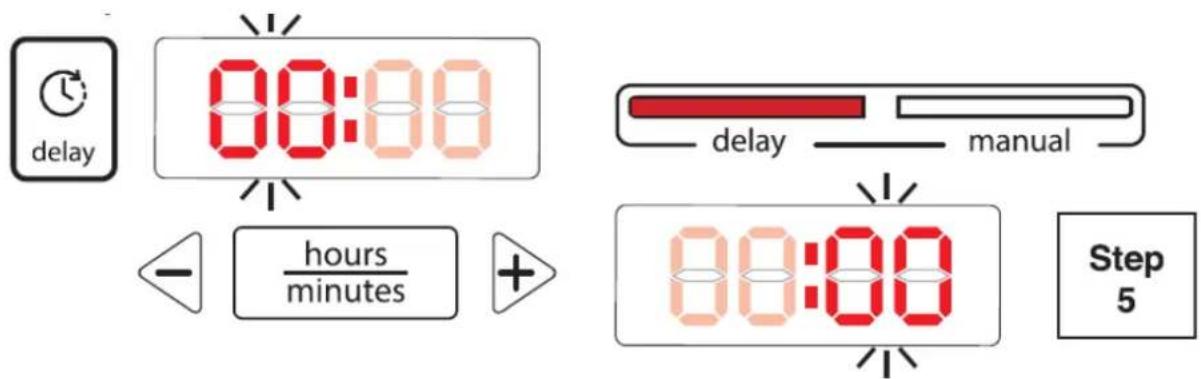
Press the "delay" button. The delay bar will light up and the first set of "00"s will be flashing.
-
Press the "+" or "-" button to increase or decrease the hours.
- To change minutes, press the "hours/minutes" button. The second set of "00" will be flashing. This indicates that you can change the minutes.
- Press the "+" or "-" button to increase or decrease the minutes.
- Press the desired function button to continue your program base on your recipe.
- Close the lid and press the "start/stop" button.
Note:
- When utilizing the delay function, it will always be the first function performed.
- You can adjust the delay time in 5-minute and 1-hour increments.
- The maximum amount of time to delay your Pressure Cooker is in operation.
Example:

This function will let you manually adjust the time you would like to keep your food warm.
DIRECTIONS:
- Press the "warm" button, display will show "04:00".
- Press the "+" or "-" button to increase or decrease the time. See
"hours/minutes" section for instructions on adjusting the time.
- Press the "start/stop" button to start.
Note:
- The default time for the warm functions is 4 hours, the minimum time is 1 hour and the maximum time is 24 hours.
- You can adjust the time in 5-minute and 1 hour increments.
The Pressure Cooker will automatically go to these warm functions when a desired preset has completed. Refer to the Auto Warm Feature chart on page 14 for default warm times.
Example:


This function lets you "sear" your food before cooking under pressure or before using the Slow Cook function.
DIRECTIONS:
- Press the "sear" button. Display will show "00:05".
- Press the "start/stop" button to start.
- See the "hours/minutes" section for instructions on manually adjusting the time.
Note:
- Do not close lid when using "sear" function.
- The minimum time is 1 minute (00:01).
- The maximum time is 20 minutes (00:20).
- When complete, the display will show "End".
Example:


This function lets you cook various recipes slowly at low temperatures.
DIRECTIONS:
- Press the "slow" button. Display will show "04:00".
- Press "start/stop" button to begin.
- See "hours/minutes" section for instructions on adjusting the time.
Note:
- Do not close lid when using slow function.
- The minimum time is 2 hours (02:00).
- The maximum time is 9 hours (09:00).
- When complete, the display will show "End".
Example:


PRESSURE CANNING
Canning:
Foods with lower acid content have a greater potential for spoilage and contamination that high acidity foods. Proper pressure canning minimizes the chances of spoilage and contamination.
| LOW ACID FOODS | HIGH ACID FOODS | |||
| Asparagus | Mushrooms | Apples | Oranges | |
| Beans | Okra | Applesauce | Peaches | |
| Beets | Peas | Apricots | Pears | |
| Carrots | Potatoes | Berries | Pickled Beets | |
| Corn | Seafood | Cherries | Pineapples | |
| Hominy | Spinach | Cranberries | Plums | |
| Meat | Winter Squash | Fruit Juices | Rhubarb | |
Never alter cooking times, temperatures or ingredients when pressure canning. Doing so can be extremely dangerous as there is no room for experimentation. Following the exact cooking times, temperatures and ingredients listed in the recipe will ensure that your food is protected from harmful enzymes, bacteria and mold. Altering the cooking time may destroy the food's nutrients and flavour.
Enzymes found in food may promote growth of yeast and mold, which in turn causes food to spoil. These enzymes can be killed at temperatures 212°F and higher. Other contaminants, such as salmonella, staphylococcus aureus, and clostridium botulinum, can only be killed at temperatures 240°F. These higher temperatures can only be achieved by pressure canning.
PLEASE NOTE: Before pressure canning in the pressure cooker, consult an instructional book written specifically for pressure canning. The pressure cooker can be used for basic pressure canning, along
with the water bath method. Both low and high acid fruits and vegetables are recommended. Meat and seafood are not recommended to be pressure canned.
SAFE CANNING TIPS:
- Do not use overripe fruit. Bad quality degrades with storage.
- Do not add more low-acid ingredients (onions, celery, peppers, garlic, etc) than specified in the written recipe. This may lead to an unsafe end result.
-
Don't use too many spices. Many spices tend to contain high levels of bacteria, which may result it unsafe canned goods.
-
Do not add butter or fat to the recipe. Fats do not store well and may cause premature spoilage. Never use thickeners such a flour, starch, pasta, rice or barley.
-
Use only USDA recommended tools and accessories.
-
Do add acid (lemon juice, vinegar or critic acid) especially to tomato products when directed in the recipe. If necessary, you can balance the tart taste by adding sugar.
HELLER'S PRESSURE COOKER'S PRESSUE CANNING PROCESS:
Though your exact experience may vary depending on the specific recipe you are following, most recipes can be prepared by following this guide.
- Only follow recipes that have been tested for pressure canning. Prepare the necessary ingredients as instructed in the recipe.
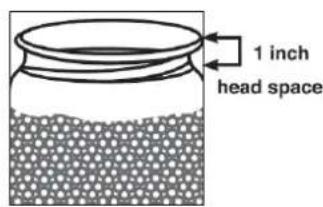
- Fill clean 16-ounce mason jars to the level. Do not allow ingredients to exceed the level. Always leave no less than 1 inch of head space.
-
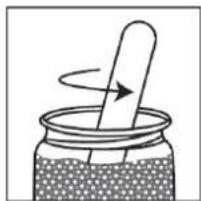
Gently remove any lingering air bubbles by pressing a flexible, nonporous spatula between the ingredients and the jar itself.
-
Place a clean lid onto each jar, then add a screw band. Turn the lid clockwise and tighten in place.
NOTE: Never re-tighten lids after pressurizing the jars. As the jars cool, the contents will contract, pulling the lid firmly against the jar to form a high vacuum and create a seal. If the screw bands are too loose, liquid may escape from the jars during this process, causing the seals to fail. If the screw bands are too tight, air cannot vent during this process, causing food to discolour while in storage. Tightening the lids too much may also cause the lids to buckle and the jars to break. Screw bands are not needed on stored jars. Remove after jars have cooled. When removed, washed, dried and stored, screw bands may be used many times.
natural_image
Simple line drawing of a jar with a stirring rod and rotating arrow (no text or symbols)If left on stored jars, they become difficult to remove, often rust and may not work properly again.
-
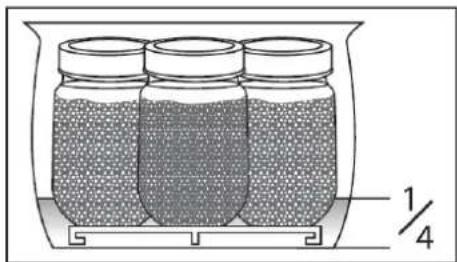
Place the inner pot in the base unit. Then put the wire rack in the bottom of the inner pot. Place filled, sealed jars on rack. Unit will hold up to 4-16 oz. jars (maximum).
-
Pour hot water over the jars and into the inner pot until the water level reaches 1/4 of the way up the sides of the jars. For 4-16 oz. This would be about 6 cups of water. When processing fewer jars, more water would be needed.
- After reading the Instruction Manual, put the lid on the base and lock in place. Plug the unit into the wall outlet.
- Press the "canning" button, Pressure Cooker will default to 20 minutes. To change pressure time, to go to "time" button then adjust accordingly.
- When the canning process is complete, the unit will shut off. Press the pressure release button to release the pressure. Once all the steam has escaped, carefully remove the lid.
- Using canning tongs, remove the hot jars and place them on a heat resistant surface and allow to cool down to room temperature.
- When jars are thoroughly cool, remove the screw bands. The lids should be tightly sealed to the jars and when pressed in the center they should not have any "give" or springing motion. If they do, you cannot safely store this food for future use. It must be reprocessed immediately or refrigerated and used within a few days.
- Place the finished jars on shelves in a cool, clean, dry atmosphere. Properly processed food will last for months and seasons. Jars, lids and screw bands are reusable. Check all carefully for damage before reuse.
IMPORTANT: It is recommended to use the pressure cooker as a canning device at altitudes of 2,000 feet above sea level or higher.
NOTES & TIPS:
- While the jars are cooling, you will hear the lids emit a faint clocking sound. This sound indicates that the lids have properly sealed.
- You can check the seal on flat lids by pressing down with your thumb after they have cooled for one hour or more. If the lid remains stiff with no movement, then the lids have properly sealed.
- If the lids have not properly sealed after 2 hours of cooling, the pressure canning process did not work. Should this happen, refrigerate or freeze the ingredients and use within the standard use-by dates.
- Always use supplies specifically manufactured for the purpose of canning. For best results, use mason jars that are no larger than 16 ounces. When pressure canning, never stack the jars.
Use chart below. The canning function goes to a default of 20 minutes.
| FOOD | PACKING CONDITIONS | PRESSURE 70kPa | |
| TYPE | SIZE (JAR) | Time (hrs:mins) | |
| Asparagus | Hot & Raw | Pints | 00:30 |
| Beans (green) | Hot & Raw | Pints | 00:20 |
| Beans (lima, pinto, butter or soy) | Hot & Raw | Pints | 00:40 |
| Beets | Hot | Pints | 00:30 |
| Carrots | Hot & Raw | Pints | 00:25 |
| Corn, Whole-kernel | Hot & Raw | Pints | 00:55 |
| Greens | Hot | Pints | 01:10 |
| Okra | Hot | Pints | 00:25 |
| Peas, Green or English | Hot & Raw | Pints | 00:40 |
| Potatoes, White | Hot | Pints | 00:35 |
AFTER EACH USE:
- Switch off the pressure at the power outlet and then unplug prior to cleaning.
- Allow all parts to cool before removing the removable or cleaning any parts of the unit.
- Wipe the base and inside of the base, if necessary, with a clean cloth.
- Remove and clean the water collection box. Wipe with a wet towel and insert it back to the body of the pressure cooker.
- The lid can be detached from the base. See image under "Operating Instructions" step 1 for proper assembling instructions. All parts inside the lid can be hand washed separately with water and should always be checked to make sure they are not damaged or cracked.
- Use a sponge or non-metallic soft brush to clean the inner pot, then wipe the surface with a clean cloth.
CAUTION: Do not use abrasive cleaners, steel wool, or metal scouring pads as these can damage the non-stick surface. - The Stainless Steel Housing can be wiped over with a damp cloth and then dried thoroughly.
NOTE: NEVER IMMERSE THE BASE IN WATER OR ANY OTHER LIQUID, OR SPRAY ANY WATER IN IT.
FOR YOUR SAFETY
- Do not operate any product with a damaged cord or plug, or after the product malfunctions, or is dropped or appears damaged in any way. Return the complete product to the place of purchase for inspection, repair or replacement.
- Switch off and unplug from outlet when not in use, before assembling or disassembling parts and before cleaning. Remove by grasping the plug - do not pull on the cord.
- The appliance has no user serviceable parts. In the event that it is dropped or damaged in any way, or fails to operate it should be returned to the place of purchase, together with your purchase receipt or the address below for repair or replacement.
TROUBLESHOOTING GUIDE
| PROBLEM | POSSIBLE CAUSE | RESOLUTION |
| Difficulty closing lid. | Silicone Gasket may not be placed correctly.Floater Valve may be blocking the push rod. | Place the Silicone Gasket correctly.Push the Floater Valve to the correct position. |
| Difficulty opening lid. | The Floater Valve may not be falling down properly.Pot may still be under pressure. | Push the Floater Valve correctly. |
| Gas leakage from cooker lid. | Some ingredients may be stuck to the Silicone Gasket.Silicone gasket may be broken. | Clean the Silicone Gasket.Make sure that the lid is closed as per instructions in heading“Operating Instructions” step 4. |
| Gas leakage from the Floater Valve. | Some ingredients may stick to the Floater’s Valve’s sealing circle.The Floater Valve’s sealing circle may be broken. | Clean the Anti-Clog Filter.The Floater Valve’s sealing circle may need to be replaced. |
| Floater Valve does not rise up. | There may not be enough ingredients/water to generate enough pressure.Gas leakage from lid or Pressure Release Valve. | Ingredients or water need to be at minimum level.Unit may need to be set to the manufacturer. |
| CONTACT CUSTOMER SERVICE IF ANY OF THESE ERRORS OCCUR | ||||
| CODE | E1 | E2 | E3 | E4 |
| ERROR | Broken circuit of sensor | Short circuit of sensor | Over heat | Signal switch broken |
WARNING: PLEASE IMMEDIATELY CUT OFF CIRCUIT AND SENT UNIT TO OUR CUSTOMER SERVICE DEPARTMENT IN CASE OF OTHER PROBLEMS.
NOTE: IF UNIT NEEDS TO BE REPLACED OR RETURNED TO THE MANUFACTURER, PLEASE CONTACT CUSTOMER SERVICE.
SPECIFICATIONS
| Model | Brand | Description | Voltage | Frequency | Wattage |
| HPC1000 | Heller | Pressure Cooker 1000W | 220-240Vac | 50Hz | 1000W |
CUSTOMER SERVICE
Australian Customer Service
GAF Control (Sales) Pty Ltd
P.O Box 19
Altona North Victoria 3025
Phone: 1300 659 489
Hours: 9am-5pm (EST) Mon-Fri
www.gafcontrol.com.au
*This product may vary slightly to the product illustrated due to ongoing product development
SMOKE SAUSAGE & CABBAGE SOUP
Serves: 4-6 people
Ingredients:
| 3 tablespoons olive oil | 12 teaspoon caraway seeds |
| 1 pound andouille sausage (diced) | 1 teaspoon fennel seeds |
| 1 small onion (diced) | 12 teaspoon mustard powder |
| 2 carrots (chopped) | 1 tablespoon tomato paste |
| 12 ribs celery (chopped) | 6 cups low sodium chicken stock |
| 12 head nappa cabbage (chopped) | Salt & black pepper to taste |
| 12 head green cabbage (chopped) | 12 cup chopped fresh parsley |
| 3 cloves garlic (minced) |
Directions:
- Press "sear" button, set to 3 minutes, then press "start/stop" button.
- Add olive oil and sausage to the Pressure Cooker, and brown the sausage.
- Add onions, carrots, celery and cabbage to the pressure cooker and mix well.
- Add seasonings and toss to coat well.
- Add stock and tomato paste, and mix well.
- Season with salt and pepper.
- Close lid and lock in place.
- Press "soup" button, press "texture" once to 20 minutes, then press "start/stop" button.
- Once finished, the pressure cooker will automatically go to the "warm" feature and the pressure will released naturally.
- Once pressure is released, carefully open lid, stir in fresh parsley, season with salt and pepper to taste and serve.
BARLEY BEEF SOUP
Serves: 4-6 people
Ingredients:
| 3 tablespoons olive oil (divided) | 2 cloves garlic (chopped) |
| 1 1⁄2 pounds beef (cubed) | 1 teaspoon dried rosemary |
| 1 onion (medium diced) | 2 tablespoons tomato paste |
| 2 carrots (medium diced) | 1 cup of red wine |
| 4 ribs celery (medium diced) | 1 cup uncooked pearl barley |
| 2 medium parsnips (chopped) | 6 cups low sodium beef broth |
| 225 grams white mushrooms (chopped) | 1 tablespoon chopped fresh thyme |
| Salt & black pepper to taste |
Directions:
- Press "sear" button, set to 10 minutes, then press "start/stop" button.
- Rub 1 tablespoon oil onto beef and season with salt and pepper.
- Working in small batches, brown beef on all sides in pressure cooker, adding additional oil between batches.
-
Transfer browned beef to paper towel-lined dish and set aside.
-
Add onions, carrots, celery, parsnips, mushrooms, garlic and rosemary to pressure cooker and sauté for 5-7 minutes.
- Stir in tomato paste and return beef to pressure cooker.
- Close lid and lock in place.
- Press soup button, press "texture" once for 20 minutes, then press "start/stop" button.
- Once finished, the pressure cooker will automatically go to the "warm" feature and the pressure will release naturally.
- Carefully open lid, stir in fresh thyme, season with salt & pepper to taste and serve.
Tips: Use grape juice or beef stock in place of red wine.
CHICKEN & RICE SOUP
Serves: 6-8 people
Ingredients:
| 1 tablespoon olive oil | 1 cup long-grain rice |
| 3 boneless skinless chicken breast (small diced) | 4 cups chicken stock |
| 1 onion (finely chopped) | 1 (28 ounce) can diced tomatoes |
| 3 carrots (peeled & sliced) | 1 12 teaspoons salt |
| 2 ribs celery (sliced) | Freshly ground black pepper to taste |
| 3 cloves garlic (minced) | 14 cup chopped fresh parsley |
| 1 teaspoon dried thyme |
Directions:
- Press "sear" button, then press "start/stop" button.
- Add olive oil & chicken to Pressure cooker, and brown chicken.
- Add onions, carrots, celery, garlic and thyme and sauté for 2 minutes.
- Add rice, chicken stock and tomatoes and season with salt and pepper.
- Close lid and lock in place.
- Press "soup" button, set 8 minutes, then press "start/stop" button.
- Once finished, the pressure cooker will automatically go to the "warm" feature and the pressure will release naturally.
- Season with salt and pepper, garnish with celery and serve.
CASSOULET CHICKEN
Serves: 4-6 people
Ingredients:
| 6-8 chicken legs or thighs | 1 cup carrots (diced) |
| Salt & black pepper to taste | 1 tablespoon Dijon mustard |
| 3 tablespoons olive oil | 1 clove garlic (chopped) |
| 12 pound diced pancetta | 2 cups low sodium chicken stock |
| 1 cup white wine | 2 (15 ounce) cans navy beans (drained) |
| 12 onion (chopped) | 1 teaspoon chopped fresh thyme |
| 14 cup celery (diced) |
Directions:
- Press "sear" button, set to 13 minutes, then press "start/stop" button.
- Coat chicken in olive oil and season with salt and pepper.
- Working in batches, brown chicken on both sides in pressure cooker and set chicken aside on a covered plate.
- Add pancetta and wine to pressure cooker, and scrape off any chicken pieces stuck to the bottom.
- Return chicken to pressure cooker, add all remaining ingredients and continue to sear for 3 minutes.
- Close lid and lock in place.
- Press "poultry" button, press "texture" once for 25 minutes, then press "start/stop" button.
- Once finished, the pressure cooker will automatically go to the "warm" feature and the pressure will release naturally.
- Season with salt and pepper to taste and serve.
Tips: Use white juice or chicken stock in place of white wine.
CHICKEN, PEAS & RICE
Serves: 6 people
Ingredients:
| 1 tablespoon olive oil | 1 1⁄2 cup rice |
| 3 shallots (chopped) | 2 tablespoons parsley |
| 3 carrots (diced) | 2 teaspoons salt |
| 3 ribs celery (diced) | 1 teaspoon white pepper |
| 1 tablespoon garlic (chopped) | 1 tablespoon butter |
| 1 cup mushrooms (chopped) | 3 tablespoon flour |
| 1 1⁄2 teaspoons fresh thyme | 16 ounces frozen peas |
| 6 boneless skinless chicken breasts | 2 cups low sodium chicken stock |
Directions:
- Press "sear" button, set to 5 minutes, then press "start/stop" button.
- Add olive oil, shallots, carrots, celery and garlic to pressure cooker. Cook for 4 minutes.
- Add mushrooms, thyme, chicken, chicken stock, rice, parsley, salt and pepper to pressure cooker. Mix ingredients until combined.
- Close lid and lock in place.
- Press "poultry" button, press "texture" twice for 15 minutes, then press "start/stop" button.
- Once finished, the pressure cooker will automatically go to the "warm" feature and the pressure will release naturally.
- Remove the chicken, press "sear" button. Add butter, flour, peas and stir until sauce begins to thicken.
- Season with salt and pepper to taste, and serve chicken with rice mixture.
SALSA CHICKEN & RICE
Serves: 4 people
Ingredients:
2 teaspoons olive oil 1 (10 ounce) can diced tomatoes
1 (1.8 kgs) chicken, cut into 8 pieces 1 (10 ounce) can green chilies
1 cup basmati rice 1 tablespoon chili powder
2 cups chicken stock 2 cloves garlic (chopped)
½ cup dry white wine Salt and pepper to taste
1 (8 ounce) jar prepared salsa 12 cup cilantro (chopped)
Directions:
- Press "sear" button, set to 10 minutes, then press "start/stop" button.
- Add oil to pressure cooker and, working in batches, brown chicken on all sides.
- Transfer browned chicken to dish lined with paper towels and set aside.
- Add all remaining ingredients, except cilantro, to pressure cooker and stir well.
- Return all chicken to pressure cooker.
- Close lid and lock in place.
- Press "poultry" button, press "texture" once for 25 minutes, then press "start/stop" button.
- Once finished, the pressure cooker will automatically go to the "warm" feature and the pressure will release naturally.
- Season with salt and pepper, garnish with cilantro and serve.
Tips: Use white juice or chicken stock in place of white wine.
BEEF MAC AND CHEESE
Serves: 6-8 people
Ingredients:
1 tablespoon olive oil 1 teaspoon salt
500 grams lean ground beef 1 teaspoon paprika
1 onion (finely chopped) Fresh ground black pepper to taste
1 green pepper (small diced) 1 can (28 ounces) diced tomatoes in juice
1 red pepper (small diced) 1 cup beef stock
1 ½ teaspoons dried oregano ¼ cup ketchup
1 ½ teaspoons dried basil ½ pound dried elbow macaroni
1 ½ cups grated parmesan or cheddar cheese
Directions:
- Press "sear" button, set to 8 minutes, then press "start/stop" button.
- Add olive oil to pressure cooker and ground beef to pressure cooker.
- Break beef into large chunks, and brown on all sides.
- Add onions, peppers and seasonings. Cook until fragrant, stirring well.
- Add tomatoes, stock, ketchup and macaroni to pressure cooker.
- Close lid and lock in place.
- Press "potatoes" button, set to 5 minutes, then press "start/stop" button.
- Once finished, the pressure cooker will automatically go to the "warm" feature, and the pressure will release naturally.
- Stir in grated cheese and season with salt and pepper before serving.
BEEF SHORT RIBS
Serves: 4-6 people
Ingredients:
| 2 tablespoons olive oil | 3 sprigs fresh thyme |
| 4 pounds beef short ribs | 1 bay leaf |
| Salt and freshly ground black pepper to taste | 12 cup white wine |
| 1 onion (chopped) | 1 12 cups orange juice |
| 1 rib celery (chopped) | 2 tablespoons soy sauce |
| 2 cloves garlic (minced) | 2 tablespoons chopped fresh chives |
Directions:
- Press "sear" button, set to 20 minutes, then press "start/stop" button.
- Add olive oil to pressure cooker.
- Season ribs with salt & pepper.
- Working in batches, sear ribs for about 5 minutes per side, transfer to covered dish and set aside.
- Add onions, celery, garlic, thyme and bay leaf to pressure cooker and sauté for 3-4 minutes.
- Pour wine into pressure cooker to deglaze, scraping up any brown bits from the bottom. Continue to simmer until nearly dissipated.
- Add orange juice, soy sauce and ribs to pressure cooker.
- Close lid and lock in place.
- Press "meat/stew" button, set timer to 25 minutes, then press "start/stop" button.
- Once finished, the pressure cooker will automatically go to the "warm" feature and the pressure will release naturally.
- Carefully remove lid and transfer ribs to platter.
- Press "sear" button, set timer to 5 minutes, then press "start/stop" button to thicken gravy.
- Once gravy has thickened, return ribs to pressure cooker and toss to coat well.
- Press start/stop" button, garnish ribs with chives and serve.
Tips: Use white juice or chicken stock in place of white wine.
SPICY BEEF & CABBAGE
Serves: 4-6 people
Ingredients:
| 1 tablespoon olive oil | 1 tablespoon tomato paste |
| 500 grams lean ground beef | 1 tablespoon brown sugar |
| 1 onion (small diced) | 2 cups beef stock |
| 1 clove garlic (sliced) | 1 (28 ounce) can tomatoes (whole peeled) |
| 1 teaspoon of salt | 1 (14 ounce) can crushed tomatoes |
| 1 teaspoon red pepper flakes | 1 cup basmati rice |
| 1 tablespoon Worcestershire sauce | 1 medium head green cabbage (coarsely chopped) |
| 1 tablespoon red wine vinegar | 14 cup chopped fresh parsley |
Directions:
- Press "sear" button, set to 6 minutes, then press "start/stop" button.
-
Add olive oil and beef to pressure cooker and brown beef, stirring constantly.
-
Transfer beef to paper towel-lined dish to drain, reserving 1 tablespoon beef fat in pressure cooker.
- Add onions, garlic and seasonings to pressure cooker and stir to combine.
- Stir in Worcestershire sauce, vinegar, tomato paste, brown sugar and beef stock.
- Return beef to pot and stir in tomatoes, rice and cabbage.
- Close lid and lock in place.
- Press "rice" button, set to 6 minutes, then press "start/stop" button.
- Once finished, the pressure cooker will automatically go to the "warm" feature and the pressure will release naturally.
- Carefully open lid, stir in fresh parsley and serve.
BEEF SHORT RIBS
Serves: 4-6 people
Ingredients:
| 2 tablespoons olive oil (divided) | 2 teaspoons kosher salt |
| 1 yellow onion (medium diced) | 1 teaspoon pepper |
| 4 cloves garlic (minced) | 1 teaspoon apple cider vinegar |
| 1 rack baby back ribs (about 3-4 lbs) | 2 cups ketchup |
| 1 teaspoon smoked paprika | 2 tablespoons tomato paste |
| 1 teaspoon dark chili powder | 12 cup water |
| 1 teaspoon light brown sugar |
Directions:
- Press "sear" button, set to 4 minutes, then press "start/stop" button.
- Add 1 tablespoon olive oil, onion and garlic to pressure cooker and cook 3-4 minutes.
- Cut rack of ribs in half and coat in 1 tablespoon oil.
- Combine paprika, chilli powder, brown sugar, salt & pepper in bowl and rub onto ribs.
- Add remaining ingredients to pressure cooker.
- Shingle ribs and place in pressure cooker.
- Close lid and lock in place.
- Press "meat/stew" button, press "texture" twice for 20 minutes, then press "start/stop" button.
- Once finished, the pressure cooker will automatically go to the "warm" feature and the pressure will release naturally.
- Remove ribs and serve immediately.
BBQ PULLED PORK
Serves: 8-10 people
Ingredients:
| 6 slices bacon (chopped) | 12 teaspoon cayenne pepper |
| 1 (2.3kgs) pork shoulder roast | 1 cup ketchup |
| 1 red onion (finely chopped) | 1 tablespoon tomato paste |
| 4 garlic cloves (minced) | 2 tablespoons brown sugar |
| 12 teaspoon dry mustard powder | 14 cup apple cider vinegar |
| 12 teaspoon smoked paprika | 1 teaspoon of salt |
Directions:
- Press "sear" button, set to 18 minutes, then press "start/stop" button.
- Add bacon to pressure cooker and cook for about 3 minutes per side, until crispy.
- Transfer bacon to paper towels to remove grease and set aside.
- Season pork with salt and pepper, then brown in bacon fat in pressure cooker for about 6 minutes per side.
- Remove pork and set aside.
- Add onions and garlic to pressure cooker and sauté for about 5 minutes.
- Add spices to pressure cooker and cook for 1 minute.
- Add all remaining ingredients to pressure cooker, and stir to combine.
- Return pork and bacon to pressure cooker.
- Close lid and lock in place.
- Set timer to 45 minutes, then press "start/stop" button.
- Once finished, the pressure cooker will automatically go to the "warm" feature and the pressure will release naturally.
- Remove pork and let it rest for 10-15 minutes.
- Shred pork and return to pressure cooker and toss with sauce until thoroughly coated.
BRAISED LAMB SHANKS
Serves: 4-6 people
Ingredients:
| 6 lamb shanks | 2 cloves garlic (smashed) |
| Salt & freshly ground black pepper to taste | 3 tablespoons tomato paste |
| 12 cup flour | 2 cups red wine |
| 4 tablespoons olive oil | 1 12 cups beef stock |
| 1 yellow onion (chopped) | 2 bay leaves |
| 1 rib celery (small diced) | 1 teaspoon dried thyme |
| 1 medium carrot (small diced) | 12 teaspoon dried oregano |
| 1 lemon (juiced and zested) | 1 orange (juiced and zested) |
| Fresh parsley (chopped) |
Directions:
- Place flour in shallow wide dish.
- Season lamb with salt and pepper and dredge in flour to coat well.
- Press "sear" button, set to 12 minutes, the press "start/stop" button.
- Add olive oil to pressure cooker and, working in batches, sear lamb on all sides until dark brown and set aside in covered dish.
- Add carrots, celery and onions to pressure cooker and sauté for 2-3 minutes.
- Add red wine to pressure cooker and deglaze, scraping any bits with a non-abrasive utensil.
- Add stock, juices, zests, bay leaves and lamb to pressure cooker.
- Close lid and lock in place.
- Set timer to 35 minutes, then press "start/stop" button.
- Once finished, the pressure cooker will automatically go to the "warm" feature, and the pressure will release naturally.
-
Carefully open lid, season lamb and set aside.
-
Press "sear" button, set for 5 minutes, then press "start/stop" button to thicken sauce.
- Once sauce has thickened, pour over lamb and garnish with parsley.
Tips: Use grape juice or beef stock in place of red wine.
BLISTERED CHERRY TOMATO STUFFED PEPPERS
Serves: 6 people
Ingredients:
| 1 tablespoon olive oil | 1 1⁄2 cups cooked rice |
| 1⁄2 onion | 2 teaspoons parsley |
| 1 cup cherry tomatoes (halved) | 1 teaspoon marjoram |
| 1 (14 ounce) can diced tomatoes | 1 teaspoon fresh basil |
| 1 (14 ounce) can tomato puree | 1 teaspoon salt |
| 1 clove garlic (minced) | 1 teaspoon black pepper |
| 500 grams ground chicken | 6 large green peppers (tops and seeds removed) |
| 1⁄2 cup provolone cheese |
Directions:
- Press "sear" button, set to 8 minutes, then press "start/stop" button.
- Add oil, onions, garlic and tomatoes to pressure cooker and cook until tomatoes have blistered.
- In separate bowl, add ground chicken, cooked rice, parsley, marjoram, basil, salt and pepper. Mix ingredients until combined.
- Spoon chicken mixture into each pepper.
- Place steamer rack in pressure cooker and place peppers on rack.
- Close lid and lock in place.
- Press "poultry" button; ensure its set for 20 minutes, then press "start/stop" button.
- Once finished, the pressure cooker will automatically go to "warm" feature, and the pressure will release naturally.
- Carefully remove lid and add shredded provolone onto each pepper.
- Place lid on pressure cooker and let peppers sit for 2 minutes, until cheese melts.
- Transfer peppers to serving platter and top with sauce.
*Note: Tomato sauce can touch rack.
CLASSIC CHILI
Serves: 6-8 people
Ingredients:
| 1 tablespoon chili powder | 1 medium white onion (small diced) |
| 1 teaspoon dried oregano | 3 cloves garlic (minced) |
| 12 teaspoon ground, dried cumin | 2-3 chipotle peppers in adobo sauce (chopped) |
| 12 teaspoon smoked paprika | 1 (28 ounce) can chopped tomatoes |
| 3 tablespoons olive oil | 1 cup low sodium beef stock |
| 4 pounds boneless chuck or round roast (cut into cubes) | 14 cup chopped fresh cilantro |
| Salt and freshly ground pepper to taste |
Directions:
- Combine all seasonings in shallow dish.
- Rub cubed beef with olive oil, coat with seasonings and toss to coat well.
- Press "sear" button, set to 10 minutes, then press "start/stop" button.
- Add remaining oil to pressure cooker and, working in batches, sear beef on all sides and transfer to covered dish.
- Add onions, garlic, chipotle peppers, tomatoes and beef stock to pressure cooker and return all brown meat.
- Close lid and lock in place.
- Press "meat/stew" button, press "texture" twice for 20 minutes, then press "start/stop" button.
- Once finished, the pressure cooker will automatically go to the "warm" feature, and the pressure will release naturally.
- Carefully open lid and season chilli with salt and pepper to taste.
- Garnish with cilantro and serve.
RISOTTO WITH ITALIAN SAUSAGE & PARMESAN
Serves: 4-6 people
Ingredients:
| 1 tablespoon olive oil | 12 cup white wine |
| 500 grams sweet Italian sausage (sliced) | 3 12 cups low sodium chicken stock |
| 12 cup shallots (chopped) | 1 teaspoon salt |
| 2 cloves garlic (minced) | Freshly ground black pepper to taste |
| 12 cup sliced sundried tomatoes | 12 cup grated parmesan cheese |
| 1 12 cups Arborio rice | 14 chopped fresh basil |
Directions:
- Press "sear" button, and ensure it is set to 5 minutes, then press "start/stop" button.
- Add olive oil and sausage to pressure cooker and brown sausages on all sides.
- Add shallots and garlic, and continue to cook 2-3 minutes.
- Stir in rice, tomatoes, chicken stock and wine.
- Season with salt and pepper.
- Close lid and lock in place.
- Press "rice" button, press "texture" twice for 7 minutes, then press "start/stop" button.
- Once finished, the pressure cooker will automatically go to the "warm" feature, and the pressure will release naturally.
- Stir in cheese, top with basil and serve.
Tips: Use white grape juice or chicken stock in place of white wine.
MARINARA SAUCE
Serves: 6 people
Ingredients:
3 tablespoon olive oil 1 teaspoon of salt
4 cloves garlic (finely chopped)
14 teaspoon crushed red pepper flakes
2 (28 ounce) cans crushed herb tomatoes
Freshly ground black pepper to taste
½ teaspoon sugar
14 cup chopped fresh basil
Directions:
- Press "sear" button, and ensure it is set for 5 minutes, then press "start/stop" button.
- Add olive oil, garlic and red pepper flakes to pressure cooker, and cook until fragrant.
- Add tomatoes, salt, pepper and sugar to pressure cooker.
- Close lid and lock in place.
- Set timer to 8 minutes, then press "start/stop" button.
- Once finished, the pressure cooker will automatically go to the "warm" feature and the pressure will release naturally.
- Stir in basil, season with salt and pepper to taste and serve.
BOX CAKE MIX
Serves: 6 people
Ingredients:
2 cups of water
1 box cake mix
Directions:
- Prepare cake batter according to packaging directions.
- Butter bottom and sides of 7-inch baking pan that will fit inside pressure cooker.
- Pour half of prepared batter into baking pan and wrap it with foil, ensuring the foil is airtight.
- Place steamer rack in pressure cooker and pour in water.
- Carefully place baking pan on rack.
- Close lid and lock in place.
- Press "bake" and set to 25 minutes, then press "start/stop" button.
- Once finished, the pressure cooker with auto shut off; wait 15-20 minutes for pressure to naturally release.
- Carefully open lid and lift cake pan out of cooker using foil sling and transfer to cooling rack.
- Repeat steps 3-9 with remaining batter.
ORANGE CHEESECAKE
Yields 1 (6 inch) cheesecake
Ingredients: Filling Ingredients:
1 cup graham cracker crumbs
2 tablespoons butter, melted
1 tablespoon orange zest
2 (8-ounce) packages cream cheese
2/3 cup granulated sugar
2 tablespoons all-purpose flour
1 tablespoon confectioners' sugar
Juice from 1 orange
2 eggs
1 teaspoon vanilla extract
Directions:
- Cut parchment paper to fit a 7-inch spring form pan or pie plate.
- Butter bottom and sides of pan and parchment paper; set aside.
- In medium bowl, mix melted butter, graham cracker crumbs and orange zest.
- Press crumb mixture into prepared pan; cover and refrigerate until ready to use.
- In large bowl, blend cream cheese with electric mixer until smooth.
- Gradually add sugar, flour and confectioner's sugar and mix until combined.
- Add eggs one at a time and mix until smooth.
- Add vanilla and orange juice and mix until smooth.
- Pour mixture into prepared crust.
- Carefully lower cheesecake onto steamer rack. Add enough water to cover the bottom by 1 inch.
- Close lid and lock in place.
- Press "bake" and set to 22 minutes, then press "start/stop" button.
- Once finished, the pressure cooker with auto shut off, wait 15-20 minutes for pressure to naturally release. Press the Quick Release Button to ensure all pressure is released.
- Let it set in pressure cooker for 1 hour.
- Carefully open lid and lift cheesecake out of pressure cooker and transfer to cooling rack.
- Once cheesecake comes to room temperature, cover and refrigerate for at least 4 hours, or overnight.
BROWNIES
Serves: 6-8 people
Ingredients:
2/3 cup all-purpose flour
1/3 cup unsweetened cocoa powder
2/3 cup granulated sugar
1 teaspoon confectioner's sugar
12 teaspoon baking powder
14 teaspoon salt
2 eggs
8 tablespoons butter (melted)
12 teaspoon vanilla extract
12 cup chopped walnuts
2 cups of water
Directions:
- Butter bottom and sides of 7-inch baking pan that will fit inside pressure cooker; set aside.
- In large bowl, mix together flour, cocoa powder, sugars, baking powder and salt; set aside.
- Combine eggs, vanilla extract and melted butter in a small dish.
- Gradually add wet ingredients to dry ingredients and mix just until combined. Mixture will be slightly lumpy.
- Fold nuts into batter.
- Pour batter into prepared baking pan and wrap in foil, ensuring the foil is airtight.
- Place steamer rack in pressure cooker and pour in water.
- Carefully place baking pan on wire rack.
- Close lid and lock in place.
- Press "bake" button, ensure timer is set to 40 minutes, then press "start/stop" button.
- Once finished, the pressure cooker with auto shut off; wait 15-20 minutes for pressure to naturally release.
- Carefully open lid and lift cake pan out of cooker using foil sling and transfer to cooling rack.
- BEFORE FIRST USE
- IMPORTANT SAFEGUARDS
- READ AND SAVE THESE INSTRUCTIONS
- Benefits
- Multiple Cooking Functions
- Microcomputer
- Preset Time Function
- Saved Memory
- High Efficiency
- Perfect Seal
- Easy to Clean
- Innovative Design
- Faster Cooking
- Tastier Meals
- Healthier Results
- Multifunctional
- MULTIPLE SAFETY DEVICES:
- Lid Safety Device
- Pressure Control
- Maintaining Pressure
- Anti-Block Device
- Pressure Release Safety Device
- Temperature Controller
- Thermostat:
- PRESSURE COOKING NOTES
- Tip
- Pressure
- Auto Warm Feature
- What is quick release?
- What is natural release?
- OPERATING INSTRUCTIONS
- CONTROL PANEL
- NOTE (Applies to all):
- hours/minutes
- Pressure:
- Example:
- Auto Warm Feature:
- NOTE:
- FUNCTIONS
- DIRECTIONS:
- PRESSURE CANNING
- Canning:
- SAFE CANNING TIPS:
- HELLER'S PRESSURE COOKER'S PRESSUE CANNING PROCESS:
- NOTES & TIPS:
- AFTER EACH USE:
- FOR YOUR SAFETY
- TROUBLESHOOTING GUIDE
- SPECIFICATIONS
- CUSTOMER SERVICE
- Australian Customer Service
- SMOKE SAUSAGE & CABBAGE SOUP
- BARLEY BEEF SOUP
- CHICKEN & RICE SOUP
- CASSOULET CHICKEN
- CHICKEN, PEAS & RICE
- SALSA CHICKEN & RICE
- Ingredients:
- BEEF MAC AND CHEESE
- BEEF SHORT RIBS
- SPICY BEEF & CABBAGE
- BBQ PULLED PORK
- BRAISED LAMB SHANKS
- BLISTERED CHERRY TOMATO STUFFED PEPPERS
- CLASSIC CHILI
- RISOTTO WITH ITALIAN SAUSAGE & PARMESAN
- MARINARA SAUCE
- BOX CAKE MIX
- ORANGE CHEESECAKE
- Ingredients: Filling Ingredients:
- BROWNIES
Brand : Heller
Model : HPC1000
Category : Frying Pan