
LX-120 - Air conditioner SoleusAir - Free user manual and instructions
Find the device manual for free LX-120 SoleusAir in PDF.


| Product Type | Portable Air Conditioner |
| Brand | SoleusAir |
| Model | LX-120 |
| Cooling Capacity | 12000 BTU |
| Coverage Area | Up to 450 sq ft |
| Dimensions (W x D x H) | 17.5 x 13 x 27.5 inches |
| Weight | 65 lbs |
| Power Supply | 115 V / 60 Hz |
| Power Consumption | 1100 Watts |
| Current | 10.2 Amps |
| Energy Efficiency (EER) | 10.5 |
| Refrigerant | R410A |
| Modes | Cool, Fan, Dehumidify |
| Fan Speeds | 3 (High, Medium, Low) |
| Thermostat | 60°F - 86°F (16°C - 30°C) |
| Air Flow | 320 CFM |
| Noise Level | 55 dB (Low speed) |
| Timer | 24-hour on/off |
| Remote Control | Yes (included) |
| Filter Type | Washable mesh filter |
| Exhaust Hose | 5.9 ft (1.8 m) |
| Window Kit | Included (adjustable) |
| Self-Evaporation | Yes |
| Auto Restart | Yes |
Frequently Asked Questions - LX-120 SoleusAir
User questions about LX-120 SoleusAir
0 question about this device. Answer the ones you know or ask your own.
Ask a new question about this device
Download the instructions for your Air conditioner in PDF format for free! Find your manual LX-120 - SoleusAir and take your electronic device back in hand. On this page are published all the documents necessary for the use of your device. LX-120 by SoleusAir.
USER MANUAL LX-120 SoleusAir
10,000 / 12,000 BTU Portable Air Conditioner
LX-100/LX-100BL/LX-120/LX-120BL
Operating Instructions

Thank you for choosing a Soleus Air Portable Air Conditioner. This owner's manual will provide you with valuable information necessary for the proper care and maintenance of your new product. Please take a few moments to thoroughly read the instructions and familiarize yourself with all the operational aspects of your new Soleus Air Portable Air Conditioner.
For your own records, please attach a copy of your sales receipt to this manual. Also, write the store name/location, date purchased, and serial number below:
Store Name: ____
▼ocation:
Date Purchased: ____
Serial Number (located on back of unit): ____
IMPORTANT INSTRUCTIONS
Before installing and using your portable air conditioner, please read this owner's manual carefully. Store this manual in a safe place for future reference.
1) Always place the unit on a level surface.
2) Never use or store gasoline or other flammable vapor or liquid near this unit unless instructed by this manual.
3) Maintain at least 10 inches (25 cm) clearance space around this unit. Do not block or cover air inlet or outlet grilles.
4) The unit must be connected to a correctly grounded power supply.
5) Do not start or stop the unit by inserting or pulling out the power plug.
6) Do not use an adapter plug or extension cord.
7) Do not use the unit in the immediate surroundings of a bath, a shower or a swimming pool.
8) Do not insert anything into the air outlet. Do not obstruct air inlet or outlet grills unless instructed by this manual.
9) Do not let children play near this unit.
10) Always inspect the cord for signs of damage before use. If the power cord is damaged, it must be replaced by the manufacturer or a qualified service technician.
11) When cleaning the unit, always turn the unit off and unplug the power cord.
PACKAGE CONTENTS
Portable Air Conditioner
Exhaust Hoses (2)
Hose Adapters (2)
Window ▲it Adapter (2)
Remote Control
AAA Batteries (2)
Window ▲it - 3 Sliding Panels (1 dual hose panel, 2 extension panels)
Air Intake and Outlet Covers (2)
Owner's Manual
SPECIFICATIONS
- The cooling capacity is measured at an ambient temperature of DB 86 °F, WB 78 °F.
- Noise level is measured at a distance of 3.28 ft away from the front of the unit, when the unit is in cooling mode.
- Power consumption is measured when the fan runs at the highest speed setting.
• These specifications are for reference only. For actual data, please refer to the rating label on the back of the unit. - If the environment temperature is higher than the max operating temperature or lower than the minimum operating temperature, the air conditioner may not work properly.
| MODEL LX-100 & LX-100BL / LX- | 120 & LX-120BL | ||
| COOLING CAPACITY 10,000 BTU/H / 12,000 BTU/H | |||
| HEATING CAPACITY 1350 Watts / 1350 watts | |||
| DEHUMIDIFYING CAPACITY 50 pts/Day / 60 pts/Day | |||
| POWER | COOLING 1020 W / 1350 W | ||
| HEATING 1350W / 1350W | |||
| AIR FLOW VOLUME 225 CFM | |||
| POWER SOURCE | 115 V~ 60 HZ9/12 AMP / 12/12 AMPCOOLING/HEATING | ||
| SOUND PRESSURE LEVEL 46 dB(A) | |||
| NET WEIGHT 76 Lbs / 82 Lbs | |||
| OPERATING TEMPERATURE | COOLING | 60.8°F -107.6°F | |
| HEATING | 23°F -89.6°F | ||
| DIMENSIONS | ASSEMBLED | 17.5" W × 32.75" H × 19" D | |
| PACKAGE | 22.4" W × 34.44" H × 19.88" D | ||
| REFRIGERANT R22 | |||
PRODUCT DIAGRAM
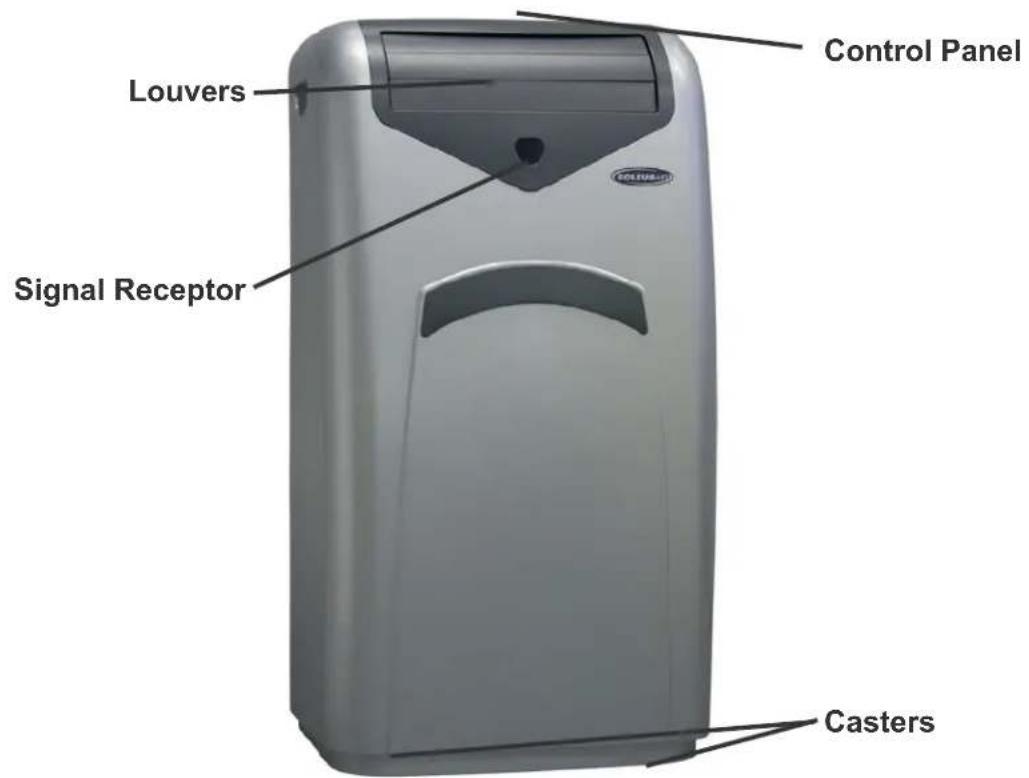
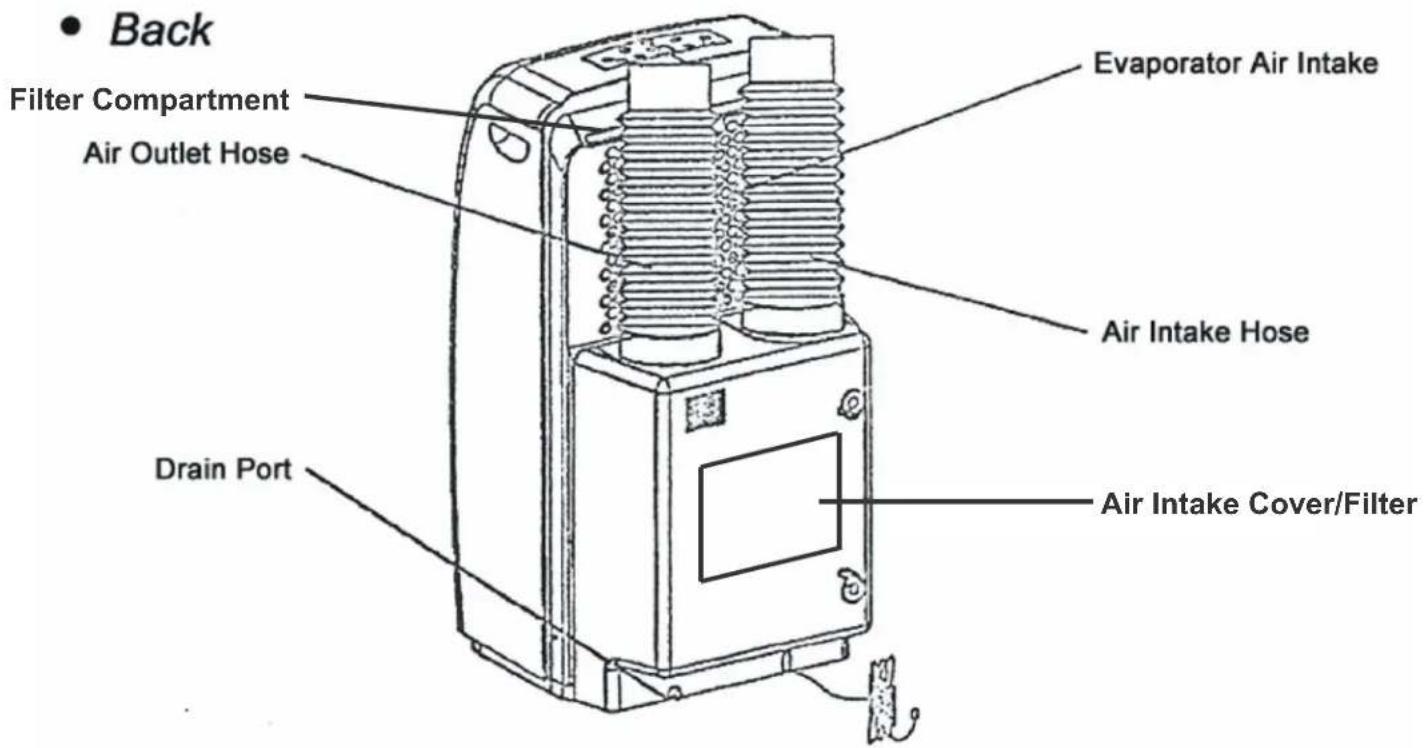
PARTS & ASSEMBLY
PARTS
EXHAUST HOSES

WINDOW KIT

ASSEMBLY & INSTALLATION
INSTALLATION
When the unit is operating as an air conditioner or dehumidifier, the unit draws in fresh outdoor air and exhausts hot air out of the room to complete the air exchange. When the unit is operating in fan or heater modes, no outdoor air exchange takes place. The window kit and exhaust hose do not need to be installed when the unit is used as a fan or heater.
NOTE: The supplied window kit can be installed in sliding windows and sliding glass doors up to 8 ft. long (approximate length).
MOUNTING THE EXHAUST HOSES
- Choose a suitable location, near a grounded electrical outlet and suitable window or door. Remove packaging and locate components.
- Extend both ends of the exhaust hoses approximately 6 inches.
- Screw the window kit adapter onto one end of the exhaust hose clockwise. Screw the hose adapter onto the other end of the exhaust hose clockwise. Repeat on the other exhaust hose.
- Remove outlet covers from the back of the unit by screwing them counter-clockwise, then lifting up.
- Mount the exhaust hoses onto the back of the unit by locking the hose adapters into place.

Innovative products for a cleaner, more comfortable world.
Installation of the Venting Kit
FOR DUAL HOSE PORTABLE AIR CONDITIONERS




The venting kit must be installed in order for the unit to work correctly in the air conditioning, heating or dehumidifying mode. The venting kit does not need to be used while the unit is fanning.
The window kit has been designed to fit into most vertical and horizontal window openings. The window kit can also be used in a sliding door.
- Choose a suitable location, near a grounded electrical outlet and a suitable window or door. Remove packaging and locate components. (figure a)
- Remove the outlet covers from the back of the unit by screwing them counter-clockwise, then lifting up. (figure b)
- Pull out one end of the exhaust hose, then screw on the adapter clockwise. Repeat on other exhaust hose. (figure c)
- Pull out the opposite end of the exhaust hose, then screw on the window kit adapter clockwise. Repeat on other exhaust hose. (figure d)
- Mount the exhaust hoses onto the back of the unit. (figure e)
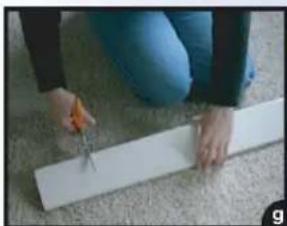
- Open the window or door and adjust the length of the window kit to fit the opening. (figure f) If necessary, mark the kit and cut down one end to properly fit the opening. (figures g & h)
- Attach the window kit adapters to the window kit. (figure i) Close the window or door tightly. (figure j) Your Portable Air Conditioner is now ready to cool!
NOTE: When using the venting system, keep the exhaust hose as short and straight as possible. The exhaust hose can be shortened, but it is not recommended to increase the length of the exhaust hose. Do not use an extension cord with your portable air conditioner.
CONTROL PANEL, DISPLAY, & OPERATING INSTRUCTIONS
CONTROL PANEL & MULTI-COLOR DISPLAY

MULTI-COLOR DISPLAY

OPERATING INSTRUCTIONS
CONTROL PANEL BUTTONS (Refer to the images on page 7)
1) Power On and Off - Press the POWER button once to manually turn the unit on. Press the POWER button once more to turn the unit off.
2) Mode Selection - Press the MODE Button repeatedly to cycle between the different modes: Auto mode, Air Conditioner, Dehumidifier, Fan only, and Heater.
3) Fan Speed Control - Press the FAN SPEED Button to cycle through the different fan speeds: High, Medium, and low. The fan speed can be visually distinguished by the speed of the digital air segments progressing out from the windmill fan image on the Multi-color display. There is an additional auto speed setting that is enabled in only heating and cooling modes. This speed is next setting after low when pressing the speed control button. The speeds will cycle through in this order: Low, Medium, High, Auto. Each change in speed will be associated with a “beep” sound from the unit.
4) Temperature - Select the desired temperature by pressing either ▼ or ▲ key when using the unit in cooling or heating mode. The temperature indicator flashes to display the desired temperature setting. After the temperature is set, the unit will display this temperature setting until it is changed by the user. The Multi-color display shows temperature in Celsius or Fahrenheit. Press the ▼ or ▲ simultaneously to change from C° to F°.
5) SWING - To turn on the exclusive WAVEF ▼O® oscillation, press the SWING button on the control panel. Once you press SWING, the louvers on the unit will oscillate up and down and back and forth.
6) Timer - To program the timer, press the TIMER ON button until the display shows a flashing “ Ⓧ→| ”. Press the ▲ or ▼ buttons to change the clock to the desired time for the unit to automatically turn on.
Press the TIMER OFF button and the display on the unit will flash “ ⏻→○ ”. Press the ▲ or ▼ buttons to change the clock to the desired time for the unit to automatically turn off. The TIMER OFF indicator will flash for 3 seconds to activate the times you programmed.
NOTE: The timer will also remember your settings when it is set. If you set the timer while in Air Conditioning mode, the timer will automatically turn the unit on and off in air conditioning mode according to the desired programmed times. The timer will also remember the temperature settings, fan speed, and oscillation setting. The timer works when the unit is in Air Conditioner mode, Heating mode, Dehumidifier mode, Fan mode, and Auto mode
1) Install the exhaust hoses and window kit properly (see pages 6).
2) Plug the Power Cord into an electrical outlet.
3) Turn on the unit by pressing the POWER button on the control panel.
4) Press the Mode button until the “ ” icon appears on the Multi-color display
5) Press the ▲ or ▼ buttons until the desired room temperature appears on the control panel display. The temperature ranges from 61° F - 88° F ( 16° C - 31° C).
6) Select the desired fan speed by pressing the FAN button.
NOTE: During hot days, the unit will cool the room most efficiently by setting the temperature at the lowest setting and the fan speed on high. Reducing the length of the exhaust duct, insulating the exhaust hose and window kit, and keeping direct sunlight to a minimum will also improve the cooling efficiency.
Dehumidifier Mode
1) Install the exhaust hoses and window kit properly (see pages 6).
2) Plug the Power Cord into an electrical outlet.
3) Turn on the unit by pressing the POWER Button on the control panel.
4) Press the MODE button until the “” appears on the control panel display.
NOTE: The unit operates at low fan speed during dehumidifier mode. The unit cools room slightly during the dehumidification. ▲eep the windows and doors closed to aid the effectiveness of the unit in removing the moisture from the room.
NOTE: The unit will not perform in dehumidifier mode when the room temperature is lower than 61° F.
Fan Mode
1) Plug the Power Cord into an electrical outlet.
2) Turn on the unit by pressing the POWER button on the control panel.
3) Press the MODE button until the “ ” icon appears on the control panel display.
4) Select the fan speed by pressing the FAN button.
5) To circulate more air, press the SWING button on the remote control. The louvers will oscillate in our exclusive WAVEFLO® pattern; back and forth and up and down, spreading more air throughout the room.
NOTE: It is not necessary for the exhaust hoses and window kit to be installed to operate the unit in fan mode.
Heating Mode
1) Plug the Power Cord into an electrical outlet.
2) Turn on the unit by pressing the POWER button on the control panel.
3) Press the MODE button until the “ ” icon appears on the control panel display.
4) Press the ▼ or ▲ buttons until the desired room temperature appears on the control panel display. The temperature ranges from 61°F - 88°F (16°C - 31°C).
5) Select the fan speed by pressing the FAN button. It is recommended to set the fan speed to low.
NOTE: It is not necessary for the exhaust hoses and window kit to be installed to operate the unit in heating mode.
Auto Mode
1) Install the exhaust hoses and window kit properly (see pages 6).
2) Plug the Power Cord into an electrical outlet.
3) Turn on the unit by pressing the POWER button on the control panel.
4) Press the MODE button until the “ ” icon appears on the control panel display. Select the fan speed
by pressing the FAN button.
NOTE: During AUTO mode, the unit operates in Heating mode when the room temperature is below 68° F, Dehumidifier mode when the room temperature is between 68° F to 80° F. And Air Conditioner mode when the room temperature is above 80° F.
Sleep Mode (This mode can only be selected when using the Remote control)
1) To set Sleep mode, make sure the unit is in Air Conditioner mode.
2) Press the SLEEP Button on the remote control. The “ ” icon appears on the control panel display.
3) When in SLEEP mode, the fan will run on low to keep fan noise at a minimum.
4) When in Air Conditioner mode, the temperature setting will gradually increase to 2°F above the original set temperature for 6 hours. After 6 hours the temperature setting will return to the set temperature.
5) When in Heating mode, the temperature setting will gradually decrease to 2° F below the original set temperature for 6 hours. After 6 hours, the temperature setting will return to the set temperature.
6) When in Dehumidifier mode, the temperature will not change when Sleep mode is selected.
Compressor Indicator


The “ ” icon will light up on the control panel display when the compressor turns on. The “ ” icon will turn off when the compressor shuts off.
Emergency Condensate Holding Tank
When the room temperature is low and the indoor humidity is high, the air conditioner may not be able to evaporate some of the moisture fast enough. When this happens, the water will accumulate in an emergency condensate tank inside the unit. Once the emergency condensate tank is full, the unit will automatically shut
off and the “ ” will appear on the control panel display. To empty the condensate tank, pull the drain plug at the bottom back of the unit. You will need a small pan, approximately 1” high to catch the water coming out of the condensate tank. Once the condensate tank is drained, the unit will begin working within a few minutes. The emergency condensate tank is approximately 1.5 ▼ iters of water. Another option is to purchase a small hose from a hardware store that can fit around the 5/8” drain plug on the back of the unit and drain the unit into a gravity drain or larger pan for continuous drainage. It is not advised to use continuous drainage when the room temperature is higher than 90°F .
1) Power On and Off - Press the POWER (I/O) button once to manually turn the unit on. Press the Power button once more to turn the unit off. When you press the POWER button the upper right square on the remote control LCD Display will light up. When in Air Conditioner, Heating, and Auto mode, the selected temperature will appear on the remote control display. When the unit is in Fan mode and Dehumidifier mode you will see the “- -” icon instead of the set temperature. This shows that temperature selection is not available when the unit is in Fan or Dehumidifier mode.
2) Mode Selection - Press the MODE Button repeatedly to cycle between the different modes: Auto, Air Conditioner, Dehumidifier, Fan only, and Heater mode. The upper left square on the Remote control display will light up showing which mode is selected. In Air Conditioner mode the display will show "COOLING", in Heating mode the display will show "HEAT", in Dehumidifier mode the display will show "DRY", in Fan mode the display will show "FAN", and in Auto mode the display will show "AUTO".
3) Fan Speed - Press the FAN speed button to cycle through low, medium, and high fan speeds. The display on the remote control will show LOW, MED, & HIGH under the “SPEED” label on the remote control LCD display. There is an additional auto speed setting that is enabled in only heating and cooling modes. This speed is next setting after low when pressing the FAN speed button on the remote control. The speeds will cycle through in this order: High, Medium, Low, Auto. Each change in speed will be associated with a “beep” sound from the unit. The remote control will not display “AUTO” under the speed label. Once Auto fan speed is selected the unit will beep and there will not be a fan speed displayed on the remote control.
4) Temperature Setting - When the unit is in Air Conditioner or Heating mode you can select your desired temperature. Press the ▲ or ▼ to select your desired temperature setting. The temperature on the LCD display on the remote control will increase or decrease accordingly. Pressing the ▼ and ▲ buttons simultaneously will change the temperature select between °F and °C.
5) SWING - To turn on the exclusive WAVEFLO® oscillation, press the SWING button on the remote control. Once you press SWING, the louvers on the unit will oscillate up and down and back and forth. The bottom left square of the remote control display will show the “←→” icon when WAVEFLO® oscillation (SWING) is selected.
6) TIMER - To program the timer, first press the T-ON button. Once T-ON is pressed the auto-on timer will blink in the bottom right rectangle of the remote control display. Press the MIN and HOUR buttons to change the clock to the desired time for the unit to automatically turn on. The minutes will increase by 10 with each press of the MIN button and the hours will increase by 1 with each press of the HOUR button. Press the T-OFF button and the remote control display will flash the desired auto-off timer. Press the MIN and HOUR buttons to change the clock to the desired time for the unit to automatically turn off. The timer is set when the auto-off time stops flashing and the words "ON" and "OFF" are displayed next to the time.
7) CLOCK - To set the clock on the remote control, hold down either the MIN or HOUR button until the displayed time flashes on the remote control display. Change the minutes by pressing the MIN button and change the hours by pressing the HOUR button.
MAINTENANCE
Note: Make sure power is off and the power cord is not plugged into an electrical outlet prior to performing any maintenance on the unit.
Clean or replace filter - If the air filter is blocked with a dust, the airflow volume may reduce. It is recommended to clean the filter once every two weeks or as needed.
1) Remove the filter from the filter compartment on the back of the unit.
2) Wash the air filter by immersing it gently into warm water with a neutral detergent. Rinse the filter and dry it thoroughly out of sunlight.
3) Slide the filter back into the filter compartment after it is thoroughly dried.
4) If the filter is torn or unusable, order a new filter by calling the customer service number on the warranty page of this manual.
Clean the unit Housing
1) ▲eep the unit from being exposed directly to the sun to prevent color fading.
2) Clean the surface with a damp cloth and dry it with a soft towel.
Storing the Unit for an Extended Period of Time or Transporting the unit
1) Empty any excess water by unplugging the water drainage stop in the back of the unit (located at the bottom).
2) Unplug the unit.
3) The unit should be stored in a cool dry place.
DISCLAIMER
ALL INFORMATION AND THE TECHNICAL SPECIFICATIONS PRESENTED IN THIS USER'S MANUAL ARE THE PRESENTATION OF THE MANUFACTURER. SOLEUS INTERNATIONAL HAS NOT CONDUCTED INDEPENDENT TEST TO THE INFORMATION AND THE SPECIFICATIONS PRESENTED HEREWITHIN.
WARRANTY
One Year Limited Warranty
Soleus International Inc. warrants the accompanying Soleus Air Portable Air Conditioner to be free of defects in material and workmanship for the applications specified in its operation instruction for a period of ONE (1) year from the date of original retail purchase in the United States.
If the unit exhibits a defect in normal use, Soleus International Inc. will, at its option, either repair or replace it, free of charge within a reasonable time after the unit is returned during the warranty period.
As a condition to any warranty service obligation, the consumer must present this Warranty Certificate along with a copy of the original purchase invoice.
THIS WARRANTY DOES NOT COVER:
- Damage, accidental or otherwise, to the unit while in the possession of a consumer not caused by a defect in material or workmanship.
- Damage caused by consumer misuse, tampering, or failure to follow the care and special handling provisions in the instructions.
- Damage to the finish of the case, or other appearance parts caused by wear.
- Damage caused by repairs or alterations of the unit by anyone other than those authorized by Soleus International Inc.
- Freight and Insurance cost for the warranty service.
A ▼ ▼ WARRANTIES, INC ▼ UDING ANY IMP ▼ IED WARRANTY OF MERCHANTABILITY ARE ▼ IMITED TO ONE-YEAR DURATION OF THIS EXPRESS ▼ IMITED WARRANTY. SOLEUS INTERNATIONAL INC. DISC ▼ AIMS ANY ▼ IABI ▼ ITY FOR CONSEQUENTIAL ▼ OR INCIDENTA ▼ DAMAGES AND IN NO EVENT SHA ▼ ▼ SO ▼ EUS INTERNATIONA ▼ INC'S ▼ IABI ▼ ITY EXCEED THE RETAI ▼ VA ▼ UE OF THE UNIT FOR BREACH OF ANY WRITTEN OR IMP ▼ IED WARRANTY WITH RESPECT TO THIS UNIT.
This warranty covers only new products purchased from our authorized dealers or retailers. It does not cover used, salvaged, or refurbished products.
As some states do not allow the limitation or exclusion of incidental or consequential damages, or do not allow limitation on implied warranties, the above limitations and exclusions may not apply to you. This warranty gives you specific legal rights, and you may also have other rights that vary from state to state.
For Technical Support & Warranty Service
Please Call (888) 876-5387
Or Write To:
Soleus International Inc.
9451 Telstar Ave.
El Monte, CA 91731 USA
www.soleusair.com
- 10,000 / 12,000 BTU PORTABLE AIR CONDITIONER
- LX-100/LX-100BL/LX-120/LX-120BL
- OPERATING INSTRUCTIONS
- IMPORTANT INSTRUCTIONS
- PACKAGE CONTENTS
- SPECIFICATIONS
- PARTS & ASSEMBLY
- PARTS
- EXHAUST HOSES
- WINDOW KIT
- ASSEMBLY & INSTALLATION
- INSTALLATION
- MOUNTING THE EXHAUST HOSES
- INSTALLATION OF THE VENTING KIT
- FOR DUAL HOSE PORTABLE AIR CONDITIONERS
- CONTROL PANEL, DISPLAY, & OPERATING INSTRUCTIONS
- CONTROL PANEL BUTTONS (REFER TO THE IMAGES ON PAGE 7)
- DEHUMIDIFIER MODE
- FAN MODE
- HEATING MODE
- AUTO MODE
- SLEEP MODE (THIS MODE CAN ONLY BE SELECTED WHEN USING THE REMOTE CONTROL)
- COMPRESSOR INDICATOR
- EMERGENCY CONDENSATE HOLDING TANK
- MAINTENANCE
- CLEAN THE UNIT HOUSING
- STORING THE UNIT FOR AN EXTENDED PERIOD OF TIME OR TRANSPORTING THE UNIT
- DISCLAIMER
- WARRANTY
- ONE YEAR LIMITED WARRANTY
- THIS WARRANTY DOES NOT COVER
- FOR TECHNICAL SUPPORT & WARRANTY SERVICE
Brand : SoleusAir
Model : LX-120
Category : Air conditioner