
SB-06WC - Wireless media player NEC - Free user manual and instructions
Find the device manual for free SB-06WC NEC in PDF.


| Product Type | LED Monitor |
| Model Number | SB-06WC |
| Brand | NEC |
| Screen Size | 24 inches (16:9) |
| Native Resolution | 1920 x 1080 (Full HD) |
| Refresh Rate | 60 Hz |
| Response Time | 5 ms (GTG) |
| Brightness | 250 cd/m² |
| Contrast Ratio | 1000:1 (static) |
| Viewing Angle | 178° / 178° (horizontal/vertical) |
| Input Connections | 1 x VGA, 1 x HDMI, 1 x DisplayPort |
| Audio | Built-in speakers (2 x 2W) |
| Dimensions (W x H x D) | 553 x 330 x 45 mm (without stand) |
| Weight | 4.2 kg (without stand) |
| Power Consumption | 30 W (typical), 0.5 W (standby) |
| Power Supply | AC 100-240V, 50/60 Hz |
| VESA Mount | 100 x 100 mm |
| Adjustability | Tilt: -5° to +20° |
| Special Features | Flicker-free, Low Blue Light |
| Included Accessories | Stand, power cord, VGA cable, user manual |
| Warranty | 3 years |
Frequently Asked Questions - SB-06WC NEC
User questions about SB-06WC NEC
0 question about this device. Answer the ones you know or ask your own.
Ask a new question about this device
Download the instructions for your Wireless media player in PDF format for free! Find your manual SB-06WC - NEC and take your electronic device back in hand. On this page are published all the documents necessary for the use of your device. SB-06WC by NEC.
USER MANUAL SB-06WC NEC
Wireless Display Media Player SB-06WC
Index
Declaration of conformity ....English-1
Safety Precautions and Maintenance ....English-5
Information ......English-6
Accessory ......English-7
Part Names ......English-8
Connections ......English-9
Installation ....English-10
Installation of protector for wireless LAN unit ......English-11
Installation of protector for SD memory card ......English-12
Installation of adapter for wireless LAN unit ......English-13
Basic Operation ....English-14
Preparations ......English-14
Display remote control ......English-14
Dedicated remote control for the projector ......English-15
Operations and settings of the display and projector ......English-16
Product Operations ......English-16
Selection of Functions ......English-16
Setting the display language ......English-16
Screen Saver ......English-16
Function Controls ....English-17
-
Wireless Display ......English-17
-
Media Player ......English-19
-
Settings ......English-24
Troubleshooting ......English-34
Specifications ......English-36
FCC statement
Federal Communication Commission Interference Statement
This equipment has been tested and found to comply with the limits for a Class B digital device, pursuant to Part 15 of the FCC Rules. These limits are designed to provide reasonable protection against harmful interference in a residential installation. This equipment generates, uses and can radiate radio frequency energy and, if not installed and used in accordance with the instructions, may cause harmful interference to radio communications. However, there is no guarantee that interference will not occur in a particular installation. If this equipment does cause harmful interference to radio or television reception, which can be determined by turning the equipment off and on, the user is encouraged to try to correct the interference by one or more of the following measures:
- Reorient or relocate the receiving antenna.
- Increase the separation between the equipment and receiver.
- Connect the equipment into an outlet on a circuit different from that to which the receiver is connected.
- Consult the dealer or an experienced radio/TV technician for help.
Declaration of Conformity
This device complies with Part 15 of FCC Rules. Operation is subject to the following two conditions. (1) This device may not cause harmful interference, and (2) this device must accept any interference received, including interference that may cause undesired operation.
U.S. Responsible Party: NEC Display Solutions of America, Inc.
Address: 500 Park Boulevard, Suite 1100 Itasca, Illinois 60143
Tel. No.: (630) 467-3000
Type of Product: Wireless Display Media Player Equipment Classification: Class B Peripheral Model: SB-06WC

We hereby declare that the equipment specified above conforms to the technical standards as specified in the FCC Rules.
FCC Caution: Any changes or modifications not expressly approved by the party responsible for compliance could void the user's authority to operate this equipment.
This device and its antenna(s) must not be co-located or operating in conjunction with any other antenna or transmitter.
IMPORTANT NOTE:
FCC Radiation Exposure Statement:
This equipment complies with FCC radiation exposure limits set forth for an uncontrolled environment. This equipment should be installed and operated with minimum distance 20cm between the radiator & your body.
Country Code selection feature to be disabled for products marketed to the US/CANADA
Operations in the 5.15-5.25GHz band are restricted to indoor usage only.
IC
Industry of Canada statement
This device complies with Industry Canada licence-exempt RSS standard(s). Operation is subject to the following two conditions:
(1) this device may not cause interference, and
(2) this device must accept any interference, including interference that may cause undesired operation of the device.
Caution:
(With DFS band)
(i) the device for operation in the band 5150-5250 MHz is only for indoor use to reduce the potential for harmful interference to co-channel mobile satellite systems;
(ii) the maximum antenna gain permitted for devices in the bands 5250-5350 MHz and 5470-5725 MHz shall comply with the e.i.r.p. limit; and
(iii) the maximum antenna gain permitted for devices in the band 5725-5825 MHz shall comply with the e.i.r.p. limits specified for point-to-point and non point-to-point operation as appropriate.
(iv) Users should also be advised that high-power radars are allocated as primary users (i.e. priority users) of the bands 5250-5350 MHz and 5650-5850 MHz and that these radars could cause interference and/or damage to LE-LAN devices.
Radiation Exposure Statement:
This equipment complies with IC radiation exposure limits set forth for an uncontrolled environment. This equipment should be installed and operated with minimum distance 20cm between the radiator & your body.
Antenna list:
| Model Type | Connector | 2.4~2.48 | 35GHz | 5.15~5.25 | 5.25~5.35GHz | 5.47~5.725GHz | 5.725~5.85GHz | |
| Ant (L) | PCB ant. | NA | 0.34 dBi | -2.8 dBi | -2.72 dBi | -1.29 dBi | -0.19 dBi | |
| Ant (R) | PCB ant. | NA | 1.15 dBi | -0.58 dBi | -0.45 dBi | 3.24 dBi | 1.78 dBi |
Canadian Department of Communications Compliance Statement (for Canada)
This Class B digital apparatus complies with Canadian ICES-003.
CE statement
Europe – EU Declaration of Conformity
This device complies with the essential requirements of the R&TTE Directive 1999/5/EC. The following test methods have been applied in order to prove presumption of conformity with the essential requirements of the R&TTE Directive 1999/5/EC:
- EN 60950-1:2006+A11:2009+A1:2010+A12:2011
- EN62311 : 2008
- EN 300 328 V1.8.1: 2012
- EN 301 893 V1.7.1: 2012
- EN 301 489-1 V1.9.2: 2011
- EN 301 489-17 V2.2.1: 2012
In Italy the end-user should apply for a license at the national spectrum authorities in order to obtain authorization to use the device for setting up outdoor radio links and/or for supplying public access to telecommunications and/or network services.

| Česky [Czech] | NEC Display Solutions, Ltd. tímto prohlašuje, že tento Wireless Display Media Player (Model:SB-06WC) je ve shodě se základními požadavky a dalšími příslušnými ustanoveními směrnice 1999/5/ES. |
| Dansk [Danish] | Undertegnede NEC Display Solutions, Ltd. erklærer herved, at følgende udstyr Wireless Display Media Player (Model:SB-06WC) overholder de væsentlige krav og øvrige relevante krav i direktiv 1999/5/EF. |
| Deutsch [German] | Hiermit erklärt NEC Display Solutions, Ltd., dass sich das Gerät Wireless Display Media Player (Model:SB-06WC) in Übereinstimmung mit den grundlegenden Anforderungen und den übrigen einschlägigen Bestimmungen der Richtlinie 1999/5/EG befindet. |
| Eesti [Estonian] | Käesolevaga kinnitab NEC Display Solutions, Ltd. seadme Wireless Display Media Player (Model:SB-06WC) vastavust direktiivi 1999/5/EÜ põhinõuetele ja nimetatud direktiivist tulenevatele teistele asjakohastele sätetele. |
| English Hereby, NEC | Display Solutions, Ltd., declares that this Wireless Display Media Player (Model:SB-06WC) is in compliance with the essential requirements and other relevant provisions of Directive 1999/5/EC. |
| Español [Spanish] | Por medio de la presente NEC Display Solutions, Ltd. declara que el Wireless Display Media Player (Model:SB-06WC) cumple con los requisitos esenciales y cualesquiera otras disposiciones aplicables o exigibles de la Directiva 1999/5/CE. |
| Ελληνική [Greek] | ME THN ΠΑΡΟΥΣΑ NEC Display Solutions, Ltd. ΔΗΛΩΝΕΙ OTI Wireless Display Media Player (Model:SB-06WC) ΣΥΜΜΟΡΦΩΝΕΤΑΙ ΠΡΟΣ ΤΙΣ ΟΥΣΙΩΔΕΙΣ ΑΠΑΙΤΗΣΕΙΣ ΚΑΙ ΤΙΣ ΛΟΙΠΕΣ ΣΧΕΤΙΚΕΣ ΔΙΑΤΑΞΕΙΣ ΤΗΣ ΟΔΗΓΙΑΣ 1999/5/EK. |
| Français [French] | Par la présente NEC Display Solutions, Ltd. déclare que l'appareil Wireless Display Media Player (Model:SB-06WC) est conforme aux exigences essentielles et aux autres dispositions pertinentes de la directive 1999/5/CE. |
| Italiano [Italian] | Con la presente NEC Display Solutions, Ltd. dichiara che questo Wireless Display Media Player (Model:SB-06WC) è conforme ai requisiti essenziali ed alle altre disposizioni pertinenti stabilite dalla direttiva 1999/5/CE. |
| Latviski [Latvian] | Ar šo NEC Display Solutions, Ltd. deklarē, ka Wireless Display Media Player (Model:SB-06WC) atbilst Direktīvas 1999/5/EK būtiskajām prasībām un citiem ar to saistītajiem noteikumiem. |
| Lietuvių [Lithuanian] | Šiuo NEC Display Solutions, Ltd. deklaruoja, kad šis Wireless Display Media Player (Model:SB-06WC) atitinka esminius reikalavimus ir kitas 1999/5/EB Direktyvos nuostatas. |
| Nederlands [Dutch] | Hierbij verklaart NEC Display Solutions, Ltd. dat het toestel Wireless Display Media Player (Model:SB-06WC) in overeenstemming is met de essentiële eisen en de andere relevante bepalingen van richtlijn 1999/5/EG. |
| Malti [Maltese] | Hawnhekk, NEC Display Solutions, Ltd., jiddikjara li dan Wireless Display Media Player (Model:SB-06WC) jikkonforma mal-ħtiġijiet essenzjali u ma provvedimenti oħrajn relevanti li hemm fid-Dirrettiva 1999/5/EC. |
| Magyar [Hungarian] | Alulírott, NEC Display Solutions, Ltd. nyilatkozom, hogy a Wireless Display Media Player (Model:SB-06WC) megfelel a vonatkozó alapvető követelményeknek és az 1999/5/EC irányelv egyéb előírásainak. |
| Polski [Polish] | Niniejszym NEC Display Solutions, Ltd. oświadcza, że Wireless Display Media Player (Model:SB-06WC) jest zgodny z zasadniczymi wymogami oraz pozostałymi stosownymi postanowieniami Dyrektywy 1999/5/EC. |
| Português [Portuguese] | NEC Display Solutions, Ltd. declara que este Wireless Display Media Player (Model:SB-06WC) está conforme com os requisitos essenciais e outras disposições da Directiva 1999/5/CE. |
| Slovensko [Slovenian] | NEC Display Solutions, Ltd. izjavlja, da je ta Wireless Display Media Player (Model:SB-06WC) v skladu z bistvenimi zahtevami in ostalimi relevantnimi določili direktive 1999/5/ES. |
| Slovensky [Slovak] | NEC Display Solutions, Ltd. týmto vyhlasuje, że Wireless Display Media Player (Model:SB-06WC) spĺňa základné požiadavky a všetky príslušné ustanovenia Smernice 1999/5/ES. |
| Suomi [Finnish] | NEC Display Solutions, Ltd. vakuuttaa täten että Wireless Display Media Player (Model:SB-06WC) tyyppinen laite on direktiivin 1999/5/EY oleellisten vaatimusten ja sitä koskevien direktiivin muiden ehtojen mukainen. |
Safety Precautions and Maintenance
For optimum performance, please note the following when setting up and using the Wireless Display Media Player.
Please adhere to the precautions stated in the user's manual of the projector or display to be connected to this product.
| In the event of a fault occurring, pull out the power plug of the display or projector immediately!If not, this may result in fire or electric shock. Pull out the power plug from the electrical outlet immediately. Consult your dealer for repairs subsequently. |
| Do not use when there is a failure (e.g. the screen does not appear etc.) or when there is smoke or strange odorsThis may result in fire or electric shock. |
| Do not place foreign objects inside the productDo not place foreign objects inside the device when mounting the display or projector to this product. This result in fire or electric shock. |
| Do not disassemble or modify the productThis may result in injury, fire or electric shock. |
| Do not touch the power cable when there is thunderDo not touch the power cable of the display or projector when there is thunder. This may result in electric shock. |
| Do not replace this product with the power cable still connected to the electrical outletDo not replace this product with the power cable of the display or projector still connected to the electrical outlet. This may result in a failure. |
| Do not use this product in a location where it may get wetCut off the power supply immediately if water were to get inside this product, the display or projector and consult your dealer after pulling out the power cable from the electrical outlet. If not, this may result in a failure, fire or electric shock. |
| Do not use the wireless LAN unit as a life-saving device or equipmentThe wireless LAN unit attached to this product is not designed to be used as a life-saving equipment or device such as a medical device, nuclear power equipment / device, aeronautical device, transport equipment / or equipment / device that requires a high level of reliability, nor is it designed to be used in combination with such devices.Do not use the wireless LAN unit near people who are fitted with artificial pacemakers.Do not use the wireless LAN unit medical devices. This may result in electromagnetic interference in the medical device and pose a risk to human life. |
Corresponding regions, corresponding countries of Wireless LAN Unit
Please refer to our company website for the list of regions and countries where the use of the product is supported. Please duly note that use of the product in a region or country which does not support its use may contravene the laws on electromagnetic transmissions in that country.
URL: http://www.nec-display.com/ap/en_projector/others/wlan.html
GPL/LGPL Software Licenses
The product includes software licensed under GNU General Public License (GPL), GNU Lesser General Public License (LGPL), and others.
For more information on each software, see “readme.pdf” inside the “about GPL&LGPL” folder on the supplied CD-ROM.
About Trademarks
- Intel and the Intel ^ logo are trademarks of Intel Corporation in the US and/or other countries.
- Windows ^ is a registered trademark of Microsoft Corporation in the US and/or other countries.
- SD and SDHC are the trademarks of SD-3C, LLC.
WEEE Mark (European Directive 2012/19/EC)

natural_image
Pure electrical circuit lines without any symbolsWithin the European Union
EU-wide legislation, as implemented in each Member State, requires that waste electrical and electronic products carrying the mark (left) must be disposed of separately from normal household waste. This includes monitors and electrical accessories, such as signal cables or power cords. When you need to dispose of your NEC display products, please follow the guidance of your local authority, or ask the shop where you purchased the product, or if applicable, follow any agreements made between yourself and NEC. The mark on electrical and electronic products only applies to the current European Union Member States.
Outside the European Union
If you wish to dispose of used electrical and electronic products outside the European Union, please contact your local authority so as to comply with the correct disposal method.
NOTE:
- Unauthorized reproduction of the information in this manual in part or in whole is strictly prohibited.
- The information in this manual may differ from the information shown in the actual display screen.
- The information in this manual is subject to future changes without notice.
- While every endeavor has been made to ensure the information in this manual is accurate and complete, please contact us if you find any errors or omissions.
Accessory
The following accessories are enclosed with the product at the time of purchase. Please contact your dealer if you find any of the accessories missing or damaged.
- SB-06WC Main unit
- Wireless LAN unit
- Setup manual
- User's manual (CD-ROM)
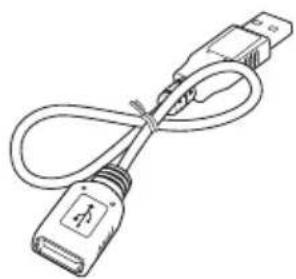
- USB extension cable
• SD memory card (capacity: 8GB)
• SD memory card protector
• Wireless LAN unit protector
• Wireless LAN unit adapter
- Screws (for adapter)

natural_image
Front view of a portable electronic device with ports and ventilation grilles (no text or symbols visible)
natural_image
Technical line drawing of a rectangular electronic device with a separate small component (no text or symbols)
SB-06WC Main unit Wireless LAN unit SD memory card (capacity: 8GB)

natural_image
Simple line drawing of a circular disc with concentric rings (no text or symbols)User's manual (CD-ROM) Setup manual

USB extension cable
natural_image
Line drawing of a USB cable with connector (no text or symbols)
natural_image
Technical line drawing of a rectangular electronic component with a screw attached (no text or symbols)Wireless LAN unit adapter Screws (for adapter)

natural_image
Technical line drawing of a mechanical bracket or bracket (no text or symbols)Wireless LAN unit protector

SD memory card protector
SB-06WC Main unit

① LAN Port (RJ-45)
This is used when functions are expanded in future.
② Reset button
This resets the product.
③ USB Port 1
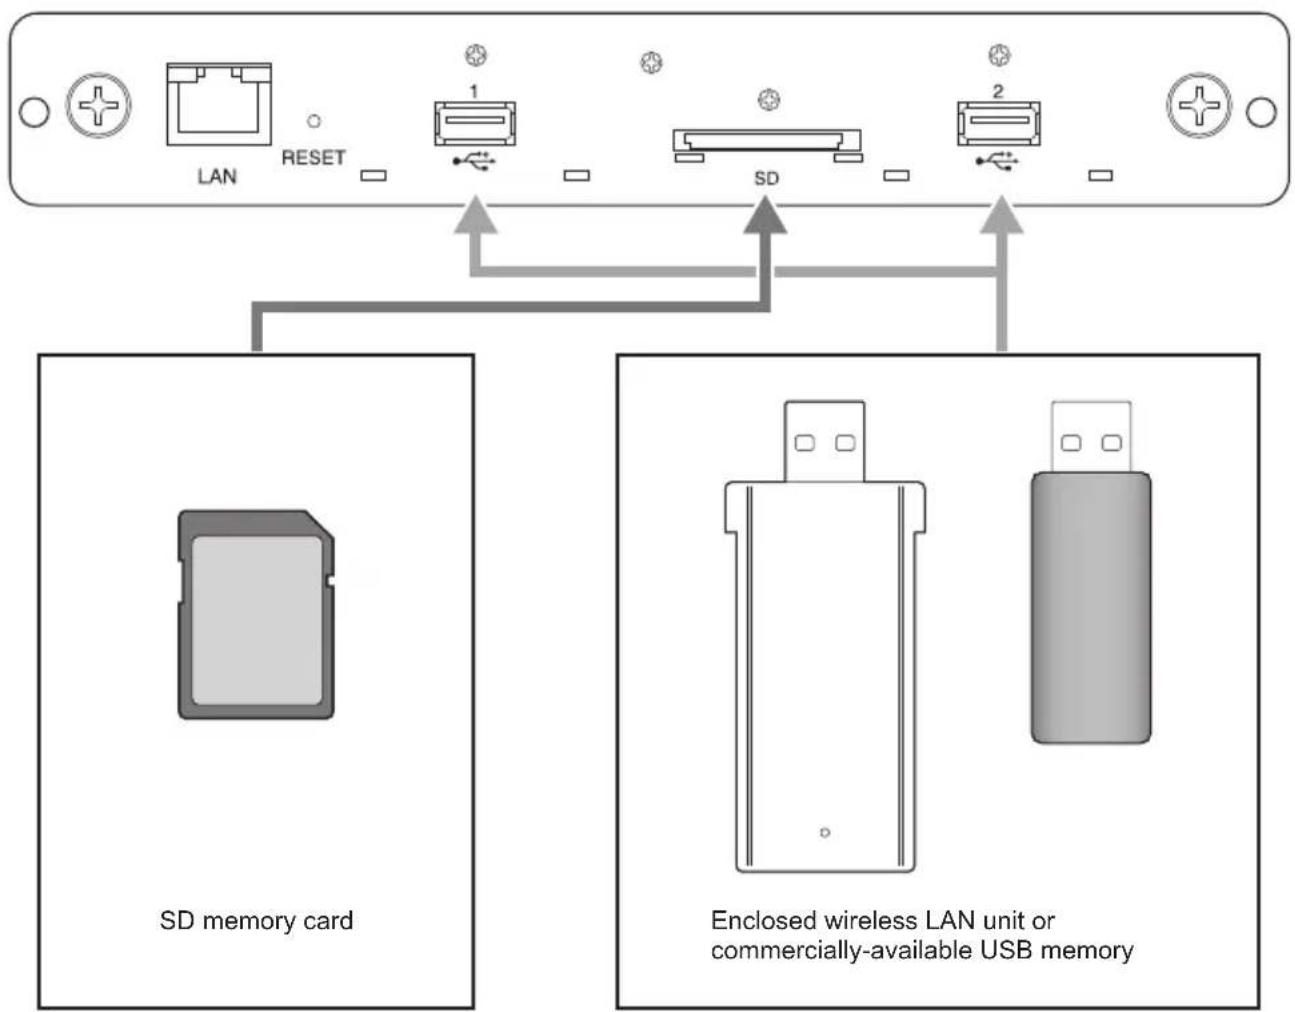
This is used to connect the enclosed wireless LAN unit or a commercially-available USB memory.
4 Indicator
Displays the status of the product.
When using the Intel ^® WiDi function:
- Lights up in green: Intel ^ WiDi connection in progress (communication in progress)
- Flashes in green: Intel progress ^36 WiDi connection preparation in
•Lights up in orange: Intel ^ WiDi standby for connection (connection preparation completed)
Media player function, setting screen:
•Lights up in green: Power ON
Common
•Lights up in red: System startup in progress
- Flashes in red: System error
Firmware update error
- Flashes in orange: Firmware update in progress
⑤ Slot for the SD memory card
Connect the SD memory card.
⑥ USB Port 2
This is used to connect the enclosed wireless LAN unit or a commercially-available USB memory.
Wireless LAN unit

natural_image
Simple line drawing of a rectangular electronic component with two ports and a pointer labeled '7' (no text or symbols on the object itself)⑦ Indicator
Display the status of the wireless LAN unit.
- Lights up in blue: Intel ^ WiDi connection in progress
- Flashes in blue: Intel ^ WiDi connection in progress (data transmission in progress)/standby for connection
Connections
Insert the enclosed wireless LAN unit or a commercially-available USB memory or SD memory card into the product.
- Insert the wireless LAN unit into the product first before turning on the power supply.
- Insert the SD memory card into the slot for the SD memory card so that the label faces the top of the product.
- Please refer to the paragraph on "Specifications" for the specifications of the USB memory, SD memory card that can be used.
NOTE:
- The Intel ^ WiDi function cannot be used if the wireless LAN unit is connected after the product is powered up.
- The enclosed wireless LAN unit and USB memory can be used when inserted into either USB Port 1 or USB Port 2.
flowchart
graph TD
    A["SD memory card"] --> B["LAN"]
    C["Enclosed wireless LAN unit or commercially-available USB memory"] --> D["1"]
    C --> E["2"]
    B --> F["RESET"]
    D --> G["SD"]
Installation
Attach this product to the display main unit or projector main unit. Depending on the display, an optional slot board conversion adapter SB-02AM may be required. Refer to the Quick Start Guide of the SB-02AM on how to install the SB-02AM.
Check with your dealer for the compatible displays and projectors that can be used.
CAUTION:
- During installation, do not leave any foreign objects inside the display or projector. Do not drop the product, screws and optional slot cover as well.
1. Remove the two screws on the optional slot of slot 2 type to remove the optional slot cover.
For displays, remove the handle where necessary.
2. Attach this product to a display or projector.
CAUTION:
- When attaching this product to a display, make sure the top side of this product (side opposite to the side where the label is pasted) faces the rear of the display. Damages may result if it is inserted in the opposite direction.
- When attaching this product to a projector, make sure the top side of this product faces the top of the projector. Damages may result if it is inserted in the opposite direction.
3. Securely fasten this product with the screws on the optional slot. (tightening torque 49.0N cm - 68.6N cm)
Securely fasten the handle with the screws if the handle of the display is removed. See the manual of the display for the tightening torque of the handle screws.
CAUTION:
- Do not apply a force higher than the specified force when tightening the screws. This may result in damages to the screw holes.

natural_image
Mechanical assembly diagram showing a bracket with mounting holes and a directional arrow indicating motion (no text or symbols)

natural_image
3D mechanical component diagram showing a bracket with mounting holes and a dashed line indicating alignment (no text or symbols)Installation of protector for wireless LAN unit
- Remove the screws for securing the protector at the top of the USB Port where the wireless LAN unit is going to be connected.
NOTE:
- The wireless LAN unit can be inserted into either USB Port 1 or USB Port 2.
CAUTION:
- Do not lose the removed screws. Do not leave them inside the device as well.
-
Insert the wireless LAN unit to the USB Port.
-
Attach the protector for the wireless LAN unit. At this point, fit the two studs on the protector into the two square holes on the front panel of the product.
-
Securely fasten the protector with the screws. (tightening torque 4.7N•cm - 7.3N•cm)
CAUTION:
- Do not apply a force higher than the specified force when tightening the screws. This may result in damages to the screw holes.

Installation of protector for SD memory card
- Remove the screws for securing the protector at the top of the slot for the SD memory card.
CAUTION:
- Do not lose the removed screws. Do not leave them inside the device as well.
-
Insert the SD memory card into the slot for the SD memory card.
-
Attach the protector for the SD memory card. At this point, fit the two studs on the protector into the square holes on the front panel of the product.
-
Securely fasten the protector with the screws. (tightening torque 4.7N•cm - 7.3N•cm)
CAUTION:
- Do not apply a force higher than the specified force when tightening the screws. This may result in damages to the screw holes.

Installation of adapter for wireless LAN unit
Depending on the model of the display, when an external speaker is fitted, the wireless LAN unit may interfere with the external speaker, making direct connection to the product impossible. In this case, use an adapter for the wireless LAN unit (hereinafter "adapter") and a USB extension cable to install the wireless LAN unit to the back of the display etc.
- Install the adapter such that the indicator on the wireless LAN unit is on the side of the screw holes on the adapter.

- Securely fasten the adapter with the enclosed adapter screws. (tightening torque 19.6N•cm - 29.4N•cm)
CAUTION:
- Do not apply a force higher than the specified force when tightening the screws. This may result in damages to the screw holes.
-
Connect the USB extension cable to the USB Port of the product and the USB port of the wireless LAN unit.
-
Peel off the cover of the two-sided tape at the bottom of the adapter and press it strongly against the rear of the display to secure the adapter.
CAUTION:
- Secure the adapter only after you have carefully considered the installation position.
• Install the adapter on a horizontal surface.
• Install the adapter in a location that will not impose stresses on the USB extension cable.
- Do not install the adapter on top of the heat release outlet on the display.
- Remove all moisture, dust, oil, etc., from the location first before pasting the adapter at the location. Do not allow the sticky surface to get into contact with your hands or dust. This will result in a drop in the adhesive strength.
- The two-sided tape cannot be peeled off and used again. Do not use it again once it is peeled off.
- Be careful when removing an adapter that has been attached using two-sided tape. Using excessive force may result in damages to the adapter.
Basic Operation
Preparations
For displays
- Remote control enclosed with the display
For projectors
- Remote control enclosed with the projector
•Dedicated remote control for operating the product
Display remote control
① POWER ON button
Turn on the power of the display.
② STANDBY button
Turn off the power of the display.
③ SWITCH INPUT button (OPTION)
Switch the video input of the display to the product.
④ SWITCH AUDIO INPUT button (AUDIO INPUT)
Switch the audio input of the display. Select [OPTION] when outputting the audio of the product.
⑤ OPTION MENU button
Used for the menu operations of the product.
6 NUMBER button, PLAY button
Used for the input of numbers. When playing content with the media player, the functions are as follows. 1: Back, 2: Playback, 3: Skip, 5: Stop, 6: Pause.
⑦ MENU button
Turn the display OSD screen ON/OFF.
⑧ UP button ( ▲ )
Move to the setting at the top of the menu screen.
⑨ DOWN button (▼)
Move to the setting at the bottom of the menu screen.
⑩ MINUS button (-)
Move to the setting on the left of the menu screen.
Delete the number in front when inputting numbers.
⑪ PLUS button (+)
Move to the setting on the right of the menu screen.
12 SET button
Confirm the setting in the menu screen.
⑬ EXIT button
Return to the previous menu screen.
NOTE:
- The remote control enclosed with the display differs depending on the model. Use the OPTION button for menu operations of the product if there is no OPTION MENU button.
• See the manual of the display for button operations other than the above.

Dedicated remote control for the projector
① NUMBER button, PLAY button
Used for the input of numbers.
When playing contents with the media player, the functions are as follows. 1: Back, 2: Playback, 3: Skip, 5: Stop, 6: Pause.
② MENU button
Used for the menu operations of the product.
③ UP button ( ▲ )
Move to the setting at the top of the menu screen.
④ DOWN button (▼)
Move to the setting at the bottom of the menu screen.
⑤ LEFT button (◀)
Move to the setting on the left of the menu screen.
Delete the number in front when inputting numbers.
⑥ RIGHT button ( ▶ )
Move to the setting on the right of the menu screen.
⑦ SET button
Confirm the setting in the menu screen.
⑧ EXIT button
Return to the previous menu screen.

NOTE:
- Use the remote control enclosed with the projector to turn the power of the projector ON/OFF.
• See the manual of the projector regarding the button operations of the remote control enclosed with the projector. - Check with your dealer regarding the dedicated remote control for the projector.
Operations and settings of the display and projector
For displays
(1) Connect the power cable to the display first before connecting to the electrical outlet.
(2) Turn on the main power of the display.
(3) The video input of the display changes to the product upon pressing the OPTION button on the remote control of the display.
(4) The audio input changes upon pressing the AUDIO INPUT button on the remote control of the display. Set the input to "OPTION" to select the audio of the product.
(5) Use the display OSD function to set the "AUDIO" setting under "OPTION SETTING" to [DIGITAL].
For projectors
(1) Connect the power cable to the projector first before connecting to the electrical outlet.
(2) Turn on the main power of the projector.
(3) The video input of the projector changes to the product upon pressing the SLOT button on the remote control of the projector.
NOTE:
- Depending on the model, the projector may not support the audio output of the product. Please check with your dealer for details.
Product Operations
Use the remote control enclosed with the display to operate the product when using a display. Use the dedicated remote control for the projector to operate the product when using a projector.
Selection of Functions
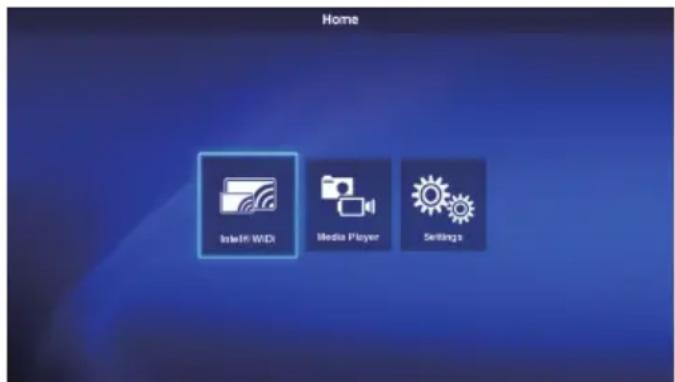
The “Home” Screen is displayed during startup in initial state. Select the function using the -/+ buttons on the remote control and press the SET button to move to the execution screen of each function.
Press the OPTION MENU button* on the remote control to return to the previous screen.
* : The remote control of the display differs depending on the model. Use the OPTION button if there is no OPTION MENU button on the remote control.
*: Use the MENU button when using a dedicated remote control for the projector.
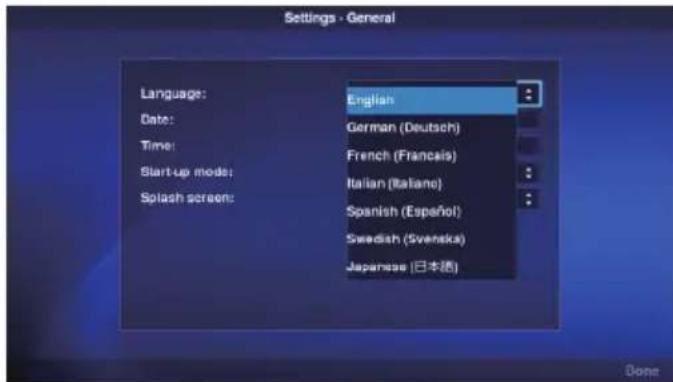
Setting the display language
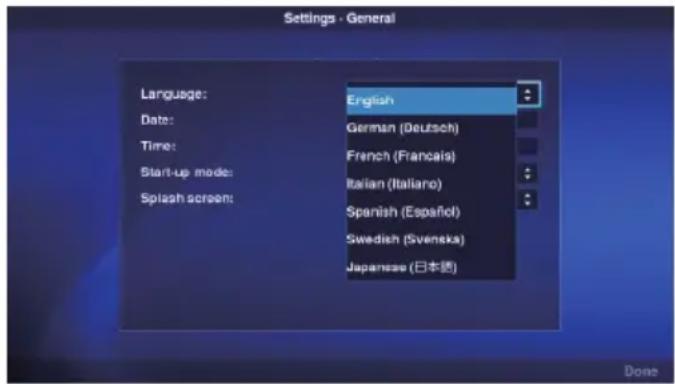
The display language in the initial state is “English”. Change the display language where necessary.
(1) Select [Settings] in the home screen and press the SET button on the remote control.
(2) Select [General] and press the SET button when the Settings menu appears.
(3) Select [Language] and press the SET button to display a list of the display languages, and use the ▲ / ▼buttons to select the desired display language before pressing the SET button.
(4) Select [Done] and press the SET button to switch the display language.
Screen Saver
- The screen saver screen will appear if there are no operations on the home screen or Intel ^ WiDi standby screen for 30 or more seconds. Press the EXIT button to return to the previous screen from the screen saver screen.
1. Wireless Display
Video from a computer that supports Intel ^® Wireless Display (hereinafter “Intel ^® WiDi”) can be received and displayed on a display or projected with a projector.

natural_image
Illustration of a laptop displaying a bar chart with sound waves, symbolizing data or audio (no text present)Computer that supports Intel® Wireless Display


bar
| Category | Value | |---|---| | 1 | 3.0 | | 2 | 4.5 | | 3 | 6.0 | | 4 | 5.5 | | 5 | 4.0 | | 6 | 7.0 | | 7 | 8.5 | | 8 | 9.0 |Projector or display which is connected to this product
NOTE:
- Refer to the user's manual of the computer and the Intel website for details on the use and update of the Intel® WiFi software.
Connection Method
Explains the operations using Windows ^® 7, Windows ^® 8.
(1) Select [Intel® WiDi] from the home screen and press the SET button.

(2) The right screen is displayed when the upon completing the connection preparation of the product.

(3) Start up the Intel ^® WiDi software with the computer.
(4) Operate the Intel ^® WiDi software to select "SB06WC" (adapter name of the product when shipped from the factory and then click [Connect].
If the adapter name has been changed, select the specified adapter, and then click [Connect].
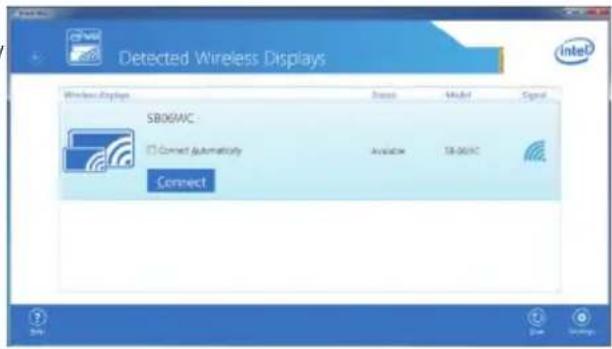
NOTE:
- Depending on the operating environment, the product "SB06WC" may not be detected. In that case, click [Scan] to scan again.
- For Windows ^® 8.1, open the Charm bar, select [Devices] – [Project] – [Add a wireless display], and then click “SB06WC”.
(5) When connecting the product to a computer for the first time, the security code will be displayed in the standby screen on the display end. Enter this security code in the Intel® WiDi software and click [Continue].

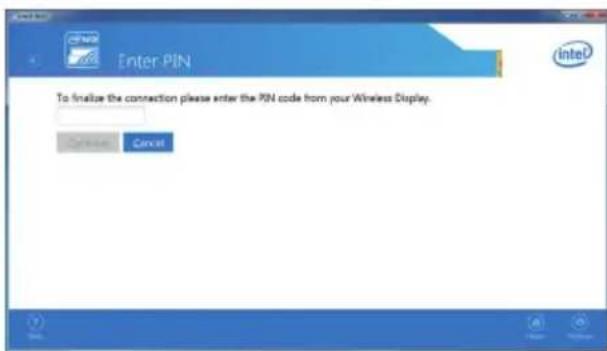
(6) At the end of the connection processing, the display screen of the computer will appear in the display.
(7) Click [Disconnect] in the Intel ^® WiDi software to stop the connection with the Intel ^® WiDi software.
How to adjust the size of the computer image displayed in the display/projector
When black edges appear around the screen without the computer display screen appearing correctly in the screen of the display/projector, the size of the image can be adjusted using the following method.
(1) Select [Settings]-[Picture and Sound] in the Intel ^® WiDi software.
(2) Click [Adjust cropping] in the [Settings - Picture and Sound] screen.
(3) Click the [+]/[-] icons in the [Setting – Adjust Edge Visibility] screen to adjust the image size.
2. Media Player
2-1. Overview
Repeat the playback of video, still image and audio files stored in the same folder of the SD memory card or USB memory in the order of the character code of the filename.
NOTE:
- Multiple videos and still images can be selected but only one can be displayed at any one time.
- Contents from multiple folders cannot be selected at the same time.
- Create the folder in the root directory.
- The character count limit of the folder name and filename is up to 260 characters including the folder path and extension. If 2-byte characters are used, the limit becomes even shorter.
Two playback modes
(1) Auto play mode:
- When contents are stored in advance in a designated folder (folder name: Contents ^1 ) of the SD memory card or USB memory, playback of the stored contents will start at the same time the display is started ^2 , or when the media player function is selected.
*1: Create the "Contents" folder in the root directory.
*2: Set the start mode to "Media Player" when starting playback automatically after starting the display. Refer to "3-4. General" for the details of the start mode.
(2) Manual play mode:
- Start manual playback after selecting the media, folder and contents.
Playback Settings
- The playback time for still images can be set. The time can be set between 10 and 999 sec.
- When the selected contents consist of only a single static image, the contents will continue to be displayed regardless of the set time.
- The type of screen transition (fade-in, fade-out, cross-fade) can be selected. Different types of screen transition cannot be used at the same time. The time can be set between 1 and 5 sec.
Playback time and transition time (image for fade-in cases)

Playback Operation
- Playback operations ( playback, stop, pause, skip, back) can be carried out using the remote control.
SD contents update function
- Contents can be copied from a USB memory to a SD memory card on the product. When a SD memory card with a protector is connected to the product, the contents in the SD memory card can be updated without removing the protector.
- In the auto play mode, the contents files in a designated folder of the USB memory (folder name: Contents) will be copied to the “Contents” folder of the SD memory card.
- In the manual play mode, all the files in the USB memory will be copied to the SD memory card.
Audio Selection
- The product outputs the audio of either an audio file or video file. Select which audio to playback.
Example on playback of contents
Selected contents
| File type File name | |
| Video, Still Images 1) | Image-1.jpg (still image playback time setting: 10 sec)2) Image-2.bmp (still image playback time setting: 10 sec)3) Movie.wmv (playback time: 15 sec) |
| Audio | 1) Audio-1.mp3 (playback time: 15 sec)2) Audio-2.wav (playback time: 25 sec) |
The playback image is as follows when "Audio" is selected in the audio selection settings.
Playback time (sec.) 0 10 20 30 40

The playback image is as follows when "Video" is selected in the audio selection settings.
Playback time (sec.) 0 10 20 30 40
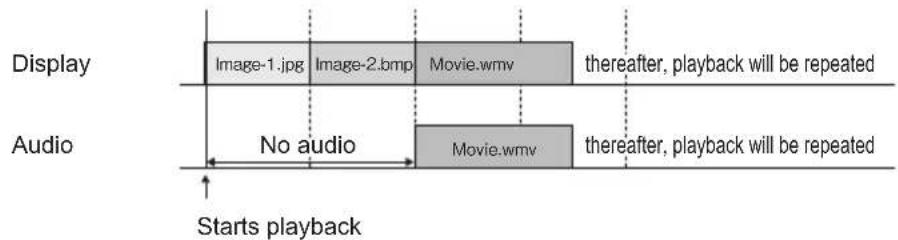
2-2. Operating flow of media player function
(1) Preparation of contents
- Create the folder in the root directory of either the SD memory card or USB memory.
- Save the contents in the folder created.
(2) Settings
Configure the various media player settings.
• Media player mode
- Display time
• Type of image transition
• Image transition time
- Contents aspect
- Audio selection
(3) Select the media
- Select the media (SD memory card or USB memory) connected to the product.
(4) Selection of folders
- Select the folder where the contents are stored.
(5) Selection of video and still images
(6) Selection of audio
(7) Playback
NOTE:
- When auto play mode is selected, the contents saved in the "Contents" folder of the designated media will be played. The above-mentioned (3) Media, (4) Folder, (5) Video, Still Image Contents Selection, (6) Audio Contents Selection will not be carried out.
2-3. Preparation of Contents
(1) Create the folder in the root directory of either the SD memory card or USB memory.
(2) Save video, still image or audio files in the created folder.
Refer to "Compatible Formats of the Media Player" for the file types.
NOTE:
- The media player function will playback the contents in the order of the character code of the filename. When specifying the playback order of the contents, follow that order to change the filename.
Example: The playback order is as follows when the filenames are Image1.jpg, Image2.jpg, Image3.jpg.
(1) Image1.jpg (2) Image2.jpg (3) Image3.jpg thereafter, playback will be repeated in the order (1)-(3).
2-4. Settings
(1) Configure the respective settings for the auto play mode and manual play mode.
How to display the setting menu of each play mode
[In the case of auto play mode]
(1) Select [Settings] - [Applications] - [Media Player] from the home screen.
(2) The setting screen for the auto play mode is displayed.
[In the case of manual play mode]
(1) Select [Media Player] from the home screen.
(2) Select [Manual Play Mode Settings] at the bottom left of the drive selection screen.
(3) The setting screen for the manual play mode is displayed.
(2) Configure the following settings where necessary when the setting screen appears.
Refer to "3-3-2.Media Player Settings" for details of the settings.
- Display time
- Type of image transition
• Image transition time - Contents aspect
- Audio selection
2-5. Selection, playback of contents
(1) Select "Media Player" in the home screen.
(2) Select one media when the media selection screen appears.
NOTE:
- The icons of unconnected media will be shaded in grey.
(3) Select one folder.
NOTE:
- Only those folders in the root directory are displayed.


(4) Select the video and still image files to be displayed.
(1) Use the /▲/▼ buttons to align the focus on the file you want to select and press the SET button to select the file. Press the SET button again to cancel the selection.
NOTE:
- Upon being selected, a check mark will appear on that thumbnail.
- For video files, a movie mark will appear on that icon.
- The maximum number of files that can be displayed on the file selection screen at any one time is 15. When saving more files than this, the excess files will be shown in a different display screen.

If "<" and "> " appears on the left and right of the screen, it means that there are multiple file selections screens.
The file selection screen is changed using the -/+ buttons.
- Playback of files is carried out in the code order of the filename. When files with the same filename but different file formats exist, playback will be in the code order of the file format name.
(2) Press and hold the button in the contents selection screen to move the focus to the lower column.
Press the ▲ button to return to the selection of contents.
(3) Select the actions displayed in the lower column of the screen and press the SET button to perform the following actions.
•[Select All]: Select all the video and still image contents.
•[Clear All]: Clear all the video and still image contents.
•[Next]: Move to the audio file selection screen.
If there are no audio files saved, [Next] will appear in grey.
•[Play]: Start the playback of contents.
NOTE:
- The selected contents will be saved in the various media at the stage when "Play" is executed. If the contents selection screen is changed before "Play" is executed, the selected contents will be cleared.
(5) Select the audio files.
(1) Use the /▲/▼ buttons to align the focus on the file you want to select and press the SET button to select the file. Press the SET button again to cancel the selection.
NOTE:
- Upon being selected, a check mark will appear on that thumbnail.
- The file format (MP3 or WAV) will be displayed on the thumbnail of the file.
- The maximum number of files that can be displayed on the file selection screen at any one time is 15.
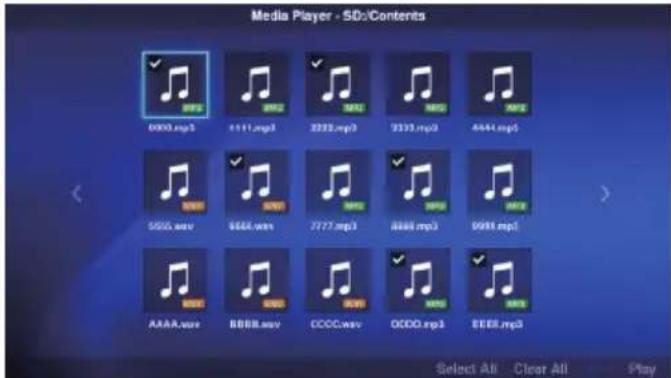
When saving more files than this, the excess files will be shown in a different display screen.
If "<" and "> " appears on the left and right of the screen, it means that there are multiple file selections screens. The file selection screen is changed using the -/+ buttons.
- Playback of files is carried out in the code order of the filename. When files with the same filename but different file formats exist, playback will be in the code order of the file format name.
(2) Press and hold the ▼ button in the contents selection screen to move the focus to the lower column.
Press the ▲ button to return to the selection of contents.
(3) Select the actions displayed in the lower column of the screen and press the SET button to perform the following actions.
•[Select All]: Select all the audio contents.
•[Clear All]: Clear all the audio contents.
•[Play]: Start the playback of contents.
NOTE:
- The selected contents will be saved in the various media at the stage when "Play" is executed. If the contents selection screen is changed before playback is started, the selected contents will be cleared.
(6) Playback of contents
- Select [Play] in the video, still image or audio selection screen to start the playback.
- Press the remote control buttons to perform the following actions during playback.
2 / ▶(Play) : Start the playback of contents from the pause state.
5 / ■(Stop) : Stop the playback of contents and return to the menu screen.
6 / II (Pause) : Stop playback and continue showing the displayed contents.
3 / ▶▶▶I (Skip) : Play the next contents.
1 / (Back) : Play the previous still image when playing still images.
Start playback from the beginning when playing video and audio contents. Play the previous contents if pressed within 1 sec from the start of playback of the contents.
OPTION MENU : Stop the playback and return to the home screen.
EXIT : Stop the playback of contents and return to the menu screen.
- Use the operation buttons to display the order of the video and still image files currently being played and the total number of selected files at the bottom left of the screen.
Example) When 12/25 is displayed, it means that:
•The total number of selected video and still image files is 25.
•The order of the video or still image file currently being played is 12.
IMAGE

012/025
3. Settings
3-1. Overview
Display product information, configure various settings, format the media and so on.
Select [Settings] in the home screen to display the main screen of the setting menu.
Password Setting
- The setting menu can be protected by a password. Upon setting a password, a password entry screen will appear for you to enter the password when the setting menu is selected. Please remember your password as entry to the setting menu will be denied if the password is wrong.
- No password is set at the initial state.
- Set the password under [Settings] - [System] - [Security] - [Settings password].

How to change settings
(1) Select the setting with the ▲▼buttons on the remote control and press the SET button to display the setting.
(2) After selecting the setting, press the SET button again to change the setting.
(3) Press the SET button after selecting [Done] at the bottom right of the screen to save the setting.
NOTE:
- If the OPTION MENU button or EXIT button is pressed and the screen changes before the setting is confirmed, the changes in the setting will be cleared.
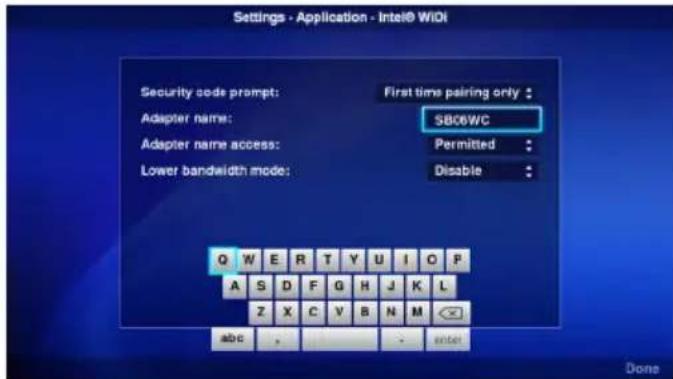
How to operating the software keyboard
A software keyboard will be displayed when entering the adapter name in the Intel ^ WiDi settings. There are 3 software keyboard screens. Follow the instructions below to enter the changes.
(1) Use the ▲/▼/-/+ buttons on the remote control to align the focus on the characters you wish to enter and press the SET button to display that character in the input area of the setting menu.
(2) Select [enter] and press the SET button to confirm the input.
The meaning of keys other than English characters and symbols are as follows.
- ABC: Change to the input screen for capital letters.
- abc: Change to the input screen for small letters.
- ?123: Change to the input screen for numbers and symbols.
- enter: Confirm the entered information and close the software keyboard.
• X: Delete the last character entered.
3-2. About
Displays the information of the SD memory card and USB memory connected to the product. Select [About] from the main screen of the setting menu.

| Item Displays | |
| Model Product name “SB-06WC” | |
| Serial Number Serial no. of this product | |
| Firmware version Firmware version of this product | |
| SD card Spare and usable capacity of the SD memory card connected to the SD memory card slot of the product | |
| USB flash drive 1 Spare and usable capacity of the USB memory connected to the USB Port 1 of the product | |
| USB flash drive 2 Spare and usable capacity of the USB memory connected to the USB Port 2 of the product | |
3-3. Application
3-3-1. Intel® WiDi Settings
Perform the Intel ^® WiDi settings.
Select [Application]–[Intel ^® WiDi] from the main screen of the setting menu for the setting screen.

| Item Setting | |
| Security code prompt Control | the storage and use of persistent WFD groups.The default is “First time pairing only”.1) First time pairing only : Enter PIN code for first time pairing only.2) Always : Enter PIN code for all pairings. |
| Adapter name The adapter name | of the product can be specified. The adapter name is entered using the software keyboard. Only alphabet letters and numbers can be used for the adapter name. Hyphens “-” cannot be used.The default is “SB06WC”. |
| Adapter name access Enable | and disable whether the Device Name setting can be changed by the end user. The default is “Permitted”.[Setting]1) Permitted : Permit changes to be made from the Intel ^ WiDi software.2) Prohibited : Prohibit changes to be made from the Intel ^ WiDi software. |
| Lower bandwidth mode Limit the bandwidth used for Intel ^ WiDi.The default is “Disable”.[Setting]1) Disable : Do not set the mode to the low bandwidth mode.2) Enable : Set the mode to the low bandwidth mode. |
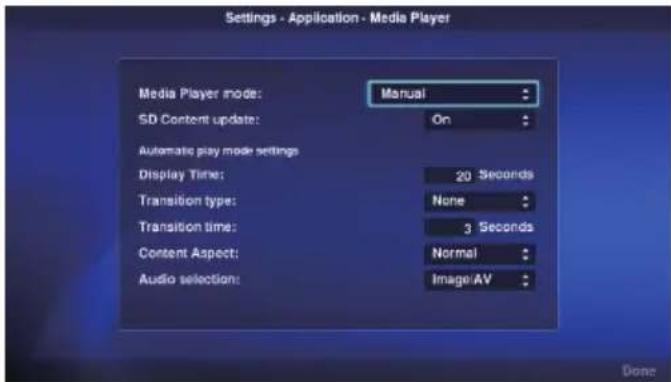
3-3-2. Media Player settings
Configure the settings for the play mode and auto play mode of the media player.
Select [Application]–[Media Player] from the main screen of the setting menu for the setting screen.
| Item Settings | |
| Media Player mode Sets the playback mode of the media player.[Settings]1) Manual (manual play mode)Start manual playback after selecting the contents.2) Auto: SD card (auto play mode)If [Media Player] is selected in the home screen, the contents inside the Contents folder of the SD memory card will be played automatically.If [Media Player] is selected in the startup mode settings, the contents inside the Contents folder of the SD memory card will be played automatically when the display is powered up.3) Auto: USB flash drive (auto play mode)If [Media Player] is selected in the home screen, the contents inside the Contents folder of the USB memory will be played automatically.If [Media Player] is selected in the startup mode settings, the contents inside the Contents folder of the USB memory will be played automatically when the display is powered up.NOTE:Select [Media Player] in the home screen to automatically play the contents in the auto play mode. Select “Manual” in this setting to display the contents selection screen of the media player.In the auto mode, playback will not be carried out if there are no contents in the Contents folder of the SD memory card or USB memory. | |
| SD Content update If a SD memory card is inserted, the files saved in the USB memory will be automatically copied to the SD memory card.The files will be copied when the USB memory is inserted, or when the media player function is selected with the USB memory inserted.The contents copied vary depending on the playback mode.In the auto play mode, only the files in the Contents folder are copied.In the manual play mode, all the folders and files in the folders are copied.[Settings]1) On: Enable the function.2) Off: Disable the function.NOTE:When there are two USB memories connected, the files in the USB memory connected to USB Port 1 are copied.Create the “Contents” folder in the root directory.All files will be overwritten.In the auto play mode, a “Contents_bak” folder will be automatically created in the SD memory card to provide a backup copy of the contents in the original “Contents” folder.The capacity of the SD memory card that can be used is limited because of this backup.The time required for copying is about 3 minutes per 10 megabytes. | |
| Display time Set the time for displaying still images.Use the number keys on the remote control to enter the time.[Settings]Selection range: 10-999 secSetting unit: 1 sec[Setting Method](1) Press the SET button after selecting this setting.(2) Press the - (minus) button to clear the current setting time.(3) Use the number buttons to enter the display time and then press the SET button. | |
| Transition type Specify the transition type. | [Settings]1) Fade-in2) Fade-out3) Cross-fade4) NoneNOTE:Only one type of image transition can be specified.When cross-fade is selected, the switchover between videos will be fade-out followed by fade-in.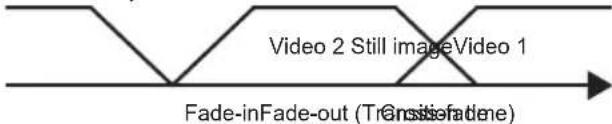 This setting does not support audio. This setting does not support audio. |
| Transition time Set the time for | the fade-in, fade-out and cross-fade.Use the number keys on the remote control to enter the time.[Settings]Setting range: 1-5 secSetting unit: 1 sec[Setting Method](1) Press the SET button after selecting this setting.(2) Press the - (minus) button to clear the current setting time.(3) Use the number buttons to enter the image transition time and then press the SET button. |
| Content aspect Set the display | method for videos and still images.[Settings]1) Full: Change the aspect ratio of the image to occupy the entire screen of the display.2) Normal: Maintain the aspect ratio of the image.NOTE:Please note that there is a risk of infringing upon the rights of copyrights holders that are protected under the Copyrights Act when screen compression or expansion is carried out through changes in the aspect ratio in commercial establishments or public viewing locations like cafes and hotels etc.When set to “Normal”, some parts on the left and right or up and down of the screen may appear blank depending on the aspect ratio of the contents.(Display Example)Original image Full Normal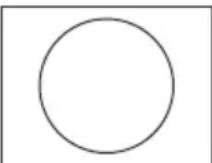 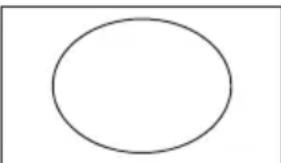 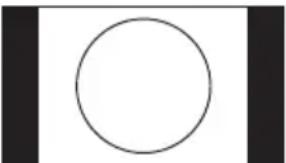 |
| Audio selection Play either the | audio of an audio file or the audio of a video file. Set which audio to playback.[Settings]1) Video: Play the audio of the video.Audio files will not be played even if they are selected.2) Audio: Play the audio of the audio file.The audio in the video will not be played even if the video contains audio. |
| Non-supported file display If the | selected folder contains files with formats that are not supported by the product, you can set whether to display the names of those files in the contents selection screen. You can check whether the files saved in the media are supported by the product.[Settings]1) Yes: Display non compatible file names.2) No: Do not display non compatible filenames.NOTE:When the filename is set to “Yes”, the thumbnail of that file appears in grey but it cannot be selected. |
3-4. General
Configure the settings for the menu display language, date and time, startup mode and splash screen display.
Select [General] from the main screen of the setting menu for the setting screen.

| Item Settings | |
| Language Selects the language of the menu screen.The default is “English”.[Settings]•English•German•French•Italian•Spanish•Swedish•Japanese | |
| Date Set the current date | (Month/Day/Year).[Setting Method](1) Press the SET button after selecting this setting.(2) Enter the date in the order Month/Day/Year using the number buttons.(3) Press the SET button after selecting [Done] at the bottom left of the screen. |
| Time Set the current time | (Hours:Minutes:Seconds). The time is displayed in 24 hours format.[Setting Method](1) Press the SET button after selecting this setting.(2) Enter the time in the order Hours/Minutes/Seconds using the number buttons.(3) Press the SET button after selecting [Done] at the bottom right of the screen. |
| Start-up mode | Set the menu screen to be displayed upon startup.If the functions to be used are fixed beforehand, those functions can be started directly during start up by setting the startup mode.The default is “Home”.[Settings]•Home•Intel®WiDi•Media Player |
| Splash screen Select whether to display the splash screen (NEC logo) during startup.The default is “Enable”.[Settings]•Enable: Display the splash screen.•Disable: Do not display the splash screen. | |
3-5. System
Security settings, media formatting, product firmware update and initialization of product settings etc. are performed.
Select [System] from the main screen of the setting menu for the setting screen.
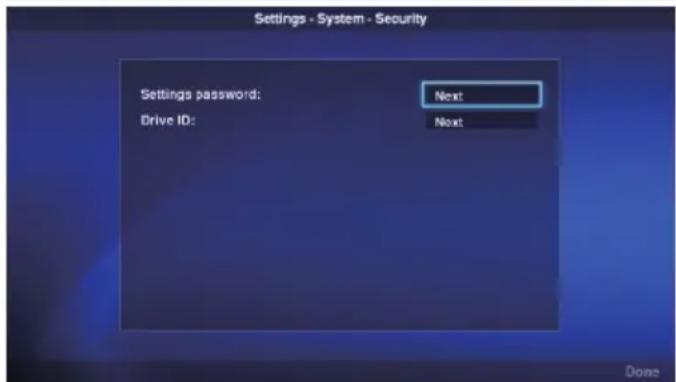
3-5-1. Security
Password for setting menu
The [Settings] menu in the home screen can be protected by a password.
A 4-digit number is specified for the password.
No password is set when the product is first shipped from the factory.
[Setting Method]
(1) Select [Settings password] and press the SET button to display the following screen.
- New Password
- Confirm Password
(2) Select [New Password]. Enter a 4-digit number after pressing the SET button and then press the SET button again
(3) Select [Confirm Password]. Enter the same 4-digit number entered in (2) above after pressing the SET button and then press the SET button again.
(4) Select [Done] at the bottom right of the screen and then press the SET button to confirm the password.
NOTE:
- If the EXIT button or OPTION MENU button is pressed and the screen changes before the password is confirmed, the entered password will be cleared.
- To cancel the password setting, leave the entry fields in [New Password], [Confirm Password] blank and press the SET button after selecting [Done] at the bottom right of the screen. The password setting will be canceled.
Drive ID
In order to prevent the use memory devices other than the designated SD memory card or USB memory, a drive ID can be set for the SD memory card or USB memory. Upon setting a drive ID, the product will no longer recognize memory devices other than the SD memory card or USB memory that is written with the designated drive ID.
A drive ID is designated with a 8-digit number.
No drive ID is set when the product is first shipped from the factory.
[Setting Method]
(1) Upon selecting [Drive ID], the following menu is displayed.
- New Drive ID
- Confirm Drive ID
(2) Select [New Drive ID]. Enter a 8-digit number after pressing the SET button and then press the SET button again.
(3) Select [Confirm Drive ID]. Enter the same 8-digit number entered in (2) above after pressing the SET button and then press the SET button again.
(4) Select [Done] at the bottom right of the screen and press the SET button to confirm the drive ID.
(5) Media initialization is carried out in order to write the “Drive ID” set in the product to the SD memory card or USB memory. Refer to “3-5-2. Initialization” on the initialization method.
NOTE:
- If the OPTION MENU button or EXIT button is pressed and the screen changes before the drive ID is confirmed, the entered drive ID will be cleared.
- To cancel the drive ID setting, leave the entry fields in [New Drive ID], [Confirm Drive ID] blank and press the SET button after selecting [Done] at the bottom right of the screen.

3-5-2. Initialization
Initialize the SD memory card or USB memory.
If a drive ID has been set, it will be written into the SD memory card or USB memory.
[Operating Method]
(1) After selecting [Drive], select [Done] at the bottom right of the screen and press the SET button.
(2) When the message “Initialize SD card?” or “Initialize USB memory?” appears, select [OK] and press the SET button. To cancel initialization, select [Cancel] and press the SET button.
CAUTION:
- Please note that all files will be deleted upon initialization.
3-5-3. Firmware Update
Updates the firmware of the product. The following two update methods are available. If these are not displayed on the product's menu, use [Operating Method 2].
[Operating Method 1]
A USB memory is used for the update.
(1) When the product is connected to a display, set the OPTION POWER setting of the display to ON. Set the POWER SAVE function of the display to OFF as well.
See the user's manual of the display on how to set up the display.
(2) Download the product firmware from the Company's website. URL: http://www.nec-display.com/jp/support.html
(3) Save the downloaded firmware file to the root directory of the USB memory.
(4) Insert the above-mentioned USB memory into the USB port of the product.
(5) Upon opening the [Update F/W] menu and selecting [Firmware], the filename of the firmware stored in the USB memory is displayed.
(6) After selecting the file, select [Done] at the bottom right of the screen and press the SET button to start the firmware update.
(7) When the firmware update is completed normally, the product will start up again.
[Operating Method 2]
Use a USB memory or the enclosed SD memory card for the update.
(1) When the product is connected to a display, set the OPTION POWER setting of the display to ON. Set the POWER SAVE function of the display to OFF as well. See the user's manual of the display on how to set up the display.
(2) Download the product firmware from the Company's website. URL: http://www.nec-display.com/jp/support.html
(3) Save the downloaded firmware file to the root directory of the SD memory card or the USB memory.
(4) Insert the above-mentioned SD memory card or USB memory into the slot for the SD memory card or the USB port on the product.
(5) Turn off the power of the display or projector connected to the product.
(6) Turn on the power of the display or projector while pressing the reset button of the product. Press and hold the reset button for about 15 sec after the display or projector starts up.
(7) The product indicator flashes orange during the update process. The indicator flashes red if the update fails. In this case, perform the update again.
(8) The product restarts when the firmware update is completed normally.
CAUTION:
- The firmware update time is about 10 minutes. Never switch off the power of the display or projector connected to the product during the update. Never pull out the SD memory card or the USB memory where the firmware is stored as well. The update may fail and the product may no longer work normally.
NOTE:
- Please consult your dealer or our after service support desk if the product fails to start up even after running the update process.
3-5-4. Reset
Return the product settings to the default state when first shipped from the factory. Or start up the product again.
| Item Contents | |
| Reset all settings Return all general and system settings and the product's Intel ^ WiDi and media player to the default state when first shipped from the factory. | |
| Reset Intel® WiDi settings Return the Intel ^ WiDi settings to the default state when first shipped from the factory. | |
| Reset Media Player settings Return the media player settings to the default state when first shipped from the factory. | |
| Restart only Start up the product again. | The product settings will not return to the default state when first shipped from the factory. |
[Operating Method]
(1) After selecting the contents you want to run, select [Done] at the bottom right of the screen and press the SET button.
(2) Select [OK] and press the SET button when the message “Reset the ** setting?” appears. To cancel, select [Cancel] and press the SET button.
General
| Audio cannot be heard from the display. | [When the product is connected to a display]Set the audio input of the display to “OPTION”. To do so, press the AUDIO INPUT button and set the selected audio input (AUDIO) shown at the top right of the screen to “OPTION”.Set the AUDIO setting in the display OPTION to DIGITAL. To do so, press the MENU button, select [ADVANCED OPTIONS] - [OPTION SETTING] and set [AUDIO] to [DIGITAL].Check whether the switch for the external speaker and built-in speaker of the display has been set correctly.Adjust the volume of the display.[When the product is connected to a projector]Depending on the model of the projector, the audio output of the product may not be supported. Check with your dealer regarding the specifications of the projector. |
| The menu screen does not appear even after startup | After startup, it takes about a minute for the menu screen of the product to appear.After the splash screen appears, a blank screen will appear until the home screen is displayed. This is due to the specifications of the product. |
| When the power lamp is flashing in red A | failure may have occurred in the product. Please consult your dealer or our after service support desk. |
Intel ^® WiDi function
| The Intel®WiDi menu cannot be selected in the home screen. | ·Start up the product again after checking whether the wireless LAN unit is correctly inserted into the product. |
| The Intel®WiDi software does not detect or connect to the product. | ·Start up the Intel®WiDi software in the PC again.·Start up the Intel®WiDi software after re-starting the PC.·Start up the product again.·Reset the settings of the product.·When multiple networks exist in the vicinity, detection or connection may not be possible. In this case, change the channel of the wireless router to a channel that is not in use on another network.·Update the Intel®WiDi software in the PC to the latest version. |
| Distortions, interruptions and delays are observed in the image. | ·When the intensity of the radio waves is not sufficient, the display may not appear normally.·Move the product to a location where there are no obstructions such as walls and doors etc between the PC and the installed display.·Install the wireless LAN unit at a location with good electromagnetic reception using the adapter for the wireless LAN unit and the USB extension cable.·Due to the image processing and wireless transmission processing, there may be a delay compared to the PC display. This is due to the specifications of the Intel®WiDi software. |
| The PC image does not occupy the full screen of the display. | ·Adjust the display size using the “Change TV Image Size” function in the Intel®WiDi software.·Adjust the display screen on the display end. |
Media Player Function
| SD memory card or USB memory is not recognized. | • Re-insert the SD memory card or USB memory.• Check whether the file system of the SD memory card or USB memory is compatible with the product or not.• The SD memory card or USB memory may be damaged. Check whether it can be recognized correctly on the computer. |
| The files stored in the SD memory card or USB memory do not appear in the contents selection screen. | • The contents may not be supported. Check the specifications of the contents.• Set the non-supported file display setting to [Display] and check the contents selection screen. If the thumbnail of the file appears in grey, it means that the specifications of the contents are not supported. |
| Video and still images do not appear normally. | • The files may be damaged. Check whether the files can be displayed correctly on the computer.• Copyright protected contents cannot be displayed. |
| Audio of video files is not output. • Change the audio selection setting to “Video”. | |
| Audio of audio files is not output. • Change the audio selection setting to “Audio”. | |
| Setting not included in the media player menu in the home screen. | • When “Auto” is selected in the media player mode setting, the setting will not be included in the media player menu. Set the setting to “Manual”. |
| Even when cross-fade is selected as the type of image transition, cross-fade does not occur when switching between videos. | • When cross-fade is selected, the switchover between videos will be fade-out followed by fade-in. These are the specifications of the product. |
| When auto play mode is selected, SD contents update is not carried out. | • Create a “Contents” folder in the root directory of the SD memory card.• Create a “Contents” folder in the root directory of the USB memory and save the contents in that folder. |
| The folder does not appear in the folder selection screen. | • Only folders in the root directory of the media are displayed.• Folders at other levels are not displayed. |
| Even when auto play mode is selected, playback of contents does not start automatically after startup. | • Select “Media Player” in the startup mode settings.• Create a “Contents” folder in the root directory of the USB memory or SD memo card and save the contents in that folder. |
Wireless Display Media Player SB-06WC
| Interface | USB port | USB2.0 port x2•File system: FAT, FAT32 |
| SD memory card slot | SD memory card slot x1•Card type: SD, SDHC•File system: FAT, FAT32 | |
| LAN port | RJ-45 x1•To be used when functions are expanded in future | |
| Power Supply +16VDC (from Option slot interface of Display/Projector) | ||
| Power Consumption 4W (maximum) | ||
| Complied Regulatory and Guidelines FCC, CE : Class B | ||
| Operational Environment | Temperature 0-40°C | |
| Humidity 20-80% (without condensation) | ||
| Storage Environment | Temperature -10-60°C | |
| Humidity 10-90% (without condensation) | ||
| Dimensions | 180.0(W)x 30.0(H) x 119.0(D)mm/ 7.09(W)x 1.18(H)x 4.69(D) inches (excluding protrusions) | |
| Weight 0.3kg/ 0.7lbs | ||
Wireless LAN Unit NP04LM1/NP04LM2
| Wireless LAN standard | 2.4 GHz band conforming to the IEEE802.11b/g/n standard5 GHz band conforming to the IEEE802.11a/n standard (W52/W52/W56) | |
| Host Interface USB 2.0 | ||
| Power Consumption 2W (maximum) | ||
| Complied Regulatory and Guidelines | NP04LM1: FCC Class B, ICNP04LM2: CE Class B | |
| Operational Environment | Temperature 0-40°C | |
| Humidity 20-80% (without condensation) | ||
| Storage Environment | Temperature -10-60°C | |
| Humidity 10-90% (without condensation) | ||
| Dimensions | 26.2(W)x 12.9(H) x 69.7(D)mm/ 1.03(W)x 0.51(H)x 2.74(D) inches (excluding protrusions) | |
| Weight 15g/ 0.03lbs | ||
CAUTION: Please refer to our company website for the list of regions and countries where the use of the Wireless LAN Unit NP04LM1/NP04LM2 is supported. Please duly note that use of the product in a region or country which does not support its use may contravene the laws on electromagnetic transmissions in that country.
URL:http://www.nec-display.com/ap/en_projector/others/wlan.html
Compatible formats of the media player
(1) Video
| Type Video | /Audio Details extension | |||
| MPEG2, MP2/MP3 | Video Codec MPEG2 .mpg | .mpeg | ||
| Audio Codec MPEG-1 Audio layer 2 | MPEG-2 Audio layer 2MPEG-1 Audio layer 3MPEG-2 Audio layer 3 | |||
| WMV9, WMA9 | Video Codec Windows Media Video 9(WMV3) .wmv | |||
| Audio Codec Windows Media Audio 9 | Windows Media Audio 9 Professional | |||
| H.264/AVC, AAC | Video Codec H.264/AVC .mp4 | |||
| Audio Codec Advanced Audio Coding | ||||
(2) Image
| Type Details extension | ||
| GIF Maximum resolution: 1280 x 1280 dot .gif | ||
| JPEG Maximum resolution: 4000 x 4000 dot | .jpg, .jpe, .jpeg | |
| PNG | Maximum resolution: 4000 x 4000 dot | .png |
| BMP | Maximum resolution: 4000 x 4000 dot | .bmp |
(3) Audio
| Type | Details | extension | |
| MP3 | Codec | MPEG-1 Audio layer 3MPEG-2 Audio layer 3 | .mp3 |
| Channel | 2ch | ||
| LPCM | Codec | Linear Pulse Code Modulation | .wav |
| Channel | 2ch | ||
- Wireless Display Media Player SB-06WC
- Index
- FCC statement
- Federal Communication Commission Interference Statement
- Declaration of Conformity
- IMPORTANT NOTE:
- FCC Radiation Exposure Statement:
- IC
- Industry of Canada statement
- Caution:
- (With DFS band)
- Radiation Exposure Statement:
- Canadian Department of Communications Compliance Statement (for Canada)
- CE statement
- Europe – EU Declaration of Conformity
- Safety Precautions and Maintenance
- Corresponding regions, corresponding countries of Wireless LAN Unit
- GPL/LGPL Software Licenses
- About Trademarks
- WEEE Mark (European Directive 2012/19/EC)
- Within the European Union
- Outside the European Union
- NOTE:
- Accessory
- ① LAN Port (RJ-45)
- ② Reset button
- ③ USB Port 1
- Indicator
- ⑤ Slot for the SD memory card
- ⑥ USB Port 2
- ⑦ Indicator
- Connections
- Installation
- Remove the two screws on the optional slot of slot 2 type to remove the optional slot cover.
- Attach this product to a display or projector.
- Securely fasten this product with the screws on the optional slot. (tightening torque 49.0N cm - 68.6N cm)
- Installation of protector for wireless LAN unit
- Installation of protector for SD memory card
- Installation of adapter for wireless LAN unit
- Basic Operation
- Preparations
- Display remote control
- Dedicated remote control for the projector
- ① NUMBER button, PLAY button
- ② MENU button
- ③ UP button ( ▲ )
- ④ DOWN button (▼)
- ⑤ LEFT button (◀)
- ⑥ RIGHT button ( ▶ )
- ⑦ SET button
- ⑧ EXIT button
- Operations and settings of the display and projector
- For displays
- For projectors
- Product Operations
- Selection of Functions
- Setting the display language
- Screen Saver
- Wireless Display
- Connection Method
- How to adjust the size of the computer image displayed in the display/projector
- Media Player
- 2-1. Overview
- Two playback modes
- Auto play mode:
- Manual play mode:
- Playback Settings
- Playback Operation
- SD contents update function
- Audio Selection
- Example on playback of contents
- 2-2. Operating flow of media player function
- Preparation of contents
- Settings
- Select the media
- Selection of folders
- Selection of video and still images
- Selection of audio
- Playback
- 2-3. Preparation of Contents
- 2-4. Settings
- 2-5. Selection, playback of contents
- Select the video and still image files to be displayed.
- Select the audio files.
- Playback of contents
- Example) When 12/25 is displayed, it means that:
- Settings
- 3-1. Overview
- Password Setting
- How to change settings
- How to operating the software keyboard
- 3-2. About
- 3-3. Application
- 3-3-1. Intel® WiDi Settings
- 3-3-2. Media Player settings
- 3-4. General
- 3-5. System
- 3-5-1. Security
- Password for setting menu
- [Setting Method]
- Drive ID
- 3-5-2. Initialization
- [Operating Method]
- 3-5-3. Firmware Update
- [Operating Method 1]
- [Operating Method 2]
- 3-5-4. Reset
- Compatible formats of the media player
Brand : NEC
Model : SB-06WC
Category : Wireless media player