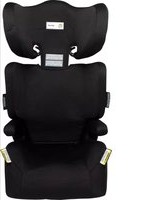
Transit - Car seat InfaSecure - Free user manual and instructions
Find the device manual for free Transit InfaSecure in PDF.


| Product Type | Car Seat |
| Brand | InfaSecure |
| Model | Transit |
| Overall Dimensions (H x W x D) | 60 cm x 40 cm x 40 cm |
| Weight | 5 kg |
| Installation Method | Seat belt secured or ISOFIX compatible |
| Orientation | Forward-facing or rearward-facing (convertible) |
| Child Weight Range | 0-18 kg (approx.) |
| Child Height Range | 40-100 cm (approx.) |
| Harness Type | 5-point harness with adjustable straps |
| Recline Positions | Multiple recline positions for comfort |
| Headrest Adjustment | Adjustable headrest height |
| Safety Certification | ECE R44/04 or UN R129 (i-Size) compliant |
| Side Impact Protection | Integrated side impact protection system |
| Cover Material | Machine washable fabric |
| Maintenance | Hand wash cover with mild soap, air dry; wipe plastic parts with damp cloth |
| Spare Parts | Harness straps, crotch buckle, cover available from manufacturer |
| Warranty | 2 years against manufacturing defects |
| Country of Origin | Australia |
Frequently Asked Questions - Transit InfaSecure
User questions about Transit InfaSecure
0 question about this device. Answer the ones you know or ask your own.
Ask a new question about this device
Download the instructions for your Car seat in PDF format for free! Find your manual Transit - InfaSecure and take your electronic device back in hand. On this page are published all the documents necessary for the use of your device. Transit by InfaSecure.
USER MANUAL Transit InfaSecure
natural_image
Child sitting in a car seat with a blue shirt and black seatbelt, no visible text or symbols
natural_image
Child wearing a red shirt and green seatbelt, seated in a car seat (no visible text or symbols)FORWARD FACING
(Forward Facing) Suitable for children from approximately 4 years to 8 years* of age.
Instruction Manual
IMPORTANT: KEEP THIS BOOKLET IN THE PLACE PROVIDED ON THE CHILD RESTRAINT
*All references to age are approximates only and reference to children of average proportions. Children vary in shapes and sizes. The photo displayed is indicative of the type of restraint and may vary slightly depending on the model.
Certified Product

Australian Standard
AS/NZS: 1754-2013 Licence No. 25324-1 SAI Global
Contents
Contents 1
Information 2
Warnings 3
Restraint Guide 5
Booster Seat
Information 6
Shoulder Height Marker 7
CS5413 Child Restraints (Itemised list) 9
Next Restraint 10
Set Up - Adjusting Headrest 11
Installation - Installation in Vehicle 11
Use - Using Lap-sash Seatbelt 13 - To Release Child 16
Care of Restraint - Care and Maintenance 17 - Cleaning 18
Extension Straps 18
Accessories 19
Anchorage Fittings 20
Insurers Information 22
Lifetime Warranty 26
Please read carefully the whole of the instructions for installation and, in the event of doubt about the method of installation, to consult InfaSecure or agent, or a child restraint fitter, or in New Zealand, to consult the agent for the vehicle.
Information
This instruction manual covers various models under the Model number CS5413 SERIES II. This Booster Seat is designed to be used by children from approximately 4 years of age up to approximately 8 years of age. This booster seat is installed in the rear of the car, forward-facing using the vehicle seatbelts & top tether strap.
Air Cocoon Technology™ - A Protective Embrace
Air Cocoon Technology™ (A.C.T.) enhances protection by dramatically reducing the impact forces during a crash. A.C.T. utilises a layer of air held inside the entirety of the child restraint shell, offering an increased level of protection across the entire surface area of the restraint. Your child is quite literally cradled in a cocoon of air, offering a true 180 degrees of protection to your child's vital organs.
Air Cocoon Technology™ integrated child restraints start their life as an actual pillow of air. This pillow is moulded into a child restraint, retaining the pillow-like construction while adding incredible strength and structural integrity. This manufacturing process is called blow-moulding.
Air Cocoon Technology™ (A.C.T.) is an all encompassing protective 'cocoon' around your child.
Child Restraints
No child restraint can guarantee absolute protection from injury in every crash. However, to ensure that your child gets all the protection designed into the restraint please read and follow the instructions exactly and use only InfaSecure recommended parts and accessories.
Family Bussiness
InfaSecure is an Australian owned and operated family business, which can trace it's roots back over 60 years, becoming the single largest Australian owned and operated child restraint company in the country. Today, we are still growing, continuing to innovate and provide high quality products at an affordable price.


WARNINGS
- Use the restraint exactly as shown in the instructions.
• Supervision of children is needed because they may be able to undo buckles.
• DO NOT LEAVE CHILDREN UNATTENDED IN THE CAR. - Do not alter or modify this restraint.
• Repairs must only be done by the manufacturers or agent. - Do not allow the restraint to come into contact with polishes, oils, bleach and other chemicals.
- Destroy the restraint if it has been in a severe crash, even if no damage is visible.
• DO NOT USE THIS RESTRAINT WITHOUT THE COVER. - Always secure the loose end of the top tether strap. Do not use the child restraint where this strap may fall into a split in the seat back or off the side of the seat.
• ALWAYS ATTACH HOOK AND REMOVE SLACK. - DO NOT USE WITH JUST A LAP BELT. You must use with a lap-sash belt.
- The lap part of the seat belt must be firmly across the thighs and the sash belt fitted diagonally across the chest and on the shoulder.

WARNINGS
- THIS RESTRAINT IS NOT SUITABLE FOR USE WHERE THE TOP TETHER STRAP MAY FALL INTO A SPLIT IN THE SEAT BACK OR OFF THE SIDE OF THE SEAT.
- THIS RESTRAINT MUST BE ATTACHED TO A CHILD RESTRAINT UPPER ANCHORAGE POINT IN THE CAR. REFER TO CAR OWNER'S HANDBOOK FOR LOCATION OF ANCHORAGE POINTS. REFER TO A CHILD RESTRAINT FITTING STATION IF NO ANCHORAGE POINTS ARE IN THE MOTOR CAR.
- Always secure the loose end of the top tether strap to prevent it hanging out of the car or being accessible by the child.
- Do not use the child restraint where this strap may fall into a split into the seat back or off the side of the seat.
- IF AN AIRBAG IS FITTED IN THE SEATING POSITION WHERE THE CHILD RESTRAINT IS TO BE FITTED, FOLLOW THE VEHICLE MANUFACTURER'S WARNINGS AND INSTRUCTIONS.

WARNING
DO NOT LEAVE CHILDREN UNATTENDED IN THE CAR.
Restraint Guide

heatmap
| MODE | BIRTH | Infant Seat (months) | Child Seat (months) | Booster Seat (months) | Seat Belt | Required BY LAW | |---|---|---|---|---|---|---| | REARWARD-FACING RESTRAINT (TYPE A1) BIRTH TO APPROX 6 MONTHS | 0 to 6 | 0 | 0 | 0 | 0 | 0 | | CONVERTIBLE CAR SEAT (TYPE A2/B) BIRTH TO 4 YEARS | FORWARD FACING | Approx 0 to 4 years | 0 | 0 | 0 | 0 | | CONVERTIBLE CAR SEAT (TYPE A4/B) BIRTH TO 4 YEARS | REARWARD FACING FORWARD FACING | Approx 0 to 4 years | 0 | 0 | 0 | 0 | | ZERO TO 8 CONVERTIBLE CAR SEAT (TYPE A1/B/E) BIRTH TO 8 YEARS | REARWARD FACING FORWARD FACING | BOOSTER SEAT | 0 | 0 | Approx 0 to 8 years | 0 | | FORWARD-FACING RESTRAINT (TYPE B) APPROX 6 MONTHS TO 4 YEARS | FORWARD FACING | Approx 6 months to 4 years | 0 | 0 | 0 | 0 | | FORWARD-FACING RESTRAINT (TYPE G) APPROX 6 MONTHS TO 8 YEARS | FORWARD FACING | Approx 6 months to 8 years | 0 | 0 | Approx 6 months to 8 years | 0 | | CONVERTIBLE BOOSTER SEAT (TYPE B/E) APPROX 6 MONTHS TO 8 YEARS | FORWARD FACING | BOOSTER SEAT | 0 | 0 | Approx 6 months to 8 years | 0 | | BOOSTER SEAT (TYPE E) FROM APPROX 4 YEARS TO 8 YEARS | Approx 4 years to 8 years | BOOSTER SEAT | 0 | LARGER BOOSTER SEAT | 0 | 0 | | BOOSTER SEAT (TYPE F) FROM APPROX 4 YEARS TO 10 YEARS | Approx 4 years to 10 years | BOOSTER SEAT | 0 | 0 | 0 | 0 | | SEAT BELT FROM APPROX 7 YEARS AND OVER | REQUIRED BY LAW | 7 + Allowable by law | 7 + Allowable by law | 7 + Allowable by law | 10 + More Appropriate | 10 + More Appropriate |IMPORTANT: Research has shown that the likelihood of an accessory child safety harness being used incorrectly is very high and the risk of injuries when incorrectly used is much higher compared to a lap-sash seat belt. InfaSecure recommend that an accessory child safety harness should only be used if a lap-only seat belt is all that is available.
Booster Seat (Forward Facing)
THE SUITABILITY OF THE CHILD RESTRAINT TO GROUPS OF CHILDREN
TYPE E
To be used with a lap-sash seatbelt by a child whose shoulders are above the lower shoulder height marker (approximately 4 years of age) until the child's shoulders reach the upper shoulder height marker (approximately 6 to 8 years of age).
Continue to use this booster seat until the child reaches this limit. Children are safest in a booster seat until their shoulders reach the upper shoulder height marker of the booster seat.
Do not use this booster seat until child's shoulders are above the lower shoulder height marker.
If the knees do not bend in front of the vehicle seat cushion continue to use a booster seat.
Just using a seatbelt is not recommended for children that have outgrown this seat. Use a larger booster seat.
THIS RESTRAINT MUST BE USED IN CARS WITH FORWARD-FACING SEATS WITH A LAP-SASH SEATBELT. THIS BOOSTER SEAT IS NOT SUITABLE FOR USE WITH A CHILD HARNESS.
The use of child restraints in the front seat may be restricted for children of specific ages by local legislation. Please check with your local Department of Transport for the specific seating locations of children using child restraints for their given ages.

IMPORTANT
- For a vehicle without a fixed parcel shelf an extension strap(s) may be needed. If so ring (02) 4728 8080 for nearest supply location.
- Seatbelt extenders are not recommended to be used if the seatbelt is not long enough to secure the child restraint. If seatbelts are too short then advice should be sought from a child restraint fitter and their recommendation be considered before using a seatbelt extender.

IMPORTANT
This child restraint is not approved for use with any connectors that connect to the low anchorages.
Shoulder Height Markers
Smaller Child
Shoulder height markers are provided on this restraint for a visual indication that the child is safe to travel in this restraint.
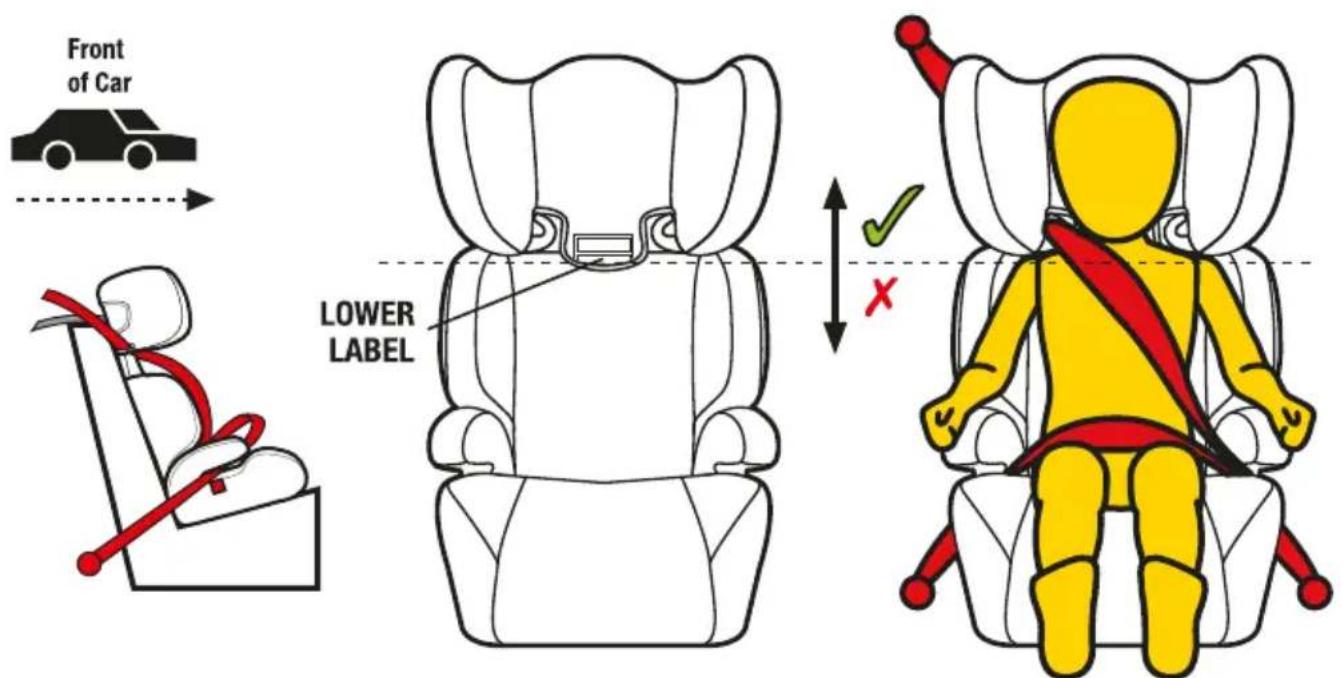
Smaller Child from approximately 4 years of age
Do not use this booster seat if the child's shoulders are below the lower shoulder height marker, (Lower label)


IMPORTANT
If moving a child from forward facing child restraint with an inbuilt harness, the child's shoulders will need to be inline or above the lower label with the headrest in the lowest position. If the child's shoulders are below the lower label with the headrest in the lowest position the child should continue to use the forward facing child restraint with an inbuilt harness
Shoulder Height Markers
Taller Child
Shoulder height markers are provided on this restraint for a visual indication that the child is safe to travel in this restraint.

Continue to use this booster seat until the child's shoulders reach the upper shoulder height marker, (Upper Label).
UPPER LABEL
SHOULDERS BELOW THIS LINE WHEN

HEADREST AT HIGHEST POSITION
SHOULDERS ABOVE THIS LINE WHEN
HEADREST AT LOWEST POSITION
If the child's shoulders reach the shoulder height markers, the child should move to the next type of restraint.
Model CS5413

- Adjustable Headrest
- Shoulder Height Markers
- SAFE GRIP Red Belt Clamp (if supplied)
- Vehicle Seat Belt
-
"BOOSTER SEAT BELT PATH" Marker (each side of restraint - coloured red)
-
Comfort Cover
-
Headrest
- Backrest
-
Seat Base
-
Top Tether Assembly
• Tether Strap
- Adjuster
- Attachment Clip
- Anchor Fitting + Attachment Hardware
Next Restraint
Next Type of Restraint
Refer to the 'RESTRAINT GUIDE' for the selection for the most appropriate next restraint (refer Page 5). When the child has outgrown the booster seat, then you can use either of the following;
- Vehicle Seat Belt – check the "Five Step Test" for suitability.
Five Step Test
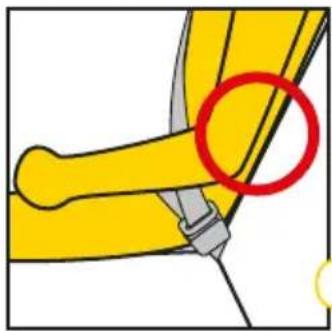
Step 1: Can the child sit with their back against the vehicle seat back? (refer Figure 1).
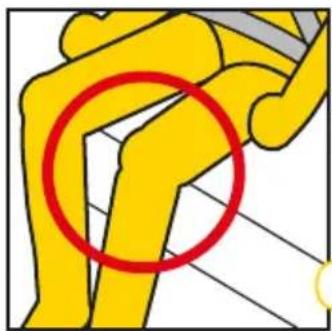
Step 2: Do the child's knees bend in front of the edge of the seat? (refer Figure 2).
Step 3: Does the sash (shoulder) belt sit across the middle of the shoulder, not on the neck or out near the arm? (refer Figure 3).
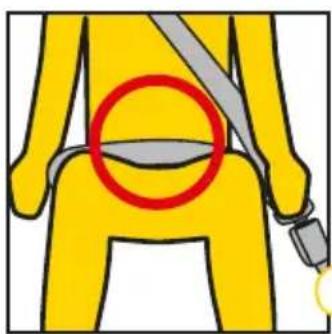
Step 4: Is the lap belt sitting low across the hips touching the thighs? (refer Figure 4).
Step 5: Can the child stay seated like this for the whole trip? (refer Figure 5).
natural_image
Illustration of a yellow mechanical joint with a red circle highlighting a specific area (no text or symbols present)Figure 1
natural_image
Illustration of a yellow human figure with a red circle highlighting the knee area (no text or symbols present)Figure 2

natural_image
Illustration of a person wearing a sword with a red circle highlighting the blade (no text or symbols)Figure 3
natural_image
Illustration of a person wearing a yellow safety harness with a red circle highlighting the seat area (no text or symbols)Figure 4

natural_image
Yellow silhouette of a seated person wearing a seatbelt and harness (no text or symbols)Figure 5
Set Up
Adjusting the Headrest
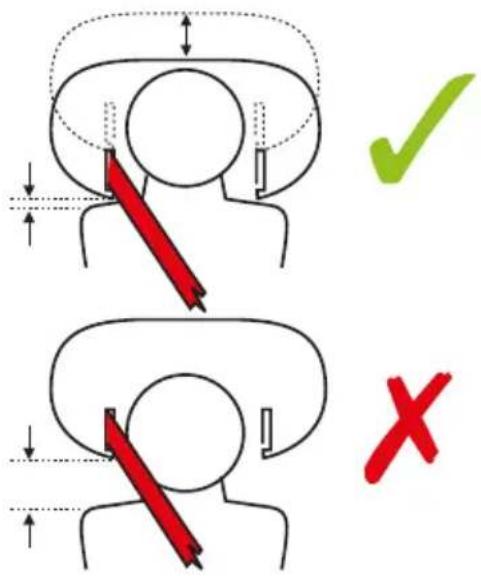
The headrest can be adjusted to different heights, to best suit your child's shoulder height. This can be done with the child in the seat.
Step 1: Grab the headrest, push or pull to move the headrest either up or down.
Step 2: Adjust the headrest height so that the bottom of the sash guide is located level with or just above the child's shoulder.

IMPORTANT
- For comfort ensure the bottom edges of the headrest are not contacting the child's shoulders.
Installation
Installing in Vehicle
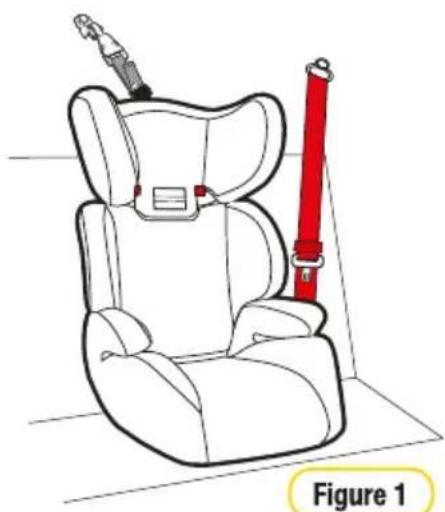
Step 1: Place the child restraint in the car, in a forward facing seating position (Refer the Figure 1).
Step 2: Install the upper anchorage fitting as shown on page 20 & 21 of these instructions.
Step 3: Hook the attachment clip to the anchor fitting. Ensure there are no twists in the upper anchorage strap (Refer to Figure 2).

WARNING
• DO NOT USE WITH JUST A LAP BELT. You must use a lap-sash seat belt.
natural_image
Line drawing of a car seat with a red safety belt attached, labeled Figure 1 (no text or symbols on the diagram itself)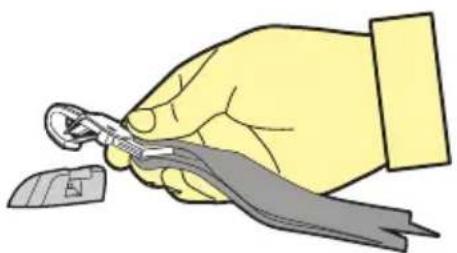
natural_image
Illustration of a hand holding a tool with a clip, no text or symbols presentFigure 2
Installation
Installing in Vehicle
Step 4: Pull to tighten and remove all the slack, from the top tether strap (refer to Figure 3).
Do not overtighten as this could cause the restraint to lift off the vehicle seat.
Step 5: Roll up the excess webbing from top tether strap and store in the pocket provided (refer Figure 4).

WARNING
• DO NOT USE WITH JUST A LAP BELT. You must use a lap-sash seat belt.
CAUTION: CHILDREN CAN BE INJURED OR RESTRAINTS AND TOP TETHER STRAP DAMAGED BY UNSECURED CARGO IN A COLLISION. SECURE OR REMOVE HAZARDOUS CARGO BEFORE USING THIS CHILD RESTRAINT.
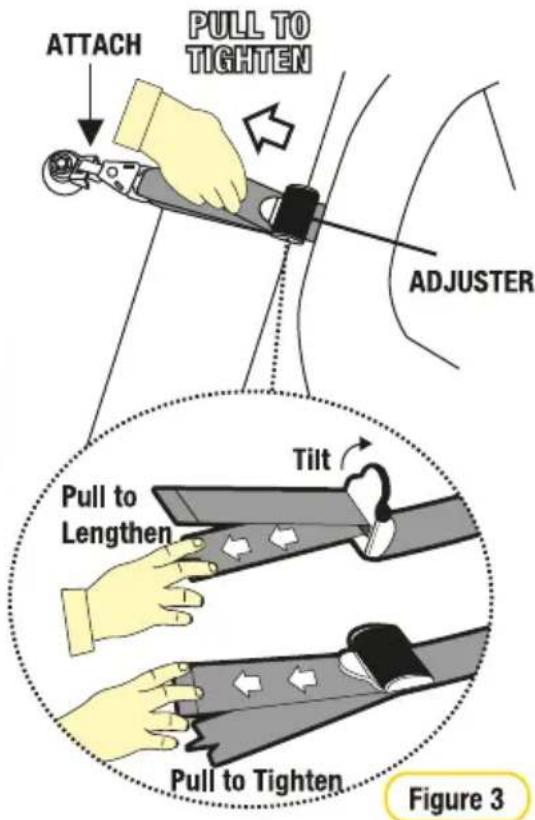

IMPORTANT
- Tighten till slack is removed.
- In certain vehicles an extension strap may be needed.
- Do not overtighten Top Tether strap.
- Ensure Top Tether strap is passed through the Top Tether Strap Guide.
• Always secure the loose end of the top tether strap to prevent it hanging out of the car or being accessible by the child.

Figure 4
Tether Storage
After correctly installing the restraint in your car, roll up and place any excess tether strap in the storage pocket provided (refer Figure 4).
Using lap-sash seat belt
Step 1: Ensure the restraint has been installed as per "INSTALLING IN VEHICLE" (refer Figure 1)
Step 2: Sit your child in the restraint with their back against the backrest adjust the headrest as described in setup to best suit your child (refer Figure 2).

IMPORTANT
Ensure that you use the BOOSTER BELT PATH identified by the following label.

Step 3: Position the lap section of the vehicle seat across the child's lap then insert the buckle tongue in to the belt buckle until you hear "CLICK". Ensuring the lap portion is positioned under the armrests and over the child's thighs (refer Figure 3).
The red "Booster Seat belt Path" labels are located each side of the Booster seat and on the head rest.
Step 4: Check the position of the headrest and adjust if needed (refer Page 9).
Step 5: Thread the sash belt through the sash guide on the bottom of the headrest.

IMPORTANT
Refer to shoulder height marker (As shown on pages 5 and 6).

Use
Using lap-sash seat belt
Step 6: Pull the lap belt tight by first pulling on the lap belt in the direction of arrow 1 (refer Figure 4). Pull the sash belt tight in the direction of arrow 2.

WARNING
• ALWAYS USE THE SASH GUIDE
Safe Grip (if supplied)
*Can be purchased separately visit http://store.infasecure.com.au/
SAFE GRIP BELT CLAMP
It is important that the lap belt must be firmly across the thighs. The Safe Grip locks the lap belt to ensure a firm fit across the thighs, and avoids slack in the lap belt. This fit ensures that the lap belt does not ride up into the soft abdominal region of the child, which may cause internal injury.

natural_image
Red illustration of a mechanical device with gears and levers (no text or symbols)To install the Safe Grip (red belt clamp);
Continue from Step 6: while holding the belts tight open the Safe Grip and clamp the "sash section" of the vehicle seat belt by closing the barrel section of the red belt clamp in the direction of arrow 3 (refer Figure 6) and then locking with the toggle section by pushing in the direction of arrow 4 (refer Figure 6) Note: Positioned as close as possible to the buckle and tongue. When the Safe Grip (red belt clamp) is secured in place, the lap section is now tightly holding your child in place, independent of the sash section.
The Safe Grip (red belt clamp) can be left located on the sash belt when the child is removed from the booster. It is then ready for the next use. Repositioning of the Safe Grip (red belt clamp) may be required as the child grows. The Safe Grip (red belt clamp) must be removed when the child restraint is not installed to allow other users to use the seat belt as a lap/sash seat belt. Always keep the Safe Grip (red belt clamp) in pocket provided when not in use.


NOTE: Do not place the Safe Grip (red belt clamp) around both the lap and sash sections of the belt. This could cause the Safe Grip (red belt clamp) to break.
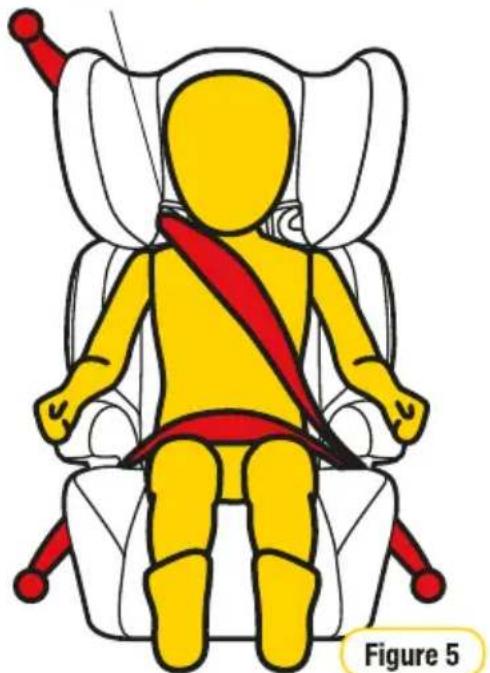
Using lap-sash seat belt
Step 5: Check the position of the headrest and adjust if needed (refer Page 9).
Step 6: Thread the sash belt through the sash guide on the bottom of the headrest.

WARNING
• DO NOT LEAVE CHILDREN UNATTENDED IN THE CAR
• ALWAYS USE THE SASH GUIDE
Sash Guide
natural_image
Illustration of a yellow car seat with red belt and red straps, labeled Figure 5 (no text or symbols on the diagram itself)Safety Warning

WARNING
Step 1: To release your child from the restraint simply press the belt buckle and carefully remove your child from the seat. It is not necessary to release the red belt clamp, to remove your child
Note: When the restraint is not in use, the seat belt should be fastened around it and engaged.


WARNING
• Always use lap-sash seat belt and upper anchorage strap to attach the child restraint to the vehicle.
- Do not use the restraint without the upper anchorage strap correctly attached and adjusted.
- Do not use on any vehicle seat which faces sideways or rearwards.
- IF AN AIRBAG IS FITTED IN THE SEATING POSITION WHERE THE CHILD RESTRAINT IS TO BE FITTED, FOLLOW THE VEHICLE MANUFACTURER'S WARNINGS AND INSTRUCTIONS.
• DO NOT USE WITH JUST A LAP BELT. You must use with a lap-sash seat belt
- Ensure the lap belt is correctly positioned on the child's thighs and hips.
- Do not place the seat belt sash under the arm or behind the back of the child.
Care of Restraint
The child restraint cover has been manufactured to meet the Australian Standards requirements for flammability and toxicity to ensure your child's safety. The cover has also been designed to provide your child with comfort and support.

-
Headrest Cover
-
Backrest Cover
-
Seatbase Cover
VERY IMPORTANT
Only replace the cover with a InfaSecure supplied replacement cover with identical shoulder height markers or a replacement cover meeting AS/NZS 8005.
Care and Maintenance
Regular care of the restraint will ensure safety of your child.
- Check the webbing for fraying.
- Check the upper anchorage attachment clip to ensure retainer clip is still present.
- Ensure there are no cracks in moulding or the plastic moulding.
- Check the buckles "click" when you engage tongues and is not sluggish or sticky in operation.
- Ensure the buckle is free of fluff, liquid, or other matter that may enter the buckle slots. Clean the buckle if it is sluggish to engage (refer Cleaning Harness Buckle Pages 23 & 24).
- Check the harness adjuster is operating and is clamping the webbing
- If any part of the restraint is cracked or broken, seek repair immediately or replace the child restraint.
Care of Restraint
Cleaning

IMPORTANT
Use only mild soap and water to clean all parts of the CS5413 Booster Seat.
Do not use chemicals or cleaning agents
Cold water only to be used and to be rinsed well
Do not dry clean or tumble dry
Do not bleach.
Covers
The restraint has a flame retardant cover which is removable for cleaning. Cleaning instructions are on the care label attached to the cover. If a fluffy cover is fitted, then washing the cover prior to use will remove excess fluff.
The cover has been designed to protect your child when seated in the restraint.
Care should be taken if children either eat or drink while in the restraint as some food or drink products may cause damage or marking to the cover. Wash or clean immediately. Do not pull sticky items from covers as the cover may be damaged - soak in water and gently remove.
Only machine wash on gentle cycle (hand washing is recommended). When washing the covers, ensure the hook and loop attachment strips are connected to eliminate other materials or garments being caught. Ensure that the hook and loop attachment strips are free of lint, this will ensure a positive engagement.
Seat
Use only mild soap and water to clean all webbing, metal and plastic parts of the restraint using a damp cloth. Do not use chemicals or cleaning agents.
Care and Maintenance
Regular care of the restraint will ensure safety of your child.
(A) Check the webbing for fraying.
(B) Check the upper anchorage attachment clip to ensure plastic retainer clip is still present.
(C) Ensure there are no cracks in the plastic moulding.
Extension Straps
If required contact infasecure for nearest supply location. Extension straps may be required in vehicle
without a fixed parcel shelf (not included in this package)
Products Codes
CS111 300mm Length
CS112 600mm Length
CS113 200mm - 900mm
Adjustable Length

LAP SASH BELT
Accessories
Follow the instructions covering the use of accessories provided with this child restraint or spare parts provided by InfaSecure for this restraint.
IMPORTANT
Use of unauthorised aftermarket accessories (i.e items not provided in this box with the child restraint), can reduce the safety provided by the child restraint and may cause injury or death.
SEAT PROTECTOR (if fitted)
The seat protector is designed to protect your car's seat.
STANDARD
Step 1: Position the front flap with pockets, at the front of the rear seat and position the mat rearwards to obtain a flat fit.
FULL LENGTH
Step 1: Position the front flap with pockets, at the front of the rear seat and position the mat rearwards to obtain a flat fit. (If required an additional flap has been provided to tuck in between the seat back & cushion)
Step 2: Position the back section up the seat back and use the plastic buckle & webbing strap to attach around the vehicle seat headrest (if the rear vehicle seat does not have a headrest then the strap could be used to attach around the child seats top tether after you have installed the child seat).

Anchorage Fittings
Some vehicles may have an anchor fitting already fitted by the vehicle manufacturer.
If no anchorage points can be found refer to the vehicle manufacturer, or an authorised child restraint fitting station for the best location of an anchorage point.
Refer to the vehicle owners handbook or child restraint fitting station for the possible use of spacers.
Some vehicles may require the use of additional extension straps (not supplied with this child restraint)
If so ring InfaSecure on (Aust) (02) 4728 8090 for nearest supply location.
ADDITIONAL EXTENSION STRAPS AVAILABLE:
CS111 300mm Extension strap
CS112 600mm Extension strap
CS113 200 - 900mm Adjustable Extension strap

WARNINGS
- Top tether strap and attachment clip must always be used
• Always ensure that the upper attachment clip is correctly engaged to the anchor fitting - THIS RESTRAINT MUST BE ATTACHED TO A CHILD RESTRAINT ANCHORAGE POINT IN THE CAR. REFER TO CAR OWNER'S HANDBOOK FOR LOCATION OF ANCHORAGE POINTS. REFER TO A CHILD RESTRAINT FITTING STATION IF NO CAR ANCHORAGE POINTS ARE IN THE MOTOR CAR.
- THIS RESTRAINT IS NOT SUITABLE FOR USE WHERE TOP TETHER STRAP MAY FALL INTO A SPLIT IN THE SEAT BACK OR OFF THE SIDE OF THE SEAT.
For cars fitted with a child restraint anchorage point
THIS RESTRAINT MUST BE ATTACHED TO A CHILD RESTRAINT ANCHORAGE POINT IN THE CAR.
LOCATE THE ANCHORAGE POINT BEHIND THE REAR SEATING POSITION
CONSULT THE CAR OWNER'S HANDBOOK FOR LOCATION OF ANCHORAGE POINTS.
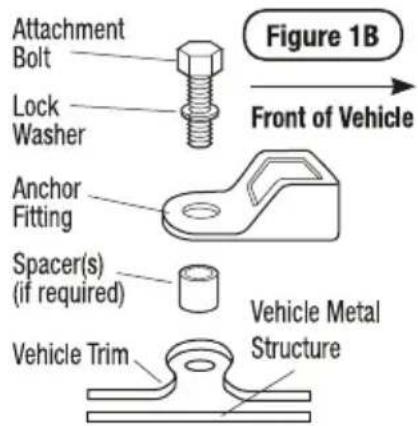
REMOVE THE THREAD PLUG FROM THE PARCEL SHELF/FLOOR/ROOF AND INSTALL THE ATTACHMENT BOLT AS SHOWN IN FIGURE 1A & 1B.
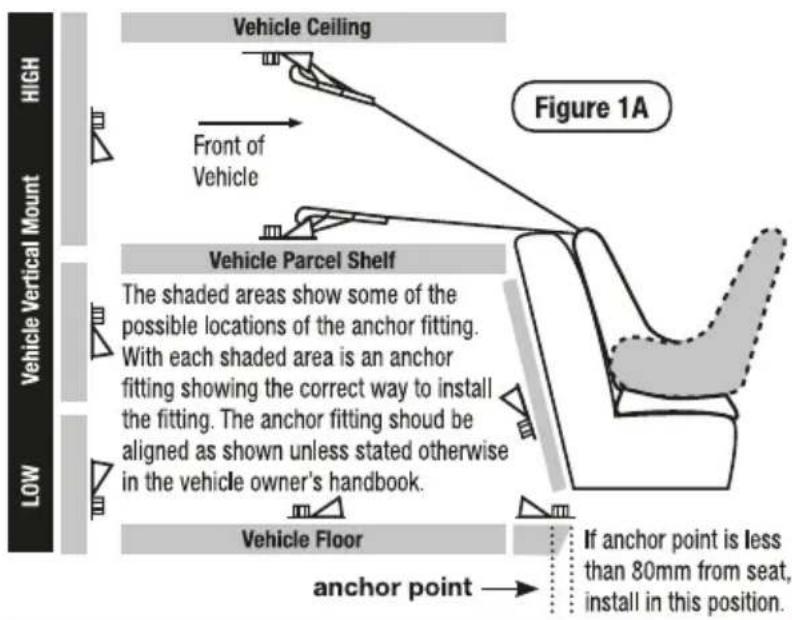
CAUTION: DO NOT OVERTIGHTEN ATTACHMENT BOLT. MAXIMUM TORQUE IS 20NM.
WARNING: If A.D.R. anchorage point is recessed, spacer(s) may be required. Spacer Part No's are as follows:
10mm - CCS001;
5mm - CCS002
UPPER ANCHORAGE FITTINGS
Anchorage Fittings
For cars not fitted with a child restraint anchorage point
For Sedans Only
Drill a 9mm diameter hole in the parcel shelf on the centre line of the seating position as shown in Figure 1C. Hole must be no closer than 200mm from the front of the back seat. Install the anchor bolt as shown in Figure 1D.
Note to Queensland purchases: The installation of anchorage points must be approved by authorised officers appointed by Queensland Transport. Authorised officers can be sourced from all Queensland Transport Customer Service and Queensland Ambulance Service Centres.
For Vehicles other than Sedans
In Australia, consult your nearest child restraint fitting station of traffic authority for vehicle inspection to find the best, correct position for the placement of the anchorage point, and for the correct attachment bolt length use of spacers.
In New Zealand consult the agent of the vehicle.

WARNINGS
CHILD RESTRAINTS MUST NOT BE ATTACHED TO UNSOUND METAL OR WOOD OR SYNTHETIC STRUCTURES. WHEN DRILLING THE 9MM HOLE DO NOT DRILL THROUGH FUEL LINES, FUEL TANKS, ELECTRICAL WIRING OR RADIO SPEAKERS. WEBBING STRAPS MUST BE PROTECTED FROM SHARP CORNERS AND EDGES.
THE ANCHOR FITTING MUST BE USED ONLY AS DESCRIBED ABOVE. IT MUST NOT BE HOOKED ONTO ANY OTHER OBJECT.
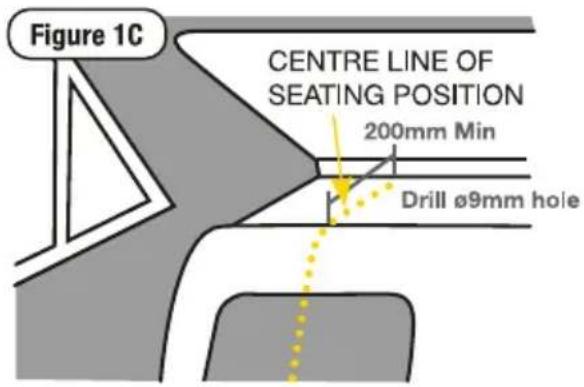
UPPER ANCHORAGE FITTINGS
FOR SEDANS ONLY

Insurers Information
If your restraint has been involved in a severe crash, you should destroy the restraint even if no damage is obvious. Some insurance companies offer vehicle insurance which covers or partially covers the replacement of your child restraint. Contact your insurance company for further details.
Your insurance company may require you to keep the child restraint for assessment, but do not use the child restraint after a severe crash. To assist you in making an accident insurance claim cut the following statement and include it with your claim.
NOTICE TO INSURANCE COMPANY CHILD RESTRAINT INVOLVED IN AN ACCIDENT
All InfaSecure child restraints are manufactured to Australian/New Zealand Standards AS/NZS1754 which requires us to advise users of child restraints to "Destroy the entire restraint if it has been in use in a severe crash, even if no damage is obvious".
The Australian/New Zealand Standards committee, advise that this statement applies whether a child was in the child restraint or not. We consider a "severe crash" as being one where the main body structure of the vehicle is distorted.
There is no method of determining if the restraint has been damaged and we concur with the Australian/New Zealand Standards in recommending destruction of the child restraint.
This notice is to advise you of the requirements of the Australian/New Zealand Standards and our obligation in complying with the standards.
Please assist the owner of this restraint in their claim.
INFASECURE PTY LTD ABN: 52 149 173 660
Head Office and Registered Address
110-114 Old Bathurst Rd, Emu Plains, NSW 2750
P.O. Box 487, Emu Plains, NSW 2750
Head Office
P: 02 4728 8000
F: 02 4728 8040
www.infasecure.com.au
Notes:
Notes:
Notes:
Register your product to receive lifetime warranty*, product updates and information.

Please visit infasecure.com.au/warranty-registration to register your product.
InfaSecure Warranty
InfaSecure Pty Ltd warrants this product for twelve months from the date of purchase against failure due to manufacturing faults or faulty materials. Misuse, accidental damages, normal wear and tear are not covered by this warranty.
When used for commercial use the period is limited to six months. "Our goods come with guarantees that cannot be excluded under the Australian Consumer Law. You are entitled to a replacement or refund for a major failure and for compensation for any other reasonably foreseeable loss or damage. You are also entitled to have the goods repaired or replaced if the goods fail to be of acceptable quality and the failure does not amount to a major failure."
Additional Warranty on Blow Moulded Child Restraints
Our blow moulded child restraints are covered against faulty materials and manufacturing when used under normal conditions and according to the instructions.
In the unlikely case that you do have a fault in relation to material quality or manufacturing that restricts your ability to use your Child Restraint normally, we will repair or replace the product within the following warranty periods from date of purchase:
• 12 month warranty for material and fabrics
• 2 year warranty for straps and webbing
- 5 year warranty for hardware and fittings
- Lifetime warranty* on the manufacturing of the seat moulding
Please read your instruction manual carefully before using any of our products.
The above express warranties do not apply where a failure or defect results from improper care, misuse or from normal wear and tear.
Refer to website for more details: www.infasecure.com.au

CHILD RESTRAINT SAFETY PARTNER

infasecure

We are proud to be working with The Wiggles. With their help, we are able to reach more young families with much needed information and advice to keep our little ones safe.

INFASECURE PTY LTD ABN: 52 149 173 660
Head Office and Registered Address
110-114 Old Bathurst Rd,Emu Plains,NSW 2750
P.O. Box 487, Emu Plains, NSW 2750
HEAD OFFICE
Phone No: +61 2 4728 8000
Fax No: +61 2 4728 8040
Email: admin@infa.com.au
CUSTOMER SERVICE
Phone No: +61 2 4728 8090
Fax No: +61 2 4728 8040
Email: service@infa.com.au
Australian
Standard
AS/NZS: 1754:2013
Licence No. 25324-1
SAI Global
- Instruction Manual
- IMPORTANT: KEEP THIS BOOKLET IN THE PLACE PROVIDED ON THE CHILD RESTRAINT
- Contents
- Booster Seat
- Information
- Air Cocoon Technology™ - A Protective Embrace
- Child Restraints
- Family Bussiness
- WARNINGS
- WARNING
- Restraint Guide
- Booster Seat (Forward Facing)
- THE SUITABILITY OF THE CHILD RESTRAINT TO GROUPS OF CHILDREN
- TYPE E
- IMPORTANT
- Shoulder Height Markers
- Smaller Child
- Taller Child
- SHOULDERS BELOW THIS LINE WHEN
- Model CS5413
- Next Restraint
- Next Type of Restraint
- Five Step Test
- Set Up
- Adjusting the Headrest
- Installation
- Installing in Vehicle
- Tether Storage
- Using lap-sash seat belt
- Use
- Safe Grip (if supplied)
- SAFE GRIP BELT CLAMP
- Safety Warning
- Care of Restraint
- VERY IMPORTANT
- Care and Maintenance
- Cleaning
- Covers
- Seat
- Extension Straps
- Accessories
- SEAT PROTECTOR (if fitted)
- STANDARD
- FULL LENGTH
- Anchorage Fittings
- For cars fitted with a child restraint anchorage point
- For cars not fitted with a child restraint anchorage point
- For Sedans Only
- For Vehicles other than Sedans
- Insurers Information
- NOTICE TO INSURANCE COMPANY CHILD RESTRAINT INVOLVED IN AN ACCIDENT
- Notes:
- InfaSecure Warranty
- Additional Warranty on Blow Moulded Child Restraints
Brand : InfaSecure
Model : Transit
Category : Car seat