GCV330 - Heating GoldAir - Free user manual and instructions
Find the device manual for free GCV330 GoldAir in PDF.


| Product Type | Fan Heater |
| Brand | GoldAir |
| Model | GCV330 |
| Power Output | 2000 W |
| Heating Area | Up to 25 m² |
| Heat Settings | 2 (Low/High) |
| Thermostat | Adjustable thermostat |
| Heating Element | PTC ceramic |
| Fan Speed | 1 speed |
| Oscillation | Yes, 70° |
| Safety Features | Overheat protection, tip-over switch |
| Control Type | Rotary knob |
| Noise Level | 45 dB |
| Dimensions (HxWxD) | 24 x 18 x 13 cm |
| Weight | 1.2 kg |
| Power Supply | 220-240 V, 50/60 Hz |
| Power Cord Length | 1.5 m |
| Material | Plastic housing |
| Certification | CE |
| Included Accessories | User manual |
Frequently Asked Questions - GCV330 GoldAir
User questions about GCV330 GoldAir
0 question about this device. Answer the ones you know or ask your own.
Ask a new question about this device
Download the instructions for your Heating in PDF format for free! Find your manual GCV330 - GoldAir and take your electronic device back in hand. On this page are published all the documents necessary for the use of your device. GCV330 by GoldAir.
USER MANUAL GCV330 GoldAir
Operating Instructions
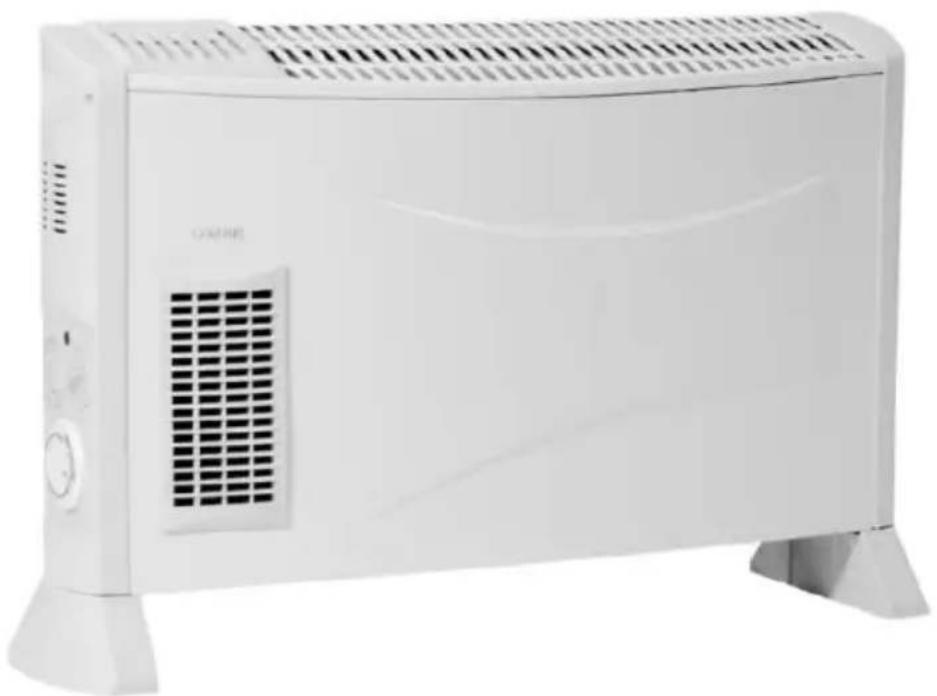
Convector Heater With Fan and Timer
natural_image
White electrical heater with ventilation grilles and a control panel (no visible text or symbols)General Care and Safety Guide
Thank you for choosing a Goldair Convector Heater. This Goldair Heater has been designed and manufactured to high standards of engineering and with proper use and care, as described in this leaflet, will give you years of useful service. Please read these instructions carefully.
- Use only the voltage specified on the rating label of the appliance.
- Keep all objects at least 1 metre from the front, sides and rear of the appliance. Do not place appliance close to radiant heat source.
- Do not operate in areas where petrol, paint or other flammable liquids are used or stored.
- Do not insert or allow foreign objects to enter any ventilation or exhaust opening, as this may cause an electric shock, fire or damage to the appliance. Do not sit on the appliance.
- Do not operate this appliance with a damaged cord, plug or after the appliance malfunctions or has been dropped or damaged in any manner. Return to a qualified electrical person for examination, electrical service or repair.
- This appliance is intended for household use only and not for commercial or industrial use.
- Use this appliance only as described in this manual. Any other use is not recommended by the manufacturer and may cause fire, electrical shock or injury.
- The common cause of overheating is deposits of dust or fluff in the appliance. Ensure these deposits are removed regularly by unplugging the appliance and vacuum cleaning the air vents and grills.
- Do not use abrasive cleaning products on this appliance. Clean with a damp cloth (not wet) rinsed in hot soapy water only. Always remove plug from the mains supply before cleaning.
- Do not connect the appliance to mains supply until completely assembled and adjusted.
- Switch off and use handles provided when moving.
- Do not operate with cord set coiled up as a heat build up is likely, which could be sufficient to become a hazard.
- It is recommended that this heater is plugged directly into the wall socket. Power boards are not rated to supply power to high wattage appliances.
- A correctly specified, undamaged extension cord may be used with this heater provided it is used in a safe manner.
-
Do not remove plug from power socket until the appliance has been switched off.
-
Do not remove plug from power socket by pulling cord; always grip plug.
- Always unplug appliance when not in use.
- Do not locate the heater directly below any power socket during operation.
- Do not twist, kink or wrap the cord around the appliance, as this may cause the insulation to weaken and split. Always ensure that all cord has been removed from any cord storage area and is unrolled before use.
- This appliance is not intended for use by persons (including children) with reduced physical, sensory or mental capabilities or lack of experience and knowledge, unless they are supervised or have been given instruction concerning the use of the appliance by a person responsible for their safety.
- Do not use this appliance in the immediate surrounds of a bath, a shower, or a swimming pool or other liquids. The appliance must not be immersed in any liquids.
- When the appliance has been unpacked, check if for transport damage and ensure all parts have been delivered. If parts are missing or the appliance has been damaged, contact the Goldair Customer Services Team.
- If your appliance does not work, or is not working properly, contact the place of purchase or the Goldair Customer Services Team. Repair work on the appliance by unqualified persons can cause serious risk to the user.
- There are no user serviceable parts installed in the unit.
- Do not place the unit in wardrobes or other enclosed spaces as this may cause fire hazards.
- This unit is not supposed to be used in or around locations where foodstuffs, works of art or delicate articles of science, etc are stored.
- Indoor use only.
- Children should be supervised to ensure that they do not play with the appliance.
- Ensure heater is on a flat, stable, heat-resistant surface.
- It is important that you do not cover this heater.
Operating your Convector Heater
Always choose a safe location for the heater, keeping in mind the safety precautions outlined. Ensure all packaging has been removed from the unit before use. This appliance requires no installation, it should be used solely as a portable appliance.
WARNING Keep all objects at least 1 metre from the front, sides and rear of the appliance.
PLEASE NOTE: As this product is fitted with a Timer, the Timer has been set to the "ON" position. Please refer to the Timer section for setting instructions.
ASSEMBLING YOUR HEATER
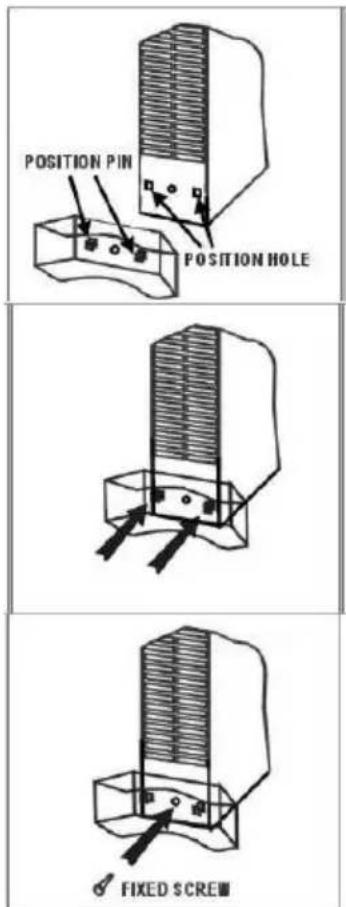
Before using the heater the feet (supplied separately in the carton), must be fitted to the unit. These are to be attached to the base of the heater by placing the lugs on the feet in the bottom ends of the heater side mouldings. The screw pack to attach the feet to your heater will be taped to either one of the feet for your heater, or taped to the plug head.
HEAT CONTROL SWITCH
The control switch positions are:
I+ - Low Heat with fan
II+ - High Heat with fan
0 -Off
I - Low Heat
II - High Heat
Check that the heat control switch is set to Off position before plugging the heater into the mains supply. For greater economy, use the High Heat setting initially and then switch to the Low Heat setting.
THERMOSTAT
Turn the thermostat knob clockwise until you reach the maximum temperature on the graduated scale. When the desired room temperature is reached, slowly turn the knob anticlockwise until the heater turns off (you will hear a click). The heater will now cycle on and off to maintain the set temperature.
SAFETY DEVICE
This appliance has two protection devices: The first device automatically disconnects & reconnects the appliance at a pre-set temperature.
The second safety device disconnects the appliance permanently in case of overheating, by means of a thermal fuse (it is non resettable).
IMPORTANT! NEVER COVER THIS HEATER
Do not use this heater with a programmer, remote-control system, separate timer or any other device that switches the heater on automatically.
Operating your Convector Heater
TIMER
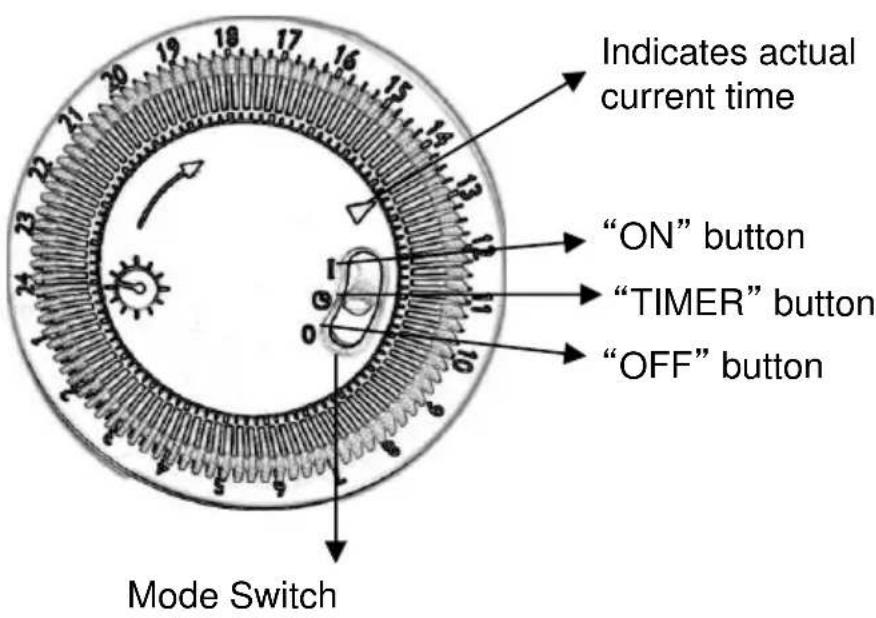
The heater will always be on when the slide switch is in the "I" position.
The heater will always be off when the slide switch is in the "O" position.
To set the Timer; set the MODE switch to the Timer position.
(This function can only be used once a heat level has been selected; see thermostat section).
You must set the time prior to programming the Timer. To do this; turn the outer dial of the timer in a clockwise direction until the time of the day (24-hour clock) corresponds with the triangular marking. Example if it is 2pm (1400 hours) then set the triangular mark in line with 14. One complete turn of the dial corresponds to 24 hours. There are 96 "riders", positioned around the dial, each rider represents 15 minutes.
Where all the "riders" are pushed to the outside of the timer the heater will be ON continuously. To set a specific time for example:
If you want the heater to be on from 6pm to 10pm, then set all the riders from 18 to 22 (1800 hours to 2200 hours) to the outside of the rim and all other riders to the inside of the timer. The unit will then turn on automatically at 6pm and off again at 10pm.
WARNING! Take care in positioning your heater, using the timer will mean the heater will come on automatically. Fire may result if placed next to combustible material.
CLEANING YOUR HEATER
The heater requires regular cleaning to ensure trouble free operation:
Unplug the heater from the mains supply before cleaning.
Ensure that the heater has been allowed to cool down completely before cleaning.
Use a damp cloth (not wet) to wipe the exterior of the heater to remove dust and dirt.
Use a vacuum cleaner to remove dust and fluff from around the grills.
Never use solutions such as benzene, thinners or polishing agents.
Ensure the heater is dry before plugging back into the mains supply.
Do not attempt to dismantle the heater. There are no user serviceable parts. For service or repair, contact an authorised electrical service technician.
CAUTION This heater generates heat during use. Proper precautions must be taken to prevent the risk of burns, scalds, fires or other damage to persons
PROOF OF PURCHASE
To receive warranty retain receipt as proof of purchase.
CDB GOLDAIR
Two Year Warranty
Thank you for purchasing this Goldair product. Your product is warranted against faults and manufacture when used in normal domestic use for a period of two years. In non-domestic use Goldair limits the voluntary warranty to three months.
Goldair undertake to repair or replace this product at no charge if found to be defective due to a manufacturing fault during the warranty period.
This warranty excludes damage caused by misuse, neglect, shipping accident, incorrect installation, or work carried out by anyone other than a qualified electrical service technician.
PLEASE KEEP YOUR RECEIPT AS THIS WILL HELP VERIFY YOUR WARRANTY.
The benefits given to you by this warranty are in addition to other rights and remedies available to you under law in relation to the goods or services to which this warranty relates.
In Australia, our goods come with guarantees that cannot be excluded under the Australian Consumer Law. You are entitled to a replacement or refund for a major failure and compensation for any other reasonably foreseeable loss or damage. You are also entitled to have the goods repaired or replaced if the goods fail to be of acceptable quality and the failure does not amount to a major failure.
In New Zealand this warranty is additional to the conditions and guarantees of the Consumers Guarantee Act (1993).
Goldair – New Zealand
CDB Goldair
PO Box 100-707
N.S.M.C
Auckland
Phone +64 (0)9 917 4000
Phone 0800 232 633
www.goldair.co.nz
Goldair – Australia
CDB Goldair Australia Pty
PO Box 574
South Morang
Victoria, 3752
Phone +61 (0)3 9336 4423
Phone 1300 GOLDAIR (1300 465 324)
www.goldair.com.au
Goldair Two Year Warranty (IMPORTANT: Please complete and retain this warranty card)
Name
Address
Place Of Purchase Date Of Purchase
Name Of Product Model Number
Attach a copy of the purchase receipt to this warranty card
- Operating Instructions
- Convector Heater With Fan and Timer
- General Care and Safety Guide
- Thank you for choosing a Goldair Convector Heater. This Goldair Heater has been designed and manufactured to high standards of engineering and with proper use and care, as described in this leaflet, will give you years of useful service. Please read these instructions carefully.
- Operating your Convector Heater
- ASSEMBLING YOUR HEATER
- THERMOSTAT
- SAFETY DEVICE
- IMPORTANT! NEVER COVER THIS HEATER
- TIMER
- CLEANING YOUR HEATER
- PROOF OF PURCHASE
- CDB GOLDAIR
- Two Year Warranty
Brand : GoldAir
Model : GCV330
Category : Heating