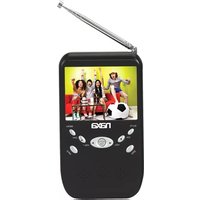
NT-301 - Television Naxa - Free user manual and instructions
Find the device manual for free NT-301 Naxa in PDF.


| Product Type | 3.5-inch Digital LCD Television with FM Radio and SD/MMC Card Slot |
| Display | 3.5" TFT LCD, 320 x 240 pixels, 70.08 x 52.56 mm visible area |
| Dimensions (L x W x D) | 146 x 84 x 25 mm |
| Weight | Approx. 206.6 g |
| Power Supply | AC adapter (DC 5V), rechargeable lithium battery (built-in) |
| Power Consumption | ≤ 7.5 W |
| Battery Charge Time | Approx. 4.5 hours (first charge: 12 hours) |
| Operating Temperature | -5°C to +45°C |
| FM Frequency Range | 87.5 - 108 MHz |
| Supported Media Formats | JPEG (slideshow), MP3/WMA (music), DAT/MPEG/AVI (video) |
| Card Slot | SD/MMC/MS card reader |
| TV System | Digital broadcasting reception (DVB-T) |
| EPG | Electronic Program Guide (when available) |
| Antenna | Built-in telescoping antenna |
| Audio Output | Built-in speaker, headphone jack (3.5mm) |
| Menu Languages | Multi-OSD (English and others) |
| Battery Type | Rechargeable lithium battery (replaceable) |
| Standby Mode | Yes, with sleep timer up to 240 min |
| Care Instructions | Wipe with dry soft cloth; mild soap solution if needed. Avoid alcohol, benzine, thinner. |
| Safety Features | Overheat protection, short-circuit protection, automatic power-off in FM radio |
Frequently Asked Questions - NT-301 Naxa
User questions about NT-301 Naxa
0 question about this device. Answer the ones you know or ask your own.
Ask a new question about this device
Download the instructions for your Television in PDF format for free! Find your manual NT-301 - Naxa and take your electronic device back in hand. On this page are published all the documents necessary for the use of your device. NT-301 by Naxa.
USER MANUAL NT-301 Naxa
3.5" Digital LCD Television With FM Radio And SD/MMC Card Slot
MODEL NO.:NT-301

natural_image
Front view of a black remote control device with control buttons and a display screen (no visible text or symbols)Instruction Manual

BEFORE USING THIS PRODUCT, READ, UNDERSTAND AND FOLLOW THESE INSTRUCTIONS. Save this booklet for future reference.
TABLE OF CONTENTS
GETTING STARTED:
IMPORTANT INSTRUCTION....2-3
FEATURES 4
ACCESSORIES 5
GENERAL PARTS....6
BASIC CONNECTION 7
INSTALL BATTERY....8
TELESCOPING ANTENNA....9
OPERATIONS:
MAIN MENU....10-24
SLIDESHOW....10
MUSIC....11
BROWSE....13-14
DTV....14-21
FM RADIO....22
SETTINGS....23-24
FOR REFERENCE:
TROUBLESHOOTING....25
MAINTENANCE....26
SPECIFICATIONS....26
MAINTENANCE
- Be sure to press POWER to set the player to the standby mode and disconnect the AC adaptor before maintaining the player.
● Wipe the player with a dry, soft cloth. - If the surfaces are extremely dirty, wipe clean with a cloth which has been dipped in a weak soap-and-water solution and wrung out thoroughly, and then wipe again with a dry cloth.
- Never use alcohol, benzine, thinner, cleaning fluid or other chemicals. And do not use compressed air to remove dust.
SPECIFICATIONS
- Earphone Output : ≤ 3mW
- Display device: Color TFT LCD
- Display Screen Size: 3.5 inches
4.Input Resistance : 75 Ω
5.Power Consumption: ≤7.5W
6.Resolution: 320 (H)*240 (V)
7.Dots Distance: 0.073(H) X 0.219(V)mm
8.Visible Range: 70.08(H) X52.56(V)mm
9.Power Source: AC adaptor (normal: DC 5V ---) - Operation Temperature : -5°C to +45°C.
11.FM Frequency Range:87.5\~108MHz - Measurement: 146(L) X 84(W) X25(D) mm
- Weight: Approx. 206.6g
Specifications are subject to change without notice.
GENERAL TROUBLESHOOTING
Check the following points before assuming malfunctions of the TV set:
| Phenomenon | Reasons |
| No picture&sound | Improper connection of AC adapter or the battery power is not enough. |
| No picture | TV reception channel is not right and try to reset the unit.Relocate the TV set to the place where reception is better or select the sound key. |
| No sound | Volume is too low, mute function is switched in.The headphone has been plugged in or the signal is too weak. |
| Poor reception | TV antenna is not correctly adjusted or TV channel is not right. |
| Dark or blurred picture | The bright & contrast is too low. The battery voltage is too low. |
| Unclear or unstable picture | TV antenna is not properly adjusted or in too weak signal reception area. |
| Picture moves up & down, blurs or folds over | TV antenna is not rightly adjusted.The signal reception is too weak or caused by signal reflection from the buildings nearby or mountains. |
| Interfered snow picture | The signal is interfered by car's engine, railway,high tension wires, neon signs or radio frequency. |
| No color | Color or color system is not set properly. |
| FM has no sound | Insert the earphone in the phone jack |
IMPORTANT INSTRUCTIONS
SAFETY INSTRUCTIONS
WARNING -- To reduce the risk of fire, electric shock, or serious personal injury:
- Do not use this product near water; e.g. near a bathtub, washbowl, kitchen sink, laundry tub, in a wet basement, near a swimming pool, or the like.
- Situate this product away from heat sources such as radiators, heat registers, stoves, or other appliances (including amplifiers) that produce heat.
- Operate the product only with the supplied power adapter. Route power cords so they are not likely to be walked on or pinched by items placed upon or against them, paying particular attention to cords at plugs, convenience receptacles, and the point where they exit from the product.
- Clean the product only as recommended by the manufacturer (see the "Maintenance" section for details). Unplug the power cord from the wall outlet before cleaning.
●Unplug the power cord from the wall outlet when left unused for an extended period.
●Take care that objects do not fall and liquids are not spilled into the product case through product openings. - Do not operate this product under the following conditions:
-When the power-supply cord or plug is damaged.
-If liquid has been spilled into or objects have fallen into the product.
-If the product has been exposed to rain or water.
-If the product does not operate when used according to the operating instructions.
-If the product has been dropped or damaged in any way.
- Do not attempt to service the product; take it to the electronics repair shop of your choice for any servicing or repair.
- Do not overload wall outlets, extension cords, or integral convenience receptacles.
CAUTION-- To reduce the risk of personal injury or product/property damage:
- This product is intended solely for non-commercial, non-industrial, personal use as a portable television. Do not use this product for any other purpose.
- Do not subject the product to violent shocks, extreme temperatures, or lengthy periods of direct sunlight.
- Keep the product away from magnetic objects, motors, and transformers.
- Do not use outdoors in inclement weather.
- Do not wall or ceiling-mount this product.
- Do not remove the protective wrapping from the Rechargeable Battery Pack.
- Do not use the TV while driving; this is dangerous and is illegal in some areas.
Battery Handling and Usage:
- Keep batteries away from children and pets. Only adults should handle batteries. Do not allow a child to handle this product unless the Battery Compartment Cover is securely attached to the Battery Compartment in accordance with all product usage instructions.
- Never throw batteries into a fire or expose them to fire or other heat sources.
- Follow the battery manufacturer's safety and usage instructions.
7.5 SET FM RADIO
7.5.1 FM Light Auto Off
This item is used for setting the screen of unit automatically power off time when playing FM radio.
Press UP/DOWN button to select and use AUTO/OK button to confirm.
-Option: Off/10 Seconds/20 Seconds/30 Seconds.
NOTE: When the set time elapses, the screen will power down and will reactivate when any button is pressed.
INFO7.6
This item is display the information about the unit.
7.7 RESET
This item is used to restore original factory settings. Press AUTO/OK or RIGHT button to enter.
Then press LEFT or RIGHT button to select YES or NO.
-YES:is to restore original factory settings
-NO:is to cancel.

7.MAIN MENU-SETTINGS
-Press LEFT/RIGHT button to select SETTINGS item, then press AUTO/OK button to confirm, the screen will display as following:

-Press UP/DOWN button to select submenus, then press AUTO/OK or RIGHT button to enter the submenu. Press UP/DOWN button to select the desired option and press AUTO/OK button to confirm. -Press LEFT or MENU button to return to a previous menu
7.1 LANGUAGE
This item is for setting the menu language. There are multi OSD languages: English and other languages. You can choose it as desired.
7.2 SET COLOR
7.2.1 Set Contrast
This item is used for adjusting the level of TFT Contrast. The level can be adjusted from 0 to 100.
7.2.2 Set Brightness
This item is used for adjusting the level of TFT Brightness. The level can be adjusted from 0 to 100.
7.2.3 Set Saturation
This item is used for adjusting the level of TFT Saturation. The level can be adjusted from 0 to 100.
7.3 SET MENU
7.3.1 Menu Rise Effect
This item is used for setting the menu rise effect, you can choose: Straight style and Whirl style.
7.3.2 Menu View
This item is used for setting the menu view mode, you can choose: Looking Straight, Over Looking and
Looking up.
7.4 SET SLIDESHOW
7.4.1 Transition Effect
This item is used for setting the picture slideshow transition effect, you can choose what you like.
7.4.2 Fit to Display
This item is used for setting the picture display mode, you can choose: Fit To Short, Fit To Long and
Fit To Both
7.4.3 Duration
This item is used for setting the picture slideshow duration time, you can choose: Fast(1 Sec).
Normal(10 Sec) and Slow (100 Sec).
FEATURES
3.5" TFT DISPLAY
This player has a built-in 3.5" TFT display window, to provide clear vision, and low radiation.
AUTO TV SCANNING FUNCTION
WITH RECHARGEABLE LITHIUM BATTERY
MEMORY FUNCTION
DIGITAL BROADCASTING RECEPTION
SUPPORTING CURRENT DAYS ELECTRIC PROGRAM GUIDE
MULTI-SUBTITLES FUNCTION(OSD)
Subtitles may be displayed in one of a multi-language depending on the software.
GUIDE DISPLAY LETS OPERATION MORE EASILY
BUILT-IN STAND HOLDER
SUPPORT FM RADIO FUNCTION
SUPPORT SD/MMC/MS CARD READER
ACCESSORIES


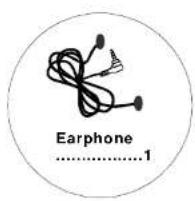

All the pictures in the instruction manual are just for your reference, specification should refer to actual accessories.
6.MAIN MENU-FM RADIO
Note: Before entering into the FM RADIO, please insert the earphone to the phone jack first. ("Please Insert Earphone" will appear on the LCD screen until insert the earphone in the phone jack.) When using the earphone, do not sell the volume too loud, that may damage your ear. You must scan channel before the first using, or there is no channel play. The screen will shut off after a certain time (it depends on the setup of SET FM RADIO in SETTINGS) of inactivity to help conserve battery power and will reactivate when any button is pressed.
When in main menu page, press LEFT or RIGHT button to select FM RADIO item and press AUTO/OK button to enter, then screen will display as follows: (You can also press SWITCH button to select the unit in FM RADIO mode)

Press CH-/▼ or CH+/▲ button to select the desired item and press AUTO/OK button to confirm.
- LEFT WINDOW-To store your favorite channels.
- RIGHT WINDOW-In playing mode, it will display the FM frequency. And in auto search channels mode, it will display the channel list that the channels are searched.
- Button-Auto search the backward channel.
-
- Button-Decreases FM frequency by 0.1 MHz with each press.
-
- Button-Increases FM frequency by 0.1 MHz with each press.
- Button-Auto search the forward channel.
- Volume button-To adjust the volume level. Use LEFT/RIGHT button to select this item, press AUTO/OK enter into this item, then press LEFT/RIGHT button to adjust the level and press AUTO/OK button to confirm your operation.
- Button-Press this button to update the favorite channel list.
- Button-Press this button to automatically search all the channels, the searched channels will display in the right window.
-Press AUTO/OK to select show or hide the program. -Press MENU to exit this page.
Channel NO
It is used to swap settings between two channels
-Press up or down button to select it.
-Press the left button to swap the current channel number with the previous channel's.
-Press the right button to swap the current channel number with the next channel's.
Channel Label
-It is used to set the channel label as desired.
-Press up or down button to select and press AUTO/OK to enter:
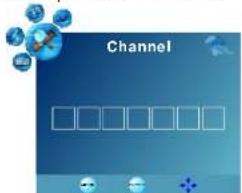
-Press up or down button to input symbol or letter as desired.
-Press left or right button to enter the previous or next item.
- Then the label will display on the screen under channel number.
DTV Signal
-It is used to display the intensity of the digital TV signal.
GENERAL PARTS
MAIN UNIT
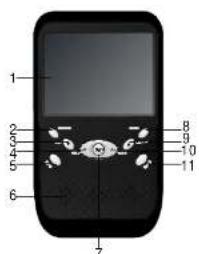

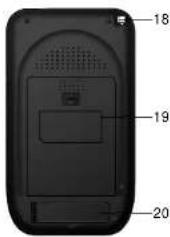
1.TFT DISPLAY WINDOW
2.SWITCH Button-Press this button to switch the unit in MAIN MENU page.FM Radio or DTV mode.
3.CH-/▼Button-To select previous channel or move down.
4.VOL-/◀Button-To adjust the volume lower or move left.
5.EPG Button-Accesses an Enhanced Program Guide (EPG) if one is available in your area(only for DTV)
6.Built-in speaker
-
AUTO/OK Button-To enter into the auto scan menu(for DTV) or confirm a selection.
-
MENU Button-In DTV mode, press this button to enter DTV menu setting page.
9.CH+/▲ Button-To select next channel or move up
10.VOL+Button-To adjust the volume louder or move right
11.INFO Button-To display current program information(only for DTV).
12.SD/MMC/MS card slot
-
Phone Jack-Connect to headphone for private listening.
-
POWER Button-Press this button to power on the unit; press and hold this button to
power off the unit.
15.DC 5V IN
- Power indicator/Charge indicator
17.Stran hole
-
Built-in telescoping antenna
-
Battery cover
-
Stand holder
Note: if the TV won't turn on, it may be low battery of the unit, in this situation, please charge the battery immediately.
BASIC CONNECTION
- Ensure all the cables are disconnected from the main unit before connecting to AC power source by AC power adaptor.
- Read through the instructions before connecting other equipment.
CONNECTING TO AC POWER SOURCE
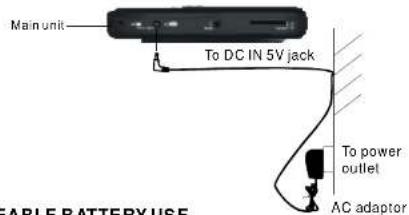
RECHARGEABLE BATTERY USE
This player with a chargeable Lithium battery.
- Charge the battery
Connect the adaptor to the DC 5V IN jack, the unit in ON mode (THE PLAYING MODE) for fully charge.
Or you can set in the POWER OFF mode for fully charge.
And the red charge indicator light will illuminate; When the battery is fully charged, the indicator light will dim if the TV is in power OFF mode or turn green if the TV is in power ON mode.
2.Time to recharge the battery
Charge the built-in battery pack 12 hours before using the TV for the first time.
Recharge and playback time depends on battery pack capacity and the temperature condition. Generally speaking, the battery needs to be charged about 4.5 hours.
3. Using and Maintaining Rechargeable Battery
The normal working condition temperature is: 0 \~45°C
Always unplug AC/DC power supply for the unit whenever not playing.
NOTÉ:
A new battery pack which has not been used or one which has not been used for more than a month, may appear to not recharged enough. This is due to the characteristic of this battery and is not a malfunction. In this case, recharge it two or three times before the first use and it needs more than 12 hours to recharge battery.
Noises may be generated during recharging. In this case, use a more distant power socket.

5.CHANNEL
Press left or right button to enter this page:
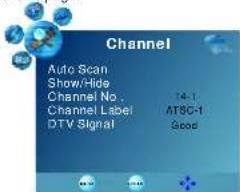
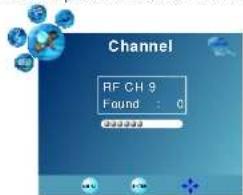
Auto Scan
Before normal watching you must search effective channel first.
-Press up or down button to select it and press AUTO/OK or RIGHT button to get in.
Show/Hide
It is used to show or hide the channel.
-Press up or down button to select it and press AUTO/OK to show/hide page:

Closed Caption
It is used to set the caption mode.
-Press up or down button to select it and press AUTO/OK button to get in setting page:

CC Mode-Press up or down button to select it and press left or right button to set the caption mode as CC Off/CC On/CC On Mute.
Basic Selection-Press up or down button to select it and press left or right button to set as desired.
Advanced Selection-Press up or down button to select it and press left or right button to set as desired.
Option-In this submenu, you can set items as desired.
Restore Default
- It is used to reset to factory settings.
-Press up or down button to select it and press AUTO/OK or RIGHT button to confirm, then the screen displays as below:

-Press left or right button to select YES or NO, and then press AUTO/OK button to confirm.
Return to MM
- It is used to return to MAIN MENU page.
- Press up or down button to select it and press AUTO/OK or RIGHT button to confirm.
Do not recharge or discharge battery near a heating element such as a heater or direct sunlight. When battery strength becomes low, the low battery icon will blink in the lower right corner of the LCD screen(As the picture of follows:)

Low battery icon
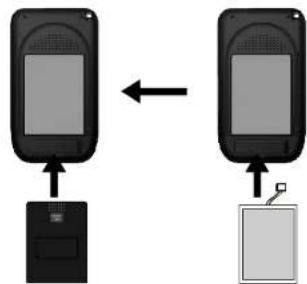
INSTALL BATTERY
flowchart
graph TD
    A["Device 1"] <--> B["Device 2"]
    C["Device 3"] <--> D["Device 4"]
BATTERY COVER
INSTALL THE BATTERY AS FOLLOWS:
-
Push the cover to open it.
-
Put the lithium battery in the flute.
-
Close the cover.
Note:
Before install the battery, please push the POWER button to turn the unit OFF. Make sure all the connectors are unconnected. When closing the cover, you should aim at the slot accurately.
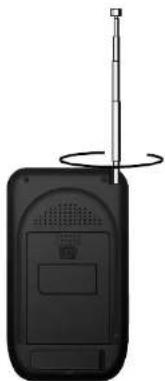
TELESCOPING ANTENNA USE
natural_image
Black flip phone with a vertical antenna and circular base, no visible text or symbols- Extend the Telescoping Antenna to its full length.
- Rotate the Telescoping Antenna securely clockwise or counter clockwise direction as the picture shown.
NOTICE: Take care when closing the Telescoping Antenna to avoid damaging the sections.
Time Zone
- Press up or down button to select it and press left or right button to set the time zone according to the zone that you are in.
-Options: Eastern/ Central/ Mountain/ Pacific/ Alaska/ Hawaii/ Atlantic
DST
It is used to set daylight saving time(summer time)
Press up or down button to select it and press left or right button to switch this function on or off.
Time Format
It is used to set the time format of clock.
-Option:12-hour/24-hour
Clock
Shows date and time as broadcast by some TV stations (this option is not user adjustable)

4. SETUP
Press left or right button to enter this page:
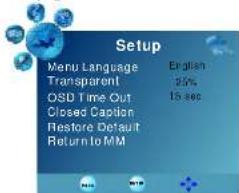
Menu Language
- Press up or down button to select it and press left or right button to change the menu language. - Options: English or other languages. It depends on the software.
Transparent
It is used to change the menu transparency.
-Option:0%/25%/50%/75%/100%
OSD Time Out
Select it and press left or right button to set the OSD display time as 5/15/30/45/60 Seconds.

2. AUDIO
Press left or right button to enter audio setup page:

Audio language
Press up or down button to select it, then press left or right button to change the language what you want. In this unit, you can select English or other languages.
Balance
-The Balance can be adjusted from 0 to 100.

3.TIME
Press left or right button to enter time setup page:

Sleep Timer
-Select it and press left or right button to switch the timer function off or set different sleep time. -The sleep time can be set as 5:1015/30/45/60/90/120/180/240 Min. By pressing left or right button. (The TV will be in standby mode automatically in a period of time you set. And when the time left is less than 1 minute, there will spring a dialog window to show count down and remind you.)
59 sec. TO POWER OFF
MAKE SURE ALL THE EQUIPMENTS AND AC ADAPTOR ARE CONNECTED PROPERLY AND THE UNIT IS SET IN CORRECT MODE BEFORE KINDS OF OPERATIONS.
OPERATIONS
ON/OFF
-Press POWER button to turn on the unit.
-Press POWER button and hold this button to turn off the unit.

Turn on the unit then you can select desired function to get in, there are seven functions consist of Slideshow, DTV, FM Radio, Settings, Browse, Video and Music. (Note: If there is no card in the unit, the Slideshow, Browse, Video and Music have no function.) Press UP/DOWN button to switch the main menu display style. You can press LEFT/RIGHT button to select your favorite function, then press AUTO/OK button to go into it. And you can press MENU button to return to previous menu page.
Press SWITCH button to select the unit in MAIN MENU page, DTV or FM radio mode.
1.MAIN MENU-SLIDESHOW
Insert card(SD/MMC/MS) into the card slot, then select the SLIDESHOW item in the main menu, press AUTO/OK button to confirm. Then press navigation buttons to select desired file and press AUTO/OK button to confirm.
The media format which unit support consists of:
| Content | file format |
| Slideshow | JPEG |
| Music | MP3/WMA |
| Video | DAT/MPEG/AVI |
SLIDESHOW

-In the SLIDESHOW item, it supports play picture and background music synchronously.
-Press MENU button the screen will display as shown(left picture): Press VOL-/VOL+ button to select and press AUTO/OK button to confirm. 1.To exit the slideshow item and return to MAIN MENU page. 2.To display the information of picture you select.
-Press LEFT/RIGHT button to select file as you desired and press AUTO/OK button to slideshow pictures. Press UP/DOWN button to select slideshow mode as desired; press LEFT/RIGHT button to play the previous or next picture.
-When playing the picture, press AUTO/OK button the screen will display as following:

natural_image
Sunflower with blue sky background and playback controls (no text or symbols on flower)-Press LEFT or RIGHT button to select the item and press AUTO/OK button to confirm. -Press MENU button to exit.
- M : To play the previous file
- ▶ : To play the next file.
- ♂ : To rotate one picture clockwise by 90°.
- ▶ : To play the file or pause the file
5.4: To adjust the volume level as desired and the level can be adjusted from 0 to 100. Press LEFT/RIGHT button to select this item and press AUTO/OK button to confirm, then press LEFT/RIGHT button to adjust and press AUTO/OK button to confirm.
6.*: To adjust the brightness as desired and the level can be adjusted from 0 to 100. Press LEFT/RIGHT button to select this item and press AUTO/OK button to confirm, then press LEFT/RIGHT button to adjust and press AUTO/OK button to confirm.
7.1: To display the information of picture you select.
8.9: To zoom the picture in x1,x2,x4,x8 and press navigation button to see other portions of the picture. Press MENU button to exit.
2.MAIN MENU-MUSIC
Select the MUSIC item in the main menu, press AUTO/OK button to confirm. Then press UP/DOWN buttons to select desired file and press AUTO/OK button to confirm. -In the MUSIC item, it only supports music playing and the format is MP3/WMA.
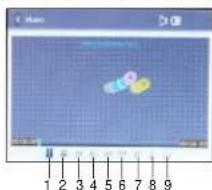
-Press LEFT or RIGHT button to select the item and press AUTO/OK button to confirm. -Press MENU button to exit.
1.PICTURE
- Press the MENU button the screen will display:

Picture mode
Press up or down button to select it, then press left or right button to set the picture mode: Personal/Standard/Dynamic/Soft.
Contrast/Brightness/Sharpness/Tint/Color
-Press up or down button to select Contrast/Brightness/Sharpness/Tint/Color, then press left or right button to adjust.
- The level can be adjusted from 0-100.
Color mode
-Press up or down button to select it and press left or right button to change the color mode. -Options: Personal/Normal/Warm/Cool.

Zoom mode
-Press up or down button to select it and press left or right button to change the zoom mode. -Options: Normal/Wide
VOLUME CONTROL
Press the VOL+ or VOL- to adjust the level of currently volume.
INFO(INFORMATION)
It is used to display current program information.
- Press INFO button, the screen will display as below:

* Digital Channels Only
** Indicates free-to-air (FTA) or subscription channel
EPG (ELECTRONIC PROGRAM GUIDE)
It shows you the program guide for the current and future.
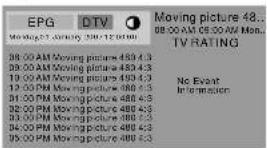
When viewing a digital channel, press the EPG Button to access the program guide supplied by the signal provider (not available in all areas). Information in the EPG includes current and future program titles, dates, show lengths, and episode summaries.
3.TV MAIN MENU
Common procedure for initial settings
-
Press MENU button to display the setup menu.
-
Use the ◀ and ▶ buttons to select submenus, then press the ▼ or ▲ button to enter the submenu. Press the ◀ and ▶ buttons to select the desired option and press AUTO/OK to confirm.
-
Press the MENU Button to return to a previous menu.
-
■: To play or pause the file.
-
■: To return to the play list page.
-
⚠: To play the previous file.
-
▶: To play the next file.
-
: To fast forward playing file by 10 seconds with each press.
-
▶: To last rewind playing file by 10 seconds with each press.
-
To adjust the volume level as desired and the level can be adjusted from 0 to 100. Press LEFT/RIGHT button to select this item and press AUTO/OK button to confirm, then press LEFT/RIGHT button to adjust and press AUTO/OK button to confirm.
-
1: To display the information of file you select.
9.∅: To select file repeat mode, there are four mode for your selection, you can select as desired.
3.MAIN MENU-VIDEO
Select the VIDEO item in the main menu, press AUTO/OK button to confirm. Then press UP/DOWN buttons to select desired file and press AUTO/OK button to confirm.
-In the VIDEO item, it only supports video playing and the format is DAT/MPEG/AVI.
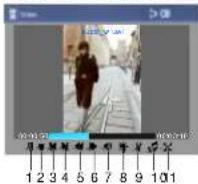
-Press LEFT or RIGHT button to select the item and press AUTO/OK button to confirm. -Press MENU button to exit.
-
■: To play or pause the file.
-
■: To return to the play list page.
-
M: To play the previous file.
-
▶: To play the next file
-
←: To fast forward playing file by 10 seconds with each press.
-
▶: To fast rewind playing file by 10 seconds with each press.
-
To adjust the volume level as desired and the level can be adjusted from 0 to 100. Press LEFT/RIGHT button to select this item and press AUTO/OK button to confirm, then press LEFT/RIGHT button to adjust and press AUTO/OK button to confirm.
-
*: To adjust the brightness as desired and the level can be adjusted from 0 to 100. Press LEFT/RIGHT button to select this item and press AUTO/OK button to confirm, then press LEFT/RIGHT button to adjust and press AUTO/OK button to confirm.
11.X: To switch the unit to full screen playing mode. Press LEFT/RIGHT button to select this item and press AUTO/OK button to confirm to full screen playing mode, and press AUTO/OK button again to return to previous mode.
4.MAIN MENU-BROWSE
Select the BROWSE item in the main menu, press AUTO/OK button to confirm. Then press navigation buttons to select desired file and press AUTO/OK button to confirm.
-In the BROWSE item, it supports play all format file which the unit support as desired.

When select picture file:
-Press AUTO/OK button to play this file.
-Press MENU button the screen will display as shown(left picture):
Press LEFT or RIGHT button to select and press AUTO/OK button to confirm.
1. To exit the browse item and return to MAIN MENU page
2. To display the information of picture you select
2. To display the information of picture you select.
3. To set the picture what you select as startup screen logo.
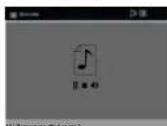
When select music file:
1) Press AUTO/OK button to play this file. The screen will display as shown:
Press LEFT or RIGHT button to select and press AUTO/OK button to confirm.
To play or pause the file
■To return to browse page.
To adjust the volume level as desired and the level can be adjusted from
0 to 100
Press LEFT/RIGHT button to select this item and press AUTO/OK
button to confirm, then press LEFT/RIGHT button to adjust and press
AUTO/OK button to confirm.
Press MENU button to exit.

2) Press MENU button the screen will display as shown:
Press LEFT or RIGHT button to select and press AUTO/OK button to confirm.
-
To exit the browse item and return to MAIN MENU page.
-
To display the information of file you select
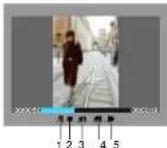
When select video file:
1) Press AUTO/OK button to play this file. The screen will display as shown:
Press LEFT or RIGHT button to select and press AUTO/OK button to confirm.
1.Ⅱ:To play or pause the file
2.■: To return to browse page.
-
To fast forward playing file by 10 seconds with each press.
-
▶: To fast rewind playing file by 10 seconds with each press.
-
To adjust the volume level as desired and the level can be adjusted from
0 to 100
Press LEFT/RIGHT button to select this item and press AUTO/OK button to confirm, then press LEFT/RIGHT button to adjust and press AUTO/OK button to confirm.

2) Press MENU button the screen will display as shown:
Press LEFT or RIGHT button to select and press AUTO/OK button to confirm.
-
To exit the browse item and return to MAIN MENU page.
-
To display the information of file you select.
5.MAIN MENU-DTV
When in main menu page, press LEFT or RIGHT button to select DTV item and press AUTO/OK button to enter.(You can also press SWITCH button to select the unit in DTV mode)
1. SCAN SIGNAL
-Press AUTO/OK button to enter the following menu.
-

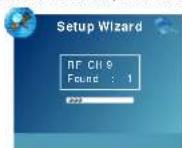
-Effective channel will be memorized automatically.
-Then the channel first stored will be played.
NOTE:1. You must scan channel before the first watching, or there is no program shown.
- You can press the AUTO/OK button on the front panel of unit for three seconds to exit the AUTO SCAN
page
- Reception of TV signals depends on many factors; if the signal is weak, reception will be poor. For better reception, adjust the direction/position of the antenna or relocate the TV. After improving reception, repeat the Auto Scan process.
2. BASIC OPERATION
SELECTA CHANNEL
-
Press CH + button to play next channel.
-
Press CH - button to play previous channel.
- 3.5" Digital LCD Television With FM Radio And SD/MMC Card Slot
- TABLE OF CONTENTS
- GETTING STARTED:
- OPERATIONS:
- FOR REFERENCE:
- MAINTENANCE
- SPECIFICATIONS
- GENERAL TROUBLESHOOTING
- IMPORTANT INSTRUCTIONS
- SAFETY INSTRUCTIONS
- CAUTION-- To reduce the risk of personal injury or product/property damage:
- Battery Handling and Usage:
- SET FM RADIO
- INFO7.6
- RESET
- 7.MAIN MENU-SETTINGS
- LANGUAGE
- SET COLOR
- SET MENU
- SET SLIDESHOW
- FEATURES
- 3.5" TFT DISPLAY
- AUTO TV SCANNING FUNCTION
- WITH RECHARGEABLE LITHIUM BATTERY
- MEMORY FUNCTION
- DIGITAL BROADCASTING RECEPTION
- SUPPORTING CURRENT DAYS ELECTRIC PROGRAM GUIDE
- MULTI-SUBTITLES FUNCTION(OSD)
- GUIDE DISPLAY LETS OPERATION MORE EASILY
- BUILT-IN STAND HOLDER
- SUPPORT FM RADIO FUNCTION
- SUPPORT SD/MMC/MS CARD READER
- ACCESSORIES
- 6.MAIN MENU-FM RADIO
- Channel NO
- Channel Label
- DTV Signal
- GENERAL PARTS
- 1.TFT DISPLAY WINDOW
- BASIC CONNECTION
- RECHARGEABLE BATTERY USE
- 2.Time to recharge the battery
- Using and Maintaining Rechargeable Battery
- 5.CHANNEL
- Auto Scan
- Show/Hide
- Closed Caption
- Restore Default
- Return to MM
- INSTALL BATTERY
- INSTALL THE BATTERY AS FOLLOWS:
- TELESCOPING ANTENNA USE
- Time Zone
- DST
- Time Format
- Clock
- SETUP
- Menu Language
- Transparent
- OSD Time Out
- AUDIO
- Audio language
- Balance
- 3.TIME
- Sleep Timer
- MAKE SURE ALL THE EQUIPMENTS AND AC ADAPTOR ARE CONNECTED PROPERLY AND THE UNIT IS SET IN CORRECT MODE BEFORE KINDS OF OPERATIONS.
- OPERATIONS
- ON/OFF
- 1.MAIN MENU-SLIDESHOW
- SLIDESHOW
- 2.MAIN MENU-MUSIC
- 1.PICTURE
- Picture mode
- Contrast/Brightness/Sharpness/Tint/Color
- Color mode
- Zoom mode
- VOLUME CONTROL
- INFO(INFORMATION)
- EPG (ELECTRONIC PROGRAM GUIDE)
- 3.TV MAIN MENU
- Common procedure for initial settings
- 3.MAIN MENU-VIDEO
- 4.MAIN MENU-BROWSE
- 5.MAIN MENU-DTV
- SCAN SIGNAL
- BASIC OPERATION
Brand : Naxa
Model : NT-301
Category : Television