
VP-901 - Hi-Fi System DataVideo - Free user manual and instructions
Find the device manual for free VP-901 DataVideo in PDF.


| Product Type | Hi-Fi System |
| Brand | DataVideo |
| Model | VP-901 |
| Dimensions (W x H x D) | 430 x 150 x 350 mm |
| Weight | 8 kg |
| Power Supply | 120V AC, 60Hz |
| Power Consumption | 50W |
| Frequency Response | 20 Hz - 20 kHz |
| Output Power | 2 x 30W RMS |
| Inputs | AUX, CD, Tape |
| Outputs | Speaker terminals, Headphone jack |
| Tuner | AM/FM |
| CD Player | Yes |
| Tape Deck | Yes |
| Remote Control | Included |
| Safety | Use only in dry environment; do not obstruct ventilation. |
| Cleaning | Soft dry cloth |
| Spare Parts | Contact customer service |
Frequently Asked Questions - VP-901 DataVideo
User questions about VP-901 DataVideo
0 question about this device. Answer the ones you know or ask your own.
Ask a new question about this device
Download the instructions for your Hi-Fi System in PDF format for free! Find your manual VP-901 - DataVideo and take your electronic device back in hand. On this page are published all the documents necessary for the use of your device. VP-901 by DataVideo.
USER MANUAL VP-901 DataVideo
1 x 8 12G SDI
DISTRIBUTION AMPLIFIER
VP-901
Instruction Manual
Table of Contents
TABLE OF CONTENTS......2
FCC COMPLIANCE STATEMENT......4
WARNINGS AND PRECAUTIONS 4
WARRANTY......6
STANDARD WARRANTY....6
THREE YEAR WARRANTY....7
DISPOSAL 7
INTRODUCTION......8
FEATURES....8
REAR PANEL 10
SYSTEM SETUP .... 11
IMPORTANT NOTICES....12
FIRMWARE UPDATE.... 13
HOW TO UPDATE THE VP-901 FIRMWARE 13
DIMENSIONS....18
SPECIFICATIONS 19
SERVICE AND SUPPORT 24
Disclaimer of Product and Services
The information offered in this instruction manual is intended as a guide only. At all times, Datavideo Technologies will try to give correct, complete and suitable information. However, Datavideo Technologies cannot exclude that some information in this manual, from time to time, may not be correct or may be incomplete. This manual may contain typing errors, omissions or incorrect information. Datavideo Technologies always recommend that you double check the information in this document for accuracy before making any purchase decision or using the product. Datavideo Technologies is not responsible for any omissions or errors, or for any subsequent loss or damage caused by using the information contained within this manual. Further advice on the content of this manual or on the product can be obtained by contacting your local Datavideo Office or dealer.
FCC Compliance Statement
This device complies with part 15 of the FCC rules. Operation is subject to the following two conditions:
- This device may not cause harmful interference, and
- This device must accept any interference received, including interference that may cause undesired operation.
Warnings and Precautions
- Read all of these warnings and save them for later reference.
- Follow all warnings and instructions marked on this unit.
-
Unplug this unit from the wall outlet before cleaning. Do not use liquid or aerosol cleaners. Use a damp cloth for cleaning.
-
Do not use this unit in or near water.
-
Do not place this unit on an unstable cart, stand, or table. The unit may fall, causing serious damage.
-
Slots and openings on the cabinet top, back, and bottom are provided for ventilation. To ensure safe and reliable operation of this unit, and to protect it from overheating, do not block or cover these openings. Do not place this unit on a bed, sofa, rug, or similar surface, as the ventilation openings on the bottom of the cabinet will be blocked. This unit should never be placed near or over a heat register or radiator. This unit should not be placed in a built-in installation unless proper ventilation is provided.
-
This product should only be operated from the type of power source indicated on the marking label of the AC adapter. If you are not sure of the type of power available, consult your Datavideo dealer or your local power company.
-
Do not allow anything to rest on the power cord. Do not locate this unit where the power cord will be walked on, rolled over, or otherwise stressed.

-
If an extension cord must be used with this unit, make sure that the total of the ampere ratings on the products plugged into the extension cord do not exceed the extension cord rating.
-
Make sure that the total amperes of all the units that are plugged into a single wall outlet do not exceed 15 amperes.
-
Never push objects of any kind into this unit through the cabinet ventilation slots, as they may touch dangerous voltage points or short out parts that could result in risk of fire or electric shock. Never spill liquid of any kind onto or into this unit.
-
Except as specifically explained elsewhere in this manual, do not attempt to service this product yourself. Opening or removing covers that are marked “Do Not Remove” may expose you to dangerous voltage points or other risks, and will void your warranty. Refer all service issues to qualified service personnel.
-
Unplug this product from the wall outlet and refer to qualified service personnel under the following conditions:
a. When the power cord is damaged or frayed;
b. When liquid has spilled into the unit;
c. When the product has been exposed to rain or water;
d. When the product does not operate normally under normal operating conditions. Adjust only those controls that are covered by the operating instructions in this manual; improper adjustment of other controls may result in damage to the unit and may often require extensive work by a qualified technician to restore the unit to normal operation;
e. When the product has been dropped or the cabinet has been damaged;
f. When the product exhibits a distinct change in performance, indicating a need for service.
Warranty
Standard Warranty
- Datavideo equipment is guaranteed against any manufacturing defects for one year from the date of purchase.
- The original purchase invoice or other documentary evidence should be supplied at the time of any request for repair under warranty.
- The product warranty period beings on the purchase date. If the purchase date is unknown, the product warranty period begins on the thirtieth day after shipment from a Datavideo office.
- All non-Datavideo manufactured products (product without Datavideo logo) have only one year warranty from the date of purchase.
- Damage caused by accident, misuse, unauthorized repairs, sand, grit or water is not covered under warranty.
- Viruses and malware infections on the computer systems are not covered under warranty.
- Any errors that are caused by unauthorized third-party software installations, which are not required by our computer systems, are not covered under warranty.
- All mail or transportation costs including insurance are at the expense of the owner.
- All other claims of any nature are not covered.
- All accessories including headphones, cables, batteries, metal parts, housing, cable reel and consumable parts are not covered under warranty.
- Warranty only valid in the country or region of purchase.
- Your statutory rights are not affected.
Three Year Warranty
- All Datavideo products purchased after July 1st, 2017 qualify for a free two years extension to the standard warranty, providing the product is registered with Datavideo within 30 days of purchase.

- Certain parts with limited lifetime expectancy such as LCD panels, DVD drives, Hard Drive, Solid State Drive, SD Card, USB Thumb Drive, Lighting, Non-PCIe Card and third party provided PC components are covered for 1 year.
- The three-year warranty must be registered on Datavideo's official website or with your local Datavideo office or one of its authorized distributors within 30 days of purchase.
Disposal

natural_image
Symbol of a trash bin crossed with diagonal lines, no text or labels presentFor EU Customers only - WEEE Marking
This symbol on the product or on its packaging indicates that this product must not be disposed of with your other household waste. Instead, it is your responsibility to dispose of your waste equipment by handing it over to a designated collection point for the recycling of waste electrical and electronic equipment. The separate collection and recycling
of your waste equipment at the time of disposal will help to conserve natural resources and ensure that it is recycled in a manner that protects human health and the environment. For more information about where you can drop off your waste equipment for recycling, please contact your local city office, your household waste disposal service or the shop where you purchased the product.
Introduction
The Datavideo VP-901 is a 4K-compatible Distribution Amplifier supporting up to 12G/6G/3G/HD/SD-SDI video signals, it allows one source to be distributed and amplified up to eight outputs to multiple devices such as switchers, recorders and monitors.
The SDI input format is auto-detected and provides re-clocking and equalization to regenerate the signal at the output for extending distances between source and displays.
Features
• Supports 12G/6G/3G/HD/SD-SDI video with embedded Audio
- Driver-free, plug and play
• Automatic detection of the input formats.
- Equalization and Re-clocking ensure the stability of the SDI signal and longer-range transmission
- Provides LED indicators to indicate the SDI format of current SDI input source
- Its strong and rugged material makes it super sturdy and durable.
Front Panel

natural_image
Pure electrical circuit lines without any symbols | SDI OUT InterfaceThere are 4 SDI output interfaces including SDI OUT 5, SDI OUT 6, SDI OUT 7 and SDI OUT 8 from the left side to the right side respectively. |
 | Power and Input Signal LED IndicatorsThere are six LED indicators including PWR, 12G-SDI, 6G-SDI, 3G-SDI, HD-SDI and SD-SDI from the left side to the right side respectively. |
Rear Panel

natural_image
Diagram of a device rear panel with six circular components and a separate button (no text or labels) | 12V DC IN InterfacePlease connect a 12V DC power cable to this interface. |
    | SDI OUT InterfaceThere are 4 SDI interfaces including SDI OUT 1, SDI OUT 2, SDI OUT 3 and SDI OUT 4 from the left side to the right side respectively. |
 | SDI IN/FW UPGRADEThe SDI IN interface is located at the left side for users to connect an SDI input source.The FW UPGRADE micro USB interface is located at the right side.Please connect a micro USB cable from this interface to your laptop for updating the firmware. |
System Setup
Please follow following steps for setting your VP-901 system.
(1) Please turn off the power of all devices including monitor.
(2) Please use SDI cables to connect from the SDI OUT interfaces of the VP-901 to the devices with SDI IN interfaces. (Such as monitors or switchers).
(3) Please connect an SDI video-playing device to the SDI IN interface of the VP-901.
(4) Please connect a 12V DC power adapter to the 12V DC IN interface of the VP-901.
(5) Please turn on the power of the connected devices with SDI IN interfaces.
(6) Please turn on the power of the SDI video-playing source device.
Important Notices
Due to the fact that the ultra-high frequency characteristic and the low-jitter demand of the 12G SDI signal, if users want to achieve the highest performance, it is highly recommended that when one of the paired SDI interfaces is not in use, users must cover this unused SDI interface with a 75Ω terminator to prevent the “Impedance Mismatch” from happening.
There are 8 SDI output interfaces for the VP-901 which can be paired in 4 pairs including Pair A, Pair B, Pair C and Pair D.
Please see following table for the pairing details.
| Output Interfaces | |
| Pair A | Output 1 & Output 2 |
| Pair B | Output 3 & Output 4 |
| Pair C | Output 5 & Output 6 |
| Pair D | Output 7 & Output 8 |
Please pay attention that if you need to use the SDI output interface with even number (2/4/6/8), please be sure to connect these interfaces in pairs (A, B, C, D). If you need to use the SDI output interface with odd number (1/3/5/7), it is recommended that users should cover the unused SDI output interfaces with bundled 75Ω terminator. The bundled 75Ω 1/4W terminator is shown as following diagram.

natural_image
Metallic plastic bag containing a small mechanical component (no visible text or symbols)Firmware Update
Datavideo usually releases new firmware containing new features or reported bug fixes from time to time. Customers can either download the VP-901 firmware as they wish or contact their local dealer or reseller for assistance.
This section outlines the firmware upgrade process which should take approximately few minutes to complete.
The existing settings should persist through the firmware upgrade process, which should not be interrupted once started as this could result in a nonresponsive unit.
Requirements:
The latest version firmware of the VP-901(can be obtained from local Datavideo office or dealer.
Micro-USB Cable
Windows Laptop
▶ VP-901 Firmware Tool
How to Update the VP-901 Firmware
Please follow following steps for updating the firmware for the VP-901.
-
Please download the latest VP-901 firmware from Datavideo official website www.datavideo.com.
-
After the firmware is downloaded, please save the downloaded firmware "VP-901 Firmware V. xxx_xxxxxxxx & Firmware Update Tool" in the hard disk of your laptop.
-
Please unzip the downloaded firmware.
-
Users will see the firmware "VP-901_Ver.xxx_xxxxxxxx.bin" and "VP-901 TOOLS" file folder.
- Please make sure that the files including "VP-901", "USB_Library.dll" and "firmwareWriter.dll" are saved in the same file folder.
- Please double-click the VP-901 Firmware Tool which is shown as following diagram.
- After the firmware tool is launched, please press the "FW updated" button which is shown as following diagram.

- Please press the "Load File" button to load the firmware "VP-901_Ver.xxx_xxxxxxxx.bin".

- Please press the "Burn" button.
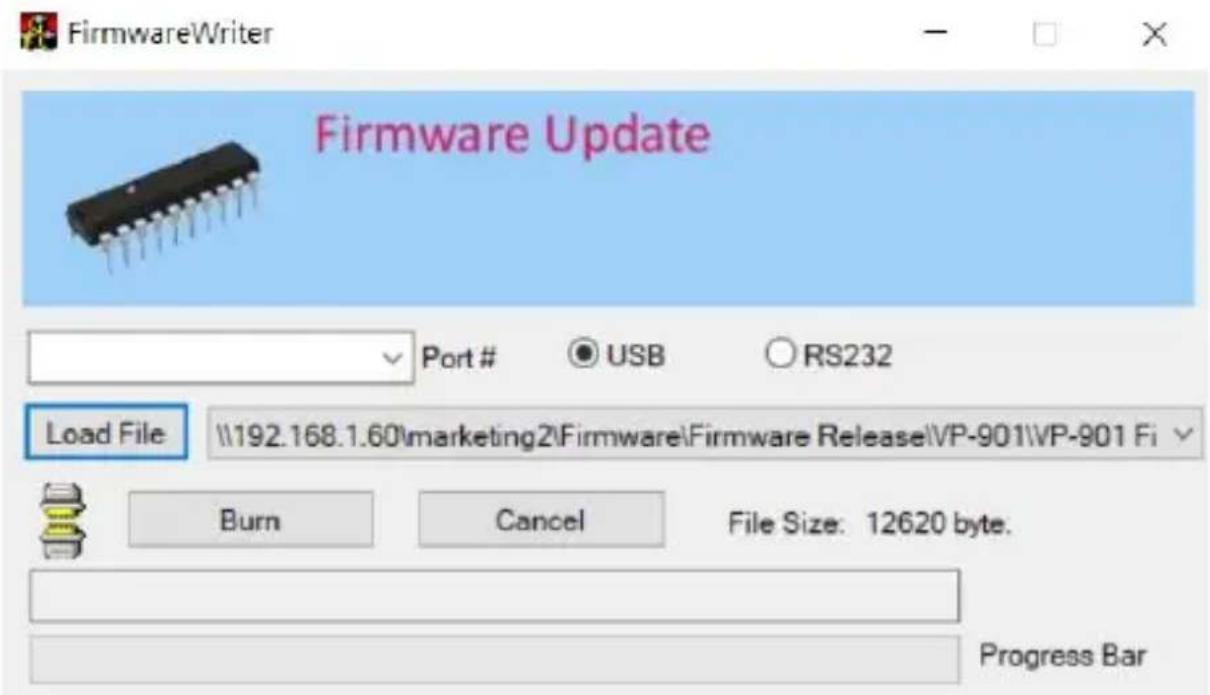
- Please use a micro USB cable to connect from your laptop to the VP-901.
- Please connect a 12V DC IN power adapter to the VP-901.
- After the power cable is connected, the firmware update process will be started automatically. When the green progress bar reaches 100%, it means the whole firmware update procedure is finished.
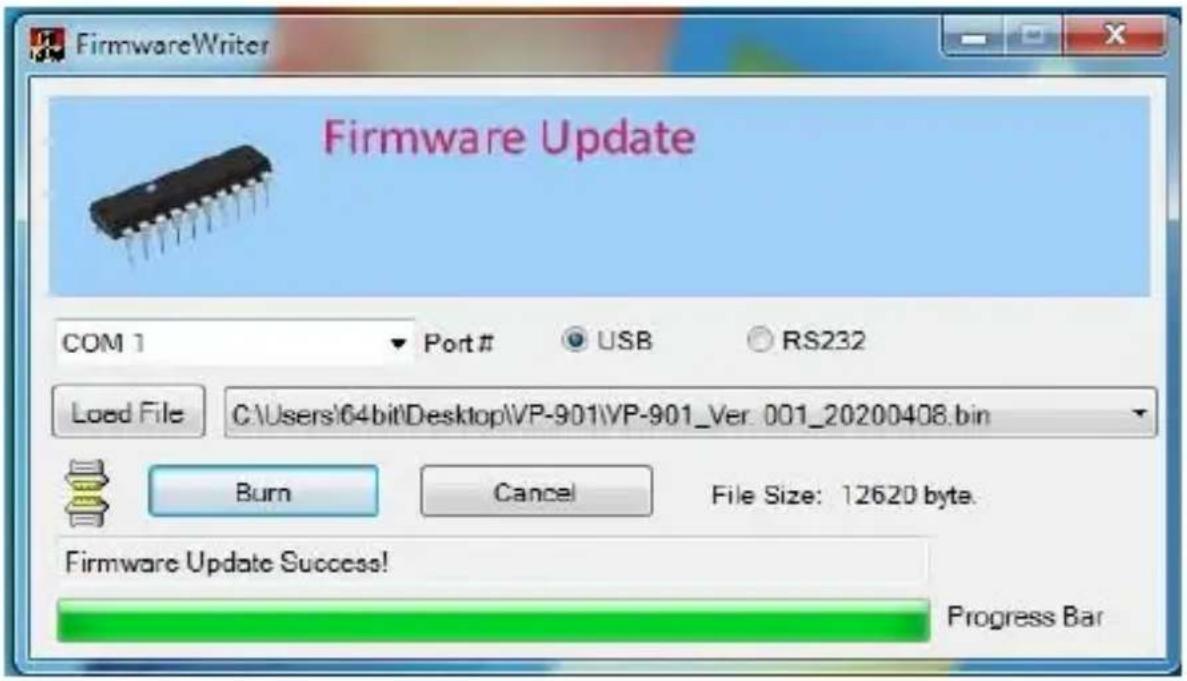
Note: Please make sure that the files including "VP-901", "USB_Library.dll" and "firmwareWriter.dll" are saved in the same file folder.
How to Confirm the Firmware Version of the VP-901
Please follow following steps for confirming the firmware version.
- Please connect a 12V DC IN power adapter to the VP-901.
- Please connect a micro USB cable from the VP-901 to your laptop.
- Please launch the VP-901 Firmware Tool and then please press the "Get" button.

- The current firmware version will be shown as following diagram.

Dimensions
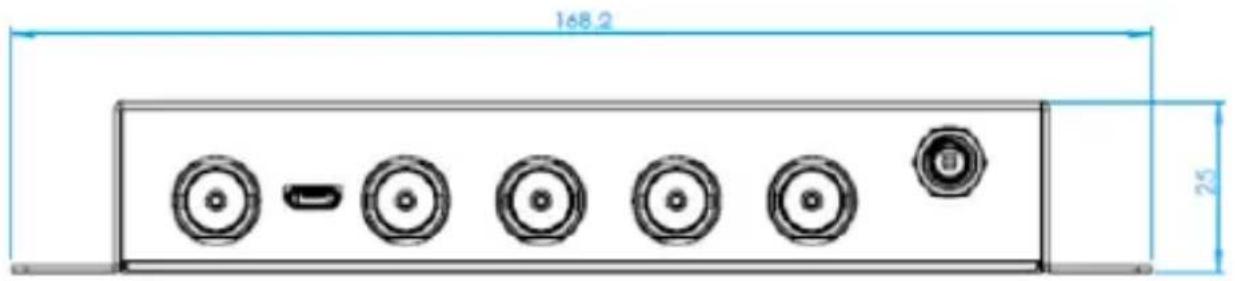

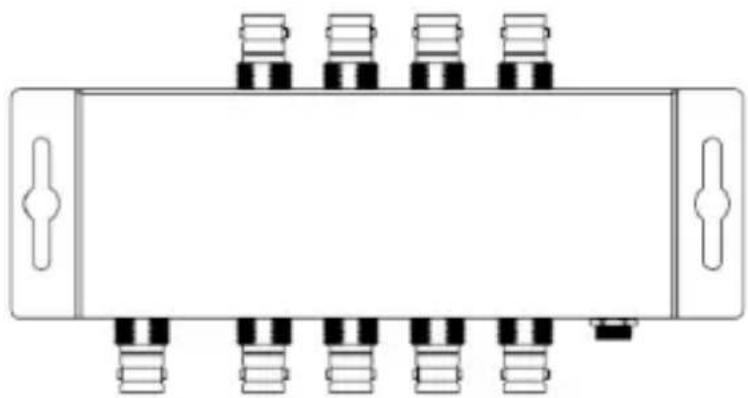
natural_image
Top-down schematic of an electronic component with multiple pins and connectors (no text or symbols)
natural_image
Isometric line drawing of a rectangular electronic device with multiple ports and connectors (no text or symbols)
natural_image
Simple diagram of five circular components arranged horizontally with ellipses, no text or symbols presentUnit: mm
Specifications
| Interfaces | |
| Video Input | SDI x 1 |
| Video Output | SDI x 8 |
| LED Indicator | Power LED Indicator x 112G-SDI Signal LED Indicator x 16G-SDI Signal LED Indicator x 13G-SDI Signal LED Indicator x 1HD-SDI Signal LED Indicator x 1SD-SDI Signal LED Indicator x 1 |
| Power Interface | 12V DC IN Interface |
| Firmware Update Interface | Micro USB port x 1 |
| Standard | |
| Supported Video Format | 3840 x 2160p:60/59.94/50/30/29.97/25/24/23.981080p: 60/59.94/50/30/29.97/25/24/23.981080i: 60/59.94/50720p: 60/59.94/50525i: 59.94 NTSC625i50 PAL |
| Supported SDI Standard | SD/HD/3G/6G/12G-SDI |
| Supports multiple SDI Transmission Signal | Automatic Detection for the SD/HD/3G/6G/12G SDI Signals |
| SDI Compliance | SMPTE 424M, SMPTE 292M, SMPTE 344M, SMPTE 259M, DVB-ASI, ST-2081(6G), ST-2082(12G) |
| Supported SDI Data Rate | 1.485 / 2.97 / 5.94 / 11.88 Gbps |
| Video Bandwidth | 11.88Gpbs & 11.88/1.001Gbps |
| Output Impedance | 75Ω |
| Re-clocking | Yes |
| Cable Equalization (Belden 1694A) | 12G up to max. 70 meter(230 Feet)6G up to max. 100 meter(330 Feet)3G up to max. 180 meter(594 Feet) |
| Audio Support | Yes |
| ESD Protection | Contact Discharge : +/-8kVAir Discharge : +/-8kV |
| Others | |
| Operating Temperature | 0 °C to 40 °C (32 °F – 104 °F) |
| Storage Temperature | -20°C to 60°C (-4°F to 140°F) |
| Humidity | 10% to 80% (Non-condensing) |
| Dimensions (mm) | 166.9 x 50.3 x 24.0 (mm) |
| Weight | 310 g |
Note
Note
Note
Service & Support
It is our goal to make your products ownership a satisfying experience. Our supporting staff is available to assist you in setting up and operating your system. Please refer to our web site www.datavideo.com for answers to common questions, support requests or contact your local office below.

Please visit our website for latest manual update. https://www.datavideo.com/product/VP-901
datavideo
www.datavideo.com

@DatavideoUSA @DatavideoIndia2016
@DatavideoEMEA @Datavideojapan
@DatavideoTaiwan @DatavideoLatam
@DatavideoAsia @DatavideoBrasil

@Datavideo
@Datavideo_EMEA
@Datavideo Taiwan

@DatavideoUSA
@DVTWDVCN

@DatavideoUSA
@DatavideoEurope
All the trademarks are the properties of their respective owners.
Datavideo Technologies Co., Ltd. All rights reserved 2020
- Table of Contents
- TABLE OF CONTENTS......2
- FCC COMPLIANCE STATEMENT......4
- WARNINGS AND PRECAUTIONS 4
- WARRANTY......6
- DISPOSAL 7
- INTRODUCTION......8
- SYSTEM SETUP .... 11
- IMPORTANT NOTICES....12
- FIRMWARE UPDATE.... 13
- DIMENSIONS....18
- SPECIFICATIONS 19
- SERVICE AND SUPPORT 24
- Disclaimer of Product and Services
- FCC Compliance Statement
- Warnings and Precautions
- Warranty
- Standard Warranty
- Three Year Warranty
- Disposal
- For EU Customers only - WEEE Marking
- Introduction
- Features
- Front Panel
- Rear Panel
- System Setup
- Important Notices
- Firmware Update
- Requirements:
- How to Update the VP-901 Firmware
- How to Confirm the Firmware Version of the VP-901
- Note
- Service & Support
- datavideo
Brand : DataVideo
Model : VP-901
Category : Hi-Fi System