
PO110 - Pizza oven Gasmate - Free user manual and instructions
Find the device manual for free PO110 Gasmate in PDF.


| Product Type | Pizza oven |
| Brand | Gasmate |
| Model | PO110 |
| Fuel Type | LPG (propane) |
| Max Temperature | 400°C (752°F) |
| Cooking Surface Diameter | 35 cm (13.8 inches) |
| Dimensions (W x D x H) | 50 x 40 x 30 cm |
| Weight | 15 kg (33 lbs) |
| Power Output | 12 MJ/h |
| Main Material | Stainless steel |
| Adjustable Heat Control | Yes |
| Safety Valve | Yes |
| Foldable Legs | Yes |
| Usage | Outdoor use only |
| Cleaning | Wipe with damp cloth; avoid abrasive cleaners |
| Maintenance | Check gas connections regularly; clean burner ports |
| Documentation | Free manual available at notice-facile.com |
Frequently Asked Questions - PO110 Gasmate
User questions about PO110 Gasmate
0 question about this device. Answer the ones you know or ask your own.
Ask a new question about this device
Download the instructions for your Pizza oven in PDF format for free! Find your manual PO110 - Gasmate and take your electronic device back in hand. On this page are published all the documents necessary for the use of your device. PO110 by Gasmate.
USER MANUAL PO110 Gasmate
Pizza Oven with Light
- Deluxe outdoor oven for versatile cooking - from cooking pizzas with a delicious wood fired flavour to a beautifully cooked roast dinner
• Cooks up to 3 pizzas at a time - Convenient electronic ignition
• Cool touch heat resistant handle - Includes food safe ceramic pizza stone
• Powerful 22MJ/h stainless steel burner
• Large viewing window with temperature gauge
- Easy clean vitreous enamel interior
• Tested to NZ Standards
- Operates on LPG

Model No. PO106
FOR OUTDOOR USE ONLY
Gasmate® is a registered trademark of: Sitro Group Australia Pty Ltd www.gasmate.com.au
Aber, Hamilton, N.Z. www.gasmate.co.nz
Important: Retain these instructions for future use.
Section Page
| General information 2-3 | |
| General assembly 4 | |
| Lighting procedure 4 | |
| Operating procedure 5 | |
| Care and maintenance 5 | |
| Important safeguards 6 | |
| Service and safety 7 | |
| Operating instructions 7 | |
| Electrical data 7 | |
| Assembly instructions 8-10 | |
| Usage Tips 11 | |
| Safe appliance locations | 12 |
GENERAL INFORMATIONCONTENTS
Gas Installation Codes
- Appliances must be used in accordance with New Zealand Standard 5261 "Gas Installations".
- Appliances for use with bottled gas are labelled 'LPG'.
Clearances
Minimum Clearances from combustible materials must be:
Rear - 350mm Sides - 300mm Above - 600mm

Side clearances of 300mm must be maintained to allow adequate airflow for combustion.
Rear clearance of 350mm must be maintained to avoid overheating surrounding surfaces.
Hose & Regulator Safety
The regulator and hose assembly supplied with the appliance are suitable for LPG only.
A gas regulator adjusted to have an outlet pressure of 2.75kPA is supplied for connection to the LPG cylinder. The pressure regulator and hose assembly supplied with the appliance must be used. Replacement pressure regulators and hose assemblies must be those specified by the appliance manufacturer.
When connecting the hose and regulator assembly to the gas cylinder, take care to avoid unnecessary twisting or kinking of the flexible hose.
After the assembly has been secured, turn on the gas and check for leaks by brushing a soap and water solution over all connections.
If you are unable to correct the leak by tightening the connections, turn off the gas and contact the supplier immediately.
Always ensure the appliance is kept away from flammable materials and the gas cylinder clear of any heat source. When changing over from an empty gas cylinder to a full one make sure this procedure is carried out in a flame free atmosphere.
Gas Cylinder Use & Safety
This is a low pressure appliance and must only be used with the hose and regulator supplied. It is designed for use with 9Kg LPG cylinders.
The cylinder should be filled by a reputable gas supplier and visually inspected and re-qualified at each filling.
Always keep cylinder in an upright position.
Always close the cylinder valve when the appliance is not in use. Do not subject the cylinder to excessive heat.
Specifications
Specifications can be found on the data label attached to body panel.
Never Store your Gas Cylinder Indoors.
If you store your appliance indoors, ALWAYS disconnect the cylinder first and store it safely outside. Cylinders must be stored outdoors in a well ventilated area out of reach of children, and must not be stored in a building, garage or any other enclosed area.

WARNING
Failure to comply with these instructions could result in a fire or explosion which could cause serious bodily injury, death or property damage. Accessible parts may be very hot.
Keep young children away.
Any modifications to this appliance may be dangerous.
Do not move this appliance during use.
Turn off gas supply at the cylinder after use.
Read instructions before using the appliance.
Parts sealed by the manufacturer or their agent must not be manipulated by the user.
Never operate this appliance without a regulator
Do not test for gas leaks with an open flame. If this information is not followed exactly, a fire causing death or serious injury may occur. Do not store a spare gas cylinder under or near this appliance. Never fill the cylinder beyond 85% full. This appliance is only to be used and stored outdoors.
If you smell gas
- Shut off gas to the appliance at its source, if possible.
- Extinguish any open flame.
- Open door.
- If odour continues, immediately call your gas supplier or fire department.
Do not connect your appliance to a gas cylinder exceeding 9kg capacity.
Never connect an unregulated gas cylinder. Read carefully before assembling and operating your appliance.
Location of your Appliance
DO NOT use in garages, porches, sheds, breezeways or other enclosed areas. Your appliance is to be used OUTDOORS and is not intended to be installed in or on recreational vehicles and/or boats and should not be placed on any surface that will burn. Do not obstruct the flow of combustion and ventilation air around the outer housing. Side clearance must be 300mm.
Check for any Damage
Contact your supplier for assistance regarding replacement of any damaged or missing parts. Do not operate an appliance that appears damaged.
Protect Children
Keep children away during use and until the appliance has cooled after you have finished. Do not allow children to operate the appliance.
Always ensure that no sporting or physical activities are carried out in close proximity to the appliance during use and while still hot.

For your safety:
- Do not store or use petrol or other flammable liquids in the vicinity of this or any other appliance.
- Do not store empty or full spare gas cylinders under or near this or any other appliance.
- Ensure the gas hose is not in contact with the appliance.
- Keep the gas hose away from hot surfaces and protect from dripping grease. Avoid unnecessary twisting of hose. Visually inspect the hose prior to each use for cracks, excessive wear or other damage. Replace the hose if necessary.
- Never test for gas leaks with a lit match or open flame. Never light with the door closed or before checking to ensure the burner tube is fully seated over gas valve orifice.
- Never alter or modify the regulator or gas supply assembly.
• This appliance must not be used indoors.
- Ensure the appliance is set up on a level and stable surface.
- Do not move the appliance while in use or when hot.
- Remove the drip tray before moving.
GENERAL ASSEMBLY
Connecting & Disconnecting to Gas Source
Familiarise yourself with the general information and safety guidelines located at the front of this manual.
Check:
- The cylinder is filled. A sloshing sound will be heard when shaken.
- The burner control is in the 'OFF' position
Connecting:
- Ensure cylinder valve is in its full off position.
- Check for any damage to either the cylinder connection or the hose. NEVER attempt to use damaged equipment.
- When connecting the hose to the cylinder tighten the nut to a positive stop by hand or spanner.
- Open cylinder valve fully. If a leak can be heard at either end of the hose turn cylinder off and tighten joint. Wait 5 minutes before re-testing and use a soapy water solution to check the joint. If bubbles appear, the connection will need to be re-tightened.
Disconnecting:
- Ensure burner control is in the 'OFF' position.
- Ensure cylinder valve is in the full off position.
For storage and cylinder exchange, disconnect hose at the cylinder only, DO NOT disconnect hose from appliance.
LIGHTING PROCEDURE
Burner Operation & Ignition System Check
- With cylinder valve in 'OFF' position press the electronic ignitor button. Check for sparking to the burner.
- If spark is not evident at the burner ignition point, check that the ignition lead is firmly attached to the control and sparker tip.
- Open the door and ensure that it remains open while lighting the burner.
- With sparking established turn the cylinder valve 'ON'. Then push and turn the control knob to 'HIGH' and press the ignitor button.
- If the burner fails to light after several attempts turn off gas supply at cylinder and inspect for obstructions to gas flow.
If re-ignition is necessary while the appliance is still hot, you must wait for a minimum of 5 minutes before commencing to re-ignite (this allows accumulated gas fumes to clear).

IMPORTANT
- Before connecting and disconnecting to gas source, make sure burner control is in 'OFF' position.
- Caution: When the appliance is not in use, the gas must be turned off at the cylinder.
- Important: The appliance control knob must be in the 'OFF' position before opening the cylinder valve.
- Be aware of the hot door if re-igniting after use.
-
Check performance of burner prior to installing ceramic stone.
-
Do not smoke when attempting to ignite burner.
- Always use protective gloves when handling hot components.
- During use the side and top surfaces will be HOT.
- Note: If for some reason, ignitor fails to produce a spark at the electrode, appliance can be lit by a long barbecue match. With door open insert lighted match into the gap on the front of the ceramic stone. Push and turn control knob to 'HIGH'. Burner ignition can be checked through this gap.
Nominal Hourly Gas Consumption
| Gas Type | Number of Burners | Injector Size Main Burner | Total Gas Consumption MJ/h | Gas Pressure kPa |
| General Product LPG | 1 1.25m | 01 MJ/h 2.75 kPa |
Burner Operation & Ignition system check
| Problem Possible Reason Solution | ||
| Burner will not ignite | Valve on cylinder is closed Open valve on cylinder | |
| Control knob is closed Turn knob to high when lighting | ||
| Igniter is faulty Use a long barbecue match | ||
| Food is not cooking or is taking too long | Burner has gone out Check that the gas bottle is not empty and re-ignite the burner | |
| Oven was not given enough time to warm up before the food was applied | Remove the food and give the burner time to pre-heat (5-15 minutes) | |
| There is too much food on the cooking surface | Cook smaller portions | |

IMPORTANT
- Note: If the appliance cannot be adjusted to perform correctly it should not be used until serviced or repaired.
- The door must be in the open position for lighting.
- Do not smoke when attempting to ignite burner.
- Do not leave the appliance unattended when alight.
- Warning: Improper installation, adjustment, alteration, service or maintenance can cause injury or property damage. Any modifications or adjustments made to product without prior authority from the manufacturer will void any warranty claims. Read the installation, operating and maintenance instructions thoroughly before installing or servicing this equipment.
Flash-Back
Spiders and small insects occasionally spin webs or make nests in the burner tubes during warehousing and transit. These webs can lead to a gas flow obstruction which could result in a fire in and around the burner tubes.
This type of fire is known as 'FLASH-BACK' and can cause serious damage to your appliance and create an unsafe operating condition for the user. Although an obstructed burner tube is not the only cause of 'FLASH-BACK' it is the most common cause and frequent inspection and cleaning of the burner tubes is necessary.
If fire occurs in and around the burner, immediately turn off gas at its source and turn the burner control to 'OFF', wait until the appliance has cooled, then clean the burner tubes and burner ports.
Preheating
It is necessary to preheat the appliance for at least 15 minutes before cooking certain foods, depending on the type of food and the cooking temperature. Food that requires a low cooking temperature needs a shorter period of preheating.
Service
If the appliance cannot be adjusted to perform correctly it should not be used until serviced or repaired. Contact Aber for spare parts and service information.

WARNING
Locate this appliance on a suitably sized (minimum size 580W x 480D) sturdy bench (minimum load capacity 50Kg).
Beware of spiders and wasps. Burner tube should be inspected and cleaned periodically.
To avoid any flare-ups, it is recommended that the drip tray be checked and emptied regularly. Contents of the drip tray may be very hot during cooking. If emptied during extended cooking extreme caution should be taken and direct contact by hand should be avoided at all times. Allow to cool completely before disposing of the contents.
OVEN LIGHT

IMPORTANT SAFEGUARDS
READ THESE INSTRUCTIONS CAREFULLY BEFORE USING THE PRODUCT. KEEP THE INSTRUCTIONS HANDY FOR FUTURE REFERENCE.
Important: Always operate the Product from a power source of the same Voltage, Frequency and Rating as indicated on the Product Identification Plate.
- Close supervision is necessary when any Electrical Product is used or operated near children or infirm persons; DO NOT leave the Product unattended when in use; young children should be supervised to ensure that they DO NOT play with the Product.
- DO NOT operate any product which has been/or appears damaged in any manner or after the Product malfunctions, or is dropped.
- Always arrange the Cord so that it cannot be pulled or tripped over.
- DO NOT operate this Product immediately below an electrical Socket Outlet.
- If it is necessary to use an Extension Cord with this Product, prior to its use, make sure the Extension Cord is safe to use, capable of handling the electrical load of the Product (refer to Product Identification Plate) and has been checked & tested by an electricity supplier or qualified technician.
- Avoid operating the Product on uneven surfaces. Use only on flat, level and stable surfaces.
- DO NOT disconnect the Product from the Power Supply by pulling on the Cord. Never move, carry or hang the Product by the Cord.
- DO NOT operate this Product in the presence of explosive and/or flammable liquid or fumes such as where aerosol (spray) Products are being used or where Oxygen is being administered.
- Avoid leaving the Product unattended when in use.
- Switch OFF and UNPLUG from Power Outlet when not in use, allow to cool before shifting the Product from one location to another, and before cleaning.
- DO NOT use the product during inclement weather, rain or damp conditions.
To reduce the risk of personal injury or damage to property, follow basic safety precautions when using this product, including the following:
- When storing the Product, gently wind the Cord around the Cord Wrap if provided, otherwise loosely coil the cord. Avoid wrapping the Cord around the Product.
- Avoid contacting moving parts. Keep hands, hair, and clothing, well away from the Product while it is in operation.
- DO NOT operate or place any part of this Product on or near any hot surfaces such as a gas flame, electric element, or let the Cord hang over the edge of a table or bench.
- Avoid touching hot surfaces, use Handles or Knobs.
- DO NOT use the Product for other than its intended use as described in these instructions. This Product is intended for Normal Domestic Household Use only. The use of accessory attachments other than those recommended by the manufacturer may cause safety hazards.
- The power supply must be supplied through a residual device (RCD) having a tripping current not exceeding 30mA.
- Only connect this product to a socket-outlet having an earthing contact.
- DO NOT operate the product with a damaged cord or plug, or if oven malfunctions, or has been damaged in any manner.
- Never operate this product when your are tired, drinking alcohol, taking drugs or if taking medication that causes drowsiness.
- This product is not intended for use by persons (including children) with reduced physical, sensory or mental capabilities, or lack of experience and knowledge, unless they have been given supervision or instruction concerning use of the product by a person responsible for their safety.
- Pets and animals must be kept away from the work area so as to avoid tripping dangers.
- Always arrange the Cord so that it cannot be pulled or tripped over.
- Never modify this Product as damage and injury may occur, and this will void your warranty.
- Check for damaged parts before operating this Product.
- Keep power cord away from heat, oil, solvents and sharp edges.
- Check power cord for signs of damage before each use. If damaged do not use.
- Power cord must only be replaced by an authorised service facility.
- Use only a '3' core (earth pin) extension cord with this Product.
SERVICE & SAFETY
- This Product is shipped to you in a factory sealed carton. Should the Product be damaged, dropped, or malfunctions in any way, or its Flexible Cord is damaged, return the complete Product to the place of purchase.
- Always operate the Product as described in these instructions.
Important: In some Products the replacement by the user of the Flexible Cord is not intended. Special Tools are required to disassemble the Product or to replace the Cord, or a special Cord is required.
Note: This transformer must only be used with the light in your pizza oven.
OPERATING INSTRUCTIONS
- Plug the Power Cord into a Power Outlet and turn ON. To avoid damage to the Power cord, make sure it is kept away from the Product when in use.
- When unattended, we recommend you make sure the Product is turned OFF and DISCONNECTED from the Power Supply.
- When storing the Product, loosely coil the cord. It is important to allow the Product to cool before storage.
Important: Always operate the Product from a power source of the same Voltage, Frequency and Rating as indicated on the Product Identification Plate.

CAUTION
DO NOT immerse the Product, its Flexible Cord or Plug in water or any other liquid.
To reduce the risk of shock or damage to the Product, DO NOT disassemble. No user serviceable parts inside.

WARNING
To reduce risk of electric shock, DO NOT IMMERSE the Product in any liquid, or use the Product near baths, basins, swimming pool, shower area or other vessels containing water or other liquids, or when standing in or on damp or wet surfaces. If any Electrical product falls into water, UNPLUG it immediately; DO NOT REACH INTO THE WATER. Do not immerse or expose the Flexible Cord or Plug to rain, moisture or any liquid. Important: Prior to reconnecting the Power Supply, the complete Product should be inspected by a qualified technician.
This Product should not be used/operated in a confined space. Always use/operate this Product well away from walls and curtains. A fire may occur when this Product is in operation, if it is covered, or is close to flammable materials, such as curtains, drapes or wall coverings, etc.
To avoid overheating the Power Supply Cord, completely unwind all the cord, including from the cord storage area of product, if fitted.
ELECTRICAL DATA
IMPORTANT
This product is fitted with a sealed electrical connection plug that is compatible with the product, the mains supply for New Zealand and meets the requirements of international standards. This product must be connected to a supply voltage that is equal to that stated on the rating label. If the mains connection plug or power cord becomes damaged it must be replaced with a complete assembly that is identical to the original, and this must be replaced by an authorised service centre. Always follow the New Zealand requirements for connection to the mains supply. If in doubt always consult a qualified electrician.
Technical Specification
| Model JT-12V | |
| Voltage Input 22 | 0-240V AC 50Hz |
| Voltage Output 1 | 2V-10W |
ASSEMBLY INSTRUCTIONS
Tools Needed for Assembly
• Phillips screwdriver
- Adjustable wrench
Note: Remove any transit protection material
STEP 1
Lay the Pizza Oven on it's back and attach the washers and rubber feet by using 4*M5 screws 30mm long.

STEP 2
Stand the Pizza Oven on it's feet and attach the chimney to the body by using 3*M4 screws 8mm long. Then attach the control knob.

STEP 3
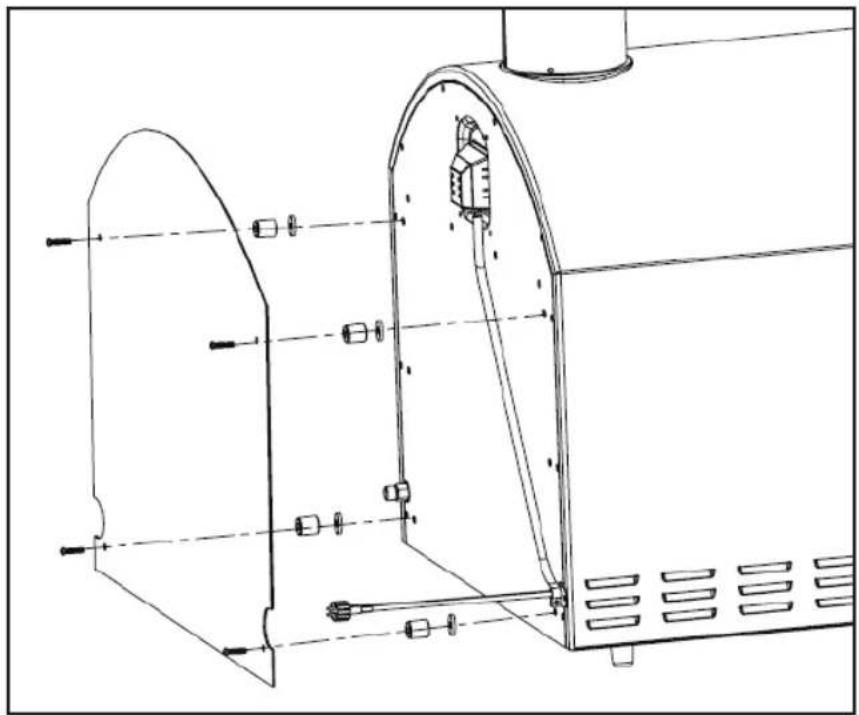
Attach the rear heat shield to the Pizza Oven using 4*M5 screws 30mm long and the spacers plus washers as shown.
STEP 4
Position the wire racks ensuring the folded down tabs locate into the holes of the front of the rack supports. Locate the ceramic stone into the bottom rack and position it at the rear of the appliance.

Step 5
Offer the hose assembly up to the connection point on the Pizza Oven. Tighten the connection nut clockwise with your fingers until it is finger tight. Using an adjustable crescent (spanner) tighten the nut by approximately 1/4 of a full turn.
Step 6
Attach the regulator to your gas cylinder.
Step 7
Turn on the gas cylinder ensuring that all of the controls on the Pizza Oven are turned OFF at this point. DO NOT ATTEMPT TO LIGHT THE PIZZA OVEN!!.


Step 8
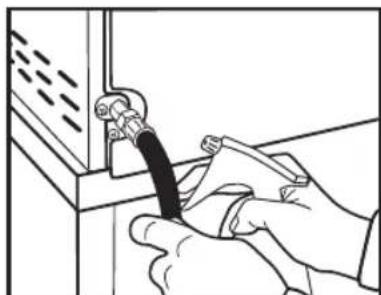
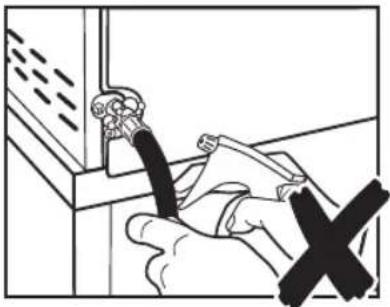
Use a solution of soapy water (dishwashing liquid and water is fine). Brush it on or use a spray bottle as shown in the photo. Ensure the connections have a good coating.
Step 9a
If the connection is leaking, bubbles will start to grow in the soapy solution. If this happens shut off the gas supply at the cylinder.
Step 9b
Retighten the connections using an adjustable crescent (spanner) then repeat steps 7 - 8.

Step 9c
The connection is gas tight when no bubbles grow around the gas connection.

USAGE TIPS
Preheating
It is necessary to preheat the appliance for at least 15 minutes before cooking certain foods, depending on the type of food and the cooking temperature. Food that requires a low cooking temperature needs a shorter period of preheating.
Cooking Pizza
A properly cooked, fresh pizza is one of life's true pleasures. Using the Gasmate Pizza Oven you can enjoy fresh cooked pizza in your own back yard.
Before cooking we recommend installing your pizza stone and turning the cooker to high until the cooker reaches just below your desired temperature. At this stage turn the cooker to low and the stored heat in the pizza stone will bring it up to the correct temperature (you may need a couple of tries to get this right).
Once your pizza is ready for cooking transfer it to a heated pizza tray on the middle shelf of the Pizza Oven using a spatula. Five minutes before cooking is complete transfer to the pizza stone to crisp the base and finish off. The pizza stone ensures an intense and even heat for a perfect crust.
This should produce a delicious pizza, however everyone's pizza recipe is a little different and we suggest you try a few different methods of cooking until you find the perfect process for you.
Cooking other Foods
Other foods can be cooked within the Pizza Oven just as you would with a conventional oven. The thermostat indicates the temperature at the top of the oven and the temperature within the oven may exhibit some local variation. We recommend always using a baking tray especially if cooking very greasy foods.
Smoking with the Pizza Oven
Your Pizza Oven can be used as a hot smoker. Hot smoking will not produce the intense smoked flavours obtained by cold smoking for long periods of time, but will give an added dimension to foods such as fish and poultry.
We suggest that you fill the smoker box with wood chips of your choice and sit on the open flame instead of the pizza stone. Leave the smoker box in place in a lit cooker for 10-15 minutes (or until smoke appears) before you start cooking. Then simply cook your food thoroughly as usual.
As with cooking pizza, everyone's taste is a little different so enjoy experimenting with a range of wood chip types and quantities, cooking times and foods.
Caring for your Pizza Oven
Both in inside and outside of your Pizza Oven require frequent cleaning to keep them in tip top shape. We generally recommend washing with warm soapy water and rinsing thoroughly at least once per month. Always allow the Pizza Oven to dry thoroughly before storage or use.
You're pizza stone is made of porous compacted sand and it will pick up flavours from cooking and smoking. The best way to clean the pizza stone is first to remove all loose residue and then soak in warm water for 20 minutes. Then allow to dry overnight in a dry place. You may need to repeat this process several times to get rid of all cooked in flavours. If any odours or flavours persist after repeating 5-6 times then you will probably need a new pizza stone.
SAFE APPLIANCE LOCATIONS
This appliance shall only be used in an above ground open-air situation with natural ventilation, without stagnant areas, where gas leakage and products of combustion are rapidly dispersed by wind and natural convection.
Any enclosure in which the appliance is used shall comply with the following:
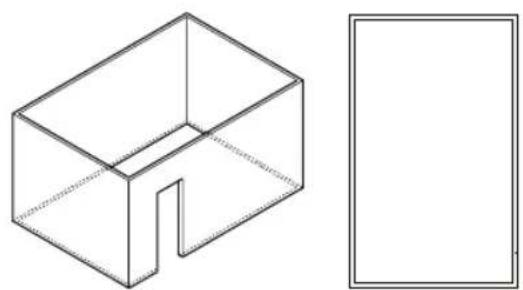
An enclosure with walls on all sides, but at least one permanent opening at ground level and no overhead cover (see Example 1).
Within a partial enclosure that includes an overhead cover and no more than two walls (see Example 2 & 3).
Within a partial enclosure that includes an overhead cover and more than two walls, the following will apply:
at least 25% of the total wall area is completely open, and at least 30% of the remaining wall area is open and unrestricted (see Example 4 & 5).
In the case of balconies, at least 20% of the total wall area shall be and remain open and unrestricted.
DIAGRAMMATIC REPRESENTATIONS OF OUTDOOR AREAS
The following figures are diagrammatic representations of outdoor areas. Rectangular areas have been used in these figures – the same principles apply to any other shaped area.
Outdoor Area - Example 1
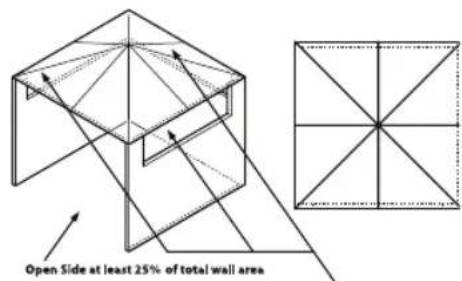
30% or more in total of the remaining wall area is open and unrestricted
Outdoor Area - Example 4
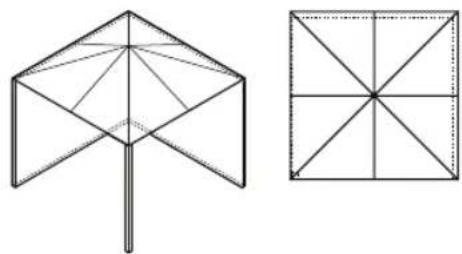
Outdoor Area - Example 2
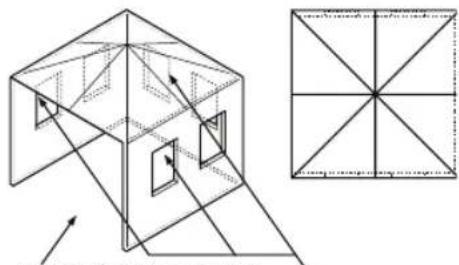
Open Side at least 25% of total wall area
30% or more in total of the remaining wall area is open and unrestricted
Outdoor Area - Example 5

Outdoor Area - Example 3
BARBECUE RANGE
Aber warrants the purchaser of this Barbecue against defects in workmanship and material, for a period of 12 months from the date of purchase. Barbecues are warranted for 12 months for domestic use only. Commercial use will void warranty.
Warranty and purchase receipt of this product are to be retained as proof of purchase and must be presented if making a claim under the terms of the Aber warranty. Repairs under warranty are made free of charge, provided the barbecue is delivered to our Service Department or Authorised Service Agent and freight charges both ways are paid by the owner. No liability will be accepted for any loss or damage in transit.
Note: In most cases the BBQ Body only will need to be returned.
Aber reserves the right to replace or repair the appliance within the warranty period. Warranty does not apply to any defect, deterioration (including corrosion if located within 1km of the sea), loss, injury or damage occasioned by or as a result of the misuse or abuse, negligent handling or if the product has not been installed and used in accordance with the instructions. The warranty is void if there is evidence of the product being tampered with by unauthorised persons.
If the product includes one or a number of accessories, only the defective accessory or part will be replaced i.e. Hose, Regulator, Rotisserie, Piezo Ignitor, Roast Hood, Side Burner and Rail Burners.
In the event of Aberchoosing to replace the appliance, the guarantee will expire at the original date, i.e. 12 months from the original purchase date.
Where this product contains information from an overseas country, nothing in that information is intended to limit any condition, guarantee, right or remedy which may be available under the Consumer Guarantees Act 1993, except to the extent permitted by that Act.
Approved For Outdoor Use Only
Fat fires are not covered under warranty
For service, spare parts or product information in New Zealand, please call Aber on the Customer Service Line - 0800 161 161. www.aber.co.nz.
YOUR PURCHASE RECORD (please complete)
Date of Purchase ____/____/____
Model Number ____
Serial Number (if applicable) ____
Purchased from ____
Attach copy of purchase receipt here


- PIZZA OVEN WITH LIGHT
- FOR OUTDOOR USE ONLY
- GENERAL INFORMATIONCONTENTS
- GAS INSTALLATION CODES
- CLEARANCES
- HOSE & REGULATOR SAFETY
- GAS CYLINDER USE & SAFETY
- SPECIFICATIONS
- NEVER STORE YOUR GAS CYLINDER INDOORS
- WARNING
- IF YOU SMELL GAS
- LOCATION OF YOUR APPLIANCE
- CHECK FOR ANY DAMAGE
- PROTECT CHILDREN
- FOR YOUR SAFETY
- GENERAL ASSEMBLY
- CONNECTING & DISCONNECTING TO GAS SOURCE
- CHECK
- CONNECTING
- DISCONNECTING
- LIGHTING PROCEDURE
- BURNER OPERATION & IGNITION SYSTEM CHECK
- IMPORTANT
- FLASH-BACK
- PREHEATING
- SERVICE
- OVEN LIGHT
- IMPORTANT SAFEGUARDS
- READ THESE INSTRUCTIONS CAREFULLY BEFORE USING THE PRODUCT. KEEP THE INSTRUCTIONS HANDY FOR FUTURE REFERENCE
- TO REDUCE THE RISK OF PERSONAL INJURY OR DAMAGE TO PROPERTY, FOLLOW BASIC SAFETY PRECAUTIONS WHEN USING THIS PRODUCT, INCLUDING THE FOLLOWING
- SERVICE & SAFETY
- OPERATING INSTRUCTIONS
- CAUTION
- ELECTRICAL DATA
- ASSEMBLY INSTRUCTIONS
- TOOLS NEEDED FOR ASSEMBLY
- STEP 1
- STEP 2
- STEP 3
- STEP 4
- STEP 5
- STEP 6
- STEP 7
- STEP 8
- STEP 9A
- STEP 9B
- STEP 9C
- USAGE TIPS
- COOKING PIZZA
- COOKING OTHER FOODS
- SMOKING WITH THE PIZZA OVEN
- CARING FOR YOUR PIZZA OVEN
- SAFE APPLIANCE LOCATIONS
- ANY ENCLOSURE IN WHICH THE APPLIANCE IS USED SHALL COMPLY WITH THE FOLLOWING
- DIAGRAMMATIC REPRESENTATIONS OF OUTDOOR AREAS
- BARBECUE RANGE
- FAT FIRES ARE NOT COVERED UNDER WARRANTY
- YOUR PURCHASE RECORD (PLEASE COMPLETE)
Brand : Gasmate
Model : PO110
Category : Pizza oven