KAPORAIR12GA - Air-conditioner Kogan - Free user manual and instructions
Find the device manual for free KAPORAIR12GA Kogan in PDF.


| Type of Product | Portable Air Conditioner |
| Brand | Kogan |
| Model | KAPORAIR12GA |
| Cooling Capacity | 12000 BTU |
| Dimensions (W x D x H) | 350 x 350 x 700 mm |
| Net Weight | 25 kg |
| Power Supply | 220-240 V ~ 50 Hz |
| Power Consumption (Cooling) | 1100 W |
| Operating Modes | Cool, Fan, Dehumidify |
| Fan Speeds | 3 (Low, Medium, High) |
| Noise Level | ≤ 50 dB(A) |
| Refrigerant | R410A |
| Timer | 24-hour programmable |
| Remote Control | Yes, included |
| Self-Evaporation | Yes (automatic) |
| Air Flow | 320 m³/h |
| Window Kit Included | Yes |
| Filter Cleaning | Washable mesh filter; clean every 2 weeks |
| Safety Features | Auto restart, thermal overload protection |
| Spare Parts Available | Filter, remote control |
| Energy Efficiency | EER ≥ 2.6 |
Frequently Asked Questions - KAPORAIR12GA Kogan
User questions about KAPORAIR12GA Kogan
0 question about this device. Answer the ones you know or ask your own.
Ask a new question about this device
Download the instructions for your Air-conditioner in PDF format for free! Find your manual KAPORAIR12GA - Kogan and take your electronic device back in hand. On this page are published all the documents necessary for the use of your device. KAPORAIR12GA by Kogan.
USER MANUAL KAPORAIR12GA Kogan
natural_image
White modular air conditioner unit with control panel and ventilation slots (no visible text or symbols)Thank you for selecting this high quality portable air-conditioner. Before use, read all instructions carefully. If you have any further questions, please contact the Kogan.com customer support team.
Table of Contents
Instruction Guide....2
Precautions....2
Important Safety Tips....2
Usage Notes....2
Product Layout....3
Control Panel....4
Functions Setting....4
Buttons....4
Product Usage....5
Placement....5
Installation....5
Remote Control....6
Protection Functions....7
Anti-Freeze Protection Function....7
Full Water Protection Function....7
Delay Protection Function of the Compressor....7
Cleaning and Maintenance....8
Manual Drainage Method....8
Continuous Drainage Method....8
Surface Cleaning....9
Filter Screen....9
Installing the Filter Frames and Filter Mesh....9
Moving the Unit....10
Seasonal Maintenance....10
Common Failures & Diagnostics....11
Intelligent Failure Detection....11
Breakdown Maintenance....11
Specifications....11
Instruction Guide
Precautions
- This air-conditioner is intended for household use only. Not suitable for use in commercial or industrial surroundings.
- This air-conditioner should only be used indoors in a dry environment. Do not use air-conditioner outdoors under any circumstances.
- Do not place or store objects around the air-conditioner. Air must be able to flow freely around the unit.
- Do not place anything on top of the air-conditioner.
- Do not operate the air-conditioner with wet hands or in a damp environment.
- To clean the air-conditioner, wipe it with a soft cloth. Do not use wax, thinners or any other cleaning agents.
- Clean the filter regularly. Once every two weeks is recommended.
- Do not drink the water from the condenser that the air-conditioner discharges.
- If you will not be using the air-conditioner for an extended period of time, unplug the power cord.
- There are no user-serviceable parts inside the air-conditioner. All maintenance must be done by a Kogan.com technician or a suitably qualified repair service.
Important Safety Tips
- Do not use damaged power cords or plugs. Do not plug the air-conditioner into a loose power outlet.
- Before use, ensure that the voltage supply matches the requirements of the air-conditioner.
- Do not attempt to modify or extend the power cord.
- Do not handle the plug with wet hands. This may lead to electric shock.
- When unplugging the power cord, hold the plug itself and remove. Never pull on the cord itself to unplug an electrical device.
- Do not operate the unit by turning the power supply on or off at the wall, nor by simply plugging and unplugging the power cord.
- Turn the air-conditioner off before unplugging the unit.
- Do not share a single power outlet with multiple high demand electrical appliances.
- Keep air-conditioner away from heat sources and keep it out of direct sunlight.
- If the air-conditioner starts to emit a strange noise, odour or smoke, switch the unit off immediately and disconnect the plug from the power socket. Contact the Kogan.com customer support team for further information.
- Do not place heavy objects on the power cord.
- Do not place fingers or objects into the air outlet.
- Do not allow water to enter the air-conditioner. If water does get into the unit, turn it off and disconnect the plug from the power socket immediately.
- When cleaning or moving the air-conditioner, turn it off and unplug it.
- Do not allow children to play with the air-conditioner. When children are nearby, adult supervision is required to ensure they do not play with the unit in any manner.
Usage Notes
- The air-conditioner must be placed on flat even ground and kept vertical to ensure the normal operation of the compressor.
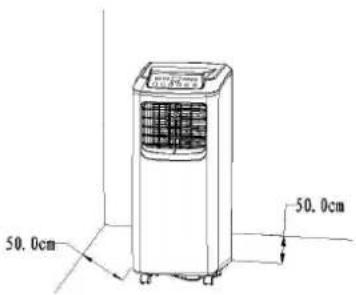
- There must be at least 50cm of space maintained between the air-conditioner and surrounding objects/walls.
- Do not use the air-conditioner near fuel or other flammable liquids.
- Do not use aerosol sprays or other solvents near the air-conditioner, as it may cause plastic deformation or even damage the electrical components of the unit.
Product Layout
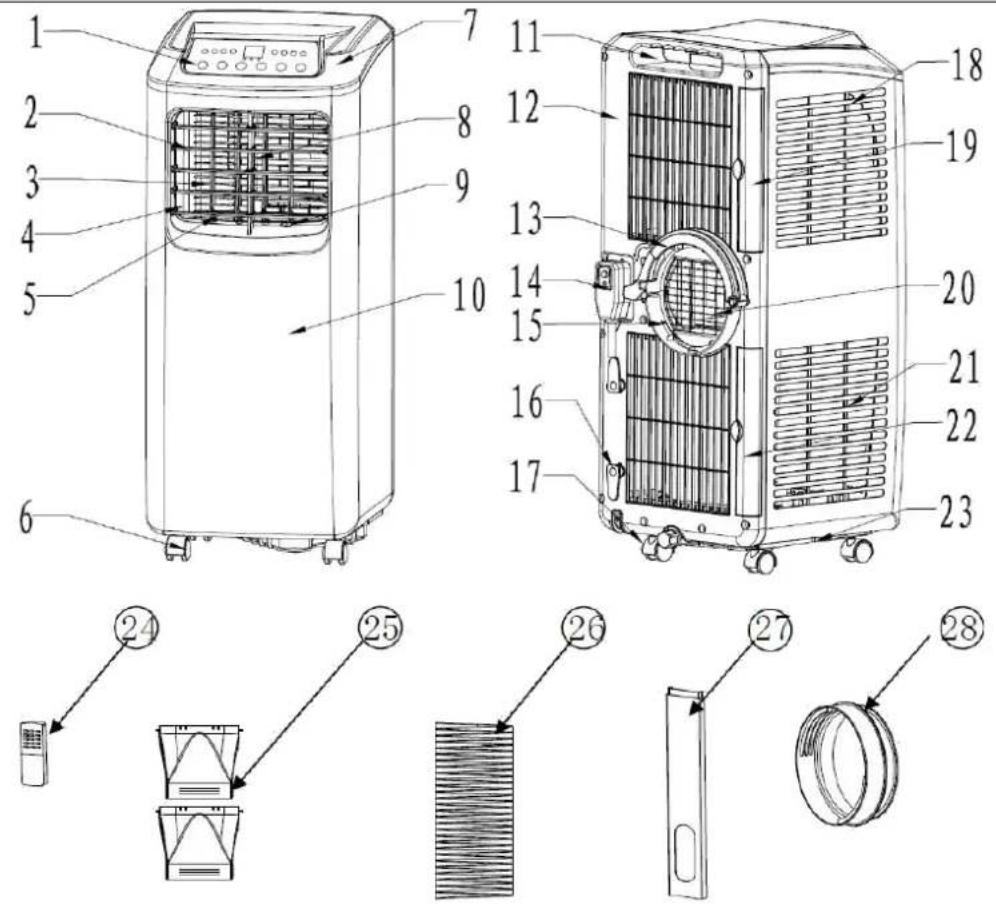
| 1 - Control Panel 15 - Lower Air Duct | |
| 2 - Horizontal Louvre 16 - Cord Winding Hook | |
| 3 - Vertical Louvre 17 - Drain Cap | |
| 4 - Air Outlet 18 - Evaporator Filter Mesh | |
| 5 - Vertical Louvre Connector Lever 19 - Evaporator Filter Frame | |
| 6 - Caster 20 - Radiating Fine Mesh | |
| 7 - Top Casing 21 - Condenser Filter Mesh | |
| 8 - Horizontal Louvre Connecting Lever 22 - Condenser Filter Frame | |
| 9 - Main Vertical Louver 23 - Base Plate | |
| 10 - Front Casing 24 - Remote Control | |
| 11 - Handle (plus remote control storage) 25 - Hose Adapter Connector | |
| 12 - Back Casing 26 - Heat Exhaust Hose | |
| 13 - C Shape Bracket for Head Exhaust Hose 27 - Heat Exhaust Hose Window Assembly | |
| 14 - Power Cord 28 - Window Sealing Board Assembly |
Functions Setting
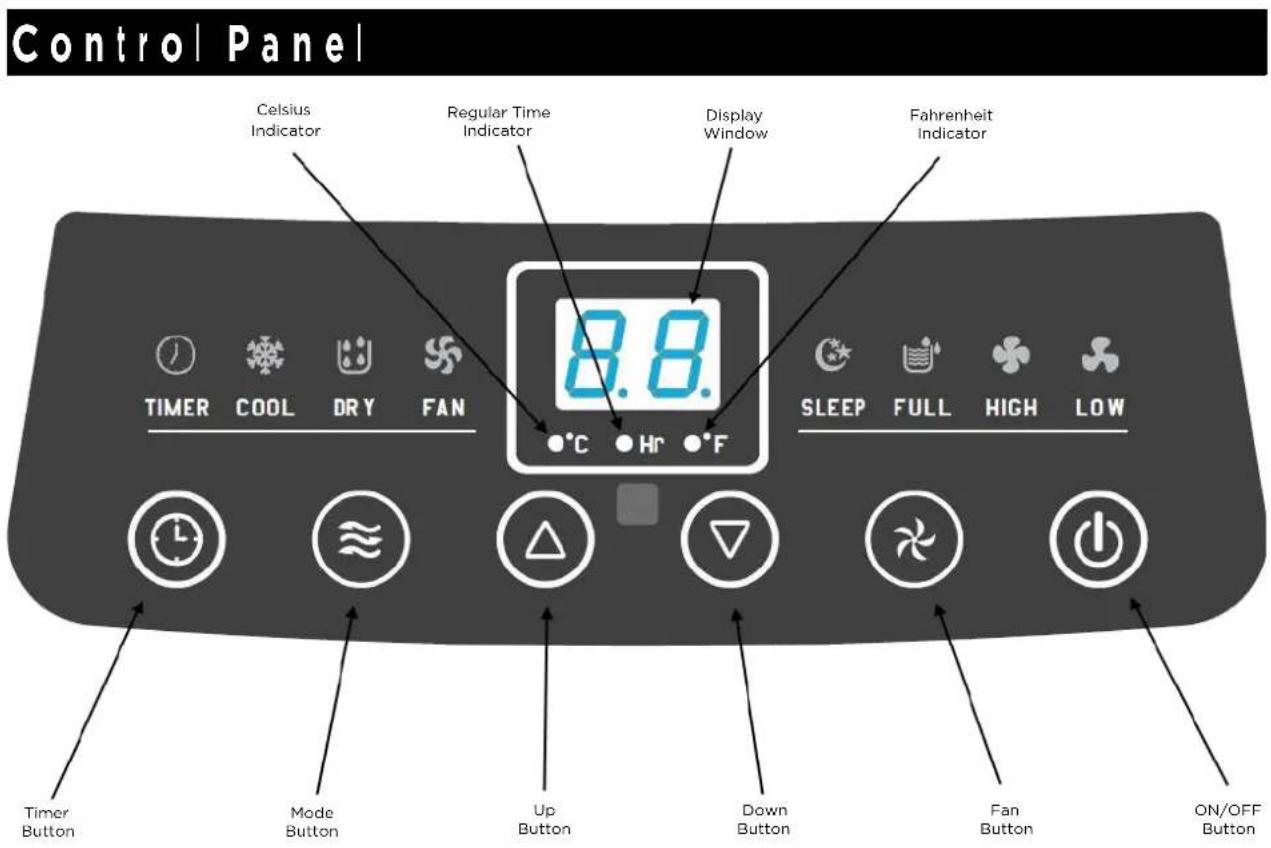
This portable air conditioner has three functions: cooling, dehumidifying and fan. The fan has two speeds: high speed and low speed. You can set the temperatures between 17^ 30^ and set a 24 hour timer.
Buttons
There are six keys on the control panel: POWER, Mode, Fan Speed, Timer, UP and Down
- Power Button
Press to turn air-conditioner ON or OFF.
- Mode Key
Set the cooling, dehumidifying and fan modes when unit is working or during the timer-on sequence.
- Fan Speed
Press to select between high and low air speeds.
- Timer
When the unit is operating, you can press this to set a time for the unit to turn itself off. Once the time set has passed, the unit will automatically shut down. If this button is used while the unit is not operating, it serves as a timer that will count-down until the unit turns itself on automatically.
Once a timer has been set, the Timer indicator light will be on.
- Up/Down Button
Press this two key set to set the desired room temperature (each press up or down will shift the setting by 1^ C), and it can also be used to set the timer in Timer mode. If you wish to switch between ^ F and ^ C measurements, press both the UP and DOWN buttons together.
Product Usage
Placement
- Leave the air-conditioner in an upright position for at least 2 hours before use. If possible keep the unit upright at all times.
- Place the air-conditioner on a flat floor near a window
- To maintain good air circulation and obtain the optimum air-conditioning performance, ensure there is 50cm of space around the unit.
installation
Installation of the C Shaped Bracket
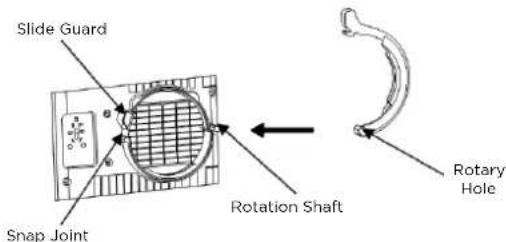
- Take the C shaped bracket out from the exhaust hose and remove the plastic bag.
- Align the rotary hole on the bracket with the rotation shaft point and slide it around until it meets up with the snap joint. When the bracket cannot be rotated any further due to the slide guard, then the bracket is in place.
- If the bracket is not sliding smoothly through the rotation shaft, do not force it. Instead rotate it back out of the rotation shaft and try to align them again.
Installation of the Heat Exhaust Hose
- Pull the end of the heat exhaust hose apart by several segments.
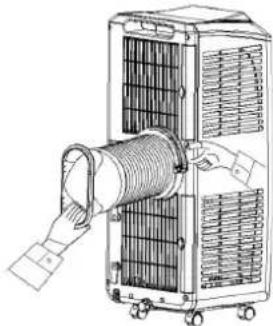
- Hold the end handle of the C shape bracket of the heat exhaust hose in your left hand, and the heat exhaust hose adaptor connector in your right hand. Put one end of the heat exhaust hose that has been pulled apart onto the snap lock of the lower air duct, then press the C shape bracket with your left hand with some force until the C shape bracket clips the snap joint of the back casing (as shown to right, top).
Notes:
a) The end of the heat exhaust hose must reach one step inside the bottom of the lower air duct (as shown to right, bottom).
b) The few turns at the end of the heat exhaust hose must be snapped into the snap lock of the lower air duct bottom.
c) The C shape bracket that clips the heat exhaust hose must clip the back casing and the heat exhaust hose firmly.
natural_image
Line drawing of a mechanical device with a coiled spring and hands operating it (no text or symbols)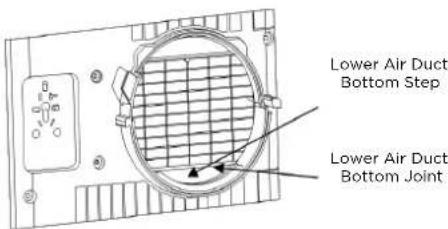
- Hold the unit with one hand and the heat exhaust hose adaptor connector with
another hand, or have someone assist you, while gently pulling the exhaust hose to extend the length if required.
Installation of the Window Sealing Board Assembly
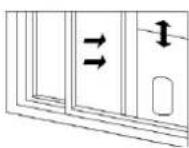
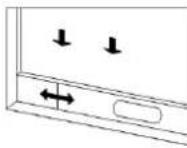
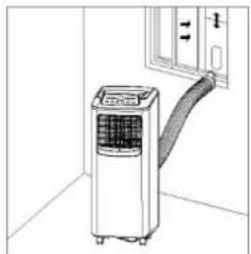
- Half open the window and mount the window sealing board assembly onto the window, either vertically or horizontally as is suitable (as shown below).
- Slide the backing of the window sealing board out as required until the two ends of the sealing board come into contact with the window frame, then fasten the parts of the assembly into place with copper screws.
Installation of the Unit
- Move the air conditioner with the heat exhaust hose assembly installed near the window, keeping the unit at least 50cm away from the walls and other nearby objects.
- Snap the flat end of the heat exhaust hose short connector into the elliptical hole in the window sealing board assembly (as shown below).
natural_image
Line drawing of an air conditioner unit with a handle, placed near a door (no text or symbols visible)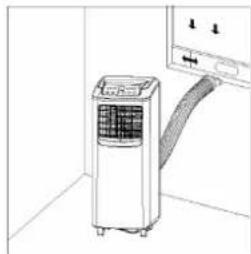
natural_image
Illustration of an air conditioner unit with a curved cable or hose attached to the front panel (no text or symbols visible)Note: The flat end of the heat exhaust hose must be in position. The heat exhaust hose should be kept as short and free of bends as possible for the maximum efficiency
The length of the exhaust hose is 280mm-1500mm long. This length is determined based on the specification of the air-conditioner itself. Do not extend or replace the hose with another one of different specifications as this may affect the function of the air-conditioner. The exhaust must be smooth and unobstructed. The air-conditioner may overheat if the exhaust is not vented properly.
Remote Control
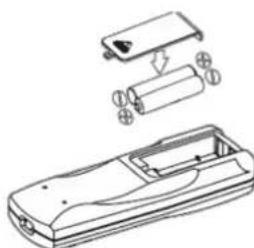
Before using the remote control, please install the batteries correctly. The steps to do so are as follows:
- Slide the battery cover on the back of the remote control open.
- Insert 2 batteries into the battery compartment, ensuring that the polarities match the markings on the inside of the compartment.
- Slide the battery cover back into place.
natural_image
Technical line drawing of a remote control casing with battery and battery pack (no text or symbols)Battery Notes:
• We recommend the use of alkaline batteries with the air conditioner. Do not use rechargeable batteries.
- When replacing the batteries, replace both at the same time. Do not mix old and new batteries.
- If the air-conditioner and remote control is not being used for a long time, remove the batteries from the remote control.
Battery Warnings:
If there is a battery leak, do not touch the battery with your bare hands.
Chemicals inside the battery may cause burns and other health hazards; if the battery liquid flows through onto your skin or clothing, rinse with water immediately; if it gets into your mouth, gargle with water and go straight to a hospital for urgent examination.
Protection Functions
Anti-Freeze Protection Function
Upon cooling, after the compressor has been operating for more than 10 minutes and the pipe temperature gets to 2^ C or below continuously for 20 seconds, the compressor and water pumping motor will turn off and the LED display will show E4. The unit will initiate the anti-frost protection function and all buttons will be inactive (except for the OFF button). Once the pipe temperature rises to 8^ C or above, the protection function will cease and the unit will meet the requirement for a 3-minute delay protection of the compressor.
Full Water Protection Function
When the water in the water tray exceeds the alarm level, the unit will sound an alarm automatically and the full water indicator will illuminate. In this case, you will need to drain the condensate from the unit, otherwise the unit will shut down automatically after the buzzer has sounded 5 beeps. (For more information regarding draining the tank, see the section "Drainage Method").
If the unit is not shut down manually, the unit will be restored to the previous operating status automatically once the water is fully drained. Otherwise the power can be restored and the unit usage can resume.
Delay Protection Function of the Compressor
This unit offers restart protection for the compressor. The compressor may start immediately upon first use, however if it has been running and shut-down for any reason, a 3-minute delay will be enforced before the compressor can then be started up again.
Cleaning and Maintenance
Manual Drainage Method
- Once the unit shuts down with a full water tank, turn the power off on the unit and then unplug the power plug.
- If required, carefully move the air-conditioner to a location where it will not matter if water accidentally splashes onto the floor.
- Put a large pan, bowl or other receptacle suitable for catching water below the water outlet at the back of the unit.
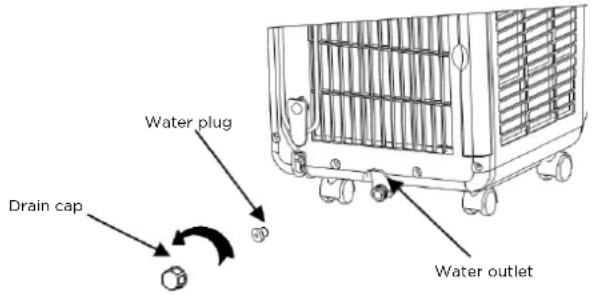
- Screw the drain cap off and unplug the water plug as shown below. Allow the water to flow from the unit into the receptacle. As the water flow lessens, slightly tilt the unit backwards to assist in getting as much water out as possible.
- If the receptacle being used cannot hold the entire contents of the water tank, you can block the water outlet with the plug to stop the water flow while the receptacle is emptied and replaced.
- Once the water is fully drained, insert the water plug and then screw the drain cap back on tightly. Be sure to only turn the unit on again once the plug and cap are in position, or else the condensate from the unit will drain out onto the floor or carpet.
Continuous Drainage Method
- Unscrew the drain cap in the direction shown by the arrow above and unplug the water plug.
- Insert a OD 13mm PVC drain hose (not supplied) 8mm-10mm into the water outlet (as shown to right).
- Connect the drain hose to a household drain or allow the end to access outside the house where the water can harmlessly drain away.
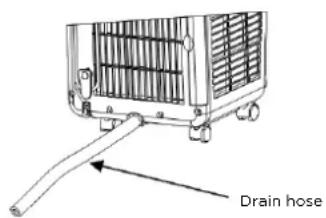
Notes:
- The drain hose must be installed when there is no water already in the tank.
- When operating in cooling mode, to ensure the water required for circulation around the condenser and to assist in the cooling effect of the unit, it is not recommended that the continuous drain method be used in air-conditioning mode.
- When operating in heating mode, the continuous drainage method is recommended, or else the unit may shut down often due to a full water tank.
- Put the drain hose in an inaccessible location at a height not above the water outlet itself, ensuring that the drain hose is not bent excessively.
- When continuous drainage is being employed, be sure to store the drain cap and water plug in a safe location.
Surface Cleaning
-
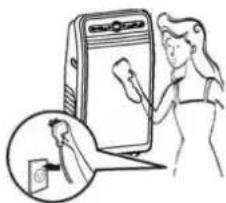
Remove plug from power supply.
-
Wipe with a soft cloth. Do not use any cleaning agents or rubbing alcohol on the surface as it may cause damage.
-
Do not let any liquids get into the internal parts of the air-conditioner.
Filter Screen
natural_image
Illustration of a person using a mobile phone to clean a small electronic device (no text or symbols visible)It is recommended that you clean the filter screens once every two weeks. If the air quality if poor, then more frequent cleaning may be required. If the filter becomes clogged with dust, the effective operation of the unit will be reduced. Screen cleaning steps are as follows:
-
Hold the frames by the grip positions on the evaporator filter frame and the condenser filter frame and pull the frames out gently in the direction shown by the arrow, as shown below left.
-
Hold the mesh frames by the grip positions as shown below right to remove the filter mesh.
Note: when taking the filter frame or filter mesh out, apply a nice even amount of force to avoid twisting or damaging the frames. Be sure to take out the filter frame first, followed by the filter mesh.
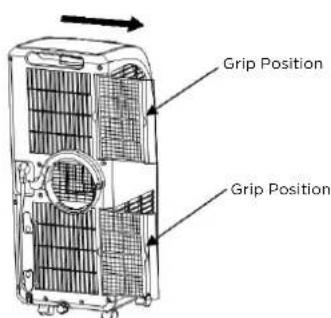
Filter Frame Removal
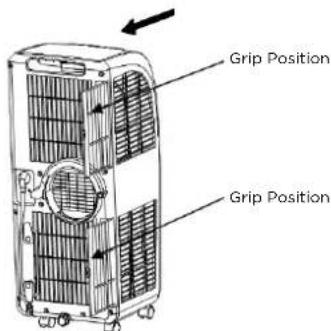
Filter Mesh Removal
- Put the evaporator filter frame, condenser filter frame and the mesh frames into warm water (about 40C) to which a neutral cleaner has been added for cleaning, the dry them in the shade.
Installing the Filter Frames and Filter Mesh
Note: be sure to install the filter mesh first, then the filter frame.
- To install the evaporator filter mesh and condenser filter mesh, point the back end of the filter mesh towards the socket, then push the filter evenly and gently into the socket.
Note: install the filter mesh in the reverse order of removal. The filter mesh must be installed into place, or else the filter frame will not be installed correctly.
- To install the evaporator filter frame and the condenser filter frame, point the back end of the filter frame towards the socket, then push the filter evenly and gently into the socket.
Moving the Unit
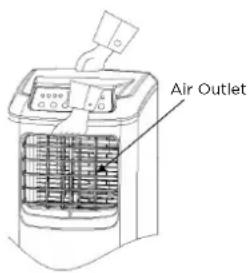
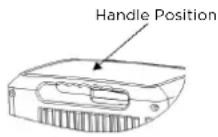
To handle or move the unit, hold the top of the air outlet on the front casing with one hand and the handle position at the top of the back casing with the other hand and move the unit, allowing it to remain in the upright position.
- Do not hold the horizontal louvre by hand.
- Leave the unit upright when handling or moving it.
- To hand or move the unit, drain the water in the unit first to prevent the water in the unit from flowing out onto the ground or carpet.
- If the remove control is being stored in the handle cavity, remove it first.
Seasonal Maintenance
If the air-conditioner will not be used for a long time, the maintenance steps are as follows:
- Unplug the unit from the power socket.
- Unscrew the drain cap, then unplug the water plug and drain all of the water out of the tank.
- Plug the unit back in to a pocket socket, turn the unit to air circulation mode with a low fan speed and leave it running in this mode for at least 8 hours to ensure the interior of the unit completely dries to prevent mold.
- Turn the unit off, unplug the power plug, wrap the power cord around the cord-winding hooks, insert the plug into the universal jack at the back of the unit, then replace the water plug and the drain cap.
- Remove the heat exhaust hose assembly and store it safely.
Note: to remove the heat exhaust hose assembly, hold the handle of the C shaped bracket on the heat exhaust hose and pull outward. Rotate the C shaped bracket clockwise once the bracket is separated from the snap lock position.
- Cover the air conditioner with a plastic bag such as a garbage bag, then store it in a dry location.
- Remove the batteries from the remote control.
When resuming use after a long break, check the integrity of the power cord and plug. If there are cracks or breakages, do not use the air-conditioner. Ensure that the water plug and filter screens are both correctly installed.
Common Failures & Diagnostics
Intelligent Failure Detection
| Error Code Multi-Function Testing | |
| E1 Coil temperature sensor failure | |
| E2 Indoor temperature sensor failure | |
| E4 | Anti-freeze protection: when the coil temperature is below 0°C, the whole machine will stop. When the coil temperature rises back up to 8°C or higher, the anti-freeze protection will cease and the unit will resume working. |
Breakdown Maintenance
The following table lists the common failures and the maintenance methods for the portable air-conditioner. When the unit runs abnormally, the following table may help diagnose the issue and suggest a resolution method. If the issue cannot be resolved, please contact the Kogan.com customer support team.
| Problem Possible Cause Solution Suggestion | ||
| Air-conditioner does not work. | No Power | Check power socket is plugged in and turned on. |
| Screen displays "FL" Check that water tank isn't full of water. | ||
| Off-timer function is activated. | Restart unit again once it has been turned off for 3 minutes. | |
| Air-conditioner doesn't seem to be effective. | Direct Sunlight Close curtains. | |
| Doors and windows are open, or there are too many people or heat sources. | Close doors and windows, and remove any non-essential heat sources. | |
| Air-inlet or outlet is blocked. Remove the blockage. | ||
| Air-conditioner is noisy. | The air-conditioner base is not located on a flat surface. | Place unit on a flat, solid surface. |
| Compressor is not working. | Compressor delay protection has been activated. | Wait for 3 minutes, then restart the air-conditioner once it's temperature has been reduced. |
Specifications
Power: 220-240VAC, 50HZ
- Table of Contents
- Instruction Guide
- Precautions
- Important Safety Tips
- Usage Notes
- Product Layout
- Functions Setting
- Buttons
- Product Usage
- Placement
- installation
- Installation of the Window Sealing Board Assembly
- Installation of the Unit
- Remote Control
- Battery Notes:
- Battery Warnings:
- Protection Functions
- Anti-Freeze Protection Function
- Full Water Protection Function
- Delay Protection Function of the Compressor
- Cleaning and Maintenance
- Manual Drainage Method
- Continuous Drainage Method
- Notes:
- Surface Cleaning
- Filter Screen
- Installing the Filter Frames and Filter Mesh
- Moving the Unit
- Seasonal Maintenance
- Common Failures & Diagnostics
- Breakdown Maintenance
- Specifications
Brand : Kogan
Model : KAPORAIR12GA
Category : Air-conditioner