
8830 S - Receiver NOKIA - Free user manual and instructions
Find the device manual for free 8830 S NOKIA in PDF.


| Product Type | Digital Satellite Receiver |
| Dimensions (W x D x H) | 280 x 200 x 50 mm |
| Weight | 1.2 kg |
| Power Supply | 100-240V AC, 50/60 Hz |
| Power Consumption | 15 W (max) |
| Supported TV Systems | PAL, NTSC, SECAM |
| Video Outputs | HDMI, Composite (RCA), SCART |
| Audio Outputs | Digital optical, Analog stereo (RCA) |
| USB Port | 1 x USB 2.0 for media playback |
| Supported File Systems | FAT32, NTFS |
| Channel Memory | 4000 channels |
| LNB Power | 13/18 V DC, 500 mA max |
| DiSEqC Support | DiSEqC 1.0, 1.1, 1.2, USALS |
| Remote Control | Infrared, 4x AAA batteries (not included) |
| Display | LED front panel |
| Cleaning Instructions | Use a soft, dry cloth to clean the casing. Avoid liquids. |
| Safety Instructions | Do not expose to moisture or heat sources. Ensure adequate ventilation. |
| Spare Parts & Repairability | No user-serviceable parts. Contact authorized service center. |
| Warranty | 1 year limited warranty |
| Package Contents | Receiver, remote control, power adapter, user manual, HDMI cable |
Frequently Asked Questions - 8830 S NOKIA
User questions about 8830 S NOKIA
0 question about this device. Answer the ones you know or ask your own.
Ask a new question about this device
Download the instructions for your Receiver in PDF format for free! Find your manual 8830 S - NOKIA and take your electronic device back in hand. On this page are published all the documents necessary for the use of your device. 8830 S by NOKIA.
USER MANUAL 8830 S NOKIA
natural_image
Black Nokia digital multimedia processor with DREAM branding (no visible text beyond branding)NOKIA
CONNECTING PEOPLE
DIGITAL MULTIMEDIA PROCESSOR (DMP) 8830
Contents
General Operation of the DMP 4
For your Safety 4
Remote Control 5
Front and Rear Panel 6
Installation of the DMP 8
Preparing the Remote Control 8
Connecting the DMP to the Dish 8
Connecting the DMP 9
Connecting to the TV 9
Connecting a TV and VCR 9
Connecting to the Telephone Wall Socket 10
Connecting a HiFi System 10
Connecting the AC power cord 10
Tuning Procedure when RF Connections
are Used 11
First time installation 12
General Information 12
The Welcome Menu 12
Channel Search 13
Time Adjustment 13
Viewing Mode 14
General Information 14
Programme Information 14
The "i" (Information) Button 15
Guide 15
List of TV and Radio Channels 16
Options (Green Button) 16
Video Recording 17
The TEXT button 17
Main Menu 18
General Information 18
TV and Radio Channels 18
Edit Channels 18
System Configuration 22
Channel Search 22
TV Settings 23
Time Adjustment 23
Receiver Upgrade 24
Reinstall 24
User Preferences 24
Parental Control 25
Change access code 25
Appearance Preferences 26
System Information 27
Conditional Access 27
Glossary of terms 28
Problem solving 29
Front panel display 30
Technical Specifications 31
Menu Screen Structure 32
Nokia and Nokia Connecting People are registered trademarks of Nokia
Corporation. Other product and company names mentioned herein may be trademarks or trade names of their owners.
Nokia Multimedia Terminals operates a policy of continuous development.
Therefore we reserve the right to make changes and improvements to any of the products described in this manual without any prior notice.
The EMC Directive 89/336/EEC is applied to this product.
Copyright©2000.Nokia Multimedia Terminals.
All rights reserved.
Throughout this manual you will notice that the everyday operation of your DMP is based on a series of user friendly on-screen displays and menus. These menus will help you get the most from your DMP, guiding you through installation, channel selection, viewing and many other functions.
All functions can be carried out using the buttons on the remote control, and some of the functions can also be carried out using the buttons on the front panel.
If at any time when using the menus (except Installation and Reinstall) you want to return to the normal TV/Radio mode, press the EXIT button.
Please be aware that new software may change the functionality of the DMP.
Should you experience any difficulties with the operation of your DMP, please consult the relevant section of this manual, including the Problem Solving, or alternatively call your dealer or a customer service adviser.
Please note: The first thing to do before sending the DMP to service is to:
1: Perform "Diagnostic" procedure in System Information menu.
2: Try downloading new software into the DMP.
With this procedure, the new software may solve the problem in the quickest and most efficient way. See the relevant section "Receiver Upgrade" further on in this manual.
FOR YOUR SAFETY
- Allow clear space around the DMP for sufficient ventilation.
- Do not cover the DMP or place it on a unit that emits heat.
- Use a soft cloth and a mild solution of washing-up liquid to clean the casing.
- Never allow liquids, spray or other materials to come into contact with the inside of the DMP.
-
Do not connect or modify cables when the DMP is plugged in.
-
Do not remove the cover.
- Do not allow the unit to be exposed to hot, cold or humid conditions.
• Service should be carried out only at a Nokia Authorised Service Centre. - Please note that the only way to isolate the DMP completely from the mains supply is to unplug the mains lead!
- For best protection of your DMP it is strongly advised that a surge protection device be installed (not included in standard accessory package).
REMOTE CONTROL
This section describes how to operate the DMP using the buttons on the remote control. Some of the functions can also be carried out using the buttons on the front panel.
To switch the DMP in and out of standby mode.
TV 📂 switch between TV or Radio (in viewing mode).
To turn the sound off/on (mute).
- + To adjust the volume of digital programmes. The DMP's maximum level is controlled by the TV's present volume setting.
0 - 9 To change channel and to select individual menu options. Note: If 0 is entered as the first digit, the Freeze (on/off) functionality is activated.
i Info. To display short and extended information (if transmitted) about current and next programmes.
BACK To go back one level in the menus normally without storing settings.
EXIT To return to viewing mode from a menu without storing settings (in menu mode).
MENU To display or exit from the "Main Menu" screen.
GUIDE To obtain a list of present and following programmes for the available channels. This information is only shown if your Service Provider transmits programme information (EPG information).
P+ P- To change channels up and down by one unit.
To change page in a menu/list/text if more than one page is available. To browse through teletext history.
▲ ▼ To move up/down in the menus and to change channels.
◀ ▶To change settings in menus.
OK To confirm choices and selection of a highlighted item. To display the TV/Radio channel list.
(Red) At the moment, no function.
OPTION (Green) To select service options in viewing mode e.g. Alternative Audio DVB Subtitling etc. At the moment, no function.
(Blue) To toggle between present and previous TV/Radio channels.
TEXT To enter and exit the application Teletext. At the moment, no function.

FRONT AND REAR PANEL
Front Panel
Display
shows channel number, error messages, remote control commands and time in standby mode

Rear Panel

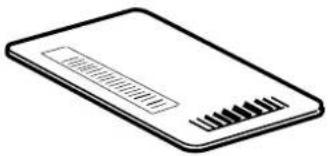
ABOUT THE SMARTCARD
The DMP box has access to scrambled TV/Radio channels based on the embedded Nagravision system.
To be able to receive these scrambled digital channels you will need a special Smartcard distributed by your Service Provider or included in the box. The Service Provider is the programme distributor of the channels.
Only some "Free-to-Air" channels may be available without the Smartcard.
After inserting the Smartcard, leave it in the slot permanently.
New and updated information may be downloaded on the Smartcard from time to time.
natural_image
Simple line drawing of a rectangular electronic device with no text or symbolsHow to insert a Smartcard (Nagravision)
- Insert your Smartcard fully into the slot on the front panel of the DMP. The gold chip should face downwards and inwards.


Note 1!
The gold chip of the smartcard should face downwards and inwards
PIN Code
The Smartcard is loaded with a 4-digit code, also called a PIN code (Personal Identification Number).
The code is essential in order to access future services offered by the Service Provider.
INSTALLATION OF THE DMP
The box for your DMP should contain the following items:
- the DMP
• a Remote control with 2 AAA batteries - an Audio/Video cable(fully featured 1,0 metre)
- an AC power cord
• an Owner's Manual
• a Software License agreement

About the Audio/Video sockets
- The rear panel of the DMP is equipped with 4 Phono sockets (see figure on page 6).
- Audio/Video cables are also necessary to get stereo sound from a stereo TV and video recorder.
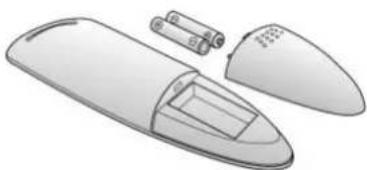
Preparing the Remote Control
- Remove the cover on the battery compartment at the bottom of the remote control.
- Insert the 2 AAA (1,5 V) batteries, as shown in the diagram, taking care to observe the + and - markings indicated inside
- Replace the cover.
Connecting the DMP to the Dish
If you need to fit the F-connectors onto the cable
- Prepare each end of the cable as shown in the diagram. You will need to fold back the outer braid (as shown).
- Slide the F-connector onto the cable, then turn it clockwise until it grips the braid.
- Ensure that 3mm of the core is protruding from the end of the connector.
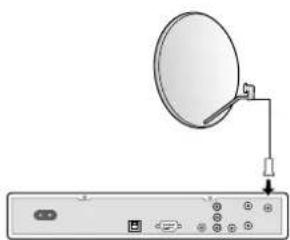
Installing the Satellite Dish
- See the "Fitting instructions for satellite dish" on how to install the dish.
- Connect the coaxial cable, with F-connectors fitted, from the LNB on the satellite dish to the socket marked "ANTENNA" on the rear panel of the DMP.
natural_image
Illustration of a remote control device with a battery and ventilation slots (no text or symbols)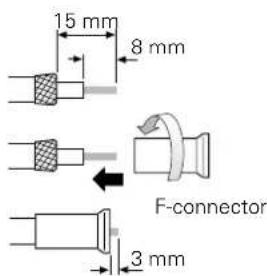
natural_image
Diagram of a satellite dish mounted on a monitor with a cable inserted, showing no text or symbols.Connecting the DMP
There are many different types of TV/VCR and other equipment that you can connect to the DMP.
In this manual you will see some of the most common ways to connect your equipment.
If you use RF leads you will have to tune your TV and VCR to the DMP output channel (see page 11).
If you have problems with your connections and need help, contact your dealer or Service Provider.
Connecting to the TV
- Connect the Audio/Video cable between the TV and the AUDIO/VIDEO L R sockets on the DMP.
- Connect an RF cable (not included) from the TV AERIAL input socket on the TV to the TV/VCR output of the DMP.
- Connect the TV aerial directly to the TV AERIAL input socket on the DMP.

Connecting a TV and VCR
Refer to your VCR's manual for full instructions.
If your TV has a Audio/Video socket, but your VCR does not
- Connect the Audio/Video cable between the TV and the VIDEO/AUDIO L R sockets on the DMP.
- Connect an RF cable from the RF output on the VCR to the TV aerial input socket on the TV.
- Connect an RF cable from the RF input socket on the VCR to the TV/VCR output socket on the DMP.
- Connect the TV aerial directly to the TV AERIAL input socket on the DMP.

flowchart
graph TD
    A["Video"] -->|Out In| B["Out"]
    A -->|RF| C["VCR"]
    C -->|RF| D["DMP"]
    D -->|Audio| A
    D -->|DMP| E["Ground"]
If your VCR has a Audio/Video socket, but your TV does not
- Connect the Audio/Video cable between the VCR and the VIDEO/AUDIO L R sockets on the DMP
- Connect an RF cable from the RF output socket on the VCR to the TV aerial input socket on the TV.
- Connect an RF cable from the RF input socket on the VCR to the TV/VCR output socket on the DMP.
- Connect the TV aerial directly to the TV AERIAL input socket on the DMP.

If your TV has a S-Video socket (S-Video cable is not included)
- Connect a S-Video cable from the S-Video socket on the DMP to the S-Video input socket on your TV.
- Connect an RF cable from the RF output socket on the VCR to the TV aerial input socket on the TV.
- Connect an RF cable from the TV/VCR output socket on the DMP to the RF input socket on the VCR.
- Connect the Audio cable between the AUDIO L R sockets on the DMP and the input sockets on the TV.
- Connect the TV aerial directly to the TV AERIAL input socket on the DMP.

flowchart
graph TD
    A["S-Video"] -->|RF| B["VCR"]
    A -->|RF| C["DMP"]
    B --> D["Output"]
    C --> E["Output"]
    style A fill:#f9f,stroke:#333
    style B fill:#ccf,stroke:#333
    style C fill:#cfc,stroke:#333
    style D fill:#fcc,stroke:#333
    style E fill:#cff,stroke:#333
Connecting a HiFi System
- Connect an RCA/Cinch stereo cable from the AUDIO L R sockets on the DMP to the LINE, AUX, SPARE or EXTRA input sockets on your HiFi system.
Note: To avoid interference you must use a screened audio cable.

natural_image
Diagram showing two speakers connected to a device via cables, with no visible text or symbolsConnecting to the Telephone Wall Socket
You will be offered interactive and Pay-Per-View services from your Service Provider. You may then need to connect the DMP to a telephone line.
- To connect the modem cable, plug the cable from the DMP TELEPHONE socket into the splitter (not included).
- Connect the telephone cable to the splitter and the splitter to the wall socket.
- For best protection of your DMP it is strongly advised that a surge protection device is installed (Surge protector not included).

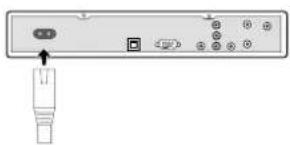
Connecting the AC power cord
- Connect the AC power cord to the DMP and connect the plug end to an AC power outlet.
natural_image
Back panel of a computer interface with an attached plug (no text or symbols visible)Tuning Procedure when RF Connections are Used
This procedure is necessary only if your DMP is connected to the TV with an RF lead.
To tune your TV to the RF signal you might also need your TV manual in addition to this manual. The steps below explain what to do if you have been unable to use Audio/Video leads in your connection.
- Plug in your DMP.
Tuning your TV to the DMP
- Select a channel number on the TV that is not currently used for other TV channels.
- Follow the instructions in your TV manual to tune the TV channel selector to VHF channel 3 (this is the DMP's factory preset VHF channel). If you are already using this channel, select channel 4.
- If you need to change VHF channel you do as follows: First you change on the DMP. Use the ▼ or ▲buttons on the front panel of the DMP, or on the remote. You will see the VHF channel number displayed on the front panel of the DMP. Then you tune the TV channel selector to the same VHF channel.
- When you have correctly changed the VHF channel number you will see the "Welcome" menu on the TV screen. If there is interference from other channels you will have to change the chosen VHF channel.
- Follow the instructions in your TV manual to store this VHF channel as the channel used by your DMP. You will have to select it when you want to watch digital TV/Radio channels.
- Once the welcome message is visible, press the OK button on the DMPs remote control to start the installation procedure.
If for some reason you have to change the RF channel later, you can do this by using TV settings menu further on in this manual.
If you have a VCR connected it must be tuned to a different VHF channel (between 3 to 4) than the DMP.
You may now proceed to "First Time Installation."


FIRST TIME INSTALLATION
General Information
Once you have correctly connected the DMP, you also have to perform a "First Time Installation."
During this procedure, helpful information is displayed at the bottom of the menus.
Please note!
The OK button always confirms a selection within these menus, and pressing it will take you to the next step in the installation process. However, and this is important, often more than one value has to be entered in a menu. First, perform all necessary settings on the different lines. Then, confirm them all simultaneously by pressing OK.
You can always go back to the previous menu by pressing the BACK button.
Use the ▲▼buttons to move upwards and downwards from one line to another. Use ◀▶to change settings.
You can also use the numeric buttons on the remote control to select a line in a menu and to enter numeric values.
The Welcome Menu
This picture indicates that you have started the installation procedure.
- Press the OK button to proceed.

FIRST TIME INSTALLATION
Channel Search
The Channel Search procedure can be performed in different ways.
- If there are predefined channels, you can make an Automatic Search.
- If no predefined channel is available you can make a Manual Search.

Manual Search
When you perform a Manual Search you first need to enter some parameters for the channel search to work.
The information you need to enter in this menu is available in magazines covering satellite TV reception, on the Internet or from your Service Provider.
Transponder frequency: Specify the frequency in GHz. If you enter the wrong figure(s), erase with the ◀button.
Polarization: Select Horizontal, Vertical, Circular left or Circular right.
Symbol rate (MSym/s): Enter with the numeric buttons. If you enter the wrong figure(s), erase with the ◀button.
FEC: Select "Auto" or any of the preprogrammed values.
Network Search: Select "Yes" if you want to search on all transponders connected to a specific network.
Press OK to start searching for channels.

Signal Strength (AGC) and Signal Quality (SNR)
The different signal indicators above the information bar provide information about two things:
AGC: The AGC will indicate the average strength of any incoming signal, digital as well as analogue.
SNR: The SNR indicates the signal quality from that specific channel.
When the search is finished, information about how many channels where found will appear on the screen.
- Press OK to continue.

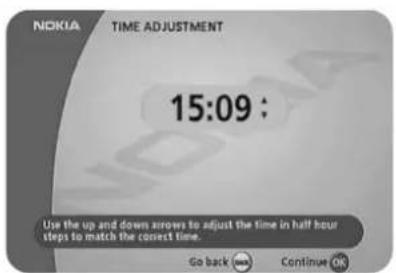
Time Adjustment
The time is adjusted by using the ▼▲ buttons, ±1/2 an hour at a time.
You can also adjust the minutes by using the ◀ buttons.
- Press OK and you are ready to watch TV.
VIEWING MODE
General Information
The following describes the basic functions of your DMP while watching satellite TV or listening to satellite radio.
Some of the functions described here are dependent on the Service Provider and can only be used if they are included in the transmitted programme information.
Please note, that during the Channel Search procedure, the DMP may download a large number of channels. This may include channels from various Service Providers, also those to which you do not have access unless you have a Smartcard from one of those Service Providers.
If you select a programme to which you do not have access, you will get a message on the screen. This message may vary, depending on Service Provider and used Smartcard.
While viewing, the current channel number will be shown on the front panel display.
In addition to the normal functions like switching the DMP in/out of standby, changing the volume etc. (ref. to the overview of the remote control) there are some other useful functions which will be explained in this part of the manual.
Programme Information
Every time you change channels you will receive programme information for a few seconds. (In the "User Preferences" menu you can select how long this information will be shown.)
The information may include:
Current time.
Channel list.
Channel number and name.
Name of the current and next programme.
The start and total time of the current programme.
A bar, indicating the elapsed time of the current programme.
Recommended lowest age limit for watching the programme.
The start and total time of the next programme.
Programme information will only be available if it is included in the transmission. Otherwise a "No information available" message will be shown.
You may change channel lists with the◀▶buttons.

VIEWING MODE
The "i" (Information) Button
The DMP has the ability to display information about programmes currently being broadcast as well as those being broadcast next.
This procedure is the same for both TV and Radio mode.
By pressing the "i" button while watching TV you will get a special Programme Information Banner. Select channel with ▼▲r the numeric buttons.
The "i" symbol is coloured blue when displaying information about the current channel, and red when information for another channel is shown.

Press "i" again to get more information about the current programme.
If a lot of information is available you can use the double arrow button to see the rest of the text.
Press "i" a third time to return to TV/Radio mode.

In this view, you can select to get information about the current and next programme by using the ◀▶buttons.
You can leave the menus at any time and return to viewing TV by pressing EXIT.

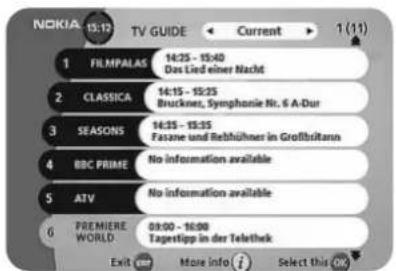
By pressing the GUIDE button you get access to the TV Guide (or Radio Guide if you are listening to radio channels) which will give the titles of the current and next programmes on different channels. The information is only available from the network to which the channel you are watching belongs.
Use the ▼ buttons to move the cursor to another programme. Use the double arrow buttons to move a page at a time up and down.
When a line is highlighted, you can get more information about this programme by pressing the "i" button.
VIEWING MODE
List of TV and Radio Channels
At the channel search procedure, two Channel lists are created. One list named "All TV" containing all channels, and another named "Free TV" containing only free channels.
In the "All TV" list scrambled channels are marked with a picture of a Smartcard (if this information is transmitted in the signal) and locked channels are marked with a padlock.
If you have performed a new channel search the new channels found will be marked with a star ★ in the "All TV" list.
When viewing TV or listening to radio channels you can access the Channel List by pressing OK. The lists are sorted by channel.
At the top of the menu you will see the name of the list. The current list is the one in which the channel you are watching right now is located.
Change channel lists with ◀ ▶.
To open the radio channel list you first have to enter radio mode by pressing "TV♪" and then OK.
You can change channel by stepping with the ▼ buttons or enter the channel number with the numeric buttons on the remote control.
Press OK when a channel name is highlighted to start watching/listening to it.
To change one channel list page at a time, use the double arrow buttons.
You can also get more information about a marked (highlighted) channel by pressing the "i" button.


Options (Green Button)
By pressing the OPTION button, you open a menu in which it is possible to enter temporary settings. Note! This function is not yet implemented. The menu will only appear if the programme contains any options to change.
Settings made in this "options menu" are only valid for the programme you currently are watching. If you leave the programme and return to it again, the temporary settings will be gone.
Audio Language
If available, you can select among the different languages being broadcast.
Subtitle Language/DVB Subtitling
If available, you can select among different subtitle languages. If you select "OFF", you will not get any subtitling at all.

VIEWING MODE
Video Recording
Please note, that during the recording of a programme, everything shown on the screen will be registered! For example, if you call up a menu from the DMP on the screen, the menu will be recorded!
When recording digital channels from the DMP and the Video recorder is connected with a RF cable: you must give the DMP an own position number on the video. (The same way as you probably already have given other channels their own positions.)
The TEXT button
- Pressing the TEXT button will turn Teletext on or off. This function is not yet implemented.
MAIN MENU
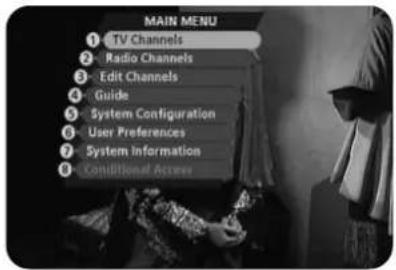
General Information
Many of the functions of the DMP are available from the Main Menu.
- Press MENU to open it.
TV and Radio Channels
Please refer to "List of TV and Radio channels" on page 16.
Edit Channels
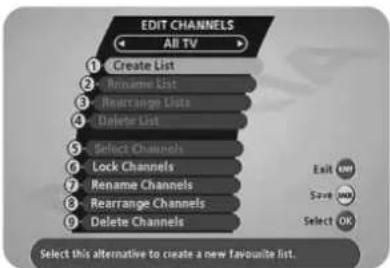
From these menus you can create and edit channel lists. You can, among other things, create favourite lists; add, delete, rename and arrange the order of the channels within the lists.
The "All TV" list can contain hundreds of channels. By creating your own favourite lists you can make channel handling a bit more convenient.
- Press BACK to save changes.
MAIN MENU
Create list
From here you can create your own favourite lists, containing the channels you watch most frequently. You can give each list a specific name, e.g. "Sport" or "Films."
When a favourite list is selected, you see only those channels defined in the list.
When you have given the list a name; press OK and you will enter the "Select Channels" menu (see next page) from where you add channels to the list.
You can create separate favourite lists for TV and Radio channels.
How to give a specific name
This procedure is the same whether you enter a name for the first time or change an existing.
- Move to a new character position by using
- To delete the last character use
- Enter the characters one by one (A....Z, 0....9) by using ▼▲. To speed up the procedure a bit you can use the double arrow buttons to jump 3 letters at the time.
- Figures can also be entered with the numeric buttons on the remote control.
- The next letter will be shown above the current, and the previous below it.
- Toggle between capital and lowercase letters with the blue button.

Rename list
From here you can give an existing list a new name. Use the arrow buttons the same way as when you created the list.
Rearrange lists
If you have created several Favourite lists you can determine the sequence in which the lists will appear.
Delete list
If you want to delete a Favourite list completely, select the list and press OK.
MAIN MENU
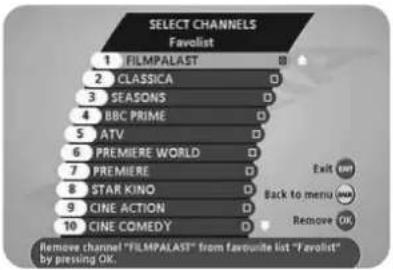
Select Channels
From this menu you add and remove the channels in your Favourite Lists. You use the "All TV" or "All Radio" list as basis to select the channels from.
A channel is added or removed by pressing the OK button. The square to the right on a line will be empty for removed channels, and will contain an "x" for added channels.
- Move to desired channel(s) with ▼▲, double arrows or the numeric buttons, and add/remove them by pressing OK.
- When you are ready, confirm the selections and leave the menu by pressing BACK.
Lock Channels
To get to this menu you first have to enter your access code. From here you can lock (and later unlock) channels in any of the lists in order to prevent e.g. your children from watching.
Select the channel you want to lock and press OK. Repeat the procedure for each channel you want to lock. When you lock a channel in any list, the channel will automatically be locked in all other lists.
A locked channel will be marked with a padlock symbol.
When watching TV, you will be asked to enter your access code before you can watch a locked channel.

Rename Channels
Within any of your favourite lists you can rename the channels. Mark the channel you want to rename and press OK. The Rename dialogue box will then appear and let you modify the existing name.
To enter the new name, please follow the instructions under the headline "How to give a specific name" on page 19.
When you have changed a channel name, the new name will appear in all lists where the channel is included.

MAIN MENU
Rearrange Channels
From here you can arrange the sequence for the channels within your favourite lists.
- With ▶, mark the channel you want to move to a new position within the list.
- Press ▶ again and the right side of the marked channel will change to ▼ ▲
- Move the channel to the desired position with ▼▲and press OK.
It is also possible to first mark several channels, and then move them all simultaneously.
- For each channel, press the button to add it to the set of marked channels.
- When a number of channels are marked this way and you want to move the whole set of channels, press ▶ again.
- The marked channels will now be put together into one group.
- The right side of the first and last marked channel will change to ▲ arrows respectively.
- Use the corresponding buttons to move the selected channels to a new position within the list.
- When the channels are in the position you want, press OK.


Delete Channels
From here, when the "All TV" list is selected in the "Edit Channels" menu, you can delete channels.
Please note. Channels deleted this way will be permanently deleted. The only way to get them back is to perform a new channel search.
To delete channels:
Mark the channel you want to delete and press OK. You will be asked if you really want to delete it. If so, confirm by pressing OK once more. If not, press BACK.
Press BACK after confirmation to go back to the Edit Channels main menu and press BACK one more time to save the changes.

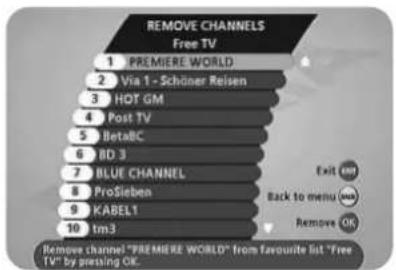
Remove Channels
From here, when the "Free TV" or a favourite list is selected in the "Edit Channels" menu, you can remove channels from those lists.
To remove channels:
Mark the channel you want to remove and press OK. You will be asked if you really want to remove it. If so, confirm by pressing OK once more. If not, press BACK.
Channels removed from a list this way are not permanently deleted. They are still available from the "All TV" list.
MAIN MENU
System Configuration
You will be asked to enter your access code before you can enter this menu. The code is preset to 1234 from the factory.
(The code can be changed from the Parental Control menu. Refer to page 25.)
If you want to customize the system to suit you better, you can specify some settings from the submenus in the "System Configuration" menu.
Please note that many of these functions are the same as in the "First Time Installation."

Channel Search
The Channel Search procedure can be performed in different ways.
- If there are predefined channels, you can make an Automatic or Manual Search.
- If no predefined channel is available you can make a Manual Search.

Automatic Search
Start an Automatic Search by pressing OK.

MAIN MENU
Manual Search
When you perform a Manual Search you first need to enter some parameters for the channel search to work.
The information you need to enter in this menu is available in magazines covering satellite TV reception, on the Internet or from your Service Provider.
Transponder frequency: Specify the frequency in GHz. If you enter the wrong figure(s), erase with the ◀button.
Polarization: Select Horizontal, Vertical, Circular left or Circular right.
Symbol rate (MSym/s): Enter with the numeric buttons. If you enter the wrong figure(s), erase with the ◀button.
FEC: Select "Auto" or any of the preprogrammed values.
Network Search: Select "Yes" if you want to search on all transponders connected to a specific network.
Press OK to start searching for channels.

TV Settings
From here you can adjust settings concerning your TV.
TV screen format
Select your TV screen format.
The 4:3 format is the standard format for most TV screens.
Select 16:9 for a wide screen TV.

RF channel
Select this alternative if you have to change the RF channel. If you change the RF channel number, you must also change it to the same value on the TV. If you do not, the picture will become black.
TV Standard
The TV standard is NTSC.
Time Adjustment
The time is adjusted by using the ▼▲ buttons, ±1/2 an hour at a time.
You can also adjust the minutes by using the ▶ buttons.

MAIN MENU
Receiver Upgrade
In order to keep the DMP up-to-date, it will be possible to download new versions of the system software via satellite. New software may include new or improved features for existing menus.
Enter this menu to check for new software. If new software is available you will get information in the menu on how to proceed.
If you download new software from "Nokia Internet pages", you transfer the software from the computer to the DMP via the serial port.
IMPORTANT! Updating via satellite may take a while. The front display will indicate the percent left to download.
NEVER turn off the DMP, never use the remote control or disconnect the antenna/LNB cable during the download procedure!

Reinstall
Use this option only if you have to start the complete installation procedure from scratch. If you continue from here, all your previous settings, parental code and favourite channels etc. will be erased!
If you do not want to change any settings you can leave this menu when the warning is displayed by pressing BACK or EXIT.

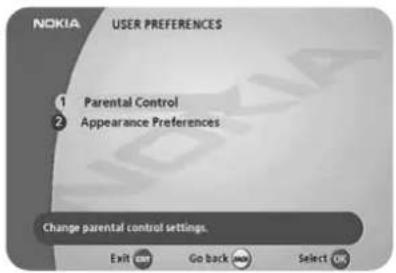
User Preferences
From here you can access the Parental Control and the Appearance menus.
MAIN MENU
Parental Control
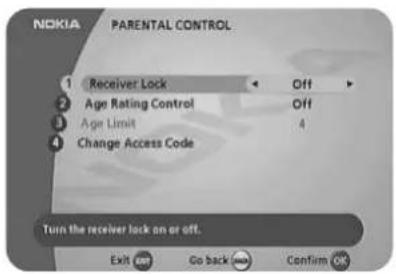
To open this menu you will be asked to enter your access code. From the factory the access code is set to 1234.
The following settings can be altered from this menu.
Receiver lock
If you select "On," you will have to enter the access code every time you start the DMP from standby.
Age Rating Control
If you want everybody to have access to all available types of programmes, select "Off."
If you select "On," you may block programmes unsuitable for children. Select an age limit between 4 and 18 years on the line that appears.
However, you should be aware that not all Service Providers have the necessary codes for these functions implemented in their transmissions.
Do not use this Age Rating Control function if you are using the Age Rating Control provided with your Smartcard.
Change access code
From here you can change the access code from the standard 1234. DO NOT FORGET IT! Without it you do not have access to any of the functions where the code is required!
If you forget it, you have to contact an Authorized Nokia Service Center to get help.

MAIN MENU
Appearance Preferences
Banner time-out
When you switch channels, an information banner will be shown for a few seconds. You can select for how long the banner will be shown.
Volume bar
Select whether or not you want the volume bar to appear on the screen when you change the volume.
Volume bar time-out
Select how long the banner will be visible on the screen.

Subtitles
Select whether or not subtitles will be visible on the screen. This function is not yet implemented.
Picture format
If you have a TV set with the 4:3 picture format and the transmission is in 16:9, you can select Fullscreen or Letterbox.
Fullscreen will fill up the screen but cut off some information on the left and right sides.
Letterbox will give a complete picture, but leave black areas at the top and bottom.

'fullscreen format'

'letterbox format'
MAIN MENU
System Information
If you have to contact your service provider or a service center, they might ask for information available from this menu. Therefore, it is important that you first check the information in the following menus.

System Information
This gives general information about which hardware and software version your DMP is running on.

Diagnostics
To find out the condition of certain parts of the DMP, you can run a diagnostic test.

Conditional Access
This menu will only be activated if you have inserted a valid Smartcard in the slot.
The Nagravision Conditional Access (CA) System is embedded in the DMP.
A Smartcard that supports this standard can be used in the slot on the front panel.

GLOSSARY OF TERMS
Access
Authorisation to use the coding system to purchase / order TV programmes.
AGC
Automatic Gain Control.
Audio system
With digital satellite reception, the sound is transmitted in packages and is selected either in a special audio mode or pre-selected by using the installation setup. This makes it possible to select between several different languages in a film. The number of choices is dependent on what is available in the signal.
CA
Conditional Access. A system to control subscriber access to services, programmes and events.
DVB
The Digital Video Broadcast group was created to establish a technical framework for the introduction of digital video broadcasting systems.
EPG
Electronic Programme Guide. A software that enables viewers to navigate easily among the large number of channels provided by digital technology, in order to select the service they desire.
FEC
Forward Error Correction. Correction of faulty bits in the received signal.
Guide
Programme Schedules. An application that enables viewers to navigate easily among the large number of channels provided by digital technology, in order to select the service they desire.
GHz
The prefix giga means billion, and Hertz means cycles per second. Signals in the GHz range are often called microwaves.
LNB (low-noise block converter) or LNBF
An electronic unit mounted on the satellite dish. It receives the signals reflected by the dish and converts them to signals that can be used by the DMP.
L.O.
Local oscillator part of the LNB. It converts from the satellite frequency down to a frequency acceptable for the DMP.
DMP
Digital Multimedia Processor.
A unit that converts the digital satellite signals into audio and video signals. The audio and video signal can be sent to the TV set either via Audio/Video or via RF (modulator output).
MHz
The prefix mega means million, and Hertz means cycles per second.
MPEG
Moving Picture Experts Group. Body established by the International Standards Organisation to provide the basis for a picture coding and compression system.
Network
A number of digital channels transmitted from one source. Grouped under separate headings in the channel list.
Parental control
A feature that allows parents to "lock" programmes that they consider unsuitable for children. A "locked" channel or programme can only be " unlocked" with the special parental access code.
Parental Access code
A four-digit code stored in the DMP. Used to lock the DMP.
PIN code
Personal Identification Number. A four-digit code stored in the Smartcard. For PPV (Pay Per View) or other services together with the subscription.
Polarization
Polarization allows several programmes to be fit into the same frequency band. The signals from a satellite are transmitted either with linear (vertical or horizontal) polarization or circular (right or left) polarization.
RF
Radio frequency (known as HF in some countries).
SERIAL RS 232
A serial communication standard data port.
Satellite dish
A dish-shaped antenna (reflector) to receive signals from a satellite. The dish focuses the signals into the LNB.
Scrambled satellite TV programme
Some satellite TV programmes are transmitted in scrambled form. A Smartcard, and possibly a CA module, will be needed to view such programmes.
Service provider
Is a company that collects a number of programmes/services and distributes them to customers.
SNR
Signal to Noise Ratio. Signal quality measure.
Symbol rate
Size of the digital package transmission
S-Video
A means to transport a high quality video signal (also known as S-VHS).
PROBLEM SOLVING
| Problem | Possible causes | What to do |
| The display on the front panel does not light up/is not lit. | Mains cable is not connected. | Check that the mains cable is plugged into the power socket. |
| No sound or picture, but the front panel shows the time or - - : - - . | The DMP is in standby mode. | Press the standby button or any number button to bring the DMP out of standby mode. |
| No sound or picture. | The satellite dish is not pointing at the satellite.No signal or weak signal. | Adjust the dish. Check the signal level indicator in one of the channel search submenus.Check the cable connections, LNB and other equipment connected between the LNB and the receiver, or adjust the dish.Severe weather conditions and heavy cloud cover may also produce this effect. |
| No sound or picture on horizontal modulated transponder. | The LNB is faulty. | Replace the LNB. |
| Bad picture/blocking error. | The satellite dish is not pointing at the satellite.Signal too strong.Satellite dish is too small.LNB noise factor too high.The LNB is faulty. | Adjust the dish.Connect a signal attenuator to the LNB input.Change to a larger dish.Change to an LNB with lower noise factor.Change the LNB. |
| There is no menu on the screen after you switched on the DMP for the first time. | The system is connected by Audio/Video cable and the TV is not in Audio/Video mode.The system is connected by RF cables and the TV is not set to the channel tuned for digital satellite TV. | If the system is connected by Audio/Video cable, switch the TV to the appropriate AV input.If the system is connected by RF cables, switch the TV to the channel for digital satellite TV. If you have not tuned in the TV you may do this first. Please look in the TV manual for instructions. You can also change the RF-channel in the DMP. See TV settings. |
| There is interference on your digital satellite channels, an existing terrestrial channel or video signal. | The system is connected by RF cables and the output channel of the Media-master interferes with an existing terrestrial channel or video signal. | Change the DMP output channel to a more suitable channel between 3-4, or connect the system by Audio/Video cable. |
| You made a video recording of a digital satellite channel and whole or parts of the programme was not recorded. | The DMP was not left on the appropriate channel.The system is connected by Audio/Video cables and the VCR is not in Audio/Video mode.The system is connected by RF cables and the VCR is not set to the channel tuned for digital satellite TV. | If you make a recording of digital satellite TV your DMP has to be left on the channel you want to record. If the system is connected by Audio/Video cables, switch the VCR to appropriate AV input.If the system is connected by RF cables, switch the VCR to the channel for digital satellite TV. If you have not tuned in the VCR you may do this first. Please look in the VCR manual for instructions. |
PROBLEM SOLVING
| Problem | Possible causes | What to do |
| The remote control is not working. | Battery exhausted.Remote control is incorrectly aimed.The DMP is in standby mode. | Change the batteries (both).Aim the remote control at box.Check that nothing blocks the front panel.Check if (.) is flashing on the front panel display when you press a button.If not replace the batteries (both). |
| You see the on-screen message.Viewing card error. | The DMP can't recognise or detect your Smartcard. | Check that you are using the proper Smartcard. Check that the Smartcard has been correctly inserted with the gold chip downwards. If the problem persists, you may have a problem with the card.Contact your dealer or Service Provider. |
| You have forgotten your secret PIN code. | Contact your Service Provider.They will help you set it up again. |
Please note: The first thing to do before sending the DMP to service is to:
1: Perform "Diagnostic" procedure in System Information menu.
2: Try downloading new software into the DMP.
With this procedure, the new software may solve the problem in the quickest and most efficient way. See the relevant section "Receiver Upgrade" earlier on in this manual.
What to do if you can't solve the problem
If you have tried all of the actions suggested above, without solving the problem, please contact your dealer or Service Provider.
FRONT PANEL DISPLAY
 | When power-up, front processor version, boot version and system software version is shown. |  | RF channel in tuning mode. |
| When starting from standby, product variant and system software version is shown. | 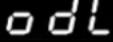 | When downloading new software via the air. | |
| Remaining time in percent during the download procedure. |  | When downloading new software via the Serial RS232 socket. | |
 | The DMP is in standby mode, and current time is shown. | 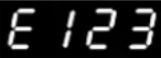 | Error messages. For service personnel |
| Channel number in TV mode. |  | Lights when no signal is being received. | |
 | |||
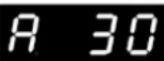 | Channel number in radio mode. |  | Flashes when pressing a button on the remote control. |
TECHNICAL SPECIFICATIONS
Transmission Standards
DVB, MPEG 2
LNB / Tuner input
Input connector 1x F-type (Antenna)
RF input frequency 920 to 2150 MHz
RF input power level -25 to -60 dBm
Supply voltage 13 V ± 0.5 V / 18 V ± 0.7 V
Max. current 400 mA, overload protected
Control voltage 22 kHz
RF impedance 75 Ω
Smartcard Interface:
Interface for one card according to ISO 7816 Supports embedded Nagravision descrambler.
Front panel
4x7 segment numeric LED display, Buttons: ⏻, ↓↑ (standby, channel number an RF channel number up/down)
General data
Article code
The model code, variant and serial number, are located on a label on the underside of the housing.
RF modulator
Input/output connector 2x F-type (TV AERIAL/TV/VCR)
Modulator frequency 61.25, 67.25 MHz, channel 3 & 4
Bypass frequency 54 to 806 MHz
Output signal NTSC
Output channel 3 to 4
Preset channel 3
Design Loop through output
VIDEO
Connector 1 x RCA
Composite video output
Supply voltage 95-250 V AC 50-60 Hz
Power consumption max 20 W
Power consumption in
standby 7 W
Operating temperature +5°C to +45°C
Storage temperature - 40°C to +65°C
Humidity
Operating distance for remote control
Dimensions (w x d x h) 380 x 240 x 65 mm
Weight 2,1 kg approx
AUDIO R L
Connector 2 x RCA (stereo R+L)
Connector 1 x RCA (for mono audio)
Output 0,5 V ms ± 0,5 dB / R _L 10 kΩ
Dynamic range 80 dB A @ 0 dB FS
S-VIDEO
Connector 1x4 pin Mini-DIN
Y Luminance 1 V _pp
C Chrominance
Impedance 75 Ω
TELEPHONE
Connector Modular Jack 6-pin RJ11
If Closed Caption is present in the digital stream it will be inserted in the analogue output.
SERIAL (RS 232) Serial data
Connector 9-pin D-sub female
Signals RS232, max. 115,2 kbit/s
Pin 1 DCD (Data carrier detect) + 12 V when
DMP is operational
2 TXD (Transmit data)
3 RXD (Receive data)
4 DTR (Data terminal ready) not connected
5 GND (Signal ground)
6 DSR (Data set ready) Set to high
7 CTS (Clear to send)
8 RTS (Ready to send)
9 RI (Ring indicator) not connected
MENUS SCREEN STRUCTURE
First time installation

flowchart
graph LR
    A["Welcome menu"] --> B["Channel Search\n1 Automatic Search\n2 Manual Search"]
    B --> C["Antenna Adjustment:\n1 Automatic Search\nAGC SNR"]
    C --> D["Time Adjustment\n19:35"]
    D --> E["Picture"]
Main Menu

flowchart
graph TD
    A["TV Channels All TV"] --> B["Radio Channels All Radio"]
    A --> C["Edit Channels All TV"]
    A --> D["System Configuration"]
    A --> E["Channel Search"]
    A --> F["Time Adjustment"]
    A --> G["System Configuration"]
    A --> H["System Configuration"]
    B --> I["Main Menu 1 TV Channels"]
    C --> I
    D --> I
    E --> J["Antenna Adjustment"]
    F --> J
    G --> J
    H --> J
    I --> K["User Preferences 1 Parental Control 2 Appearance Preferences"]
    J --> K
    K --> L["Code User Preferences Access Code Enter access code xxxx"]
    L --> M["Parental Control 1 Receiver Lock Off 2 Age rating Control On 3 Age Limit 15 4 Change Access Code"]
    M --> N["Appearance Preferences 1 Banner Time-out 2 Volume Bar 3 Volume Bar Time-out 4 Substitles 5 Picture format"]
    N --> O["TV Guide FILMPALAST ...... 2 CLASSICA ...... 3 SEASONS ...... 4 BBC PRIME ......"]
    O --> P["TV Guide ...... ...... ...... ...... ...... ...... ...... ...... ...... ...... ...... ...... ...... ...... ...... ...... ...... ...... ...... ...... ...... ...... ...... ...... ...... ...... ...... ...... ...... ...... ...... ...... ...... ...... ...... ...... ...... ...... ...... ...... ...... ...... ...... ...... ...... ...... ...... ...... ...... ...... ...... ...... ...... ...... ...... ...... ...... ...... ...... ...... ...... ...... ...... ...... ...... ...... ...... ...... ...... ...... ...... ...... ...... ...... ...... ...... ...... ...... ... "]

    I --> Q["AGC SNR"]
    J --> R["AGC SNR"]
    K --> S["AGC SNR"]
    L --> T["AGC SNR"]
    M --> U["AGC SNR"]
    N --> V["AGC SNR"]
    O --> W["AGC SNR"]
    P --> X["AGC SNR"]
    Q --> Y[Satellite Position: Satellite Position: Satellite Position: Satellite Position: Satellite Position: Satellite Position: Satellite Position: Satellite Position: Satellite Position: Satellite Position: Satellite Position: Satellite Position: Satellite Position: Satellite Position: Satellite Position: Satellite Position: Satellite Position: Satellite Position: Satellite Position: Satellite Position: Satellite Position: Satellite Position: Satellite Position: Satellite Position: Satellite Position: Satellite Position: Satellite Position: Satellite Position: Satellite Position: Satellite Position: Satellite Position: Satellite Position: Satellite Position: Satellite Position: Satellite Positions: Satellite Positions: Satellite Positions: Satellite Positions: Satellite Positions: Satellite Positions: Satellite Positions: Satellite Positions: Satellite Positions: Satellite Positions: Satellite Positions: Satellite Positions: Satellite Positions: Satellite Positions: Satellite Positions: Satellite Positions: Satellite Positions: Satellite Positions: Satellite Positions: Satellite Positions: Satellite Positions: Satellite Positions: Satellite Positions: Satellite Positions: Satellite Positions: Satellite Positions: Satellite Positions: Satellite Positions: Satellite Positions: Satellite Positions: Satellite Positions: Satellite Positions: Satellite Positions: Satellite Positions; Unknown; Unknown; Unknown; Unknown; Unknown; Unknown; Unknown; Unknown; Unknown; Unknown; Unknown; Unknown; Unknown; Unknown; Unknown; Unknown; Unknown; Unknown; Unknown; Unknown; Unknown; Unknown; Unknown; Unknown; Unknown; Unknown; Unknown; Unknown; Unknown; Unknown; Unknown; Unknown; Unknown; Unknown; Unknown; Unknown; Unknown; Unknown; Unknown; Unknown; Unknown; Unknown; Unknown; Unknown; Unknown; Unknown; Unknown; Unknown; Unknown; Unknown; Un Available; Unknown; Unknown; Unknown; Unknown; Unknown; Unknown; Unknown; Unknown; Unknown; Unknown; Unknown; Unknown; Unknown; Unknown; Unknown; Unknown; Unknown; Unknown; Unknown; Unknown; Unknown; Unknown; Unknown; Unknown; Unknown; Unknown; Unknown; Unknown; Unknown; Unknown; Unknown; Unknown; Unknown; Unknown; Unknown; Unknown; Unknown; Unknown; Unknown; Unknown; Unknown; Unknown; Unknown; Unknown; Unknown; Unknown; Unknown; Unknown; Unknown;Unknown; Unknown; Unknown; Unknown; Unknown; Unknown; Unknown; Unknown; Unknown; Unknown; Unknown; Unknown; Unknown; Unknown; Unknown; Unknown; Unknown; Unknown; Unknown; Unknown; Unknown; Unknown; Unknown; Unknown; Unknown; Unknown; Unknown; Unknown; Unknown; Unknown; Unknown; Unknown; Unknown; Unknown; Unknown; Unknown; Unknown; Unknown; Unknown; Unknown; Unknown; Unknown; Unknown; Unknown; Unknown; Unknown; Unknown; Unknown;
    I --> N
    J --> O
    K --> P
    L --> Q
    M --> R
    N --> S
    O --> T
    P --> U
    Q --> V
    R --> W
    S --> X
    T --> Y
    U --> Z
    V --> AA
    W --> AB
    X --> AC
    Y --> AD
    Z --> AE
    AA --> AF
    AB --> AG
    AC --> AH
    AD --> AI
    AE --> AJ
    AF --> AK
    AG --> AL
    AH --> AM
    AI --> AN
    AJ --> AO
    AK --> AP
    AL --> AQ
    AM --> AR
    AN --> AS
    AO --> AT
    AP --> AU
    AQ --> AV
    AR --> AW
    AS --> AX
    AT --> AY
    AU --> AZ
    AV --> BA
    AW --> BB
    AX --> BC
    AY --> BD

Nokia and Nokia Connecting People are registered
trademarks of Nokia Corporation
www.nokia.com
- DIGITAL MULTIMEDIA PROCESSOR (DMP) 8830
- Contents
- General Operation of the DMP 4
- For your Safety 4
- Remote Control 5
- Front and Rear Panel 6
- Installation of the DMP 8
- First time installation 12
- Viewing Mode 14
- Main Menu 18
- Glossary of terms 28
- Problem solving 29
- Front panel display 30
- Technical Specifications 31
- Menu Screen Structure 32
- FOR YOUR SAFETY
- REMOTE CONTROL
- FRONT AND REAR PANEL
- Front Panel
- Display
- Rear Panel
- ABOUT THE SMARTCARD
- How to insert a Smartcard (Nagravision)
- Note 1!
- PIN Code
- INSTALLATION OF THE DMP
- About the Audio/Video sockets
- Preparing the Remote Control
- Connecting the DMP to the Dish
- If you need to fit the F-connectors onto the cable
- Installing the Satellite Dish
- Connecting the DMP
- Connecting to the TV
- Connecting a TV and VCR
- If your TV has a Audio/Video socket, but your VCR does not
- If your VCR has a Audio/Video socket, but your TV does not
- If your TV has a S-Video socket (S-Video cable is not included)
- Connecting a HiFi System
- Connecting to the Telephone Wall Socket
- Connecting the AC power cord
- Tuning Procedure when RF Connections are Used
- This procedure is necessary only if your DMP is connected to the TV with an RF lead.
- Tuning your TV to the DMP
- FIRST TIME INSTALLATION
- General Information
- Please note!
- The Welcome Menu
- Channel Search
- Manual Search
- Signal Strength (AGC) and Signal Quality (SNR)
- Time Adjustment
- VIEWING MODE
- Some of the functions described here are dependent on the Service Provider and can only be used if they are included in the transmitted programme information.
- Programme Information
- The "i" (Information) Button
- List of TV and Radio Channels
- Options (Green Button)
- Audio Language
- Subtitle Language/DVB Subtitling
- Video Recording
- The TEXT button
- MAIN MENU
- TV and Radio Channels
- Edit Channels
- Create list
- How to give a specific name
- Rename list
- Rearrange lists
- Delete list
- Select Channels
- Lock Channels
- Rename Channels
- Rearrange Channels
- Delete Channels
- Please note. Channels deleted this way will be permanently deleted. The only way to get them back is to perform a new channel search.
- To delete channels:
- Remove Channels
- To remove channels:
- System Configuration
- Automatic Search
- TV Settings
- TV screen format
- RF channel
- TV Standard
- Receiver Upgrade
- Reinstall
- User Preferences
- Parental Control
- Receiver lock
- Age Rating Control
- Change access code
- Appearance Preferences
- Banner time-out
- Volume bar
- Volume bar time-out
- Subtitles
- Picture format
- System Information
- Diagnostics
- Conditional Access
- GLOSSARY OF TERMS
- Access
- AGC
- Audio system
- CA
- DVB
- EPG
- FEC
- Guide
- GHz
- LNB (low-noise block converter) or LNBF
- L.O.
- DMP
- MHz
- MPEG
- Network
- Parental Access code
- Polarization
- RF
- SERIAL RS 232
- Satellite dish
- Scrambled satellite TV programme
- Service provider
- SNR
- Symbol rate
- S-Video
- What to do if you can't solve the problem
- TECHNICAL SPECIFICATIONS
- Transmission Standards
- LNB / Tuner input
- Smartcard Interface:
- General data
- RF modulator
- VIDEO
- AUDIO R L
- TELEPHONE
- SERIAL (RS 232) Serial data
- MENUS SCREEN STRUCTURE
Brand : NOKIA
Model : 8830 S
Category : Receiver