
DigiWalker A700 - Smartphone MIO - Free user manual and instructions
Find the device manual for free DigiWalker A700 MIO in PDF.


| Product Type | Smartphone with GPS and phone capabilities |
| Operating System | Microsoft Windows Mobile 5.0 |
| Display | Touch screen, 240x320 pixels, TFT |
| Processor | Not specified in manual, typical of Pocket PC era |
| Memory | Storage and program memory shared; expandable via SD/MMC card |
| Battery | Rechargeable lithium battery, capacity not specified; charger: PHIHONG PSC05R-050 |
| Phone Network | GSM/GPRS, SIM card required |
| GPS | Integrated GPS antenna for navigation |
| Camera | Rear camera for pictures and video clips |
| Connectivity | Bluetooth 2.0? (manual mentions Bluetooth), mini-USB, headphone jack |
| Input Methods | Stylus, navigation pad, on-screen keyboard, handwriting recognition |
| Dimensions | Not specified in manual (typical Pocket PC: approx 120x70x20 mm) |
| Weight | Not specified (estimated ~150 g with battery) |
| Power Saving | Automatic suspend after inactivity; adjustable backlight and CPU performance |
| Maintenance | Clean with soft lint-free cloth; avoid moisture and extreme temperatures |
| Safety | Do not use unauthorized charger or battery; turn off phone near hospitals or aircraft |
| Spare Parts / Repairability | Battery and SIM card user-replaceable; other repairs by authorized service; factory reset available |
| General Information | Manual revision R00 (December 2005); CE marked; SAR 0.612 W/kg |
Frequently Asked Questions - DigiWalker A700 MIO
User questions about DigiWalker A700 MIO
0 question about this device. Answer the ones you know or ask your own.
Ask a new question about this device
Download the instructions for your Smartphone in PDF format for free! Find your manual DigiWalker A700 - MIO and take your electronic device back in hand. On this page are published all the documents necessary for the use of your device. DigiWalker A700 by MIO.
USER MANUAL DigiWalker A700 MIO
natural_image
Illustration of a MiO mobile phone with a stylus and control buttons (no text or symbols on the device body)Revision: R00
(December 2005)
Trademarks
All brand and product names are trademarks or registered trademarks of their respective companies.
Note
The information in this manual is subject to change without notice.
Table of Contents
Preface......vii
1 Getting Started 1-1
1.1 Identifying Hardware Components.... 1-1
Front Components 1-1
Back Components....1-3
Left-Side Components 1-4
Right-Side Components 1-5
Top Components....1-6
Bottom Components 1-6
1.2 Installing the SIM Card and Battery 1-7
1.3 Charging the Battery 1-8
1.4 Turning A700 On and Off 1-9
Turning On for the First Time 1-9
Turning Off 1-9
Turning Off to Suspend 1-10
1.5 Installing Microsoft ActiveSync.... 1-11
1.6 Using Your A700 in a Vehicle 1-13
Using the Car Holder....1-13
Connecting the Car Charger 1-14
1.7 Expanding Your A700 1-15
Using a SD/MMC Card....1-15
2 Basic Skills 2-1
2.1 Using the Stylus 2-1
2.2 Using the Navigation Pad....2-2
2.3 Today Screen....2-2
Quick Launch Bar....2-3
Mio Menu 2-4
Landscape View....2-5
2.4 Navigation Bar and Toolbar 2-5
2.5 Running Programs.... 2-6
2.6 Shortcut Menus 2-7
2.7 Notifications 2-7
2.8 Entering Information 2-8
Entering Text Using the Input Panel 2-8
Writing on the Screen 2-10
Drawing on the Screen 2-13
Recording a Message....2-15
Using My Text.... 2-17
2.9 Securing Your A700 2-18
Locking the Keypad 2-18
Locking the Device 2-19
Locking the Phone 2-20
3 Using the Phone.... 3-1
3.1 About Your Phone 3-1
Before You Start 3-1
Phone Features 3-2
3.2 Turning On and Off the Phone Function 3-2
Turning Off the Phone 3-2
Turning On the Phone 3-3
Starting Microsoft Phone 3-3
Phone Status Icons 3-3
3.3 Basic Phone Operations 3-4
Making a Call.... 3-4
Answering a Call.... 3-9
Rejecting a Call 3-9
Ending a Call 3-10
Managing More than One Call.... 3-10
Adjusting the Phone Volume 3-13
Muting a Call....3-14
Using Speakerphone 3-14
In-call Options.... 3-15
3.4 Taking a Note During a Call 3-16
3.5 Using Call History 3-17
Viewing Call History.... 3-17
Managing Call History 3-18
Adding an Entry to Contacts Using Call History 3-18
3.6 Using Speed Dial 3-19
Creating a Speed Dial Entry 3-19
Editing a Speed Dial Entry 3-20
Deleting a Speed Dial Entry 3-20
3.7 Managing Phone Numbers 3-21
Microsoft Contacts: Transferring Contacts....3-21
SIM Card: Transferring and Adding Entries 3-21
3.8 Customizing Your Phone 3-23
Changing Phone Settings 3-23
Changing Services Settings 3-24
Changing Network Settings....3-26
3.9 Additional Phone Operations 3-27
Checking Your Voice Mail 3-27
Making an Emergency Call 3-27
Dialing an International Call 3-27
4 Managing Your A700....4-1
4.1 Managing Power 4-1
Low Battery Signals and Actions....4-1
Power Management 4-2
Power-Saving Tips 4-3
4.2 Managing Memory 4-5
Storage and Program Memory 4-5
Additional Memory 4-5
4.3 Customizing Your A700 4-6
4.4 Finding and Organizing Information 4-9
4.5 Adding or Removing Programs 4-10
Adding Programs 4-10
Removing Programs 4-12
5 Microsoft Pocket Outlook....5-1
5.1 Calendar: Scheduling Appointments and Meetings ..... 5-1
Creating an Appointment 5-2
Using the Calendar Summary Screen....5-3
5.2 Contacts: Tracking Friends and Colleagues 5-4
Creating a Contact 5-5
Using the Contacts Summary Screen 5-6
5.3 Tasks: Keeping a To Do List....5-7
Creating a Task....5-8
Using the Tasks Summary Screen....5-9
5.4 Notes: Capturing Thoughts and Ideas 5-10
Creating a Note....5-11
5.5 Messaging: Sending and Receiving E-mail Messages..... 5-12
Downloading Messages 5-12
Setting up an E-mail Account 5-15
Composing and Sending an E-mail and SMS Message.... 5-15
Composing and Sending a MMS Message 5-17
Receiving and Viewing a MMS Message 5-20
Replying to or Forwarding a Message 5-21
Moving a Message 5-22
Deleting a Message 5-22
Creating or Changing a Message Signature 5-23
Receiving Attachments 5-23
Managing Folders 5-24
6 More Programs.... 6-1
6.1 Microsoft ActiveSync 6-1
Synchronizing Data 6-2
6.2 Word Mobile 6-3
Creating a Document....6-3
Opening a Document.... 6-4
6.3 Excel Mobile 6-5
Creating a Workbook....6-5
Opening a Workbook 6-6
6.4 PowerPoint Mobile 6-7
6.5 Pocket MSN 6-8
Signing in to Pocket MSN 6-9
Using Pocket MSN Messenger 6-9
Using MSN Hotmail 6-10
6.6 Windows Media Player 6-11
6.7 Camera.... 6-12
Taking Pictures....6-12
Taking Continuous Pictures.... 6-14
Recording Video Clips 6-15
Camera Settings....6-16
6.8 Pictures & Videos 6-17
Viewing Pictures and Launching Video Clips 6-17
6.9 Calculator 6-19
6.10 Modem Link 6-20
6.11 Terminal Services Client.... 6-21
Connecting to a Remote Server 6-21
Disconnecting and Ending a Session 6-21
6.12 Additional Programs....6-22
Mio Club Registration....6-22
Location Call 6-24
Mio SMS Location....6-26
Quick Position 6-26
7 Getting Connected 7-1
7.1 Connection Settings....7-1
GPRS Connection....7-1
Modem Connection....7-2
Wireless Network Connection 7-3
7.2 Using Bluetooth....7-5
Turning On and Off Bluetooth 7-5
Transferring Files via Bluetooth 7-6
Bluetooth Partnership....7-7
7.3 Using Internet Explorer Mobile....7-9
Browsing the Internet 7-10
Managing Favorites....7-10
8 Troubleshooting and Maintenance....8-1
8.1 Resetting Your A700....8-1
8.2 Restoring Factory Default State 8-2
8.3 Power Problems....8-3
8.4 Memory Problems 8-3
8.5 Screen Problems....8-5
8.6 Connection Problems....8-6 Synchronization Problems....8-6 Cable Connection Problems....8-6 Modem Connection Problems....8-6
8.7 Taking Care of Your A700....8-8 General Guidelines....8-8 Phone Guidelines....8-9 Travel Guidelines....8-9
A Regulatory Information...... A-1
A.1 Regulations Statements.... A-1 European Notice.... A-1
A.2 Safety Precautions.... A-2 About the AC Adapter.... A-2
About the Battery....A-2
About the Radio Frequency Exposure......A-3
About the Electrostatic Discharge ......A-3
Preface
Welcome
Congratulations on purchasing A700 with the phone and GPS features. A700 is a Microsoft® Windows Mobile™ Version 5.0-based device. Due to the size and capabilities of the device, you can keep your most important business and personal information up-to-date and close at hand. Microsoft ActiveSync® increases the power of your A700 by allowing you to synchronize the information on your desktop computer or Microsoft Exchange Server with A700.
Your A700 is more than a Pocket PC and mobile phone. It allows you to take pictures, record video clips, browse the Internet and WAP web pages, receive and send messages (such as e-mails, instant messages, and text and multimedia messages), listen to music, and lots more. Whenever you need to communicate, capture images, search for information, send messages or enjoy yourself, A700 can help you get what you want any time any place.
Where to Find Information
If you cannot find information in this manual, refer to the following table to acquire the specific information:
For information on See this source
| First time startup A700 Quick Start Guide | |
| Using the phone function Chapter 3 of this manual | |
| A700 Navigation System Quick Start Guide Using the map | |
| A700 Navigation System Manual on the Map CD | |
| Using the programs on the Bonus CD | A700 Application Manual on the Bonus CD |
| Section 6.1 of this manualMicrosoft ActiveSync ActiveSync Help on your desktop computer | |
| Last-minute updates and detailed technical information | Product web site: www.mio-tech.com Microsoft web site: www.microsoft.com |

Getting Started
This chapter introduces you to the external components of your A700, and guides you through the process of setting up your A700 for use.
1.1 Identifying Hardware Components
The illustrations below introduce you to the various buttons, connectors, ports and features of your A700.
Front Components
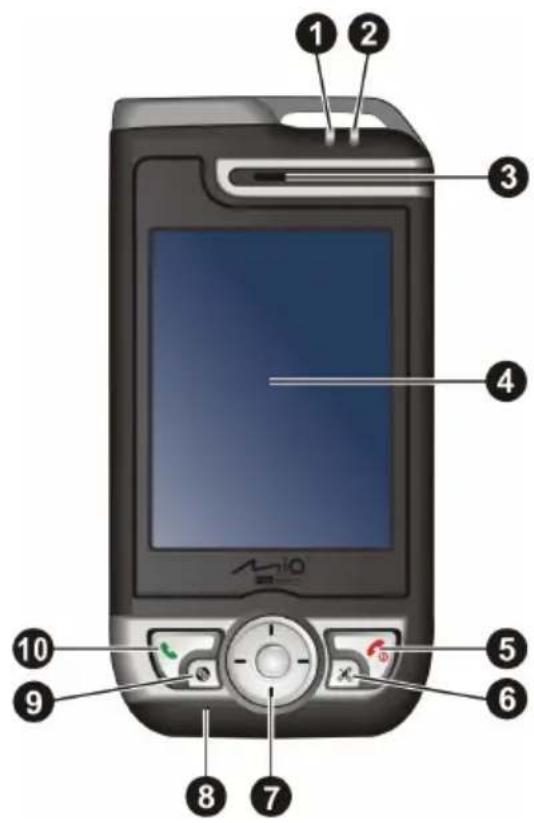
| Ref | Component Description | |
| 1 | Charge Indicator | Glowing in red indicates that battery charging is in progress. |
| Glowing in green indicates that the battery is fully charged. | ||
| Flashing in green indicates that A700 is inside the mobile phone network. | ||
| 2 | Notification Indicator | Flashing in red informs you of scheduled appointments, alarms and reminders. |
| Flashing in blue indicates that Bluetooth is turned on. | ||
| 3 | Earpiece | Serves as the phone earpiece during a call. |
| 4 | Touch Screen | Displays the output of your A700. Tap the screen with the stylus to select menu commands or enter information. |
| 5 | Program Button – End Button 📞 | Turns your A700 on or off. |
| Ends or rejects a call. | ||
| Returns to the Today screen from another program. | ||
| 6 | Program Button – GPS Button ✗ | Starts the map program. |
| 7 | Navigation Pad | Moves up, down, left or right by pressing the corresponding area of the pad. |
| The central Enter button confirms your selection, similar to the Enter key on a keyboard. | ||
| 8 | Microphone | Receives sound and voice to record voice. |
| Serves as the mouthpiece during a call. | ||
| 9 | Program Button – Media Player Button 📊 | Starts Windows Media Player. |
| 10 | Program Button – Talk Button 📋 | Dials or answers a call. |
| Pressing and holding this button during a call can put the call on hold. |
Back Components
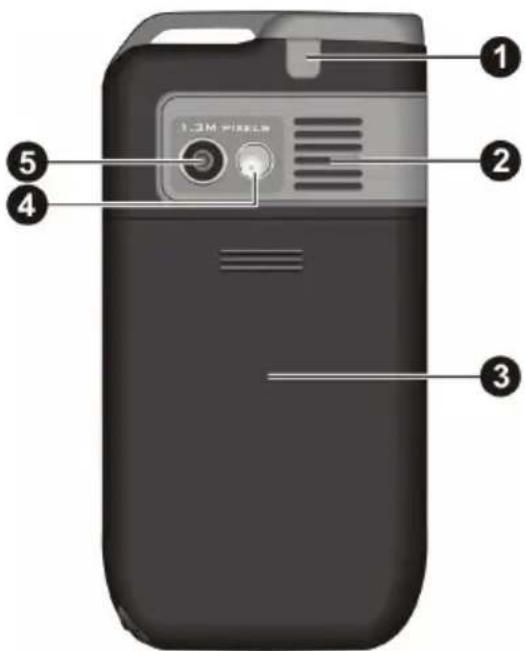
| Ref | Component | Description |
| 1 | Car Antenna Connector | This connector (under rubber dust cover) allows use of an optional external antenna with magnetic mount, which may be positioned on top of the car for better signal reception in areas with poor reception. |
| 2 | Speaker | Sends out music, sounds and voice. |
| 3 | Back Cover | Inside is the rechargeable battery that serves as the internal power source for your A700. You can recharge the battery by connecting to AC power. |
| 4 | Viewing Mirror | Allows you to adjust the distance and angle when taking a picture of yourself. |
| 5 | Camera Lens | Takes pictures or records video clips. |
Left-Side Components
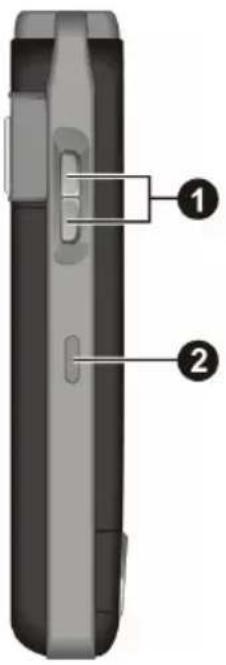
| Ref | Component Description | |
| 1 | Volume Control | Adjusts the volume by pressing the upper or lower button. |
| Pressing the Volume control can immediately silence the ring of an incoming call. | ||
| Pressing the Volume down button for 6 seconds enables you to send emergency text messages to your pre-defined recipients. (See “Location Call” in section 6.11 for information.) | ||
| 2 | Car Holder Slot | Secures the car holder. |
Right-Side Components
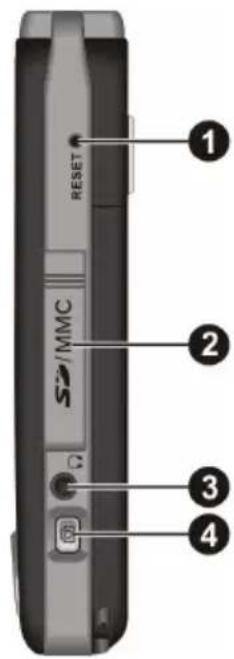
| Ref | Component | Description |
| 1 | Reset Button | Restarts your A700. |
| 2 | SD/MMC Slot | Accepts an optional SD (Secure Digital) or MMC (MultiMediaCard) storage card for removable storage, or SD IO wireless network card for the network connection. |
| 3 | Headphone Connector | Connects to a pair of stereo headphones. |
| 4 | Camera Button | Starts the camera program to take pictures or record video clips. |
Top Components
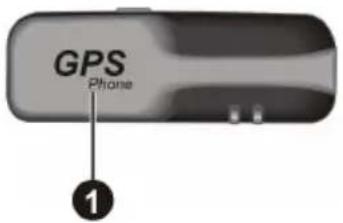
Ref Component Description
① GPS Antenna Receives signals from the GPS satellites overhead.
Bottom Components
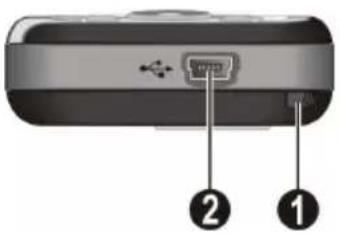
| Ref | Component | Description |
| 1 | Stylus | Tap on the touch screen to make selections and enter information. Pull the stylus out of its slot to use and store it in the slot when not in use. |
| 2 | Mini-USB Connector | Connects to the AC adapter or USB cable. |
1.2 Installing the SIM Card and Battery
After applying for an account with a mobile phone service provider, you will be provided a SIM (Subscriber Identification Module) card. This card contains your mobile phone account details, contacts that can be stored and any additional services to which you have subscribed.
You must install a SIM card before you can use the phone feature.
-
Slide the back cover and remove it from A700.
-
Insert the SIM card with the contact area facing downward (the angled corner is in the top-left position). Push the card into the slot until it clicks into place.
-
Install the battery with the contact area pointing to the contact area on A700, and then push the battery until it fits into place.
-
Replace the back cover.

1.3 Charging the Battery
Fully charge the battery before starting to use your A700 for the first time. When charging the battery for the very first time, charge it for at least 8 hours.
- Plug the converter to the AC adapter (①).
- Connect the DC end of the AC adapter to the Mini-USB connector on the bottom of your A700 (②), and plug the other end of the AC adapter into a wall outlet (③).
- The charge indicator glows in red when charging is in progress. Do not disconnect your A700 from AC power until the battery is fully charged, as indicated by the red indicator turning into green. This will take a couple of hours.
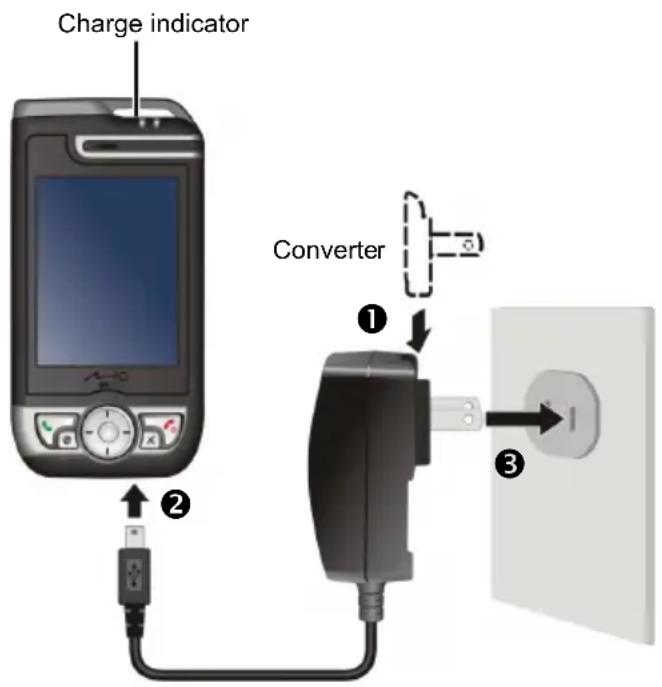
Whenever possible, keep your A700 connected to the AC adapter and a power source. Doing so keeps the battery charged.
NOTE: Your A700 can also be charged when it is connected to a desktop computer via the USB cable.
CAUTION: For optimal performance of the lithium battery, take note of the following:
- The environment temperature for charging should be 0\~40°C.
- When a battery is fully discharged due to a long period of usage or idleness, connect A700 to AC power for charging, and wait for at least 5 minutes before turning it on.
- Do not charge the battery where the temperature is high (e.g. in direct sunlight).
- There is no need to fully discharge the battery before charging. You can charge the battery before it is discharged.
- If you will not use the product for a long period of time, be sure to fully charge the battery at least once every two weeks. Over discharge of the battery can affect the charging performance.
1.4 Turning A700 On and Off
The on and off of A700 is controlled by the End button.
Turning On for the First Time
-
Make sure that A700 is connected to AC power or the battery has power.
-
Press the ① End button for 3 seconds to turn on A700.
The backlight of the keypad will glow, and the setup wizard will appear on the screen.
-
Follow the on-screen instructions to complete the setup wizard.
-
If a SIM card has been inserted, and the service provider (or you) has set the PIN, you will be prompted to enter the PIN. Enter the PIN and tap Enter.
If a SIM card has not been inserted yet, a message of an invalid or missing SIM card will appear on the screen. You can tap Cancel to continue the startup procedure.
- You will then see the Today screen.
If a SIM card has been inserted, A700 will start to search the mobile phone network and the service provider's name will be displayed on the screen.
Turning Off
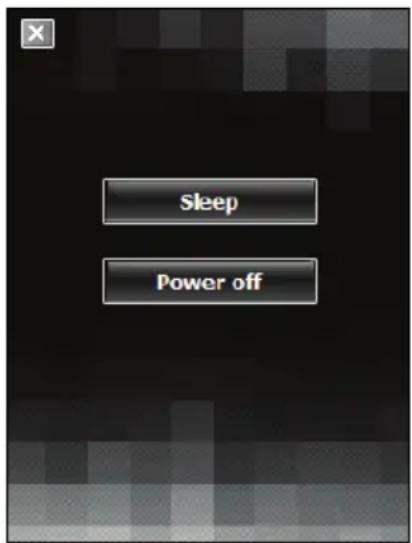
If you are not using A700, press and hold the End button for 3 seconds until the Quick List appears. Then tap Power off to turn A700 off.
Turning Off to Suspend
By default, your A700 will automatically suspend after 1 minute of inactivity when operating on battery power.
A700 will not automatically suspend when it is connected to AC power for charging or to the desktop computer for synchronization. To make A700 enter the suspend mode, press and hold the ⏻ End button for 3 seconds until the Quick List appears, and then tap Sleep.
If a SIM card is inserted, the charge indicator will flash in green, indicating that A700 is inside the mobile phone network. A700 will automatically resume upon an incoming call, and ring (or vibrate, depending on your setting) and display the caller's phone number and name on the screen.
You can press the ⓤ End button to resume A700.
To change these settings, tap → Settings → System → Power.
1.5 Installing Microsoft ActiveSync
You can use Microsoft ActiveSync technology to synchronize information on your desktop computer and/or a Microsoft Exchange Server with the information on your A700. ActiveSync compares the information on your A700 with the information on the desktop computer and/or the server and updates all locations, keeping you up-to-date with the most recent information.
ActiveSync is already installed on your A700. You need to install ActiveSync on your desktop computer.
CAUTION:
- Before installation, make sure that you have Microsoft Outlook installed on your desktop computer.
- Do not connect your A700 to your desktop computer before ActiveSync is installed.
- In some specific cases, A700 may experience connection problems when it is connected to a Windows computer running ActiveSync 4.0. The problems may be caused by the interoperability with desktop firewall applications, applications that manage network traffic, or LAN configuration tools. To resolve the problems, please visit Microsoft web site at http://www.microsoft.com/windowsmobile/help/activesync, or disable the LAN configuration tools.
Follow the procedure below:
- Turn on your desktop computer.
- Insert the supplied Getting Started Disc into the CD-ROM drive of your desktop computer.
- Click Next on the "Get ready t ..." screen.
- Click Next on the "Getting Started ..." screen.
- The program will automatically detect if ActiveSync is installed on the desktop computer. Click Next.
- Follow the on-screen instructions to install ActiveSync. You may be asked to restart the desktop computer during the installation process.
- Connect A700 to the desktop computer. Connect the mini-USB end of the USB cable to the bottom of your A700, and the other end to a USB port on your desktop computer.
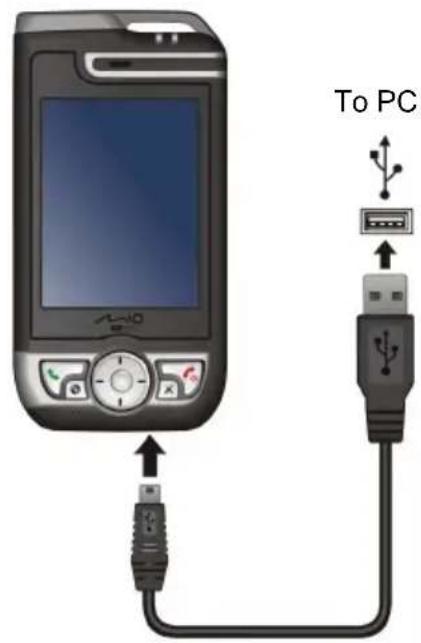
- The “Add New Hardware Wizard” should automatically install the USB driver. (If you need to specify the location of the driver, click Browse and select the CD-ROM drive containing the Getting Started Disc.)
- Follow the on-screen instructions to establish a partnership and synchronize your A700 with your desktop computer.
- Click Next on the "Program Installation Status" screen.
- Click Finish.
After your first synchronization, the data you have stored on your desktop computer such as Calendar, Contacts and Tasks is copied to your A700. You are now ready to take it along with you when you go.
NOTE: If you have set a device password, you will need to enter this password on the desktop computer for the ActiveSync connection. See "Locking the Device" in section 2.9 for information.
1.6 Using Your A700 in a Vehicle
Using the Car Holder
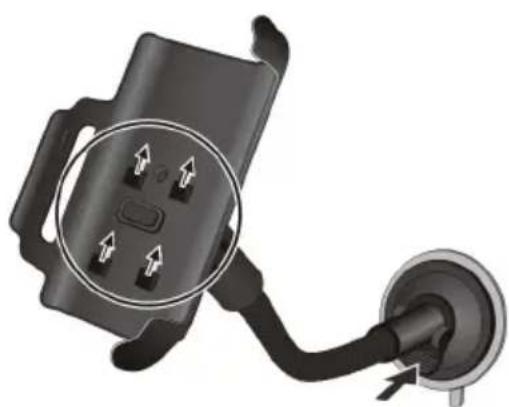
Your car holder consists of a bracket and an arm stand. Follow this procedure to mount your A700 in a car:
- Assemble the bracket and the arm stand.
- Clean the windshield where you will apply the suction cup.
-
Attach the suction cup to the windshield and push in the locking tab to secure the suction cup.
-
Carefully fit your A700 into the bracket.
-
Turn the rotate wheel at the top of the arm stand clockwise to loosen it. Adjust A700 to the best viewing angle, and then turn the rotate wheel counterclockwise to fasten it.
natural_image
Electric vehicle charging plug with attached cable and connector (no text or symbols visible)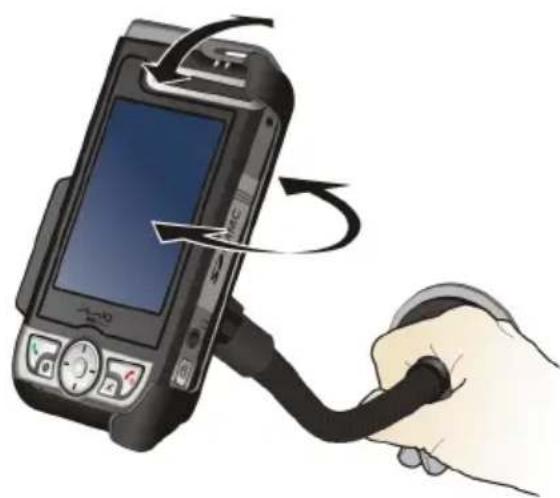
natural_image
Illustration of a hand holding a handheld device with a curved cable, showing the cable being inserted (no text or symbols present)CAUTION:
- When placing the car holder, make sure that the device does not obstruct the driver's view, or interfere with the operation of vehicle airbags and safety devices.
- After the suction cup is secured to the windshield, never try to pull or wriggle the arm.
- Always adjust A700 and the arm of the car holder for the best viewing angle BEFORE driving. Avoid adjusting A700 with one hand while driving.
- When using the car holder, keep the car temperature in a normal range. If the temperature gets too low, the car holder's suction cup can harden and affect its suction.
- Loosen the locking tab first before removing the car holder.
NOTE: If the car's windshield is tinted with a reflective coating, an external antenna (optional) may be needed to route the antenna to the top of the car through a window.
Connecting the Car Charger
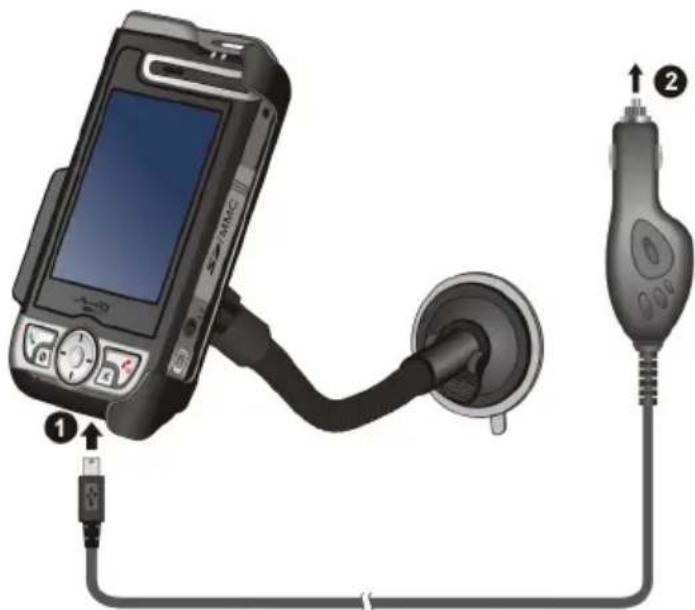
CAUTION: To protect your device against sudden surges in current, connect the car charger only after the car engine has been started.
The car charger supplies power to your A700. Connect one end of the car charger to the power connector of your A700 and the other end to the cigarette lighter in the car.
1.7 Expanding Your A700
Using a SD/MMC Card
Your A700 has a SD/MMC slot where you can insert an optional SD or MMC storage card, or SD IO wireless network card. With the removable memory, you can store or backup your data and exchange data with other devices.
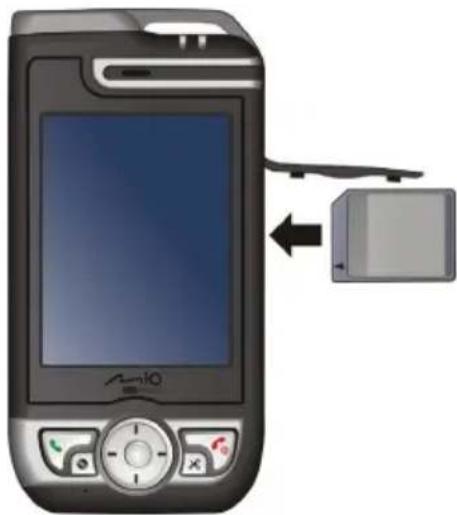
To use a SD/MMC card, insert it into the slot, with the connector pointing to the slot and its label facing the front of your A700. Follow the instructions supplied with the card for more information.
natural_image
Illustration of a Amio phone with a USB cable inserted into its screen (no text or symbols visible)To remove a card, first make sure that no application is accessing the card, then slightly push the top edge of the card to release it and pull it out of the slot.
NOTE:
- A storage card is also called a memory card.
• Make sure that no foreign objects enter the slot. - Keep a SD or MMC card in a well-protected box to avoid dust and humidity when you are not using it.

Basic Skills
This chapter familiarizes you with the basic operations of your A700 such as using the stylus, navigation pad, Today screen, menus, and programs. You will also know how to enter information and lock your A700.
2.1 Using the Stylus
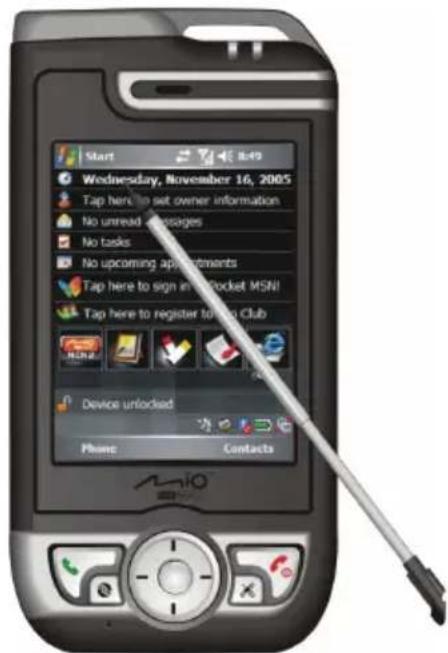
Use the stylus to navigate and select objects on the screen.
Pull the stylus out of the slot and extend it for ease of use. Store it in the slot when not in use.
- Tap Touch the screen once with the stylus to open items and select options.
- Drag Hold the stylus on the screen and drag across the screen to select text and images. Drag in a list to select multiple items.
- Tap and hold Tap and hold the stylus on an item to see a list of actions available for that item. On the shortcut menu that appears, tap the action you want to perform.
2.2 Using the Navigation Pad
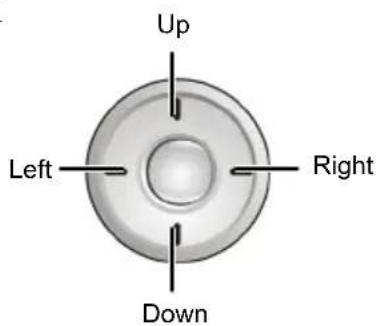
With the navigation pad, you can move up, down, left and right within a menu. This is particularly useful for one-hand operation.
To move in a direction, simply press the button of the corresponding direction.
To activate the selected item, press the center button.
2.3 Today Screen
When you turn on your A700 for the first time each day, you will see the Today screen. The Today screen is accessible from anywhere by tapping and then Today.
The Today screen shows your upcoming appointments, active tasks, and information about e-mail messages. Along the top of the Today screen you will see the volume icon, the clock, and connectivity indicators. You can tap a section of the Today screen to open the program that is associated with that section.
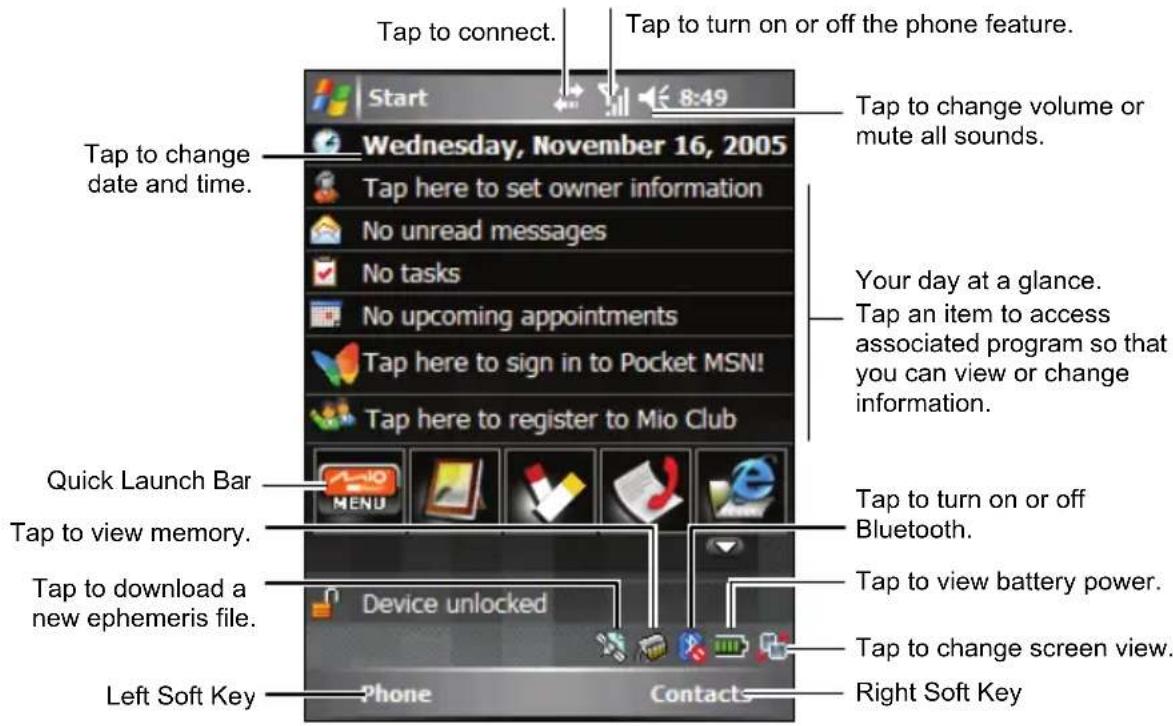
NOTE: You can customize what is displayed on the Today screen by tapping → Settings → Personal → Today.
Quick Launch Bar
You can use the Quick Launch Bar on the Today screen to quickly switch to specific programs.

By default, you can use the Quick Launch Bar to access the following programs:
• Mio Menu (See the next section.)
• Pictures & Videos (See section 6.8.)
• Notes (See section 5.4.)
• Call History (See section 3.5.)
- Internet Explorer (The program will access the Mio-tech Online web site by default. See section 7.1 for information on connections.)
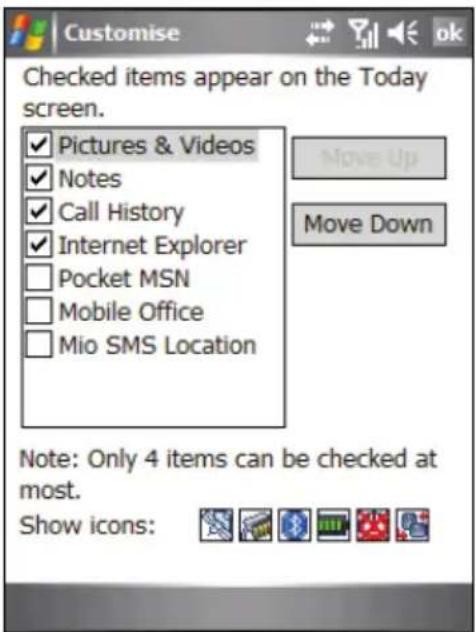
On the Quick Launch Bar, Mio Menu is not an adjustable item. You can tap the 📋 button to customize up to 4 items to be displayed on the Quick Launch Bar.
First cancel the item not to be displayed, and then select the desired item. You can tap Move Up and Move Down to adjust the displayed positions of the items.
When finished, tap ok to save the setting.
In Show icons, you can select the program icons to appear on the lower-right corner of the Today screen. A red X on the icon means that icon does not appear on the Today screen.
By default, the 🏠️ Suspend icon does not appear on the Today screen.
Mio Menu
You can access the Mio Menu by tapping the 📄 button on the Quick Launch Bar.
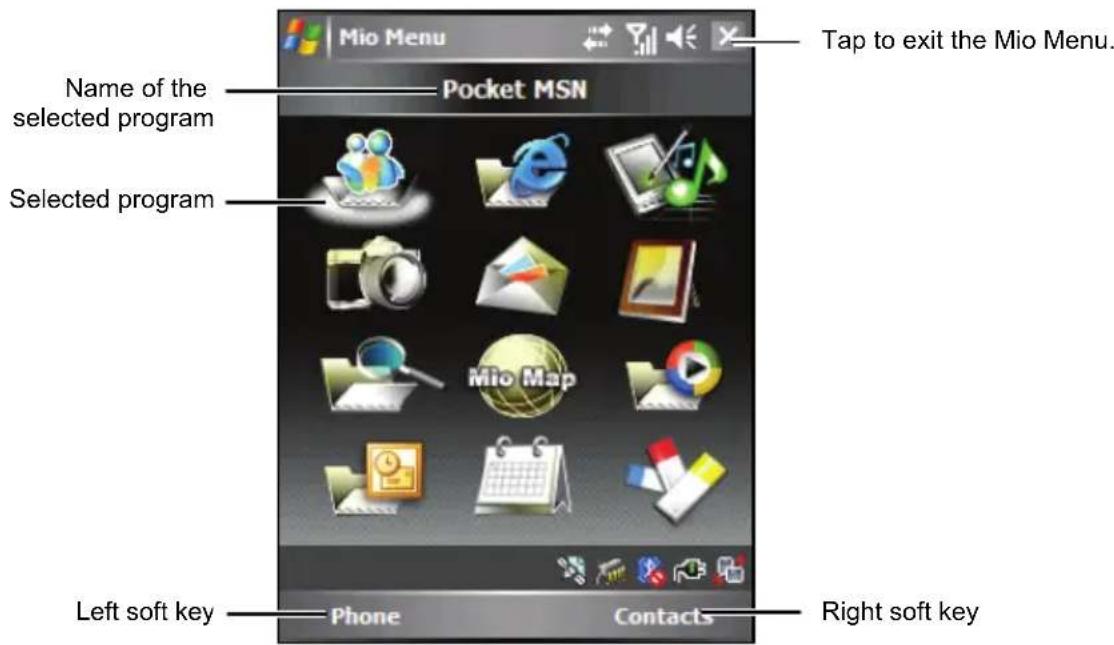
The central area on the Mio Menu displays the program icons. The selected program icon is highlighted by a white cloud underneath, and its program name is displayed at the top of the screen. When tapping an icon, you can start a program, or open a folder to access its content.
The table below explains the icons and their corresponding program names:
| Icon Description Icon Description | |||
 | Pocket MSN |  | File Explorer |
 | Mio-tech Online |  | Map Program |
 | Sounds & Notifications |  | Windows Media Player |
 | Camera |  | Mobile Office |
 | Messaging |  | Calendar |
 | Pictures & Videos |  | Notes |
Landscape View
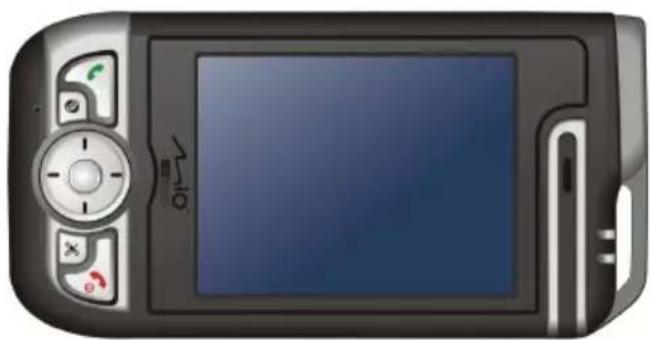
You can use your A700 in a landscape manner.
To change the screen view, do one of the following:
- Tap → Settings → System → Screen, and select Landscape (right-handed) or Landscape (left-handed). Tap ok to save your setting.
- On the Today screen or the Mio Menu, tap the 📄 icon on the lower-right corner.
natural_image
Illustration of a digital camera with control panel and display screen (no text or symbols)2.4 Navigation Bar and Toolbar
The Navigation bar is located at the top of the screen. It displays the active program and current time and allows you to switch programs and close screens.
The Navigation bar and Start menu:
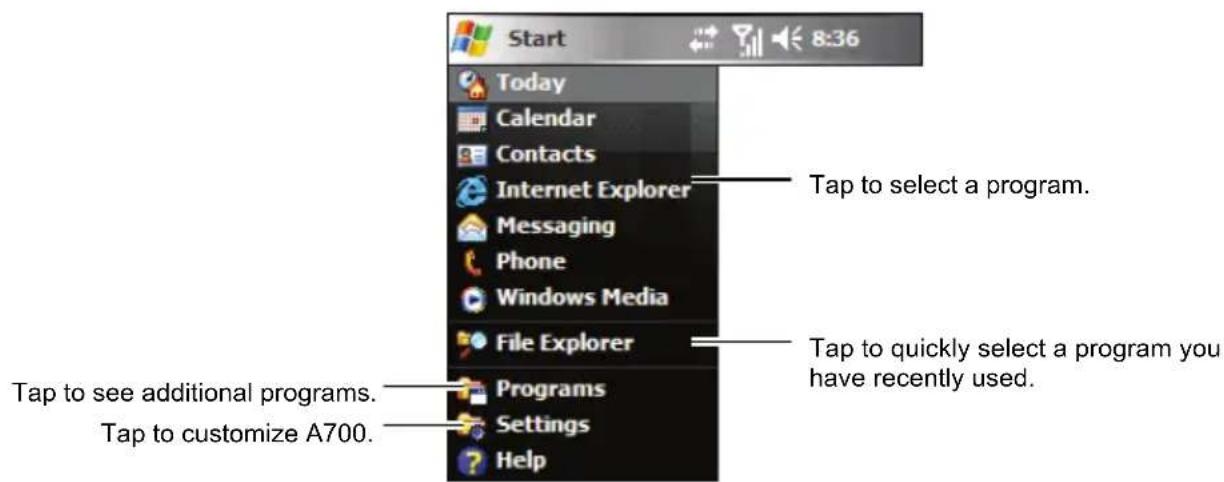
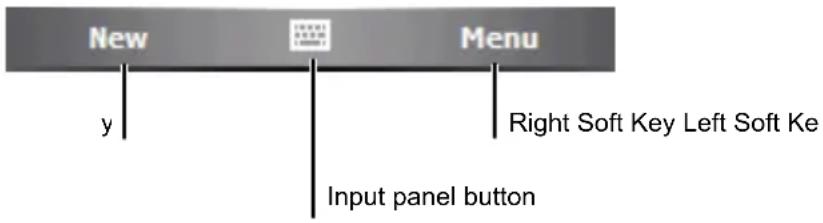
Use the toolbar at the bottom of the screen to perform tasks in programs. The toolbar includes a left soft key, a right soft key, and the Input panel button in between. The right soft key is usually Menu while the left soft key varies with programs.
An example of the toolbar:
2.5 Running Programs
You can switch from one program to another without closing any program.
- To run a program, tap at the left-top corner of the screen and select from the Start menu.
- To access additional programs, tap → Programs and tap the program icon.
- You can press a program button on the front of your A700. The icons on the buttons identify the default programs they are associated with.
- From the Quick Launch Bar on the Today screen or the Mio Menu, tap the program icon.
2.6 Shortcut Menus
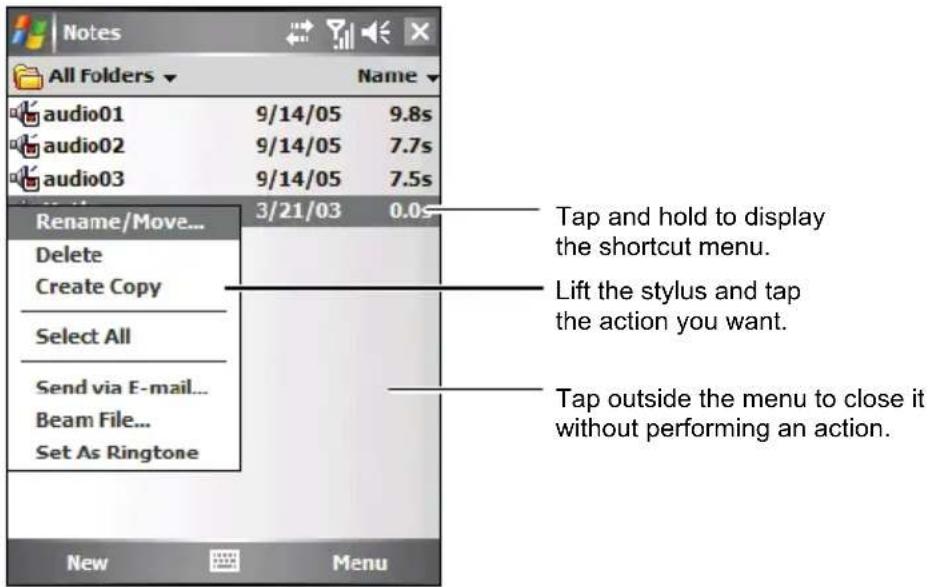
With shortcut menus, you can quickly choose an action for an item. For example, you can use the shortcut menu in the contact list to quickly delete a contact, make a copy of a contact or send an e-mail message to a contact. The actions in the shortcut menus vary from program to program. To access a shortcut menu, tap and hold the stylus on the name of the item that you want to perform the action on. When the menu appears, lift the stylus and tap the action you want to perform. Or tap anywhere outside the menu to close the menu without performing an action.
2.7 Notifications
Your A700 reminds you in a variety of ways when you have something to do. For example, if you have set up an appointment in Calendar, a task with a due date in Tasks or an alarm in Clock, you will be notified in any of the following ways:
• A message appears on the screen.
• A sound, which you can specify, is played.
• The notification indicator flashes in amber.
To choose reminder types and sounds for your A700, tap → Settings → Personal → Sounds & Notifications.
2.8 Entering Information
You have several options for entering new information:
- Use the Input panel to enter typed text, either by using the on-screen keyboard or other input methods.
• Write directly on the screen.
• Draw pictures on the screen. - Speak into the microphone to record a message.
Entering Text Using the Input Panel
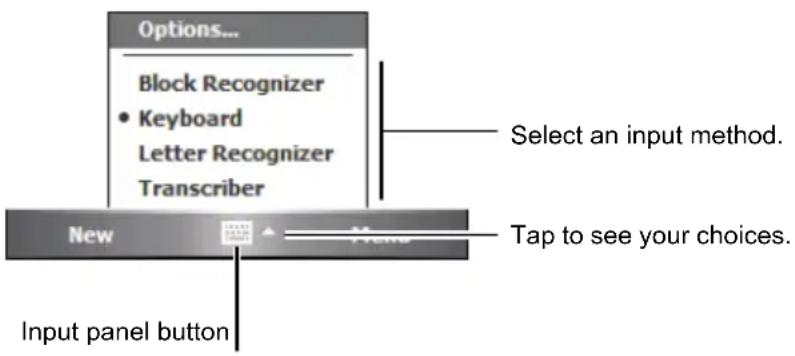
Use the Input panel to enter information in any program on your A700. You can either type using the on-screen keyboard or write using the on-screen keyboard, Block Recognizer, Letter Recognizer or Transcriber. In any case, the characters appear as typed text on the screen.
To show or hide the Input panel, tap the Input panel button. Tap the arrow next to the Input panel button to see your choices.
When you use the Input panel, your A700 anticipates the word you are typing or writing and displays it above the Input panel. When you tap the displayed word, it is inserted into your text at the insertion point. The more you use your A700, the more words it learns to anticipate.
![Notes Monthly mee meeting Tap here if this is the right word. 123 1 2 3 4 5 6 7 8 9 0 - = Tab q w e r t y u i o p [ ] CAP a s d f g h j k l ; ' Shift z x c v b n m , . / Ctl áü ` \ ↓ ↑ ← → New Menu](/content/2026/05/1052770/images/d309010d742002e009935a8d739e447a17be11a7af61d57c54a57cc48b1df623.jpg)
NOTE: To change word suggestion options, such as the number of words suggested at one time, tap → Settings → Personal → Input → Word Completion.
Block Recognizer
With Block Recognizer, you can use the stylus to input characters using strokes that are similar to the Palm™ Graffiti® method.
To type with Block Recognizer:
- Tap the arrow next to the Input panel button and then tap Block Recognizer.
- Write a letter in the box.
When you write a letter, it is converted to typed text that appears on the screen. For specific instructions on using Block Recognizer, open Block Recognizer and then tap the question mark next to the writing area.
Letter Recognizer
With Letter Recognizer, you can write letters using the stylus just as you would use a pen on paper.
To type with Letter Recognizer:
- Tap the arrow next to the Input panel button and then tap Letter Recognizer.
- Write a letter in the box.
When you write a letter, it is converted to typed text that appears on the screen. For specific instructions on using Letter Recognizer, open Letter Recognizer and then tap the question mark next to the writing area.
Transcriber
With Transcriber you can write anywhere on the screen using the stylus just as you would on paper. Unlike Letter Recognizer and Block Recognizer, you can write a sentence or more of information; then, you pause and let Transcriber change the written characters to typed characters.
To type with Transcriber:
- Tap the arrow next to the Input panel button then tap Transcriber.
- Write anywhere on the screen.
For specific instructions on using Transcriber, open Transcriber and then tap the question mark in the lower-right corner of the screen.
Writing on the Screen
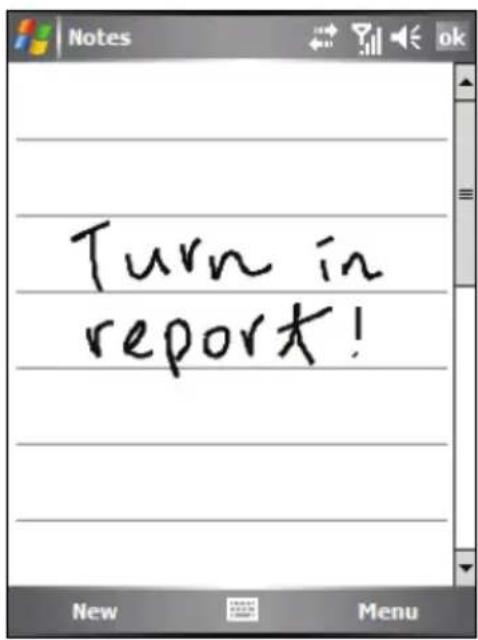
In any program that accepts writing, such as the Notes program, you can use your stylus to write directly on the screen. Write the way you do on paper. You can edit and format what you have written and convert the information to text later.
Writing
To write on the screen, tap Menu → Draw to switch to the drawing mode. This action displays lines on the screen to help you write.
| NOTE: Not all programs support the drawing mode.
Editing Your Writing
If you want to edit or format writing, you must first select the writing and then edit it.
- Tap and hold the stylus next to the text you want to select until the insertion point appears. Without lifting, drag the stylus across the text you want to select.
- Tap and hold the selected words and then tap an editing command (cut, copy or paste) on the shortcut menu or tap the command on the Menu → Edit menu.
If you accidentally write on the screen, tap Menu → Undo Ink and try again.
Converting Your Writing to Text
-
If you want to convert only certain words, select them before going to the next step.
-
To convert writing to text, tap Menu → Tools → Recognize or tap and hold the selected words and then tap Recognize on the shortcut menu. Your writing is turned into text.
If a word is not recognized, it is left as writing.
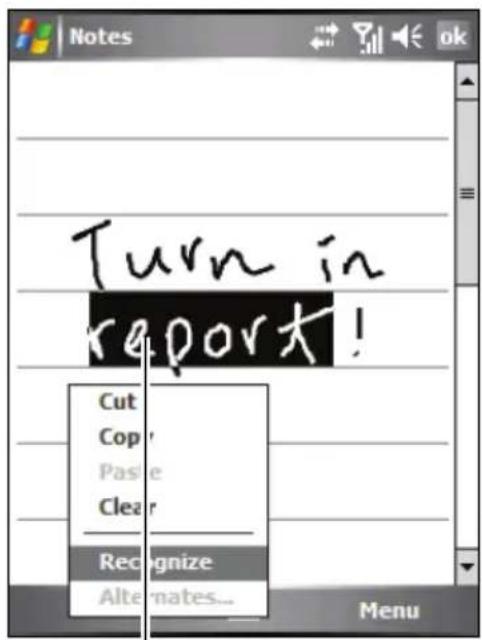
Select the text you want to convert and tap Recognize on the shortcut menu.
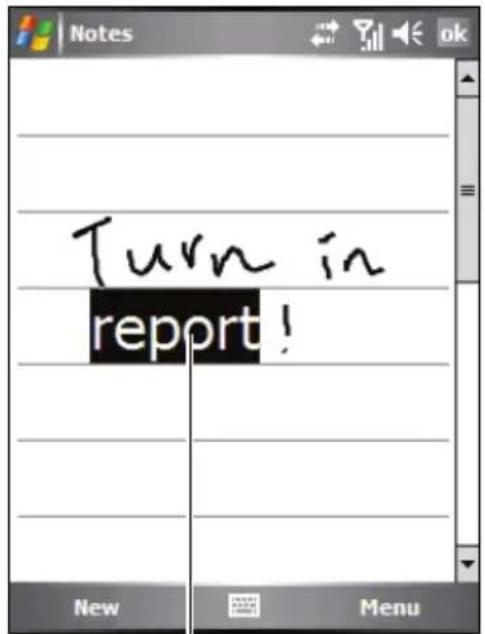
The writing is turned into text.
If the conversion is incorrect, you can select different words from a list of alternates or return to the original writing.
-
Tap and hold the incorrect word (tap one word at a time).
-
On the shortcut menu, tap Alternates. A menu with a list of alternate words appears.
-
Tap the word you want to use or tap the writing at the top of the menu to return to the original writing.
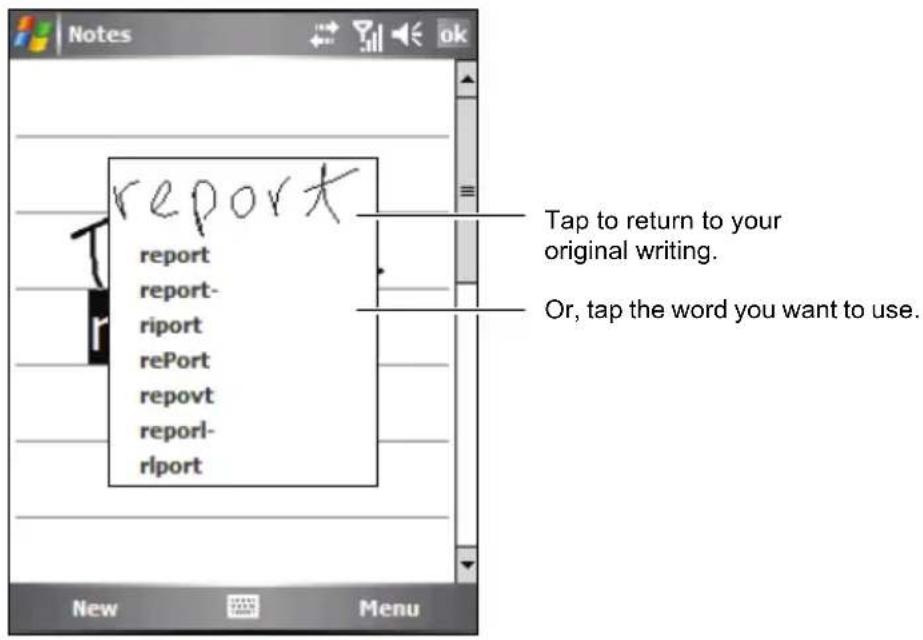
Some tips for getting good recognition are listed below:
- Write neatly.
- Write on the lines and draw descendants below the line. Write the cross of the “t” and apostrophes below the top line so that they are not confused with the word above. Write periods and commas above the line.
- For better recognition, use Menu → Zoom to increase the zoom level to 300%.
● Write the letters of a word close together and leave big gaps between words. - Hyphenated words, foreign words that use special characters such as accents some punctuation cannot be converted.
- If you add writing to a word to change it (such as changing a “3” to an “8”) after you attempt to recognize the word, the writing you add will not be included if you attempt to recognize the writing again.
Drawing on the Screen
You can draw on the screen in the same way that you write on the screen. The difference between writing and drawing on the screen is how you select items and how they can be edited. For example, selected drawings can be resized, while writing cannot.
Creating a Drawing
-
Tap Menu → Draw to enable drawing mode. A check (√) appears before the command.
-
To create a drawing, cross three ruled lines on your first stroke. A drawing box appears.
-
Subsequent strokes in or touching the drawing box become part of the drawing. Drawings that do not cross three ruled lines will be treated as writing.
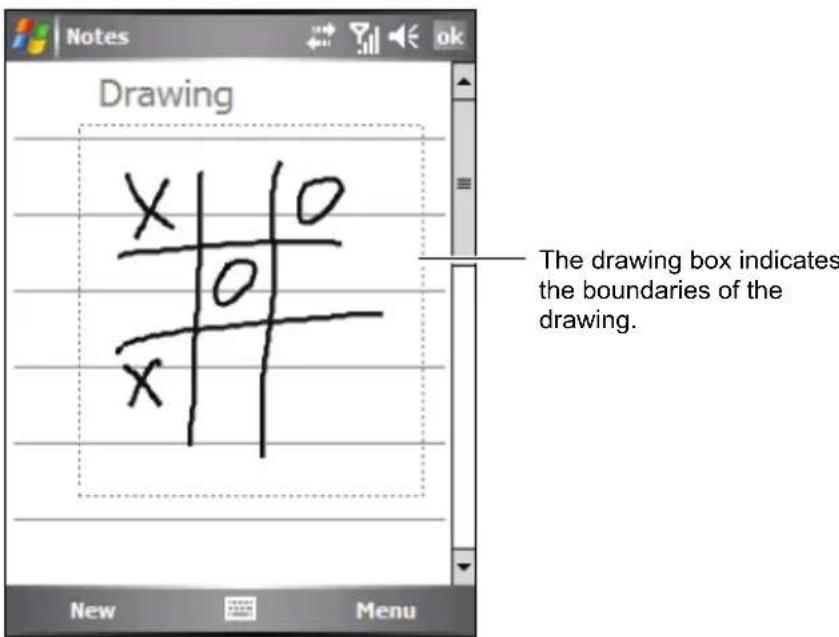
NOTE: You may want to change the zoom level so that you can more easily work on or view your drawing. Tap Menu → Zoom and then choose a zoom level.
Editing Your Drawing
If you want to edit or format a drawing, you must select it first.
- Tap Menu → Draw to disable drawing mode. The check (√) before the command should disappear.
- Tap and hold the stylus on the drawing until the selection handle appears.
- Tap and hold the selected drawing and then tap an editing command (cut, copy or paste) on the shortcut menu.
- To resize a drawing, drag a selection handle.
Recording a Message
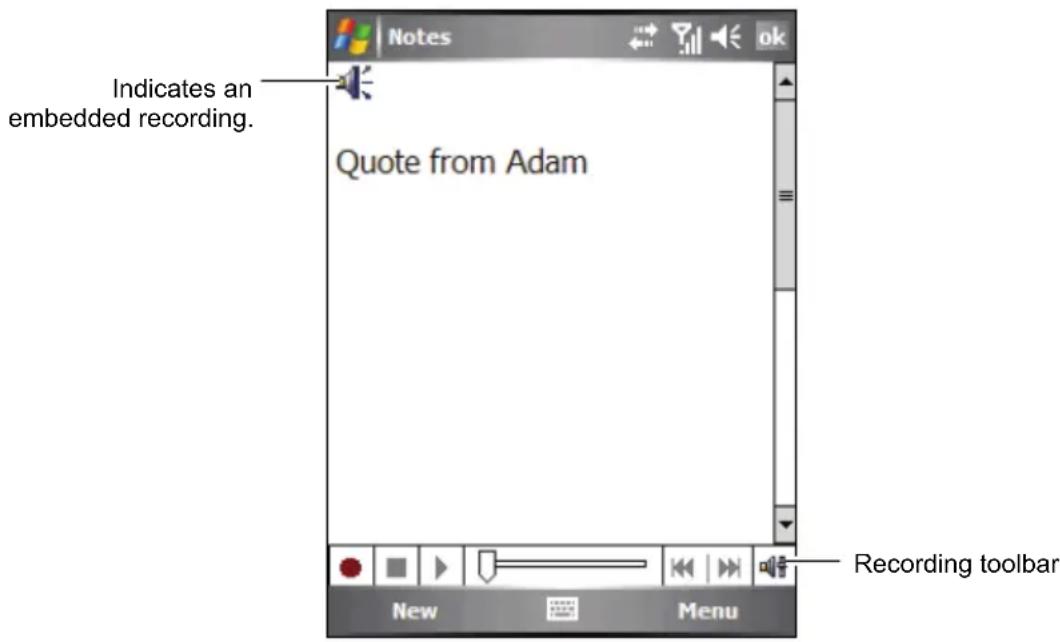
In any program where you can write or draw on the screen, you can also quickly capture thoughts, reminders and phone numbers by recording a message. In the Notes program, you can either create a stand-alone recording or include a recording in a written note. If you want to include the recording in a note, open the note first. In the Messaging program, you can add a recording to an e-mail message.
To create a recording:
- Hold A700's microphone near your mouth or other source of sound.
- Tap the Record button on the Recording toolbar to start recording. If the speaker is not muted, a beep indicates that your A700 is recording.
- To stop recording, tap the ■ Stop button on the Recording toolbar. Two beeps will sound. The new recording appears in the note list or as an embedded icon.
To play a recording, tap it in the list or tap its icon in the note.
Recording Formats
Your A700 supports several formats for voice notes. The formats vary in both the quality of the recording and the size of the sound file. When selecting a recording format, you should consider the quality you need as well as how much storage memory the recording will use on your A700.
Not all recording formats are compatible with other software or computers. If you will share your recordings with others or transfer a recording to your desktop computer, be sure to choose a recording format that is supported by the software used to play recordings on the other computer.
The PCM format offers the highest quality recording and is compatible with all Pocket PC models, other Windows-powered mobile devices and desktop computers that use Windows operating systems. The GSM 6.10 format is compatible with all Pocket PC models and other Windows-powered mobile devices, but may not work with desktop computers.
To select a recording format:
- Tap → Settings → Personal → Input.
- On the Options tab in the Input control panel, select a voice recording format from the drop-down list.
The list of recording formats on your A700 indicates the sample rate, whether the format is stereo or mono and how much storage memory is required per second of recording. You may need to experiment with different sample rates and formats to determine which format best suits your voice.
Using My Text
When using Messaging or MSN Messenger, use My Text to quickly insert preset or frequently used messages into the text entry area. To insert a message, tap Menu → My Text and then tap a message.
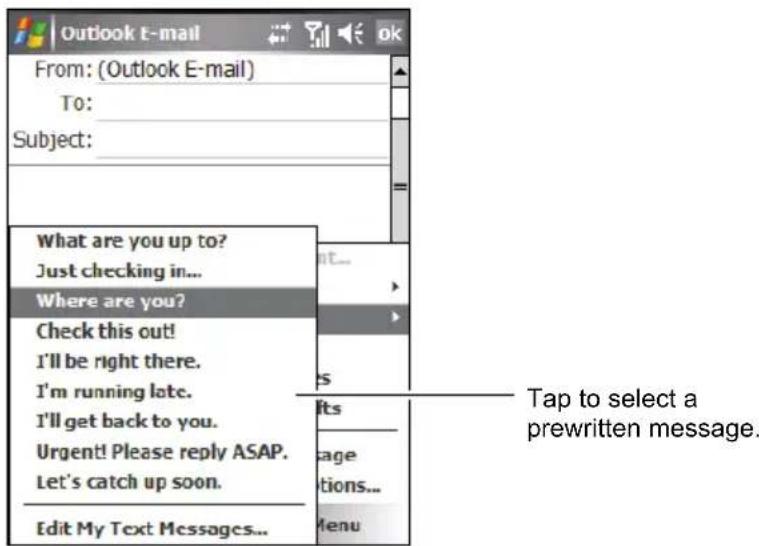
NOTE: After inserting a My Text message, you can add text to it before you send the message.
To edit a My Text message, tap Menu → My Text → Edit My Text Messages. Select the message you wish to edit and make desired changes.
2.9 Securing Your A700
You can customize the level of security you want to have on A700 by locking the keypad, the entire device, or the phone.
Locking the Keypad
The keypad lock turns off the keypad functionality. This is a helpful feature if, for example, A700 is turned on and in your pocket, and you want to prevent accidental keypresses and unintentional phone calls.
To lock the keypad:
Tap Device unlocked on the Today screen. Your A700 will not respond to any tapping of the screen or pressing of the buttons.
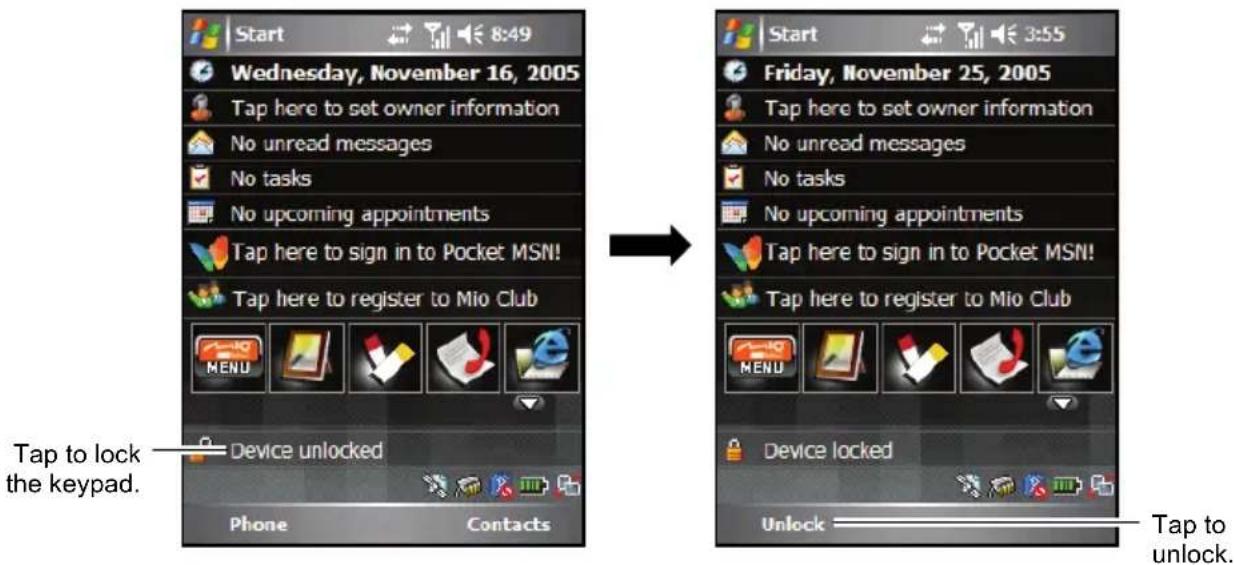
To unlock, tap Unlock (left soft key) and tap Unlock.
Locking the Device
Locking your A700 prevents access to personal data. You can help keep your data more secure by requiring a password every time A700 is turned on.
- Tap → Settings → Personal → Password.
- Tap to select Prompt if device unused for, and in the box to the right select a desired period of time.
- Select the password type: Simple 4 digit or Strong alphanumeric.
- Under Password, enter the password you want to use to access A700 when it is locked. Confirm the password, if necessary.
![Password Prompt if device unused 5 minutes for Password type: Simple 4 digit Password: Password Hint 123 1 2 3 4 5 6 7 8 9 0 - = Tab q w e r t y u i o p [ ] CAP a s d f g h j k l ; * Shift z x c v b n m , . / ← CtI áü ` \ | ↓ ↑ ← →](/content/2026/05/1052770/images/3262a2e92d599ffe755826accb7067d6b9795e52df67f5d21115c190dd1c7cc9.jpg)
- On theHint tab, enter a phrase that will help you remember your password, but doesn't allow others to guess your password.
The hint will be displayed after the wrong password is entered four times.
- Tap ok to save the setting.
The next time the device is turned on, you will be prompted to enter your password. You also need to enter this password on the desktop computer for the ActiveSync connection.
NOTE: If you forget your password, you must clear memory before you can access your A700. See section 8.2.
Locking the Phone
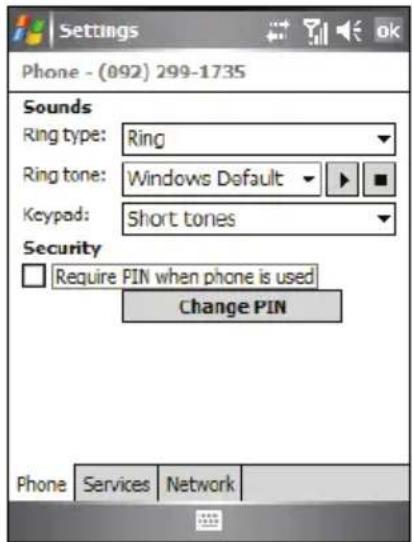
You can protect your phone from unauthorized use by assigning a type of password called a PIN (personal identification number). Your first PIN will be given to you by your mobile phone service provider.
-
Tap → Phone → Menu → Options.
-
On the phone tab, tap to select Require PIN when phone is use.
-
Enter the PIN, and tap Enter.
-
To change the PIN at any time, tap Change PIN.
-
Tap ok to save the setting.
NOTE: Emergency calls can be placed at any time without requiring a PIN.

Using the Phone
This chapter explains how to make and receive phone calls, track your calls, manage your calls and phone numbers more efficiently, and how to customize the phone functions.
3.1 About Your Phone
Your A700 includes an integrated GSM (Global System for Mobile Communications) / GPRS (general packet radio service) phone.
The integrated phone in A700 can also be used to connect your A700 to an ISP or work network so you can browse the Web and read e-mail. You can connect to the Internet or work network over GPRS, using Cellular Line, or using the modem specified by your mobile phone service provider.
Before You Start
To use the phone, you need to first set up an account with a GSM/GPRS mobile phone service provider. The functions available to you depend on the services offered by your service provider and your type of subscription.
Your service provider will provide you with a SIM (Subscriber Identification Module) card. This card contains your mobile phone account details, contacts that can be stored and any additional services to which you have subscribed. You must install a SIM card before you can make or receive phone calls or use wireless data services. (For information on installing a SIM card, see “Installing the SIM Card and Battery” in section 1.2.)
Phone Features
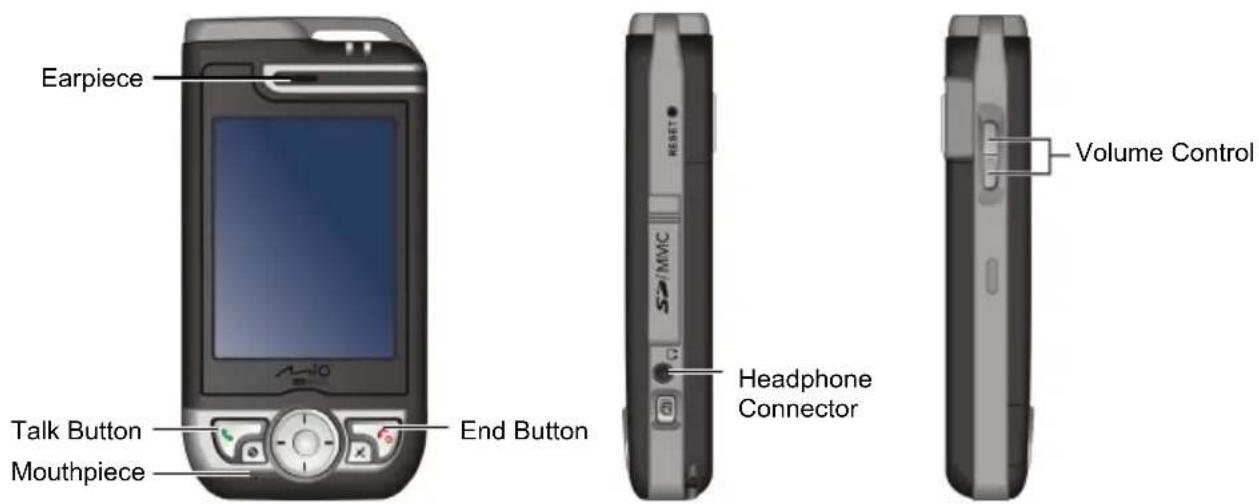
Your A700 includes an application program called Microsoft Phone. This program provides an on-screen phone keypad where you can perform all the phone operations.
The phone features of your A700 are identified as below.
3.2 Turning On and Off the Phone Function
You turn the phone on or off independently of the device. The phone is turned on by default.
You can turn off the phone if needed (for example, on the airplane). After turning off the phone, you can still use other functions such as camera, Calendar, games, Windows Media Player, etc.
Turning Off the Phone
-
Tap ? when using any program.
-
Tap Turn on flight mode.
NOTE:
- You can turn off the phone to save battery power. However, you cannot receive incoming phone calls or SMS/MMS messages when the phone is off.
- If you need to turn on the phone right after you turn it off, wait for at least 20 seconds.
Turning On the Phone
-
Tap ☐ when using any program.
-
Tap Turn off flight mode.
Starting Microsoft Phone
Start Phone by tapping → Phone or pressing the Talk button on your A700.
The Phone keypad appears on the screen. From this keypad, you can make calls, access Call History, Speed Dial and Phone Settings.
You can use other programs on you A700 during a call. To quickly switch back to the Phone keypad, tap 📄 on the navigation bar or press the 📋 Talk button.
Phone Status Icons
Icons will be displayed on the navigation bar to indicate the status of the phone functions. They are listed below.
| Icon | Meaning | Description |
 | Phone off (flight mode) | Tap this icon to turn on the phone. |
 | Signal strength | The number of the vertical bars in the icon indicates the strength of the signal. |
 | Call in progress | The phone is dialing or you are talking on the phone. Tap this icon to quickly switch back to the Phone keypad if you are using other programs during a call. |
 | Missed call Tap this icon to view the call(s) you missed. | |
 | Call on hold | This icon indicates you are putting a call on hold. |
 | GPRS available | This icon indicates the GPRS connection is available for use. |
 | GPRS in use | This icon indicates the GPRS connection is being used. |
| New message Tap this icon to view unread messages. | ||
| Missing SIM card | This icon indicates that no SIM card is installed and you cannot use the phone function. | |
3.3 Basic Phone Operations
Making a Call
There are several ways you can make a call. The easiest way is to dial the phone number on the Phone keypad.
Dialing a Call
-
Access the Phone keypad by tapping Phone or pressing the Talk button on your A700.
-
Tap the number on the Phone keypad.
If you tap a wrong number, you can tap the (Backspace) button to erase individual numbers one at a time, or you can delete all the numbers that have been keyed in by tapping and holding the (Backspace) button.
If you are making an international call, tap and hold the 0 key until the + sign appears. The + sign replaces the international prefix of the country from where you are calling.
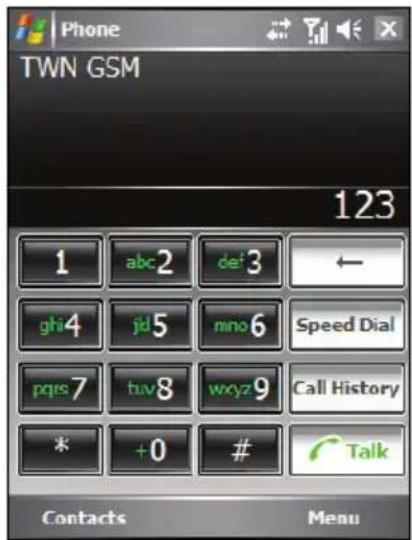
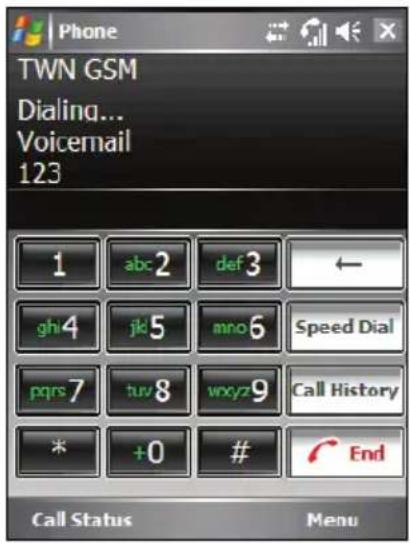
- Tap or press the Talk button on your A700 to dial the numbers you have entered.
Making a Call Using a Recently Connected Number
To make a call using a recently connected number:
- When on the Phone keypad screen: press the 📞 Talk button.
- When using programs other than Phone: press the 📞 Talk button twice.
Making a Call from Contacts
Microsoft Contacts displays your contact information stored both in A700's memory and your SIM card.
-
Tap → Contacts, or tap the Contacts soft key on the Today screen.
-
Do one of the following to call someone from the contact list:
- Tap the contact to call. Then tap the number to call; or move to the number to call and then tap the Call soft key or press the Talk button.
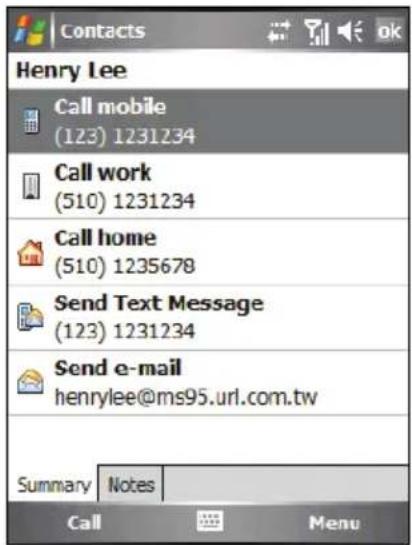
- Tap and hold the contact to call, and then tap the number to call on the shortcut menu.
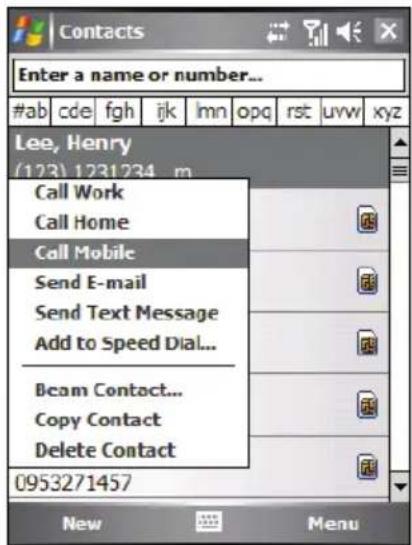
NOTE:
- If a contact has several phone numbers, including a mobile phone number, then the mobile phone number is displayed as the default number in the contact list. However, if you ever call the contact using other phone numbers, then this recently dialed number will display in the contact list.
- For information on Contacts, see section 5.2.
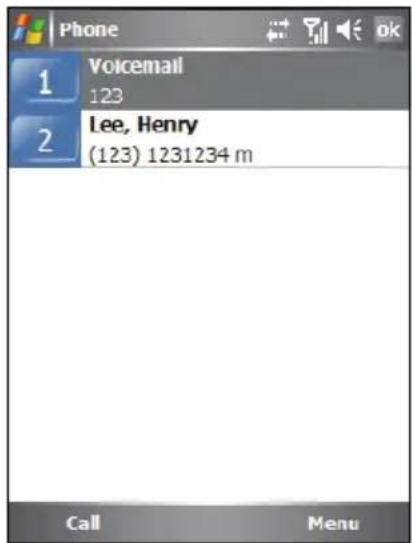
Making a Call from Speed Dial
Speed Dial enables you to quickly place a call without having to actually enter the number.
-
Access the Phone keypad by tapping Phone or pressing the Talk button on your A700.
-
Tap and hold the speed dial number on the Phone keypad that you have assigned to the contact you want to call.
To dial a two-digit speed dial number, tap the first digit on the Phone keypad, and then tap and hold the second digit.
If you can't remember which speed dial number to dial, tap Speed Dial on the Phone keypad, and tap the speed dial number next to the contact you want to call.
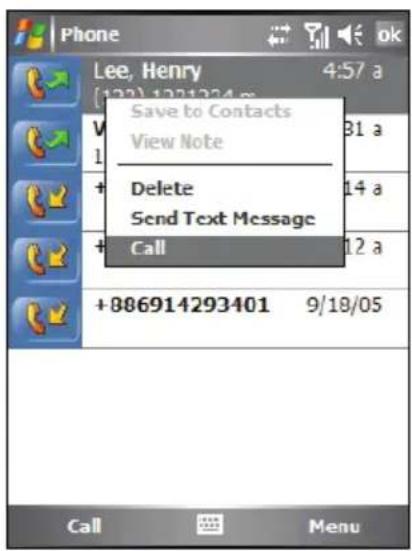
Making a Call from the Call History List
The Call History list displays the calls you made, received, and missed.
-
Access the Phone keypad by tapping Phone or pressing the Talk button on your A700.
-
Tap Call History on the Phone keypad.
-
Do one of the following to call someone from the Call History list:
- Move to the number to call and then tap the Call soft key or press the Talk button.
- Tap and hold the contact to call, and then tap Call on the shortcut menu.
To Make a Call Using SIM Manager
SIM Manager displays names and phone numbers stored on your SIM card.
-
Tap → Programs → SIM Manager.
-
Wait for your SIM card contents to be loaded. Do one of the following to make a call:
- Tap the contact to call, and then tap the Menu soft key → Call.
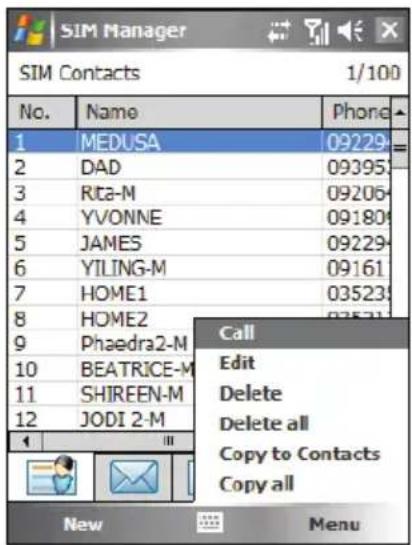
- Tap and hold the contact to call, and then tap Call on the shortcut menu.
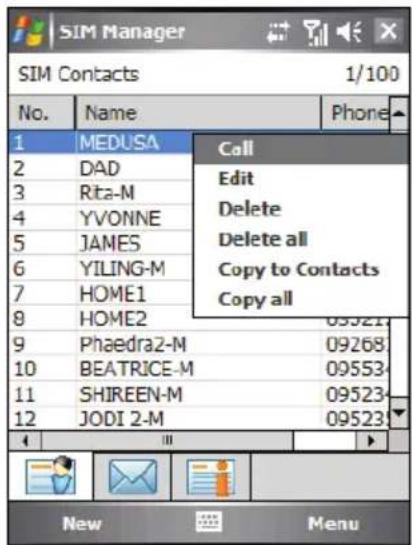
NOTE: SIM Manager can also display the text messages stored on your SIM card.
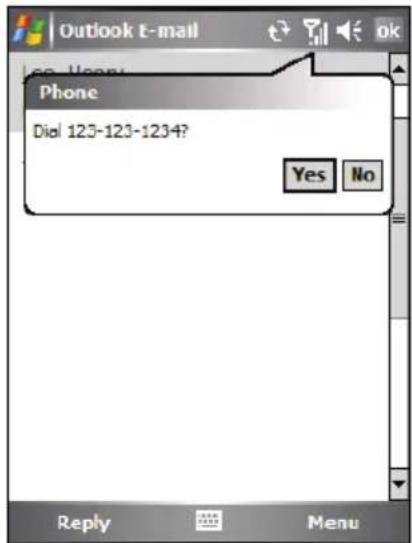
Making a Call from a Hyperlink
When you see an underlined phone number presented as a hyperlink in an e-mail message, you can use the hyperlink to make a call.
- Tap the hyperlink phone number.
- Tap Yes to make a call.
Answering a Call
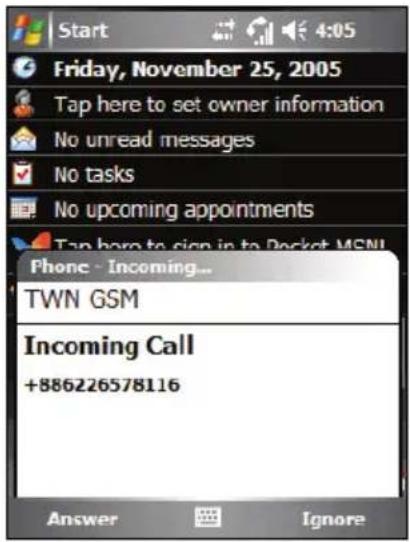
When an incoming call is received, your A700 rings or vibrates according to the options you have set for the phone. The name and number of the caller are displayed on the pop-up window. If the name of the caller is not in your contact list, only the caller's phone number is displayed.
To answer an incoming call, tap Answer on the pop-up window or press the 📞 Talk button.
You can use other programs on A700 during a call. To quickly switch back to Phone, press the Talk button or tap → Phone.
NOTE:
- There may be situations where you want to immediately silence the ring of an incoming call. Simply press the Volume control, and then proceed to answer the call.
- If you receive an incoming call while using Windows Media Player to listen to music, the music will pause. It will resume after you end the call or reject the call.
- If you answer a call while you are in a WAP/GPRS session, the session will suspend. After you end the call, the session will resume automatically.
Rejecting a Call
To reject an incoming call, tap Ignore on the pop-up window or press the End button. If you have voice mail, the call will be sent to your voice mail, depending on your service provider.
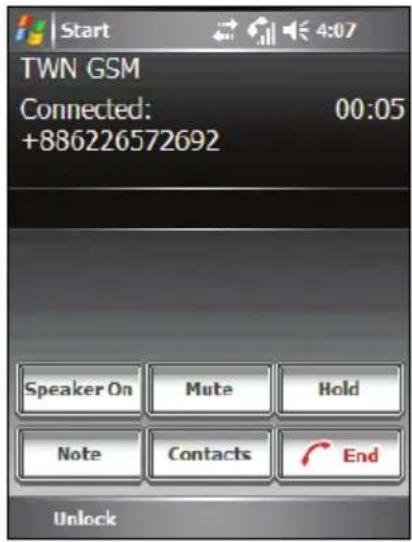
Ending a Call
To end a call, tap on the Phone keypad or press the 📞 End button.
Managing More than One Call
During a call, you can make or take a second call while putting the current call on hold. Then, you can choose to swap between the two callers or set up a conference call between all three parties.
NOTE: You may need to register for the "call waiting" service with your service provider and set your A700 accordingly. The exact number of people you can talk at the same time depends on your service provider.
Holding a Call to Take a Second Call
-
If there is another incoming call when you are talking on A700, a pop-up window appears to notify you.
-
Tap the Answer soft key to place the first call on hold, and answer the second call.
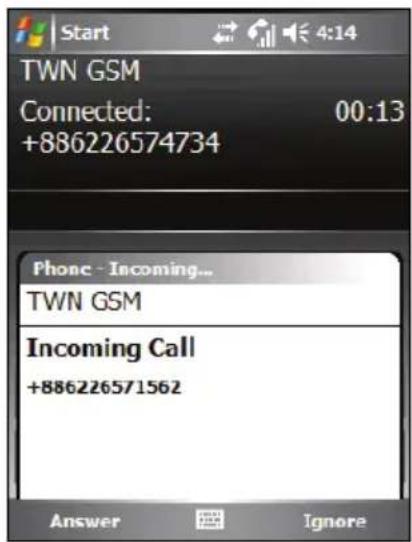
- To end the second call and go back to the first, tap End or press the End button.
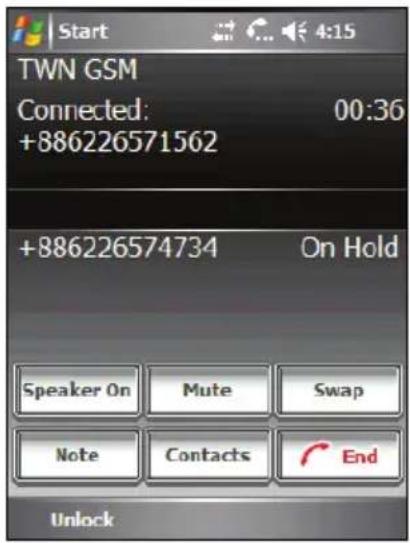
Rejecting the Second Call
To reject the second call and keep your current call in progress, tap Ignore. Note not to press the 🔔 End button; doing so will end the current call.
Holding a Call to Make a Second Call
-
During a call, tap on the Phone keypad to place the first call on hold.
-
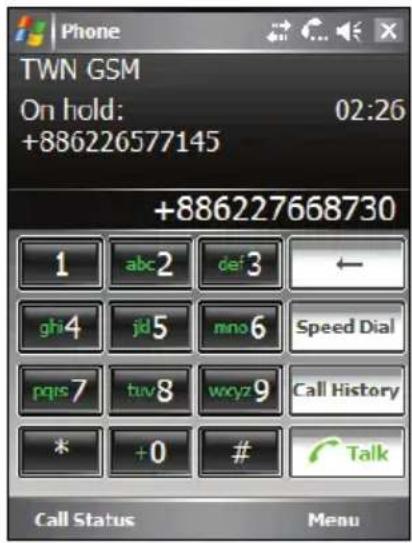
Tap thKeypad soft key.
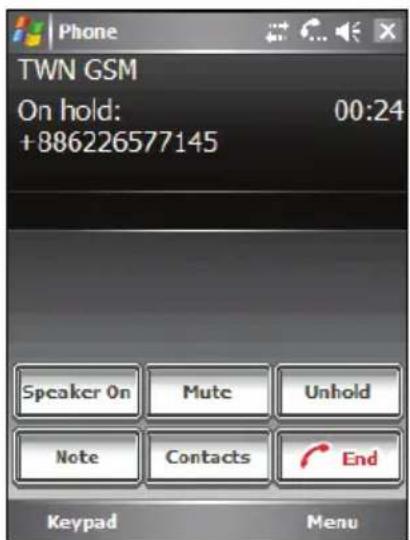
- Dial a second number and tap press the 🔔 Talk button to connect. Wait for it to be picked up.
- To end the second call and go back to the first, tap End or press the End button.
Swapping between Calls
When you have put a call on hold and made or taken another call as described earlier, you can swap between the two calls by tapping Swap.
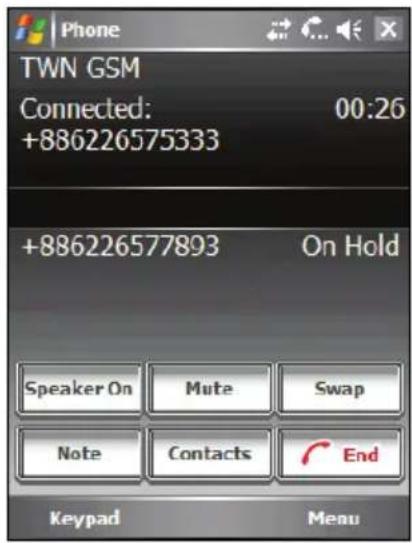
Setting up a Conference Call
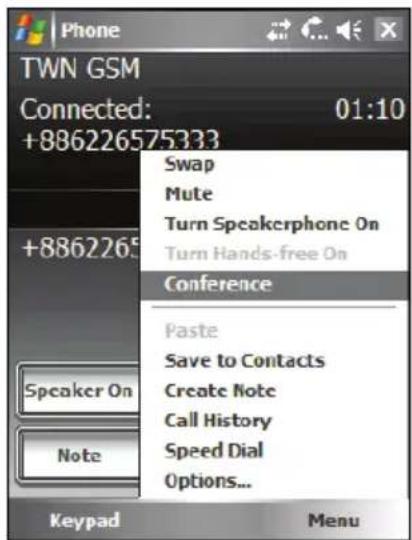
- When you have put a call on hold and made or taken another call as described earlier, you can set up conference calling by tapping the Menu soft key → Conference.
- To add additional people to your conference, tap Hold → Keypad soft key. Dial a second number and tap or press the Talk button to connect. Wait for it to be picked up. Then tap the Menu soft key → Conference.
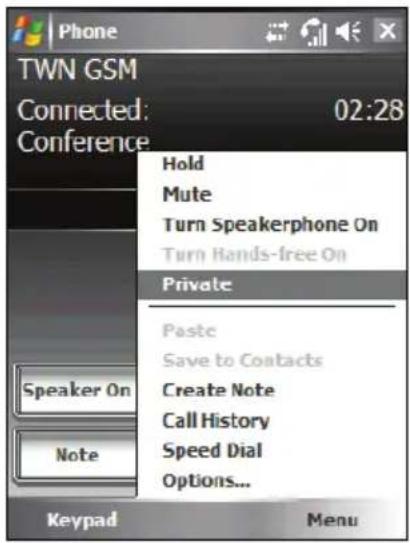
- If you want to talk to one of the parties privately during the call, tap the Menu soft key Private.
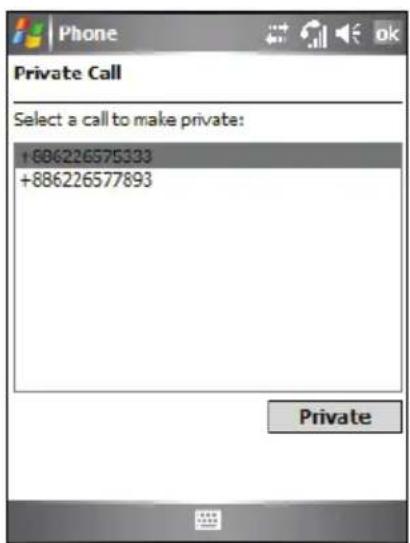
Select a number, and tap Private.
To include everyone in the call again, tap the Menu soft key → Conference.
Adjusting the Phone Volume
To adjust the volume during a call, tap the icon on the navigation bar to select a volume level, or use the Volume control on the side of A700.
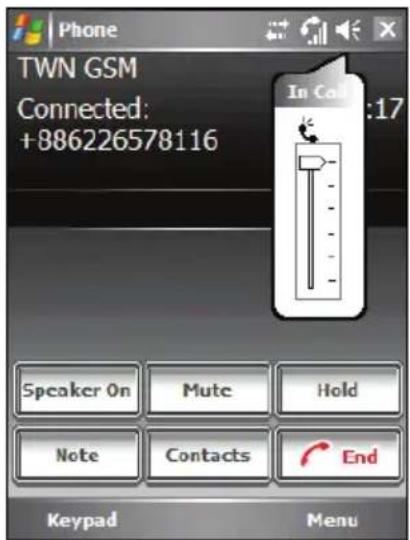
CAUTION: Never raise the sound volume level too high when using earphones. An excessive sound volume level could cause damage to your hearing.
Muting a Call
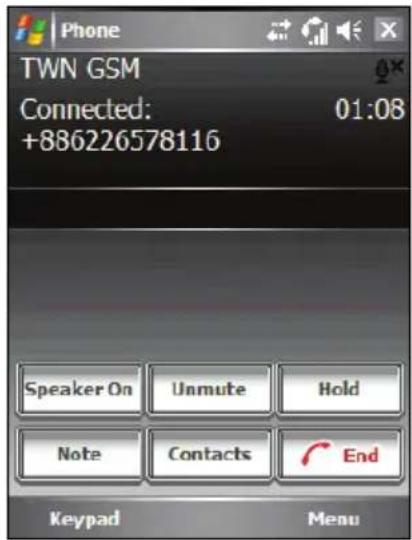
During a call, you can mute your microphone so that the person with whom you are speaking cannot hear you, but you can still hear him or her. This is useful if, for example, you do not want the other person to hear a conversation or background noise on your side of the call.
On the Phone kaypad, tap 📂 Mute to turn on the mute function. The ✕ will appear on the navigation bar.
To turn off the mute function, tap Unmute
Using Speakerphone
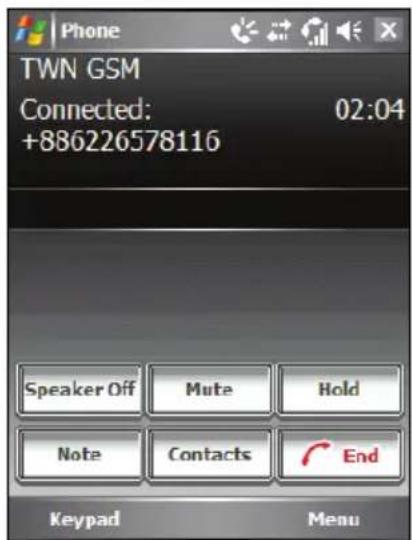
You can turn on the speakerphone to use A700 as a hands-free solution.
On the Phone kaypad, tap Speaker On to turn on the speakerphone function. The 🎨 will appear on the navigation bar.
To turn off the speakerphone function, tap Speaker Off.
In-call Options
While a call is in progress, you can tap the Menu soft key to access menu commands for common tasks. The following table shows the commands available when a call is in progress. Some of these commands are available only when multiple calls are in progress or during a conference call.
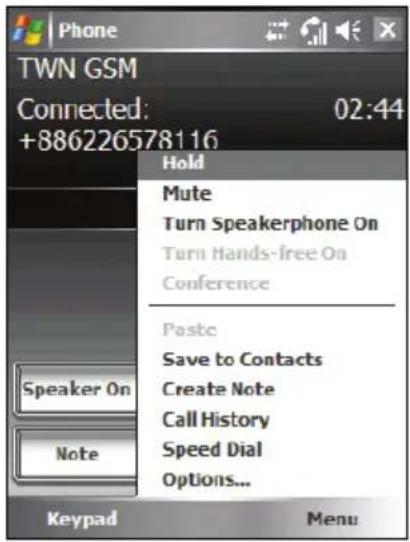
Item Description
| Hold Puts the active call on hold. | |
| Unhold Activates the call on hold. | |
| Mute | Mutes the microphone for the active call; the other party will not hear anything you say, but you can still hear the other party. |
| Unmute Turns the microphone back on for the active call. | |
| Turn Speakerphone On Sends out the caller's voice through the speaker. | |
| Turn Speakerphone Off Turns off the speakerphone function. | |
| Conference | Joins together all existing calls, if you have subscribed to this service. |
| Private | Breaks one call out of a conference and make it active while the rest of the conference is on hold. |
| Paste | Pastes a number that you copied from another program to the Phone keypad. |
| Save to Contacts Creates a contact card for the caller. | |
| Create Note Takes notes during a call. (See section 3.4.) | |
| Call History Opens the Call History list. (See section 3.5.) | |
| Speed Dial Opens the speed dial list. (See section 3.6.) | |
| Options Changes the phone settings. (See section 3.8.) | |
3.4 Taking a Note During a Call
You can take a note during a call.
- Tap the Note button.
- Enter your note and tap ok.
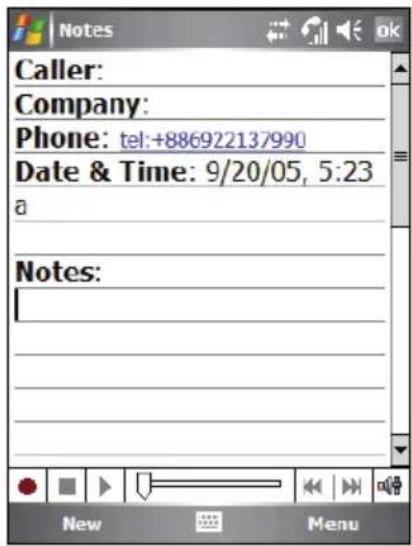
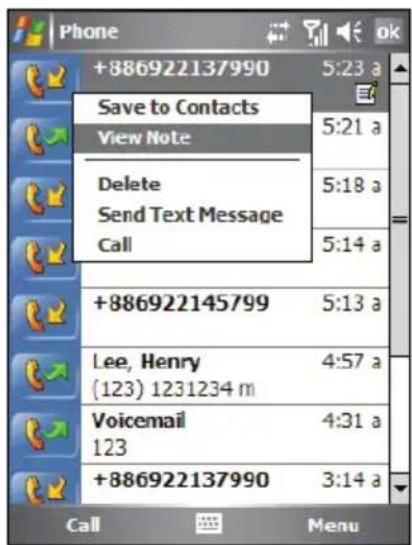
To access a note you created during a call:
- Access the Phone keypad by tapping Phone or pressing the Talk button on your A700.
- Tap Call History on the Phone keypad.
- The icon indicates that the phone call entry contains a note. Tap and hold the name or number for that entry, and tap View Note on the shortcut menu.
You can also tap → Programs → Notes, and access the note in the Calls folder.
3.5 Using Call History
Call History provides the time and duration of all incoming, outgoing, and missed calls, and a summary of total calls. Call History also provides easy access to any notes taken during a call.
To access Call History:
- Access the Phone keypad by tapping button on your A700.
→ Phone or pressing the Talk
- Tap the Call History button on the Phone keypad.
NOTE: To clear the entire Call History, tap the Menu soft key → Delete All Calls.
Viewing Call History
You can tap the Menu soft key → Filter to change the Call History view (All Calls by default).
- All Calls displays all calls made to and from A700 in a chronological order.
- Missed ( ) displays only calls that were not answered.
- Outgoing ( ) displays only calls made from A700.
- Incoming ( ) displays only calls made to A700.
- By Caller displays a list of all contacts on your A700 who have a phone number assigned to them.
NOTE: To quickly see the time, date, and duration of a call, tap the white area of the call's entry.
![+886922137990 5:23 a +886226271188 5:21 a +886922145799 5:18 a +886922137990 5:14 a +886922145799 5:13 a Lee, Henry 4:57 a [123] 1231234 m All Calls Missed Outgoing Incoming By Caller... Filter Delete All Calls Call Timers... Menu](/content/2026/05/1052770/images/a33a01b13c21ece78b84476783abc106d3bad2b65f7a559dce7bb88d707ef448.jpg)
Managing Call History
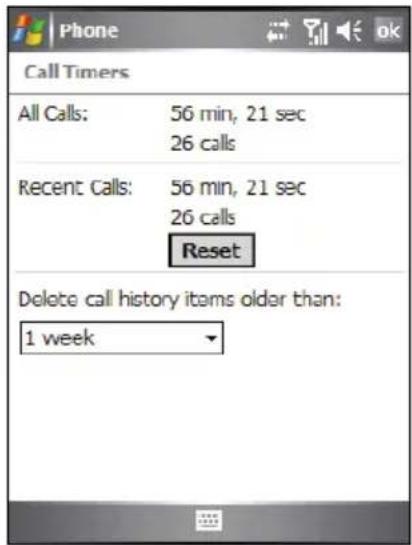
You can tap the Menu soft key → Call Timers to manage Call History.
- All Calls displays the statistics, including total number of calls and total time. The All Calls counter cannot be reset.
- Recent Calls displays the total number of calls and total time since last time the call history was reset.
- To delete Call History items older than a specific amount of time, select a time period under Delete call history items older than.
Adding an Entry to Contacts Using Call History
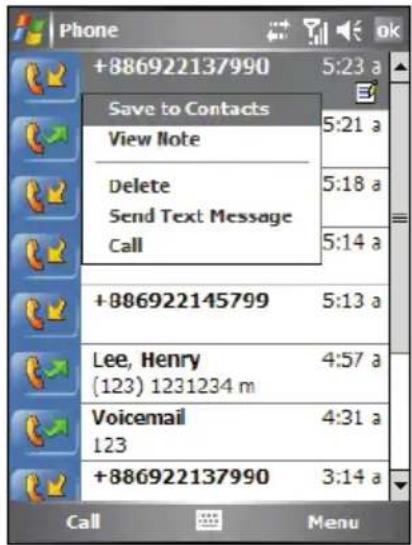
You can add a phone number in the Call History to Contacts.
- Tap and hold the entry you wish to transfer, and tap Save to Contacts on the shortcut menu.
- Finish the details in Contacts.
- Tap ok to save the setting and return to the previous screen.
3.6 Using Speed Dial
You can create speed dials for frequently-called phone numbers so you can dial a number with a single tap. Speed dials can only be created for numbers stored in Contacts.
Creating a Speed Dial Entry
-
Access the Phone keypad by tapping → Phone or pressing the Talk button on your A700.
-
Tap the Speed Dial button on the Phone keypad.
-
Tap thMenu soft key → New.
-
Tap a contact.
-
Tap the phone number for which you want to create a speed dial.
-
In the location box, select an available location for the new speed dial.
-
Tap ok to save the setting.
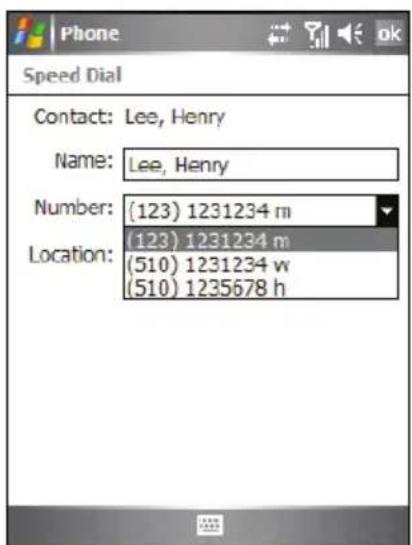
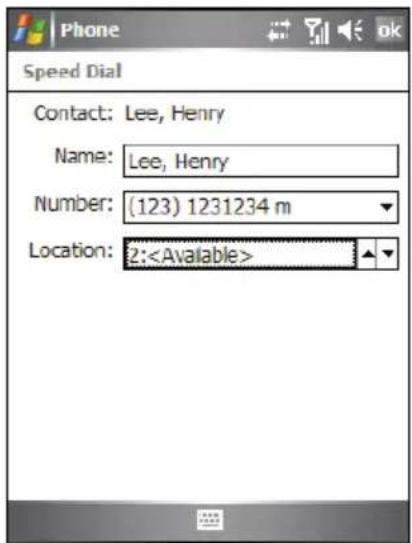
NOTE:
- The first speed dial location is reserved for your voice mail.
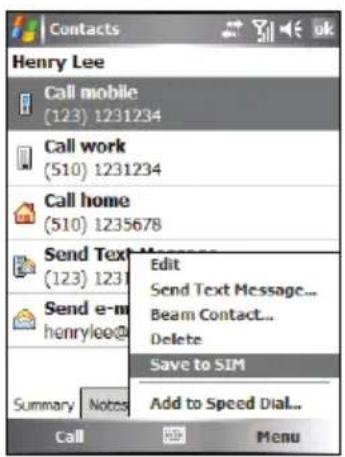
- You can create a speed dial from Contacts. Tap and hold the contact name, tap Add to Speed Dial, and then select an available location for the new speed dial.
Editing a Speed Dial Entry
- Access the Phone keypad by tapping button on your A700.
→ Phone or pressing the Talk - Tap the Speed Dial button on the Phone keypad.
- Tap and hold the entry you wish to edit, and tap Edit on the shortcut menu.
- When the editing is completed, tap the ok soft key.
Deleting a Speed Dial Entry
- Access the Phone keypad by tapping → Phone or pressing the Talk button on your A700.
- Tap the Speed Dial button on the Phone keypad.
- Do one of the following:
- Tap to open the entry you wish to delete, and tap the Delete soft key.
- Tap and hold the entry you wish to delete, and tap Delete on the shortcut menu.
- Tap Yes to delete the entry.
3.7 Managing Phone Numbers
Phone numbers can be stored in various places on your A700. Therefore, you can add, access and transfer phone numbers in a number of ways.
Microsoft Contacts: Transferring Contacts
- Tap → Contacts, or tap the Contacts soft key on the Today screen.
- Tap the desired entry in the contact list.
-
Move to the phone number to copy, and do one of the following:
-
To add the phone number to the SIM card, tap the Menu soft key → Save to SIM.
-
To add the phone number to the speed dial list, tap the Menu soft key → Add to Speed Dial.
-
Accept or edit the details. When finished, tap the ok soft key.
For more information on using Contacts, see section 5.2.
SIM Card: Transferring and Adding Entries
Transferring an Entry to Microsoft Contacts
- Tap → Programs → SIM Manager. Wait for your SIM card contents to be loaded.
- Tap the desired entry.
- Tap theMenu soft key → Copy to Contacts.
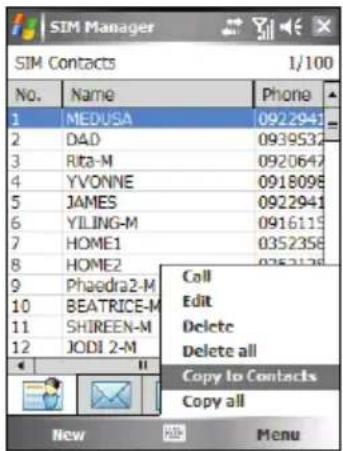
NOTE: You can tap the Menu soft key → Copy all to transfer all entries from your SIM card to Microsoft Contacts.
Adding an Entry
- Tap → Programs → SIM Manager. Wait for your SIM card contents to be loaded.
- Tap thNew soft key.
- Enter the name and phone number of the new entry. When finished, tap OK.
![SIM Manager Name: Ted Phone: 425 OK Cancel 123 1 2 3 4 5 6 7 8 9 0 - = Tab q w e r t y u i o p [ ] CAP a s d f g h j k l ; * Shift z x c v b n m , . / Ctrl äü ` \ ↓ ↑ ← →](/content/2026/05/1052770/images/4fe168a83666b1e8d3e9ea9ce54db000d8314e66da1165b1cb76774cab5064a7.jpg)
NOTE:
- To edit a SIM card entry, on the contact list, tap the Menu soft key Edit.
- To delete the selected SIM card entry, tap the Menu soft key → Delete. To delete all SIM card entries, tap the Menu soft key → Delete all.
3.8 Customizing Your Phone
Changing Phone Settings
You can customize phone settings, such as the ring type and ring tone to be used for incoming calls, and the keypad tone to be used when entering phone numbers. You can also protect your phone from unauthorized use.
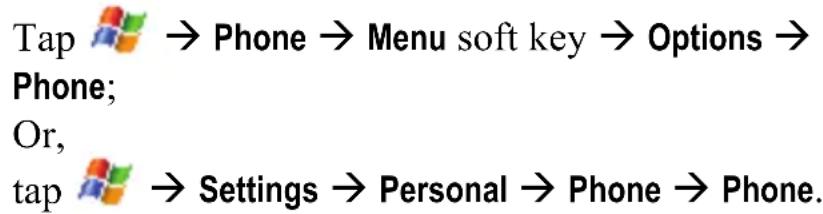
flowchart
graph LR
    Tap -->|→ Phone → Menu soft key → Options → Phone;| Or
    Or --> tap
    tap -->|→ Settings → Personal → Phone → Phone.|
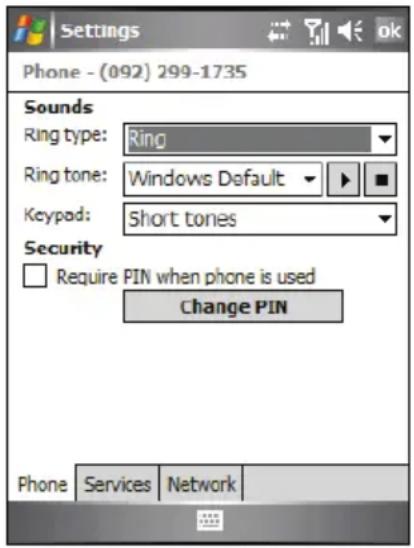
- Ring type determines the way that you are notified of incoming calls. For example, you can choose to be notified by a ring, a vibration, or a combination of both. Select the desired option from the list.
- Ring tone determines a ring tone to notify you of incoming calls if you select a ring type that will cause your phone to ring. Select the desired option from the list. You can tap the ▶ button to hear the tone.
- Keypad determines the keypad tone to be used when entering phone numbers. Set your keypad tone to Short tones or Off for enhanced privacy in public places.
- Security You can protect your phone from unauthorized use by assigning a PIN. Tap Require PIN when phone is used. Your first PIN will be given to you by your mobile phone service provider. To change the PIN at any time, tap Change PIN. The PIN must be between 4 and 8 digits in length.
NOTE:
- To use custom .mp3, .wav, .mmf or .mid files as ring tones, use ActiveSync on your desktop computer to copy the files to the \Windows\Rings folder on your A700. Then, select the sound from the Ring Tone list. (For information on copying files to your A700, see ActiveSync Help on your desktop computer.)
- Emergency calls can be placed at any time without requiring a PIN.
Changing Services Settings
You can access and configure settings for the phone services you subscribed to through your mobile phone service provider. For example, you may want to block certain types of incoming and/or outgoing calls, forward incoming calls to a different phone number based on your situation, be notified of incoming calls when you are already in a call, or let others know your identity when making calls. Services available to you depend on your service provider and the type of your subscription.
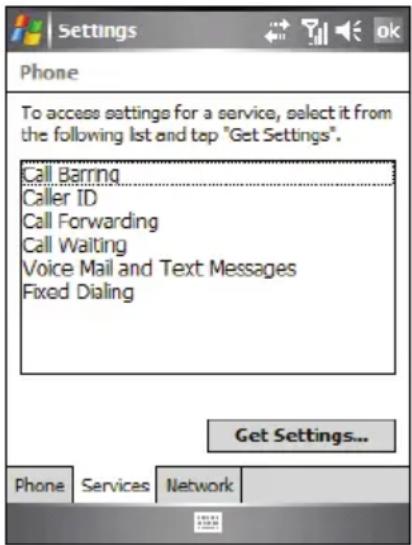
Tap → Phone → Menu soft key → Options → Services;
Or,
tap → Settings → Personal → Phone → Services.
To view your services settings, tap a service and then tap Get Settings.
- Call Barring blocks certain types of incoming and/or outgoing calls.
- Caller ID reveals your identity when you are calling people.
- Call Forwarding forwards all incoming calls to a different number.
- Call Waiting notifies you of incoming calls when you are already in a phone session.
- Voice Mail and Text Messages To use voice mail or send text messages (SMS), make sure that you enter the correct voice mail phone number or text message phone number in Phone settings. Sending text messages is not included in all network service plans. You can access your voice mail from speed dial location 1.
- Fixed Dialing enables you to limit your calling area to one or more specific phone numbers and/or area codes.
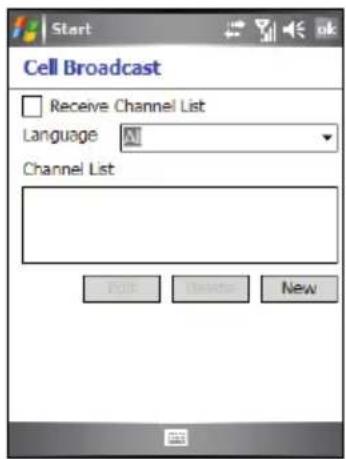
Cell Broadcast
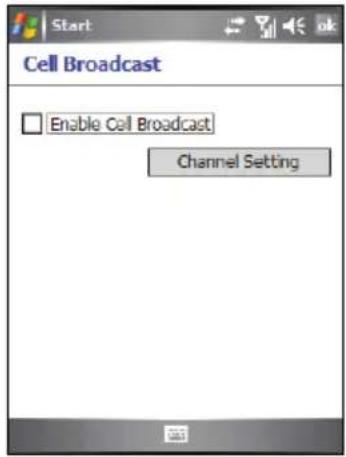
Cell Broadcast is an add-on service provided by your service provider, allowing you to receive a variety of information such as weather forecast, stock, and traffic. For available topic numbers, consult your service provider.
-
Tap → Settings → System → CellBroadcast.
-
Select Enable Cell Broadcast.
-
Tap Channel Setting.
-
Select Receive Channel List.
-
Select the language for the messages. Only messages in the selected language will be shown. You can also select to display messages in all languages.
-
You can add, delete or edit message channels.
-
Tap ok to save the setting.
Changing Network Settings
You can view available wireless networks, determine the order in which your phone accesses another network if the current one is unavailable, and specify whether you want to change networks manually or automatically. The current network will remain active until you change it, lose your signal, or change your SIM card.
Tap → Phone → Menu soft key → Options → Network; Or, tap → Settings → Personal → Phone → Network.
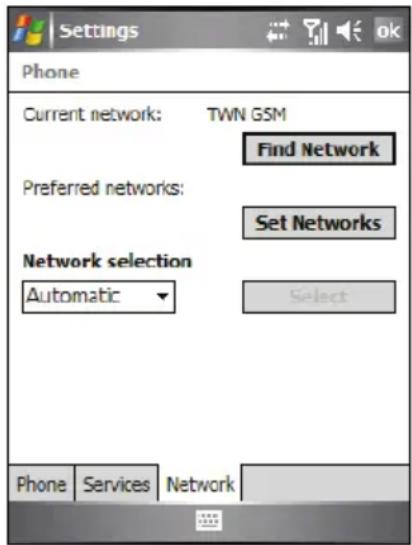
- Current network displays the currently registered network.
- Preferred networks You can set your preferred networks in the order you want A700 to access them. For example, if your first preferred network is unavailable, A700 will try to access your second preferred network. Tap Set Networks and follow the on-screen instructions.
• Network selection
By default, A700 automatically selects the most appropriate network for you. There may be times when you want to manually select a different wireless network to use. For example, you may want to control costs by knowing when connectivity for your current selected network is unavailable. In the Network selection list, tap Manual, select the network you want to use, and then tap OK.
3.9 Additional Phone Operations
Checking Your Voice Mail
The first position in your speed dial list defaults as your voice mailbox. When you insert your SIM card, your A700 automatically detects your voice mailbox number and sets it to the first position in your speed dial list.
To retrieve your voice mail:
- Access the Phone keypad by tapping button on your A700.
→ Phone or pressing the Talk
-
Do one of the following:
-
Tap the Speed Dial button on the Phone keypad, and tap the first position.
- Tap and hold the number 1 on the Phone keypad.
Making an Emergency Call
You can use A700 to dial the international emergency number 112. This number can normally be used to make an emergency call in any country with or without a SIM card inserted, as long as you are within a mobile phone service network.
Some mobile phone service providers may require that a SIM card be inserted, and in some cases that the PIN be entered.
There may be other emergency numbers available. Your mobile phone service provider may save additional local emergency numbers in the SIM card.
Dialing an International Call
When you are manually dialing a number, tap and hold the number 0 until the + sign appears. The + sign replaces the international prefix of the country from where you are calling.
Enter the full phone number you want to dial including country code, area code (without the leading zero) and local phone number.

Managing Your A700
This chapter tells you how to effectively manage power, memory, settings, data and programs of your A700.
4.1 Managing Power
You must maintain a continuous power supply to your A700 to retain your data, including any information, programs or settings that you added to your A700.
A fully charged battery should provide power for up to 8 hours of use. The operating time of a fully charged battery depends on how you are using the A700. Some functions, such as using multimedia or phone features and operating a SD/MMC card, may consume the battery power considerably.
Low Battery Signals and Actions
CAUTION:
- When the battery runs out of power completely, A700 turns off automatically. Charge the battery or replace the old battery immediately. Replacing the battery needs to be finished in 5 minutes to make sure of the current system time.
- When you charge the battery upon a warning of low power, you should charge for at least 30 minutes before unplugging the AC adapter. A700 may not be able to turn on during the first few minutes of the charging until the battery power reaches the protection point of the system.
You can monitor the battery power by tapping → Settings → System → Power, or tapping the 📄 icon on the Today screen. The remaining power is displayed on a status bar.
When the battery is low, your A700 will pop up a warning message. You should save your data and charge the battery immediately upon a warning of low power; otherwise your A700 will turn off automatically. You need to connect A700 to external AC power for charging before you can use it again.
Power Management
Supplied with your A700 is a tool called “eUtility.” This tool helps you effectively manage power to prolong the battery’s operating time.
Tap → Settings → System → eUtility. The tool consists of five tabs: System, Performance, Power, USB and Camera. They are described as below.
System
This page displays the program information. It does not contain any adjustable items.
Performance
Select a mode from the following four options.
- Auto A700 will automatically adjust the CPU speed according to the need of the current operation.
- Low Performance The CPU always runs at a lower speed, thus extending the battery life.
- High Performance The CPU always runs at normal speed, thus providing standard battery life.
- Super Performance The CPU always runs at a high speed, thus shortening the battery life.
Power
You can change the settings of the following items based on your needs.
• Keypad Backlight on
• SD slot powered off during sleep mode
You can also select the events for waking up your A700.
• Application Buttons
• SD/MMC Card insertion/removal
- USB plug-in
USB
You can establish a synchronization partnership between A700 and the desktop computer, or simply use A700 as a card reader. The default setting is ActiveSync mode. Note that you do not need to disable the USB connection in ActiveSync on the desktop computer when using the card reader mode.
Camera
When you use the camera indoors, you can select 50Hz or 60Hz to match the flicker frequency of the fluorescent lamp.
Power-Saving Tips
Follow these suggestions to maximize the battery's operating time, particularly when you are relying solely on the battery power for extended time periods.
- Suspend or turn off the device frequently.
By default, the screen backlight will automatically turn off and A700 will also suspend when it has been idle for a period of time. You can shorten the length of the idle time using ⬤ → Settings → System → Power → Advanced to set up.
Press the ① End button for 3 seconds until the Quick List appears and then tap Power off to turn off your A700 when it is not in use, even for a short time.
- Turn off functions not needed or adjust settings.
√ Lower the volume.
√ Do not enable sounds or light flashing except for the most necessary notifications. Tap → Settings → Personal → Sounds & Notifications to set up.
√ Remove the SD/MMC card, if installed, from the slot if you are not using it.
√ Close the map program and remove the map card from the slot if you are not using the program.
- Avoid power-consuming situations such as:
√ When connecting A700 to your desktop computer (Your A700 will not auto-suspend while it is connected.)
√ When using a SD/MMC card
√ When monitoring Bluetooth transfers (Although you can set your A700 to constantly monitor the Bluetooth transfers sent from other devices, doing so will quickly drain your battery.)
√ When playing sound or music, or recording
4.2 Managing Memory
Storage and Program Memory
Files, settings and data that you add to your A700 are stored in the memory of A700. The memory on your A700 is shared between storage memory and program memory.
- Storage memory
Storage memory is used to store the data you create and additional programs you install.
- Program memory
Program memory is used to run programs on your A700.
Your A700 automatically manages the allocation between storage and program memory. However, in some situations, such as when the memory is running out, your A700 may not be able to automatically adjust the allocation. (For information on solving memory problems, see section 8.2.)
Additional Memory
You can buy a SD/MMC storage card for backup, storage, and archives, or to transfer large files to other devices. Files stored on a storage card appear in a folder called Storage Card, listed under My Device in the File Explorer application.
Data stored on a storage card will be saved, even if your A700 loses power.
4.3 Customizing Your A700
CAUTION: Incorrect settings may cause your system to malfunction. Make sure that you fully understand the function of a certain item before any adjustment.
You can customize the settings of A700 to your own preferences. Tap → Settings. You can tap any of the icons on the Personal, System or Connections tabs for the options. The items you can customize are described as follows:
| Item Description | ||
| Personal | Buttons | To assigns programs to the hardware buttons and set the repeat rate of the up/down control. |
| Input | To set up items related to Block Recognizer, Keyboard, Letter Recognizer, Transcriber input methods and voice recording format. | |
| Menus To customize what appears on the Start menu. | ||
| MSN Options To manage your MSN password settings. | ||
| Owner Information | To enter your personal information. | |
| Password | To set a password for security. (See “Locking the Device” in section 2.9 for more information.) | |
| Phone | To customize the phone function. (See section 3.8 for more information.) | |
| Sounds & Notifications | To set the conditions and types of the sounds, system volume and ways of notifications. | |
| Today | To select the information you want displayed on the Today screen and to select a desired theme for the background. | |
| System | About | To show the hardware information of A700 and to define the device name that your A700 uses for identifying itself to other computers. |
| Backlight | To adjust the brightness level of the display and to set the automatic turnoff for power saving purposes. | |
| CellBroadcast | To receive a variety of information such as weather forecast, stock, and traffic from your mobile phone service provider. | |
Item Description
| Certificates | To establish your identify or the identify of other computers. Certificates help establish your identity when you are logging onto a secured network, such as a corporate network. Certificates also help establish the identity of other computers, such as servers, with which you connect. This helps prevent unauthorized users from accessing your A700 and information. |
| Clock & Alarms | To change the time and date and to set alarms. |
| Error Reporting | To enable or disable error reporting. Error Reporting sends information needed by technical support groups to diagnose a program error for a device running Windows Mobile software. |
| eUtility | To effectively manage power to prolong the battery's operating time. (See “Power Management” previously for more information.) |
| GPSSettings | To configure the GPS hardware settings and manage GPS. |
| Memory | To temporarily adjust the allocation between storage and program memory, to view the memory on the storage card (if installed) and to manually stop a program if it becomes unstable or program memory is low. |
| Power | To show the remaining battery power and to set the time for A700 to turn off automatically. |
| Quick Position | To update the ephemeris file for quicker GPS positioning. (See “Quick Position” in section 6.11 for more information.) |
| Regional Settings | To specify the region of your location and the formats of the number, currency, time and date. |
| Remove Programs | To remove programs you added to the memory of A700. |
Item Description
| Screen | To set the orientation of the screen to portrait or landscape. | |
| To adjust the touch screen for accurate screen taps. | ||
| To enable the ClearType feature for easier reading of text in programs that support ClearType. | ||
| To adjust the text size to see more content or increase the readability in many programs. | ||
| Connections | Beam | To send and receive information and files using Bluetooth. (See section 7.2 for more information.) |
| Bluetooth | To set up or change the Bluetooth connection. (See section 7.2 for more information.) | |
| Connections | To set up or change connection information. (See section 7.1 for more information.) | |
| Network Cards | To configure the network card, if installed. (See section 7.1 for more information.) | |
4.4 Finding and Organizing Information
The Search feature on your A700 helps you quickly locate information. To find a file, tap → Programs → Search. Enter the text you want to find, select a data type and then tap the Search soft key to start the search.
NOTE: To quickly find information that is taking up storage space on your A700, select Larger than 64 KB under Type.
You can also use the File Explorer to find files on your A700 and to organize these files into folders. Tap → Programs → File Explorer.
You can move files in File Explorer by tapping and holding the item you want to move, tapping Cut or Copy on the shortcut menu, browsing to the new location and then tapping Paste.
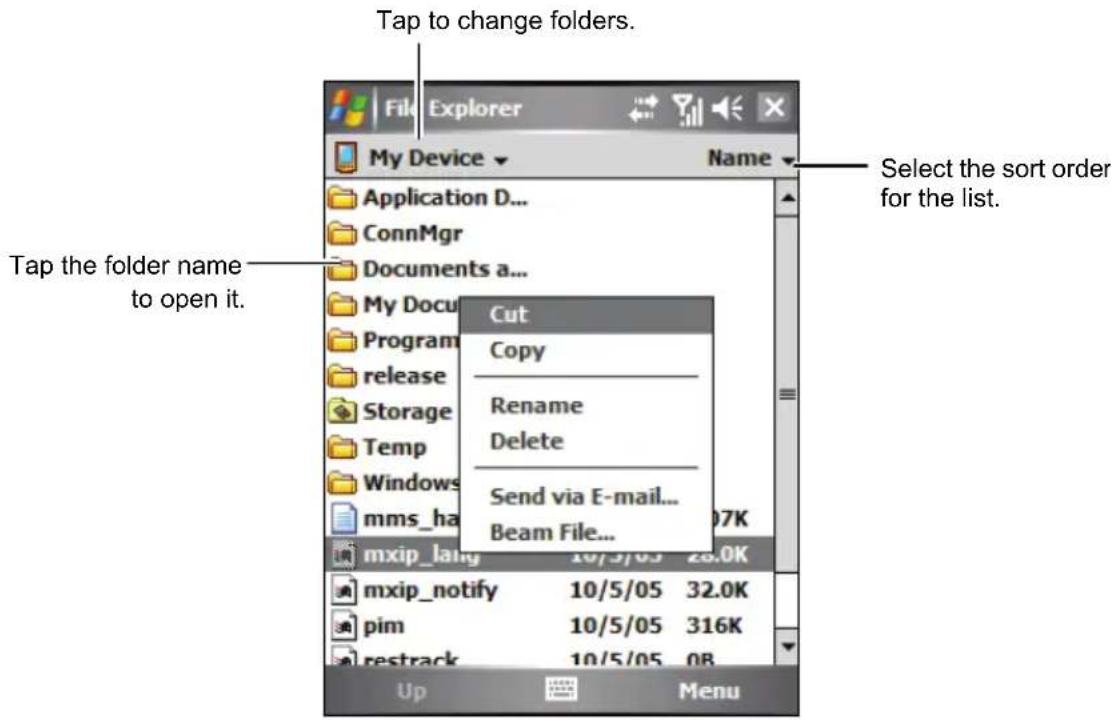
4.5 Adding or Removing Programs
Programs added to your A700 at the factory are stored in ROM (Read-Only Memory). You cannot remove the programs and you will never accidentally lose ROM contents. All other programs and data files added to your A700 after factory installations are stored in the memory.
You can install any program created for your A700 as long as your A700 has enough memory. The most popular place to find software for your A700 is on the Pocket PC web site (http://www.pocketpc.com).
Adding Programs
To Add Programs Using ActiveSync
You will need to install the appropriate software for your A700 on your desktop computer before installing it on your A700.
- Determine your A700 and processor type so that you know which version of the software to install. Tap → Settings → System → About and make a note of the information in Processor.
- Download the program to your desktop computer or, if you have a CD or disk containing the program, insert the CD or disk into your desktop computer. You might see a single *.zip, *.exe *.zip file, a Setup.exe file or several versions of files for different device types and processors. Be sure to select the program designed for A700 and its processor type.
- Read any installation instructions, Read Me files or documentation that comes with the program. Many programs provide special installation instructions.
- Connect your A700 and desktop computer.
- Double-click on the *.exe file.
- If the file is an installer, the installation wizard begins. Follow the on-screen instructions. Once the software has been installed on your computer, the installer automatically transfers the software to your A700.
- If the file is not an installer, you will see an error message stating that the program is valid but it is designed for a different type of computer. You will need to move this file to your A700. If you cannot find any installation instructions for the program in the Read Me file or documentation, use ActiveSync Explore to copy the program file to the Program Files folder on your A700. For more information on copying files using ActiveSync, see ActiveSync Help.
Once installation is complete, tap → Programs and tap the program icon to switch to it.
NOTE: You can also use Internet Explorer Mobile to download some programs from the Internet directly to your A700 if your A700 is connected to the Internet.
To Add a Program to the Start Menu
Do one of the following to add a program to the Start menu.
- Tap → Settings → Personal → Menus and tap the check box for the program. If you do not see the program listed, use any of the following two methods.
• If you are using File Explorer on A700:
Tap → Programs → File Explorer and locate the program (tap the folder list, labelled My Documents by default and tap My Device to see a list of all folders on A700). Tap and hold the program and tap Cut on the shortcut menu. Open the Start Menu folder located in the Windows folder, tap and hold a blank area of the window and tap Paste on the shortcut menu. The program appears on the Start menu. Note that the Start Menu folder can contain only up to 9 items.
- If you are using ActiveSync on the desktop computer:
Use ActiveSync Explore to explore your A700 files and locate the program. Right-click on the program and then click on Create Shortcut. Move the shortcut to the Start Menu folder in the Windows folder. The shortcut appears on the Start menu. Note that the Start Menu folder can contain only up to 9 items.
Removing Programs
To remove a program from your A700:
- Tap → Settings → System → Remove Programs.
- Select the program in the list, and then tap Remove.
If the program does not appear in the list of installed programs, use File Explorer on your A700 to locate the program, tap and hold the program, and then tap Delete on the shortcut menu.

Microsoft Pocket Outlook
This chapter tells you how to use Microsoft Pocket Outlook that includes Calendar, Contacts, Tasks, Notes, and Messaging. You can use these programs individually or together. For example, e-mail addresses stored in Contacts can be used to address e-mail messages in Messaging.
5.1 Calendar: Scheduling Appointments and Meetings
Use Calendar to schedule appointments, including meetings and other events. You can check your appointments in one of several views (Agenda, Day, Week, Month and Year), and set Calendar to remind you of appointments with a sound or other methods. Appointments for the day can be displayed on the Today screen.
Tap → Calendar to switch to the program.
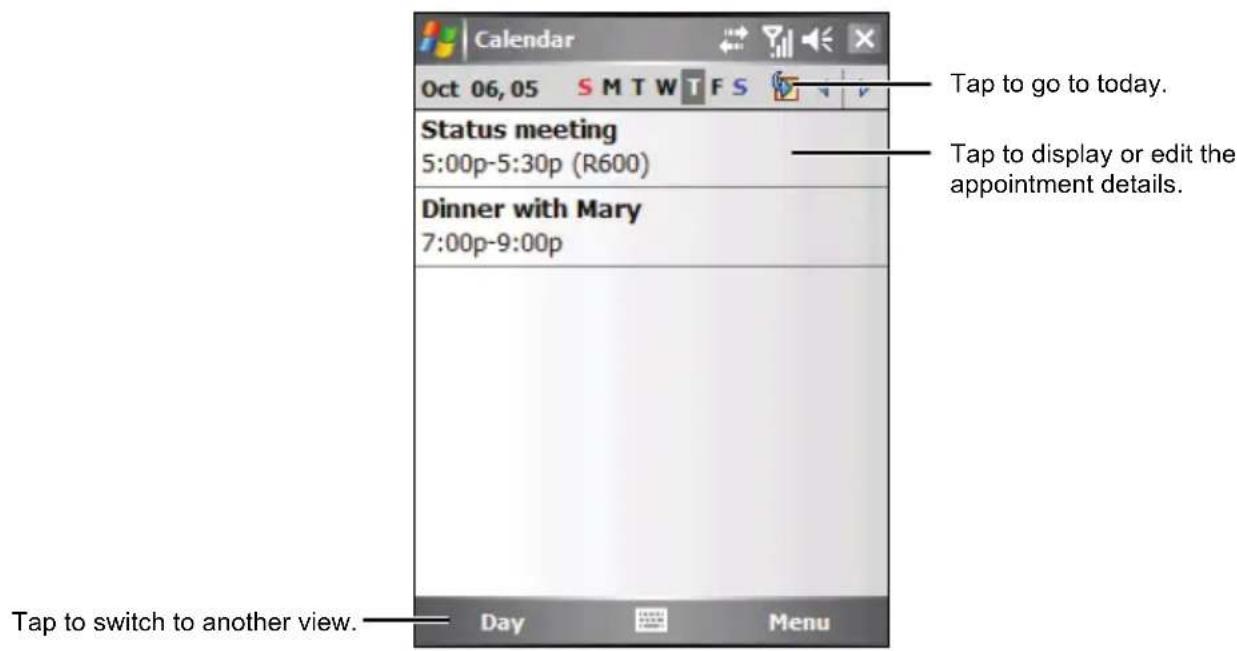
NOTE: You can customize the Calendar display (for example, change the first day of the week), by tapping the Menu soft key → Options.
Creating an Appointment
-
In Day or Week view, tap the desired date and time for the appointment.
-
Tap thMenu soft key → New Appointment.
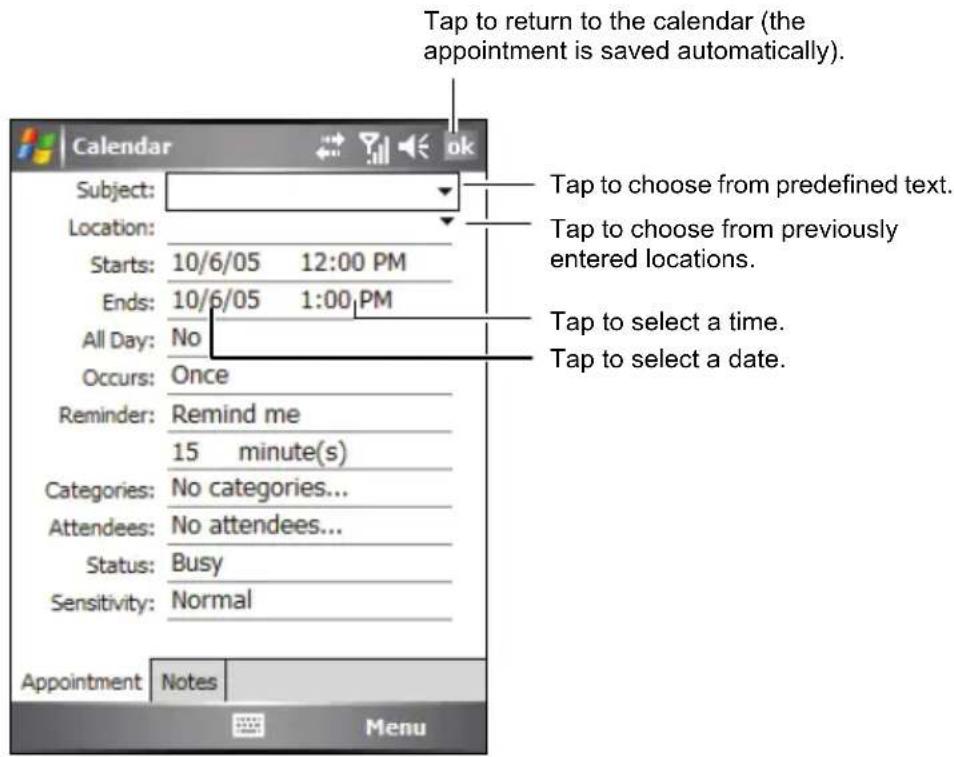
-
Using the Input panel, tap first to select the field, and then enter a description and a location. (See section 2.8 for information on entering text.)
-
Enter other desired information. You will need to hide the Input panel to see all available fields.
-
Tap ok to save and return to Calendar.
For more information, tap → Help.
Using the Calendar Summary Screen
When you tap an appointment in Calendar, a summary screen is displayed. To change the appointment, tap the Edit soft key.
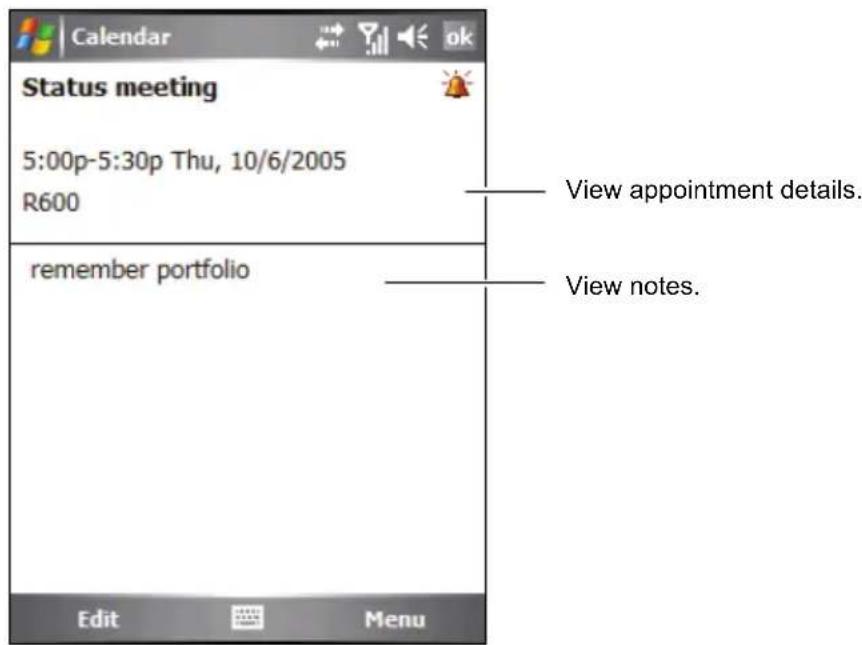
5.2 Contacts: Tracking Friends and Colleagues
Contacts maintains a list of your friends and colleagues so that you can easily find the information you are looking for, whether you are at home or on the road.
Tap → Contacts, or tap the Contacts soft key on the Today screen to switch to the program.
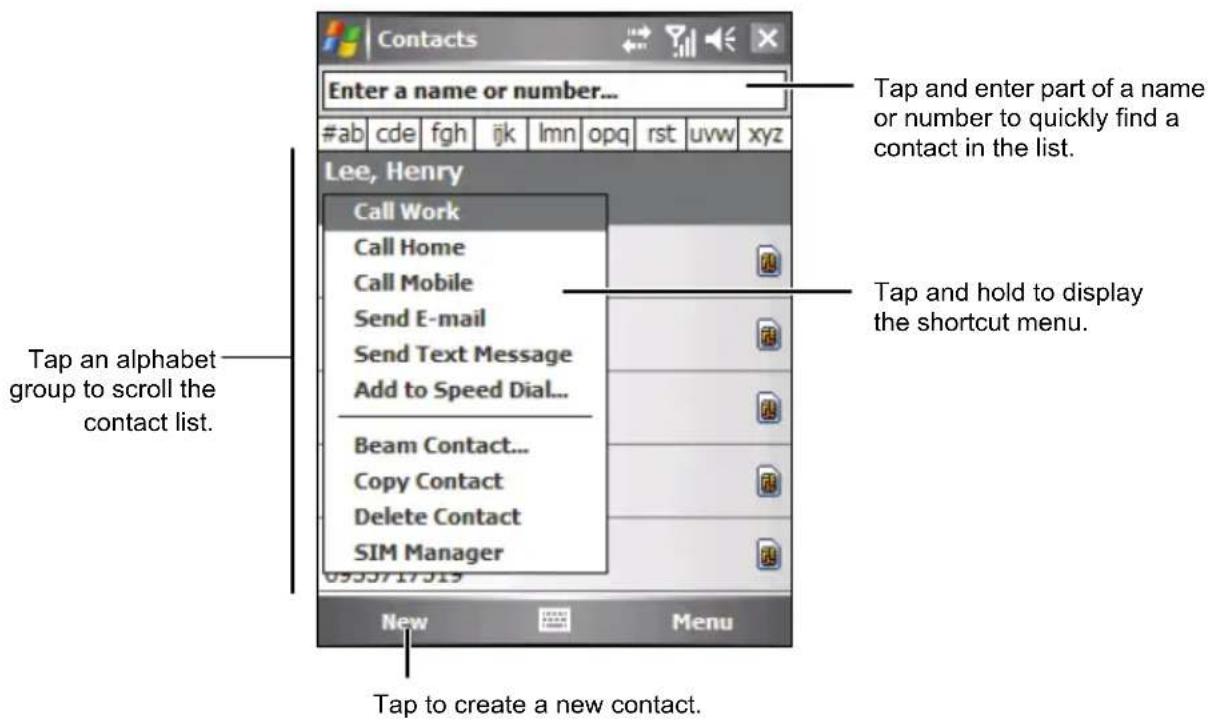
NOTE: To change the way information is displayed in the list, tap the Menu soft key → Options.
Creating a Contact
- In Contacts, tap the New soft key.
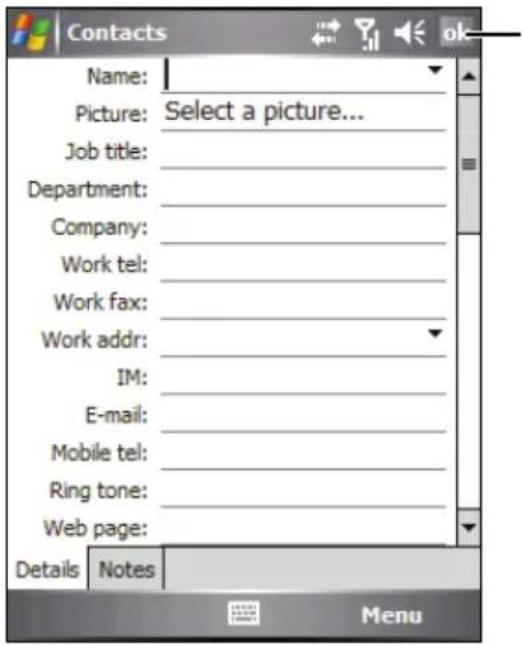
Tap to return to the contact list (the contact is saved automatically).
- Using the Input panel, enter a name and other contact information. You will need to scroll down to see all available fields. (See section 2.8 for information on entering text.)
- Tap ok to save and return to the contact list.
For more information, tap → Help.
Using the Contacts Summary Screen
When you tap a contact in the contact list, a summary screen is displayed. To change the contact information, tap the Edit soft key.
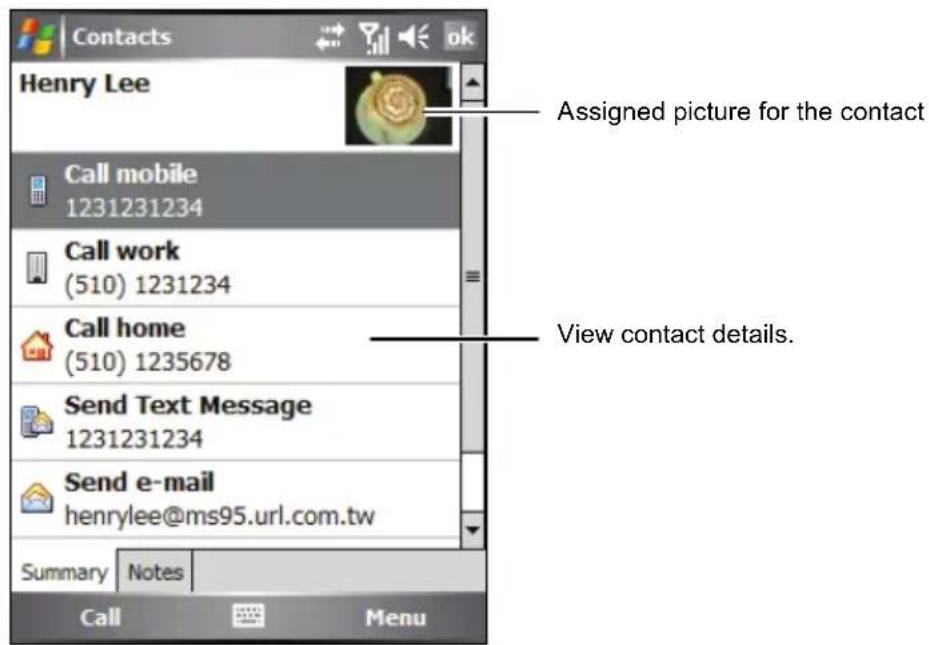
5.3 Tasks: Keeping a To Do List
Use Tasks to keep track of what you have to do.
Tap → Tasks to switch to the program.
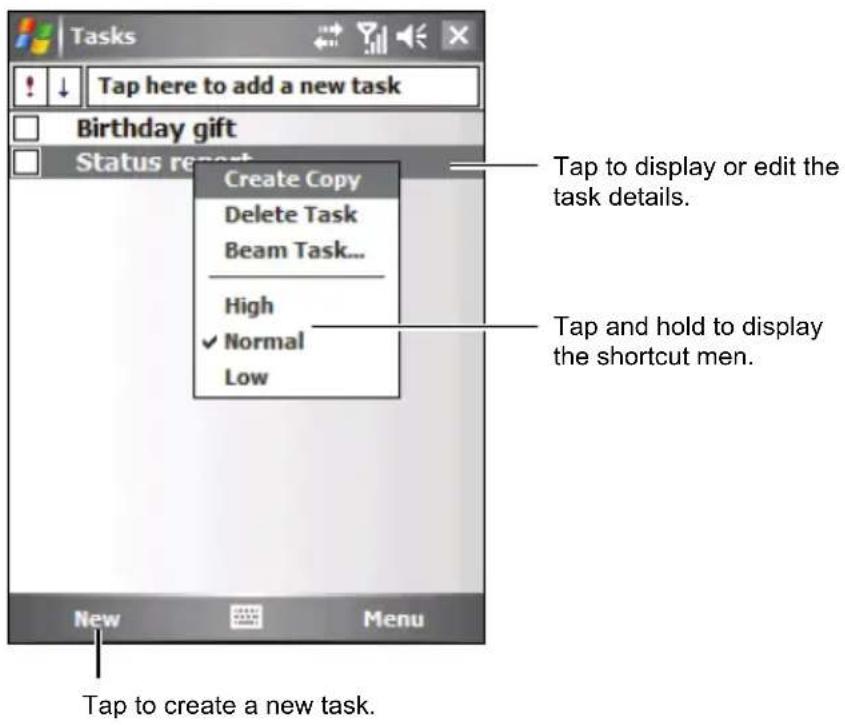
Creating a Task
- In Tasks, tap the New soft key.
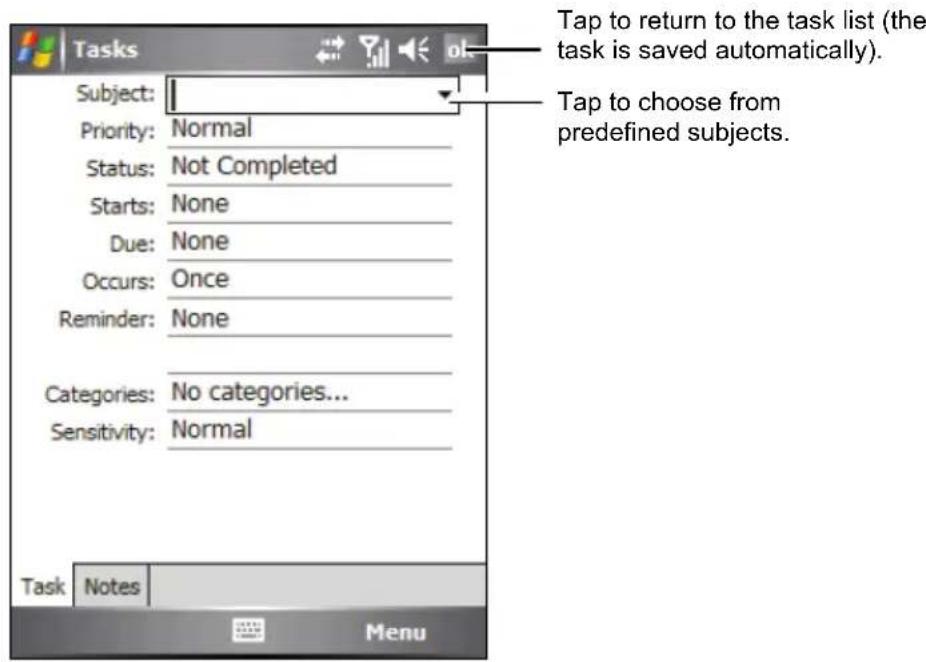
- Using the Input panel, enter a description. (See section 2.8 for information on entering text.)
- You can enter a start date and due date or enter other information by first tapping the field. If the Input panel is open, you will need to hide it to see all available fields.
- Tap ok to save and return to the task list.
For more information, tap → Help.
Using the Tasks Summary Screen
When you tap a task in the task list, a summary screen is displayed. To change the task, tap the Edit soft key.
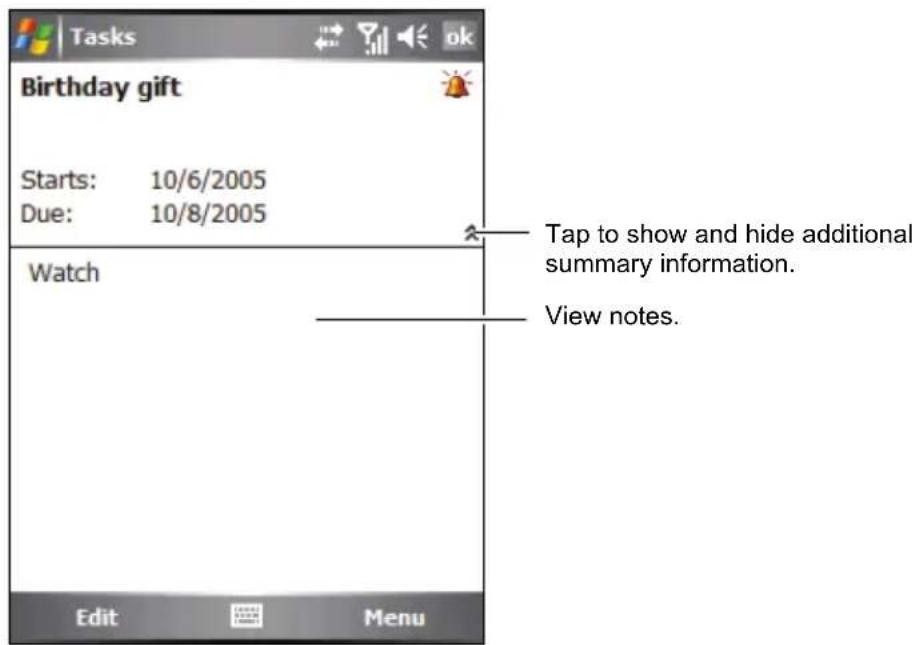
5.4 Notes: Capturing Thoughts and Ideas
Quickly capture thoughts, reminders, ideas, drawings and phone numbers with Notes. You can create a written note or a recording. You can also include a recording in a note.
Tap → Programs → Notes to switch to the program.
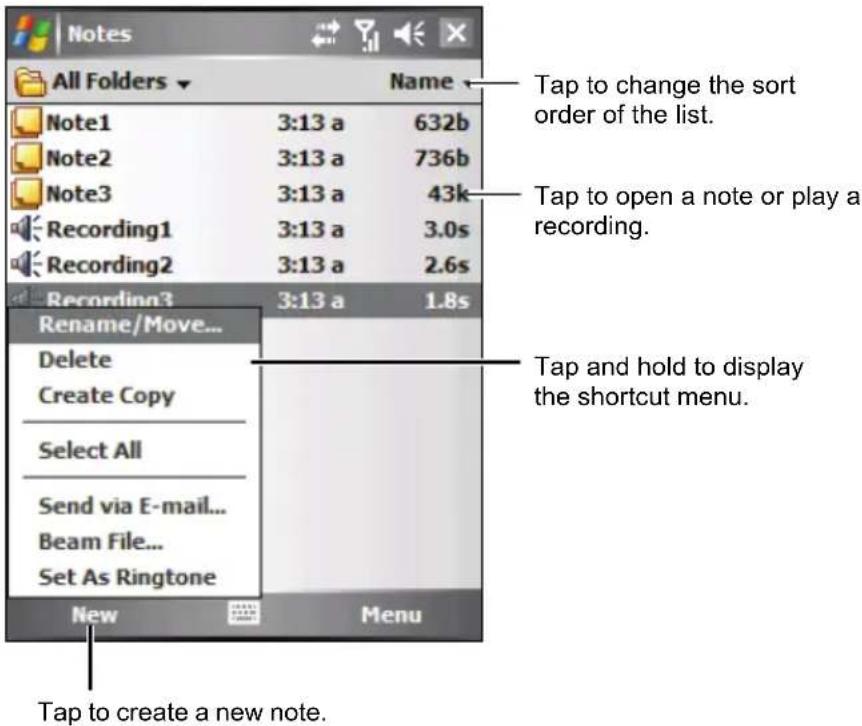
Creating a Note
- In Notes, tap the New soft key.
- Create your note by writing, drawing, typing, or recording. For more information about using the Input panel, writing, and drawing on the screen and creating recordings, see section 2.8.
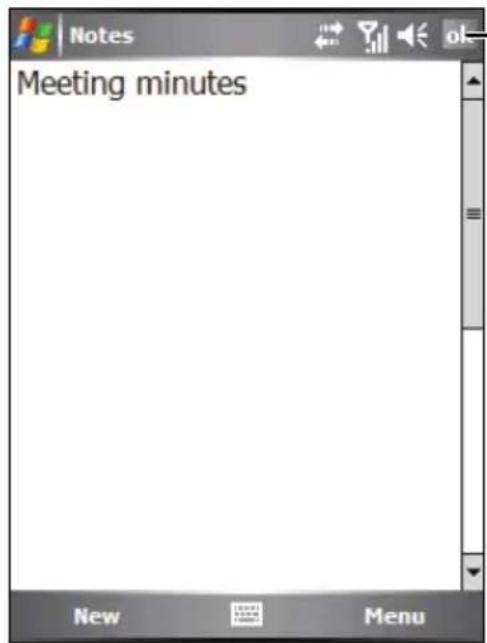
Tap to return to the note list (the note is saved automatically).
- Tap ok to save and return to the note list.
For more information, tap → Help.
5.5 Messaging: Sending and Receiving E-mail Messages
You can work with e-mail, SMS and MMS messages from Messaging.
Tap → Messaging to switch to the program.
Downloading Messages
The manner in which you download messages depends on the type of account you have:
- To send and receive e-mail for an Outlook E-mail account, begin synchronization through ActiveSync. (For more information, see section 6.1.)
- To send and receive e-mail messages for an e-mail account that you have with an Internet Service Provider (ISP) or that you access using a VPN server connection (typically a work account), download messages through a remote e-mail server. (See the later section for information on connection settings.)
- SMS messages are automatically received when your phone is turned on. When your phone is turned off (in flight mode), messages are held by your service provider until the next time your phone is turned on.
NOTE: By default, messages you send are saved in the Sent folder on A700. to help conserve memory. If you want to conserve memory and do not want to keep copies of sent messages, in the messaging list, tap the Menu soft key → Tools → Options → Message, and cancel the Keep copies of sent items in Sent folder check box.
Synchronizing Outlook E-mail
When you synchronize Outlook e-mail on the desktop computer with your A700, e-mail messages are synchronized as follows:
- Messages in the Inbox folder on your desktop computer or Exchange Server are copied to the Inbox folder of the Outlook E-mail account on A700.
- Messages in the Outbox folder on A700 are transferred to Exchange Server or Outlook, and then sent from those programs.
- When you delete a message on A700, it's deleted from your desktop computer or Exchange Server the next time you synchronize.
- The default sync settings are to synchronize messages from the last three days only, the first 0.5 KB of each new message, and not to sync file attachments.
NOTE:
- You can also specify that subfolders of the Inbox folder are synchronized.
- SMS messages are not received via synchronization. Instead, they are sent to A700 via your service provider.
Downloading Messages from the Server
To send and receive e-mail messages for an e-mail account that you have with an Internet Service Provider (ISP) or that you access using a VPN server connection (typically a work account) you need to connect to the Internet or your corporate network, depending on the account.
-
Tap → Messaging.
-
Tap thMenu soft key → Switch Accounts, and tap the desired account.
-
Tap thMenu soft key → Send/Receive.
The messages on your A700 and e-mail server are synchronized: new messages are downloaded to the A700 Inbox folder, messages in the A700 Outbox folder are sent, and messages that have been deleted from the server are removed from the A700 Inbox folder.
NOTE:
- If you want to read the entire message, tap the Menu soft key → Download Message while in the message window. If you are in the message list, tap and hold the message, and then tap Download Message. The message will download the next time you send and receive e-mail. This will also download message attachments if you selected those options when you set up the e-mail account.
- The size column in the message list displays the local size and server size of a message. Even when an entire message has been downloaded, these numbers may differ because the size of a message can vary between the server and A700.
Changing E-mail Download Options
You can customize the following download options for each e-mail account that you have with an Internet Service Provider (ISP) or that you access using a VPN server connection (typically a work account).
You can choose:
- Whether messages are downloaded automatically.
• How much e-mail is downloaded. -
If and how attachments are downloaded (IMAP4 only).
-
Tap → Messaging.
-
In the message list, tap the Menu soft key → Tools → Options.
-
Select the e-mail account.
-
Tap Next until you reach Server information.
-
Tap Options.
-
Enter your changes on the next three screens, and tap Finish.
NOTE:
- To send and receive messages automatically, tap Connect and check for messages and enter a time interval. Connecting automatically may result in higher connection charges.
- To save memory, limit the number of e-mails that are downloaded to your A700 by lowering the number of days to display.
Setting up an E-mail Account
You need to set up an e-mail account that you have with an Internet service provider (ISP) or an account that you access using a VPN server connection (typically a work account) before you can send and receive mail.
- Tap → Messaging.
- Tap thMenu soft key → Tools → New Account.
- Enter your e-mail address, and tap Next.
Auto configuration attempts to download necessary e-mail server settings so that you do not need to enter them manually.
- Once Auto configuration has finished, tap Next.
- Enter your name (the name you want displayed when you send e-mail) and your password.
- Select the account type and name, and tap Next.
- Enter the server information, and tap Finish.
- Decide if you want to download e-mail messages of the new account immediately.
NOTE: You cannot add a new account while connected. Tap the Menu soft key → Stop Send/Receive to disconnect.
Composing and Sending an E-mail and SMS Message
- Tap → Messaging.
- In the message list, tap the Menu soft key → Switch Accounts, and select the account.
- Tap theNew soft key.
- Enter the e-mail address or text message address of one or more recipients, separating them with a semicolon. To access addresses and phone numbers from Contacts, tap To.
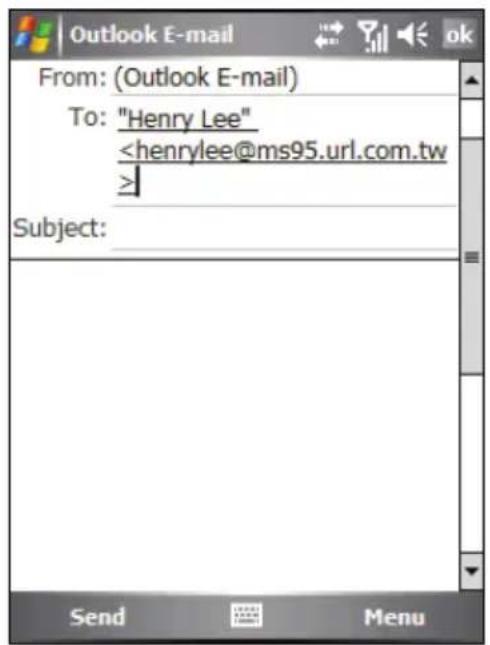
NOTE:
• To enter symbols, tap Shift using the on-screen keyboard. - To set the priority of your message, tap the Menu soft key → Message Options. - If you are working offline, e-mail messages are moved to the Outbox folder and will be sent the next time you connect. - If you are sending a SMS message and want to know if it was received, before sending the message, tap the Menu soft key → Tools → Options. Tap Text Messages → Request delivery notifications → ok.Composing and Sending a MMS Message
NOTE:
\- You need to subscribe to the GPRS and MMS services with your service provider before you can send and receive MMS messages. (See section 7.1 for information on the GPRS connection.) - Depending on the service that you subscribe to, you may not be able to send and receive MMS messages to users using a different mobile phone network. 1. Tap → Messaging. 2. In the message list, tap the Menu soft key → Switch Accounts, and select the account. 3. Tap thNew soft key.  4. First verify your MMS settings. Tap the Menu soft key → Options → MMS Settings → General. In Active Profile, select the name of your service provider, and then tap ok to save the setting. 5. Enter the mobile phone number of one or more recipients, separating them with a semicolon. To access phone numbers from Contacts, tap the Menu soft key → Add Recipient.   6. Enter the subject. 7. To add a picture, tap Insert Picture; or tap the Menu soft key → Insert → Picture. Then select the desired picture. 8. To add an audio file, tap Insert Audio; or tap the Menu soft key → Insert → Audio. Then select the desired audio file. 9. To add a recording, tap the Menu soft key → Insert → Sound Recorder. Tap the Record soft key to start recording. To stop recording, tap the Stop soft key. Then tap the Menu soft key → Select. The program will ask you if you wish to save the recording. Tap OK. Modify the filename and tap the Save soft key. The recording is saved in the AMR format, and displays on the message screen.   10. Tap Insert Text to enter your message. To quickly add common messages, tap the Menu soft key → My Text, and tap a desired message.  11. Before sending the message, you can preview your message by tapping the Menu soft key → Preview. 12. Tap the Send soft key.NOTE:
- You can add only one recording on each slide of a message. A second recording replaces the first recording. The recordings will be saved in the My Device\My Documents\My Music folder on your A700. - To delete the selected picture/audio/text message, move to the selection, and tap the Menu soft key → Remove Picture/Remove Audio/Remove Text. - To cancel the current message, tap the Menu soft key → Cancel Message.Managing Message Slides
To add a new slide of the message, tap the Menu soft key → Slides → Insert. To delete a slide, tap Menu soft key → Slides → Delete. To view the previous/next slide, tap the Menu soft key → Slides → Previous/Next. For a message that contains several slides, you can set the minimum duration for playing back each slide. 1. On the message screen, tap the Menu soft key → Slides → Duration. 2. Enter the desired duration for each slide. The range is 5\~600 seconds. If you wish to apply the setting to all MMS messages, tap the Menu soft key → Apply All. 3. When finished, tap the Done soft key.Receiving and Viewing a MMS Message
When you receive a MMS message, a icon will appear on the navigation bar to notify you. The new MMS message will be stored in the Inbox folder. 1. Tap → Messaging; or tap the unread MMS message area on the Today screen (for example: MMS: 1 Unread). 2. On the message list, tap the desired message to view. The program will start to download and play back the selected message. If there is more than one page in the message, the program will automatically turn the pages. To replay the message, tap the Menu soft key → Replay.   3. To save the picture and audio in the message, tap the Menu soft key → Object View. The screen will display the filenames and file sizes. Tap the file to save, tap the Save soft key, accept or change the filename, tap the Done soft key, and then tap ok. The picture will be saved in the \My Device\My Documents\ My Pictures folder on A700; the audio will be saved in the \My Device\My Documents\ My Music folder. Tap ok to return to the message. 4. After the playback, tap the Done soft key to return to the message list. Replying to or Forwarding a Message
1. Tap → Messaging. 2. Open the message, and tap the Menu soft key →Reply, Reply All or Forward. 3. Enter your response. To quickly add common messages, tap the Menu soft key My Text, and tap a desired message. 4. Tap thSend soft key.NOTE:
- To always include the original message, from the list view, tap the Menu soft key → Tools → Options → Message, and select the When replying to e-mail, include body check box. - In the Outlook E-mail account, you will send less data if you do not edit the original message. This may reduce data transfer costs based on your rate plan.Moving a Message
1. Tap → Messaging. 2. In the message list, tap and hold the message. To select multiple messages, tap and drag. Then, tap and hold the selected messages. 3. Tap Move. 4. Select where you want to move the message, and tap ok. NOTE: If you use a POP3 account and you move e-mail messages to a folder you created, the link is broken between the messages on A700 and their copies on the e-mail server. The next time you connect, the e-mail server will see that the messages are missing from the A700 Inbox folder and delete them from the server. This prevents you from having duplicate copies of a message, but it also means that you will no longer have access to messages that you move to folders created from anywhere except A700.Deleting a Message
To delete a message, in the message list, tap and hold the message and tap Delete. To select multiple messages, tap and drag. Then, tap and hold the selected messages, and tap Delete. Messages are moved to the Deleted Items folder and deleted according to the option that you have selected in the Menu soft key → Tools → Options → Storage. If you are working offline, messages that have been deleted from the server will be deleted from A700 the next time you connect or according to the options you have selected. To permanently delete messages in the Deleted Items folder, tap the Menu soft key → Tools → Empty Deleted Items. To choose when items will be permanently removed, in the message list, tap the Menu soft key → Tools → Options → Storage, and make a selection in Empty deleted items.Creating or Changing a Message Signature
1. Tap → Messaging. 2. Tap thMenu soft key → Tools → Options. 3. Tap Accounts → Signatures. 4. Select the account for which you want to create or change a signature. 5. Select the Use signature with this account check box if it is not already selected. 6. Select the Use when replying and forwarding check box if wanted. 7. Enter a signature in the box. 8. When finished, tap ok.NOTE:
- To stop using a signature, clear the Use signature with this account check box. - You can use a different signature with each Messaging account.Receiving Attachments
An attachment sent with an e-mail message or downloaded from the server appears below the subject of the message. Tapping the attachment opens the attachment if it has been fully downloaded or marks it for download the next time you send and receive e-mail. You can also download attachments automatically with your messages if you have an Outlook E-mail or IMAP4 e-mail account. If you have an Outlook E-mail account, do the following: 1. Tap → Programs → ActiveSync. 2. Tap thMenu soft key → Options. 3. Tap E-mail → Settings, and then select Include File Attachments. 4. Tap ok to save the setting. If you have an IMAP4 e-mail account with an Internet service provider (ISP) or an account that you access using a VPN server connection (typically a work account), do the following: 1. Tap → Messaging. 2. Tap thMenu soft key → Tools → Options. 3. Tap the name of the IMAP4 account. 4. Tap Next until you reach Server information, and tap Options. 5. Tap Next twice, and select Get full copy of messages from the drop-down list, and select When getting full copy, get attachments. 6. Tap thFinish soft key.NOTE:
- Embedded images and objects cannot be received as attachments. - An embedded message can be viewed as an attachment when using IMAP4 to receive e-mail. However, this feature does not work if TNEF is enabled so that you can receive meeting requests. - To store attachments on a storage card rather than on A700, tap the Menu soft key → Tools → Options → Storage, and select the Store attachments on a storage card check box.Managing Folders
You can create, rename, or delete a folder or select it for synchronization. 1. Tap → Messaging. 2. Tap theMenu soft key → Switch Accounts, and select the account. 3. Tap thMenu soft key → Tools → Manage Folders. 4. Do one of the following: - To create a subfolder, tap and hold a folder, and tap New. - To change the name of a folder, tap and hold the folder, and tap Rename. - To delete a folder and its contents, tap and hold the folder, and tap Delete. - To select a folder for synchronization in an Outlook E-mail or IMAP4 account, select the check box next to the folder.NOTE:
\- You must be online and connected to delete or rename an Outlook E-mail or IMAP4 account folder. \- Default folders (Drafts, Outbox, Inbox, Deleted Items, and Sent Items) cannot be renamed or deleted.Deleting all Messages and Folders
You can quickly delete all messages and the non-default folders in a Messaging account. 1. Tap  → Messaging. 2. Tap thMenu soft key → Tools → Clear6.1 Microsoft ActiveSync
NOTE: ActiveSync is already installed on your A700. You need to install ActiveSync on your desktop computer. (See section 1.5 for installation procedures.) When you have established the connection between your A700 and your desktop computer, you can synchronize the information between the two with ActiveSync. Synchronization compares the data on the two sides and updates both computers with the most recent information. For example, you can: - Keep your Pocket Outlook Contacts, Calendar and Tasks databases up-to-date by synchronizing your A700 with Microsoft Outlook data on your desktop computer. - Synchronize email messages in your A700 Inbox with email messages in Microsoft Outlook on your desktop computer. - Synchronize Microsoft Word and Excel files between your A700 and desktop computer. Your files are automatically converted to the correct format. With ActiveSync, you can also: - Copy (rather than synchronize) files between your A700 and desktop computer. - Add and remove programs on your A700. - Pass through your desktop computer to a network or the Internet.Synchronizing Data
Once you have created a synchronization relationship and completed the first synchronization, you can initiate synchronization from your A700. 1. Connect your A700 to your desktop computer. (See Step 7 of section 1.5 for connection procedures.) 2. On your A700, tap → Programs → ActiveSync. 3. Tap thSync soft key to begin synchronization.  By default, ActiveSync does not automatically synchronize all types of information. Use ActiveSync options to turn synchronization on and off for specific information types. You can select which information types are synchronized and control how much data is synchronized. For example, you can choose how many weeks of past appointments you want synchronized. For information on setting ActiveSync options and using ActiveSync on your desktop computer, see ActiveSync Help on the desktop computer. For information on using ActiveSync on your A700, see ActiveSync Help on A700.6.2 Word Mobile
Microsoft Word Mobile works with Microsoft Word on your desktop computer to give you easy access to copies of your documents. You can create new documents on your A700 or you can copy documents from your desktop computer. Tap → Programs → Word Mobile to switch to the program.Creating a Document
1. Tap the New soft key. 2. Enter the information. (See section 2.8 for information on entering text.)  3. When finished, tap ok and the document is automatically saved and named according to the first characters of text entered in the document. NOTE: To open a template rather than a blank document, select a template for new documents. Tap the Menu soft key → Options and select the desired template. When you tap the New soft key, the template appears with appropriate text and formatting already provided.Opening a Document
Whenever you switch to Word Mobile, you will see the document list. Tap the desired document to open it. You can open only one document at a time; when you open a second document, the first will be saved and closed automatically. For more information, tap → Help.6.3 Excel Mobile
Microsoft Excel Mobile works with Microsoft Excel on your desktop computer to give you easy access to copies of your workbooks. You can create new workbooks on your A700 or you can copy workbooks from your desktop computer to your A700. Tap → Programs → Excel Mobile to switch to the program.Creating a Workbook
1. Tap the New soft key. 2. To use Excel toolbar, tap the View soft key → Toolbar. 3. You can use Excel Mobile much the same way you use Excel on your desktop computer. You can enter formulas and functions and then filter data to see the subset of information you want. (See section 2.8 for information on entering text.)  4. When finished, tap ok and the workbook is automatically saved and named according to the first characters of text entered in the workbook.Opening a Workbook
Whenever you switch to Excel Mobile, you will see the workbook list. Tap the desired workbook to open it. You can open only one workbook at a time; when you open a second workbook, you will be asked to save the first. For more information, tap → Help.6.4 PowerPoint Mobile
With PowerPoint Mobile, you can open and view slide show presentations created on your desktop computer. Slide shows created in \*.ppt and \*.pps format with PowerPoint '97 and later can be viewed on your A700. 1. Tap Programs PowerPoint Mobile to switch to the program. 2. In the presentation list, tap the slide show you want to view.  3. Tap the current slide to advance to the next slide. If the presentation is set up as a timed slide show, slides will advance automatically. For more information, tap → Help.6.5 Pocket MSN
Pocket MSN on your A700 provides practically instant access to your up-to-date MSN Hotmail Inbox, your MSN Messenger contact list, and options for customizing your Pocket MSN experience. With Pocket MSN, you get: - MSN Hotmail. Read, write, and send e-mail. Delete e-mail and manage your Hotmail folders. - MSN Messenger. See who is online. Send and receive instant messages. Subscribe to status updates for selected contacts so you are notified when they are online. - Options and settings you can use to create a custom Pocket MSN experience. To use Pocket MSN, you must have an Internet connection. Tap → Programs → Pocket MSN to switch to the program.  Before you can use Pocket MSN, you must set up a Microsoft .NET Passport or Hotmail account to use. To obtain a Passport, go to http://www.passport.com. To create a Hotmail account, go to http://www.hotmail.com.Signing in to Pocket MSN
The sign-in process helps to maintain secure access to your MSN Hotmail and MSN Messenger accounts. 1. Tap Tap here to sign in to Pocket MSN on the Today screen. 2. Type the e-mail address and password you use to sign in to MSN Mobile. Select Save Password to have Pocket MSN automatically sign you in. 3. Tap Sign In. 4. The Pocket MSN items will display on the Today screen after you have signed in to Pocket MSN. Using Pocket MSN Messenger
Pocket MSN Messenger on your A700 provides the same chat environment as MSN Messenger on your desktop computer. After you have signed in to Pocket MSN, tap the 📄 MSN Messenger icon on the Today screen to sign in to MSN Messenger. Tap the Sign In soft key. Once you sign in, you can exchange instant messages with your contacts.Using MSN Hotmail
With MSN Hotmail on your A700, you have access to your Hotmail Inbox even when you are mobile. Read, send, and reply to e-mail, and manage your folders. Mark e-mail attachments for downloading so that you can view them. After you have signed in to Pocket MSN, tap the 📋 Pocket MSN icon on the Today screen. On the Pocket MSN screen, tap MSN Hotmail to access your Hotmail Inbox, or Compose Hotmail to compose a new e-mail.6.6 Windows Media Player
Use Microsoft Windows Media Player to play digital audio and video files that are stored on your A700 or on a network, such as on a web site. You can play files in either Windows Media or MP3 format (including files with the extensions .asf, .wma, .wmv and .mp3). Tap → Windows Media to switch to the program.  Library  Playback Screen Use Microsoft Windows Media Player on your desktop computer to synchronize (if using Windows Media Player 10) or copy (if using Windows Media Player 9) digital audio and video files from your computer to A700. For more information, tap 📄 → Help, or see Windows Media Player Help on the desktop computer.6.7 Camera
Your A700 features a built-in CMOS camera. You can take pictures or record video clips, and then directly view these pictures on your A700. What's more, you can immediately share with others your pictures through the mobile phone network service.Taking Pictures
1. Press the Camera button on the right side of A700; or, tap → Programs → Camera to switch to the program. 2. By default, the camera is in the Still mode. If you are not in this mode, tap the Menu soft key → Still to change the mode. 3. Frame your target in the viewing window. You can rotate your A700 if necessary. 4. To adjust the brightness of the image or zoom in/out: \- Press the Left/Right button to adjust the brightness of the image. The adjustable range is -3 +3 . \- Press the Volume down button to zoom in. The adjustable range is 1, 2, 4 and 8 times. (The higher the resolution, the less the zoom options.) 5. When you are ready to take the picture, press the Enter or Camera button. natural_image
Surreal landscape painting at sunset with trees and distant hills, displayed within a photo editing interface (no text or symbols on the landscape itself)Taking Continuous Pictures
While in the Still mode, tap the Menu soft key → Mode → Burst to take 4 continuous pictures. The 📁 icon will appear on the lower-right corner of the screen. Take pictures according to the instructions described in the “Taking Pictures” section. Recording Video Clips
1. Press the Camera button on the right side of A700; or, tap → Programs → Camera to switch to the program. 2. By default, the camera is in the Still mode. Tap the Menu soft key → Video to change the mode. The 🎨 icon will appear on the lower-right corner of the screen. 3. Frame your target in the viewing window. You can rotate your A700 if necessary. 4. Press the Left/Right button to adjust the brightness of the image. The adjustable range is -3 +3 . 5. When you are ready to record the video clip, press the Enter or Camera button to start recording. During recording, you can tap the Pause soft key to pause, and then tap the Resume soft key to continue. To stop recording, press the Enter or Camera button, or tap the Stop soft key.  6. The program will automatically save the recording. By default, the video clip is saved in the My Device\My Documents\My Pictures folder of A700. 7. To view the recorded video clip, tap the Thumbnails soft key to switch to the Pictures & Videos program, and tap the desired file. A700 uses Windows Media Player to play the video clip.Camera Settings
In Camera, tap the Menu soft key → Options to configure the following settings.| Item Description | ||
| General | When ... use this picture size | Sets the resolution (pixels) of the image. The options are Original size, Large (640 x 480), Medium (320 x 240) and Small (160 x 120). |
| When rotating a picture, rotate 90 degrees | Rotates the image at 90 degrees clockwise or counterclockwise. | |
| Slide Show | During slide shows, optimize for viewing | Allows the full-screen display when playing the slide show in the portrait or landscape mode. |
| Play screensaver when connected to my PC and idle for 2 minutes | Sets if you want the A700 to enter the screensaver mode after 2 minutes of inactivity when connected to the desktop computer. | |
| Camera | Save files | Sets if you wish to store pictures on A700 or a SD/MMC card. |
| Type filename | prefix Sets the filename prefix for picture files. | |
| Still image cpmpression level | Sets the compression level for picture files. | |
| Video | Include audio when recording video files | Sets if you wish to include audio signals in video clips. |
| Time limit for videos | Sets the time limit for video clips. The options are No limit, 10 seconds and 15 seconds. | |
6.8 Pictures & Videos
With Pictures & Videos, you can: • Take, view, and edit pictures. - Record and launch video clips stored on A700 or on a SD/MMC card. - Send pictures and video clips to others. - Set a picture as the background on the Today screen. • See your pictures individually, as thumbnails, or as part of a slide show. - Edit your pictures by cropping, rotating, and adjusting the brightness and contrast.Viewing Pictures and Launching Video Clips
1. You can copy picture and video files from your desktop computer to the My Device\My Documents\My Pictures folder of A700. (For information on copying files to your A700, see ActiveSync Help on your desktop computer.) 2. To view pictures or video clips stored on a SD/MMC card, insert the card. 3. Tap → Programs → Pictures & Videos to switch to the program. — or — Tap the button on the Quick Launch Bar on the Today screen. 4. By default, the program displays thumbnails of the pictures and video clips in the My Pictures folder, within the My Documents folder on your A700. To view pictures and video clips on a SD/MMC card, tap Storage Card. To view pictures and video clips on A700, tap My Pictures. 5. Thumbnails of pictures and video clips appear on the screen. You can tap one of them to view in full screen.  For more information, tap → Help.6.9 Calculator
You can use Calculator to perform any of the standard operations for which you would normally use a handheld calculator. Calculator performs basic arithmetic, such as addition, subtraction, multiplication and division. 1. Tap Programs Calculator to switch to the program. 2. Use the keypad to enter numbers and perform calculations. - To clear the last digit entered in a multi-digit entry, tap ←. - To clear the current calculation or the displayed number, tap C. - To calculate the reciprocal of a number, tap 1/x. - To perform operations with percentages, tap %. - To calculate the square root of a number, tap . - To change a number from positive to negative and back, tap +/- . 3. You can store a number in the calculator memory for later use. To store a number, tap the box to the left of the entry box. An M will appear in the box. - To add the displayed number to the number already stored in memory, tap M+ - To display the number stored in memory, tap MR. • To clear the memory, tap ^MC   NOTE: You can also use the eConvertor program on the Bonus CD to perform basic arithmetic. eConvertor also allows you to use the Currency and Metrology modes. For information on eConvertor, see the A700 Application Manual on the Bonus CD.6.10 Modem Link
Using Modem Link, you can use your A700 as an external modem for another device or computer via the USB connection.NOTE:
- A700 does not support the COM and infrared connection. - When using the modem link connection, A700 supports Windows 2000/XP only. - Before using your A700 as a USB modem, cancel Allow USB connections of ActiveSync on your desktop computer to close the ActiveSync connection. To use the ActiveSync connection again, you need to select Allow USB connections. 1. Make sure that your A700 is not connected to another device. 2. Tap → Programs → Modem Link. 3. Tap ok on the message that appears. 4. In Connection, select USB. 5. Tap theActivate soft key. Note not to leave the current screen. 6. Connect A700 to the desktop computer, and insert the supplied Getting Started Disc into the CD-ROM drive of the computer. 7. The installation of the USB driver will start automatically. If needed, browse for the USB driver on the Getting Started Disc. 8. Open the Device Manager on the desktop computer by clicking Start → Control Panel → System → Hardware (if needed) → Device Manager. 9. Open the Modem item, right-click on Mio DigiWalker SmartPhone USB Modem, and select Properties. \- Open the Modem page, and select 115200 as the baud rate. \- Open the Advanced page, enter +cgdcont=1,"IP","internet", "",0,0 under Extra initialization commands. click OK. 10. On your desktop computer, create a dial-up connection using your A700 as the modem, enter \*99# for the phone number and user name; you do not need to set up the password. For information on creating a dial-up connection on the desktop computer, see the documents that came with the operating system. 11. Click Dial on your dial-up connection screen. The 📋 icon appears on the task bar after the successful dial-up connection. 12. To end the connection, right-click on the 📋 icon on the desktop computer and select Disconnect. Or, tap the Deactivate soft key on A700. NOTE: Depending on your service provider, the APN for you to enter in Step 9 may not internet. Consult your service provider for the correct APN.6.11 Terminal Services Client
Using Terminal Services Client, you can log on to a desktop computer running Terminal Services or Remote Desktop, and use all of the programs available on that computer from your A700. For example, instead of running Word Mobile, you can run the desktop computer version of Word and access all of the .doc files on that computer from A700.Connecting to a Remote Server
Before you try to connect to a remote server, make sure that you have a functioning connection. (See section 7.1 for information on connections.) 1. Tap → Programs → Terminal Services Client. 2. Do one of the following: - To connect to a server you have previously connected to, in Recent Servers, tap a server. - To connect to a new server, enter the server name or IP address in the Server box. 3. Tap Connect.Disconnecting and Ending a Session
1. In the computer window, tap Start → Shut Down. 2. The Shut Down Windows dialog box appears. 3. Tap Log Off6.12 Additional Programs
In addition to Microsoft software, your A700 also provides additional programs to enhance the functionality or facilitate your operation.NOTE:
- For information on the map program, see the A700 Navigation System Manual on the Map CD. - Depending on the continuing developments of the product, the software supplied with your A700 may be changed or updated. If there is any difference between the information in this manual and your product, the operation should be based on the product you have.Mio Club Registration
You are advised to register as a VIP member of the Mio Club for newsletters, updates and related information about sale campaigns. You can use A700 to send a registration SMS message or to connect to the registration web site. 1. On the Today screen, tap Tap here to register to Mio Club. 2. You can select to register via a SMS message or the Internet. Registering via SMS
1. On the Mio Club Registration screen, tap SMS → Continue soft key. 2. The screen will display a device identification code (UUID) for your A700. This UUID code is generated automatically and cannot be modified. 3. To register using the current SIM phone number, select Use this phone number. To register using another phone number, cancel Use this phone number, and enter the number in Phone. 4. You can enter an e-mail address for receiving the account information of your registration. 5. Tap theRegister soft key to send the registration message.Registering via the Internet
1. Make sure that A700 is connected to the Internet. (See section 7.1 for information on connections.) 2. On the Mio Club Registration screen, tap Internet → Continue soft key. 3. The program will start Internet Explorer. The registration page will display a UUID code for your A700. This UUID code is generated automatically and cannot be modified. 4. Enter the phone number and/or e-mail address for registration. 5. Tap Register to send the registration information. Location Call
Using Location Call, you can define the recipients of emergency text messages, and notify them of your need for help and/or the longitude and latitude of your current position. You can use Location Call even if the map program is not installed on your A700. 1. Tap → Programs → Location Call to switch to the program. 2. Tap Add. 3. Tap the desired contact from the contact list. You can also tap Enter a number, enter a phone number manually, and then tap the OK soft key. 4. To delete a recipient, select the item to delete from the list and tap Delete. 5. Tap ok to save the setting.  Sending an Emergency Message
1. Make sure that you have defined the recipient for the emergency message. 2. Press and hold the Volume down button on the side of A700 for 6 seconds to activate the program. (If you have not defined the recipient, the program will display a notification message.) 3. The program will activate the GPS port of A700 and search for the GPS data, and then send the message. If you have defined multiple recipients, then all recipients will receive this message. 4. The program will automatically send notifications to let you know the message has been sent out.  If A700 has received the GPS data (within 120 seconds), the message will contain the longitude and latitude information. If A700 fails to receive the GPS data, then the message will only show that you need help.  Without GPS dataMio SMS Location
You can use A700 to notify your friends and family of your current position. This feature can be very important for group activities or outdoor rescue activities. You can use Mio SMS Location even if the map program is not installed on your A700. 1. Tap → Programs → Mio SMS Location to switch to the program. 2. The program will activate the GPS port of A700 and search for the GPS data. 3. When the longitude and latitude information appears on the screen, enter the phone number of the message recipient and enter the message content. 4. Tap Send to send the message. The message can be sent only after the GPS data is available. Quick Position
You can update the ephemeris file from the manufacturer's server using Quick Position. The updated ephemeris file allows you to quickly position when using the map program. 1. You need to connect to the Internet to download the new ephemeris file. (See section 7.1 for information on connections.) 2. Tap → Settings → System → Quick Position, or tap the icon on the Today screen, to switch to the program. 3. Tap ok on the message that appears. 4. Tap Download File.  5. After the new ephemeris file is downloaded, the screen will display its expiration period. 6. If you want to create an update appointment in Calendar, select Show expiration in Calendar. The appointment will be created automatically and shown on the Today screen. 7. If you want A700 to automatically download the ephemeris file when the expiration date arrives, select Automatic Download. 8. Tap ok.    Getting Connected
To take full advantage of your A700, you will want to get connected. This chapter tells you how you can get your A700 connected through a variety of ways including modem, wireless network card, and Bluetooth. It also describes Internet Explorer for Web browsing.7.1 Connection Settings
Your A700 has two groups of connection settings: “My ISP” and “My Work Network.” My ISP settings are used to connect to the Internet, and My Work Network settings can be used to connect to any private network, such as a corporate network you use at work. Connections can be made using GPRS, a modem or wireless network card. After the connections, you can browse the Internet or intranet, send and receive e-mail and instant messages, and synchronize information using ActiveSync.GPRS Connection
Your A700 can receive general packet radio services (GPRS), a high-speed data-only service that transmits data over a mobile phone network. In addition, GPRS provides permanent on-line connection. To use GPRS, you must have a subscription to the function with a service provider that supports GPRS. The GPRS connection settings for several service providers have been built into your A700. Simply select the proper connection setting for your service provider. 1. Tap → Programs → GPRS Configuration. 2. Select your service provider from the drop-down list, and tap Apply → ok → ok.Starting and Ending a GPRS Connection
To start the connection, simply use the desired program. For example, switch to Internet Explorer Mobile and browse to a web page. Your A700 will automatically connect. To end the connection, tap the G+ icon on the Navigation bar and then tap Disconnect.Modem Connection
With a modem, you can dial in to your ISP or corporate network. Before creating the connection, you need to: - Have a modem (SD IO card). (For installation information, see the documentation supplied with the product.) - Obtain the following information from your ISP or network administrator: server phone number, user name, password, domain name and TCP/IP settings.Creating a Modem Connection
1. Tap → Settings → Connections → Connections. 2. In My ISP or My Work Network, tap Add a new modem connection. Follow the instructions in the New Connection wizard. 3. To view additional settings, tap ? NOTE: To change modem connection settings, in either My ISP or My Work Network, tap Manage existing connections. Select the desired modem connection, tap Settings and follow the on-screen instructions.Starting and Ending a Modem Connection
To start the connection, install the modem and connect the modem cable. Then, use the desired program. For example, switch to Internet Explorer Mobile nd browse to a web page. Your A700 will automatically connect. To end the connection, tap the ✦ icon on the Navigation bar and then tap Disconnect.Wireless Network Connection
Use a wireless network card to connect to a wireless network without physical cables. Before creating the connection, you need to: - Have a wireless network card (SD IO card) that is compatible with A700. (For driver and installation procedures, see the documentation that came with the SD IO card.) - If necessary, obtain the authentication information from your network administrator.Creating a Wireless Connection to a Network
1. Install the wireless network card. 2. By default, A700 will automatically detect the available wireless networks. 3. If more than one network is detected, the screen will display a network list. Tap the desired network and tap the OK soft key.  4. Select to connect to the Internet or the private network, and then tap the Connect soft key. 5. If the selected network requires a network key, enter the key and tap the Connect soft key.  NOTE: To change the network settings, tap → Settings → Connections → Network Cards. Tap the desired network and change the settings.Starting and Ending a Wireless Network Connection
After you install the wireless network card and set up the wireless network, use the desired program when you are within the range of wireless network. For example, switch to Internet Explorer Mobile and browse to a web page. Your A700 will automatically connect, and the 🔊 icon will appear on the navigation bar. To end the connection, remove the card from your A700. NOTE: When you have finished using the wireless network, complete the actions for ending the connection. Leaving the wireless network module active will consume more power.7.2 Using Bluetooth
Your A700 incorporates the Bluetooth capability. Bluetooth is a short-range wireless communications technology. Devices with Bluetooth capabilities can exchange information over a distance of about 10 meters (30 feet) without requiring a physical connection. Unlike infrared, you do not need to line up the devices to beam information with Bluetooth. You can even beam information to a device in a different room, as long as it is within range. You can use Bluetooth as follows: - Beam information, such as files, appointments, tasks, and contact cards, between devices that have Bluetooth capabilities. - Create a connection between your A700 and a Bluetooth phone to use the phone as a modem. - Use a Bluetooth service. Once you connect to another device or computer using Bluetooth, you can locate and use any of the services available on that device.Turning On and Off Bluetooth
1. Tap → Settings → Connections → Bluetooth. — or — Tap the 📄 icon on the Today screen. 2. To turn on Bluetooth, tap Turn on Bluetooth. To transfer files via Bluetooth, tap Make this device discoverable to other devices. 3. To turn off Bluetooth, clear Turn on Bluetooth and Make this device discoverable to other devices. 4. Tap ok. NOTE:
- By default, Bluetooth is turned off. If you turn it on, and then turn off your A700, Bluetooth also turns off. When you turn on your A700 again, Bluetooth turns on automatically. - When you have finished using Bluetooth, complete the actions for turning it off. Leaving the Bluetooth capability active will consume more power.Transferring Files via Bluetooth
Sending Files via Bluetooth
1. Turn on Bluetooth. (See “Turning On and Off Bluetooth” previously in this chapter.) 2. From the program, tap and hold the item you want to beam, such as an appointment in Calendar, a task in Tasks, a contact card in Contacts, or a file in File Explorer. 3. Tap Beam [type of item] on the shortcut menu. 4. Your A700 searches for other devices with Bluetooth capabilities within close range, and displays them in the list. Tap the device to which you want to send the item.  CAUTION: Files are saved automatically before they are beamed. If a Word document or Excel workbook was created on a desktop computer, unsupported content and formatting may be lost when the files are saved.Receiving Files via Bluetooth
1. Tap → Settings → Connections → Beam. Make sure that Receive all incoming beams is selected. 2. Make sure that Make this device discoverable to other devices in Bluetooth settings is selected. (See “Turning On and Off Bluetooth” previously in this chapter.) 3. Make sure that your A700 and the device that is beaming the information are within close range, and that device is discoverable. 4. When prompted to receive an incoming beam, tap Yes to receive the beamed information. Bluetooth Partnership
A partnership is a relationship that you create between your A700 and another device with Bluetooth capabilities to help exchange information in a secure manner. Creating a partnership involves entering the same Bluetooth passkey on both devices. Once a partnership is created, the devices need only have Bluetooth turned on to exchange information; they do not need to be discoverable.Creating a Bluetooth Partnership
1. Make sure that the two devices are turned on, discoverable, and within close range. (For information on turning on Bluetooth on A700, see “Turning On and Off Bluetooth” previously in this chapter.) 2. Tap → Settings → Connections → Bluetooth → Devices → New Partnership. 3. Your A700 searches for other devices with Bluetooth capabilities, and displays them in the list.  4. Tap the name of the other device, and tap Next. 5. In Passkey, enter an alphanumeric passkey between 1 and 16 characters, and tap Next. 6. Enter the same passkey on the other device. 7. To give the partnership a more meaningful name, change the name of the device in Name. 8. Tap Finish.Accepting a Bluetooth Partnership
1. Make sure that the two devices are turned on, discoverable, and within close range. (For information on turning on Bluetooth on A700, see “Turning On and Off Bluetooth” previously in this chapter.) 2. When prompted to accept a Bluetooth partnership with another device, tap Yes. 3. In Passkey, enter an alphanumeric passkey between 1 and 16 characters, and tap Next. You need to enter the same Bluetooth passkey as the other device. 4. To give the partnership a more meaningful name, change the name of the device in Name. 5. Tap Finish. You are now ready to transfer files with that device.Renaming a Bluetooth Partnership
1. Tap → Settings → Connections → Bluetooth → Devices. 2. Tap and hold the partnership to rename. 3. Tap Edit on the shortcut menu. 4. In Display Name, enter a new name for the partnership. 5. Tap thSave soft key.Ending a Bluetooth Partnership
1. Tap → Settings → Connections → Bluetooth → Devices. 2. Tap and hold the partnership you want to end. 3. Tap Delete on the shortcut menu.7.3 Using Internet Explorer Mobile
Use Internet Explorer Mobile to view web pages in either of these ways: - Connect to an ISP or network and browse the web. - During synchronization with your desktop computer, download your favorite links that are stored in the Mobile Favorites subfolder in Internet Explorer on the desktop computer. While you are connected to an ISP or network, you can also download files and programs from the Internet or an intranet. Tap → Internet Explorer to switch to the program. The Internet Explorer Mobile home page appears: Browsing the Internet
1. Tap → Internet Explorer. 2. Tap the Favorites soft key to display the Favorites list.  3. Tap the page that you want to view. NOTE: If a favorite link is dimmed or you receive a message that the page is not available, you must download the page to your device through synchronization or connect to the Internet. To visit web pages not included in Favorites, in the address bar that appears at the top of the screen, enter the web address you want to visit and then tap Go. Or, tap the arrow to choose from previously entered addresses.Managing Favorites
Adding a Favorite
1. Tap → Internet Explorer. 2. Go to the page you want to add. 3. Tap and hold the page, and tap Add to Favorites on the shortcut menu. 4. Confirm or change the name and select a folder for storing the favorite. 5. Tap ok to save the setting.Adding a Folder in Favorites
1. Tap → Internet Explorer. 2. Tap thMenu soft key → Favorites → Add/Delete. 3. Tap New Folder. 4. Enter a name for the folder, and tap Add.Deleting a Favorite or Folder
1. Tap → Internet Explorer. 2. Tap theMenu soft key → Favorites → Add/Delete. 3. Select the item you want to delete, and tap Delete. 4. Tap Yes to delete the item.Synchronize a Favorite Link
You can synchronize the Internet Explorer favorites on your desktop computer with your A700 so you can use them with Internet Explorer Mobile as well. 1. In ActiveSync on your desktop computer, click Tools → Options → Favorite, and click OK. For more information on using ActiveSync, see ActiveSync Help. 2. In Internet Explorer on your desktop computer, save or move favorite links to the Mobile Favorites subfolder in the Favorites list. For more information on using Internet Explorer, see Internet Explorer Help on the desktop computer. 3. Connect your A700 to your desktop computer. If synchronization does not start automatically, in ActiveSync on your desktop computer, click Sync. NOTE: You need to create a partnership between your A700 and desktop computer for data synchronization. See section 1.5 for information. Troubleshooting and Maintenance
This chapter gives solutions to common problems you may encounter. It also provides guidelines on taking care of your A700. NOTE: If you encounter a problem you cannot solve, contact your dealer for assistance.8.1 Resetting Your A700
| CAUTION: Resetting will cause unsaved data to be lost. Resetting your A700 is similar to restarting your desktop computer. It restarts the operating system, but you will lose any unsaved data. Occasionally, you may need to reset your A700; for example, you should reset when your A700 stops responding; in other words, it appears to be “frozen” or “locked up.” Use the stylus to press the reset button on your A700. natural_image
Side view of a handheld electronic device with a metallic tool and labeled buttons (no readable text or symbols beyond branding)8.2 Restoring Factory Default State
In some cases, you may need to restore your A700 to the factory default state by clearing the memory from your A700. For example, you should clear the memory: - When your A700 does not respond after being reset. - When you forget your password. Clearing the memory means all data you have entered in A700's memory, including all files, system settings and additional programs you have installed, will be erased. (Programs installed to ROM at the factory are not affected.) CAUTION: To ensure the integrity of your data should it be necessary to clear the memory, you are advised to regularly back up your data. Follow this procedure to clear the memory from your A700: 1. Make sure that A700 is turned off. 2. Press and hold the Down Volume button. When holding it, press and hold the ⏻ End button. 3. After A700 vibrates, you can let go of both buttons. 4. A700 will turn on automatically. The backlight of the keypad will glow, and the setup wizard will appear on the screen. Follow the on-screen instructions to complete the setup wizard. 5. Re-establish a partnership with your desktop computer. 6. Re-install the add-on software, if necessary.8.3 Power Problems
Power does not turn on when using battery power \- The remaining battery power may be too low to run your A700. Connect the AC adapter to your A700 and to external AC power. Then, turn on your A700. Battery runs out of power quickly \- You might be using your A700 in ways that drain power quickly. (See “Power-Saving Tips” in section 4.1 for more information.)8.4 Memory Problems
If a warning message of not enough memory appears due to the memory allocation problem, try the following to free memory on your A700. CAUTION: Be discreet when you delete files. Deleting files of which the function is unknown can cause programs or features to malfunction. It is appropriate to make a backup before deleting files. - Delete files you no longer need. Tap → Programs → File Explorer. Tap and hold the file you wish to delete, and then tap Delete on the shortcut menu. To find your largest files, tap → Programs → Search. In the Type list, tap Larger than 64KB → Search soft key. - In Internet Explorer options, delete all files and clear history. In Internet Explorer, tap Menu → Tools → Options → Memory. Tap Delete Files and Clear History. - Remove programs you no longer need. Tap → Settings → System → Remove Programs. Tap the program you want to remove and then tap Remove. \- Stop programs you are not currently using. In most cases, programs automatically stop to free needed memory. However, in some situations, such as when confirmation dialog boxes are waiting for a user response, the program may not be able to automatically stop. To check the state of your active programs, tap → Settings → System → Memory → Running Programs. Tap the program you want to view and then tap Activate. Close any open windows or messages and return the program to list view. If this does not work, you can stop the program manually. First, make sure that your work is saved by closing open items and returning the program to list view. Then, stop the program by tapping Stop or Stop All on the Running Programs tab. \- Reset your A700 as described in section 8.1 and 8.2. If you have a storage card, move data to the storage card as described below. - Tap → Programs → File Explorer. Tap and hold the file you want to move and tap Cut. Browse to the My Documents folder in the storage card folder, tap and hold on the white area and then tap Paste. - Move e-mail attachments. In Messaging, tap the Menu soft key → Tools → Options → Storage and select Store attachments on storage card. All attachments are moved to the storage card and new attachments are automatically stored on the storage card. - Set programs such as Notes, Word Mobile and Excel Mobile to automatically save new items on the storage card. In the program, tap the Menu soft key → Options. In Save to, select Storage Card.8.5 Screen Problems
Screen is off
If the screen does not respond even after you turn on A700, try the following in order until the problem is solved: - Connect the AC adapter to your A700 and to external AC power. - Reset your A700 as described in section 8.1.Screen responds slowly
\- Make sure that your A700 is not running out of battery power or running many active programs. If the problem still exists, reset your A700 as described in section 8.1.Screen freezes
\- Reset your A700 as described in section 8.1.Screen is hard to read
• Make sure that the backlight of the display is on. - Move to a location with enough light. - If you're having a hard time reading a document on the screen, try adjusting the zoom percentage or text size. √ Tap → Settings → System → Screen → Text Size and select the text size. √ In Notes, tap the Menu soft key → Zoom and select a zoom percentage. √ In Word Mobile and Excel Mobile, tap the View soft key → Zoom and select a zoom percentage. √ In Internet Explorer Mobile, tap the Menu soft key → Zoom and select a size.Inaccurate response to stylus taps
\- Realign the touch screen. Tap → Settings → System → Screen → Align Screen.8.6 Connection Problems
Synchronization Problems
- Make sure that no other connection is being used. Tap the ✦ icon on the navigation bar and then tap Disconnect. - In some specific cases, A700 may experience connection problems when it is connected to a Windows computer running ActiveSync 4.0. The problems may be caused by the interoperability with desktop firewall applications, applications that manage network traffic, or LAN configuration tools. To resolve the problems, please visit Microsoft web site at http://www.microsoft.com/windowsmobile/help/activesync, or disable the LAN configuration tools. - Make sure that you have installed the correct version of ActiveSync on your desktop computer. Install the version ActiveSync included with your A700. You can also check the version of the operating system by tapping → Settings → System → About → Version. For example, the version information mayu display “Microsoft® Windows Mobile™ Version 5.0 OS 5.1.70 (Build 14406.1.1.1).” Check the first number after “14406” (your A700 may not display the same number). If the number is “1,” you can use ActiveSync 4.0; if the number is “2,” then you need to use ActiveSync 4.1.Cable Connection Problems
- Make sure that your A700 and your desktop computer are both turned on before establishing the connection. - Make sure that the cable is securely plugged into the USB port on your desktop computer.Modem Connection Problems
Unable to dial out
● Make sure that the telephone line is connected correctly. \- Make sure that the telephone line is analog. Do not connect a modem to a digital telephone line unless it is specifically designed for use with a digital line.Able to dial out but unable to make a proper connection
- Make sure that the network you are trying to connect supports the Point-to-Point Protocol (PPP). Your ISP or network administrator can verify this. • Make sure that your dialing location is correct. ● Make sure that the phone number you are trying to reach is correct.Modem connection is unreliable
● Make sure that the telephone line is connected correctly.Network Connection Problems
- Make sure that the network card is compatible with your A700. - In the properties for your network card, make sure that you have correctly configured the IP settings, and the addresses of your DNS servers and/or WINS servers. Your network administrator can verify this. - If Network Connection is not listed as a connection method in the ActiveSync dialog box when starting synchronization, wait a few minutes and try again. Also, if synchronization does not start right away, the network is probably busy, and it may take a minute for your A700 to connect to the network. - Verify with your network administrator that your user name and password are correct. - Verify with your network administrator that the network you are trying to connect to is available, to try to connect to it from another computer.8.7 Taking Care of Your A700
Taking good care of your A700 will ensure trouble-free operation and reduce the risk of damage to your A700.General Guidelines
- Keep your A700 away from excessive moisture and extreme temperatures. - Avoid exposing your A700 to direct sunlight or strong ultraviolet light for extended periods of time. - Do not place anything on top of your A700 or drop objects on top of your A700. - Do not drop your A700 or subject it to severe shock. - Store your A700 in a protective cover when not in use. - Do not subject your A700 to sudden and severe temperature changes. This could cause moisture condensation inside the unit that could damage your A700. In the event of moisture condensation, allow your A700 to dry out completely. - Take care not to sit on your A700 when it is located in the back pocket of trousers, etc. - The screen surface is easily scratched. Use only the stylus to tap on the screen. Avoid touching it with your fingers, pens, pencils or any other sharp objects. - Never clean your A700 with its power on. Use a soft, lint-free cloth moistened with water to wipe the screen and the exterior of your A700. - Do not use paper towels to clean the screen. - Never attempt to disassemble, repair or make any modifications to your A700. Disassembly, modification or any attempt at repair could cause damage to your A700 and even bodily injury or property damage. - Keep A700 and its accessories out of the reach of small children.Phone Guidelines
\- Use a phone headset or pull over your car first if using your A700 when driving. \- Your A700 is a low-power RF (radio frequency) device. It receives and sends out RF signals when the phone feature is turned on. Therefore, be careful of the following: — Most RF devices are shielded from RF signals. However, your A700 may still interfere with or get interfered by nearby devices, such as a TV set, radio, or computer. — Turn off the phone feature where posted notices are set up to avoid interference or danger. — Turn off the phone feature near hospitals or medical equipment (such as pacemakers or hearing aids) to avoid interference. — Turn off the phone feature near gas stations, fuel depots, chemical factories, or blasting areas. — Turn off the phone feature on an aircraft to avoid interference with the flight instruments for possible danger.Travel Guidelines
\- Before traveling with your A700, back up your data. As an added precaution, bring along a backup copy. \- Remove the SD/MMC card, if installed, from the slot. \- Turn off your A700 and disconnect all external devices. • Make sure that the battery is fully charged. \- Take the AC adapter with you. Use the AC adapter as the power source and as a battery-recharger. \- Keep your A700 inside its protective cover when you are not using it on the road. \- Hand-carry your A700 in a protective cover. Do not check it in as luggage. - If you plan to travel abroad with your A700, consult your dealer for the appropriate AC adapter for use in your country of destination. - If you plan to make modem connections abroad, make sure that you have the correct modem and cable for your country of destination. Regulatory Information
NOTE: Marking labels located on the exterior of your device indicate the regulations that your model complies with. Please check the marking labels on your device and refer to the corresponding statements in this chapter. Some notices apply to specific models only.A.1 Regulations Statements
European Notice
Products with the CE marking comply with Radio & Telecommunication Terminal Equipment Directive (R&TTE) (1999/5/EEC), the Electromagnetic Compatibility Directive (89/336/EEC) and the Low Voltage Directive (73/23/EEC) – as amended by Directive 93/68/ECC - issued by the Commission of the European Community. Compliance with these directives implies conformity to the following European Standards: 1999/5/EEC Radio & Telecommunication Terminal Equipment Directive (R&TTE) EN 301 511 / EN 300 328 Specific Absorption Rate (SAR) Standard: EN 50360, EN 50361 73/23/EEC Low Voltage Directive (LVD) IEC 60950-1:2001 89/336/EEC Electromagnetic Compatibility (EMC-Directive) Standard: EN 301489-1/7/17 The manufacturer cannot be held responsible for modifications made by the User and the consequences thereof, which may alter the conformity of the product with the CE Marking.A.2 Safety Precautions
About the AC Adapter
- CAUTION: Use only the AC adapter (PHIHONG, PSC05R-050) supplied with your device. Use of another type of AC adapter will result in malfunction and/or danger. - This product is intended to be supplied by a LISTED Power Unit marked with “LPS,” “Limited Power Source” and output rated + 5 V dc / 1.0 A maximum. - Do not use the adapter in a high moisture environment. Never touch the adapter when your hands or feet are wet. - Allow adequate ventilation around the adapter. Avoid locations with restricted airflow. - Connect the adapter to a proper power source. The voltage and grounding requirements are found on the product case and/or packaging. - Do not use the adapter if the cord becomes damaged. - Do not attempt to service the unit. There are no serviceable parts inside. Replace the unit if it is damaged or exposed to excess moisture.About the Battery
- CAUTION: Risk of explosion if battery replaced by an incorrect type. Dispose of used batteries according to the instructions. - Replace only with the same or equivalent type recommended by the manufacturer. - Do not mutilate, puncture, or dispose of battery in fire. The battery can burst or explode, releasing hazardous chemicals. • Use specified charger only.About the Radio Frequency Exposure
This product is a low-power radio transmitter and receiver. When it is turned on, it receives and also sends out radio frequency (RF) signals. Specific Absorption Rate (SAR) is the unit of measurement for the amount of radio frequency energy absorbed by the body. The highest SAR value for this product when tested for use is 0.612 W/kg, lower than the limit of 1.6 W/kg. However, to reduce the effects of the radio frequency energy on the human body, use the phone feature with care. For example, make short calls as possible as you can.About the Electrostatic Discharge
Electrostatic discharges can interfere with the normal functioning of the electronic devices. Your equipment can behave abnormally owing to such an event, resulting in the possible data corruption or loss of unsaved data. To recover from this, reset your equipment as described in the User's Manual. To avoid losing data due to electrostatic discharges or other types of events, it is recommended that you regularly save and backup data as described in the User's Manual.- Trademarks
- Note
- Table of Contents
- Preface......vii
- Getting Started 1-1
- Basic Skills 2-1
- Using the Phone.... 3-1
- Managing Your A700....4-1
- Microsoft Pocket Outlook....5-1
- More Programs.... 6-1
- Getting Connected 7-1
- Troubleshooting and Maintenance....8-1
- A Regulatory Information...... A-1
- Preface
- Welcome
- Where to Find Information
- Getting Started
- Identifying Hardware Components
- Front Components
- Back Components
- Left-Side Components
- Right-Side Components
- Top Components
- Ref Component Description
- Bottom Components
- Installing the SIM Card and Battery
- Charging the Battery
- Turning A700 On and Off
- Turning On for the First Time
- Turning Off
- Turning Off to Suspend
- Installing Microsoft ActiveSync
- CAUTION:
- Using Your A700 in a Vehicle
- Using the Car Holder
- Connecting the Car Charger
- Expanding Your A700
- Using a SD/MMC Card
- NOTE:
- Basic Skills
- Using the Stylus
- Using the Navigation Pad
- Today Screen
- Quick Launch Bar
- Mio Menu
- Landscape View
- Navigation Bar and Toolbar
- Running Programs
- Shortcut Menus
- Notifications
- Entering Information
- Entering Text Using the Input Panel
- Block Recognizer
- Letter Recognizer
- Transcriber
- Writing on the Screen
- Writing
- Editing Your Writing
- Converting Your Writing to Text
- Drawing on the Screen
- Creating a Drawing
- Editing Your Drawing
- Recording a Message
- To create a recording:
- Recording Formats
- Using My Text
- Securing Your A700
- Locking the Keypad
- Locking the Device
- Locking the Phone
- Using the Phone
- About Your Phone
- Before You Start
- Phone Features
- Turning On and Off the Phone Function
- Turning Off the Phone
- Turning On the Phone
- Starting Microsoft Phone
- Phone Status Icons
- Basic Phone Operations
- Making a Call
- Dialing a Call
- Making a Call Using a Recently Connected Number
- Making a Call from Contacts
- Making a Call from Speed Dial
- Making a Call from the Call History List
- To Make a Call Using SIM Manager
- Making a Call from a Hyperlink
- Answering a Call
- Rejecting a Call
- Ending a Call
- Managing More than One Call
- Holding a Call to Take a Second Call
- Rejecting the Second Call
- Holding a Call to Make a Second Call
- Swapping between Calls
- Setting up a Conference Call
- Adjusting the Phone Volume
- Muting a Call
- Using Speakerphone
- In-call Options
- Taking a Note During a Call
- Using Call History
- Viewing Call History
- Managing Call History
- Adding an Entry to Contacts Using Call History
- Using Speed Dial
- Creating a Speed Dial Entry
- Editing a Speed Dial Entry
- Deleting a Speed Dial Entry
- Managing Phone Numbers
- Microsoft Contacts: Transferring Contacts
- SIM Card: Transferring and Adding Entries
- Transferring an Entry to Microsoft Contacts
- Adding an Entry
- Customizing Your Phone
- Changing Phone Settings
- Changing Services Settings
- Cell Broadcast
- Changing Network Settings
- Additional Phone Operations
- Checking Your Voice Mail
- Making an Emergency Call
- Dialing an International Call
- Managing Your A700
- Managing Power
- Low Battery Signals and Actions
- Power Management
- System
- Performance
- Power
- USB
- Camera
- Power-Saving Tips
- Managing Memory
- Storage and Program Memory
- - Storage memory
- - Program memory
- Additional Memory
- Customizing Your A700
- Finding and Organizing Information
- Adding or Removing Programs
- Adding Programs
- To Add Programs Using ActiveSync
- To Add a Program to the Start Menu
- Removing Programs
- Microsoft Pocket Outlook
- Calendar: Scheduling Appointments and Meetings
- Creating an Appointment
- Using the Calendar Summary Screen
- Contacts: Tracking Friends and Colleagues
- Creating a Contact
- Using the Contacts Summary Screen
- Tasks: Keeping a To Do List
- Creating a Task
- Using the Tasks Summary Screen
- Notes: Capturing Thoughts and Ideas
- Creating a Note
- Messaging: Sending and Receiving E-mail Messages
- Downloading Messages
- Synchronizing Outlook E-mail
- Downloading Messages from the Server
- Changing E-mail Download Options
- Setting up an E-mail Account
- Composing and Sending an E-mail and SMS Message
- Composing and Sending a MMS Message
- Managing Message Slides
- Receiving and Viewing a MMS Message
- Replying to or Forwarding a Message
- Moving a Message
- Deleting a Message
- Creating or Changing a Message Signature
- Receiving Attachments
- Managing Folders
- Deleting all Messages and Folders
- Microsoft ActiveSync
- Synchronizing Data
- Word Mobile
- Creating a Document
- Opening a Document
- Excel Mobile
- Creating a Workbook
- Opening a Workbook
- PowerPoint Mobile
- Pocket MSN
- Signing in to Pocket MSN
- Using Pocket MSN Messenger
- Using MSN Hotmail
- Windows Media Player
- Camera
- Taking Pictures
- Taking Continuous Pictures
- Recording Video Clips
- Camera Settings
- Pictures & Videos
- Viewing Pictures and Launching Video Clips
- Calculator
- Modem Link
- Terminal Services Client
- Connecting to a Remote Server
- Disconnecting and Ending a Session
- Additional Programs
- Mio Club Registration
- Registering via SMS
- Registering via the Internet
- Location Call
- Sending an Emergency Message
- Mio SMS Location
- Quick Position
- Getting Connected
- Connection Settings
- GPRS Connection
- Starting and Ending a GPRS Connection
- Modem Connection
- Creating a Modem Connection
- Starting and Ending a Modem Connection
- Wireless Network Connection
- Creating a Wireless Connection to a Network
- Starting and Ending a Wireless Network Connection
- Using Bluetooth
- Turning On and Off Bluetooth
- Transferring Files via Bluetooth
- Sending Files via Bluetooth
- Receiving Files via Bluetooth
- Bluetooth Partnership
- Creating a Bluetooth Partnership
- Accepting a Bluetooth Partnership
- Renaming a Bluetooth Partnership
- Ending a Bluetooth Partnership
- Using Internet Explorer Mobile
- Browsing the Internet
- Managing Favorites
- Adding a Favorite
- Adding a Folder in Favorites
- Deleting a Favorite or Folder
- Synchronize a Favorite Link
- Troubleshooting and Maintenance
- Resetting Your A700
- Restoring Factory Default State
- Power Problems
- Memory Problems
- Screen Problems
- Screen is off
- Screen responds slowly
- Screen freezes
- Screen is hard to read
- Inaccurate response to stylus taps
- Connection Problems
- Synchronization Problems
- Cable Connection Problems
- Modem Connection Problems
- Unable to dial out
- Able to dial out but unable to make a proper connection
- Modem connection is unreliable
- Network Connection Problems
- Taking Care of Your A700
- General Guidelines
- Phone Guidelines
- Travel Guidelines
- Regulatory Information
- A.1 Regulations Statements
- European Notice
- A.2 Safety Precautions
- About the AC Adapter
- About the Battery
- About the Radio Frequency Exposure
- About the Electrostatic Discharge
Brand : MIO
Model : DigiWalker A700
Category : Smartphone