CIR 1000 A - Smartwatch COBRA - Free user manual and instructions
Find the device manual for free CIR 1000 A COBRA in PDF.

| Product Type | Smartwatch |
| Brand | Cobra |
| Model | CIR 1000 A |
| Display | 1.3-inch TFT LCD touchscreen |
| Dimensions | 43 x 36 x 10 mm |
| Weight | 45 g (including strap) |
| Power Source | Rechargeable lithium-ion battery, 200 mAh |
| Charging Method | Magnetic charging cradle |
| Operating System Compatibility | iOS 9.0+ and Android 5.0+ |
| Connectivity | Bluetooth 5.0 |
| Water Resistance | IP67 (splash and dust proof) |
| Main Functions | Step counter, heart rate monitor, sleep tracking, notification alerts, stopwatch, alarm clock |
| Sensor | Optical heart rate sensor, 3-axis accelerometer |
| Battery Life | Up to 7 days typical use |
| Strap Material | Soft silicone, adjustable |
| Care and Cleaning | Wipe with a soft, dry cloth; avoid harsh chemicals |
| Safety | Do not wear while showering or swimming; keep away from extreme temperatures |
| Spare Parts and Reparability | Strap replaceable; battery not user-replaceable; contact Cobra support for repairs |
| General Information | Manufacturer: Cobra Electronics Corporation | Warranty: 1 year limited |
Frequently Asked Questions - CIR 1000 A COBRA
User questions about CIR 1000 A COBRA
0 question about this device. Answer the ones you know or ask your own.
Ask a new question about this device
Download the instructions for your Smartwatch in PDF format for free! Find your manual CIR 1000 A - COBRA and take your electronic device back in hand. On this page are published all the documents necessary for the use of your device. CIR 1000 A by COBRA.
USER MANUAL CIR 1000 A COBRA
CIR 1000 A CIR 1000 E
WIFI INTERNET RADIO
Instruction Manual
text_image
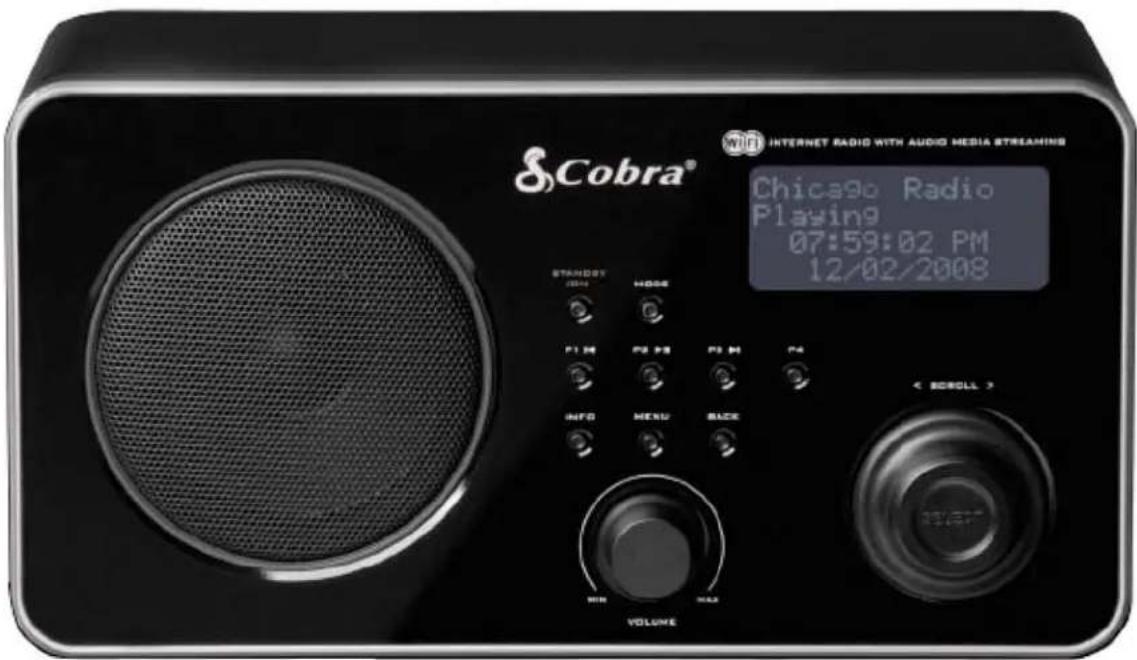
Cobra® INTERNET RADIO WITH AUDIO MEDIA STREAMING Chicago Radio Playing 07:59:02 PM 12/02/2008 STANDOT OFF HODE P1 M P2 P3 P3 M P4 INFO MENU BACK VOLUME < SCROLL >Nothing Comes Close to a Cobra®
Safety Information

text_image
CAUTION RISK OF ELECTRIC SHOCK DO NOT OPEN CAUTION: TO REDUCE THE RISK OF ELECTRIC SHOCK: DO NOT REMOVE SCREWS, COVERS OR THE CABINENT. NO USER SERVICING PARTS INSIDE. REFER SERVICING TO QUALIFIED SERVICE PERSONNEL.
The lightning flash with arrowhead symbol within an equilateral triangle is intended to alert the user to the presence of uninsulated "dangerous voltage" within the product's enclosure that may be of sufficient magnitude to constitute a risk of electric shock to persons.

The exclamation point within an equilateral triangle is intended to alert the user to the presence of important operating and maintenance (servicing) instructions in the literature accompanying the appliance.
WARNING: TO REDUCE THE RISK OF FIRE OR ELECTRIC SHOCK, DO NOT EXPOSE THIS APPLIANCE TO RAIN OR MOISTURE.
IMPORTANT SAFETY INSTRUCTIONS
To reduce the risk of electrical shock, fire, etc.:
- Read these instructions.
- Keep these Instructions.
- Heed all Warnings.
- Follow all instructions.
- Do not use this apparatus near water.
-
Clean only with dry cloth. For stubborn stains, use a soft cloth dampened with a weak solution of mild detergent and water. Dry the apparatus immediately afterwards with a clean cloth. Do not use abrasive clothes, thinners, alcohol, or other chemical solvents, because they may damage the finish or remove the panel lettering.
-
Do not block any ventilation openings. The ventilation shall not be impeded by covering the ventilation openings with items, such as newspapers, table cloths, curtains, etc.
- Do not install near any heat source such as radiators, heat registers, stoves, or other apparatus (including amplifiers) that produce heat.
- Do not defeat the safety purpose of the polarized or grounding - type plug. A polarized plug has two blades with one wider than the other. A grounding type plug has two blades and a third grounding prong. The wide blade or the third prong are provided for your safety. If the provided plug does not fit into your outlet, consult an electrician for replacement of the obsolete outlet.
- Protect the power r cord from being walked on or pinched particularly at plugs, convenience receptacles, and the point where they exit from the apparatus. If the power cord is damaged, it must be repaired by a qualified repairer.
- Only use attachments/accessories specified by the manufacturer.
- Use only with the cart, stand, tripod, bracket or table specified by the manufacturer, or sold with the apparatus. When a cart is used, use caution when moving the cart/apparatus combination to avoid injury from tip-over.

PORTABLE CART WARNING
- Unplug this apparatus during lightning storms or when unused for long periods of time.
- Refer all servicing to qualified service personnel. Servicing is required when the apparatus has been damaged in any way, such as power-supply cord or plug is
damaged, liquid has been spilled or objects have fallen into the apparatus, the apparatus has been exposed to rain or moisture, does not operate normally, or has been dropped.
-
The apparatus shall not be exposed to dripping or splashing and no objects filled with liquids, such as vases, shall be placed on the apparatus.
-
The main plug or an appliance coupler is used as the disconnect device, the disconnect device shall remain readily operable.
-
Please read Rating Labels at the bottom of the Sender and Receiver for power input and other safety information.
FCC
This device complies with Part 15 of the FCC Rules Operation that is subject to following two conditions:
(1) This device may not cause harmful interference and,
(2) This device must accept any interference received, including interference that may cause undesired operation.
Warning: Changes or modifications to this unit not expressly approved by the party responsible for compliance could void the user authority to operate the equipment.
Contents
Safety Information ii
Package Content 2
Internet Radio Quick Start Guide 3
What you need before you can use your Internet Radio 3
Controls Overview (a)....4
Controls Overview (b)......5
Connecting to wired network....6
Connecting to wireless network....8
How to select a station through Podcasts....10
How to get Access code 10
How to add station to ‘My favourites’ 11
How to add station to 'My Added Stations' 12
Choosing a station 13
Station Updates....13
Music Player Operation Mode....14
FM Operation Mode....15
Setting Station Presets....16
Selecting a Preset station.... 16
How to change the Station Information .... 16
AUX IN Operation Mode....17
General Operations 18
Setting Clock....18
Sleep Function 20
Setting Alarm 21
Snooze Function 23
SW Version and Radio ID 24
Returning To Main Menu....24
Changing Volume....24
System Setup Operations 25
Network setup 25
Language 25
Factory reset....26
Software Updates....26
Appendix 27
Step 1: Set Up Media Sharing in WMP 11....27
Step 2: Play Music on the Internet Radio. 28
Set Up Media Sharing in MAC OS 29
Set up Windows File Sharing on a MAC....29
Accounts Setup 29
Directory Setup 29
Troubleshooting 30
Specification and Trademark Info 31
Licensing information and requirements
Package Content
| Main unit |  |
| Instruction manual | 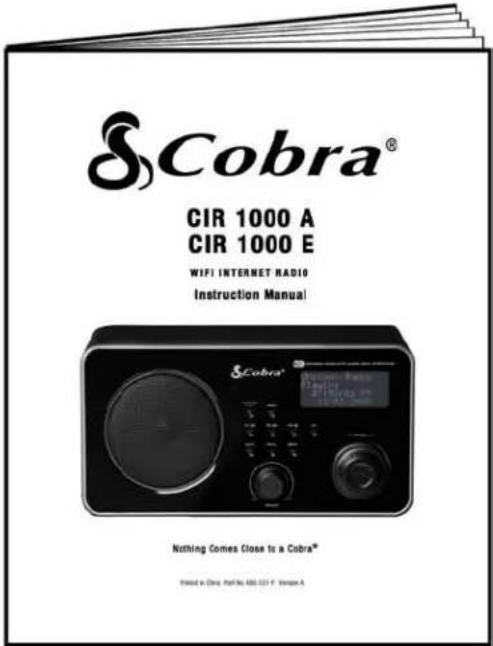 |
Internet Radio Quick start Guide
What you need before you can use your Internet Radio
Before you use your Internet Radio, you need the following:
LAN Setting:
- Make sure the internet environment is ready and the network setting is available for LAN (ADSL or Cable Modem is highly recommended).
- To find the Radio's LAN MAC address, Please follow: Main menu → System setup → Internet setup → View settings → MAC Address
Wireless LAN Setting:
• A broadband Internet connection.
- A wireless access point (Wi-Fi) connected to your broadband Internet, preferably via a router.
- If your wireless network is configured to use Wired Equivalent Privacy (WEP) or Wi-Fi Protected Access (WPA) data encryption then you need to know the WEP or WPA code so you can get the Internet Radio to communicate with the network.
- If your wireless network is configured for trusted stations you will need to enter the Radio's MAC address into your wireless access point. To find the Radio's MAC address use menu items as follows:
Main menu → System setup → Internet setup → View settings → MAC Address
- To enter the MAC address into your wireless access point, you must read the instructions supplied with the wireless access point.
Before you continue, make sure that your wireless access point is powered up and connected to your broadband Internet, or your LAN cable is inserted properly into the LAN socket. To get this part of the system working, read the instructions supplied with the wireless access point and LAN connection.
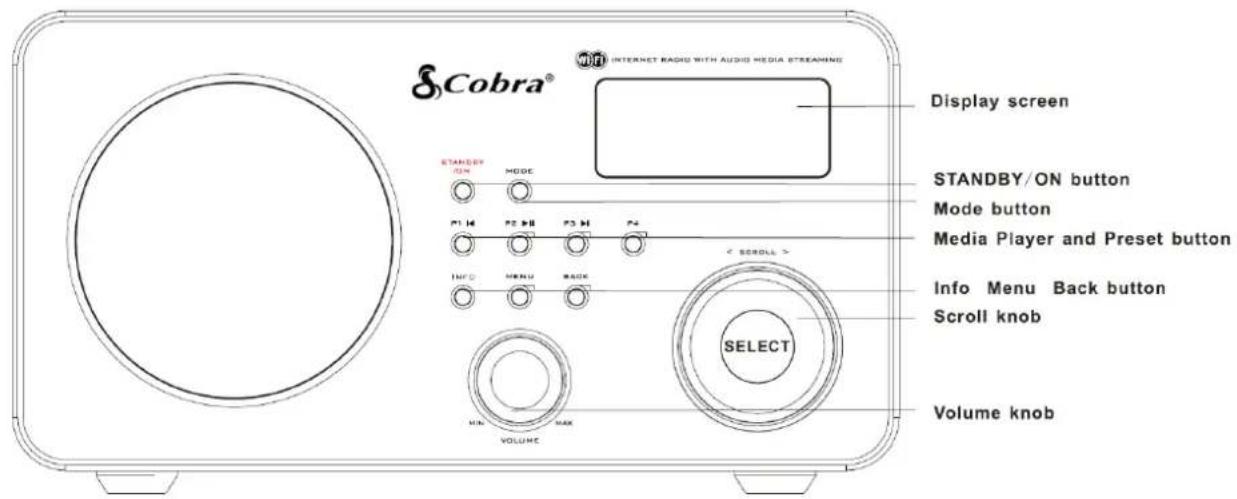
Controls Overview (a)
text_image
Cobra® INTERNET RADIO WITH AUDIO MEDIA STREAMING Display screen STANDBY/ON button Mode button Media Player and Preset button Info Menu Back button Scroll knob Volume knob < SCROLL > SELECT MIN MAX VOLUMEUnit Front view
| Control | Internet radio | FM mode | Music Player | AUN IN mode |
STANDBY | Press to turn on/off Radio | |||
| MODE | Press to scroll through Internet Radio, Music Player, FM Mode and Auxiliary Input. | |||
 | Press and hold to save Preset stationP1, P2, P3 or P4;Press to load Preset stationP1, P2, P3 or P4. | Previous Track | No function | |
P2 ▶II | Play/Pause | |||
P3 ▶I | Next Track | |||
P4 | No function | |||
IN5C | Press to display Queue information | |||
MENU | Press to Main menu and other options | |||
BACK | Go back to previous menu page | |||
  MAXVOLUME MAXVOLUME | Increase volume by turning the knob clockwiseDecrease volume by turning the knob counter-clockwise | |||
[S  L> L> SELECT SELECT | a. Turn the knob to change options, press to selectb. FM mode: press to search next available station | No function | ||
Controls Overview (b)

text_image
Antenna AUX IN socket refer note 1 LAN socket Headphone socket refer note 2UNIT BACK VIEW
| Socket | Description |
| AUX IN | Connects to the external audio device |
| Headphone | Connects to the headphone |
| LAN | Connects to the LAN cable |
| note 1: | Designed to help inner airflow from the Loudspeaker to vent |
| note 2: | AC power cord door. |
Connecting to wired network
Step 1 - Power up Radio
First, connect to your Internet Radio adaptor and ensure the Power LED is lighting up. The Radio can be switched on or off with the STANDBY/ON button.

flowchart
graph LR
    A["Starting..."] --> B["Welcome to Internet Radio"]
Later, it will say:
text_image
> Internet Radio Music Player FM Auxiliary Input
Note: Make sure LAN cable is connected to the LAN socket.
Step 2 – Choose LAN Setting
- Rotate the Scroll knob to
, and press to confirm.

flowchart
graph LR
    A["Sleep\nAlarms\nSnooze\n>System setup"] --> B["Internet setup\nTime setup\nLanguage\nFactory reset"]
- With the cursor pointing to
, press to confirm, and then rotate the Scroll knob to , and press to confirm.

flowchart
graph LR
    A["> Wizard\nPC settings\nView settings\nWlan region"] --> B["PC settings\nView settings\nWlan region\n> Manual settings"]
- With the cursor pointing to
, press to confirm, and then rotate the Scroll knob to , and press to confirm.

flowchart
graph LR
    A["> Wired Wireless"] --> B["> DHCP enable\nDHCP disable"]
Step 3 – Enter Internet Radio mode
- Press BACK repeatedly to access this mode.
Or alternatively, simply press MODE until

flowchart
graph LR
    A["> Internet Radio Music Player FM Auxiliary Input"] --> B["or"]
    B --> C["Internet radio Mode"]

Note: By pressing MODE, you can view Internet Radio, Music player, FM, and Auxiliary Input mode.
Step 4 – Enter Network
Continue the above steps, and in a few seconds:
text_image
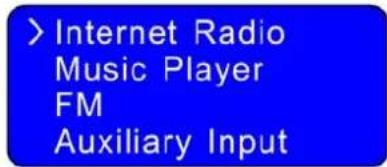
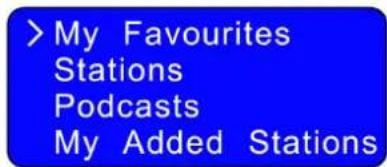
>My Favourites Stations Podcasts My Added StationsOr

text_image
Network error Select to retryIf this happens, please proceed as follows:
a. Check your router, to see that it is working normally or not.
b. Check your LAN cable, and make sure it isn't damaged, and that the cable is inserted correctly into the LAN socket.
Connecting to wireless network
Step 1 – Choose Wlan Setting

Note: a. Unless you set your internet to LAN connection, it will automatically choose WLAN connection, and then skip to step 2 below.
b. If you have set it to LAN, you may need to do a small operation as follows:
- Refer to page 6 "choose LAN setting", rotate the Scroll knob to
, and press to confirm.

flowchart
graph LR
    A["Wired"] --> B["> Wireless"]
    C["> DHCP enable"] --> D["DHCP disable"]
- With the cursor pointing to
, press to confirm.
Step 2 – Select Your Region
- Rotate the Scroll knob to
, and press to confirm.

Note: If you make a mistake at any point, press the BACK button to go back to the previous screen.
Then the display will show a list of regions for you to choose.

flowchart
graph LR
    A["Please select\nWlan region"] --> B[">Most of Europe\nUSA\nCanada\nSpain"]
- Rotate the Scroll knob to your region, and press to confirm. The Radio will save it in memory.

text_image
Network wizard ScanningAfter a few minutes, it will ask you to enter a network.
Step 3 – Entering A Network
- In some cases the Radio may find more than one network. Rotate the Scroll knob to cycle through the name list, and press this knob when the name of your network is displayed
- If your network is not configured to request a password (WEP/WPA), the Radio will connect to the network and display:
> My Favourites
Stations
Podcasts
My Added Stations
- If a WEP/WPA key (password) is required, the Radio will display the following:
> Customer Default 1 Default 2 WifiDev
- Rotate the Scroll knob to your desired one, and press to confirm.
- After a few seconds, the Radio will ask you to input the WEP/WPA code and will display the password entry screen as follows:
Key:
0123456789<←C
a. Rotate the Scroll knob to cycle through the alpha-numeric character list. Press to select an appointed character.
b. If you input a wrong character, scroll to the '<' icon and then press Scroll knob to delete it.
c. Press BACK to scroll up or down to the last or next line.
d. Select the Icon to return to the previous page.
e. After your input is complete, scroll to the '✓' icon, and then press the Scroll knob to try to access the internet.
Key: XXXXXX
0123456789<↓C
It should now successfully connect to your network.
My Favourites Stations Podcasts My Added Stations

Note: a. WEP/WPA pass codes are case-sensitive.
b. The Radio will automatically save the WEP/WPA code. Therefore, it is not necessary to re-enter it unless you perform a
Or, if it says:
Failed to connect
or
Network error Select to retry
If this happens, please follow these steps:
A. Check your router to see if it is working normally or not.
B. Relocate your radio to a stronger signal position.
C. Make sure your password is input correctly.
How to select a Podcast
- After your radio has successfully connected to the network, rotate the Scroll knob to
, and then press to confirm.

text_image
My Favourites Stations >Podcasts My Added Stations
Location Genre Search podcasts
- Rotate the Scroll knob to your favorite option, press to confirm, and then follow step by step to select your favorite program.
How to get an Access code
- After your radio has successfully connected to the network, rotate the Scroll knob to
, and press to confirm.

text_image
Stations Podcasts My Added Stations > Help
Get access code FAQ
- With the curser pointing to
, press to confirm. You will now have your access code.
How to add stations to 'My favourites'
😊 1. visit website: http://www.wifiradio-frontier.com
😊 2. Click on the register link.
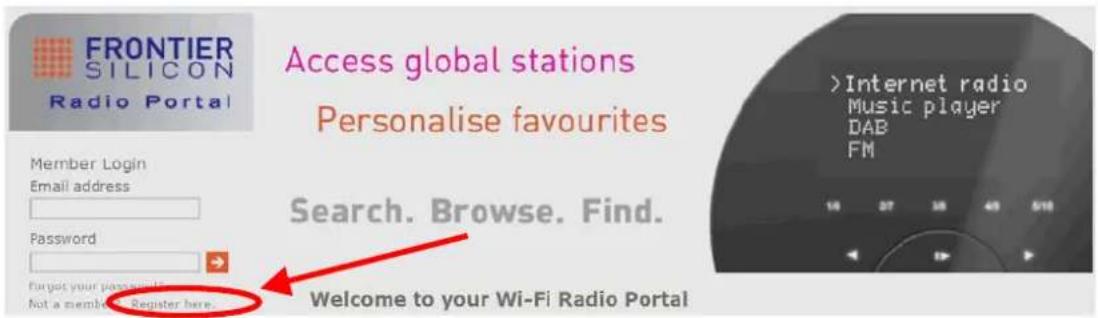
text_image
FRONTIER SILICON Radio Portal Access global stations Personalise favourites Member Login Email address Password Forgot your password to Not a member. Register here. Search. Browse. Find. Internet radio Music player DAB FM Welcome to your Wi-Fi Radio Portal- To create account login, you need to input your radio's Access Code (refer to page 10).
Note: When visiting this website as a member, please remember your registered 'Email address' and 'Password'
4. You will now be able to take advantage of various additional features and services offered by the Frontier Internet Radio Portal.
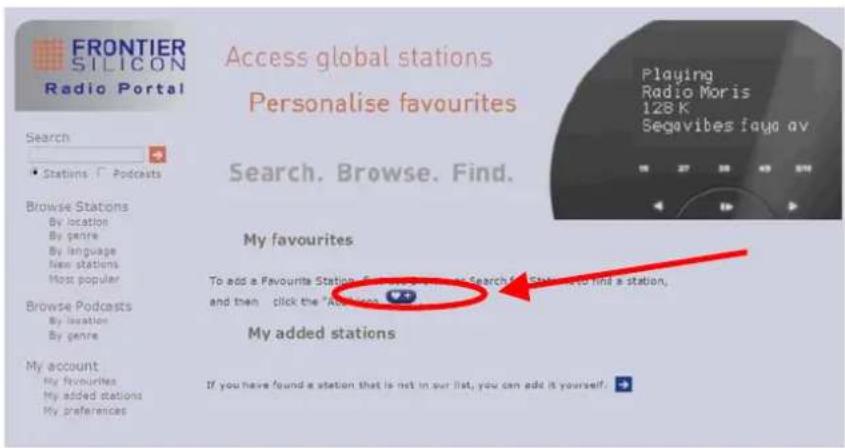
text_image
FRONTIER SILICON Radio Portal Access global stations Personalise favourites Search. Browse. Find. My favourites To add a Favourite Station, if you want to search for Station, to find a station, and then click the Add to a Station. My added stations If you have found a station that is not in our list, you can add it yourself.😊 5. Two steps on how to play
a. With the curser pointing to
b. Rotate the Scroll knob to your favorite option, press to confirm, and it will then load.
Note: 'My Favourites' stations which have been added will show up in 'My Favourites' subdirectory. Doing a 'Factory reset' cannot erase them.
How to add stations to 'My Added Stations'
😊 1. visit website: http://www.wifiradio-frontier.com
😊 2. Login as a member(see previous page to register).

text_image
FRONTIER SILICON Radio Portal Access global stations Personalise favourites Member Login Email address Password Forgot your password? Not a member? Register here. Search. Browse. Find. Welcome to your Wi-Fi Radio Portal >Internet radio Music player DAB FM- You will now be able to take advantage of various additional features and services offered by the Frontier Internet Radio Portal.

text_image
FRONTIER SILICON Radio Portal Access global stations Personalise favourites Search. Browse. Find. My favourites To add a Favourite Station, first use Browse or Search for Stations to find a station, and then click the "Add" icon . . My added stations If you have found a station that is not in our list, you can add yourself.😊 4. Two steps on how to play
a. With the cursor pointing to
b. Rotate the Scroll knob to your favorite option, press to confirm and it will then load.
Note: 'My Added Stations' stations which have been added, will show up at 'My Added Stations' subdirectory. Doing a 'Factory reset' cannot erase them.
Choosing a station
After your radio has successfully connected to the network, you are now ready to select a station.
- Rotate the Scroll knob to
, and press to confirm.

flowchart
graph LR
    A["My Favourites\n> Stations\nPodcasts\nMy Added Stations"] --> B["Location\nGenre\nSearch stations\nPopular stations"]
Note: There are five options available to select a station.
- Rotate the Scroll knob to your desired option, and then press to confirm.
■ With the cursor pointing to
Note:

flowchart
graph LR
    A["> Africa\nAsia\nCaribbean\nCentral America"] --> B["> Algeria\nAngola\nBenin\nBurundi"]
At step 2 above, you can also rotate the Scroll knob to
Note:

flowchart
graph LR
    A["Location"] --> B["Alternative Ambient"]
    A --> C["Search stations"]
    A --> D["Popular stations"]
    B --> E["Blue Grass"]
Station Updates
Occasionally, your radio will show you that it is receiving an updated station list. It does this automatically and periodically, ensuring your radio always has the latest station directory on-board.
Music Player Operation Mode

Note: To operate this function, please first read the appendix on page 27.
- Switch your radio on and press MODE repeatedly until
appears.
Music Player Mode
Or enter
The following is displayed:
Shared media Shared folders
A. PLAYING SHARED MEDIA
-
With the cursor pointing to
, press to confirm. -
According to your personal settings, follow step by step to your desired one and then enjoy.
B. PLAYING SHARED FOLDERS
- With the cursor pointing to
, rotate the Scroll knob to , and press to confirm.
Shared media > Shared folders
- According to your personal settings, follow step by step to your desired folder, then visit it and load your favourite program.
FM Operation Mode
- Press the MODE button repeatedly until
appears.
FM Mode
Or enter
- For initial use, it will start at the beginning of the FM frequency range (87.50MHz). Otherwise, the last FM station you listened to will be selected.
87.50 MHz [ No RadioText ] 09:21:00 31/12/2008
- Rotate the Scroll knob to increase or decrease the frequency by 0.05MHz per step;

Note: For US version, the frequency is 0.10MHz per step.
- For 'auto-searching' active stations, simply press the Scroll knob.
97.85 MHz [ No RadioText ] 09:21:30 31/12/2008

Note: For 'auto-searching' next active station:
a. Simply press the Scroll knob again.
b. The unit will display the frequency changes until it stops on the next station
c. After it runs to the end of the frequency range, it will continue it's search from the beginning frequency.
A. SCAN SETTING
- Press BACK until the cursor points to
, and then press to confirm.

flowchart
graph LR
    A["> Scan setting Main menu"] --> B["> Strong stations * All stations"]
- Rotate the Scroll knob to your desired setting, and then press to confirm.
Setting Station Presets
Your radio can store 4 Internet station presets and 4 FM station presets respectively.
To store the current station:
Press and hold any one of the 1-4 button for 2 sec., and it will display 'Preset stored':
Tianjin Radio Mu Preset stored 09:21:50 31/12/2008
Selecting a Preset station
To select a stored station:
- Enter corresponding mode
- Simply press the corresponding preset button.
Then radio will load that station immediately.

Note: Do not hold the button of a stored station down - if you do so, the currently playing station will overwrite the stored one in the preset.
How to change the Station Information
- It is possible to view the information that is displayed on the second line of the display when listening to a program. To view this information, press the INFO button repeatedly.
- In
, this function is out of service.
AUX IN Operation Mode
- To listen to an external audio source, press the MODE button repeatedly until
appears in the display.
Auxiliary Input Mode
Or enter
- Connect one end of the audio cable to the headphone (or auxiliary out) socket of your source device, and the other end to AUX IN socket on the rear of your radio. The radio will display the following:
Auxiliary Input
- To gain optimal volume levels, adjust the output volume level on both the source device and radio itself.
Your radio is now a high quality digital audio speaker system.

Note: AUX IN enables quick and easy connection to an MP3 player or other external sound sources.
General Operations
Setting the Clock
- At
subdirectory, rotate the Scroll knob to , and press to confirm.

flowchart
graph LR
    A["Sleep\nAlarms\nSnooze\n>System setup"] --> B["Internet setup\nTime setup\nLanguage\nFactory reset"]
- Rotate the Scroll knob to

flowchart
graph LR
    A["Internet setup\n>Time setup\nFactory reset\nSoftware update"] --> B["Set clock\nSet date\nAuto update\nSet Time Zone"]
- With the cursor pointing to
, press to confirm. It will ask you to set the hour.

text_image
Set time 00:00- Rotate the Scroll knob to change the hour, and press to confirm. Now, it asks you to set the minute.

text_image
Set time 09:00-
Set the minute by using the Scroll knob.
-
Rotate the Scroll knob to
. Set the date by using the same method.

flowchart
graph LR
    A["Set clock\n> Set date\nAuto update\nSet Time Zone"] --> B["Set date\n01-01 - 2007"]
- You can also set the clock through 'Auto Update'

Note: For
- At step 2 on the previous page, rotate the Scroll knob to
, and press to confirm.

flowchart
graph LR
    A["Set clock\nSet date\n>Auto update\nSet Time Zone"] --> B[">Update from NET*\nNo update"]
- Rotate the Scroll knob to
, and press to confirm.
- Greenwich Mean Time (GMT) ---- for your clock settings
- At above step 2 on the previous page, rotate the Scroll knob to
, and press to confirm.

flowchart
graph LR
    A["Set clock\nSet date\nAuto update\n> Set Time Zone"] --> B["Set Time Zone\nGMT 0.0"]
- To obtain Your Local Timezone = GMT ± ? hour. Please visit website:
http://www.greenwichmeantime.com
Take the 'UK-Time Zone' for example:
What is the current time - United Kingdom (UK)?
A. If you are in the UK now, click proceed to the above website.
B. Once at the above website, Click 'UK' from the left column.

text_image
User Timezone 8:27 p.m. Friday, 28 November 2008 GMT (Western Europe Standard Time) 12:27:54 12:27 p.m. Friday, 28 November 2008 GMTTime synchronized to the NTP network and should be accurate to within 1 second.
The clock will automatically re-synchronize in 214 seconds.
- Rotate the Scroll knob clockwise or counter-clockwise to increase 0.5 hour or decrease 0.5 hour per step.

flowchart
graph LR
    A["Set Time Zone GMT + 0.5"] --> B["Set Time Zone GMT - 0.5"]
- After adjusting to the correct time, press the Scroll knob to confirm.
Sleep Function
- At
subdirectory, rotate the Scroll knob to , and press to confirm.

flowchart
graph LR
    A["Music Player FM Auxiliary Input >Sleep"] --> B["Set sleep time sleep time off"]
- Rotate the Scroll knob to define the sleep period between 0 – 90 minutes, and press to confirm.

text_image
Set sleep time 15 minutes
Note: a. The time interval is 15 minutes per step.
b. The program will turn off after a pre-defined period of time.
- Select
option again, and then press the Scroll knob to show the amount of time until it will expire.

text_image
Set sleep time 12 minutes- The Radio will automatically return to standby mode after the set time has elapsed.
Setting Alarm

Note: Before setting the alarm, please set the time first.
- At
subdirectory, rotate Scroll knob to , and press to confirm.

flowchart
graph LR
    A["Internet Radio\nMusic Player\nFM\nAuxiliary Input"] --> B["FM\nAuxiliary Input\nSleep\n>Alarms"]
- Rotate Scroll knob to choose an alarm, and press to confirm.

flowchart
graph LR
    A[">Alarm1: Off\nAlarm2: Off"] --> B[">Time: 12:00 AM\nDays: Daily\nOff\nMode: Internet"]
- With the cursor pointing to 'Time: 12:00 AM', press the Scroll knob to confirm. The setting principle is the same as 'set time'.

flowchart
graph LR
    A["Set alarm time\n12:00 AM"] --> B["Set alarm time\n09:15 AM"]
- Rotate the Scroll knob to 'Days: Daily', and press to confirm. Then rotate the Scroll knob to your desired one, and press to confirm.

flowchart
graph LR
    A["Time: 09:15 PM<br>> Days: Daily<br>On<br>Mode: Internet"] --> B["> Daily<br>Once<br>Weekdays<br>Weekends"]

Note: after you complete the 'Set alarm time', the alarm status automatically turns from 'Off' to 'On'.
- Rotate the Scroll knob to 'Mode: Internet', and press to confirm Then rotate the Scroll knob to your desired one, and press to confirm.

flowchart
graph LR
    A["Days: Weekdays\nDays: Daily\nOn\n> Mode: Internet"] --> B["Buzzer\n> Internet Radio\nFM Mode"]
At this step, you can also jump over 'Mode: Internet' to 'Last listened' to set the alarm sound mode.
- Finally, you need to rotate the Scroll knob to 'Save', and then press to confirm.

flowchart
graph LR
    A["On\nMode: Internet\nLast listened\n>Save"] --> B["Alarm\nSaved"]
The display will show "Alarm Saved" for 3 seconds, and will then return to current Radio station display.
When the Radio is in standby mode, the Alarm icon ( ) will be displayed on-screen.

text_image
09:15:01 PM 11/26/2008● To deactivate the Alarm, press any button except VOLUME.
Note: if you press the Scroll knob you temporarily deactivate the alarm. See Snooze Function on the following page.
- To cancel the Alarm you need to switch the alarm from 'On' to 'Off', and remember to save your settings.
Or alternatively, perform a 'factory reset'.

flowchart
graph LR
    A["Time: 09:15 PM\nDays: Daily\n>Off\nMode: Internet"] --> B["Alarm\nSaved"]
Note: The Alarm volume level can be adjusted to your desired level before turning OFF the unit, and stored in memory. If you set the Volume knob to min., you may not hear the alarm when it sounds.
Snooze Function

Note: The snooze function is an option related to the Alarm function.
- At
subdirectory, rotate the Scroll knob to , and press to confirm.

flowchart
graph LR
    A["Auxiliary Input\nSleep\nAlarms\n>Snooze"] --> B["Set snooze time\n5 minutes"]
- Rotate the Scroll knob to define the snooze period which is between 5 – 30 minutes, and press to confirm.

text_image
Set snooze time 15 minutes
Note: The snooze interval time is 5 minutes per step.
- When the alarm is sounding – if you press the Scroll knob to stop it, the next radio alarm will be based on your snooze time setting.

Note: In standby mode, both the snooze icon and the remaining time before the next alarm will be displayed.

text_image
09:15:02 PM 04:58 Zz- When the alarm sounds again, if you press the Scroll knob, it will be repeat step 3 above. Or press any other button (except volume) to deactivate it.
SW Version and Radio ID

Note: This information may be required when dealing with technical issues.
- It can be activated from
→ , press to confirm.

flowchart
graph LR
    A["Alarms\nSnooze\nSystem setup\n>Info"] --> B[">SW version\nRadio ID"]
- With the cursor pointing to
, press to confirm. - To obtain the radio ID, rotate the Scroll knob to
, and press to confirm.
Returning To Main Menu
a. Simply press MENU button, and then rotate the Scroll knob to < Main menu >.
b. You can also move back to the Radio's top-line < Main menu > by pressing the BACK button.
Changing Volume
To change volume, rotate the Volume knob.
System Setup Operations
Network setup
😊 The purpose of doing is:
a. To enable you to scan again for connection to another wireless network,
b. To let you manually configure the network parameters.
c. To let you take your radio to another location where you want to use it.
- It can be activated from
→ , press to confirm.

flowchart
graph LR
    A["Sleep\nAlarms\nSnooze\n>System setup"] --> B["Internet setup\nTime setup\nLanguage\nFactory reset"]
- With the cursor pointing to
, press to confirm, and then rotate the Scroll knob to your desired settings.

flowchart
graph LR
    A["> Wizard\nPC settings\nView settings\nWlan region"] --> B["PC settings\nView settings\nWlan region\n> Manual settings"]
- Press to confirm your settings.
Language
- At above step 2, rotate the Scroll knob to
, and press to confirm.

flowchart
graph LR
    A["Internet setup\nTime setup\nLanguage\nFactory reset"] --> B["English (US)\nDanish\nDutch\nFinnish"]
- Rotate the Scroll knob to your desired language, and press to confirm.
Factory reset

Note: doing this will completely erase WEP/WPA codes and all user settings, and return the Radio to its default factory settings.
- From
→ → , press to confirm.

flowchart
graph LR
    A["Internet setup\nTime setup\nLanguage\n> Factory reset"] --> B["Press 'INFO' to confirm reset"]
- Press the INFO button to reset.

Note: If you want to pause this order before pressing INFO, you may press any other button, and your radio will revert to its previous operating condition immediately.
Software Updates
- From
→ → , press to confirm.

flowchart
graph LR
    A["Sleep\nAlarms\nSnooze\n>System setup"] --> B["Time setup\nLanguage\nFactory reset\n>Software update"]
- With the cursor pointing to
, press to confirm.

flowchart
graph LR
    A["Checking for / new versions..."] --> B["Software up to date"]

Note: software updates can take several minutes, so do not switch off the radio until this procedure has been completed. Otherwise, it may cause damage.
Appendix
Step 1: Setting Up Media Sharing in WMP 11
After you download and install Windows Media Player 11 for Windows XP and connect your Radio to the network, you need to set up media sharing so that you can share music with your Radio.
The following steps describe how to set up media sharing in Windows Media Player 11.
- In Windows Media Player 11, click the small arrow below the Library tab, and then click Media Sharing.
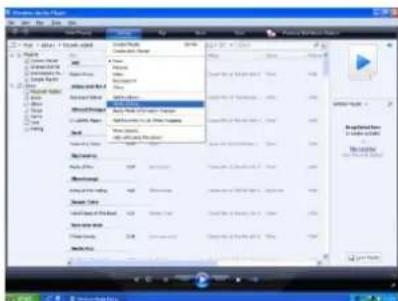
text_image
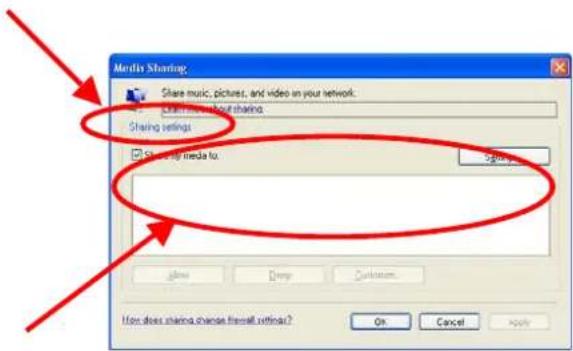
Add to New Add to New Add to New Add to New Add to New Add to New Add to New Add to New Add to New Add to New Add to New Add to New Add to New Add to New Add to New Add to New Add to New Add to New Add to New Add to New Add to New Add to New Add to New Add to New Add to New Add to New- In the Media Sharing dialogue box, select the Share my media check box.
text_image
Media Sharing Share music, pictures, and video in your network. Share sharing details Sharing settings Share media to: Sign it Show Cancel Apply How does sharing choose herself without? On CancelCheck the "share my media to" box. In the list, click your Radio *, click Allow, the selected device will show a green tick and then click OK.
* If your device does not appear in the list of devices, perform the following steps;
From the "Media Player" menu of your internet Radio select "UPNP Servers"
A list of available computers will appear.
Select the required computer.
Your device will appear in the list. If you want to check that this is your Radio, right click on the device and select "Properties": your Radio's MAC address will be shown.

text_image
Hello Storage Play music, pictures, and other on your network. New user and disk path. Storage setup: Show any links to: Settings Show Deep Accessories How does share changes disk paths? OK Cancel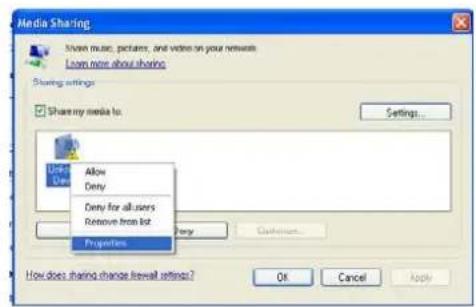
text_image
Media Sharing Show music, pictures, and video on your network Learn more about sharing Sharing settings Share my media to... Options Allow Deny Deny for all users Remove from list Properties Sett... Options... How does share change firewall settings? OK Cancel Apply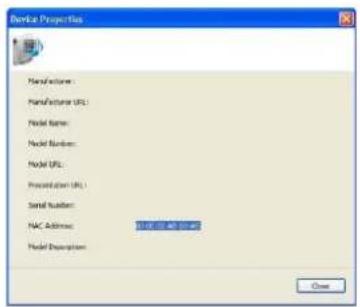
text_image
Banka Properties Network: Manufacturer (URL): Node Name: Node Number: Node URL: Presentation (URL): Serial Number: NAC Address: 1000000000000 Model Description: CloseStep 2: Play Music on the Internet Radio.
After installing and configuring your Radio and Windows Media Player 11, you are now ready to play music via a wireless connection.
The following steps describe how to play music with your Radio.
- Select "UPNP Servers" in the "Media Player" menu.
- Select the computer you wish to play the music files from.
- Use the controls to browse according to the following criteria: All Music, Genre, All Artists, Contributing Artists, Album Artists, Composers, Albums, Playlists, Folders or Star Ratings and then press the scroll knob button to confirm.
- Select the tracks you want to play, then press the Select button.
Set Up Media Sharing in MAC OS
Using the Radio with a MAC will require Windows File Sharing. MAC OS 9 and earlier versions of the OS will need extra software to use Windows File Sharing, but MAC OS X 10.2 and later versions have Windows File Sharing built into the OS.
Set up Windows File Sharing on a MAC
- From the 'Dock', click on 'System Preferences'. From the 'System Preferences' window, under the 'Internet & Network' section, click on 'Sharing'.
-
From the 'Sharing' window, do the following:
-
Under the 'Services' section, enable 'Personal File Sharing' and 'Windows Sharing'. In order to do this, tick the corresponding boxes or click on 'Start' for each of these services.
• Under the 'Firewall' section, switch off the firewall.
• Under the 'Internet' section, switch off 'Internet Sharing'.
Accounts Setup
- From the 'System Preferences' window, in the 'System' section, click on 'Accounts'. Select an account and remember its 'Short Name' and password. This will be used for the Radio to connect to the MAC.
Directory Setup
- From the 'Dock', click on 'Finder'. From 'Finder', click on 'Applications' then 'Utilities'. Click on 'More Info' for 'Directory Access' and ensure that the 'Read/Write' option is enabled. Double-click on 'Directory Access' and enable the following:
- AppleTalk
- LDAPv3
- SLP
-
SMB/CIFS
-
For 'SMB/CIFS', click on 'Configure' and select an appropriate workgroup.
- Copy and paste the mp3 files to 'Documents' in the 'Finder' window.
- Turn on 'AirPort' (wireless sharing).
- Wait for a few minutes.
In the 'Media Player' > 'Windows Shares' menu, enter the MAC account's short name and password. The Radio should then be able to connect the MAC.
Troubleshooting
If you experience any trouble with your wireless Internet Radio, then you may find it useful to visit the help section on our webpage: http://www.wifiRadio-frontier.com
If you have trouble connecting the Radio to your wireless network, these steps may help to resolve the problem:
-
Confirm that a Wi-Fi connected PC can access the Internet (i.e. can browse the web) using the same network.
-
Check that a DHCP server is available, or that you have configured a static IP address on the Radio. You can configure a static IP address on the Radio using the menu item 'System setup -> Internet setup -> Manual setting-> Wireless', and then select 'DHCP disable'.
-
Check that your access point does not restrict connections to particular MAC addresses. You can view the Radio's MAC address using the menu item 'System setup -> Internet setup -> View setting-> MAC address'.
-
If you have an encrypted network, check that you have entered the correct key or password into the Radio. Remember that text-format keys are case sensitive. If, when attempting to connect to an encrypted network, your Radio displays: 'Wireless error' followed by a 5-digit number, then please ensure that you enter the correct passphrase for the network. If the problem persists, then you may need to consult your network configuration.
-
If your Radio can connect to the network successfully, but is unable to play particular stations, it may be due to one of the following causes:
a. The station is not broadcasting at this time of the day (remember it may be located in a different time zone).
b. The station has reached the maximum allowed number of simultaneous listeners.
c. The station is not broadcasting anymore.
d. The link on the Radio is out of date.
e. The Internet connection between the server (often located in a different country) and you is slow.
Try using a PC to play back the stream via the broadcaster's web site.
- If you can play back the station with a PC, use the form at http://www.wifiRadio-frontier.com to notify us so that we can change the station data that is used by the Radio.
Specification
| ITEMS DESCRIPTION | |
| Specifications: Internet Radio with FM | |
| Power Requirements: | US version: AC Power Input: 120VAC, 60HZEU version: AC Power Input: 230VAC, 50HZIn use, please refer rear panel silk-screen |
| Frequency Range: | 87.5-108MHz |
| Rated Output Power: 5Wrms | |
| Speaker: 8 ohm | |
| Headphone Jack: 32 ohm | |
| Dimension: 250x 130 x 130mm | |
Trademark Information
Microsoft ^® and Windows Media ^® are either registered trademarks or trademarks of Microsoft Corporation in the United States and/or other countries.
Cobra ^® , Nothing Comes Close to a Cobra ^® and the snake design are registered trademarks of Cobra Electronics Corporation, USA.
Cobra Electronics Corporation™ is a trademark of Cobra Electronics Corporation, USA
Real and RealAudio™ are trademarks or registered trademarks of RealNetworks, Inc.
Licensing information and requirements
| ypoC deriugeR redivo | ||
| mp3 format Thomson Licensing "MPEG Layer-3 audio coding technology licensed from Fraunhofer IIS and Thomson" | ||
| MPEG-4 HE-AAC | Fraunhofer | "MPEG-4 HE-AAC audio coding technology licensed by Fraunhofer IIS.http://www.iis.fraunhofer.de/amm/" Fraunhofer Institut Integrierte Schaltungen Fraunhofer Institut Integrierte Schaltungen |
| Real Audio | RealNetworks | "This product contains software. You have the non-exclusive , non-transferable right to use this software in object code form only, solely to operate this product.Ownership of the intellectual property rights in the software in this product remains in the ownership of the party who provided it (or the respective licensor) and all of their respective rights are reservedYou are strictly forbidden from modifying, translating, reverse engineering, decompiling, disassembling or using other means to discover the source code of the software in this product or otherwise replicate the functionality of the software in this product except to the extent that this restriction is expressly prohibited by applicable law.Except where this is not possible in the territory where you purchased this product, we do not give any warranties in relation to the operation or performance of the software and neither we nor any of our suppliers or licensors shall be liable to you for indirect, special, incidental and consequential losses such as loss of profits arising out of your use of the software in this product.These terms apply to any updates to the software you may apply to the product.Portions of this software are included under license from RealNetworks, Inc. Copyright 1995-2007, RealNetworks, Inc. All rights reserved." |
| Windows Media Audio | Microsoft | "This product is protected by certain intellectual property rights of Microsoft. Use or distribution of such technology outside of this product is prohibited without a license from Microsoft." |
| Windows Media DRM 10 | Microsoft | "Content owners use Windows Media digital rights management technology (WMDRM) to protect their intellectual property, including copyrights. This device uses WMDRM software to access WMDRM-protected content. If the WMDRM software fails to protect the content, content owners may ask Microsoft to revoke the software's ability to use WMDRM to play or copy protected content. Revocation does not affect unprotected content. When you download licenses for protected content, you agree that Microsoft may include a revocation list with the licenses. Content owners may require you to upgrade WMDRM to access their content. If you decline an upgrade, you will not be able to access content that requires the upgrade." |
| Upgrades | Applicable to any upgrade | "If you download a software upgrade to your radio, additional licence terms may apply and these are available at http://www.frontier-silicon.com/audio/eula.htm"The information at this address can be replicated for use on your own website or portal but may be updated without notice |