BE-117T - Tripod Oben - Free user manual and instructions
Find the device manual for free BE-117T Oben in PDF.


| Product Type | Camera Tripod |
| Brand | Oben |
| Model | BE-117T |
| Material | Aluminum alloy |
| Maximum Height | 150 cm (59 in) |
| Minimum Height | 40 cm (15.7 in) |
| Folded Length | 45 cm (17.7 in) |
| Weight | 1.5 kg (3.3 lbs) |
| Load Capacity | 4 kg (8.8 lbs) |
| Head Type | Ball head with quick release plate |
| Leg Sections | 4 sections |
| Leg Lock Type | Flip locks |
| Bubble Level | Yes, built-in |
| Quick Release Plate | Compatible with Arca-Swiss standard |
| Compatibility | DSLR, mirrorless, camcorders |
| Stability Features | Rubber feet with retractable spiked tips |
| Care Instructions | Clean with a soft dry cloth; avoid liquid cleaners; store in a dry place |
| Safety Warning | Do not exceed load capacity; use on level surfaces; keep away from children |
| Spare Parts | Replacement quick release plates and leg locks available from Oben |
| Repairability | User-replaceable leg sections and head; professional repair recommended for complex issues |
Frequently Asked Questions - BE-117T Oben
User questions about BE-117T Oben
0 question about this device. Answer the ones you know or ask your own.
Ask a new question about this device
Download the instructions for your Tripod in PDF format for free! Find your manual BE-117T - Oben and take your electronic device back in hand. On this page are published all the documents necessary for the use of your device. BE-117T by Oben.
USER MANUAL BE-117T Oben
natural_image
Black headboard camera with red 'Oben' logo and blue adjustment knob, mounted on a red surface (no text or symbols on body)You're on steady ground™
Thank You for choosing Oben!
This sturdy Oben BE Series Dual-Action ballhead provides smooth, effortless operation. Two locks provide independent adjustment and locking of the ball and the panoramic base. A snap-in quick-release plate is included for quick, simple mounting/dismounting of the camera.
An integrated bubble level ensures accurate alignment of the camera with the horizon. The panoramic base of the ballhead allows for full 360° panning—ideal for shooting panoramic photos.
Please read through this entire manual before using the BE series ballhead.
Note: Images are for illustrative purposes only. Actual product may vary.
Key Features
Mount Ballhead To Tripod 5
Converting Mounting Thread 5
Main Locking Knob Operation 5
Mount Quick-Release Plate 6
Mount Camera
Panoramic Base
Warnings 7
natural_image
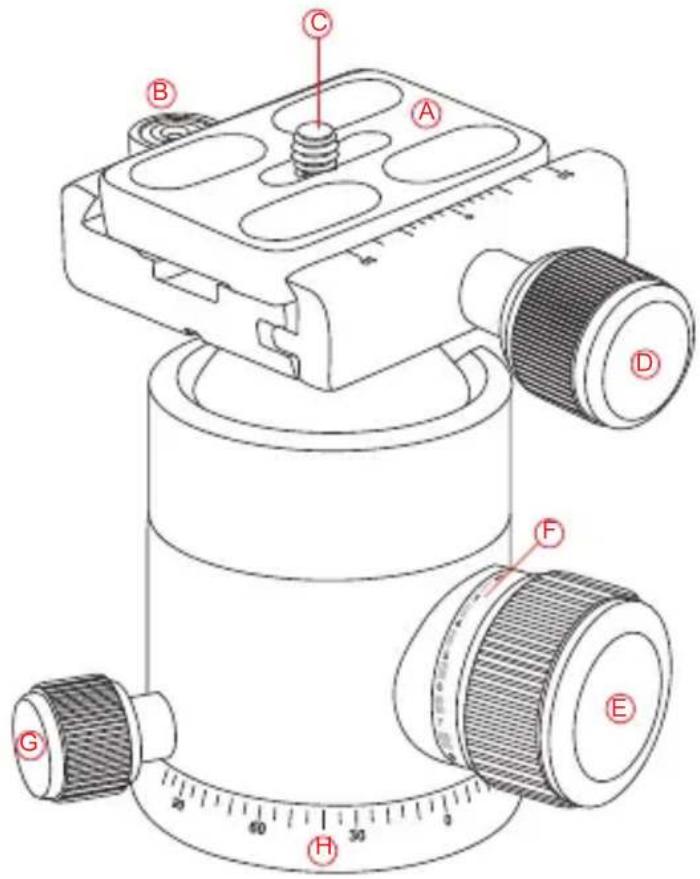
Pure technical line drawing of a mechanical part with no text or symbols(A) Quick-Release Plate
B Bubble Level
© 1/4"-20 UNC Mounting Screw
Quick-Release Knob
Main Locking Knob
Locking Index Scale
G Pan Knob
Panoramic Base With 360° Markings
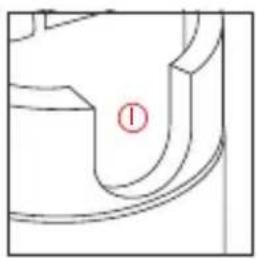
① 90^ Groove
natural_image
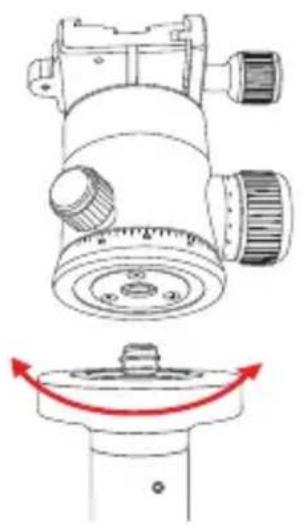
Technical line drawing of a mechanical device with a circular base and adjustment knob, showing no text or symbols.1. Mount Ballhead To Tripod
To mount the ballhead on the tripod, first tighten all of the knobs on the head. Then, being careful to properly align the tripod stud and the ballhead hole to avoid damaging them, rotate the ballhead clockwise onto the tripod, and tighten it by hand.
natural_image
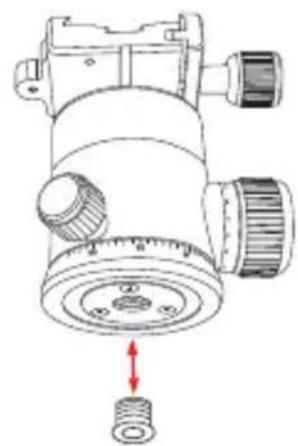
Technical line drawing of a mechanical device with a red arrow pointing to a small component (no text or symbols present)2. Converting Mounting Thread
For tripods with a 1/4" threaded mounting stud: insert the supplied Reducer Bushing into the threaded mounting hole of the head to enable a proper fit.
natural_image
Technical line drawing of a mechanical component with no visible text or symbols3. Main Locking Knob Operation
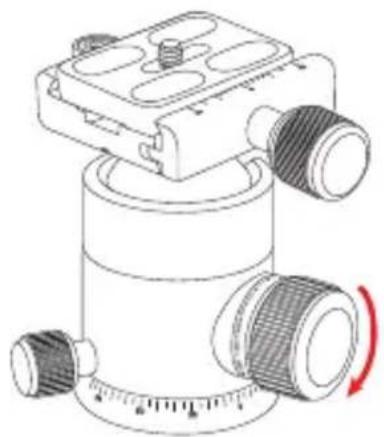
The single Locking Knob locks and unlocks the ballhead, which allows you to change the position of the camera. When changing camera position using the Locking Knob, always keep one hand on the camera. Turn the knob counterclockwise to unlock the head and clockwise to lock it. Ensure that the knob is firmly tightened before letting go of the camera.
4. Mount Quick-Release Plate
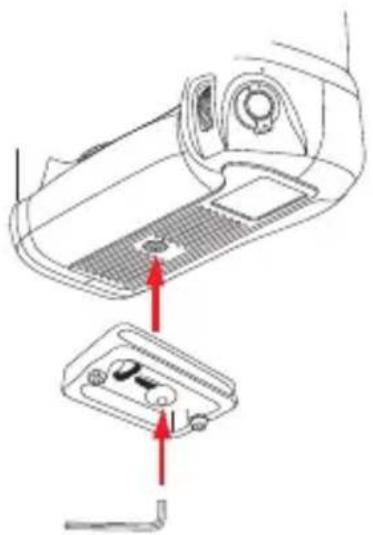
Remove the quick-release plate from the ballhead by turning the quick-release knob counterclockwise. This loosens the quick-release clamp, allowing you to remove the quick-release plate. Mount the quick-release plate to the threaded hole on the base of your camera. Use the supplied hex key to tighten the screw. The plate utilizes a 1/4"-20 screw that will fit most cameras.
natural_image
Diagram showing a device interior with a highlighted component and red arrows indicating movement (no text or symbols)Warning: Some manufacturer's plates do not meet our specifications and may not lock your equipment securely in the Oben quick-release clamp. Please test all camera and lens plates made by manufacturers other than Oben to ensure compatibility.
5. Mount Camera
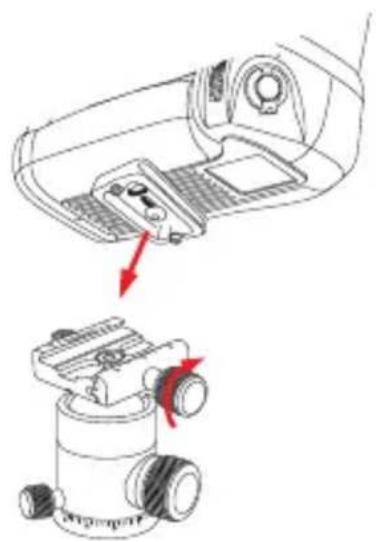
After mounting the quick-release plate to your camera, ensure that all knobs except for the quick-release knob are tightened on the ballhead. Loosen the quick-release knob by turning it counterclockwise until it stops. Mount the camera to the ballhead by sliding one edge of the quick-release plate into the ballhead, then lower the other side until the quick-release plate is lying flat in the quick-release clamp. Turn the quick-release knob clockwise to lock the plate.
natural_image
Diagram showing a mechanical device with a handle and a separate view of its internal components (no text or symbols present)Warning: Always use one hand to secure the camera while adjusting the ballhead, and ensure that the lock is engaged before letting go of the camera.
natural_image
Technical line drawing of a mechanical component with rotating dial and red motion arrows (no text or symbols)6. Panoramic Base
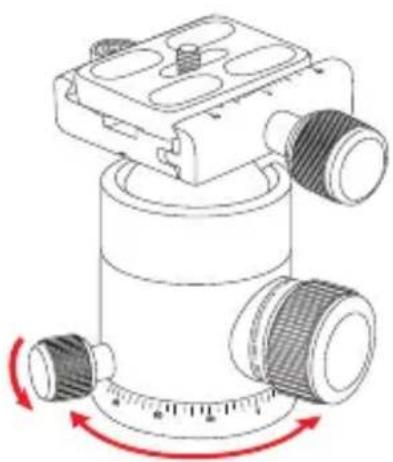
The base of the ballhead can be independently rotated 360°. The base is controlled by loosening the pan knob. This is the smallest knob, at the base of the head. Twist the knob counterclockwise to unlock the base, rotate the base to the desired position, and lock the base by turning the knob clockwise. Degree markings on the base of the ballhead can be used to accurately set up panoramic shots.

Warnings:
- Do not exceed the ballhead's maximum load capacity (see packaging for details).
- Ensure that all appropriate locks are engaged when necessary.
- Ballhead should only be used in temperatures ranging between -22^ and 140^ . Do not operate in saltwater. Dry ballhead if it becomes wet.
- Remove the camera from the ballhead during setup or transport.
- Keep out of reach of children.
Visit our website at ObenSupports.com for more Oben products.
© Copyright 2013 The Gradus Group All other trademarks are the property of their respective owners
Brand : Oben
Model : BE-117T
Category : Tripod