
SWADS-130DCM - Dash cam SWANN - Free user manual and instructions
Find the device manual for free SWADS-130DCM SWANN in PDF.


| Product Type | Dash Cam |
| Brand | Swann |
| Model | SWADS-130DCM |
| Dimensions (approx) | 5.5 x 4.0 x 2.0 cm |
| Weight | 100 g |
| Power Supply | 12V/24V car adapter via mini USB |
| Battery | Built-in rechargeable Li-ion battery |
| Video Resolution | 1920 x 1080p Full HD at 30 fps |
| Lens Angle | 140° wide angle |
| Main Functions | Loop recording, G-sensor, night vision, parking monitor, motion detection |
| Storage | Micro SD card up to 64 GB (Class 10 required) |
| Display | 2.7 inch TFT LCD |
| Mounting | Suction cup bracket; adhesive mount alternative |
| Care & Cleaning | Wipe gently with a soft, dry cloth. Avoid liquids. |
| Safety Information | Do not expose to extreme temperatures; dispose of battery properly. |
| Spare Parts / Reparability | Replacement suction cup or adhesive mount available. Battery not user-replaceable. |
| User Manual | Available for free download in PDF from notice-facile.com |
Frequently Asked Questions - SWADS-130DCM SWANN
User questions about SWADS-130DCM SWANN
0 question about this device. Answer the ones you know or ask your own.
Ask a new question about this device
Download the instructions for your Dash cam in PDF format for free! Find your manual SWADS-130DCM - SWANN and take your electronic device back in hand. On this page are published all the documents necessary for the use of your device. SWADS-130DCM by SWANN.
USER MANUAL SWADS-130DCM SWANN
Economy HD Dash Camera
Portable Vehicle Recorder

EN Instruction Manual
About this Manual
The content in this manual is for information purposes only and is subject to change without notice. While every effort is made to ensure that this manual is accurate and complete at the time of printing, no liability is assumed for any errors and omissions that may have occurred. As we're constantly making improvements to our products, firmware, software and user manuals, we reserve the right to change the information without prior notice. For the latest version of this user manual, please visit: www.swann.com
FCC Statement
This equipment has been tested and found to comply with the limits for Class B digital device, pursuant to part 15 of the FCC Rules. These limits are designed to provide reasonable protection against harmful interference in a residential installation. This equipment generates, uses and can radiate radio frequency energy and, if not installed and used in accordance with the instructions, may cause harmful interference to radio or television reception, which can be determined by turning the equipment off and on, the user is encouraged to try to correct the interference by one or more of the following measures:
- Reorient or relocate the receiving antenna
- Increase the separation between the equipment and the receiver
- Connect the equipment into an outlet on a circuit different from that to which the receiver is connected
- Consult the dealer or an experienced radio/TV technician for help
This device complies with part 15 of the FCC Rules. Operation is subject to the following two conditions: (1) This device may not cause harmful interference, and (2) This device must accept any interference received, including interference that may cause undesired operation.
FCC Caution: Any changes or modifications not expressly approved by the party responsible for compliance could void the user's authority to operate this equipment.
Disposal and Recycling Information

This symbol on the product or on the packaging indicates that this can not be disposed of as a household waste. You must dispose of your waste equipment and/or battery by handling it over to the applicable take-back scheme for the recycling of electrical and electronic equipment and/or battery. For more information about recycling of this equipment and/or battery, please contact your city office, the shop where you purchased the equipment or your household waste disposal service. The recycling of materials will help to conserve natural resources and ensure that it is recycled in a manner that protects human health and environment.
CE Regulatory Notice
This equipment complies with the requirements set out in the Council Directives on the Approximation of the Laws of the Member States relating Electromagnetic Compatibility of Radio and Telecom device (1995/5/EC); the Low Voltage Directive (2006/95/EC); the Restriction of The Use of Certain Hazardous Substances in Electrical And Electronic Equipment Directive (2002/95/EC), Turkish EEE Directive; the Commission Regulation (EC) No 1275/2008 implementing Directive 2005/32/EC of the European Parliament and of the Council with regard to eco-design requirements for standby and off mode electric power consumption of electrical and electronic household and office equipment, and the Directive 2009/125/EC of the European parliament and of the council establishing a framework for the setting of eco-design requirements for energy-related products.
Limited Warranty Terms & Conditions
Swann Communications warrants this product against defects in workmanship and material for a period of one (1) year from it's original purchase date. You must present your receipt as proof of date of purchase for warranty validation. Any unit which proves defective during the stated period will be repaired without charge for parts or labour or replaced at the sole discretion of Swann. The end user is responsible for all freight charges incurred to send the product to Swann's repair centres. The end user is responsible for all shipping costs incurred when shipping from and to any country other than the country of origin.
The warranty does not cover any incidental, accidental or consequential damages arising from the use of or the inability to use this product. Any costs associated with the fitting or removal of this product by a tradesman or other person or any other costs associated with its use are the responsibility of the end user. This warranty applies to the original purchaser of the product only and is not transferable to any third party. Unauthorized end user or third party modifications to any component or evidence of misuse or abuse of the device will render all warranties void.
By law some countries do not allow limitations on certain exclusions in this warranty. Where applicable by local laws, regulations and legal rights will take precedence.
For Australia: Our goods come with guarantees which cannot be excluded under Australian Consumer Law. You are entitled to a replacement or refund for a major failure and for compensation for any other reasonably foreseeable loss or damage. You are also entitled to have the goods repaired or replaced if the goods fail to be of acceptable quality and the failure does not amount to major failure.
GETTING STARTED
Camera Overview


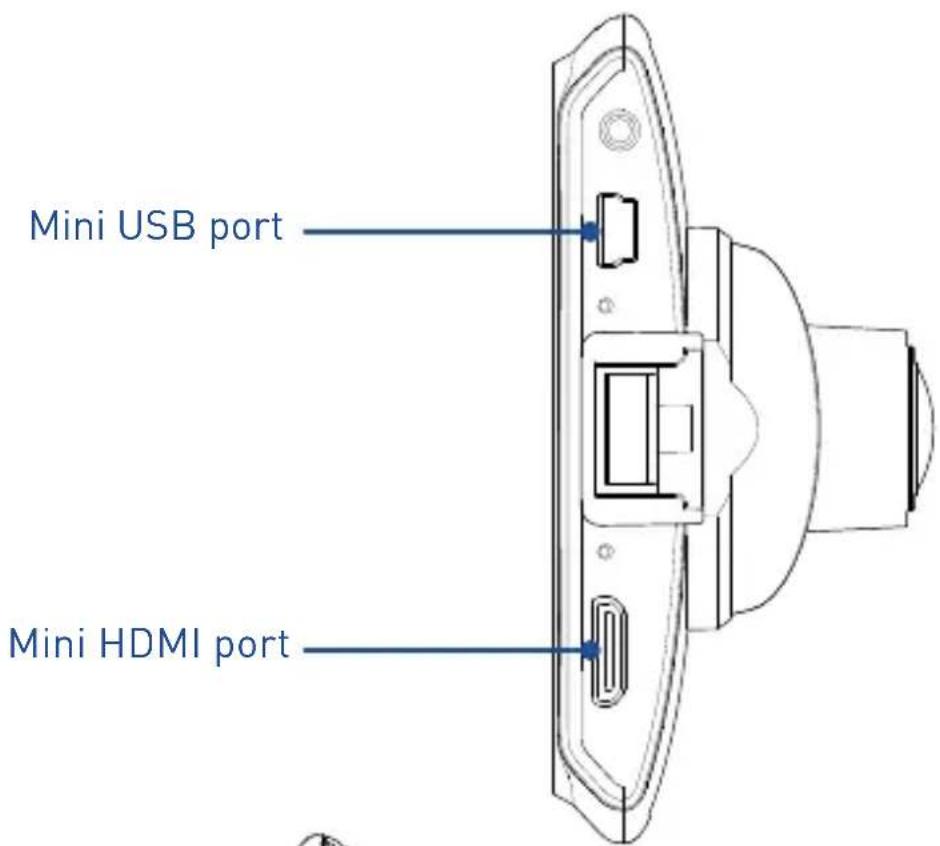

Camera Setup
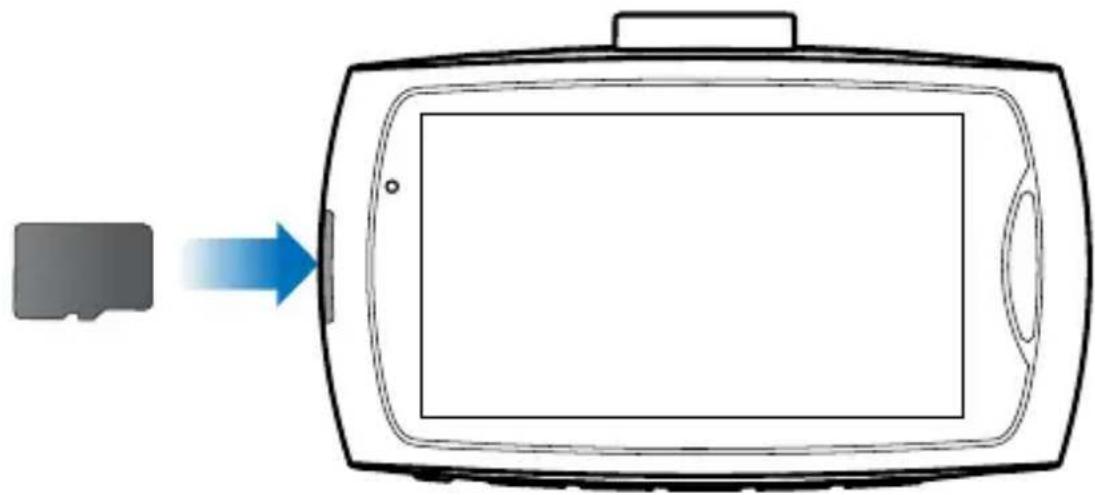
1 Insert a MicroSD memory card
Before you can record and store videos and photos on the camera, insert a MicroSD memory card into the MicroSD slot as shown below.
Notes
- The camera supports microSD cards of up to 32GB in capacity. To ensure smooth performance and plenty of room for recording long journeys, we recommend using a memory card rated class 6 or above, with at least 8GB in capacity.
- We do not guarantee compatibility with microSD cards from all manufacturers. Only use good quality microSD cards from reliable sources.
- We recommend formatting the microSD card in the camera before first using it. Go to System Settings > Format. Formatting permanently deletes all data on the memory card, so be sure to copy the data you want to keep to another storage device before starting.
2 Mount to vehicle
Attach the camera to your vehicle's windshield with the included suction mount.
- Slide the camera onto the suction mount tab.
- Remove the clear protective film from the suction cup and press the suction cup against the windshield, flipping the locking lever up so the suction mount is locked into place.

Notes
- Never install the camera in a location that will block your view of the road, interfere with the mirror or controls, or obstruct the airbag.
- To obtain the best open-field view, install the camera above the center of the dashboard near the rear-view mirror.
- Clean the windshield area where you will be mounting the camera with an alcohol/cleaning wipe before attaching the suction mount.
- Remove the clear piece of film covering the camera lens.
- Do not touch the camera lens with your fingers. Finger grease may be left on the lens and will result in unclear videos or snapshots. Clean the lens on a regular basis.
- When adjusting viewing angle, aim the camera slightly towards the ground with less sky in view to reduce lens glare when your vehicle is facing the sun.
3 Connect to power
Plug the supplied car charger into the cigarette lighter socket in your vehicle, and then connect to the mini USB port on the camera.
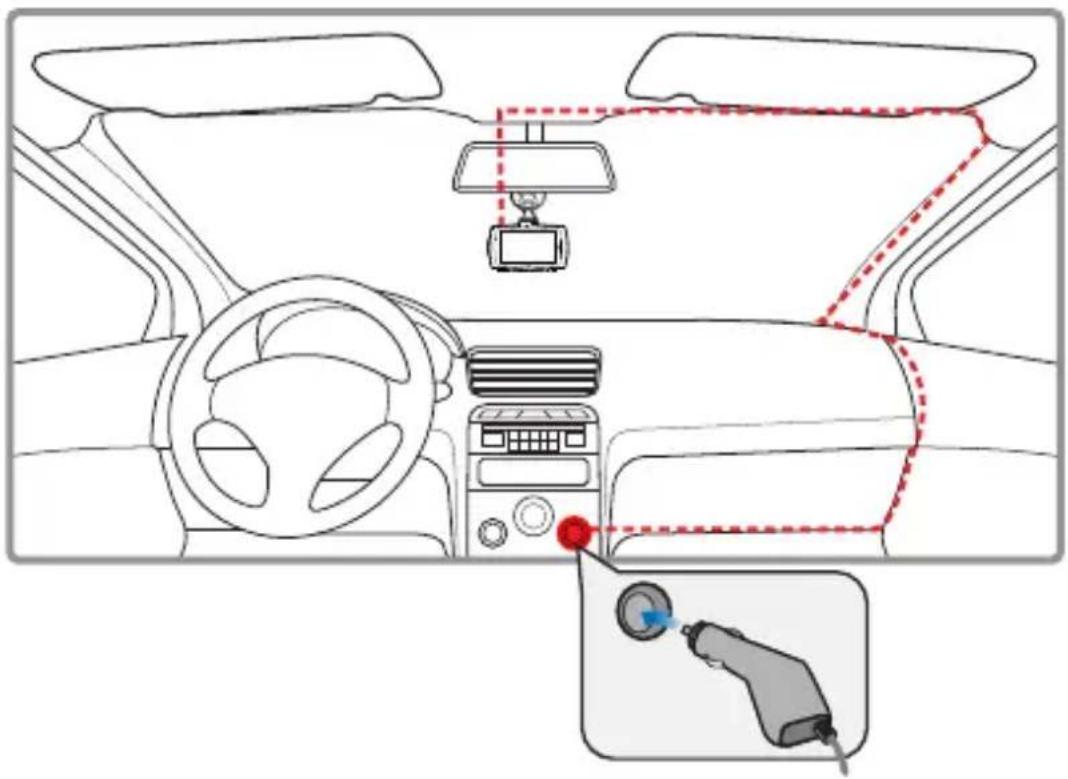
Your camera turns on and off automatically with the start and stop of your vehicle engine. See "Turning on and off" on page 9.
Note: Use cable clips (not included) to secure the power cable and keep it neatly tucked out of the way.
OPERATING BASICS
Turning on and off
- Starting the engine will automatically turn on the camera that is connected via the cigarette lighter socket.
- The camera goes into Video mode and starts recording immediately after it powers up.
- Once you have reached your destination and the engine stops, the camera will record for another 15 seconds before powering off.
- The camera can also be manually powered using its built-in rechargeable battery. Press the Power button to turn the camera on. To turn the camera off manually, press and hold the Power button for 2 seconds.
Accessing camera settings
- Press the Menu button to access Video Settings in Video mode or Photo Settings in Photo mode. To access System Settings, press the MENU button again.
- To move through settings, press the Left or Right button. To adjust a setting, press the OK button. To exit the menu, press the MODE button.
Note: Be sure to set the date and time before using the camera for the first time. Go to System Settings > Date/Time.
Switching modes
- Press the MODE button to switch between Video, Photo and Playback modes.
Note: You cannot access the menu or change modes while the camera is recording. You will need to stop recording first by pressing the OK button.
Connecting to a computer
You can transfer your HD video recordings and photos on the memory card to a computer. Use the short USB data cable included with the camera to make the connection.
The first time you use a USB connection, your computer will install the appropriate USB drivers. Once the camera has successfully connected to your computer via the USB data cable, you can select the appropriate USB mode from the following options displayed on the camera screen:
- Mass Storage - Lets you use the camera as a USB mass storage device, and transfer videos and photos from the memory card folders to your computer.
- PC Camera - Lets you set up the camera as a webcam for if you use a video conferencing app on your computer.
Connecting to a TV
You can see your HD video recordings and photos on your HD TV or monitor. Simply connect a compatible HDMI cable (not included) from the HDMI port on the camera to the HDMI port on your TV.
Note: Use a cable with a mini HDMI connector on one end for the camera, and a standard HDMI connector on the other end for your TV.

Video Mode
The camera automatically starts capturing HD (High-Definition) quality videos once it powers up in your vehicle.
Loop recording
- By default, loop recording is enabled whereby the camera continuously records video clips in 1 minute intervals and automatically overwrites the oldest, non-protected video files for new recordings when the memory card is full.
The 📄 icon appears on the screen with the number in the icon indicating the length of each video clip recording.
- You can change the length of each video clip or even turn off loop recording completely. Go to Video Settings > Loop recording.
- The icon appears on the screen and the camera status LED starts blinking while the camera is recording.
- You can manually stop an ongoing recording by pressing the OK button. Check the time label icon on the screen to see how much recording time is available based on the current video quality setting. To start a new recording, press the OK button.
Video protection
- If you have just captured something important on the camera and want to immediately protect the current video clip, simply press the LOCK button. The icon appears on the screen, indicating the current video clip recording has been locked.
- By default, the camera is set to detect collisions and hard brakings using its integrated G-sensor, automatically locking the current video clip in the loop recording in the process if such event occurs. You can configure the sensitivity level of the G-sensor. Go to Video Settings > Gsensor.
Audio recording
- By default, ambient sounds are automatically recorded through the camera's built-in microphone. You can turn off audio recording by pressing the Left button. The
icon appears on the screen when audio recording is disabled.

Photo Mode
In addition to HD video recording, you can also use the camera to capture super clear photos wherever you go.
Taking photos
To take a photo, press the OK button. The status LED blinks.


Playback Mode
In Playback mode, you can browse, view and manage video clips and photos that the camera have stored on the memory card.
- Use the Left and Right buttons to move through items arranged in chronological order. Video clips are marked
with the icon, while photos are marked with the icon. Any video clip that is protected will also display the icon on the screen.
- To play a video clip, press the OK button. During playback, you can pause the video by pressing the OK button again.
- To delete video clips or photos, press the MENU button, select Delete and choose one of the following options: Delete Current Delete All
- To protect or unprotect video clips, press the MENU button, select Protect and choose one of the following options: Lock Current Unlock Current Lock All Unlock all

Note:
- Protected video clips cannot be deleted. Remove file protection from the video clip first.
- Deleted video clips and photos cannot be recovered. Copy important files to a computer or other storage device before deleting them. See "Connecting to a computer" on page 10.
Video Settings
| Options |
| Resolution Select the quality of the video clips.Higher resolution videos show more detail, but take up more memory space. |
| Loop recording Select the length of each video clip in loop recording. |
| Exposure Change the exposure value. In low-light road conditions, use a higher exposure to improve video brightness. |
| Motion Detection Turn on or off Motion Detection recording.When enabled, the icon appears on the screen. The camera will automatically record a 10-second video clip each time any movement is visible.To deactivate Motion Detection recording, press the OK button. |
| Record Audio Turn on or off audio recording. You can also do this by pressing the Left button in Video mode. The icon appears on the screen when audio recording is disabled. |
| Date Stamp Select whether to embed the current date and time in the video clips. |
Options
Gsensor The G-sensor in the camera tracks motion and is designed to respond to sudden movements such as collisions and hard brakings by prompting the camera to automatically lock the current video clip of an ongoing recording. The lower the level, the more sensitive the camera is to movement. The G-sensor is enabled by default, but can also be turned "OFF", if necessary.
LDW Lane Departure Warning feature. When enabled, the camera monitors lane markings on the road and will beep to let you know if you drift too close to these markings.
Photo Settings
| Options |
| Resolution Select the size of the captured photos in megapixels. |
| Sequence When this feature is enabled, the camera captures a sequence of 5 continuous photos each time you press the OK button. |
| Quality Relates to the level of compression in the captured photos. For best quality photos, the "Fine" setting is recommended. |
| Sharpness Select the clarity of detail and edges in the captured photos. |
| White Balance Choose from a selection of preset white balance options to adjust screen color and help you obtain the most accurate reproduction of color tone in the scene. |
| ISO Select the camera's sensitivity to light.In general, use a higher ISO setting when taking photos in a low-light scene. |
| Exposure Change the exposure value. In low-light scenes, use a higher exposure to improve photo brightness. |
| Anti-Shaking Turn on or off the Anti-Shaking feature.Anti-Shaking helps reduce image blur in low-light scenes caused by hand shaking. |
| Quick Review Select how long to display a photo on the screen after it is taken. |
| Date Stamp Select whether to embed the date and time or only the date in the photos so that you know when they were taken. |
System Settings
Options
Park mode Select the sensitivity level of the G-sensor that is used to trigger Park Mode (P) recording. This feature is handy when you want to keep your vehicle protected while it's parked and the camera is off.
Note: Depending on how long your vehicle will be parked, you may need a backup power bank and a separate USB charging cable to keep the camera ready to record throughout the time your vehicle is parked.
In Park Mode, the camera will automatically turn on and record a 20-second video clip if any movement is detected based on the G-sensor sensitivity level selected.
Date/Time Set the current date and time, and the date format.
Auto power off Select whether you want the camera to turn off automatically when not being used. The default setting is 3 minutes.
Screen Saver Select how long the screen remains on after you press any button. To turn screen back on after it goes off, press the Right button.
Beep Sound Turn on or off the sound that is heard when pressing the camera buttons.
Language Select the menu language.
Options
| TV Mode If you are outputting the camera display to your TV via the HDMI port, you will need to select the video standard (PAL or NTSC) in your location. |
| Frequency If you are outputting the camera display to your TV via the HDMI port, you will need to select the frequency of AC power in your location to prevent your TV from flickering. |
| Flash Activate or deactivate the infrared LEDs on the front of the camera. You can also do this by pressing the Power button in either Video or Photo mode. The icon appears on the screen when the infrared LEDs are active.The 6 infrared LEDs may help short distance objects look clearer during night time recording or photography. When there is little or no ambient light, the picture will appear in black and white. |
| Format Format the microSD memory card in the camera. When you format a memory card, all files on the card will be permanently deleted. |
| Default Setting Restore camera settings back to factory default values. |
| Version Display the camera firmware version. |
NOTES
Helpdesk / Technical Support Details
Swann Technical Support
All Countries E-mail: tech@swann.com
Telephone Helpdesk
USA 1800 627 2799
USA Parts & Warranty 1800 627 2799
(M-F, 9am-5pm US PT)
AUSTRALIA 1800 788 210
NEW ZEALAND 0800 479 266
UK 0808 168 9031
- ECONOMY HD DASH CAMERA
- ABOUT THIS MANUAL
- FCC STATEMENT
- DISPOSAL AND RECYCLING INFORMATION
- CE REGULATORY NOTICE
- LIMITED WARRANTY TERMS & CONDITIONS
- GETTING STARTED
- CAMERA SETUP
- 1 INSERT A MICROSD MEMORY CARD
- NOTES
- 2 MOUNT TO VEHICLE
- 3 CONNECT TO POWER
- OPERATING BASICS
- TURNING ON AND OFF
- ACCESSING CAMERA SETTINGS
- SWITCHING MODES
- CONNECTING TO A COMPUTER
- CONNECTING TO A TV
- VIDEO MODE
- LOOP RECORDING
- VIDEO PROTECTION
- AUDIO RECORDING
- PHOTO MODE
- TAKING PHOTOS
- PLAYBACK MODE
- NOTE
- OPTIONS
- SYSTEM SETTINGS
- HELPDESK / TECHNICAL SUPPORT DETAILS
- SWANN TECHNICAL SUPPORT
- TELEPHONE HELPDESK
Brand : SWANN
Model : SWADS-130DCM
Category : Dash cam