
Face-2-Face - Teleprompter Glide Gear - Free user manual and instructions
Find the device manual for free Face-2-Face Glide Gear in PDF.


| Brand | Glide Gear |
| Model | Face-2-Face |
| Product Type | Interview Tripod with Center Column |
| Maximum Height | 67 inches (170 cm) |
| Minimum Height | 28 inches (71 cm) |
| Folded Length | 33 inches (84 cm) |
| Weight Capacity | 10 lbs (4.5 kg) |
| Weight | 8.5 lbs (3.9 kg) |
| Material | Aluminum alloy |
| Leg Sections | 3 |
| Leg Locks | Flip-lock levers |
| Feet | Rubber with retractable spikes |
| Bubble Level | Yes, on center column |
| Head Type | Fluid pan head (included) |
| Quick Release Plate | Yes, standard 1/4-20 screw |
| Compatibility | Cameras up to DSLR/mirrorless with cage |
| Warranty | 1 year limited |
| Included Accessories | Carrying bag, hex key, manual |
| Cleaning | Wipe with dry cloth; avoid solvents |
| Safety | Do not exceed weight capacity; tighten all knobs |
Frequently Asked Questions - Face-2-Face Glide Gear
User questions about Face-2-Face Glide Gear
0 question about this device. Answer the ones you know or ask your own.
Ask a new question about this device
Download the instructions for your Teleprompter in PDF format for free! Find your manual Face-2-Face - Glide Gear and take your electronic device back in hand. On this page are published all the documents necessary for the use of your device. Face-2-Face by Glide Gear.
USER MANUAL Face-2-Face Glide Gear
FACE-2-FACE Periscope Teleprompter USER MANUAL

Periscope Setup Teleprompter Setup
For more information please visit our website: www.glidegear.net

FACE-2-FACE CONFIGURATIONS
The Face-2-Face Teleprompter can be used as:
- A classic teleprompter: look straight at the camera and read the text reflected on the beam splitter glass.
Use this configuration to get your classic news anchor shot. - A Periscope teleprompter: look straight the camera while looking straight at the person talking to you.
Use this configuration to get a direct connection between the interviewee and the interviewer and achieve a very strong personal effect between the viewers and the person on screen.
Periscope Setup
- Compatible with any DSLR cameras.
- Adjust the distance between the beam splitter glass and the camera to accommodate most of the lenses.
For better results: - Adjust the height of the camera to be leveled with the eyes of the interviewee.
- Mount LED light facing the interviewee and the interviewer on top of the teleprompter
Teleprompter Setup
- Compatible with any smart phones
- Compatible with tablet with a width no greater than 18 cm or 7"
• 3 m or 10 ft reading range - Cover the camera with the supplied black cloth for a more visible reflection on the beam splitter glass.
WARNING: When the Face-2-Face is mounted on a tripod, we recommend using a tripod rated for a minimum capacity of 25 lbs or 12 kg

FACE-2-FACE ASSEMBLY
Prior to using the Face-2-Face Prompter, you will need to assemble the beam splitter glass on the main frame.
To do so:

Slide the beam splitter glass into the frame through the opening on the opposite side of the camera.
Warning: The beam splitter glass needs to be in the correct orientation. The yellow sticker on the glass frame needs to be facing the camera.

Use the 2 supplied thumb screws to lock the beam splitter glass in place to the top of the Face-2-Face.

natural_image
Isometric line drawing of a rectangular frame with mounting holes and bolt holes (no text or symbols)

PERISCOPE CONFIGURATION
Overall Layout
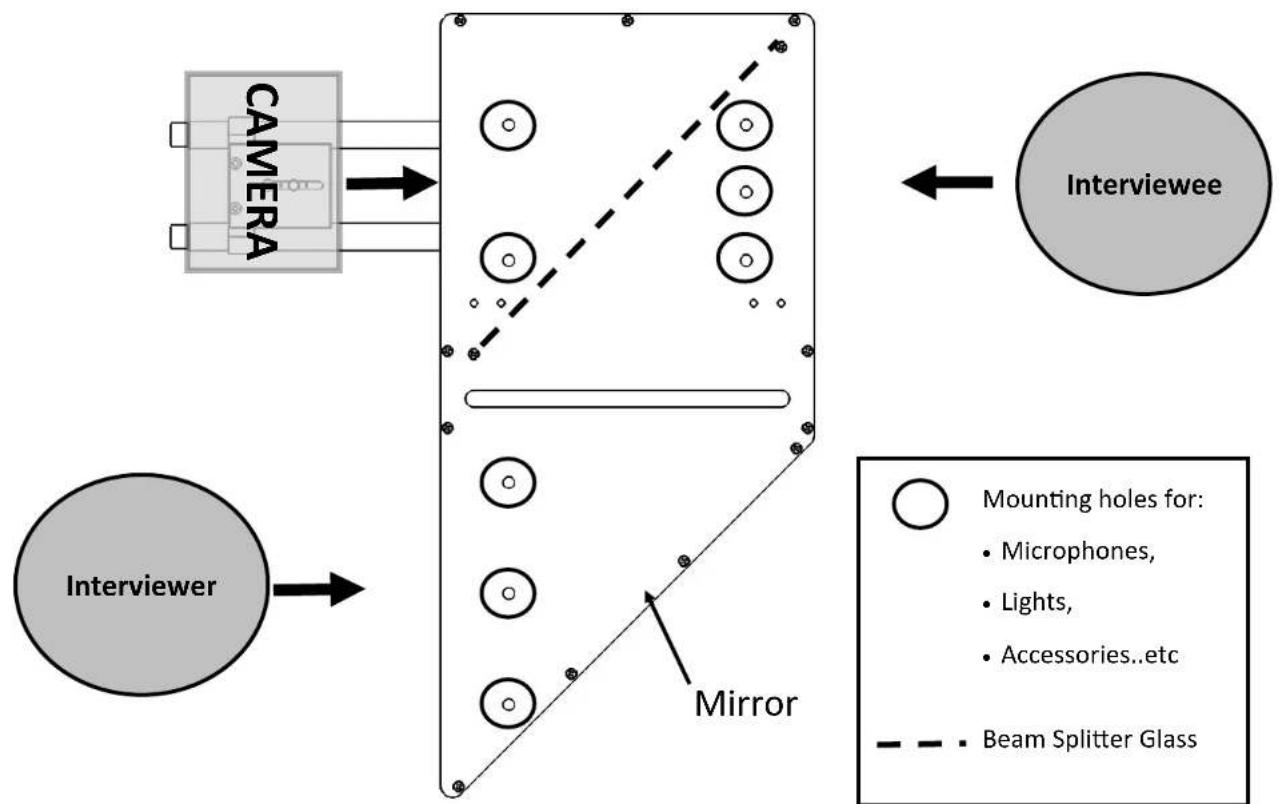
flowchart
graph TD
    A["CAMERA"] --> B["Mirror"]
    C["Interviewer"] --> B
    B --> D["Beam Splitter Glass"]
    D --> E["Interviewee"]
    style A fill:#ccc,stroke:#333
    style C fill:#ccc,stroke:#333
    style B fill:#999,stroke:#333
    style D fill:#ccc,stroke:#333

PERISCOPE CONFIGURATION
1
- Insert the rails into the clamp already mounted at the bottom of the tele-prompter.
- Mount the riser onto the rails.
• Use the riser the move your camera back and forward.
2
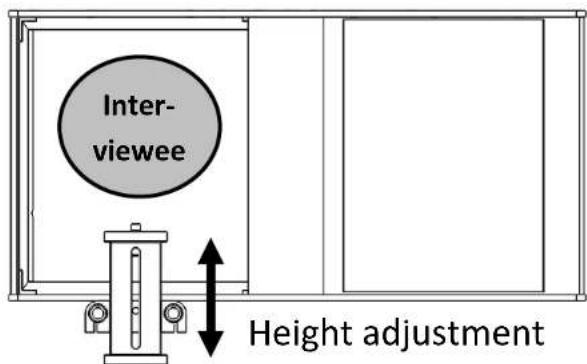

- Mount your camera onto the riser plate.
- Adjust the height of the rise so that you camera lens is aligned with the interviewee's eyes.

TELEPROMPTER CONFIGURATION
Overall Layout

flowchart
graph TD
    A["CAMERA"] --> B["Tablet/Cellphone"]
    B --> C["Mirror"]
    D["Speaker"] --> E["Beam Splitter Glass"]
    style A fill:#f9f,stroke:#333
    style B fill:#ccf,stroke:#333
    style C fill:#cfc,stroke:#333
    style D fill:#fcc,stroke:#333
    style E fill:#ffc,stroke:#333

TELEPROMPTER CONFIGURATION
Cellphone Tablet
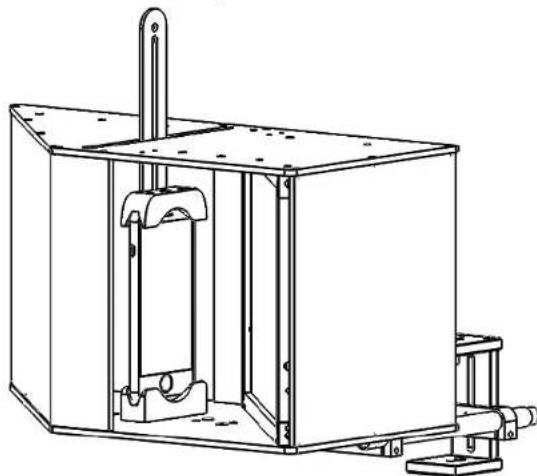
natural_image
Technical line drawing of a mechanical device with internal components and mounting bracket (no text or symbols)When using a cellphone:
- Place cellphone in a portrait or landscape orientation in the supplied holder.
- Insert the holder through the slot on the top of the teleprompter.
• The Phone must be facing the beam splitter glass.

natural_image
Technical line drawing of a rectangular industrial cabinet with mounting bracket and side-mounted frame (no text or symbols)When using a tablet:
- Insert the tablet in a portrait through the slot on the top of the teleprompter.
• The tablet must be facing the beam splitter glass.
Brand : Glide Gear
Model : Face-2-Face
Category : Teleprompter