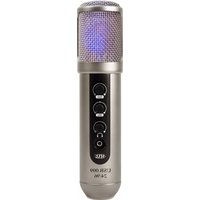
USB.009 - Microphone MXL - Free user manual and instructions
Find the device manual for free USB.009 MXL in PDF.


| Product Type | USB Condenser Microphone |
| Polar Pattern | Cardioid |
| Capsule | 32mm Pressure Gradient Condenser |
| Diaphragm | Gold-sputtered |
| A/D & D/A Conversion | 24-bit, up to 96 kHz |
| Dynamic Range | 114 dB |
| THD+N | -100 dB |
| USB Compatibility | USB 1.1 and 2.0 |
| Power Source | USB bus-powered (no external supply) |
| Headphone Output | 1/8-inch stereo jack with adjustable volume |
| Gain Control | Analog knob for record level |
| Mix Control | Balance between computer playback and live signal (center detent) |
| LED Indicator | Blue capsule illumination when powered |
| Included Cable | 10-foot USB 2.0 high speed cable |
| Included Stand | Desktop microphone stand with mount adapter |
| Included Case | Protective carrying case |
| Operating System Compatibility | Windows and Mac, plug and play |
| Warranty | 3 years against defects in material and workmanship |
| Recommended Recording Distance | 4-6 inches from sound source |
| Handling Precautions | Avoid shocks, tapping, or blowing into capsule; use pop filter |
Frequently Asked Questions - USB.009 MXL
User questions about USB.009 MXL
0 question about this device. Answer the ones you know or ask your own.
Ask a new question about this device
Download the instructions for your Microphone in PDF format for free! Find your manual USB.009 - MXL and take your electronic device back in hand. On this page are published all the documents necessary for the use of your device. USB.009 by MXL.
USER MANUAL USB.009 MXL
natural_image
Exterior view of a studio microphone setup with a silver case and blue cloth (no signage)C and thank you for purchasing the MXL ^ USB.009 microphone. With up to 24-bit, 96 kHz recording capability, and 114 dB dynamic range, you will be able to achieve the highest level of sonic detail while maintaining the simplest of recording setups. The latest advances in digital technology, along with years of research, have enabled MXL ^ 's engineering team to produce the audio quality normally found in expensive, high-end multi-channel computer interfaces within the body of this microphone.
Producing a feature rich USB microphone solution for the professional Broadcast and music industries meant no compromises on quality. Because of this, hand selecting the best components for the USB.009 was very important. At MXL ^® , we know that with audio, no matter how good specs may look on paper, your ears are the final judge.
Recording the best tracks demands a great mix with zero latency monitoring. The MXL® USB.009 delivers with rotary knobs that enable you to dial in the perfect mix. When it's time to listen back to the tracks you've recorded, or even just listen to the latest CD you've purchased, the MXL® USB.009 will dazzle with its amazing detail and punch. What this means for you is a simple, feature-rich, elegant all-in-one recording solution that is completely professional.
MXL® USB.009 Features
• 24-bit A/D and D/A converters with up to 96 KHz recording capability
• 114 dB dynamic range, -100 dB THD+N
• 32mm pressure gradient condenser capsule
• Gold-sputtered diaphragm
- Cardioid polar pattern
• USB 1.1 and 2.0 compatible
• Zero latency monitoring
- Mix control adjusts balance between playback and live signals
• Analog gain control adjusts live microphone record level
• 1/8-inch stereo headphone jack with adjustable volume control
- Plug and Play with no special drivers* preamps, mixers or any other external devices required.
- Blue LED capsule illumination signifies microphone is powered and active
• USB powered – no external power supply required
* To optimize the performance of the MXL® USB.009 with windows we Recommend downloading and using the free Asio4All driver from www.ASIO4ALL.com
Instrument Handling
The MXL ^® USB mics are a professional quality, cardioid condenser studio microphone designed specifically for recording. Unlike microphones designed for live performance or lesser dynamic model microphones, this instrument requires careful handling. Hence, you should observe the following:
ALWAYS... handle the microphone carefully, avoiding sudden shocks such as dropping or bumping the microphone into other objects.
ALWAYS... maintain a distance of approximately 4 - 6 inches when speaking or singing into the microphone. You are encouraged to use a pop filter for added protection of the sensitive capsule and to shield the instrument from saliva and sudden bursts of air.
NEVER... tap the microphone to check if it's working. The BLUE LED behind the microphone's protective grill will tell you it's on and that the correct side is facing you.
NEVER... blow into the microphone to check if it's working. The BLUE LED behind the microphone's protective grill will tell you it's on and that the correct side is facing you.
By following these few basic handling procedures, you can expect a long and trouble-free relationship with your new microphone. Again, thank you for your purchase of this outstanding MXL ^® microphone.
A Little Background Information
MXL ^® condenser microphones use what is known as a cardioid pickup pattern, which is more sensitive to sound waves arriving at the front of the microphone as opposed to those arriving from the sides or rear. Unlike other MXL ^® models, this microphone benefits from being a USB (Universal Serial Bus) device—meaning this is a plug and play microphone that will interface with Windows and Macintosh computers without the need for any special drivers. As a USB device, it carries the added benefit of not requiring an external microphone preamp, as is the case with most condenser microphones.
We've already mentioned the importance of proper handling, but should you find yourself recording an outdoor performance, you would be well advised to use a windscreen as protection for your microphone.
Unpack Your Microphone
Begin by examining the contents of your MXL ^® USB.009 kit.
You should have the following components:
- Protective case
• One MXL® USB.009 microphone
• A 10-foot USB 2.0 high speed cable
• A desktop microphone stand
- Microphone stand mount adapter
- Owners manual
• Microphone applications guide
Using the Supplied Desktop Microphone Stand
- Screw the microphone stand mount to the desktop stand & place it on a flat surface.
- While holding the microphone upright and firmly in one hand, secure the microphone to the desktop stand by screwing the black mounting ring into the microphone's base. The microphone should now sit securely in the desktop stand.
- Adjustments can be made to the angle of the microphone by loosening the thumbscrew on the side of the stand adapter.
- At this point, attach the end of the USB cable that matches the microphone's connector. The other end of the cable will connect to your computer's USB port.
Getting Familiar With Your Microphone
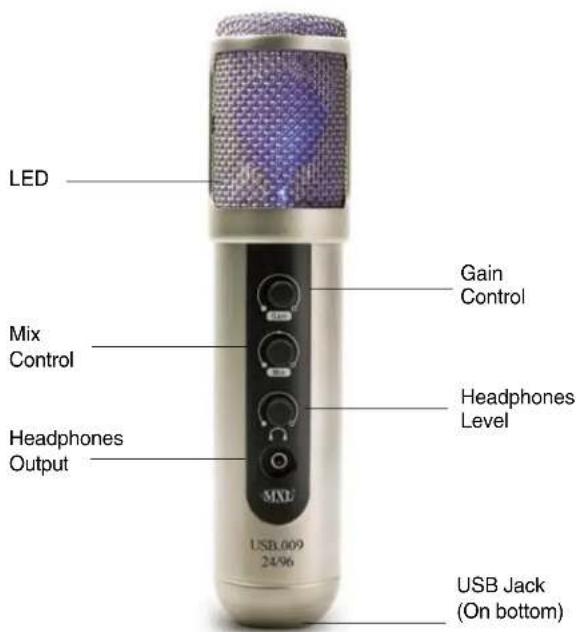
Blue Power LED
The capsule is illuminated by a bright blue LED when the microphone is connected to USB power and functioning correctly.
USB Connection
The square end of the USB cable plugs in here. The microphone is setup to be backwards compatible with USB 1.1 and 2.0. It is not recommended to plug the microphone into a hub, as this could potentially limit the power and audio bandwidth the microphone needs to operate.
Gain Control
Use this variable knob to control the record level of the microphone into the computer. This control changes the analog signal before A/D converter.
Mix Control
The Mix control provides a balance between computer playback and the live microphone signal. This variable
knob has a center detent denoting an even balance. When the knob is fully left, only the direct microphone signal will be present in the headphones.
Likewise, when the knob is all the way right, the computer playback will be all that is heard.
Headphones Level
A variable knob provides an overall volume control for stereo headphones. Always turn this knob all the way counterclockwise before using the microphone. Slowly bring the volume up while listening to yourself or recorded material to find the correct level.
Headphone Output
1/8-inch stereo headphone input accepts most headphones.
Maximum headphone volume will vary by manufacturer and model, so care should always be exercised when plugging in.
Connecting the Microphone to Your Computer (Windows)
The MXL® USB.009 microphone will operate with both USB 2.0 (high speed USB) and USB 1.1 data buses. We recommend you connect your microphone directly to the computer's USB port as opposed to using a USB hub. USB hubs have been known to interfere with the performance of various USB devices.
PLEASE NOTE: Audio and video recording can be very taxing to a computer's resources. For this reason, you should close any and all running applications that are non-essential. Please take the following steps to get connected:
If open, close your audio recording application. You will open it after the 1. microphone is connected and operational.
The other end should fit easily into the bottom of the microphone.2.
The blue LED should now illuminate the capsule beneath the grill.3.
Your computer will display a message, usually in the lower right corner of the screen, indicating New Hardware Found.
* To optimize the performance of the MXL® USB.009 with windows we recommend downloading and using the free Asio4All driver from www.ASIO4ALL.com
Initial Setup with Windows XP
- To select the MXL® USB.009 microphone as the default audio device go to the Start Menu and select Control Panel.

- Select Sounds and Audio Devices.

- Click on the Audio tab and select MXL® USB.009 as the default device for Sound playback and Sound Recording.
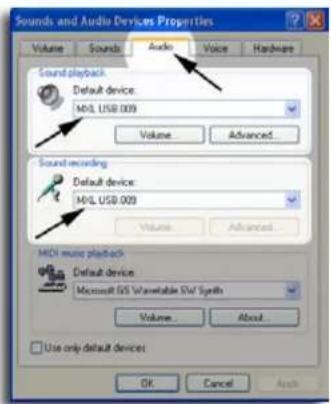
- To adjust the output volume from the computer click on the Volume button under Sound playback. * You will notice the volume control under sound recording is grayed out. This is because the volume control is on the front of the microphone.
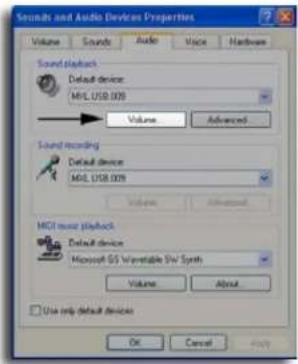
- The master volume output can be changed by moving the Speaker fader up or down.
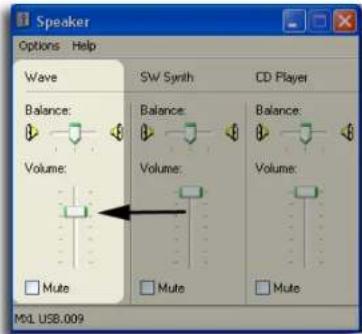
Your computer is now setup to use the MXL® USB.009 microphone with most recording applications. Some applications will require additional settings to be changed within the program. Please see your recording software's manual for proper setup.
Initial Setup with Windows Vista
- To select the MXL® USB.009 microphone as the default audio device, go to the Start Menu and select Control Panel.

- Double click the Sound icon.

- Select the Playback tab. Highlight the speaker icon labeled as MXL® USB.009 and click Set Default. To make further adjustments to the playback settings, double-click on the speaker icon labeled MXL® USB.009.
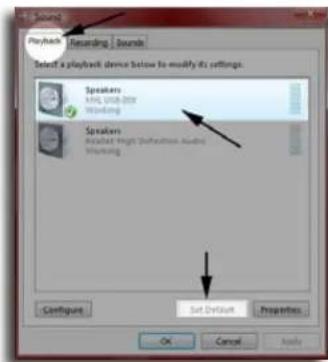
- Click on the tab labeled Advanced. From the drop down menu you can change the sample rate and bit-depth for audio playback. Please note that you should verify these settings match the settings in your recording application.
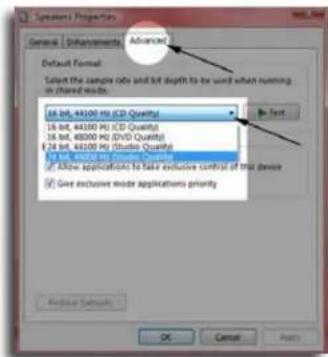
- To set the MXL® USB.009 microphone as the default input, select the Recording tab in the Sound window. Highlight the microphone icon labeled MXL® USB.009 and click Set Default.
To make further adjustments to the recording settings, double-click on the microphone icon labeled MXL® USB.009.


- Click on the tab labeled Advanced. From the drop down menu you can change the sample rate and bit-depth for audio recording. Please note that you should verify these settings match the settings in your recording application.
Your computer is now setup to use the MXL ^® USB.009 microphone with most recording applications. Some applications will require additional settings to be changed within the program. Please see your recording software's manual for proper setup.
Connecting the Microphone to Your Mac
As is the case with a Windows PC, the MXL® USB.009 microphone will operate with both USB 2.0 (high speed USB) and USB 1.1 data buses. All current Macs operate with USB 2.0. We recommend you connect your microphone directly to the computer's USB port as opposed to using a USB hub. USB hubs have been known to interfere with the performance of various USB devices.
PLEASE NOTE: Audio and video recording can be very taxing to a computer's resources. For this reason, you should close any and all running applications that are non-essential.
Initial Setup with OSX
- To select the MXL® USB.009 microphone as the default audio device, click on the Apple icon at the top of the screen then select the System Preferences.

- Click on the Sound icon.

- Click on the Input tab, then select the device named MXL® USB.009. You will notice there are no input controls for this device as they are located on the front of the microphone.

- Next click on the Output tab and select the device named MXL® USB.009. You will notice that the output volume is grayed out. This is because the volume control is located on the front of the microphone.

- Further adjustments to the sample rate and bit-depths can be found in the Audio Midi Setup (Macintosh HD > Applications > Utilities > Audio Midi Setup.) You should however, check the settings in the recording program you are using as they may override or conflict with these settings.

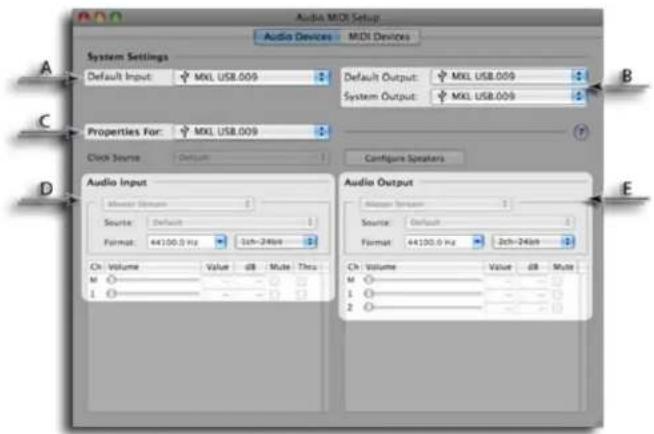
A. By selecting the MXL ^® USB.009 as the "Default Input" the microphone will automatically be selected as the input the next time it is plugged in.
B. By selecting the MXL® USB.009 as the "Default Output" the microphone will automatically be selected as the output the next time it is plugged in. By selecting the MXL® USB.009 as the "System Output", the microphone will be used as the output device for any system sounds.
C. Select the MXL® USB.009 to make adjustments to the sample rate and bit-depth. You will see the two sections D and E appear below.
D. Here you can make adjustments to the sample rate and bit-depth for the input (the microphone signal).
E. Here you can make adjustments to the sample rate and bit-depth for the output (the signal to the headphones).
Your computer is now setup to use the MXL® USB.009 microphone. However, after changing these settings you should still check the settings in your recording program. If the sample rate and/or bit-depth in the software are not the same as your hardware, you will most likely hear clicks and pops, or the audio will be the wrong pitch.
Computer Audio Tips:
- Audio recording can be very taxing on your computer, so it is recommended that you close as many non-essential applications as possible.
- In many cases, using an external dedicated hard drive for your audio sessions can dramatically improve track count and performance.
- Recording at 24-bit, 44.1 kHz is the recommended setting for most audio projects to conserve disk space. This will produce great, professional sounding recordings.
Supported Sample Rates and bit-depths:
When setting up your computer and recording software, you may want to keep in mind the supported sample rates and bit-depths shown in the following table:
Recording Computer Playback
| 24-bit 96KHz 24-bit 48KHz | |||
| 24-bit 48KHz 24-bit 44.1KHz | |||
| 24-bit 44.1KHz 16-bit 96KHz | |||
| 16-bit 96KHz 16-bit 48KHz | |||
| 16-bit 48KHz 16-bit 44.1KHz | |||
| 16-bit 44.1KHz |
Using the MXL USB.009
After you have mounted your microphone and setup your computer, plug a set of headphones into the front 1/8-inch stereo jack located on the front of the microphone.
Important Note:
The headphone amplifier can produce very loud sound levels that, when exposed to over a period of time, can cause irreparable hearing damage. Please adjust the headphone level carefully!
You should now be able to hear your computer sound in high quality 24-bit audio! When you're ready to begin tracking, open your favorite recording software and make sure its setup for use with the MXL® USB.009 according to the software manufacturer recommendations.
Software Tips
Windows:
To get started multi-tracking and overdubbing (where the MXL® USB.009 really shines) we recommend the free 30 day trial shareware version of Reaper. Go here to download Reaper: http://www.reaper.fm.
Macintosh:
Garage Band is the easiest way to get started if you are using a Macintosh computer. Since it's included on most Macintosh computers, you probably have it installed and ready to go!
With the microphone attached to your computer, and your software application running, snap your fingers in front of the grill, looking for a signal on your software's VU meters. Never "tap" on the grill to test for a signal present as this could cause peaking if the capsule gain is set too high.
After you have properly setup your software and have a signal present, simply position the microphone to best capture the performance. Begin testing the sound source with the microphone and watch the software VU meters for clipping. Clipping is usually represented by a red bar in your software and should be avoided at all times for a recording free of poor sounding digital distortion. Use the Gain control on the front of the microphone to best capture the sound source without clipping.
If you would like to listen to computer playback while recording or practicing live, use the Mix Control on the front of the microphone to create a balance between computer playback and the live microphone input. The live microphone is mixed to the headphones before any digital conversion to provide the highest audio quality without sound delay (latency), often associated with computer recording. The Headphone Control on the front of the microphone can now be used to adjust the overall level of your mix.
While there is no right or wrong way to record a performance, please refer to the included Getting the Best Results with Your MXL® Microphone recording guide to help you with the basic techniques. Remember, recording is a creative process, so experimentation is the key for the best results.
Recording Tips
While it is important to record at a loud enough volume to hear the performance over any background noise, keep in mind that with multitrack recording, each track will eventually be added together (summed) into a final Left and Right stereo mix. Since this summing increases the level of the final signal, tracks should be recorded with a fair amount of space between your maximum signal level and the OdB clipping level (this is called headroom). In addition, this will greatly benefit the use of any effects or other signal processing you wish to add later.
FAQ & Troubleshooting
No Sound from Microphone Check USB connection, gain knob setting, mix knob setting and headphone level.
No Blue LED Check USB connection. Make sure mic is getting enough power by trying a different USB port. Try a different USB Cable.
Bad/Distorted Sound from Check to see that the gain is not too Microphone high, based on the volume of the sound source you are recording.
Recorded sound isn't the Check to make sure your sample rates and correct pitch when played back bit-depths agree within your project settings and audio properties. This may require contacting the software manufacturer.
I hear Clicks and Pops when Check to make sure your sample rates and I play audio back bit-depths agree within your project settings and audio properties. This may require contacting the software manufacturer.
Sound won't playback from the computer Check that you have set up your computer according to the "Using Your MXL® USB.009"
section in this manual. Make sure that MXL USB.009 is setup to be the default audio output. If your audio program was open before plugging in the microphone, you may need to close and re-open the program.
| Sound won't record from microphone | Check that you have set up your computer according to the "Using Your MXL® USB.009" section in this manual. Make sure that MXL® USB.009 is setup to be the default audio input. Check the settings in the in your recording application. |
| Playback isn't loud enough | Make sure the volume settings within your computer are turned up, headphones are plugged in, headphone level control is at a nominal level and the mix control isn't all the way to the left. |
| Can I plug speakers into the mic? | Yes, you can use the 1/8-inch headphone jack to feed external speakers, but please make sure to keep the headphone level down so as not to damage any equipment. |
| What is this microphone best intended for? | With the MXL® USB.009 you can record anything you can think of with professional quality. Many people have found it very useful for acoustic instruments, voice, ensemble recording, podcasting, music demos and broadcasting including voice-overs. |
| Where can I go for more information? | The MXL website is www.mxlmics.com. There you will find our other products, technical support information and other resources. |
| Will this microphone make me a superstar? | We certainly hope so! |
For More Information
For additional information about your MXL USB microphone, how to contact technical support, as well as information on other products manufactured by MXL, please visit us online at www.mxl-usb.com.

Marshall Electronics
1910 East Maple Ave. El Segundo, CA 90245
www.mxlmics.com
Warranty
Marshall microphones are guaranteed against defects in material and workmanship for three years from date of purchase. Should you encounter any problem with this unit, promptly contact the company you purchased it from for assistance. The original dated sales receipt will be necessary for any warranty claim. Do not send any unit directly to us without prior authorization from our service department! Warranty coverage is limited to repair or replacement (at our option) of the microphone, and does not cover incidental damages due to use of this unit, nor damage caused by accidental misuse of this product.
- MXL® USB.009 Features
- Instrument Handling
- A Little Background Information
- Unpack Your Microphone
- Using the Supplied Desktop Microphone Stand
- Blue Power LED
- USB Connection
- Gain Control
- Mix Control
- Headphones Level
- Headphone Output
- Connecting the Microphone to Your Computer (Windows)
- Initial Setup with Windows XP
- Initial Setup with Windows Vista
- Connecting the Microphone to Your Mac
- Initial Setup with OSX
- Computer Audio Tips:
- Supported Sample Rates and bit-depths:
- Using the MXL USB.009
- Important Note:
- Software Tips
- Windows:
- Macintosh:
- Recording Tips
- FAQ & Troubleshooting
- For More Information
- Marshall Electronics
- Warranty
Brand : MXL
Model : USB.009
Category : Microphone