Reserve VRN-7HB - Browser Soundstream - Free user manual and instructions
Find the device manual for free Reserve VRN-7HB Soundstream in PDF.


| Product Type | Car GPS Navigation Receiver |
| Brand | Soundstream |
| Model | Reserve VRN-7HB |
| Display Size | 7 inches |
| Display Resolution | 800 x 480 pixels |
| Touchscreen | Yes |
| GPS Navigation | Yes, with preloaded maps |
| Bluetooth | Yes, for hands-free calling and audio streaming |
| USB Input | Yes, for media playback and charging |
| SD Card Slot | Yes, for map and media storage |
| FM/AM Radio | Yes, with RDS |
| Rear Camera Input | Yes, compatible with backup camera |
| Power Supply | 12V DC (negative ground) |
| Power Consumption | 15A max |
| Dimensions (W x H x D) | 178 x 100 x 160 mm |
| Weight | 1.5 kg |
| Operating Temperature | 0 to 60 °C |
| Mounting Type | Double DIN |
| Audio Output | 4 x 50W max |
| Supported Languages | English, Spanish, French, German, Italian, Portuguese |
| Map Updates | Via SD card (user downloadable) |
| Warranty | 1 year limited |
| Included Accessories | Mounting kit, wiring harness, remote control, user manual |
Frequently Asked Questions - Reserve VRN-7HB Soundstream
User questions about Reserve VRN-7HB Soundstream
0 question about this device. Answer the ones you know or ask your own.
Ask a new question about this device
Download the instructions for your Browser in PDF format for free! Find your manual Reserve VRN-7HB - Soundstream and take your electronic device back in hand. On this page are published all the documents necessary for the use of your device. Reserve VRN-7HB by Soundstream.
USER MANUAL Reserve VRN-7HB Soundstream
With Android Phone Link
With Bluetooth
With GPS
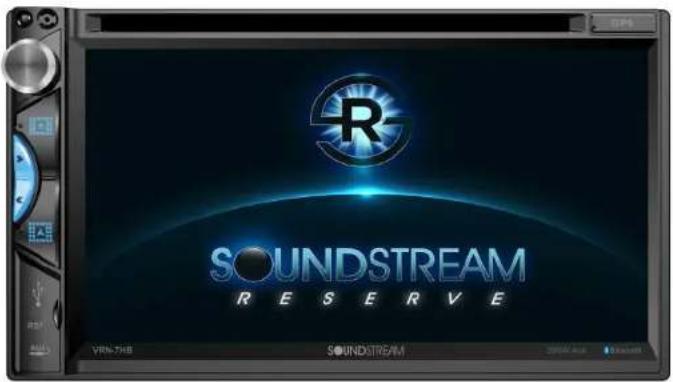
Owner's Manual
Take the time to read through this owner's manual.
Familiarity with installation and operation procedures will help you obtain the best
Performance from your new DVD-receiver.
IMPORTANT NOTICE & PRECAUTIONS
Thank you for using our company multi-media player! To operate the unit correctly, please read the operation manual carefully before using. Keep this operation manual for further reference.
The unit is designed only for DC 12V negative ground operation system. Make sure your vehicle is connected to DC 12V negative ground electrical system. Be sure to connect the speaker (-) leads to the speaker (-) terminal. Never connect the left and right channel speaker wires together or to the vehicle body.
The normal temperature for operation is between -20 and +60 degree Celsius. Do not work in extreme high or low temperature and block vents or radiator panels of the unit, blocking them will cause heat to build up inside the unit and may cause damage or fire.
This unit can play the following discs (12 cm) and media files: DVD±R/RW / MPEG 4 / DivX / AVI / SVCD / VCD / MP3 / WMA / CD-R/RW / JPEG.
This operation manual shows the full version of this unit. GPS navigation system; analog TV tuner; AM radio; mobile phone mirror linking, external microphone connection & external steering wheel control connection are the optional features of the software and may not be included in this unit. Referred to the exact functions & features that equipped with this unit for operation.
INSTALLATION
[1]
Notes:
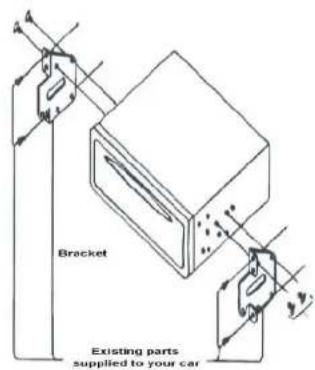
- Installation varies on type of cars and supplied parts
- Store small articles in places not accessible to children
- Install only with the supplied screws
- Installation of unit by professional technician is strongly recommended
Remarks:
Mounting brackets and screws are the parts that supplied in your car and not provided in this unit.
[26]
Note: Specification and design; functions and features; unit illumination; colour and display segment are subject to change without prior notice. Photos and drawings on gift box or operation manual might be varied from the exact unit. Depends on the input devices, operation might be varied from the operation manual described.
SIMPLE TROUBLE SHOOTING
| PROBLEMS, CAUSES & SOLUTIONS |
| No power- Check and make sure the connecting wires are connected correctly- Check whether the fuse is blown. Replace with the proper value fuse if necessary. |
| No sound- Check and make sure the speaker wires are connected correctly. |
| No picture- Check whether the video wire is connected to the video device. |
| Unit hang-up- Press the RESET button to reset the unit to its default stage. |
| No function when pressing the buttons or TFT screen- Press the RESET button to reset the unit to its default stage. |
| Poor effect or unable to receive radio / TV- Check whether the radio/ TV antenna is inserted or properly connected.- Antenna may not be the proper length. Make sure the antenna is fully extended.- Antenna may be poorly grounded. Check and make sure the antenna is properly grounded. |
| Stereo cannot be received under radio mode- Tune the radio frequency accurately.- The broadcasting signal is too weak, set the mode to MONO. |
| Disc inserted but cannot play- Check whether the disc inserted upside down.- Check whether the disc is dirty or badly cracked.- Lens is dirty. Clean lens by using the lens clean disc. |
| Abnormal moving, skipping or sound during playback- The disc is dirty or damaged. Wipe the disc with a dry soft cloth or replace a new disc. |
| Remote handset does not work- Replace new battery of the remote handset.- Point the remote handset directly at the remote sensor of the main unit.- Clean the surface of the remote sensor. |
| Bluetooth not operated- check the devices are linked up correctly. |
| Picture without colour or no sound under disc / TV mode- Improper setting of colour system at TV mode. Set again to "PAL; "SECAM" or 'NTSC" |
| GPS not operated- check micro SD card with navigation software (map) has been inserted into SD card port for GPS.- check GPS antenna connected properly. |
Note
After the above efforts, if the unit still cannot be worked normally, consult your service dealer. Never attempt to disassemble the unit by yourself. No service part inside the unit.
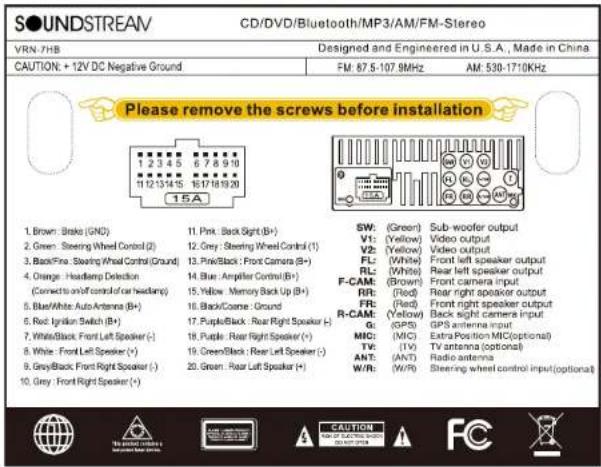
WIRING CONNECTION
MAIN UNIT OPERATION
Symbol / Function Operations & Controls
RES / RST Press with a pointed object (such as a ballpoint) to reset the unit to its initial setting by the factory (default stage).
/ POWER
MODE / MOD /
SRC
M/N / MENU
VOL / VOL /
VOL+/VOL-/
VOLUME
MUTE /
EQ
LOUD
IR
AUX
表决情况:
USB
MICRO SD / SD /
MINI SD / ☐ / ☐
GPS / MAP /
(六)本说明
BT
MIC
DVD
(1)
DISC SLOT
▲ / EJECT
▶||
[Non-Text]
BND / BAND

Press to turn on or off of sound mute control.
Press repeatedly to select the desired preset equalization mode.
Press to turn on or off of loudness control.
Remote control sensor for signal reception from remote handset.
Insert an external device to this jack in order to have sound output of that
external device through the unit.
Insert USB device to this slot for digital files playback.
Insert micro SD card to this port for digital files playback.
Insert micro SD card installed with navigation software to this port for operation under GPS mode (available for unit with GPS navigation system).
Press to shift the current operation mode to Bluetooth mode.
For voice reception under Bluetooth operation.
Press to shift the current operation mode to disc operation mode (when a disc
has been inserted).
Insert or remove disc from this disc slot (when a disc has been inserted).
Press to eject disc from the disc slot (when a disc has been inserted).
At disc / USB / SD card input & Bluetooth mode, press to start, pause or
resume playback.
At radio mode, press repeatedly to select radio band for broadcasting.
(Note: When the unit is under other operation mode, press to shift current operation mode to radio mode)
Radio Mode
Press repeatedly to fine tune the radio frequency upward or downward.
Press & hold shortly to tune the radio frequency to the upward or downward station for broadcasting.
Disc / USB / SD Input Mode / Bluetooth Mode
Press repeatedly to shift track upward or downward for playback.
Each time press & hold shortly to activate various fast forward/rewind speeds for playback. (Note: Fast forward or fast rewind is not available at Bluetooth mode & picture playback mode)
[3]
Interfaces, photos, images, icons & location as shown in this part of operation manual may be varied from the exact unit. However, all of them come with similar outlook of the same type and with the same operation method.
SPECIFICATION
GENERAL
Power Requirement:
Load Impedance:
Maximum Power Output:
Tone Control – Bass (at 100 Hz)
Trable (at 10 KHz)
AM RADIO SECTION
Frequency Range
DC 12 Volts, negative ground
4 Ohms
40 watts x 4 (RMS)
+/- 8 dB
+/- 8 dB
FM RADIO SECTION
Frequency Range
530 - 1710 KHz (America)
530 - 1710 KHz (Latin America)
522 - 1620 KHz (Asia)
522 - 1710 KHz (Australia)
522 - 1620 KHz (Europe)
522 - 1629 KHz (Japan) 522 - 1620 KHz (Middle East)
522 - 1620 KHz (Oirt)
(2) 1023 年度 (2014)
Signal to Noise Ratio
Stereo Separation (at 1 KHz)
87.5 - 107.9 (America)
87.5 - 108 MHz (Latin America)
87.5 - 108 MHz (Asia)
87.5 - 108 MHz (Australia)
87.5 - 108 MHz (Europe)
76 - 90 MHz (Japan)
87.5 - 108 MHz (Middle East)
65 - 74 MHz (Oint)
65 = 74 MHz (GHz) 60 dB
60 dB 30 dB
DISC SECTION
Disc Play:
Mounting Angle:
DVD / VCD / MP3 / CD
+/- 30 degree
VIDEO & TV SECTION
Video System
Video Output Level
Horizontal Resolution:
TV System
NTSC
1.0Vp-p 75 Ohms
500
NTSC / PAL / SECAM
BLUETOOTH SECTION
Communication type
Maximum Distance:
V4.0
5 meters
AUDIO SECTION
Maximum Output Level:
Frequency Response:
Signal to Noise Ratio
Channel Separation:
2 Vrms (+/-3 dB)
20 Hz to 20 KHz
85 dB
80 dB
[24]
-
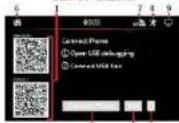
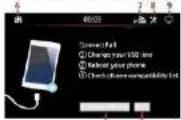
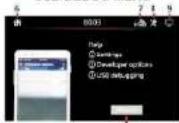
Touch to shift to USB DEBUG MENU and follow the information to have USB debug on the mobile phone before connecting again.
-
Touch to return to SETUP MENU.
-
Touch to exit mobile phone linking operation and shift to previous operation mode.
-
Touch to shift to MAIN MENU for various operation and setup.
-
Touch to shift to Bluetooth mode for operation (available when a mobile phone connected).
-
Touch to activate audio & visual setting for various audio & visual setup (refer to ON SCREEN - AUDIO & VISUAL SETTING for details).
-
Touch to turn off the screen. When the screen turned off, touch any portion of the screen to turn on the screen.
Important notice on mobile phone linking operation on Android devices:
- This head unit supports Android phone up to version 6.0 with USB mirror linking function only.
- USB cable should be used to connect the phone to the front USB slot of the head unit.
- In case connecting failed, CONNECT FAILURE MENU appeared on screen. Refer to its detail and USB DEBUG MENU, follow the step in order to have set up of the phone (USB debug).
- Phone set up will be varied from different phones. Refer to the operation method of the phone for detail (usually at setting mode → developer options → USB debugging).
- Depends on the connected smart phone, operation & setting may be varied.
Floating dock operation under mobile phone linking:
During mobile phone linking and when this floating dock icon appeared on screen, touch to activate FLOATING DOCK MENU on screen for various functions and controls of the unit. This menu will be closed when no operation for a while. Touch any blank portion on screen will also close this menu.
FLOATING DOCK MENU
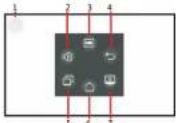
- Touch to activate FLOATING DOCK MENU on screen for various functions and controls of the unit. Hold & slide can move this icon to other desired position on the screen.
- Touch to activate audio & visual setting for various audio & visual setup (refer to ON SCREEN - AUDIO & VISUAL SETTING for details) of the car unit.
- Touch to shift screen to the MAIN MENU of the car unit.
- Touch to shift screen to previous page of the connected phone.
- Touch to shift horizontal / vertical viewing of the connected phone.
- Touch to shift screen to the main menu of the connected phone.
- Touch to turn off the screen. When the screen turned off, touch any portion of the screen to turn on the screen.

TV Mode
Press to tune TV channel upward or downward for broadcasting.
Press & hold shortly to tune the TV frequency upward or downward and stop for broadcasting when a TV channel received.
-TUN+/ENT
Radio Mode
Rotate to turn the radio frequency to the upward or downward preset station for broadcasting.
DVD Mode
At DVD menu/title display mode, rotate to select the desired setting/setup and press to confirm/enter.
(Note: Depends on the input DVD, this function may not be available for operation)
Folder / Playlist Mode
During folder/playlist display at media playback mode, rotate to shift up or down on playlist, press to confirm/enter.
(Note: Depends on the input media, these function may not be available for operation)
TFT SCREEN
It shows the status of operation on the unit. This screen is also a touch display – soft touch the screen for different operations of unit (refer to other parts of this manual for operation details).
Note
The above mentioned symbols / functions / operations & controls show the operations for various versions of the unit and may not be equipped or available for control in this unit. Printings and symbols on the above may be varied from the exact main unit. Referred to the main unit for exact functions and features that applied. User is highly recommended to use the touch screen control to operate. Most of the operations of this unit cannot be controlled by the main unit.
Refer to the back of remote handset for details on how to replace the battery. Replace the battery only with the same or equivalent type.
Note: If the remote handset will not be used for a long time, please remove the battery from the battery compartment.
(1) When the unit is turn off, press to turn on the unit.
When the unit is turn on, press & hold shortly to turn off the unit.
During unit operation, press to turn on or off of sound mute control
GPS Enter GPS operation
RADIO Press it to enter the radio mode.
DISC Press it to enter the DVD mode.
Bluetooth Mode
Press to hang up or refuse an incoming call.
USB Insert USB device to this slot for digital files playback.
Important: The USB port is intended only for data transfer only.
BT Press it to enter the Bluetooth mode.
Bluetooth Mode
Press to pick up an incoming call; dial out after input a phone number:
redial last dial out number.
AUX Insert an external device to this jack in order to have output of the
external device through the unit.
TV Mode
Press directly to input the channel number for broadcasting
▲/▼/▶/◀ DVD Mode
At DVD menu/title display mode, press to select the desired setting/setup and press ENT to confirm/enter.
ENT DVD Mode / Folder/Playlist Mode
At DVD menu/title display mode as well as folder/playlist display at media playback mode, press ▲/▼/▶/◀ to select the desired setting/setup and press ENT to confirm/enter.
VOL + / VOL - Press repeatedly or press & hold to adjust sound output level.
▶//Disc / USB / SD Input Mode
At playback mode, press to stop playback and shift to playlist for playback selection (depended on the input device, playlist may not be available). Note: Not available for control at music playback mode
At disc / USB / SD / input & Bluetooth mode, press to pause, resume or start playback.
EJECT Disc Input Mode
Press to eject disc from the disc slot.
Bluetooth Mode
Press & hold shortly to disconnect the link-up with mobile phone (when a mobile phone has been connected with Bluetooth of the unit).
EQ Press repeatedly to select the desired preset equalization mode.
1-6 Radio Mode
Press any one of the number key 1-6 to select a station that had been stored in the preset memory number key 1-6 for broadcasting.
0-9 Disc/USB/SD/Input Mode
Press directly to input the number of track for playback.
Bluetooth Mode
Press directly to input the phone number for dial out.
At MAIN MENU, touch to shift to front camera viewing (provided front camera and the pink/black wires connected). At front camera viewing mode, touch any portion of screen to activate FRONT CAMERA INPUT MENU for operation.
FRONT CAMERA
INPUT MENU
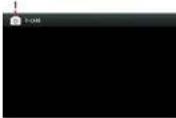
- Touch to shift to MAIN MENU for various operation and setup.
At MAIN MENU, touch repeatedly to select the desired wallpaper (background) of the unit.
At MAIN MENU, touch on screen to start mobile phone linking of the connected mobile phone operation. (Note: Mobile phone must be connected to the front USB of the unit)
For ISO devices (supported Apple phone 5 and above), mobile phone linking operation will start automatically without any setting. Mirror linking appeared on screen and mobile phone operation can be controlled by touching screen of the unit.
For Android devices, when the phone is connected at the first time. SETUP MENU appeared on screen.
SETUP MENU
CONNECT FAILURE MENU
USB DEBUG MENU
-
Scan the QR code by using the connected android phone. Follow the instruction of the connected phone & download "AUTOLINK" application from Google Play Store or Amazon site. Open "AUTOLINK" application after download, mirror linking appeared on screen and mobile phone operation can be started and controlled by touching screen of the unit.
-
Touch to connect with the mobile phone
\~ The following shows the control option:
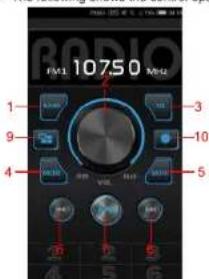
- Radio band selection
- Adjust the volume up or down
- Adjust the EQ selections
- Selection of operation mode
- Mute function
- Upward operation
- Playback/pause control
- Downward operation
- Back to homepage
- Setting
Remarks: The operation under this application is limited to some modes & controls only.
At MAIN MENU, touch to shift to auxiliary input operation (provided an auxiliary video device had been connected). At auxiliary input operation, touch any portion of screen to activate AV INPUT MENU for operation.
AV INPUT MENU
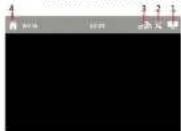
- Touch to turn off the screen. When the screen turned off, touch any portion of the screen to turn on the screen.
- Touch to activate audio & visual setting for various audio & visual setup (refer to ON SCREEN - AUDIO & VISUAL SETTING for details).
- Touch to shift to Bluetooth mode for operation (available when a mobile one connected).
- Touch to shift screen to MAIN MENU.
During unit operation and when this icon appeared on screen, touch to shift screen to MAIN MENU for various operation and setup.
MAIN MENU
12 13 14 15
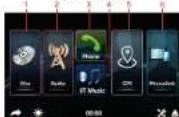
At MAIN MENU, touch the icon of the desired mode on screen and the unit will then enter into the mode that selected for operation. If no selection has been made for a white, the unit will shift back to the previous operation mode.
At MAIN MENU, touch & hold on the operation icon and slide to left or right will shift screen to another MAIN MENU for operation selection.
- Touch to start disc input operation (when a disc inserted).
- Touch to start radio operation (when the radio antenna connected).
- Touch to start Bluetooth operation (when the mobile phone connected)
- Touch to start Bluetooth Music operation (when the mobile phone connected
- Touch to start GPS operation.
- Touch to start mobile phone mirror linking operation (when the mobile phone connected to the front USB port).
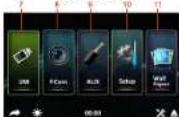
- Touch to start USB input operation (when an USB device inserted).
- Touch to start viewing front camera (when connected to front camera and pink/black wire).
- Touch to start auxiliary input operation (when an auxiliary device inserted).
- Touch to activate SYSTEM SETUP MENU on screen to have various setup of the unit.
- Touch repeatedly to select the desired background (wallpaper) of the unit.
- Touch to shift back to previous operation mode.
- Touch repeatedly to select brightness of screen or turn off the screen. Turn off of screen is available under headlamp detection at OFF mode. When the screen is off, touch any portion of the screen to turn it on again. Following preset brightness modes can be selected.

At this mode, brightness of screen is set by the user (user setting). Refer to ILLUMINATION BACKLIGHT SETUP under ON SCREEN - SETUP OPERATION for details.

- Touch to activate audio & visual setting for various audio & visual setup (refer to ON-SCREEN - AUDIO & VISUAL SETTING for details).
- Touch to eject the disc from the unit (when a disc has been inserted).
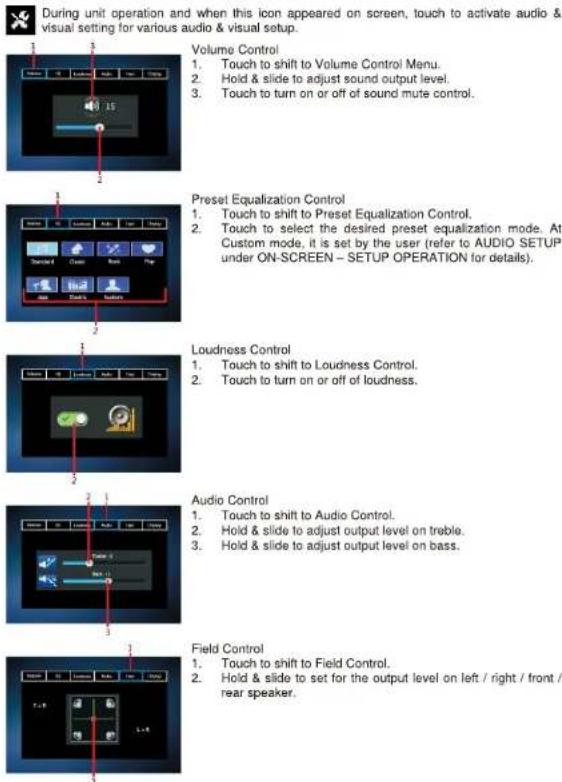
ON SCREEN - AUDIO & VISUAL SETTING
[7]
- Touch to delete the linked up device.
- Touch to input the phone number for dial out.
- Touch to erase the digit input by error.
- Touch to dial out after input the phone number or redial when no phone number input.
- Touch to hang up or refuse an incoming call.
- Touch to shift conversation between mobile phone & Bluetooth of the unit.
- Touch to turn on or off of sound muting of the microphone.
- Touch to input digit (for conversation that needs data input).
- Touch to hang up or refuse an incoming call.
- Touch to pick up an incoming call
- Touch to download/update incoming calls / dial out numbers / missing calls of the connected
mobile phone. - Touch to show list of missing calls.
- Touch to show list of incoming calls.
- Touch to show list of dial out numbers.
- Touch to shift page up or down.
- Touch to download/update phone book of the mobile phone to the unit.
- Touch to start / pause / resume music playback transmitted from the mobile phone.
- Touch to select upward or downward track for playback.
- Touch to turn off the screen. When the screen turned off, touch any portion of the screen to turn on the screen.
- Touch to activate audio & visual setting for various audio & visual setup (refer to ON SCREEN - AUDIO & VISUAL SETTING for details).
- Touch to shift screen to MAIN MENU
Remarks: Depends on the system language set on the unit, list of phone book / incoming call / dial out call / missing call will not be display correctly.
APPLICATION TO CONTROL THE UNIT VIA BLUETOOTH OF MOBILE PHONE
(Andorid support only)
User can download the following application to the mobile phone in order to have control of the main unit by the mobile phone via Bluetooth. Take your phone and follow the steps:
- for Android device, search "iCon" from Google Store and after searched, download & install:

- After installation, open application

\~ The following menu appeared in the mobile phone and you can start control the car unit with this menu (Bluetooth must be connected):
[20]
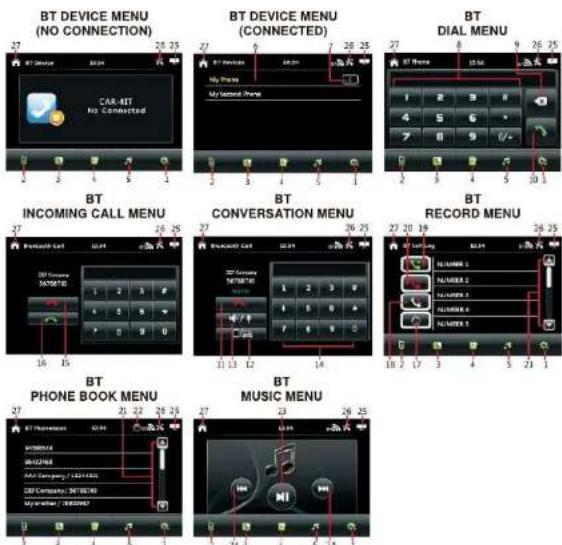
- Touch to shift to BT DEVICE MENU to show the current status on connection.
- Touch to shift to BT DIAL MENU for dial out of phone.
- Touch to shift to BT RECORD MENU to show the record on incoming calls / dial out numbers / missing calls of the connected mobile phone. (Note: When "Auto Loading Records" set at "ON", loading of record will start automatically when the unit linked up with the mobile phone & shift to BT RECORD MENU at the first time – refer to BLUETOOTH SETUP section of ON SCREEN – SETUP OPERATION for details)
- Touch to shift to BT PHONE BOOK MENU to show the phone book of the connected mobile phone. (Note: When "Auto Loading Phonebooks" set at "ON", loading of phonebooks will start automatically when the unit linked up with the mobile phone & shift to BT PHONE BOOK MENU at the first time – refer to BLUETOOTH SETUP section of ON SCREEN – SETUP OPERATION for details)
- Touch to shift to BT MUSIC MENU for transmission of music playback from the connected mobile phone.
- Touch to select the linked up device.
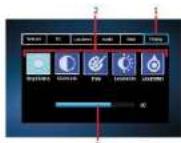
Visual Control
- Touch to shift to Display Control.
- Touch to select the desired setting mode on brightness,
contrast, hue, saturation and sharpness. - At the desired setting mode, hold & slide to adjust the level.
At MAIN MENU, touch to shift screen to SETUP MENU for various setup selection of the unit.
UNIT SETUP
SETUP MENU
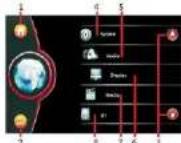
SETUP MENU
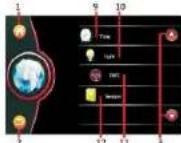
- Touch to shift screen to MAIN MENU.
- Touch to shift to previous menu or operation mode.
- Touch to shift page up or down.
- Touch to shift to SYSTEM SETUP MENU for various system setting (Refer to SYSTEM SETUP).
- Touch to shift to AUDIO SETUP MENU for various audio setting (Refer to AUDIO SETUP).
- Touch to shift to VISUAL SETUP MENU for various visual setting (Refer to VISUAL SETUP).
- Touch to shift to MEDIA SETUP MENU for various media setting (Refer to MEDIA SETUP).
- Touch to shift to BLUETOOTH SETUP MENU for various Bluetooth setting (Refer to BLUETOOTH SETUP).
- Touch to shift to CALENDAR SETUP MENU for calendar & clock setting (Refer to CALENDAR & CLOCK SETUP).
- Touch to shift to LIGHT SETUP MENU for various illumination backlight setting (Refer to ILLUMINATION BACKLIGHT SETUP).
- Touch to shift to SWC SETUP MENU for steering wheel control setting (Refer to STEERING WHEEL CONTROL SETUP).
- Touch to shift to VERSION MENU to show details of the unit (Refer to VERSION OF UNIT).
SYSTEM SETUP
SYSTEM SETUP MENU
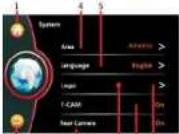
SYSTEM SETUP MENU
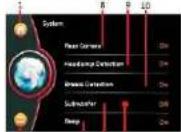


- Touch to shift screen to MAIN MENU.
- Touch to shift to previous menu or operation mode
- Hold & slide to show the hidden setting modes
- Touch to activate AREA INTERFACE to select the country or area located (for the radio frequency that suits the country or area that located).
- Touch to activate LANGUAGE INTERFACE to select the desired system language on screen.
- Touch to activate PASSWORD INTERFACE to input password for opening scene logo setting. Remarks: This setting is for ex-factory setting and not available for user setup
- Touch to turn on or off of front camera input (when front camera and the pink/black wire connected):
\~ when the front camera input is turn on and the car is shifted from backward mode to forward mode, front camera input will be display for 10 seconds
- the default setting after first installation is off and at this moment, no front camera input will be displayed when the car is shifted from backward mode to forward mode
- Touch to turn on or off of rear camera input (when rear camera and the pink wire connected).
- Touch to turn on or off of headlamp detection of the car (when the orange wire connected with the on/off of car headlamp).
ON mode: When the headlamp of the car turned on, brightness of screen will shift to the default setting by user. User can also adjust the brightness of screen at this mode (refer to ILLUMINATION BACKLIGHT SETUP for details)
OFF mode: When the headlamp of the car turned on, brightness of screen will not be affected
Remark: Backlight illumination of the unit will only be activated when the headlamp detection is turn on and the orange wire connected
- Touch to turn on or off of allowing watching video during driving (when the brake – brown wire has not been connected).
- Touch to turn on or off of sub-woofer output.
-
Touch to turn on or off of beep sound when touching on screen for control.
-
At video playback mode, hold & slide to select the position (time) for playback.
- At music playback mode, hold & slide to select the position (time) for playback.
- Touch to select music playback at FOLDER PLAYLIST / PLAYLIST provided the playback device recorded with music files.
- Touch to select photo playback at FOLDER PLAYLIST / PLAYLIST provided the playback device recorded with photo files.
- Touch to select video playback at FOLDER PLAYLIST / PLAYLIST provided the playback device recorded with video files.
- Touch to shift to FOLDER PLAYLIST or PLAYLIST to select desired folder or file for playback. To start playback, touch twice on the selected track.
- Touch to shift to previous FOLDER PLAYLIST / PLAYLIST or beginning of the folder list / playlist.
- Touch to shift page up or down.
- Touch to erase the digit input by error.
- Touch to confirm after input the number of track for playback.
- This shows the current input device for playback (DISC / USB / CARD).
- Touch to shift back to PLAYBACK MENU
- Touch to turn off the screen. When the screen turned off, touch any portion of the screen to turn on the screen.
- Touch to activate audio & visual setting for various audio & visual setup (refer to ON SCREEN - AUDIO & VISUAL SETTING for details).
- Touch to shift to Bluetooth mode for operation (available when a mobile phone connected).
- Touch to shift screen to MAIN MENU
Note: Depends on the input device and playback media, not all the mentioned operations are available for control.
At MAIN MENU, touch on screen to shift to Bluetooth operation.
During unit operation, touch on screen to shift to Bluetooth operation.
LINK UP WITH MOBILE PHONE
To linkup Bluetooth connection with the mobile phone, take your phone and follow the steps:
- set the mobile phone to Bluetooth state
- start to search new device
- after searched, new device (CAR-KIT or similar) searched out, confirm the search
- in case of need, input default code "0000" or "8888" in the mobile phone
- at the same time, Bluetooth icon & BT DEVICES MENU appeared on screen
- connection succeeded and you can start using Bluetooth function
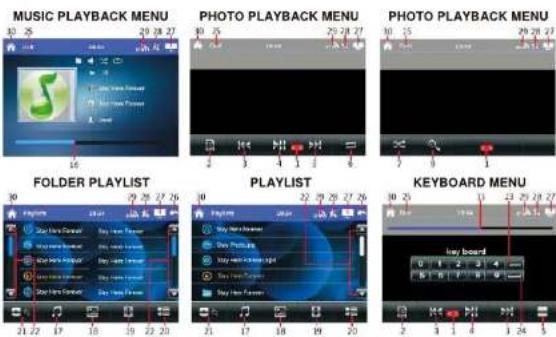
1. Hold & slide to show the hidden operation icons for operation.
2. At DVD playback mode, touch to show the title of DVD on screen. (Note: Depended on the DVD, this function may not be operated)
At VCD playback mode, touch to shift PBC on or off. At PBC on mode, touch to start playback at the beginning in sequence order.
At media playback mode, touch to activate PLAYLIST / FOLDER PLAYLIST (available for input device recorded with folder) to select folder / track for playback.
3. Touch to shift to next or previous track for playback.
At video playback mode, touch & hold shortly to activate fast forward or fast rewind mode. At this mode, touch repeatedly to select various speed on fast forward or fast rewind.
4. Touch to start, pause or resume playback.
5. At video playback mode under disc input, touch to stop playback.
At music / photo playback mode under disc input and playback mode under USB / SD card input, touch to stop playback temporary and will shift to playlist for playback selection. Touch twice on the selected track for playback or normal playback will resume after a while.
6. Touch repeatedly to select repeat playback mode.
7. Touch to turn on or off of random playback of the input device.
8. At DVD video playback mode, touch repeatedly to view the angle changes in sequential order (available for video recorded with multi-angle senses).
9. At video & photo playback mode, touch repeatedly to zoom in and zoom out of screen for viewing.
10. Touch repeatedly to select the audio output channels that recorded in the playback device.
11. Touch repeatedly to select different sub-titles that recorded in the playback device.
12. At video playback mode, touch repeatedly to select different speeds of slow motion playback.
13. At DVD playback mode, touch to show on screen the menu of the disc
At VCD playback mode, touch to shift PBC on or off. At PBC on mode, touch to start the playback at the beginning in sequence order.
14. Touch to activate KEYBOARD MENU to input track number directly for payback.
AUDIO SETUP
AUDIO SETUP MENU
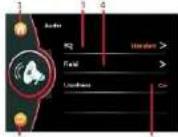
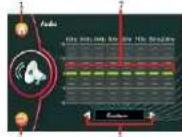
EQ MENU
FIELD MENU
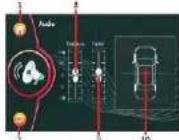
1. Touch to shift screen to MAIN MENU
2. Touch to shift to previous menu or operation mode.
3. Touch to activate EQ MENU for equalization setting.
4. Touch to activate FIELD MENU for sound output setting on balance & fader.
5. Touch to turn on or off of loudness control
6. Touch repeatedly to select the desired preset equalization mode.
7. At "Custom" control mode, hold & slide to set for your desired frequency level.
8. Hold & slide to adjust the output level between left & right speaker.
9. Hold & slide to adjust the output level between front & rear speaker.
10. Hold & slide to set for the desired output level between left & right speaker as well as front & rear speaker.
VISUAL SETUP
VISUAL SETUP MENU
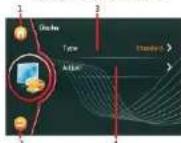
PRESET VISUAL MENU
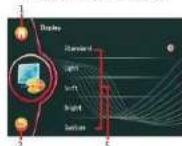
CUSTOM VISUAL MENU
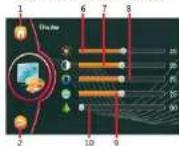
1. Touch to shift screen to MAIN MENU
2. Touch to shift to previous menu or operation mode.
3. Touch to activate PRESET VISUAL MENU for preset visual setting.
4. Touch to activate CUSTOM VISUAL MENU for visual setting.
5. Touch to select the desired preset visual mode of screen
(Note: At "Custom" mode, visual setting on brightness, contrast, hue, saturation & sharpness are made by user under CUSTOM VISUAL MENU)
6. Hold & slide to adjust brightness of screen
7. Hold & slide to adjust contrast of screen.
8. Hold & slide to adjust hue of screen
9. Hold & slide to adjust saturation of screen.
10. Hold & slide to adjust sharpness of screen
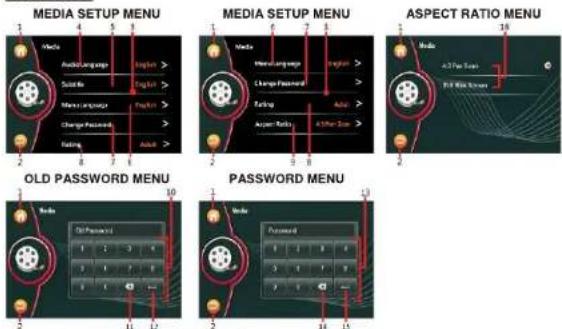
MEDIA SETUP
-
Touch to shift screen to MAIN MENU
-
Touch to shift to previous menu or operation mode.
-
Hold & slide to show the hidden media setup modes.
-
Touch to activate LANGUAGE INTERFACE to set for the desired audio language for DVD playback provided the DVD recorded with relative language.
-
Touch to activate LANGUAGE INTERFACE to set for the desired subtitle for DVD playback provided the DVD recorded with relative subtitle.
-
Touch to activate LANGUAGE INTERFACE to set for the desired menu language of the DVD provided the DVD recorded with relative menu language.
-
Touch to activate OLD PASSWORD MENU for password changing.
-
Touch to activate PASSWORD MENU to input password and enter to the RATING INTERFACE to set for the rating of video playback.
-
Touch to activate ASPECT RATIO MENU to select aspect ratio of screen for viewing.
-
Touch to input the old password number.
-
Touch to erase the digit input by error.
-
Touch to confirm the number input.
-
Touch to input the password number or input the new password number.
-
Touch to erase the digit input by error.
-
Touch to confirm the number input.
-
Touch to select the desired aspect ratio of screen for viewing.
Note
- During DVD playback mode, new setting on "Audio Language", "Subtitle" & "Menu Language" cannot be activated. It is recommended to make relative setting before inserting a DVD for playback.
- Default password "0000" or "8888".
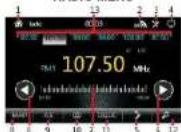
- Touch to turn frequency upward or downward and stop for broadcasting when a station received.
Touch & hold repeatedly to fine tune radio frequency upward or downward. - Touch, hold & slide to the desired frequency, release for broadcasting
- Touch repeatedly to select radio band for broadcasting.
- Touch to start searching the radio frequency & storing the strongest signal stations into memory. After one cycle searched, the unit starts intro broadcasting of the preset memory stations for a few seconds.
- Touch to select stereo (ST) or mono mode at FM radio band. When stereo signal received, stereo indicator will be appeared on screen and this is no indicator for mono signal.
- Touch to select local (LOC) setting for reception of strong signal stations and a distant setting for reception of weak stations at FM radio band. When local (LOC) setting is selected, LOC will be appeared on screen and this is no indication for distant setting.
- Touch to start intro broadcasting of the preset memory stations for a few seconds. Touch again to stop this intro broadcasting.
- This shows the preset memory stations. Touch any one of the preset memory station to have broadcasting of relative station. Touch & hold shortly on any one of the preset memory station, the current broadcasting station/frequency will be stored in the respective preset memory station.
At MAIN MENU, touch to shift to multi-media playback mode and playback will start automatically. Depends on the input device and playback media, touch on screen (at music playback, touch repeatedly on screen) to show various playback menus for operation.
-
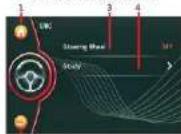
Touch to turn on or off of steering wheel control (when the steering wheel control wires – grey & green as well as the ground wire connected).
-
Touch to activate SW STUDY MENU for steering wheel control learning & setting.
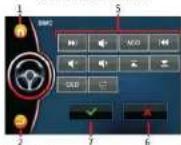
Steps for learning & setting:
- touch any control key 5 on screen
\~ press & hold the respective control of the steering wheel of the car
- the unit starts learning and once completed, indicator appears on screen
- follow the above steps to set for all other controls
- when completed, press "7" to confirm the setting
- press "6" to cancel the setting
-
These show items available for setting.
-
Touch to cancel the setting.
-
When study & setting completed, touch to confirm the setting.
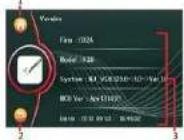
VERSION OF UNIT
VERSION OF UNIT
-
Touch to shift screen to MAIN MENU
-
Touch to shift to previous menu or operation mode.
-
These show the software version of unit.
Note: The VERSION OF UNIT is used to show the details of unit.
This is not available for setting.
ON SCREEN – RADIO OPERATION

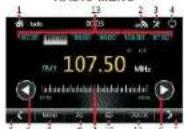
At MAIN MENU, touch to shift screen to RADIO MENU for radio operation.
RADIO MENU
RADIO MENU
-
Touch to shift to MAIN MENU for selection of various operation and setup.
-
Touch to shift to Bluetooth operation.
(Note: Bluetooth icon will be highlighted when the unit linked up with the mobile phone)
-
Touch to activate audio & visual setting for various audio & visual setup (refer to ON-SCREEN - AUDIO & VISUAL SETTING for details).
-
Touch to turn off the screen. When the screen turned off, touch any portion of the screen to turn on the screen.
-
Touch to fine tune radio frequency upward or downward.
BLUETOOTH SETUP
BLUETOOTH SETUP MENU
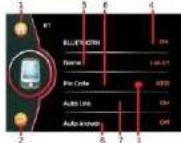
BLUETOOTH SETUP MENU
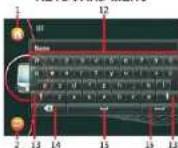
KEYBOARD MENU
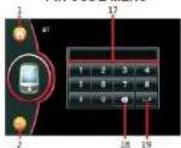
PIN CODE MENU
-
Touch to shift screen to MAIN MENU
-
Touch to shift to previous menu or operation mode.
-
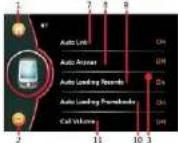
Hold & slide to show the hidden Bluetooth setup modes.
-
Touch to turn on or off of Bluetooth operation mode
-
Touch to activate KEYBOARD MENU for renaming the device (default name "CAR-KIT").
-
Touch to activate PIN CODE MENU for changing the pin code of the device.
(Note: Default pin code "0000" or "8888")
-
Touch to turn on or off of auto linking between the car unit and mobile phone when the car unit turned on again after power off.
-
Touch to turn on or off of auto answer when receiving incoming call.
-
Touch to turn on or off of automatic loading record of incoming calls / dial out numbers / missing calls of the mobile phone to the car unit. (Note: Loading of record will start automatically when the unit linked up with the mobile phone & shift to BT RECORD MENU at the first time – refer to ON SCREEN – BLUETOOTH OPERATION for details)
-
Touch to turn on or off of automatic loading phone book of the mobile phone to the car unit. (Note: Loading of phone book will start automatically when the unit linked up with the mobile phone & shift to BT PHONE BOOK MENU at the first time – refer to ON SCREEN - BLUETOOTH OPERATION (for details).
-
Touch to turn on or off of the default volume level during Bluetooth conversation. ON mode: volume level at Bluetooth conversation is shifted to the default volume level OFF mode: volume level at Bluetooth conversation is the same level at current volume level Note: Volume level can be adjusted at any time during Bluetooth conversation
-
Touch to input the new name of the device.
-
Touch to shift between capital letter & small letter.
-
Touch to erase the digit / letter input by error.
-
Touch for spacing.
-
Touch to confirm the input.
-
Touch to input the new pin code of the device.
- Touch to erase the digit input by error.
- Touch to confirm the input.
CALENDAR & CLOCK SETUP
CALENDAR SETUP MENU
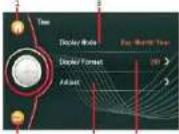
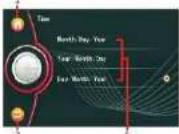
CALENDAR FORMAT MENU
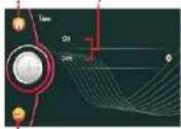
CLOCK FORMAT MENU
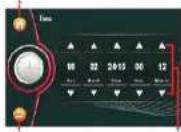
SETTING MENU
- Touch to shift screen to MAIN MENU.
- Touch to shift to previous menu or operation mode.
- Touch to activate CALENDAR FORMAT MENU for date / month / year format setting.
- Touch to activate CLOCK FORMAT MENU for 12H / 24H display format setting.
- Touch to activate SETTING MENU for calendar & clock setting.
- Touch to select calendar display format.
- Touch to select clock display format.
- Touch repeatedly to set for calendar & clock.
ILLUMINATION BACKLIGHT SETUP
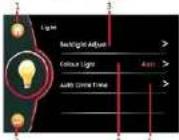
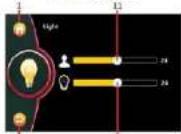
LIGHT (AUTO)
SETUP MENU
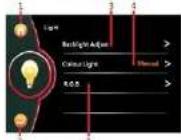
LIGHT (MANUAL)
SETUP MENU
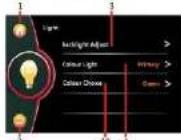
LIGHT (PRIMARY)
SETUP MENU
[13]
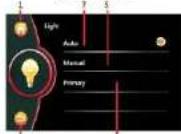
MODE MENU
ADJUST MENU
R.G.B. MENU
- Touch to shift screen to MAIN MENU
- Touch to shift to previous menu or operation mode.
- Touch to activate ADJUST MENU to adjust backlight illumination.
- Touch to activate MODE MENU to select illumination mode (auto / manual / primary).
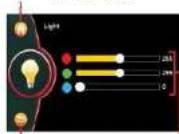
- Touch to select MANUAL MODE for R.G.B. colour setting.
- When AUTO MODE selected, touch to activate AUTO CYCLE TIME INTERFACE to select the time for automatic backlight change.
- Touch to select AUTO MODE for automatic backlight change (cycle change).
- When MANUAL MODE selected, touch to activate R.G.B. MENU for R/G/B adjustment.
- Touch to select PRIMARY MODE to select a single colour illumination.
- When PRIMARY MODE selected, touch to activate COLOUR INTERFACE to select a single colour for illumination.
- Hold & slide to set brightness of screen when brightness of screen is set at USER MODE (refer to ON SCREEN - MAIN MENU OPERATION):

- Hold & slide to set brightness of screen when brightness of screen is set at USER SETTING MODE under headlamp detection at ON mode (refer to ON SCREEN - MAIN MENU OPERATION):

- At R.G.B. MENU, hold & slide to adjust the desired R / G / B colour
Note: Backlight illumination is synced with the on/off of the car lamp. Orange wire should be connected to the on/off of car lamp
STEERING WHEEL CONTROL SETUP
SW CONTROL MENU
SW STUDY MENU
- Touch to shift screen to MAIN MENU
- Touch to shift to previous menu or operation mode.
[14]
- Owner's Manual
- IMPORTANT NOTICE & PRECAUTIONS
- WIRING CONNECTION
- MAIN UNIT OPERATION
- SPECIFICATION
- Important notice on mobile phone linking operation on Android devices:
- Floating dock operation under mobile phone linking:
- TV Mode
- -TUN+/ENT
- Radio Mode
- DVD Mode
- Folder / Playlist Mode
- TFT SCREEN
- Note
- ON SCREEN - AUDIO & VISUAL SETTING
- APPLICATION TO CONTROL THE UNIT VIA BLUETOOTH OF MOBILE PHONE
- (Andorid support only)
- SYSTEM SETUP
- LINK UP WITH MOBILE PHONE
Brand : Soundstream
Model : Reserve VRN-7HB
Category : Browser