Alcove 12 - Tent OZtrail - Free user manual and instructions
Find the device manual for free Alcove 12 OZtrail in PDF.


| Product Type | Tent |
| Brand | OZtrail |
| Model | Alcove 12 |
| Capacity | 12 person |
| Floor Area | Approximately 22.5 m² (242 ft²) |
| Peak Height | 2.1 m (6.9 ft) |
| Number of Rooms | 3 (1 main + 2 sleeping cabins) |
| Poles Material | Fiberglass 11 mm |
| Flysheet Material | Polyester 150D, PU coated |
| Floor Material | Polyethylene, reinforced |
| Waterproof Rating | 2000 mm |
| Weight | Approximately 22 kg (48.5 lbs) |
| Packed Size | 80 x 35 x 35 cm (31.5 x 13.8 x 13.8 in) |
| Setup Type | Freestanding with included pegs |
| Design Features | Pre-attached guylines, color-coded poles, vented windows |
| Maintenance | Clean with mild soap and water, air dry before storage |
| Repairability | Spare poles and pegs available from OZtrail |
| Safety | Fire retardant fabric (CPAI-84 compliant) |
Frequently Asked Questions - Alcove 12 OZtrail
User questions about Alcove 12 OZtrail
0 question about this device. Answer the ones you know or ask your own.
Ask a new question about this device
Download the instructions for your Tent in PDF format for free! Find your manual Alcove 12 - OZtrail and take your electronic device back in hand. On this page are published all the documents necessary for the use of your device. Alcove 12 by OZtrail.
USER MANUAL Alcove 12 OZtrail
MPS-AL12-A
Contents
Products and Parts 3
Assembly Instructions 4
Disassembly Instructions and Folding Instructions 7
Warranty 8
Prolonging The Life Of Your Tent/Shelter 9
Important Safety and Care Information 10
Replacing the Shock-Cord in Tent Poles.... 12
Understanding Waterproofness ..... 14
Zips 15
HELPFUL HINT
OZtrail advises to read your owner's manual fully and assemble your tent before going camping to ensure all parts are present and to become familiar with the assembly of your tent.
Alcove 12 Shade Dome
Portable shelter for a large crowd. Great for camping, the beach, your backyard, or sporting events

- 365 x 365cm ground coverage with large canopy • Cross pole frame provides quick set up, greater strength and improved water shedding
- Anti-shear shock corded fibreglass poles for greater strength and easy assembly
- Longer lasting silver coated UVtex Sun Tough fabric with water repellent treatment
- Optional at extra charge removable wall for extra sun protection or wind block • Convenient light attachment point • Easy to handle compact carry bag • 1 year manufacturer's warranty
Product Code: MPS-AL12-A
Thank you for purchasing a quality OZtrail product. Please keep this Owner's Manual in a safe and dry place, it contains information and helpful information.
The following parts are included for Product Code: MPS-AL12-A
Part Description
| 4 X Long Fibreglass Poles | 1 |
| 2 x Roof Fibreglass Poles | 2 |
| 12 X Pegs | |
| 4 X Guy Ropes |
PLEASE NOTE
Due to our policy of continual product development, specifications, parts and features of the product may vary from details within this Owners Manual.
HELPFUL HINT
We recommend that you set up this product before you leave for your trip. Check that all parts are present and that you familiarise yourself with the assembly and disassembly of the product. If you have any questions, your OZtrail dealer will be happy to help you.

Assembly Instructions
Step 1 Choosing the Site
Select a sheltered camp site protected from the wind that will not allow water to pond under the shelter. Clear a level area of all stones, twigs, etc.
Step 2: Laying out the shelter
Unpack the contents of your shelter. Lay out the shelter in the direction you wish it to face.
HELPFUL HINT
- After unpacking the tent or shelter, use the checklist on page 3 to identify all parts and make sure all parts are present.
- It is important to condition your tent or shelter before use. See page 9 for instructions.
Step 3: Peg down the shelter
Peg out one corner of the shelter. The peg points are indicated in Figure 1. Anchor the shelter to the ground by inserting the peg through the loop around the base of the shelter at an angle of 45 degrees as indicated in Figure 2. Firm but not tight.
Peg Point
Figure 1

Figure 2
Step 4: Assemble the poles
Assemble all poles, making sure each pole junction is securely connected. Place the assembled poles side by side for easy identification as indicated in Figure 3.

Figure 3
PLEASE NOTE
When sliding the poles through the pole sleeves, take care to avoid the poles or steel pole joiners getting caught. If this happens, do not force the pole; release the pressure, rotate the pole, and continue to slide the pole through the sleeve.
Step 5 Installing the roof poles
Select one of the two roof fibreglass poles. Install by sliding into the sleeves running across the apex of the shelter as indicated in Figure 4. Repeat for the remaining roof pole.
Assembly Instructions cont.

Figure 4

Figure 5
Step 6 Installing the wall poles
With the help of one other person select one of the four long fibreglass poles. Install by sliding the pole through one of the sleeves running around the perimeter of the roof as indicated in Figure 4. Repeat the above process for the remaining three long fibreglass poles. Connect the pole ends onto the corresponding pin and ring assemblies at the base of the shelter as indicated in Figure 2, please note the correct ring is at the base of the adjacent wall. Allow the poles to bow into their natural curve at this stage. While holding the pole in position, beginning at the base and working your way towards the apex of the shelter, clip the J Hooks of the shelter onto the pole as indicated in Figure 5.
The shelter will stand up during this step as indicated in Figure 6. Peg out the remaining peg points, as you work from one peg point to the other around the shelter base pull the webbing firmly, but not tight.

Figure 6
Step 7 Securing the roof poles
Connect the pole end tips into the corresponding eyelet assemblies in the middle of the long fibreglass poles sleeve as indicated in Figure 7. Allow the poles to bow into their natural curve at this stage.

Figure 7
Assembly Instructions cont.
Step 8 Guy Ropes and peg out
Ensure all guy ropes and peg points are utilised. Make a loop (about 30 – 50cm long) with a slider on the end of the rope and peg out as far as possible from the shelter as indicated in Figure 8. Ensure all peg down points are utilised and all guy ropes are attached firmly and remain firm as indicated in Figure 9.
PLEASE NOTE
In severe conditions the tent/shelter should be dismantled.

Figure 8

Figure 9
Disassembly Instructions
Step 1
Release guy ropes.
Step 2
Collapse the shelter by removing and disassembling the poles in the reverse order of the assembly instructions. Place the poles in the pole carry bag and tie shut.
Step 3
Remove pegs with a claw hammer or peg puller. Do not remove pegs from the ground by pulling on shelter base as this may cause damage to the shelter.
Step 4
Spread the shelter out flat with all loose fabric folded within the edges of the shelter base. Try to flatten the shelter as much as possible.
Step 5
Fold the shelter in half, third or quarters. The width of the folded shelter should be the length of the pole bag as indicated in Figure 10.
Step 6
Beginning at the back portion of the shelter bundle, roll forward firmly allowing trapped air to escape. It may help to use the bag of poles as a rolling pin, ensuring the shelter edges are kept straight as you roll.
Step 7
Once the shelter bundle is rolled up, tie straps around it and place into the carry bag with peg bag, instruction booklet and other miscellaneous parts. If the shelter won't fit into the carry bag, unroll and reroll more tightly.
HELPFUL HINT
Never store your tent/shelter damp or dirty. If you have no choice but to pack up a damp or dirty tent/shelter, make sure you lay it out to air in a cool, dry and shaded place as soon as possible and only pack it away when it is completely dry and clean.


The width of the tent/shelter should not exceed the length of the pole bag.

Figure 10
OZtrail warrants this product against defects for a period of one year from the date of purchase. OZtrail will repair or replace the product, at its discretion, should a warrantable defect arise within the warranty period. If the exact model is unavailable, a model of equivalent nature will be substituted at our discretion. This warranty excludes faults and failures caused by improper use and abuse; fair wear and tear; or failure to follow instructions regarding care and maintenance. Products used for a commercial nature are not covered by this warranty against defects. A warranty may be claimed by returning the product to its place of purchase, with a detailed proof-of-purchase clearly showing the date and detail of the purchase. You may also contact OZtrail Leisure Products, by phone: 07 3279 1800, or in writing: PO Box 1110, Eagle Farm QLD 4009, by email: warranty@oztrail.com.au. The benefits under OZtrail's warranty against defects are in addition to other rights and remedies under law in relation to goods.
Our goods come with guarantees that cannot be excluded under the Australian Consumer Law. You are entitled to a replacement or refund for a major failure and for compensation for any other reasonably foreseeable loss or damage. You are also entitled to have the goods repaired or replaced if the goods fail to be of acceptable quality and the failure does not amount to a major failure.
For more detailed information and an explanation of these terms see www.oztrail.com.au/warranty
PLEASE NOTE
Accessories shown may be for display purposes only and not included with the product. Due to our policy of continual product development, specifications and features of this product may vary from what is stated.
HELPFUL HINT:
AVOIDING MOULD AND MILDEW
You should always pack your products both clean and completely dry. In many climates there is a risk of mould or mildew damage to materials that are not packed away in a dry state; this condition is not covered by the warranty. After each camping trip, clean your products with warm soapy water and allow them to dry completely after rinsing them with fresh water.
CARING FOR YOUR SHOCK CORD
Shock cord is designed to help you keep your tent poles organised and to allow quick assembly of the poles. Over-stretching the cord or dropping the poles will cause shock cord failure, and this condition is not covered by the warranty.
INSURANCE, YOUR PROTECTION AGAINST THE UNEXPECTED
Most people have product problems from unexpected sources. Extreme weather is a good example of an unexpected problem. Make sure that you place your expensive camping products on your Home and Contents Insurance policy. Most good insurers will cover the storm damage to your tent or other products that falls outside of the warranty.
Prolonging The Life Of Your Tent/Shelter
- Temporary use only. Although our fabrics are treated for extra UV resistance, continuous exposure to sunlight will reduce the life of the fabric. Fading of colour is an early warning sign. OZtrail products are not designed as permanent dwellings or structures.
- During rain always lower awnings to avoid water ponding.
- Never store a wet and/or soiled tent/shelter; as mildew and corrosion can form. Always allow the tent to dry completely before packing and stowing. If mildew occurs, use a soft bristle brush or sponge with mild detergent to clean it off. After beach use or wet weather treat all zips, poles and pegs with silicon spray.
- The elastic shock cord within the poles is provided for easy assembly of the poles. The shock cord is not required for any structural reason. The poles and tent perform perfectly well without the shock cord. Age, over-stretching and mishandling may cause failure. Shock cord is not covered by warranty. It's easy to replace; see the instructions on page 12.
- Sometimes the zipper coil bursts open or does not close. This could be due to wear or metal fatigue. The problem can be easily fixed; see the instructions on page 15. • Always carry a roll of heavy duty tape for simple repairs to small rips, cuts and ash burns. This not only blocks the hole, it will
prevent further tearing. Heavy duty tape is also helpful for emergency pole repairs and many other uses around the camp site.
- When removing pegs, do not use the webbing or corner of the tent as your handle. Either use another peg, a peg remover or the claw of a hammer hooked under the peg to remove them.
HELPFUL HINT
CONDITIONING YOUR NEW SHELTER
Once you get your new shelter home, it is important to condition the shelter. Simply pitch your shelter and wet it down with your garden hose until the fabric and all seams are saturated. Pay particular attention to the seams - the thread swells when wet and blocks the needle holes. The needle holes also shrink around the thread. The fabric also benefits from this because the fibre swells into the weave and the waterproof treatment settles within the fabric. Let the shelter dry completely before repeating this wetting and drying process until there is no leakage during hosing. Always pack your shelter away dry.
MATERIALS:
Poles- Fibreglass
Skin- Polyester
CARE INSTRUCTIONS:
Wipe down all surfaces with fresh water after use. To remove marks, use a soft brush or sponge with fresh water and mild detergent only and rinse with fresh clean water. Allow to dry thoroughly. Never pack away damp, dirty or wet. After beach use or wet conditions treat all metal components with silicon spray.
Important Safety and Care Information
Please read before setting up your tent/shelter
CAMP SAFE - SAFETY HABITS
Fabrics used in the construction of OZtrail tents/shelter are treated for fire retardant properties. This treatment reduces the rate at which the fabric will burn. The fire retardant fabric will still burn if it comes into direct contact with a flame or extreme heat.
The application of any foreign substance to the fabric such as some water proofing treatments or insect sprays may render the fire retardant treatment process ineffective.
The following pages cover several safety tips that will help you avoid some of the common hazards encountered on a camping trip.
TO PREVENT INJURY CAUSED BY GAS POISONING OR SUFFOCATION
- Gas, fumes or lack of oxygen within the tent/shelter could result in unconsciousness, brain damage and even death.
- Always ensure your tent/shelter is well ventilated. Even on the coldest night do not close every vent, window and door. A well ventilated tent not only maintains healthy Oxygen levels but also reduces condensation build up inside the tent.
- Do not use fuel burning, oxygen consuming devices inside the tent. This includes candles, gas lanterns, kerosene lamps, stoves, cooking and heating appliances.
- Do not use gas appliances of any kind inside the tent/shelter.
TO PREVENT INJURY CAUSED BY FIRE
- Do not pitch the tent/shelter near a camp fire or any other flame source.
- Do not use candles, matches or any other flame source in or near the tent (this includes stoves, cooking equipment, lighting and heating appliances).
- Only use recommended water repellent compounds on the tent/shelter fly.
- Do not spray tent fabrics with insecticides.

TO PREVENT INJURY CAUSED BY ELECTRICITY
- Always exercise care when using electricity and electric lighting in and near tents/shelters. Only use 12 volt lighting.

Important Safety and Care Information cont.
To prevent injury caused by your camping environment

- Do not pitch your tent/shelter on an area that could get flooded.

- Do not pitch your tent/shelter near cliffs in case of collapse or rock fall.

- Do not leave your tent/shelter erected in strong winds - collapse the tent onto the ground and seek refuge in your vehicle.
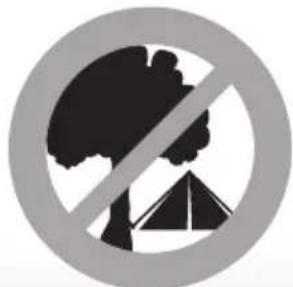
- Do not pitch your tent/shelter under trees with dead branches or under trees known to drop branches.
Tent Pole and Shock Cord Replacement
Fibreglass Tent Pole![graph TD A["Metal Ferrule"] --> B["Knot tied in Shock-Cord"] C["Elastic Shock-Cord"] --> B D["Pole Sections"] --> B E["End Ferrule"] --> B](/content/2026/05/1052113/images/a53f773c1be85ae5b456ec219ce14a677f0789aa07acbb182dfbdebd9c203f2c.jpg)
Figure 11
Tent Poles and Shock Cord are similar to the Tyres on your Car, they require both maintenance and replacement from time to time after unexpected damage. Over stretching, dropping and age are the most common causes of shock cord failure. Excessive curvature during tent assembly or during periods of high winds is the most common causes of pole failure. By maintaining both the Poles and Shock Cord you will be ensuring that you get the best performance and life out of your OZtrail Tent.
HELPFUL HINT
To maximise the life of your shock cord never drop the tents poles during transporting. When packing poles into their carry bag be careful not to settle them by tapping them vertically on a hard surface.
Replacing Shock-Cord
See Figure 11
Step One: Measure and Cut
Measure the length of the Tent Pole. You should use a length of Shock Cord roughly two-thirds the length of the Tent Pole. This will ensure that the Shock Cord has the appropriate amount of elasticity.
Step Two: Threading the Pole Sections
Tie a large knot in the end of the Shock Cord length. This knot needs to be large enough to stop it passing through the tubular hole in the pole sections whilst you are threading it. Thread the Shock Cord through the tubular hole in each pole section.
Tent Pole and Shock Cord Replacement cont.
HELPFUL HINT
Towards the end of the Pole Length it may get quite hard to thread the Pole Sections as the Shock Cord is stretching. To help avoid this, place all of the sections you have already threaded on the floor. Stretch the Shock Cord through them until you have much more than what you need for the rest of the sections to thread. Place your foot on the Shock Cord at the end of the last Pole Section you have threaded. This will maintain the stretch and give you plenty of Shock Cord to work with.
Once your new pole is cut to length, you can follow the 'Replacing Shock-Cord' directions to complete your pole length.
HELPFUL HINT
Helpful Hint: Be prepared for unexpected breakages. Always carry a few spare pole sections that match the diameter of your tent poles, as well as some lengths of replacement shock cord. These items are available at all good camping retailers.
Step Three: Tying Off
Once all of the pole sections have been threaded, you will need to tie a large knot in the shock cord, much the same as we did at the start. This knot needs to be sufficiently large to stop it pulling through the hole. Once this is done, trim the excess shock cord at each end.
Replacing Tent Pole Sections
Much like a flat tire on your car, a broken pole section is an annoyance that can be easily rectified.
Cut the shock cord to enable you to remove the broken pole section. This is also a good time to replace the shock cord as well.
Measure both the diameter and overall length of the pole section. Once you have these measurements, you will be able to organize a pole replacement kit from your local camping goods retailer. You may have to cut the replacement pole to length. This can be done easily with a hacksaw. Lightly sand the cut edge to remove any sharp edges.
Understanding Waterproofness
Know your tent/shelter
OZtrail tents/shelters are manufactured from waterproof and water repellent fabrics. However, with the addition of seams, zips, and other desirable features, a recreational tent/shelter will not be as waterproof as a car, house, or other solid structures.
The following are common examples of how water can enter a tent/shelter: -
CONDENSATION
When warm moist air meets cooler air, condensation occurs. The tent/shelter fly forms an impermeable layer between the inside and outside conditions. The moisture inside the tent/shelter condenses on the fabric. Sometimes in cold conditions it appears that the fabric is leaking when in fact the cause is condensation. Condensation can be reduced if the tent/shelter is well ventilated.
ZIPS
All care is taken in the design to cover zips. At times wind driven rain could force water under the flaps and through the zips. To minimise this, make sure all doors and windows are closed with the flaps covering the zips.
FLOOR
If the ground is very wet or water pools under the floor, downward pressure of standing or kneeling on the floor could force water through
the floor fabric. To prevent this, do not pitch the tent over hollows and make sure water drains away from the tent.
STRUCTURAL INTEGRITY
A well pitched tent/shelter on level ground is structurally strong and most waterproof. During prolonged periods of rain and wind it may be necessary to tighten guy lines and reset the tent/shelter pegs and attend to drainage around the tent/shelter. Sagging and incorrect pitching weakens the tent/shelter structure and could allow water to pool on the fly placing undue forces on the tent/shelter causing leaking and breakages.
REDUCING THE RISK OF JAMMING FABRIC IN THE ZIP
- When using the zip, hold the pull-tab between your thumb and forefinger with your thumb facing you.
- As you are closing the zip clear the way in front and under the zip slider using the back of your hand, and cup the zip slider underneath with your remaining 3 fingers.
Use this action for opening or closing. Keep the fabric clear of the zip slider - zip and unzip slowly.
WHAT TO DO IF THE ZIPPER GETS CAUGHT
- Pull the fabric bit by bit out of the slider. Do not try and pull all the fabric in one go. Do not force the slider or the fabric.
IF THE SLIDER DOES NOT CLOSE THE ZIPPER PROPERLY
- With use, the jaws of the zip slider can open ever so slightly. When this occurs the slider does not compress the zip teeth or coil together tightly enough and the zip bursts open or does not close.
- Undo the zip and with the slider at the end of the zip lightly crimp the jaws of the slider together. Try top to bottom axis first and then side to side axis.
CRIMPING A ZIP-SLIDER
The most common reason why zips burst open is that the zip slider does not close the coil tightly enough. Wear and tear may cause the gap marked A to open up. See Figure 12.
By simply 'crimping' the slider together at points B & C with a pair of pliers, this solves the problem most of the time. Crimping in other planes is worth a try if B & C does not work. This is to be done when the zip slider is still attached to the zip in the open position. See Figure 12.

Figure 12
See our website for the full OZtrail range or

facebook.com/OZtrailAustralia.

oztrail
www.oztrail.com.au
- CONTENTS
- HELPFUL HINT
- ALCOVE 12 SHADE DOME
- PRODUCT CODE: MPS-AL12-A
- PLEASE NOTE
- ASSEMBLY INSTRUCTIONS
- STEP 1 CHOOSING THE SITE
- STEP 2: LAYING OUT THE SHELTER
- STEP 3: PEG DOWN THE SHELTER
- STEP 4: ASSEMBLE THE POLES
- STEP 5 INSTALLING THE ROOF POLES
- ASSEMBLY INSTRUCTIONS CONT
- STEP 6 INSTALLING THE WALL POLES
- STEP 7 SECURING THE ROOF POLES
- STEP 8 GUY ROPES AND PEG OUT
- DISASSEMBLY INSTRUCTIONS
- STEP
- AVOIDING MOULD AND MILDEW
- CARING FOR YOUR SHOCK CORD
- INSURANCE, YOUR PROTECTION AGAINST THE UNEXPECTED
- PROLONGING THE LIFE OF YOUR TENT/SHELTER
- CONDITIONING YOUR NEW SHELTER
- MATERIALS
- CARE INSTRUCTIONS
- IMPORTANT SAFETY AND CARE INFORMATION
- PLEASE READ BEFORE SETTING UP YOUR TENT/SHELTER
- CAMP SAFE - SAFETY HABITS
- TO PREVENT INJURY CAUSED BY GAS POISONING OR SUFFOCATION
- TO PREVENT INJURY CAUSED BY FIRE
- TO PREVENT INJURY CAUSED BY ELECTRICITY
- IMPORTANT SAFETY AND CARE INFORMATION CONT
- TO PREVENT INJURY CAUSED BY YOUR CAMPING ENVIRONMENT
- TENT POLE AND SHOCK CORD REPLACEMENT
- REPLACING SHOCK-CORD
- STEP ONE: MEASURE AND CUT
- STEP TWO: THREADING THE POLE SECTIONS
- TENT POLE AND SHOCK CORD REPLACEMENT CONT
- STEP THREE: TYING OFF
- REPLACING TENT POLE SECTIONS
- UNDERSTANDING WATERPROOFNESS
- KNOW YOUR TENT/SHELTER
- CONDENSATION
- ZIPS
- FLOOR
- STRUCTURAL INTEGRITY
- REDUCING THE RISK OF JAMMING FABRIC IN THE ZIP
- WHAT TO DO IF THE ZIPPER GETS CAUGHT
- IF THE SLIDER DOES NOT CLOSE THE ZIPPER PROPERLY
- CRIMPING A ZIP-SLIDER
Brand : OZtrail
Model : Alcove 12
Category : Tent