
Punch PLC-U - Remote control Rockford Fosgate - Free user manual and instructions
Find the device manual for free Punch PLC-U Rockford Fosgate in PDF.

| Product Type | Remote Control for Car Audio Amplifier |
| Brand | Rockford Fosgate |
| Model | Punch PLC-U |
| Dimensions (L x W x H) | 2.5 x 1.5 x 0.75 inches (approx.) |
| Weight | 0.1 lb (approx.) |
| Power Source | Wired connection to amplifier (remote turn-on and ground) |
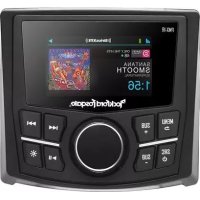
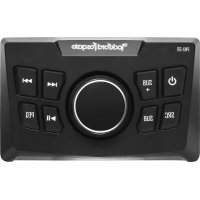
| Main Function | Adjust subwoofer or amplifier output level remotely |
| Control Type | Rotary knob with center push |
| Output Level Range | 0 to 100% of amplifier input gain |
| Connection Type | RJ-11 telephone-style cable (typically included) |
| Compatible Amplifiers | Rockford Fosgate Punch series with remote jack |
| Mounting | Panel mount with included bracket and screws |
| Materials | Plastic housing with rubberized grip knob |
| Color | Black |
| Special Features | Subwoofer level control, bass boost (if amp supports) |
| LED Indicator | Blue or red LED to show power/level status |
| Maintenance | Wipe with dry cloth; avoid liquids |
| Security | No security features; keep out of reach of children |
| Repairability | Not user-serviceable; replace unit if defective |
| Spare Parts | Contact Rockford Fosgate customer service |
| General Information | Designed for precise low-level volume control |
Frequently Asked Questions - Punch PLC-U Rockford Fosgate
User questions about Punch PLC-U Rockford Fosgate
0 question about this device. Answer the ones you know or ask your own.
Ask a new question about this device
Download the instructions for your Remote control in PDF format for free! Find your manual Punch PLC-U - Rockford Fosgate and take your electronic device back in hand. On this page are published all the documents necessary for the use of your device. Punch PLC-U by Rockford Fosgate.
USER MANUAL Punch PLC-U Rockford Fosgate
Using the rocker switch mount allows you to take advantage of factory rocker switch knockout panels. Simply remove the cover over the hole for the switch, route wires through the hole and snap into place. Plug the RCA and AUX cables into source.
If you are making a custom switch panel you will need to cut a rectangle shaped hole for the switch to mount in. The panel needs to be flat. Once the hole is cut, route the wires through the hole and snap into place. Plug the RCA and AUX cables into source.


Flush Panel Mount
To flush mount your PLC-U, find a flat area and drill a 9/32" hole. Make sure to check behind the panel for proper clearance prior to drilling. To remove the level attenuator, pull off the knob and remove retaining nut.

Attenuator Removal
Once you have the hole drilled, insert the attenuator through the backside of the hole. Attach with washer and retaining nut. After retaining nut is tight, push the knob onto the attenuator. You can use either the large or small knob with this application.

PLC-U Mounting Option Instructions
Under Panel
To mount your PLC-U, find a flat area on the underside of your dash panel. Predrill two 11/64" holes for the bracket. Make sure to check behind the panel for proper clearance prior to drilling. Once the holes are drilled, attach the bracket using the supplied screws.
Once you have the bracket mounted, remove the retaining nut and insert the PLC-U with the cables through the bracket. Slide retaining nut over cables and proceed to tighten. Plug the RCA cables into source.

Large Knob Option


Small Knob Option
Small bezel is used with small knob.


natural_image
Technical illustration of a mechanical assembly with threaded shaft and housing (no text or symbols)
Large bezel is used with large knob.
Panel Mount
To mount your PLC-U, find a flat panel and drill a 1" (25mm) hole. Make sure to check behind the panel for proper clearance prior to drilling.
Once you have the hole drilled, remove retaining nut and insert PLC-U with cables through hole. Slide the retaining nut over cables and proceed to tighten. Plug the RCA cables into source.

Large Knob Option


Small Knob Option
Small bezel is used with small knob.

natural_image
Technical illustration of a mechanical assembly with threaded shaft and housing (no text or symbols)
natural_image
Mechanical assembly diagram showing a shaft and gear assembly with no visible text or symbolsLarge bezel is used with large knob.
Brand : Rockford Fosgate
Model : Punch PLC-U
Category : Remote control