RSF3400UWG - Cooker Caloric - Free user manual and instructions
Find the device manual for free RSF3400UWG Caloric in PDF.

| Product Type | Freestanding Gas Cooker |
| Brand | Caloric |
| Model | RSF3400UWG |
| Width | 30 inches (76.2 cm) |
| Depth | 27.5 inches (69.9 cm) |
| Height | 47 inches (119.4 cm) with backguard |
| Weight | 180 lbs (81.6 kg) |
| Power Source | Natural Gas or LP (convertible) |
| Burners | 4 Gas Burners: 1 High-Output (12,000 BTU) + 3 Standard (9,000 BTU) |
| Oven Type | Gas Oven with Broiler |
| Oven Capacity | 5.0 cu ft (141.6 L) |
| Cleaning | Self-Cleaning Cycle |
| Safety Features | Oven Door Lock, Flame Failure Device, Child Lock |
| Ignition | Electronic Ignition (requires power) |
| Control Type | Knobs + Digital Timer |
| Color | White |
| Spare Parts Availability | Burner Caps, Grates, Knobs, Oven Thermostat, Door Gasket |
| Repairability | Modular design; common parts replaceable by technician |
| Included Accessories | Oven Rack (2), Broiler Pan, LP Conversion Kit |
Frequently Asked Questions - RSF3400UWG Caloric
User questions about RSF3400UWG Caloric
0 question about this device. Answer the ones you know or ask your own.
Ask a new question about this device
Download the instructions for your Cooker in PDF format for free! Find your manual RSF3400UWG - Caloric and take your electronic device back in hand. On this page are published all the documents necessary for the use of your device. RSF3400UWG by Caloric.
USER MANUAL RSF3400UWG Caloric
Self-Cleaning Gas Range Use and Care Manual
Model: RSF3400
RSF3410
To the Installer: Leave this manual and other literature with the consumer for future use.
To the Consumer: Keep this manual for future reference.
Important Safety Instructions ____ 3
Clock and Timer 6
Choosing Cooking Utensils 7
Operating Top Burners 8
Oven Tips 9
Operating the Oven 10
Baking Chart 12
Roasting Charts 13
Broiling 14
Self-Cleaning 15
Cleaning Other Range Parts 16
Removing Storage Drawer 16
Maintenance 17
Troubleshooting 18
Service Information 19
Model Identification
Complete the registration card and promptly return card to Caloric Product Registration department. If registration card is missing, call Consumer Information at 1-800-843-0304. If outside the U.S.A. call 1-319-622-5511.
When contacting Caloric, provide product information. Product information is located on the appliance nameplate. The nameplate is on the lower portion of the oven door frame. It can be seen by opening the oven door. Record the following information:
Model Number: ____
Serial Number: ____
Manufacturing Number:
Date of purchase: ____
Name and address of Dealer:
Keep a copy of sales receipt for future reference or in case warranty service is required.
If you have questions concerning product usage, installation or warranty call 1-800-834-0304. If you are calling from outside the U.S.A. call 1-319-622-5511.
To locate an authorized servicer, call 1-800-NAT-LSVC (1-800-628-5782). If outside U.S.A. call 1-319-622-5511. We recommend contacting an authorized servicer if service is required.
WARNING
If the information in this manual is not followed exactly, a fire or explosion may result causing property damage, personal injury or death.
-- Do not store or use gasoline or other flammable vapors and liquids in the vicinity of this or any other appliance.
-- WHAT TO DO IF YOU SMELL GAS
- Extinguish any open flame.
· Do not try to light any appliance. - Do not touch any electrical switch; Do not use any phone in your building.
- Immediately call your gas supplier from a neighbor's phone. Follow the gas supplier's instructions.
· If you cannot reach your gas supplier, call the Fire Department.
-- Installation and service must be performed by a qualified installer, service agency or the gas supplier.
WARNING
This gas appliance contains or produces a chemical or chemicals which can cause death or serious illness and which are known to the state of California to cause cancer, birth defects, or other reproductive harm. To reduce the risk from substances in the fuel or from fuel combustions make sure this appliance is installed, operated, and maintained according to the instructions in this book and the installation instructions.
To reduce the risk of the appliance tipping, it must be secured by a properly installed anti-tip bracket(s). To make sure bracket has been installed properly, remove the storage drawer and look under the range with a flashlight. Bracket(s) must be engaged in the rear corner of the range.
WARNING
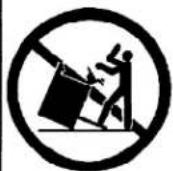
- ALL RANGES CAN TIP
- INJURY TO PERSONS COULD RESULT
- INSTALL ANTI-TIP BRACKET(S) PACKED WITH RANGE
• SEE INSTALLATION INSTRUCTIONS
WARNING
To avoid the possibility of electrical shock: disconnect the power supply before servicing this unit.
To avoid personal injury, do not sit, stand or lean on the oven door or oven drawer.
For your safety, do not obstruct the flow of combustion or ventilation air to the range.
To avoid the possibility of property damage, personal injury or death: turn off the gas supply at the main circuit breaker before servicing this unit.
NOTICE
The maximum gas supply pressure for the range must not exceed 14 inches W.C.P.
WARNING
General
- The range must be installed by an authorized servicer, qualified installer or gas supplier.
- Never use the range for warming or heating the room.
- Do not store items on the rangetop. Items stored on the rangetop can become hot and melt.
- Wear proper apparel. Loose fitting or hanging garments should never be worn while using the range.
- Do not repair or replace any part of the range yourself unless it is recommended in this manual.
- Gasoline, or other flammable vapors or liquids and combustible materials should not be stored near the range. They may ignite causing a fire.
- Use only dry potholders. Moist or damp potholders on hot surfaces may result in burns from steam. Do not let a potholder touch a flame. Do not use a towel or a bulky cloth as a potholder.
- Do not leave children unattended in an area where the range is in use.
- Never sit, stand, or lean on any part of the range.
Surface Cooking
- Use the proper pan size. Select utensils with flat bottoms large enough to cover the flame. Undersized utensils will expose the flame to direct contact with clothing.
- To reduce the risk of burns, ignition of flammable materials, or spillage due to unintentional contact with the utensil, utensil handles must be turned inward. Handles must not extend over adjacent surface burners.
- Top burner flames should not extend beyond the edge of the cooking utensil. If the flames are too large they can beadjusted following the directions in the installation instructions.
WARNING
- Do not touch areas near surface burners during or immediately after use. These areas can become hot enough to cause burns.
- Do not store items of interest to children above the range. Children climbing on the range to reach the items may be injured.
- Only certain types of glass, glass/ceramic, ceramic, earthenware, or other glazed utensils are suitable for rangetop use. Unsuitable utensils may break due to the sudden temperature change.
- Never leave surface units unattended at high heat settings. Boilovers can cause smoking and may ignite.
- Clean the rangetop with caution. To avoid steam burns, do not use a wet sponge or cloth to wipe up spills on a hot cooking area.
- Do not place aluminum foil or foods packaged in aluminum foil directly on the flame.
- Avoid unstable pans that are easily tipped. Handles should not be loose or twist and should remain cool. If a utensil handle twists or becomes hot during cooking discard the pan.
Oven
- Use care when opening the oven door. Let hot air or steam escape before removing or replacing food.
- Do not heat unopened food containers in the oven. Build-up of pressure may cause a container to burst and result in an injury.
- Keep the oven vent ducts unobstructed.
- Place oven racks in desired location while the oven is cool. If a rack must be moved while the oven is hot, use a dry potholder.
- Do not use aluminum foil to line the oven bottom. Aluminum foil can cause a fire and will affect baking results.
WARNING
- Do not touch the interior surfaces of the oven during or immediately after use. Do not let clothing or other flammable materials contact the bake or broil burners. Although these surfaces may be dark in color, they can still be hot enough to burn.
- Other areas of the oven can become hot enough to cause burns, such as vent openings, window, oven door and oven racks.
- Do not use the oven cavity for storage space.
- Never use abrasives, commercial oven cleaners or steel wool to clean any part of the range or the oven interior.
- Never attempt to operate the oven during a power failure.
- Do not drape towels or other materials on the oven door handle. These items may contact a flame or become too hot and ignite.
- Do not use aluminum foil to cover the broiler grid. The foil can trap grease on top of the grid causing it to ignite.
WARNING
Due to the nature of cooking, fires can occur as a result of overcooking or excessive grease accumulation. Although a fire is unlikely, if one occurs proceed as follows:
Surface Burner Fires
- Do not operate the vent hood. The fan can spread the flames.
- If it is safe to do so, turn the burner to "OFF".
- As an added precaution turn off the electricity at the main circuit breaker or fuse box and the gas at the main supply valve.
- Smother the fire with a non-flammable lid or use a Class "ABC" or "BC" fire extinguisher.
Oven Fires
- Do not open the oven door.
- Turn all controls to "OFF".
- As an added precaution turn off the electricity at the main circuit breaker or fuse box and the gas at the main supply valve.
- Allow the food or grease to burn itself out in the oven.
If smoke or fire persist call your local fire department!
Setting the Time of Day
- Push in the set knob.
- Rotate the knob to the desired time of day and release the knob.
Setting the Minute Timer
- Rotate the set knob to the desired time. Timer can be set up to 60 minutes.
- Buzzer will sound when time has elapsed.
- Buzzer will sound until set knob is turned to OFF position.

Cooking Utensils
- Use the proper pan size. Do not use a pan that has a bottom smaller than the flame. Do not use utensils that over hang the grate by more than 1".
- Care should be taken when using glazed cooking utensils. Some glass, earthenware or other glazed utensils will break due to sudden temperature changes.
- Select utensils without broken or loose handles. The handle should not be heavy enough to tilt the pan.
- Select utensils with flat bottoms.
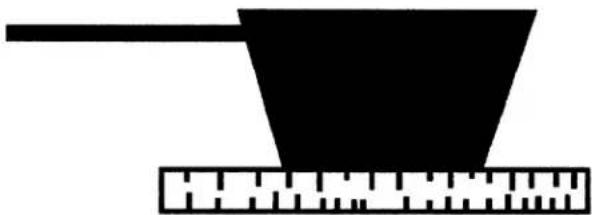
Determining If a Pan Has a Flat Bottom
- Rotate a ruler along the bottom of the pan. If the pan is not flat there will be gaps between the bottom of the pan and the edge of the ruler.
- A small grove or mark on a pan bottom will not effect cooking times. However, if a pan has a large gap or an extremely uneven bottom, it will not be energy efficient and will not provide good cooking results.
natural_image
Simple black-and-white diagram of a funnel and ruler on a base (no text or symbols)Cooking Utensil Specifications
| Type | Response To Temperature Changes | Recommended Usage |
| Aluminum | Heats and Cools Quickly | Frying, Braising, Roasting |
| Cast Iron | Heats and Cools Slowly | Low Heat Cooking, Frying |
| Copper, Tin Lined | Heats and Cools Quickly | Gourmet Cooking, Wine Sauces, Egg Dishes |
| Enamelware | Response Depends on Base Metal | Low Heat Cooking |
| Glass Ceramic | Heats and Cools Slowly | Low Heat Cooking |
| Stainless Steel | Heats and Cools at Moderate Rate | Soups, Sauces, Vegetables, General Cooking |
Operating the Top Burners
- Push in and turn the burner control to LITE.
- When the burner is lit, turn the control to the desired setting.
When Finished
Turn all controls to OFF.
Operating the Cooktop During A Power Failure
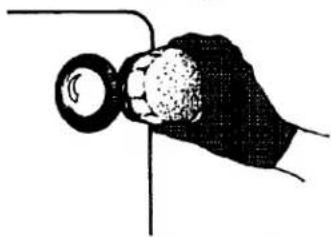
- Push in and turn the control knob to LITE.
- Hold a lit match at the corresponding burner.
- When the burner is lit, turn the control to the desired setting.
When Finished
Turn all controls to OFF.
⚠ WARNING
To avoid the risk of serious personal injury, property damage or fire do not leave the surface burners unattended while in operation. Grease and spillovers can ignite causing a fire.
Do not attempt to light the oven or broil burners during a power failure.
Lighting Burner During A Power Failure

natural_image
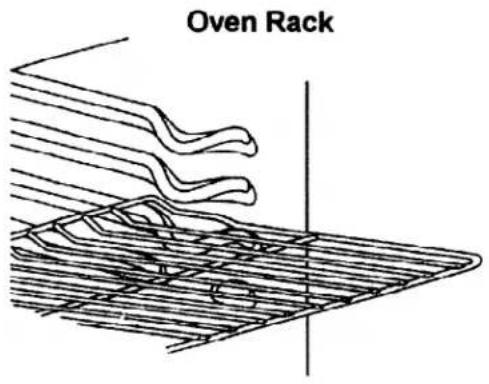
Line drawing of a hand holding a tool near a rectangular object (no text or symbols)Oven Rack Placement
- Pull rack forward to the stop position.
- Raise the front edge and pull it out of the oven.
Note: The curved edge of the rack must be toward the rear of the oven.
Pan Placement
Baking pans and cookie sheets should be kept two inches from the side and rear walls. If baking pans are placed on different racks, they should be staggered so that one is not located directly under another. This will prevent uneven browning of foods.
Correct Pan Placement

natural_image
Two identical wire grating grids containing three macarons, no text or symbols presentTo Bake
- Place the food in the oven.
- Push in and turn the oven temperature control knob to the desired setting.
- Turn the oven selector knob to BAKE.
Pre-heat the oven approximately 10 minutes before placing food inside.
When Finished
Turn all controls to OFF.
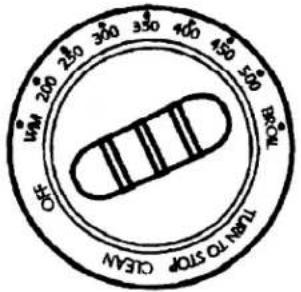
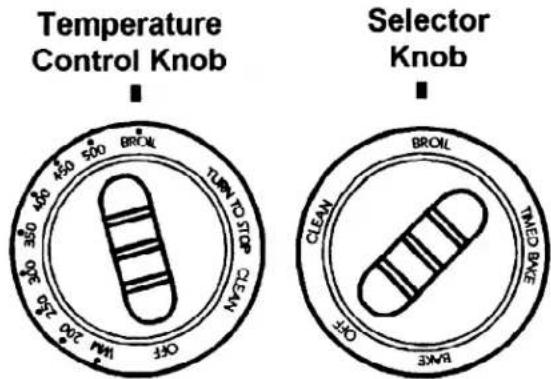
Temperature Control Knob

Selector Knob

Setting the Oven to Stop Baking Automatically
- Place food in the oven.
- The clock must be set at the correct time of day.
- Turn the oven selector knob to TIMED BAKE.
- Push in and turn the oven temperature control knob to the desired temperature.
- Turn the STOP knob to the desired stopping time.
The oven will begin to bake in approximately 60 seconds. When the time of day clock reaches the time set on the STOP knob the oven will automatically stop baking.
Clock

Set Time Using STOP Knob
When Finished
Turn all controls to OFF.
WARNING
To avoid the risk of food poisoning never keep meat, poultry, milk, egg or fish products in the oven for more than two hours before cooking.
Setting the Oven to Start and Stop Baking Automatically
- Place food in the oven.
- The clock must be set at the correct time of day.
- Turn the oven selector knob to TIMED BAKE.
- Push in and turn the oven temperature control knob to the desired temperature setting.
- Push in and turn the START knob to the desired starting time.
- Turn the STOP knob to the desired stopping time.
The oven will begin cooking when the time of day reaches the time set on the START knob. When the time of day reaches the time set on the STOP knob, the oven will automatically stop baking and the START knob will pop out of the locked position.
When Finished
Turn all controls to OFF.
To Cancel the Automatic Bake Function
- Push in and turn the START knob until the knob pops out of the locked position.
- Push in and turn the STOP knob until the knob pops out of the locked position.
- Turn the selector knob to manual.
- Turn the temperature control knob to OFF.
Temperature Control Knob
Selector Knob
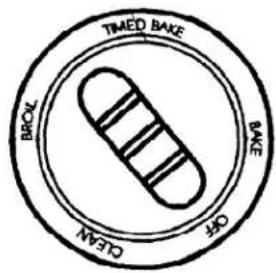
Clock

Set Baking Time Using Start and Stop Knob
NOTICE
Do not lock door lock lever during baking. The oven door may lock at normal baking temperatures. If the door is accidentally locked, turn the oven off and wait for it to cool. Do not force the door lock lever open. Forcing the lock lever can damage the locking mechanism.
Baking time and temperature will vary with temperature of ingredients and size and type of utensil being used. Follow this chart only as a guide for time and temperature.
Oven Baking Chart
| Food | Oven Temp. Degrees F. | Minutes |
| Yeast Rolls | 375 | 25-30 |
| Baking Powder Biscuits | 450 | 12-15 |
| Muffins | 425 | 20-25 |
| Popovers | 375 | 45-60 |
| Popovers With Oven Meal | 350 | 60-75 |
| Nut Bread | 400 | 50-60 |
| Corn Bread | 375-400 | 30 |
| Rolled Cookies | 375-400 | 8-12 |
| Brownies | 350 | 10-15 |
| Pie Shells | 475 | 35-40 |
| Pumkin Pie | 475 | 45-60 |
| Apple Pie | 400 | 45-60 |
| 8" Layer Cake | 375 | 25-30 |
| 9" Layer Cake | 350 | 30-35 |
| Cup Cakes | 375 | 20-25 |
| Loaf Cakes | 350 | 45-60 |
| Angel Food Cake | 350 | 40-50 |
Roasting time and temperature will vary with temperature of meat and size and type of utensil being used. Follow these charts only as a guide for time and temperature.
Oven Roasting Chart
| Food | Oven Temp. Degrees F. | Hours |
| Whole Chicken (4 lbs to 5 lbs) | 375 | 1-1/2 to 1-3/4 |
| Whole Chicken (Over 5 lbs) | 375 | 1-3/4 to 2 |
| Turkey (6 lbs to 8 lbs) | 325 | 3-1/2 to 4 |
| Turkey (8 lbs to 12 lbs) | 325 | 4 to 4-1/2 |
| Turkey (12 lbs to 16 lbs) | 325 | 5-1/2 |
| Turkey (20 lbs to 22 lbs) | 325 | 7 to 8-1/2 |
| Duck (3 lbs to 5 lbs) | 325 | 1-1/2 to 2 |
| Goose (6 lbs to 8 lbs) | 325 | 3 to 3-1/2 |
Oven Roasting Chart
| Food | Oven Temp. Degrees F. | Minutes Per Pound |
| Beef Roast (Rare) | 325 | 20-25 |
| Beef Roast (Medium) | 325 | 26-30 |
| Beef Roast (Well) | 325 | 33-35 |
| Rolled Roast (Rare) | 325 | 32-36 |
| Rolled Roast (Medium) | 325 | 36-40 |
| Rolled Roast (Well) | 325 | 43-45 |
| Fresh Whole Ham | 325 | 22-28 |
| Pork Loin | 325 | 35-40 |
| Pork Shoulder, Butt | 325 | 40-45 |
| Pork Picnic Shoulder | 325 | 35-40 |
| Mild Cured Ham Picnic, Shoulder | 350 | 30-35 |
Ultra-Ray™ Broil Cooking Area
In the upper rack positions, the broiler rays will not reach the edges of the broiler grid. Use the illustration to the right as a reference for the effective cooking area.
Ultra-Ray™ Broil Tips
- Remove excess fat from meat before broiling. Cut the edges of the meat to prevent curling.
- Place the food on a cold ungreased broiling pan. If the pan is hot the food will stick.
- Fish should be broiled with the skin side down. All food except fish should be turned at least one time.
- Season the meat after it has browned.
- Broiling does not require pre-heating.
- Ultra-Ray™ cooks approximately 30% quicker than a conventional broiler.
Operating the Broiler
- Center the food on the broiling grid and pan and place in oven.
- Close the oven door.
- Turn the selector knob to MANUAL.
- Push in and turn the temperature control knob to BROIL.
When Finished
Turn temperature control and selector knob to OFF.
Ultra-Ray™ Broil Rack Position Effective Cooking Area

⚠️CAUTION
To avoid risk of fire, do not line the broiler grid with foil. Foil may trap grease on top of the grid close to the burner causing a fire.
Never leave the oven unattended while broiling. Over cooking could result in a fire.
Approximate Broiling Time
| Food | Thickness (doneness) | Rack | Minutes |
| Beef Steak | 1" thick (med) | 2 | 12-14 |
| Beef Steak | 1" thick (well) | 2 | 20 |
| Beef Steak | 1 1/2" thick (med) | 3 | 20-25 |
| Beef Steak | 1 1/2" thick (well) | 3 | 30 |
| Hamburgers | (3/4" to 1" thick) | 2 | 10-15 |
| Fish Fillets and Steaks | 1 | 12-18 | |
| Pork Chops or Steak | 1" thick | 2 | 12-14 |
| Pork Chops or Steak | 1 1/2" thick | 3 | 20-25 |
| Bacon | 2 | 10-15 | |
| Ham Slice (pre-cooked) | 1/2" thick | 2 | 19-20 |
| Ham Slice (pre-cooked) | 1" thick | 3 | 20-30 |
Setting the Oven to Self-Clean
Remove the oven racks and cooking utensils from the oven. Clean excess spills from oven interior. Items should not be stored on the rangetop or backguard.
- Lock the oven door latch.
- Set the clock to the correct time of day.
- Tum the oven selector knob to CLEAN. Push in and turn the temperature control knob to CLEAN.
- Push in and turn the START knob to the desired starting time. Cleaning begins immediately if a start time is not set.
- Turn the STOP knob to desired stopping time. A stop time must be set to operate the cleaning cycle. Set clean cycle from 2 to 4 hours. If oven is lightly to moderately soiled clean for approximately 2 hours. If oven is moderately to heavily soiled clean for 3 to 4 hours.
The oven will begin cleaning when the time on clock reaches the time set on the START knob. If a start time has not been set, the oven will begin to clean immediately. When the oven reaches cleaning temperatures, clean indicator will light. When the time on the clock reaches the time set on the STOP knob, the oven will automatically stop and the STOP knob will pop out of the locked position.
When Finished
Turn the selector and temperature control knobs to OFF.
To Interrupt Cleaning Cycle
- Turn the START and Stop knobs until they pop out of the locked position.
- Turn the oven selector and temperature control knobs to OFF.
- Allow the oven to cool. Unlock the door.
Tips For Self-Cleaning
- A small amount of smoke is normal when cleaning. Excessive smoke may indicate there is a faulty gasket or too much food has been left in the oven.
- The oven should always be cleaned before it gets too dirty.
- Do not use the cleaning cycle if the oven light cover is not properly in place.
Temperature Control Knob

Selector Knob

Clock

natural_image
Two abstract diagrams showing a clock face and a triangular light pattern, both without any text or symbols.Set Clean Time Using Start and Stop Knob
Door Lock Lever

CAUTION
To avoid the risk of personal injury do not touch the oven vents or areas around the vents during self-cleaning. These areas can become hot enough to cause burns.
Do not try to force the door lock open. Forcing the lock can cause damage to the locking mechanism.
| Range Part | Cleaning Materials | General Directions |
| Bake, Broil Burners | Do not clean the bake or broil burner. Any soil will burn off during cooking. | |
| Broiler Pan and Grid | Soap and a Nonabrasive Plastic Scouring Pad | Drain fat. Cool pan and grid slightly. (Do not let soiled pan and grid stand in range to cool.) Sprinkle with soap. Fill the pan with warm water. Let pan and grid stand for a few minutes. Wash and scour if necessary. Rinse and dry. Option: The broiler pan and grid may also be cleaned in the dishwasher. |
| Control Knobs | Soap and Water | Pull off knobs. Wash gently but do not soak. Dry and return knobs to range, making sure to match flat area on the knob to the flat area on the shaft. |
| Inside Oven | Soap and Water | Cool before cleaning. Frequent wiping with soap and water will prolong the time between self-cleanings. Be sure to rinse throughly. A mild abrasive can be used for extra dried-on soil. Never use strong abrasives cleaners, commercial oven cleaners or steel wool. |
| Inside Oven Door | Soap and Water | Clean the inside of the door and the window area with warm soapy water. Do not clean the oven door gasket. The gasket should not be moved while cleaning. Avoid getting any cleaning materials on the gasket. |
| Oven Racks | Soap and Water | For heavy soil, clean by hand and rinse throughly. Remove the oven racks for ease in cleaning. |
| Burner Grates and Caps | Soap and Water | Cool before cleaning. For heavy soil soak in warm soapy water. Never use strong abrasives, gritty cleaners or steel wool. Option: The grates and caps may be placed in the dishwasher. Dry the grates and caps completely before placing them on the rangetop. |
| Outside of Range and Backguard | Soap and Water | Wash all glass with cloth dampened in soapy water. Rinse and polish with a dry cloth. If knobs are removed, do not allow water to run down behind the surface while cleaning. |
Removing Storage Drawer
The storage drawer can be removed for cleaning or to make it easier to clean under the range.
- Pull the drawer out to the first stop. Lift the front of the drawer and pull it out to the second stop.
- Let the drawer rest on the floor. Place hands toward the back of the drawer and lift it out.
To Replace the Drawer
- Place the set of rollers on the drawer behind the rollers on the range as shown right.
- Line the guides on the drawer with the guides on the range and push the drawer back into position.

Storage Guides & Rollers

Removing the Oven Door
The oven door can be removed for ease in cleaning large spills.
- Open the door to the first stop.
- Grasp the door firmly on each side and lift it upward off the hinges. Do not push the hinges closed once the oven door is removed. The oven hinges are difficult to open without the door in place.
Replacing the Oven Door
- Make sure the hinges are open to the first stop position. If the hinges have been accidentally closed, carefully pull them open to the first stop. Align the door with the hinge arms.
- Slide the door down and into place. Be sure the door is completely down on the hinges.
Oven Door

natural_image
Line drawing of a hand holding a tray with a slide, no text or symbols presentCAUTION
To avoid personal injury or property damage, handle the oven door with care. The door is heavy and can be damaged if it is dropped.
Do not place hands in hinge area when the door is removed. The hinge can snap closed and pinch your hands.
The door contains tempered glass. If the glass is scratched, impacted, chipped or twisted it may break suddenly. If the door glass appears damaged it should be replaced immediately.
Replacing the Oven Light (Some Models)
Protective gloves must be worn when changing the light bulb.
- Disconnect the electrical supply.
- Remove the oven door.
- Unscrew the bulb cover counterclockwise.
- Unscrew the light bulb counterclockwise.
- Replace the light bulb with a 120-volt, 40 watt appliance bulb.
- Replace the light bulb cover. Do not overtighten the bulb cover. A cover that has been overtightened can become difficult to remove.
- Replace the oven door.
- Reconnect the electrical supply.
Oven Light
natural_image
Illustration of a hand holding a ball with a circular head and textured body (no text or symbols)WARNING
To avoid the risk of burns or electrical shock, disconnect the electrical supply to the oven.
Before attempting to replace the bulb make sure it is cool.
Wear protective gloves.
Do not operate the oven without the bulb cover in place.
Trouble Shooting Guide
| Problem | Things to Check |
| Top Burners Not Lighting | Make sure caps are on sealed burners correctly.Check air shutters for proper position.Make sure ignitors are not wet. |
| Oven Light Not Working | Check bulb for looseness.Check to see if bulb is burned out. If bulb is burned out. Replaced with a 40 watt appliance bulb. |
| Oven Not Heating | Make sure range is connected to gas supply and electrical power.Make sure clock is set for manual operation. START time knob should not be in locked position. |
| Oven Burner Cycles On and Off | This is normal. |
| Oven Temperature Is Not Accurate | Do not try to measure temperature with a regular thermometer.Check for blocked air vents.Aluminum foil will alter oven temperature.Not using correct utensil. |
Adjusting the Thermostat
If the oven cooks consistently over or underdone food, make the following adjustment:
- Remove the temperature control knob.
- Loosen the metal plate on the back of the knob using a philips screw driver.
- Turn the adjustment plate to adjust the temperature. Each line is equal to 10^ F. To avoid overadjusting, do not turn the plate more than one line at a time and test the oven.
- Tighten the screws and replace the knob.

When Service Is Required
Your dealer can provide the name of your nearest Authorized Service Center. Help them give you prompt service by giving them:
- An accurate description of the trouble.
- Complete model, serial, and manufacturing numbers are located on the name plate. The nameplate is on the lower oven frame.
- Proof of purchase (sales receipt on request).
Keep an accurate record of any service calls: what was done, who serviced the appliance, and the date of service.
We have a vast network of Authorized Service Centers. If you have a service problem that is not resolved please write:
Consumer Affairs Department
Amana Refrigeration, Inc.
2800 220th Trail
P.O. Box 8901
Amana, IA 52204
To locate an authorized servicer or for questions concerning product usage, installation, or warranty, call for consumer information:
1-800-843-0304
If outside the U.S.A.
1-319-622-5511
Asure
We are pleased to offer a long-term service protection on your new cooking appliance. The Asure™ Extended Service Plan is specially designed to supplement your strong warranty. Asure provides budget protecting coverage on the appliance for up to five full years, covering parts, labor and travel charges. Your participating Amana dealer has details or contact us using the address or numbers listed below.
Call: 1-800-843-0304 or outside the U.S.A. 1-319-622-5511
Write: Asure Department
Amana Refrigeration, Inc.
2800 220th Trail
P.O. Box 8901
Amana, IA 52204-0001
FEDCHA
Part Number 36-314531-03-0
Printed in U.S.A.

©1994 Amana Refrigeration, Inc.
Amana, Iowa 52204
- Self-Cleaning Gas Range Use and Care Manual
- Model Identification
- WARNING
- NOTICE
- General
- Surface Cooking
- Oven
- Surface Burner Fires
- Oven Fires
- Setting the Time of Day
- Setting the Minute Timer
- Cooking Utensils
- Determining If a Pan Has a Flat Bottom
- Operating the Top Burners
- When Finished
- Operating the Cooktop During A Power Failure
- ⚠ WARNING
- Oven Rack Placement
- Pan Placement
- To Bake
- Setting the Oven to Stop Baking Automatically
- Setting the Oven to Start and Stop Baking Automatically
- Ultra-Ray™ Broil Cooking Area
- Ultra-Ray™ Broil Tips
- Operating the Broiler
- ⚠️CAUTION
- Setting the Oven to Self-Clean
- To Interrupt Cleaning Cycle
- Tips For Self-Cleaning
- CAUTION
- Removing Storage Drawer
- To Replace the Drawer
- Removing the Oven Door
- Replacing the Oven Door
- Replacing the Oven Light (Some Models)
- Adjusting the Thermostat
- When Service Is Required
- Asure
Brand : Caloric
Model : RSF3400UWG
Category : Cooker