
FCD-JTSA50-III - Water heater HAIER - Free user manual and instructions
Find the device manual for free FCD-JTSA50-III HAIER in PDF.


| Product Type | Electric Water Heater |
| Brand | Haier |
| Model | FCD-JTSA50-III |
| Volume | 50 L |
| Dimensions (Height × Diameter) | 683 mm × 390 mm |
| Net Weight | 19 kg |
| Rated Voltage / Frequency | 220 V~ 50 Hz |
| Rated Power | 1300 W |
| Rated Pressure | 0.75 MPa |
| Waterproof Grade | IPX4 |
| Working Water Pressure | ≥ 0.05 MPa |
| Temperature Adjustment Range | Inlet temperature to 75 °C |
| Heating Element Material | High-quality stainless steel |
| Tank Material | Enamel (enamelled steel) |
| Shell Material | Steel with dusting anticorrosion coating |
| Safety Features | Overheat protection, overpressure protection, third-generation PTO 10 technology |
| Installation Type | Vertical wall-mounted |
| Number of Water Outlets | Multiple (e.g., toilet, kitchen) |
| Included Accessories | Safety valve (1), user manual (1), expansion hooks (2), drain hose (1), expansion bolts (2) |
| Recommended Maintenance | Clean heating element and tank every 3 years; replace magnesium anode rod periodically |
| Cleanable Parts | Shell (wipe with neutral detergent) |
| Replaceable Parts | Magnesium anode rod, heating element (by authorized service) |
Frequently Asked Questions - FCD-JTSA50-III HAIER
User questions about FCD-JTSA50-III HAIER
0 question about this device. Answer the ones you know or ask your own.
Ask a new question about this device
Download the instructions for your Water heater in PDF format for free! Find your manual FCD-JTSA50-III - HAIER and take your electronic device back in hand. On this page are published all the documents necessary for the use of your device. FCD-JTSA50-III by HAIER.
USER MANUAL FCD-JTSA50-III HAIER
Haier Household Electric Water Heater
FCD-JTSA50-III
FCD-JTSA60-III
FCD-JTSA70-III
FCD-JTSA80-III
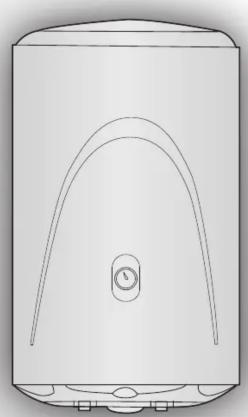
Haier
0040502744
V
Before Usage
Dear users,
Thanks for choosing Haier water heater product.
Haier products have good quality and excellent performance. To facilitate you to use the product, please read the manual and operate accordingly. Please retain it for future reference.
The international star service of Haier Group will always accompany you. No matter what kind of problems you meet in usage, please contact with the local after-sales service agent. We are at your service all the time. Thanks again for choosing Haier Product.
The water heater you purchased may not full comply with the figure in the manual due to the improvement of product. We apologize for the inconvenience occurred therefrom.
Features
1 Safety
High-quality heat proof stainless steel electric heating element, overtemperature protection; overpressure protection of tank; safe and reliable.
The 3rd generation "PTO I0" technology, safer for usage.
2 Durability
The shell adopts dusting anticorrosion treatment, handsome and durable enamel tank, with reliable quality and long operation life.
3 Convenience
Adjustable heating temperature. Adjustable water temperature. Adjusting range: water inlet temperature\~75°C.
4 Multiple usage
Enclosed structure, capable of supplying water to multiple places like toilet, kitchen etc. Suitable for family, enterprises, service trades like beauty care on hot water supply (not drinkable).
5 Nice molding, space-saving
Vertical type wall-mounting design, saving space.
The water heater you purchased is the improved model of the series product. Please operate according to the user's manual.
Parameters
| Rated voltage/Frequency | Rated power | Rated pressure | Waterproof grade | Dimension/Weight/Volume | Tap water pressure |
| 220V~,50Hz 15 | 00W 0.75MPa | IPX4 | See to Figure 1 | no less than 0.05MPa | |
| 220V~,50Hz 18 | 00W 0.75MPa | IPX4 | See to Figure 1 | no less than 0.05MPa | |
| 230V~,50Hz 16 | 50W 0.75MPa | IPX4 | See to Figure 1 | no less than 0.05MPa | |
| 230V~,60Hz 16 | 50W 0.75MPa | IPX4 | See to Figure 1 | no less than 0.05MPa |
All the rated power mentioned above are available for this model. More details, please refer to the nameplate.
- Please read this manual before usage
- Retain it for future reference
Dimension
(Figure 1)
Front view
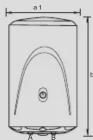
Cutaway view

Bottom view

A Hot water outlet
B Cold water inlet
C Heating element
D Enamel tank
E Wall-mounting bracket
| Model Volume | Net weight | a1 b1 | c1 d1 e1 f1 | |||||
| FCD-JTSA50-III | 50L | 19kg | 390mm | 683mm | 100mm | 390mm | 200mm | 220mm |
| FCD-JTSA60-III | 60L | 21kg | 390mm | 765mm | 100mm | 390mm | 200mm | 320mm |
| FCD-JTSA70-III | 70L | 23kg | 390mm | 865mm | 100mm | 390mm | 200mm | 420mm |
| FCD-JTSA80-III | 80L | 26.5kg | 390mm | 990mm | 100mm | 390mm | 200mm | 520mm |
Remarks: The permitted error limit of above parameters is ±10%
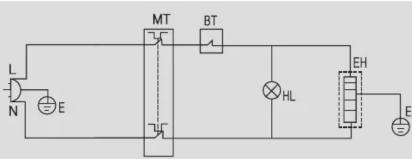
Electric Circuit Diagram
L: Brown wire
N: Blue wire
MT: High temperature limiter
BT: Thermostat
HL: Heating indicator
EH: Heating element
E: Yellow/green wire
Safety Precautions

Check if the ammeter and the diameter of the wires are in accordance with the rated current of the water heater. If necessary please have it checked by experienced electrician.

The product is only available for alternating current.

Be sure to use independent receptacle and earth it reliably. The receptacle shall comply with the stipulation of national standard.

Set the receptacle of the water heater at dry position away from water spraying. Do not insert and pull the power plug with wet hands.

After installation, be sure to fill the heater completely with water before switching on the power in the first usage. Children must take bath under the supervision of adult.

In opening and closing the water valve, do not point the shower head to human body. Otherwise it may hurt by the spraying hot water.

In winter of cold area, if the heater is idle for a long period, please pull the handle of safety valve to discharge the water. Otherwise it may freeze inside the water heater and cause damages.

In case the power cord of the water heater is damaged, be sure to have it replaced by after service technicians with special cord offered by the manufacturer.
The product adopts the patent "PTO I 0" technology of our company. As long as adopting civil power supply, even if the earthing wire is electrified by mistake, the "PTO I 0" technology still can block the dangerous electricity, and ensure your personal safety. But if you find perceptible current, please pull off the power plug and contact local after service department for maintenance. Do not disassemble by yourself.
Description of the Symbols

Never do that Be sure to act as per instructions
Setting Environment

Do not set it at place where is too cold and may freeze.

Do not set at outdoor places.

Do not use as fl oorstanding appliance.

Please mount it to firm and reliable wall.

Do not install to places without sewer.
In case connecting water heater with water drain hose, connect the drain hose to the inlet of the sewer to avoid polluting by splashing.
The original pipeline of the water heater is an organic part of "PTO I 0". Do not remove it by yourself.
Otherwise we will not take responsibility for the injure and loss caused by the safety trouble occurred therefrom.
Description of the Symbols

Never do that Be sure to act as per instructions
3
Attentions in Installation
Please fasten the drain hose to the drain thread of safety valve by twisting (see to Figure 3). Connect the other end of drain hose to the sewer to avoid polluting the room by splashing. When the power is switched on, and the water heater starts operating, there may be some water discharged from the pressure relief hole of safety valve. It is due to the water expansion under heating, and is normal phenomenon. The pressure relief pipe shall communicate with the air directly. Do not block it. The discharged water can be led to the sewer. The drain hose connecting to the safety valve shall be kept downward sloping in installation and in a frost-free environment.
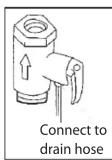
(Figure 3)
- Select suitable position on the wall to fix the shower nozzle bearer. Connect the shower nozzle hose to the pipeline. Fasten the mixing valve. Check if there's water leakage at each joint.
- Be sure to check and confirm that the tank is filled with water, there's no leakage at each joint and the power supply complies with the stipulation before switching on the power.
Safety precaution:
Do not confuse the water inlet and outlet pipe. The wall bearing the water heater shall be strong enough to endure a weight twice as much as that of water heater filled with water.
If any part is damaged, please contact the local maintenance agent, and have it replaced with our spare part.
Usage
After installation, as the tank is empty in the first usage, be sure to open the faucet water inlet valve and mixing valve. When the tank is filled with water, and the shower nozzle or other water outlet keeps water outputting, please close the mixing valve, check if there's water leakage at each joint, and plug the power plug.
Turn the knob as per the needed water temperature. The mark of knob increases from water inlet temperature to 75°C. You can set heating temperature steplessly. The heating indicator will light on under heating mode. Generally the knob should be set to the highest scale. The water heater can regulate the temperature automatically. The power will be switched off automatically when the set temperature is reached, and will be switched on automatically when the temperature drops to certain level. As it continues heating, you can use hot water as well.
- When the tap water inlet pressure arrives or exceeds 0.75MPa, the drain hose of safety valve will discharge large amount of water. It is due to extra high water pressure. Please contact the local after service for disposal.
Heating adjustment can be made flexibly all year round adapting to climate changes. In long-term out-of-use or maintenance, you can close tap water pipe valve and set the mixing valve to the highest water temperature rate after opening the safety valve handle. Move up safety valve handle to drain the tank. To avoid injury, before next use, it is suggested to first open hot water valve before switching on the water heater, exhausting gas possibly retained in the pipeline. In this case, no smoke or fi re is permitted near the open valve. Carefully check and confirm all parts are in good condition.
5
Installation
- Be sure to have it installed by installation staff of the after service department, or the appointed staff. It adopts wall-mounting installation.
Make four holes with diameter of 12mm and depth 65mm with churn drill on the wall as per the installation dimension drawing. Insert the bolts into the holes. Then lift the water heater, set the wall-mounting rack on the bolt. Set the gasket and fasten the nut. Install the accessories including safety valve etc. as indicated in Figure 2. Remember to seal with rubber tape to avoid water leakage.
To facilitate the installation and dismantling, it is suggested to add G 1/2' flexible nut at the suitable position of the water inlet and outlet pipe separately. Confirm the position needing water supply. Connect the water inlet/outlet pipe and tap water pipe to the position respectively. The hot water pipe shall not be too long to reduce the heat losses.
Please reserve some space in installation for the future maintenance.
(Figure 2) For reference in installation only


Connection and use of safety valve
The safety valve should be connected to the cold water inlet pipe. Please check carefully if the direction is correct after installation. The correct direction of installation is that the arrowhead on the safety valve should point to the water heater.
Please connect the drain hose to the safety valve. Connect one end of the hose to the safety valve vent and the other end to the sewage drain. The hose can be cut short or extended as necessary. The hose shall be installed as inclined downward.
This product should work with the safety valve whose rated pressure is 0.75MPa .
The water may drip from the discharge pipe of the pressure relief device and that this pipe must be left open to the atmosphere. Check safety valve once a month as follow: move the small handle of safety valve, if there's water flowing out, safety valve is normal; if there's no water flow, please contact local after-sales service station.
The pressure relief device is to be operated regularly to remove lime deposits and to verify that it is not blocked.
4
Cleaning and Maintenance
Be sure to switch off the power supply before cleaning. Use humid cloth with neutral detergent to wipe the shell gently. Do not use petrol and other solvent. Finally wipe it with dry cloth and keep the shell dry.
To guarantee the high-efficiency operating of the water heater, please clean the electric heating pipe and inner tank every three years. Do not damage the protection coating outside the electric heating element and inside the inner tank. The Magnesium anode rod shall also be replaced periodically according to the local water quality. Please contact the local maintenance department for maintenance service.
FAQ
| Phenomenon Conf irmation items Remedy | ||
| No water | 1 No water supply or water pressure too low | Check |
| 2 Hot water access close Check and clear | clear | |
| Only cold water but pointer light when heat | 1 Hot water access close Check and open | Adjust temperature of water |
| 2 Temperature not set to desired setting | ||
| 3 Heating time limit and setting temperature not obtain | Keep heating | |
| 4 Defective heater | Contact with service department when 123 are excluded | |
| Only cold water and pointer not light when heat | 1 No power to heater Check power socket | Socket |
| 2 Uncontrollable thermostat | Contact with service department when 1 is excluded | |
| Heating pointer always light | 1 Setting water temperature not obtain | Keep heating |
| 2 Uncontrollable thermostat | Contact with service department when 1 is excluded | |
| Unconstant flow and temperature of water | Unconstant water pressure | Adjust the fl ux of outlet water or use with constant water pressure |
| Insufficient hot water | 1 Temperature set too low Adjust setting water temperature | Setting water temperature |
| 2 Excessive water pressure Adjust the fl ux of outlet water | The fl ux of outlet water | |
Packing List
| Name | Electric water heater | Safety valve | User's manual | Expansion hook | Drain hose | Expansion bolt |
| Quantity | 1 | 1 | 1 | 2 | 1 | 2 |
6
- HAIER HOUSEHOLD ELECTRIC WATER HEATER
- HAIER
- BEFORE USAGE
- FEATURES
- 1 SAFETY
- 2 DURABILITY
- 3 CONVENIENCE
- 4 MULTIPLE USAGE
- 5 NICE MOLDING, SPACE-SAVING
- ELECTRIC CIRCUIT DIAGRAM
- SAFETY PRECAUTIONS
- DESCRIPTION OF THE SYMBOLS
- SETTING ENVIRONMENT
- ATTENTIONS IN INSTALLATION
- SAFETY PRECAUTION
- USAGE
- INSTALLATION
- CONNECTION AND USE OF SAFETY VALVE
- CLEANING AND MAINTENANCE
Brand : HAIER
Model : FCD-JTSA50-III
Category : Water heater