
PDA-100H - Mill HITACHI - Free user manual and instructions
Find the device manual for free PDA-100H HITACHI in PDF.


| Product Type | Electric Mill (Coffee/Spice Grinder) |
| Brand | Hitachi |
| Model | PDA-100H |
| Color | White/Black (typical) |
| Material | Stainless steel grinding chamber and blades |
| Dimensions (H x W x D) | Approx. 200 x 120 x 120 mm |
| Weight | Approx. 1.0 kg |
| Power Supply | 220-240 V ~ 50/60 Hz |
| Power Consumption | 200 W |
| Capacity | 50 g (coffee beans) / 30 g (spices) |
| Grinding Settings | Adjustable from coarse to fine (2 levels typical) |
| Operating Mode | Pulse or continuous operation via button |
| Safety Features | Overheat protection, non-slip feet |
| Cleaning | Wipe with damp cloth; removable grinding cup for washing |
| Maintenance | Regular cleaning after each use; dry before storage |
| Accessories Included | Cleaning brush, measuring spoon (if applicable) |
| Spare Parts Availability | Blade unit, grinding cup, lid (available from Hitachi service centers) |
| Repairability | Modular design; user-replaceable blade assembly |
| Certifications | CE, RoHS |
| Warranty | 2 years (depending on region) |
Frequently Asked Questions - PDA-100H HITACHI
User questions about PDA-100H HITACHI
0 question about this device. Answer the ones you know or ask your own.
Ask a new question about this device
Download the instructions for your Mill in PDF format for free! Find your manual PDA-100H - HITACHI and take your electronic device back in hand. On this page are published all the documents necessary for the use of your device. PDA-100H by HITACHI.
USER MANUAL PDA-100H HITACHI
natural_image
Line drawing of a power tool with a circular frame (no text or symbols)1
2
3
4
5
6
7
natural_image
Line drawing of a hand using a power tool to cut a saw (no text or symbols present)8
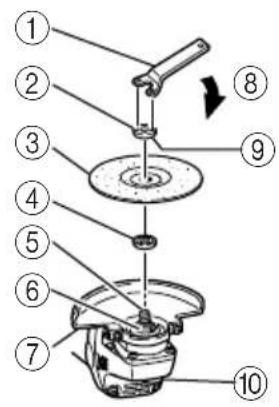
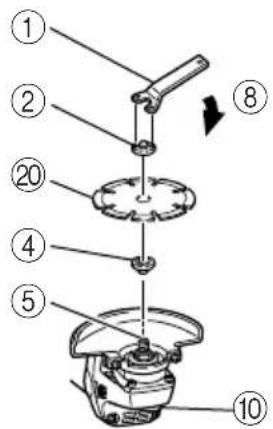
| 1 | Wrench | 扳手 |
| 2 | Wheel nut | 砂輪螺帽 |
| 3 | Depressed center wheels | 砂輪 |
| 4 | Wheel washer | 輪墊圈 |
| 5 | Spindle | 主軸 |
| 6 | Notched part | 槽口部分 |
| 7 | Wheel guard | 砂輪保護裝置 |
| 8 | Tighten | 緊 |
| 9 | Convex side | 凸面 |
| 10 | Lock pin | 鎖定銷 |
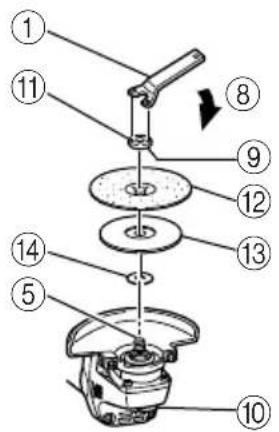
| 11 | Washer nut | 墊片螺帽 |
| 12 | Sanding disc | 砂盤 |
| 13 | Rubber pad | 橡膠墊圈 |
| 14 | Washer | 襯墊 |
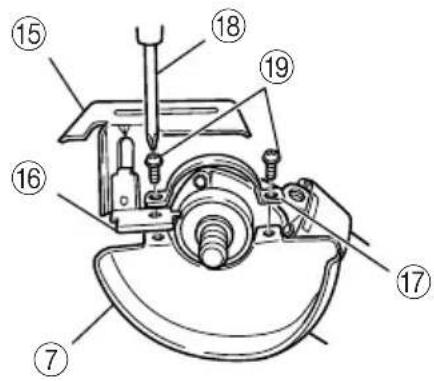
| 15 | Guide base | 導軌基座 |
| 16 | Guide piece | 導軌片 |
| 17 | Set plate (A) | 支架板(A) |
| 18 | Screwdriver | 螺絲刀 |
| 19 | Screw | 螺絲釘 |
| 20 | Diamond wheel | 金剛石輪 |
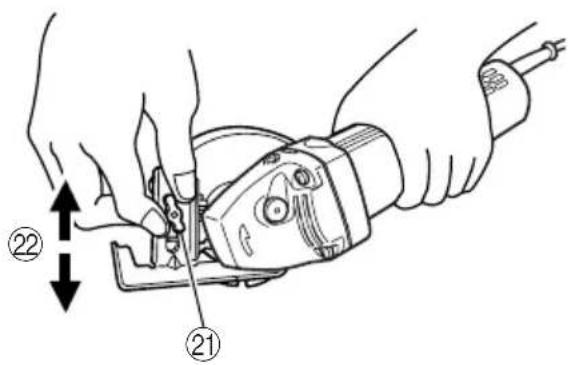
| 21 | Wing bolt | 蝶形螺栓 |
| 22 | Adjust the cutting depth by losing the wing bolt. | 利用放鬆蝶形螺栓來調節切削深度 |
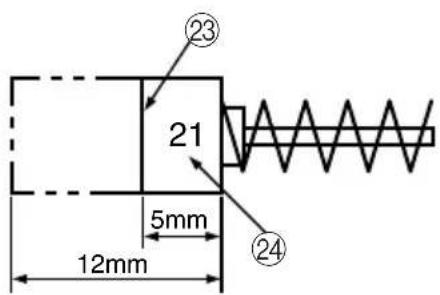
| 23 | Wear limit | 磨損極限 |
| 24 | No. of carbon brush | 碳刷號 |
GENERAL OPERATIONAL PRECAUTIONS
WARNING! When using electric tools, basic safety precautions should always be followed to reduce the risk of fire, electric shock and personal injury, including the following.
Read all these instructions before operating this product and save these instructions.
For safe operations:
- Keep work area clean. Cluttered areas and benches invite injuries.
- Consider work area environment. Do not expose power tools to rain. Do not use power tools in damp or wet locations. Keep work area well lit. Do not use power tools where there is risk to cause fire or explosion.
- Guard against electric shock. Avoid body contact with earthed or grounded surfaces. (e.g. pipes, radiators, ranges, refrigerators).
- Keep children and infirm persons away. Do not let visitors touch the tool or extension cord. All visitors should be kept away from work area.
- Store idle tools. When not in use, tools should be stored in a dry, high or locked up place, out of reach of children and infirm persons.
- Do not force the tool. It will do the job better and safer at the rate for which it was intended.
- Use the right tool. Do not force small tools or attachments to do the job of a heavy duty tool. Do not use tools for purposes not intended; for example, do not use circular saw to cut tree limbs or logs.
- Dress properly. Do not wear loose clothing or jewellery, they can be caught in moving parts. Rubber gloves and non-skid footwear are recommended when working outdoors. Wear protecting hair covering to contain long hair.
- Use eye protection. Also use face or dust mask if the cutting operation is dusty.
- Connect dust extraction equipment. If devices are provided for the connection of dust extraction and collection facilities ensure these are connected and properly used.
- Do not abuse the cord. Never carry the tool by the cord or yank it to disconnect it from the receptacle. Keep the cord away from heat, oil and sharp edges.
- Secure work. Use clamps or a vice to hold the work. It is safer than using your hand and it frees both hands to operate tool.
- Do not overreach. Keep proper footing and balance at all times.
- Maintain tools with care. Keep cutting tools sharp and clean for better and safer performance. Follow instructions for lubrication and changing accessories. Inspect tool cords periodically and if damaged, have it repaired by authorized service center. Inspect extension cords periodically and replace, if damaged. Keep handles dry, clean, and free from oil and grease.
- Disconnect tools. When not in use, before servicing, and when changing accessories such as blades, bits and cutters.
-
Remove adjusting keys and wrenches. Form the habit of checking to see that keys and adjusting wrenches are removed from the tool before turning it on.
-
Avoid unintentional starting. Do not carry a plugged-in tool with a finger on the switch. Ensure switch is off when plugging in.
- Use outdoor extension leads. When tool is used outdoors, use only extension cords intended for outdoor use.
- Stay alert. Watch what you are doing. Use common sense. Do not operate tool when you are tired.
- Check damaged parts. Before further use of the tool, a guard or other part that is damaged should be carefully checked to determine that it will operate properly and perform its intended function. Check for alignment of moving parts, free running of moving parts, breakage of parts, mounting and any other conditions that may affect its operation. A guard or other part that is damaged should be properly repaired or replaced by an authorized service center unless otherwise indicated in this handling instructions. Have defective switches replaced by an authorized service center. Do not use the tool if the switch does not turn it on and off.
- Warning The use of any accessory or attachment, other than those recommended in this instruction manual, may present a risk of personal injury.
- Have your tool repaired by a qualified person. This electric tool is in accordance with the relevant safety requirements. Repairs should only be carried out by qualified persons using original spare parts. Otherwise this may result in considerable danger to the user.
PRECAUTIONS ON USING DISC GRINDER
- Never operate these power tools without Wheel Guards.
- Use only a depressed center wheel of permissible peripheral speed 72 m/s (4300 m/min) or more.
- Correct use for safe operation.
- Mounting the standard depressed center wheel.
- Have a trial run before grinding commence.
- Keep away from a revolving depressed center wheel.
- Pay strict attention to sparks.
- Do not leave the revolving Grinder unattended on the floor.
- Follow the procedures of these Handling Instructions on depressed center wheel replacement.
- Avoid overload operation.
- Do not push in the lock pin while the spindle is running.
- Be careful those around one while operating.
SPECIFICATIONS
| Voltage (by areas)* (220V, 230V, 240V) | |
| Power Input* 760 W | |
| No-Load Speed 12,000/min | |
| Wheel sizeexternal dia. 100 mmthickness Max. 6 mmhole dia. 16 mm | |
| Weight (without cord) 1.9 kg |
* Be sure to check the nameplate on product as it is subject to change by areas.
STANDARD ACCESSORIES
(1) Depressed center wheel .... 1
external dia. 100 mm thickness 3.5 mm hole dia. 16 mm
(2) Wrench 1
Standard accessories are subject to change without notice.
OPTIONAL ACCESSORIES .. sold separately
CAUTION:
Always operate the grinder with the wheel guard attached.
1. 100mm Sanding Disc Set
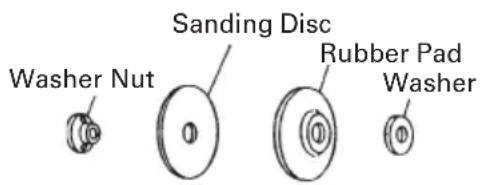
In case when only a relatively small metal surface area is to be polished and it is desired to give it a particularly fine finish, this is used for preliminary polishing of the metal surface before applying point, for removing rust, and for removing point when a new test is to be applied.
There are eleven different kinds of sanding discs, having grains of #16, #20, #24, #30, #36, #40, #50, #60, #80, #100, #120. When placing your order, please specify the grain of the disc desired.
2. Diamond Wheel Set
This is used for cutting and scribing of concrete, stone, tile etc.
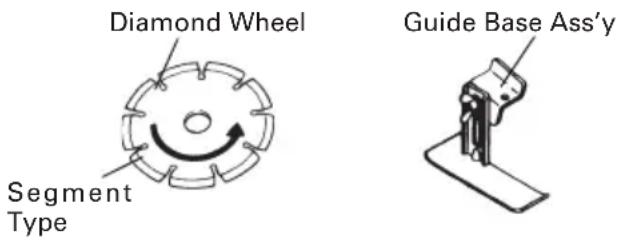
Optional accessories are subject to change without notice.
APPLICATIONS
○Removal of casting fin and finishing of various types of steel, bronze and aluminum materials and castings.
○Grinding of welded sections or sections cut by means of a cutting torch.
○Grinding of brick, marble, etc.
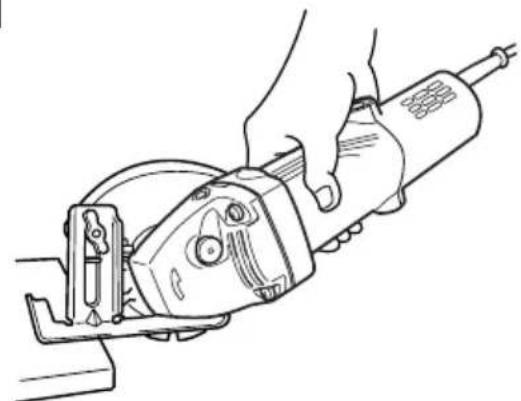
○Cutting and scribing of concrete, stone, tile, (use the diamond wheel)
PRIOR TO OPERATION
1. Power source
Ensure that the power source to be utilized conforms to the power requirements specified on the product nameplate.
2. Grounding
This tool should be grounded while in use to protect the operator from electric shock. The tool is equipped with a three conductor cord and grounding type plug to fit the proper grounding type receptacle. The green (or green and yellow) conductor in the cords is the grounding wire. Never connect the green (or green and yellow) wire to a live terminal.
3. Power switch
Ensure that the power switch is in the OFF position. If the plug is connected to a receptacle while the power switch is in the ON position, the power tool will start operating immediately, which could cause a serious accident.
4. Extension cord
When the work area is removed from the power source, use an extension cord of sufficient thickness and rated capacity. The extension cord should be kept as short as practicable.
5. Confirming condition of the environment
Confirm that the work site is placed under appropriate conditions conforming to prescribed precautions.
When grinding a thin steel plate, depending upon the state of the workbench, a loud noise will be created due to resounding noise from the steel plate being ground. To eliminate nuwanted noise in this instance, place a rubber mat beneath the material to be ground.
6. Mounting the wheel guard
Be sure to mount the wheel guard at an angle that will protect the operator's body from injury by a broken wheel piece.
7. Confirm the lock pin
Confirm that the lock pin is disengaged by pushing lock pin two or three times before switching the power tool on.
8. Confirming and mounting the depressed center wheel.
Throughly check that a specified depressed center wheel is free of cracks and splits is mounted.
Confirm that the depressed center wheel is mounted under the specified condition and is firmly clamped. For details, refer to the item “Assembling and Disassembling the depressed center wheel.”
9. Apply a trial run
To start grinding work without checking for possible cracks and splits in the depressed center wheel is very dangerous. Prior to start of grinding, direct the grinder in a direction where no one is present, and apply a trial run without fail to confirm that the grinder displays no abnormalities.
Duration of the trial run is as follows:
When depressed center wheels is replaced .... 3 minutes or more When starting daily work .... 1 minute or more
PRACTICAL GRINDER APPLICATIONS
-
Since grinding by utilizing only the grinder's own weight is feasible, the grinder should never be pressed forcibly against the plane to be ground. Hold the grinder lightly so that it only slightly contacts the plane to be ground. Heavy pressure will reduce the revolving speed and such deteriorate the finished surface, and phenomena as overload will lead to burning out of the motor.
-
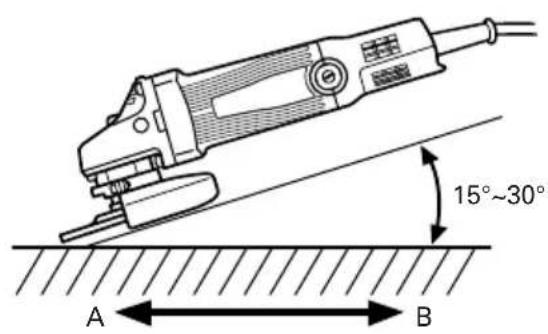
Do not utilize the depressed center wheel's entire surface when grinding. Use only its peripheral surface by tilting the wheel at an angle of 15 30^ , as shown in Fig. 1.
-
When a grinder equipped with a new depressed center wheel is pushed forward (direction A), the wheel edge may occasionally cut into the material to be ground. Always pull it backward (direction B) in this instance. However, once the depressed center wheel angle has been adequately abraded, both forward and backward operations are permissible.
-
The provided depressed center wheel is rated as Class A grain and #36 grain size.
Accordingly, its range of applications cover a wide variety, proving to be most suitable for heavy grinding of general steel materials. Since the wheel grain size is rather coarse, creating a fine-surfaced finish is very difficult. In this instance, hold the grinder lightly as through trying to lift it, and apply grinding slowly at a constant low speed. Whereby a fine finish similar to that accomplished with a fine-grain depressed center wheel is obtainable.
5. Switching on the grinder
The switch can be turned ON by turning its lever ON side, or turn OFF by turning its lever to the OFF side.
6. Precaution after use
Do not lay the grinder down immediately after use in a place where there are many shavings and much dirt and dust until it has completely stopped revolving.
CAUTIONS:
○Shock to the main body can be the cause of cracks or splits in the depressed center wheel. Be especially careful to avoid sudden shocks when using the equipment.
If the main unit is accidentally bumped or dropped, make a careful check for cracks or splits on the depressed center wheel before further use.
○Do not press the lock pin when the equipment is turning. Also, do not turn on the switch when the lock pin is pressed down.
ASSEMBLING AND DISASSEMBLING THE DEPRESSED CENTER WHEEL (Fig. 2)
CAUTION:
Be sure to switch power OFF and disconnect the attachment plug from the power receptacle to avoid serious trouble.
(1) Turn the equipment upsidedown so that the spindle will be facing up.
(2) Mount the wheel washer onto the spindle.
(3) Mount the protuberance of the depressed center wheel onto the wheel washer.
(4) Mount the convex side of the wheel nut onto the depressed center wheel, and screw the wheel nut onto the spindle.
(5) As shown in Fig. 2 push in the lock pin to prevent rotation of the spindle. Then, secure the depressed center wheel by tightening the wheel nut with the wrench.
CAUTION: Confirm that the depressed center wheel is mounted firmly.
Confirm that the lock pin is disengaged by pushing lock pin two or three times before switching the power tool on.
○Disassembling of the depressed center wheel is the reverse of assembling.
HOW TO INSTALL THE OPTIONAL ACCESSORIES
CAUTIONS:
○Be sure to switch power OFF and disconnect the plug from the power receptacle to avoid serious trouble. When utilizing the optional accessories, keep the wheel guard attached and wear protective glasses.
1. Mounting the 100mm Sanding Disc. (see Fig. 3) NOTE:
Do not use the wheel washer and wheel nut of the depressed center wheel.
(1) Mount the washer, rubber pad and sanding disc onto the spindle.
(2) Screw from the washer nut onto the spindle.
(3) As shown in Fig. 3, push in the lock pin to prevent rotation of the spindle. Then, secure the sanding disc by tightening the wheel nut with the wrench.
2. Mounting the Diamond Wheel CAUTION:
When utilizing the diamond wheel, pay particular attention to the following points.
(1) Utilize the correct size diamond wheel (external dia. 105mm, hole dia. 20mm)
(2) Do not apply cooling water or grinding fluid while utilizing the diamond wheel.
(3) Hold the tool firmly to control the tendency of the tool to be kicked back by the material during cutting operation.
(4) Ensure that the cutting depth is kept within 2\~5mm to prevent over-heating damage to the motor. Use with moderate cutting speed, not to overload the motor and do not apply excessive pressure on the workpiece.
○Mounting the Guide Base Assembly. (Fig. 4)
(1) Loosen the two small screws on the wheel guard.
(2) Insert the guide piece between the wheel guard and set plate (A), and tighten one of the small screws. Ensure that the guide will not move.
(3) Set the angle of the wheel guard to a suitable position for operation, and securely tighten the remaining small screw to fix the wheel guard in position.
○Mounting the Diamond Wheel. (Fig. 5)
NOTE:
Mounting of the diamond wheel on the spindle is illustrated in Fig. 5. Note that the wheel washer is reversed from ordinary usage with depressed center wheel.
(1) Mount the wheel washer and diamond wheel onto the spindle.
(2) Mount the concave side of the wheel nut onto the diamond wheel, and screw the wheel nut onto the spindle.
(3) As shown in Fig. 5 push in the lock pin to prevent rotation of the spindle. Then, secure the diamond wheel by tightening the wheel nut with the wrench.
MAINTENANCE AND INSPECTION
1. Inspecting the depressed center wheel
Ensure that the depressed center wheel is free of cracks and surface defects.
Replace the depressed center wheel when it has been worn out to about 60mm in external diameter.
2. Inspecting the mounting screws:
Regularly inspect all mounting screws and ensure that they are properly tightened. Should any of the screws be loose, retighten them immediately. Failure to do so could result in serious hazard.
3. Maintenance of the motor
The motor unit winding is the very "heart" of the power tool. Exercise due care to ensure the winding does not become damaged and/or wet with oil or water.
4. Inspecting the carbon brushes (Fig. 8)
The motor employs carbon brushes which are consumable parts. Since an excessively worn carbon brush can result in motor trouble, replace the carbon brush with a new one having the same carbon brush No. shown in the figure when it becomes worn to or near the “wear limit”. In addition, always keep carbon brushes clean and ensure that they slide freely within the brush holders.
5. Replacing carbon brushes:
Disassemble the brush caps with a slotted-head screwdriver. The carbon brushes can then be easily removed.
NOTE
Due to HITACHI's continuing program of research and development, the specifications herein are subject to change without prior notice.
作業上的一般注意事項
- GENERAL OPERATIONAL PRECAUTIONS
- PRECAUTIONS ON USING DISC GRINDER
- STANDARD ACCESSORIES
- OPTIONAL ACCESSORIES .. sold separately
- CAUTION:
- 100mm Sanding Disc Set
- Diamond Wheel Set
- APPLICATIONS
- PRIOR TO OPERATION
- Power source
- Grounding
- Power switch
- Extension cord
- Confirming condition of the environment
- Mounting the wheel guard
- Confirm the lock pin
- Confirming and mounting the depressed center wheel.
- Apply a trial run
- PRACTICAL GRINDER APPLICATIONS
- Switching on the grinder
- Precaution after use
- CAUTIONS:
- ASSEMBLING AND DISASSEMBLING THE DEPRESSED CENTER WHEEL (Fig. 2)
- HOW TO INSTALL THE OPTIONAL ACCESSORIES
- Mounting the 100mm Sanding Disc. (see Fig. 3) NOTE:
- Mounting the Diamond Wheel CAUTION:
- ○Mounting the Guide Base Assembly. (Fig. 4)
- ○Mounting the Diamond Wheel. (Fig. 5)
- NOTE:
- MAINTENANCE AND INSPECTION
- Inspecting the depressed center wheel
- Inspecting the mounting screws:
- Maintenance of the motor
- Inspecting the carbon brushes (Fig. 8)
- Replacing carbon brushes:
- NOTE
- 作業上的一般注意事項
Brand : HITACHI
Model : PDA-100H
Category : Mill