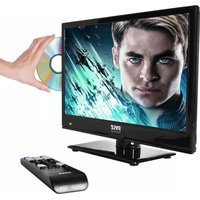
PTVDLED16 - Television Pyle - Free user manual and instructions
Find the device manual for free PTVDLED16 Pyle in PDF.


| Product Type | LED Television |
| Model | PTVDLED16 |
| Screen Size | 16 inches (diagonal) |
| Display Resolution | 1366 x 768 pixels (HD) |
| Dimensions (W x H x D) | 15.6 x 10.2 x 3.0 inches |
| Weight | 7.5 lbs |
| Power Consumption | 30 Watts (typical) |
| Power Supply | AC 100-240V, 50/60Hz |
| Inputs | 1x HDMI, 1x USB, 1x AV, 1x VGA (PC), 1x Antenna |
| Outputs | 1x Headphone jack |
| Built-in Tuner | ATSC (digital) / NTSC (analog) |
| Speakers | 2 x 3W stereo |
| Remote Control | Yes, included with batteries |
| Wall Mountable | Yes, VESA 75x75mm compatible |
| Functions | Brightness/Contrast adjust, Sleep Timer, Channel Scan, Closed Captioning |
| Care & Cleaning | Wipe with soft dry cloth; avoid abrasive cleaners |
| Safety | Do not expose to rain or moisture; use grounded outlet |
| Spare Parts & Repairability | Contact Pyle customer service for replacement remote, stand, or power adapter |
| General Information | Designed for home entertainment; can be used as a computer monitor via VGA |
Frequently Asked Questions - PTVDLED16 Pyle
User questions about PTVDLED16 Pyle
0 question about this device. Answer the ones you know or ask your own.
Ask a new question about this device
Download the instructions for your Television in PDF format for free! Find your manual PTVDLED16 - Pyle and take your electronic device back in hand. On this page are published all the documents necessary for the use of your device. PTVDLED16 by Pyle.
USER MANUAL PTVDLED16 Pyle
User Manual
CONTENTS
SAFETY INFORMATION 3-5
PRODUCT INTRODUCTION 6
CONNECTIONS 7
REMOTE CONTROL 8-9
SETUP WIZARD 9
SELECT INPUT SOURCE .... 10
MAIN MENU 11
PICTURE MENU 11-12
SOUND MENU 13-14
TIME MENU 14
CLOSE CAPTION ....14
SETUP MENU 15
LOCK MENU 17
CHANNEL MENU 19
PC MENU 20
DVD OPERATION....21-24
SPECIFICATION 25-27
SAFETY INFORMATION
This unit has been produced according to all current safety regulations. The following safety tips should safeguard users against careless use and the dangers.
- Although this appliance has been carefully manufactured and rigorously checked prior leaving the factory, as with all electrical appliances it is possible for problems to develop. If you notice smoke, an excessive build up of heat or any other unexpected phenomena, you should disconnect the plug from the mains power socket immediately.
- Ensure that the unit is sufficiently ventilated! Never place next to or underneath curtains!
- The mains plug or appliance coupler is used as the disconnect device, the disconnect device shall remain readily operable.
- This set should only be connected to a mains power supply which matches that stated on the label on the rear of the TV - do not attempt to connect it to any other type of supply.
- The socket -outlet must be installed near the equipment and easily accessible.
• To prevent overload, don't share the same mains supply socket with too many other items of equipment.
- Apparatus with Class 1 construction shall be connected to a mains socket outlet with a protective earthing connection.
- Keep away from rodents. Rodents enjoy biting into electric flexes.
- Always hold the plug when pulling out the plug from the mains supply socket. Do not pull on the flex, the flex can become overloaded and cause short circuit.
- Set up the unit so that no one is able to trip over the flex.
- Do not place heavy items on the flex, which may damage it.
• Take note that the flex cannot be reached and pulled by young children, avoiding injury.
- Do not set up the unit near to heat sources. The casing and the flex could be damaged by the impact of heat.
- The screen is made of plastic and can break if damage is done. Be careful when collecting sharp edged plastic splinters to avoid injury.
- Avoid placing the unit on any surface that may be subject to vibrations or shocks.
• To protect the unit during a thunderstorm unplug the AC power cable and disconnect the aerial.
Caution: Do not touch the aerial (RF) connector.
- When you leave your home for a long period of time, unplug the AC power cable for safety reasons.
- The unit becomes warm when in operation. Do not place any covers or blankets on the unit in order to prevent overheating. The ventilation holes are not to be blocked. Do not set up near radiators.
Do not place in direct sunshine. When placing on a shelf leave 5 cm (2") free space around the whole unit.
- Do not allow water or moisture to enter the TV. Do NOT use in wet or moist areas such as Bathrooms, steamy kitchens or near swimming pools.
- Do not use this unit when moisture condensation may occur
- Any repairs must be carried out by qualified personnel only.
- Do not open this unit. A non-expert attempting to repair the unit could be dangerous and potentially cause a fire hazard.
- Liquids spilt into the unit can cause serious damage. Switch the set OFF and disconnect the mains power supply, then consult a qualified service person before attempting to use the unit again.
- Do NOT remove the safety covers. There are no useable or serviceable parts inside.
You may invalidate the warranty. Qualified personnel must only service this apparatus.
- Do NOT tap or shake the screen, you may damage the internal circuits. Take good care of the remote control, do not drop.
- Never place hot objects or open flame sources on or close to the TV.
• High temperatures can melt plastic and lead to fires.
• To clean the TV use a soft dry cloth. Do NOT use solvents or petrol based fluids. For stubborn stains, you may use a damp cloth with dilute detergent.
HEADPHONE WARNING
Loud music can damage your hearing irreversibly, therefore do not set the volume to a high level when listening through headphones, particularly for lengthy listening periods.
WHERE TO INSTALL
Locate the television away from direct sunlight and strong lights, soft indirect lighting is recommended for comfortable viewing. Use curtains or blinds to prevent direct sunlight falling on the screen. Place the TV on a sturdy platform of which the surface should be flat and steady. This will prevent it from falling over.
Make sure the television is located in a position where it cannot be pushed or hit by objects, as pressure will break or damage the screen, and so that small objects cannot be inserted into the ventilation slots or openings in the cabinet.
PRODUCT INTRODUCTION
Front View

natural_image
PYLE TV displaying a tropical beach scene with palm trees and ocean, alongside a CD-ROM interface showing playback controls (no readable text on screen)LED Indicator Remote Control Window (keep clear)
The functions of the TV buttons are described below.
PLAY: Play/pause the disc playing.
EJECT: Eject the disc.
INPUT: Press to select the source.
MENU: Press to display the OSD menu, Press again to exit the menu.
CH+/CH-: Press to scan through channels.
VOL+ VOL-: Press to adjust the volume.
POWER: Turn on/off the TV set.
CONNECTIONS


-
Connect to the mains adaptor.
-
For service technician use only.
-
Connect an optional coaxial digital cable through a compatible amp/receiver to enjoy superior audio sound.
4/5/6. Connect an external device to the composite VIDEO (Y) and AUDIO (L/R) output jacks found on most video equipment.
4/5/6/7/8. Connect to an AV device that features component (YPbPr) video and audio output jacks.
-
Connect an optional VGA cable from your personal computer.
-
Connect an optional 3.5mm audio cable for sound when using VGA.
-
Connect to HDMI of DVD or other equipment.
-
Connect antenna or cable for television reception.
Note: Use an outdoor antenna, cable or satellite for best reception.
- Connect stereo headphone (3.5mm) for private listening.
14/15. Audio output to connect power amplifier stereo equipment.
REMOTE CONTROL
The remote control is using Infra-Red (IR). Point it towards the front of the LED TV. The remote control may not work correctly if it is operated out of range or out of angle.

POWER: Turn the TV on/standby.
MUTE: Press to mute the sound, press again or press VOL+ to unmute.
NUMBER BUTTONS
Press 0-9 to select TV channel directly when you are watching TV. Return to the previous channel viewed.
S.MODE: Select the sound mode.
P.MODE: Select the picture mode.
EPG: To show the Electronic Program Guide during no-menu state only in DTV mode.
TV MENU: System setup menu.
SOURCE: Press to display the input source menu.
CURSOR KEYS (▲/▼/◄/►/ENTER)
Allows you to navigate the on-screen menus and adjust the system settings to your preference.
MTS: Press to select an alternate audio language (if applicable).
EXIT: Exit the OSD menu.
AUTO: When you connect the TV with a PC through VGA input, press to adjust the screen resolution automatically.
DISPLAY: Provides information on the currently viewed program.
CCD: Select closed caption subtitles (if available) OFF > ON > CC on Mute (pg. 22)
VOL + / - : Adjust the volume.
CH\~/v: Scan through channels.
◀ : Fast Reverse.
▶: Fast Forward
◀◀ : Previous Chapter.
▶▶: Next Chapter.
▶I : Pause Program
■ : Play Program
▲ : Load/Eject DVD Disc
ZOOM: Select viewable display options:
Normal > Wide > Zoom > Cinema. (pg. 12)
SLEEP: Press to activate the Sleep function to turn off the TV automatically 5 Min > 10 Min > 15 Min > 30 Min > 45 Min > 60 Min > 90 Min > 120 Min > 180 Min > 240 Min > OFF.
FAV: Press to display a list of favorite TV channels you have added. (pg. 19)
FAV-: Press to scan to a lower channel from your list of favorites.
FAV+: Press to scan to a higher channel from your list of favorites.
REPEAT: Repeat playing the title or chapter
SUB-T: Turn on/off the subtitle display in DTV mode and DVD mode.
A-B: Select and play the preferable paragraph of DVD program by pressing this key twice at the beginning and end of it.
PROG: The track programming
DVD MENU: DVD to return to menu
TITLE: DVD title.
DVD SETUP: DVD Menu Settings
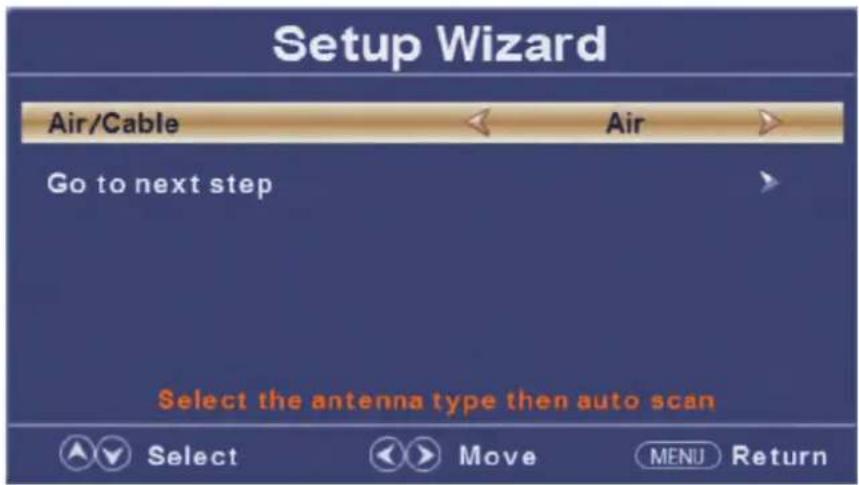
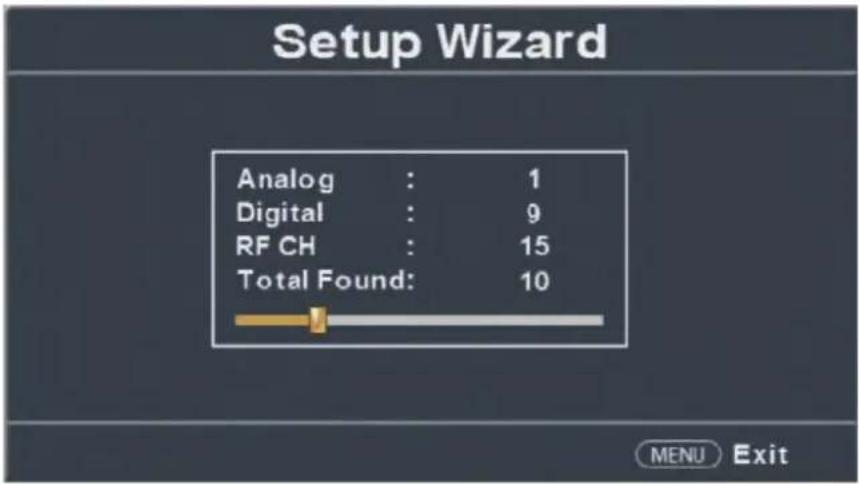
AUTO SCAN
Press ◀ / ▶ button to select the antenna type.
Press ▲ / ▼ button to select go to next step and press ENTER/▶ button to start auto scan.
SELECT INPUT SOURCE
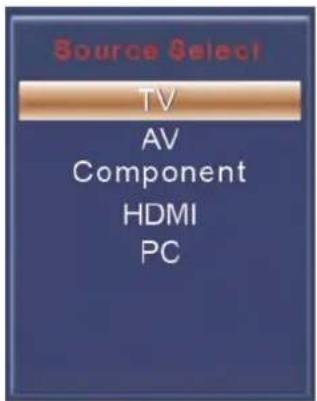
Press INPUT button to display the input source list, Press ▲ / ▼ or INPUT button to select the input source Press ENTER button to enter the input source, Press EXIT button to quit.
MAIN MENU

Press MENU to display the main menu or return to the previous menu or close the main menu Press ◀ / ▶ to highlight the desired menu icon, and press ENTER to select.
MAIN MENU OPERATION
Picture Menu
Press MENU to enter the main menu, Press ◀ / ▶ button to select. Press ENTER / ▼ to enter. Press MENU again to exit or back to parent menu.

Press ▲ / ▼button to select among Picture Mode/Brightness/Contrast/Color/Tint/Sharpness/Color Temperature/
Advanced Settings.
Press ENTER / ▼ to enter.
Press ◀ / ▶ button to adjust.
Press MENU again or back to parent menu.
【Picture Mode】
Adjust picture mode to change picture appearance.
Press ◀ / ▶ button to select (Standard / Dynamic / Soft / User).
Note: The brightness, contrast, color, tint and sharpness are only available in User mode, you can adjust as you like.
Standard: Produces a highly defined image in a normally lit room.
Dynamic: Produces a highly defined image in a brightly lit room.
Soft: Produces a highly defined image in a soft lit room.
User: Select to customize picture settings.
【Brightness】
Adjust the visual perception output of the entire picture, it will effect the iuminousness of the picture. Press ◀ / ▶ button to adjust.
[Contrast]
Adjust the highlight intensity of the picture, but the shadow of the picture is invariable.
Press ◀ / ▶ button to adjust.
【Color】
Adjust the saturation of the color based on your own like. Press ◀/▶ button to adjust.
【Tint】
Adjust the hue (Red, Green, Blue) of the picture. Press ◀ / ▶ button to adjust.
【Sharpness】
Adjust the peaking in the detail of the picture. Press ◀ / ▶ button to adjust.
【Color Temperature】
Increase or reduce warm color of the picture personally (red), and the cool color personally (blue) according to your like.
Normal Increase the sex-linked colors for the white.
Warm Increase the red color for the white.
Cool Increase the blue tone for the white.
【Advanced Settings】
Adjust advanced video features to fine tune the picture. Press ▶ button to enter sub-menu..

【Aspect】
Adjust how the picture fills the screen.
Normal Automatically adjust Aspect Ratio based on TV size and TV program.
Wide Use to watch wide screen (16:9) content.
Zoom Expands image to fill screen. Top and button maybe cut off.
Cinema Stretches image at edges but keeps a clear image in the center.
【Noise Reduction】
Set options to reduce video noise.
Off Select to turn off video noise detection.
Low Detect and reduce low video noise.
Medium Detect and reduce moderate video noise.
High Detect and reduce enhanced video noise.
【Dynamic Contrast】
Automatically adjust picture detail and brightness.
Press ◀ / ▶ button to select (Off/On).
(HDMI Mode)
Only available in HDMI input.
Press ◀ / ▶ button to select (Video/Graphic).
SOUND MENU
Press MENU to enter the main menu, Press ◀ / ▶ button to select.
Press ENTER /▼ to enter.
Press MENU again to exit or back to parent menu.

Press ▲ / ▼ button to select among Equalizer / Bass / Treble / Balance / Digital Audio Output / AVL .
Press ENTER /▼ to enter.
Press ◀ / ▶ button to adjust.
Press MENU again or back to parent menu.
SOUND MODE
Select a sound mode to achieve ideal sound.
Press ◀ / ▶ button to select (Standard / Music / Movie / Sports / User).
Note: The bass and treble are only available in User mode, you can adjust as you like.
Standard Produces a balanced sound in all environments.
Music Preserves the original sound. Good for musical programs.
Movie Enhances treble and bass for a rich sound experience.
Sports Enhances vocals for TV audio.
User Select to customize audio settings.
BASS
Adjust the bass effect. Increases or decreases lower-pitched sounds. Press ◀ / ▶ button to adjust.
TREBLE
Adjust the treble effect.Increases or decreases high-pitched sounds. Press ◀ / ▶ button to adjust.
BALANCE
Adjust the balance between left and right speakers to adapt to your listening position.
Press ◀ / ▶ button to adjust.
MTS
Configures the multi-track sound. It is only available in ATV.
Press ◀ / ▶ button to select(Mono/Stereo/SAP).
Mono Sets the sound to mono.
Stereo Sets the sound to stereo when stereo is not available, the sound is automatically switched to mono.
SAP Sets the sound to the second audio program.
AUDIO LANGUAGE
Select the language supported by the chosen digital channel. It is only available in DTV.
Press ◀ / ▶ button to select (English / French / Spanish).
DIGITAL AUDIO OUTPUT
Send digital audio to external audio system. Press ◀ / ▶ button to select.
PCM Select to output audio in 2-channel stereo.
Raw Original image coded date.
Off Set digital audio output off.
SURROUND SOUND
Set the Surround Sound. Press ◀ / ▶ button to select (On / Off).
AVL
Set the auto volume control. Press ◀ / ▶ button to select (On / Off).
NOTE:
Balance: This item can adjust the speaker's output, it enables you to listen to best at your position. AVL: This item uses for reducing the difference between channel and program's volume automatically. it made the overall water to be even. This function will also reduce the fluctuation of the sound.
TIME MENU
Press MENU to enter the main menu, Press ◀ / ▶ button to select.
Press ENTER /▼ to enter.
Press MENU again to exit or back to parent menu

Press ▲ / ▼ button to select among Sleep Timer/Time Zone/Daylight Saving Time/Time Format/Auto Clock/ Clock. Press ENTER / ▼ to enter. Press ◀ / ▶ button to adjust. Press MENU again or back to parent menu.
SLEEP TIMER
Set a timer for the TV to turn off automatically. Press ◀ / ▶ button to select(Off / 5min/10min /15min/ 30min / 60min / 90min / 120min/180min/240min).
TIME ZONE
Select your time zone. Press ◀ / ▶ button to select(Eastern/Central/Mountain/Pacific/Alaska/Hawaii/Samoa/Newfoundland/Atlantic).
Set the daylight saving time for your area. Press ◀ / ▶ button to select (On / Off).
TIME FORMAT
Select your time format. Press ◀ / ▶ button to select (12-hour / 24-hour).
AUTO CLOCK
Use to synchronize the display automatically. It is only available in DTV. Press ◀/▶ button to select (On / Off).
CLOSE CAPTION
CC MODE
Turn Closed Captioning on/off. Press ◀ / ▶ button to select (CC Off / CC On / CC On Mute).
ANALOG CC
Set Closed Captioning for standard(analog) program.
Press ◀ / ▶ button to select (CC1 / CC2 / CC3 / CC4 / TEXT1 / TEXT2 / TEXT3 / TEXT4).
DIGITAL CC
Set Closed Captioning for digital program.
Press ◀ / ▶ button to select(Off / Service1 / Service2 / Service3 / Service4 / Service5 / Service6).
OPTION
Adjust the digital Closed Captioning setting. Press ▶ button to enter.
MODE
Set the look of digital Closed Captioning. Automatic uses broadcaster's style.
Press ◀ / ▶ button to select (Default / Custom).
FONT STYLE
Select from 8 font styles.
Press ◀ / ▶ button to select(Default / Font 0 / Font 1 / Font 2 / Font 3 / Font 4 / Font 5 / Font 6 / Font 7).
FONT SIZE
Adjust the size of the digital Closed Captioning font. Pressvbutton to select(Default /Normal / Large / Small).
FONT EDGE STYLE
Adjust the edge of the digital Closed Captioning box.
Press ◀ / ▶ button to select (Default / None / Raised / Depressed / Uniform / Left Shadow / Right Shadow).
FONT EDGE COLOR
Adjust the color of the digital Closed Captioning box.
Press ◀ / ▶ button to select (Default/ Black / White / Red / Green / Blue / Yellow / Magenta / Cyan).
FG COLOR
Adjust the color of the digital Closed Captioning font.
Press ◀ / ▶ button to select (Default/ Black / White / Red / Green / Blue / Yellow / Magenta / Cyan).
BG COLOR
Adjust the digital Closed Captioning background color.
Press ◀ / ▶ button to select (Default/ Black / White / Red / Green / Blue / Yellow / Magenta / Cyan).
FG OPACITY
Adjust the transparency of the digital Closed Captioning font.
Press ◀ / ▶ button to select (Default / Solid / Flashing / Translucent).
BG OPACITY
Adjust the digital Closed Captioning background transparency.
Press ◀ / ▶ button to select (Default / Solid / Flashing / Translucent).
SETUP MENU
Press MENU to enter the main menu, Press ◀ / ▶ button to select.
Press ENTER /▼ to enter.
Press MENU again to exit or back to parent menu.

Press ▲ /▼ button to select among Menu Language / Transparent / OSD Timeout / Closed Caption / Over Scan/Source Label/ Other settings / Restore Default / Setup Wizard.
Press ENTER /▼ to enter.
Press ◀ / ▶ button to adjust.
Press MENU again or back to parent menu.
MENU LANGUAGE
Select an OSD menu language can be displayed. Default English is selected as menu language.
Press ◀ / ▶ button to select language (English / Français / Español).
TRANSPARENT
Adjust the transparency of the OSD (on screen display) menu.
Press ◀ / ▶ button to select. (0%,25%,50%,75%,100%)
OSD TIME OUT
Adjust the duration of the OSD (on screen display) menu.
Press ◀ / ▶ button to select. (5 Sec., 15Sec., 30Sec., 45Sec., 60Sec.)
CLOSED CAPTION
Adjust Closed Captioning settings. Only available under TV and AV source.
Press ENTER /▶ button to enter.
For detail please refer to page 12.
OVER SCAN
Press ◀ / ▶ button to select (On / Off).
It is only available to enter 1080i/720p/1080p in DTV/Component/HDMI. Default is On. It fixed set to be On in ATV/AV. It fixed set to be Off in PC/USB.
SOURCE LABELS
Create labels for the devices connected to your TV. Press ENTER /▶ button to enter.


OTHER SETTINGS
Set the parameter of audio only, no signal power off and no operation power off. Press ENTER /▶ button to enter.

AUDIO ONLY
Play the audio with the picture turned off. When you turn the Audio Only on and exit the OSD menu, the panel will be dark; and then press any key to exit the Audio Only status.
Press ◀ / ▶ button to select (On / Off).
RESTORE DEFAULT
Change power on options or reset TV to factory default. Press ENTER / ▶ button to enter.

SETUP WIZARD
Set the first time installation. Press ENTER /▶ button to enter. For detail please refer to page 1\~2.
LOCK MENU
Press MENU to enter the main menu, Press ◀ / ▶ button to select. Press ENTER /▼ to enter. Press MENU again to exit or back to parent menu.
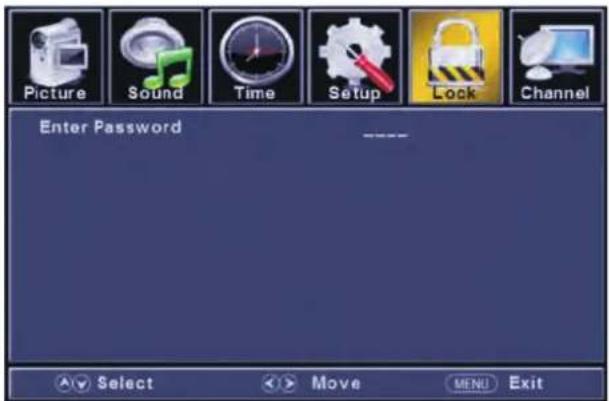

Press ▲ /▼ button to select among Change Password / System Lock / Input Block / US Rating / Canada Rating / RRT Setting / Reset RRT. Press ENTER /▼ to enter. Press ◀ / ▶ button to adjust. Press MENU again or back to parent menu.
Enter your 4- digital password. Default password is 0000, and if forget what you set, please call the service center.
CHANGE PASSWORD
Enter a new 4-digital password then re-enter it to confirm. Press ▶ button to enter.
KEY LOCK
Lock or unlock the buttons on the TV. Press◀ / ▶ button to select (Off / On).
SYSTEM LOCK
Lock or unlock the buttons on the TV. Press◀ / ▶ button to select (Off / On).
INPUT BLOCK
Block or unblock the input sources. Press ▶ button to enter. Press ◀ / ▶ button to select (Unblock / Block).

US RATING
Restrict movie and TV programs by US Ratings. Only available when "System Lock" is "on". Press ▶ button to enter. For detail please refer to page 16\~17.
CANADA RATING
Restrict movie and TV programs by Canadian Ratings.. Only available when "System Lock" is "on". Press ▶ button to enter. For detail please refer to page 17.
RRT SETTING
Display an advance V-Chip rating table for digital channels. The item is available only When current stream has downloadable rating data.
RESET RRT
Reset the RRT to default. The item is available only When current stream has downloadable rating data
US RATING
For the United States, the rating setting basically include the following options: TV, MPAA.
TV
The TV rating compose of two aspects: age-based and content-based.

Age
TV-Y
TV-Y7
TV-G
TV-PG
TV-14
TV-MA
Define
General Audience
Parental Guidance Suggested
Parents Strongly Cautioned
Retricted
No one 17 and under admitted
Adult Audience Only
\*Note:
The content ratings will increase depending on the level of the age-based rating. For example, a program with a TV-PG V(violence) rating may contain moderate violence, while a TV-14 V (violence) rating may contain intense violence. So locking a higher level option will automatically cause locking the options that has more sensitive level.
CHANNEL MENU
Press MENU to enter the main menu, Press ◀ / ▶ button to select. Press ENTER / ▼ to enter. Press MENU again to exit or back to parent menu.
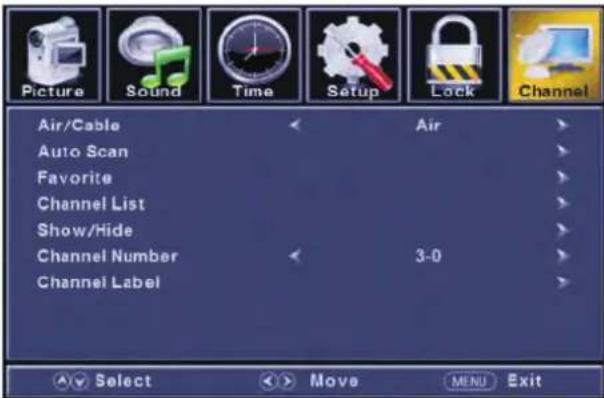
Press ▲ / ▼ button to select among Air/Cable / Auto Scan / Favorite / Show/Hide / Channel Number / Channel Label. Press ENTER / ▼ to enter. Press ◀ / ▶ button to adjust. Press MENU again or back to parent menu.
AIR/CABLE
Select signal type. Press ◀ / ▶ button to select (Air/Cable).
AUTO SCAN
Automatically search for channels. Press ENTER /▶ button to enter.


FAVORITES
Add channels to create a favorite list. Press ▶ button to enter.
CHANNEL LIST
Display your program list. Press ▶ button to enter.
SHOW/HIDE
Show or hide the channels in your program list. Press ▶ button to enter.

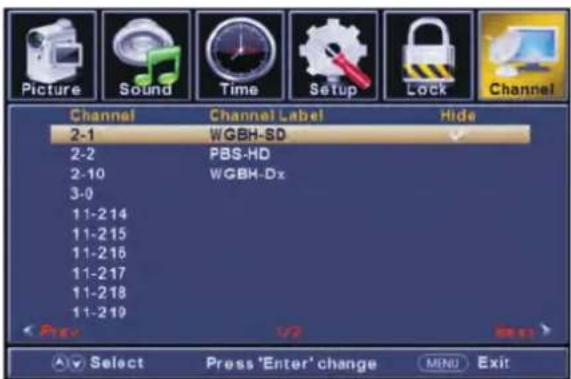
CHANNEL NUMBER
Show the channel number. Press◀ / ▶ button to adjust.
CHANNEL LABEL
Create labels for channels ,up to 7 characters. Press◀ / ▶ button to adjust.

PC MENU
Press INPUT to select PC source.
Press MENU to enter the main menu, Press ◀ / ▶ button to select Setup menu.
Press ▼ to select PC Settings.

Press ▲ /▼ button to select among H-Pos /V-Pos / Clock / Phase / Auto. Press ENTER /▼ to enter.
Press ◀ / ▶ button to adjust.
Press MENU again or back to parent menu.

H-POS
Adjust the horizontal position of the picture. Press ◀ / ▶ button to adjust.
V-POS
Adjust the vertical position of the picture. Press ◀ / ▶ button to adjust.
CLOCK
Adjust the vertical position of the picture. Press ◀ / ▶ button to adjust.
PHASE
Adjust the horizontal interfering lines. Press ◀ / ▶ button to adjust.
AUTO
Adjust to the screen automatically to the optimal position of the picture. Press ▶ button to enter.
\*Notes:
- Color, Tint, Sharpness, Noise Reduction, Dynamic Contrast and HDMI Mode in PICTURE are invalid.
- MTS and Audio Language in SOUND menu are invalid.
- Auto Clock in TIME menu is invalid.
- Close Caption in SETUP menu is invalid.
- US Rating, Canada Rating, RRT Setting and Reset RRT in LOCK menu are invalid.
- PC mode has no CHANNEL menu.
DVD OPERATION
BASIC OPERATION
- Press the Power button on the TV or the remote control, then press the INPUT button to select DVD mode.
- If there is no disc in the DVD player the screen will show "NO DISC".
- Insert Disc according to picture next to disc slot.
- Do not touch the playing surface.
- Hold the disc around the outside with your fingers and place the disc into the slot. The player will automatically draw the disc into the player.
- To "Eject" the disc, press the EJECT button on the TV or the "▲" button on the remote control.
DVD SETUP MODE
- Setup Mode provides the menu forthe configuration of General Setup Page, Audio Setup Page, Dolby Digital, Setup, Preference Page.
- Item selection in the Setup Menu is done by using the Navigation Arrows, SETUP button and the OK button.
- Press the SETUP button first, enter into SETUP menu, then press the DIRECTION RIGHT button, you can enter into the next Sub-menu.
- Press the SETUP button again to exit the Setup Menu.
GENERAL SET UP
TV DISPLAY
• 4:3 Pan Scan
This is selected when the DVD player is connected to a normal TV. Wide-screen images are shown on the screen, but with some parts out automatically.
• 4:3 Letter Box
This is selected when the player is connected to a normal TV. Wide-screen images are shown on the screen, with black belt on the top and bottom.
- Wide
This is selected when the player is connected to a wide-screen TV.

OSD LANGUAGE
This is used to select the OSD language.

SCREEN SAVER
Start the screen saver, the screen saver image will appear when the player stops or the picture is frozen for a few minutes. This saver can keep the screen from being damaged.
• ON (Start the screen saver)
• OFF (Remove the screen saver).

LAST MEMORY
Can set the items on the last memory, "ON" and "OFF" option.
Select "On", the shutdown will shutdown the machine before the settings for memory, re-boot the machine settings. Set near the same time.
Select "Off", every time the machine automatically switched back to the default settings
- On (Start the memory)
- Off (Remove the memory).
DVD OPERATION

AUDIO SETUP
- SPEAKER SETUP
In the "Audio Setup page" press "▼" button to select "Speaker Setup" item, press the "OK ENTER" or "►" button (play) into the "Speaker Setup Page".

DOWNMIX
• LT/RT: A disc recorded multi channel soundtrack, the output signal will be incorporated to left and right channel
- STEREO: A disc recorded multi channel soundtrack, The output signal will be incorporated to stereo.

PREFERENCE SETUP

You must press STOP twice to enter Preference Page or NO disc
TV TYPE
• PAL: This is selected when the player is connected to an PAL System TV.
- MULTI: The player will set the TV system according to the disc in the tray.
• NTSC: This is selected when the player is connected to a NTSC System TV.

AUDIO
If a language listed below is recorded on the disc, you can play the sound in such language. If not, the language recorded will be used.

SUBTITLE
If a language listed below is recorded on the disc, you set the subtitle to be displayed in such language. If not, the language recorded will be used.

DISC MENU
If a language listed below is recorded on the disc, you can set the Menu to be displayed in such language. If not, the language recorded will be used.
PTVLED16 SPECIFICATION
| Display technology | LED Display (Pixel Class 1) | |
| Screen size, visible | 15.6inch | |
| Screen format | 16:9 | |
| Resolution | 1920*1080 | |
| contrast ratio | 500:1 | |
| Minimum brightness | 200cd/m2 | |
| Display colors | 262.144 colors | |
| Minimum viewing angle | 90°H,60°V | |
| response time | 12ms | |
| Picture repetition rate | 50/60Hz | |
| Video color systems | NTSC | |
| TV Functions | TV Standard | NTSC/ATSC |
| CATV (optional) | CABLE( CH1~CH135) /AIR( CH2~CH69) | |
| CC | 608CC | |
| Connections | DC 12 Volt INPUT | yes |
| USB | Only for the use of upgrade | |
| DVD | 1 | |
| HDMI | 1 | |
| PC AUDIO IN | 1 | |
| VGA | 1 | |
| AV-IN | 1 | |
| YPBPR-IN | 1 | |
| COAXIAL OUTPUT | 1 | |
| EARPHONE OUTPUT | 1 | |
| OSD language | English/French/Spanish/Portuguese | |
| Audio output | 2x3 Watt | |
| Power requirement | DC 12V, 2A | |
| Power consumption maximum | 24W | |
| Peak luminance ratio in % | <75% | |
| Power consumption in stand-by mode | 0.5W | |
| Mercury content in mg / contains lead | 0,00 mg / Yes | |
| VESA | 75mm x 75mm | |
PTVLED22 SPECIFICATION
| Display technology | LED Display (Pixel Class 1) | |
| Screen size, visible | 21.5inch | |
| Screen format | 16:9 | |
| Resolution | 1920*1080 | |
| contrast ratio | 1000:1 | |
| Minimum brightness | 200cd/m2 | |
| Display colors | 16.7M colors | |
| Minimum viewing angle | 170°H,160°V | |
| response time | 5ms | |
| Picture repetition rate | 50/60Hz | |
| Video color systems | NTSC | |
| TV Functions | TV Standard | NTSC/ATSC |
| CATV (optional) | CABLE( CH1~CH135) /AIR( CH2~CH69) | |
| CC | 608CC | |
| Connections | DC 12 Volt INPUT | yes |
| USB | Only for the use of upgrade | |
| DVD | 1 | |
| HDMI | 1 | |
| PC AUDIO IN | 1 | |
| VGA | 1 | |
| AV-IN | 1 | |
| YPBPR-IN | 1 | |
| COAXIAL OUTPUT | 1 | |
| EARPHONE OUTPUT | 1 | |
| OSD language | English/French/Spanish | |
| Audio output | 2x3 Watt | |
| Power requirement | DC 12V, 3A | |
| Power consumption maximum | 36W | |
| Peak luminance ratio in % | <75% | |
| Power consumption in stand-by mode | 0.5W | |
| Mercury content in mg / contains lead | 0,00 mg / Yes | |
| VESA | 100m m x100 m m | |
PTVLED24 SPECIFICATION
| Display technology | LED Display (Pixel Class 1) | |
| Screen size, visible | 23.6inch | |
| Screen format | 16:9 | |
| Resolution | 1920*1080 | |
| contrast ratio | 3000:1 | |
| Minimum brightness | 200cd/m2 | |
| Display colors | 16.7M colors | |
| Minimum viewing angle | 176°H,176°V | |
| response time | 8.5ms | |
| Picture repetition rate | 50/60Hz | |
| Video color systems | NTSC | |
| TV Functions | TV Standard | NTSC/ATSC |
| CATV (optional) | CABLE( CH1~CH135) /AIR( CH2~CH69) | |
| CC | 608CC | |
| Connections | DC 12 Volt INPUT | yes |
| USB | Only for the use of upgrade | |
| DVD | 1 | |
| HDMI | 1 | |
| PC AUDIO IN | 1 | |
| VGA | 1 | |
| AV-IN | 1 | |
| YPBPR-IN | 1 | |
| COAXIAL OUTPUT | 1 | |
| EARPHONE OUTPUT | 1 | |
| OSD language | English/French/Spanish | |
| Audio output | 2x3 Watt | |
| Power requirement | DC 12V, 3A | |
| Power consumption maximum | 36W | |
| Peak luminance ratio in % | <75% | |
| Power consumption in stand-by mode | 0.5W | |
| Mercury content in mg / contains lead | 0,00 mg / Yes | |
| VESA | 100m m x100 mm | |
PYLE
PyleUSA.com

natural_image
Illustration of a laptop with a red checkmark on screen, next to partial text (no readable document content)VISIT US ONLINE:
Have a question?
Need service or repair?
Want to leave a comment?
PyleUSA.com/ContactUs
PYLE
SETUP WIZARD
Connect an RF cable from the TV's input called "RF-In" and to your TV Aerial socket.
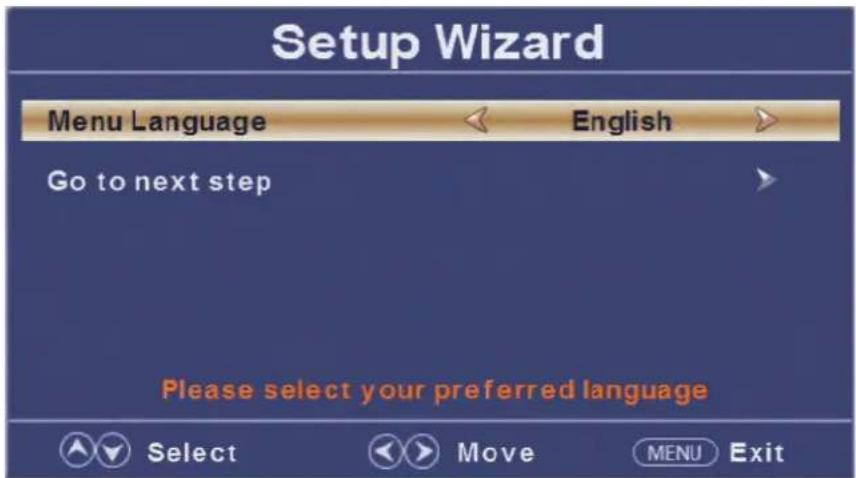
Select Language
Press ◀ / ▶ button to select the language to be used for menus and message. Press ▲ / ▼ button to select go to next step and press ENTER/▶ button to go.
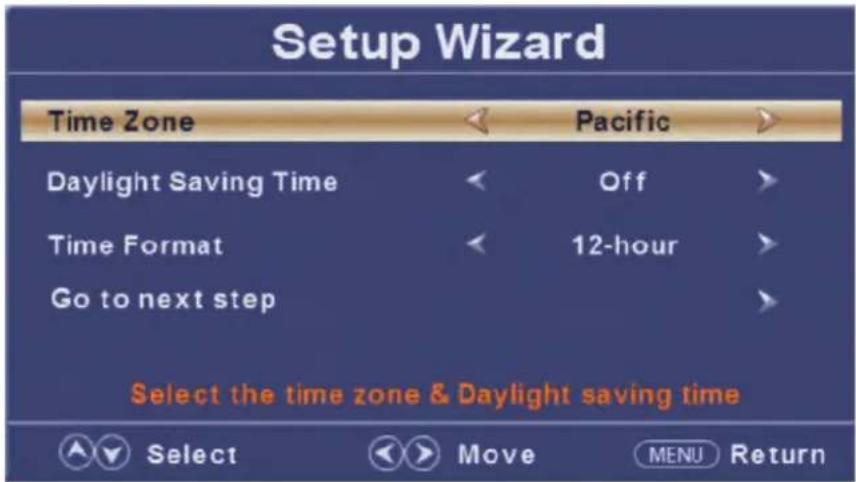
SELECT TIME
Press ▲ / ▼ button to select the time zone, daylight saving time and time format you want to.
Press ◀ / ▶ button on the remote control to adjust.
Press ▲ / ▼ button on the remote control to select go to next step and press ENTER/▶ button to go.
SAFETY INFORMATION
IMPORTANT SAFETY INSTRUCTIONS - READ CAREFULLY BEFORE USE.
Take note of the following safety information which appears on the back of the TV.

CAUTION TO PREVENT ELECTRICAL SHOCK, DO NOT REMOVE ANY COVER SCREWS, NO USER SERVICEABLE PARTS INSIDE, REFER SERVICING TO QUALIFIED SERVICE PERSONNEL.
This symbol indicates that there are important operating maintenance instructions in the literature accompanying this unit.
This symbol indicates that dangerous voltage constituting a risk of electric shock is present within this unit.
KEEP THESE INSTRUCTIONS
• Do not use this TV near water.
• Clean only with a slightly damp cloth.
• Do not block any ventilation openings.
• Install in accordance with the supplied Quick Start Guide and this User Guide.
- Protect the power chord from being walked on or pinched, particularly at plugs, and the point where it exits from the TV.
• Do not allow the power chord to overhang the edge of a table.
• Unplug this TV during lightening storms or when unused for long periods of time.
WARNING! TO REDUCE THE RISK OF FIRE OR ELECTRICAL SHOCK, DO NOT EXPOSE THIS TV TO RAIN OR MOISTURE. THE TV MUST NOT BE EXPOSED TO DRIPPING OR SPLASHING AND NO OBJECTS FILLED WITH LIQUIDS SHOULD BE PLACED ON THE TV.
NOTE: No naked flames such as candles should be placed on the TV.
- CONTENTS
- SAFETY INFORMATION
- HEADPHONE WARNING
- WHERE TO INSTALL
- PRODUCT INTRODUCTION
- Front View
- CONNECTIONS
- REMOTE CONTROL
- NUMBER BUTTONS
- CURSOR KEYS (▲/▼/◄/►/ENTER)
- AUTO SCAN
- SELECT INPUT SOURCE
- MAIN MENU
- MAIN MENU OPERATION
- Picture Menu
- Advanced Settings.
- 【Picture Mode】
- 【Brightness】
- [Contrast]
- 【Color】
- 【Tint】
- 【Sharpness】
- 【Color Temperature】
- 【Advanced Settings】
- 【Aspect】
- 【Noise Reduction】
- 【Dynamic Contrast】
- (HDMI Mode)
- SOUND MENU
- SOUND MODE
- BASS
- TREBLE
- BALANCE
- MTS
- AUDIO LANGUAGE
- DIGITAL AUDIO OUTPUT
- SURROUND SOUND
- AVL
- NOTE:
- TIME MENU
- SLEEP TIMER
- TIME ZONE
- TIME FORMAT
- AUTO CLOCK
- CLOSE CAPTION
- CC MODE
- ANALOG CC
- DIGITAL CC
- OPTION
- MODE
- FONT STYLE
- FONT SIZE
- FONT EDGE STYLE
- FONT EDGE COLOR
- FG COLOR
- BG COLOR
- FG OPACITY
- BG OPACITY
- SETUP MENU
- MENU LANGUAGE
- TRANSPARENT
- OSD TIME OUT
- CLOSED CAPTION
- OVER SCAN
- SOURCE LABELS
- OTHER SETTINGS
- AUDIO ONLY
- RESTORE DEFAULT
- SETUP WIZARD
- LOCK MENU
- CHANGE PASSWORD
- KEY LOCK
- SYSTEM LOCK
- INPUT BLOCK
- US RATING
- CANADA RATING
- RRT SETTING
- RESET RRT
- TV
- Age
- Define
- \*Note:
- CHANNEL MENU
- AIR/CABLE
- FAVORITES
- CHANNEL LIST
- SHOW/HIDE
- CHANNEL NUMBER
- CHANNEL LABEL
- PC MENU
- H-POS
- V-POS
- CLOCK
- PHASE
- AUTO
- \*Notes:
- DVD OPERATION
- BASIC OPERATION
- DVD SETUP MODE
- GENERAL SET UP
- TV DISPLAY
- • 4:3 Pan Scan
- • 4:3 Letter Box
- - Wide
- OSD LANGUAGE
- SCREEN SAVER
- LAST MEMORY
- AUDIO SETUP
- - SPEAKER SETUP
- DOWNMIX
- PREFERENCE SETUP
- TV TYPE
- AUDIO
- SUBTITLE
- DISC MENU
- PYLE
- PyleUSA.com
- VISIT US ONLINE:
- SELECT TIME
- IMPORTANT SAFETY INSTRUCTIONS - READ CAREFULLY BEFORE USE.
- KEEP THESE INSTRUCTIONS
Brand : Pyle
Model : PTVDLED16
Category : Television