
DT6.5LCR - Pregnant DEFINITIVE TECHNOLOGY - Free user manual and instructions
Find the device manual for free DT6.5LCR DEFINITIVE TECHNOLOGY in PDF.


| Product Type | In-ceiling / In-wall loudspeaker |
| Model | DT6.5LCR |
| Brand | Definitive Technology |
| Woofer Size | 6.5" (16.5 cm) |
| Tweeter Size | 1" (25 mm) pivotable |
| Frequency Response | 28 Hz - 30 kHz |
| Sensitivity | 89 dB |
| Impedance | 8 Ohms |
| Recommended Power (Min/Max) | 10 W / 200 W per channel |
| A/V Crossover Setting | Small (60 Hz) |
| Grille Dimensions (L x W) | 13-13/16" x 8-1/4" (35.08 cm x 20.96 cm) |
| Cutout Dimensions (L x W) | 12-3/4" x 7-1/4" (32.3 cm x 18.42 cm) |
| Total Depth | 3-5/16" (8.41 cm) |
| Mounting Depth (in-wall) | 2-13/16" (7.14 cm) |
| Shape | Rectangular |
| Painting | Grille paintable with spray paint; do not brush or roller |
| Installation | Requires cutout, rotating lock arms, screwdriver |
| Safety | Avoid cutting electrical wires or plumbing; use caution when cutting |
| Maintenance | Clean with dry cloth; do not use liquids |
| Warranty | 5 years drivers/cabinets, 3 years electronic components (US) |
Frequently Asked Questions - DT6.5LCR DEFINITIVE TECHNOLOGY
User questions about DT6.5LCR DEFINITIVE TECHNOLOGY
0 question about this device. Answer the ones you know or ask your own.
Ask a new question about this device
Download the instructions for your Pregnant in PDF format for free! Find your manual DT6.5LCR - DEFINITIVE TECHNOLOGY and take your electronic device back in hand. On this page are published all the documents necessary for the use of your device. DT6.5LCR by DEFINITIVE TECHNOLOGY.
USER MANUAL DT6.5LCR DEFINITIVE TECHNOLOGY
D.
DEFINITIVE TECHNOLOGY

natural_image
Circular diagram with concentric rings and circular nodes, no text or symbols present
natural_image
Technical line drawing of a mechanical assembly or structural component (no text or symbols visible)DT Series
In-ceiling Installation Guide
Models: DT6.5R, DT6.5STR, DT8R, DT6.5LCR, DT8LCR
Thank You
Thank you for choosing Definitive Technology DT Series In-Wall loudspeakers. The DT Series offers excellent sound quality - your speakers that virtually disappear when installed in a wall or ceiling. To ensure you experience the first performance possible, please take some time to fully-ood this owner's manual and familiarize yourself with the proper installation and setup procedures.
Unparking Your DT Series loudspeckers
Please inspect for shipping damage
Body loudspeaker leaves our plant in a portion confection. Any visible or concealed damage most likely occurred to handling after the loudspeaker left our plant and should be reported at once to your. Definite orders on the delivery company that delivered your loudspeaker. Please unpack your system carefully. Save all colors and packing materials should you move on next to ship your system. Your loudspeakers set a number can be found on the book of each loudspeaker one or the corner record those numbers in this manual and save a for future reference should your sponsor more service, or your best protection, register your DN Series products online at http://registerline.delitivixech.com.
Painting DT Series Speakers
Your D1 Series speakers may be pointed to match the color of the wall or ceiling in which they are installed. Failure to follow these painting instructions may result in seriously degroded sound quality. It is your responsibility to make sure your printing continentar space and follows these instructions.
1. DO NOT PAINT THE GRILLE WITH A BRUSH OR ROLLER
they will dog the line fresh of the grille and colch scim and resol in poor sourd quality.
-
Remove the grille from the speaker and place it on a drop cloth, newspaper or plastic sheet.
-
The grille Must be spotty pointed with one of the following
- Spicy pain that closely matches the desired finish/color
- A custom spray comb, color matched to your point finish
- Incoor latex paint using a spray gun (point must be diluted to the paint manufacturers specifications).
-
Removing the backing cell (scrim) is not required.
-
Faint should be applied in a series of thin coats sprayed at approximately 60 degrees from the grille surface.
-
Allow each coat to fully cure before applying additional costs.
√ In ensure the paint is applied evenly, each paint should be sprayed on from at least / Different Direction to the grille.
[14, S, F & W] This will ensure even coverage on the grills.
- Once the grille has been painted and the paint has fully cured, you may use a brush, or small roller to touch-up the outer edge of the grille frame; the very careful not to get any additional paint on the grille's mesh surface.
Note: Sherwin Williams Automotive Finishes Stores will caustan broke on rental point to match any sample that is easier to apply. Store Locator at http://www.thewin-automotive.com/call-stor-rep/brancere/bonebuy/store-bate/
Optional Fire-Rated Enclosures
Definitive DT Series speakers have been designed to meet UL 1480 and VC43 standards when used with the appropriate optional Definitive linear enclosures. AI plastic parts used in the speakers at V6 Torre sized as per UL 94. While these enclosures are necessary in most countries for commercial and multi-family installations, residential customers may want to use them for added safety and/or to reduce the sound from "claking" into adjacent rooms.
Placement Options
Definitive Technology DT Series loudspeakers give your nearly endless placement options. But remember that placement choice for your inward spoken beams careful consideration, as ventilation requires that you are a role in your wall or rolling. In how to swap the speakers at least 2 set (60 cm) train side walls [Figure 1]. When using DT Series models in train heater applications, follow the guidelines, illustrated in Figure 2, 3 and 4). Define the DT Series loudspeakers have inactive woodster that allow you to locate their sound toward or away from your listening area, depending on the application. Whenever possible she advantage of attic and crowd spaces, as it's much easier to run cobles through them than through walls.
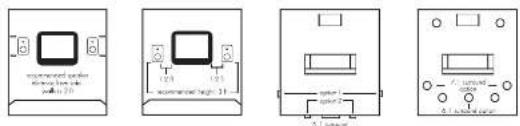
Figure
Figure 2
Figure 4
Aiming the Tweeter
A twelered one toward your listening position improves imaging and sets. To aim the tweler, first in all the speakers in the desired location. Rotate the tweler so that he answers on the tweler's backside is pointing in the direction you wish to aim the tweler [Figure 5] then gently post the tweler in her direction [Figure 6]. When using 2T Series speakers as fronts in a none-theater setup or an extreme speaker in a distributed audio system, use the words above the main listening position. As soon/surround speakers installed in walls or ceilings, then the tweler toward the nearest reflecting picture (on out-of-room wall or ceiling) for a more of these sound field. For more direct sound, aim the tweler at your listening position.
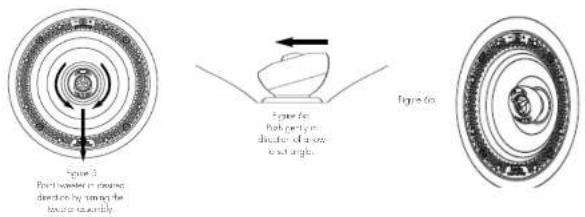
Installation Cautions
Heilding DT Series speakers requires still in using tools such as a tool, somewhere, axes and power tools. Installation sites enable running wires through walls. You should have a thorough understanding of local building and fire codes and a familiarity with the area behind the wall or ceiling into which you can to install your speakers. When cutting ropes and running walls through walls/zeeling you run the race-cutting electrical wires or water pipes, thereby curing safety tunnels and property damage. If you're in any door that you possess the necessary skills or tools to install these speakers, contact your Definitive Technology dealer, general contractor or professional intakelet.
Required Tools
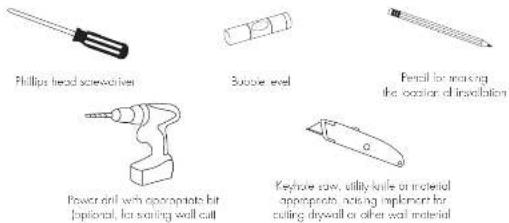
Installation Procedure
- You must first install speaker wires that meet appropriate building and fire codes before installing the speakers. Use at least 18 gouge wire or heavier to ensure optimum sound quality.
- Noise sure the material into which you plan to mount the speakers [plaster, crystal, pointing, stone, etc. I can support the weight of the speakers.
- Note sure the locations you select do not encrocal studs, electrical wiring or plumbing. From no installation, hold the speaker with grille on in your chosen location or make sure safely clears obstacles such as studs corners, beams, lighting fixtures and door/window frames. Your cutout must be or less 2" (50 mm) from adjoining walls or ceiling, internal studs or plumbing.
- Using the supplied template, twice the installation location with a pencil. You can do this by holding the template in your preferred location and tracking around it. In the case of the rectangular mode (DT6.5ICR and DT8.CR) use a square level to square and level the template. [Figures 8 & 9]
- Carefully cut the hole with the appropriate cutting tool for your wall or ceiling material. Start the hole by drilling a hole on the inside of the tracing (with the drill bit just inside the line). Use this hole to insert the screw or knife end begin cutting. [Figure 10]
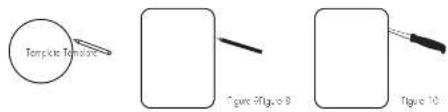
- Once you have cut the holds, pull the speaker were out of the hold and connect two speakers. Step 1/2" inch (12 mm) of invitation to the one of the two conductors of the wire to expose the base metal and total each of the conductors in a single uncolyzed band. Note that one of the terminals on the rear of worn speaker is marked with [4] and the other block [1]. Make certain that you connect the wire from the red terminal [1], of your amplifier or receiver to the red terminal [2], or your speaker and the wire from the black terminal [1] of your amplifier or receiver to the block terminal [1] on your speaker. Most wire has some kind color (such as color-coding, roasting or writing), on one of the two conductors to help you minimize consistency [Figure 1.1a]. In the case of the [1] 6.55(3) single speaker series model, bolt-left and right ornamental speaker wires are connected to the speaker (Figure 11b).
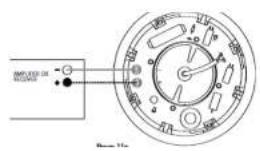
b.p. = 11:
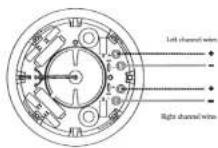
H10011
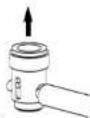
- Push down on the top of the terminal to reveal the wire hole in the side of the terminal post and insert the wire into the hole [Figure 12] Release the pressure on the terminal to secure the wire.
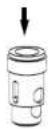
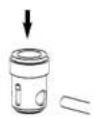
2
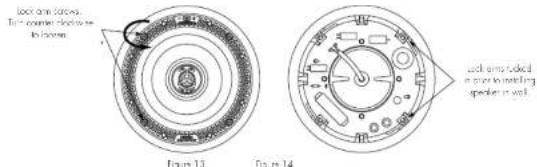
- Loose the rotating lock arms by turning the lock arm screws on the front of the speaker counter clockwise 1/2 o 1 turn, just enough to allow the lock arm to move freely. [Figure 13]. Make sure that the rotating lock arms are flipped in words [Figure 14] so that your speaker fills into your cutout.
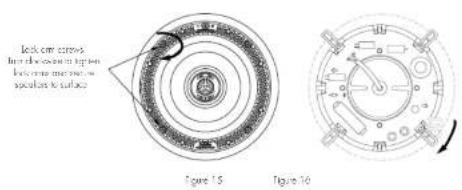
- Place the speaker carefully into the output. If you have a level, use it to help you correctly align rectangular speaker models. Tighten the lock on screws with a screwdriver [Figure 15]. This will rotate the lock ends [Figure 16] and secure the speaker to the wall/casting.
Do not over-tighten the lock arm screws. If you are using a powered screwdriver or drill, set the torque in a value of 7 in. - In. (Boltv - mt) install the grille on the speaker frame. Powerful magnets take the grille in place.
Safety First
When installing your Di Series In-Wall sound speakers, be aware of the weight of your particular model and the sourliness of the material into which you are installing the speaker. Also see aware of any concealed status, excepted writing on planning in the wall or ceiling into which you are installing the speakers. If you are not sure of a safe way to install these speakers, consult a professional installer, your authorized Definitive Technology Officer, or a building contractor.
Technical Assistance
It is our pleasure to offer assistance if you have any questions regarding your Definitive Technology loudspeakers. Please contact your request. Definitive technology dealer or call us directly at (600) 228/148 IUS & Conadol, 0- (415) 363/148 (International) or email info@oclinewe.com
Service
Service work on your Definitive loudspeakers will normally be performed by your Local Definitive Technology dealer. If your dealer is unable or unwilling to perform service contact us for other services, please note that the address given in this material is the access of our offices only. Under no circumstances should loudspeakers be shipped to our offices or returned without contacting us for and obtaining return obligations.
Definitive Technology Offices
11493 Crumidge Drive
Owings Mills, Maryland 21117
Phone: (800) 2287146 [US & Canada].
01 (210, 363/48) (n) other countries
WARNING: LISTEN CAREFULLY
Definitive Technology loudspeakers and subscooters are capable of copying of extremely high volume levels, which could cause serious or spontaneous hearing damage. Definitive technology accepts no liability for hearing loss, locally injury or property damage resulting from the imitate of its products. You should limit poached exposure to volumes that exceed 8.5 dBols (HR). For more severe safe volume levels refer to the Occupational Health and Safety Administration (ICSHAI guidelines at www.cama.gov
| Specifications | DTA-5TR | DTA-5STR | DTWR | DTA-5SCR | CTR/CR |
| Grille Diameter | 8.5/16" (21.11cm) | 8.5/16" (21.11cm) | 9.75" (24.76cm) | ||
| Grille Length | 13-13/16" (35.08cm) | 13-13/16" (35.08cm) | |||
| Grille Width | 8-1/4" (20.96cm) | 9.7/8" (25.08cm) | |||
| Optional Sq. Grille | |||||
| Cutout Diameter | 7-1/4" (18.41cm) | 7-1/4" (18.41cm) | 8-3/4" (22.23cm) | ||
| Cutout Width | 7-1/4" (18.42cm) | 8-3/4" (22.2cm) | |||
| Cutout Length | 12-3/4" (32.3cm) | 12-3/4" (32.3cm) | |||
| Total Depth* | 3-3/8" (8.57cm) | 3-4/16" (9.05cm) | 3-13/16" (9.68cm) | 3-5/16" (8.41cm) | 3-3/4" (9.32cm) |
| Mounting Depth In-Wall** | 2-7/8" (7.30cm) | 3-1/16" (7.78cm) | 3-3/16" (8.41cm) | 2-13/16" (7.14cm) | 3-1/4" (8.26cm) |
| Wooder | 6-1/2" (16.5cm) | 6-1/2" (16.5cm) | 8" (20.3cm) | 6-1/2" (16.5cm) | 8" (20.3cm) |
| Tweeter | 1" (25mm) | Two 3/4" (19mm) | 1" (25mm) | 1" (25mm) | 1" (25mm) |
| Product Weight | TBD | TBD | TBD | TBD | TBD |
| Frequency Response | 28 Hz - 30 kHz | 27 Hz - 30 kHz | 27 Hz - 30 kHz | 28 Hz - 30 kHz | 27 Hz - 30 kHz |
| A/V Crossover Setting | Small (50Hz) | Small (60Hz) | Small (60Hz) | Small (60Hz) | Small (60Hz) |
| Sensitivity | 89dB | 89dB | 89dB | 89dB | 89dB |
| ImpedanceAll models are compatible with 8 Ohm outputs. | |||||
| Recommended Power(Min/Mos) | 10/200w/Ch | 10/100w/ChSloons:10/200w/ChSurround | 10/225w/Ch | 10/200w/Ch | 10/225w/Ch |
| * From back of mounting tube to deeper part of product** Total depth when product molded in 1/2" (12.7mm) thick material | |||||
UNITED USA WARRANTY
5 YEARS FOR DRIVERS AND CABINETS. 3 YEARS FOR ELECTRONIC COMPONENTS
DE Sales Co., all defense Techs copy press "Defense," warrants to the general retail purchase any of the Defense, as proper product the Thocell will be necessary for minimum and minimum benefit in a period of 20 years owing to these and intertments, and five 30 years to fundamental comparisons that include the targeted value from Defense Auto and Bank. The financial data is not available in warranty sheet. Ministry of Auto and Bank will be written on a report with the following: (1) or (2) or (3) or (4) of the Company's share price; (5) or (6) or (7) or (8) of the Company's share price; (9) or (10) or (11) or (12) or (13) or (14) of the Company's share price; (15) or (16) or (17) or (18) or (19) or (20) or (21) or (22) or (23) or (24) or (25) or (26) or (27) or (28) or (29) or (30) or (31) or (32) or (33) or (34) or (35) or (36) or (37) or (38) or (39) or (40) or (41) or (42) or (43) or (44) or (45) or (46) or (47) or (48) or (49) or (50) or (51) or (52) or (53) or (54) or (55) or (56) or (57) or (58) or (59) or (60) or (61) or (62) or (63) or (64) or (65) or (66) or (67) or (68) or (69) or (70) or (71) or (72) or (73) or (74) or (75) or (76) or (77) or (78) or (79) or (80) or (81) or (82) or (83) or (84) or (85) or (86) or (87) or (88) or (89) or (90) or (91) or (92) or (93) or (94) or (95) or (96) or (97) or (98) or (99) or (100).
THE WARRANTY IS AUTOMATICALLY VOID IF
If the process has been done, close to any way, neither had the operation as a dependent result.
2) the process is damaged due to accident, but, based on exercise, must, all as, make a medical decision from to above the case of any setting.
neglect or related events
3) Review or modification of the Product has not been made or authorized by Derivative Technology.
4) The product has been expressly matched or used. Potential markets are realized and acquired, together with the original dates provided in accordance to the Australia Stock Exchange from where the Product was purchased on or before the Derivatives company's service period. The product has been planned in the original shipping contracts or its equivalent. Definition is not necessary or possible for use as changes to product or other.
THIS WAY BE WARRANTY IS THE ONE OF THIS WARRANTY. ANY ASSES TO YOUR PRODUCT. BEGINNING THE ASSISTERS' HANDS AND ANY PERSON OR ENTITY TO ASSUME FOR ANY OTHER EDUCATION. CALLABUTY IN CONNECTION WITH YOUR PRODUCT OF THE WARRANTY. ALL OTHER WARRANTIES, INCLUDING BUT NOT AWAY TO EXPRESS, WITHOUT WARRANTY OF ASIC, IN BASIS OF IRNESS FOR A PARTICULAR PURPOSE, ARE EXPRESSLY DOILED AND DISCLOSED TO THE WARRANTY (WITH ANY ORDER ANY AT ANY WIDTH, ASKS ON CODE) AND/OR TO THE INFORMATION. THE WARRANTY SHALL BE NO AVAILABLE FROM THIS WRITTEN NOTICE. THIS WRITTEN NOTICE SHALL NOT BE ACCEPTED. THIS WRITTEN NOTICE SHALL NOT BE ACCEPTED. THIS WRITTEN NOTICE SHALL NOT BE ACCEPTED. THIS WRITTEN NOTICE SHALL NOT BE ACCEPTED. THIS WRITTEN NOTICE SHALL NOT BE ACCEPTED. THIS WRITTEN NOTICE SHALL NOT BE ACCEPTED. THIS WRITTEN NOTICE SHALL NOT BE ACCEPTED. THIS WRITTEN NOTICE SHALL NOT BE ACCEPTED. THIS WRITTEN NOTICE SHALL NOT BE ACCEPTED. THIS WRITTEN NOTICE SHALL NOT BE ACCEPTED
demonstrate due to place the airport or location of a sensor tell at the metal clamping, or incident verification, on the other laboratory may not imply to you. This warranty gives you specific legal rights and you may also have other rights which vary from there is risk.

11433 Cronridge Drive
Owings Mills, Maryland 21117
800-228-7148
www.definitivetech.com
- DT Series
- Thank You
- Please inspect for shipping damage
- Painting DT Series Speakers
- DO NOT PAINT THE GRILLE WITH A BRUSH OR ROLLER
- Optional Fire-Rated Enclosures
- Placement Options
- Aiming the Tweeter
- Installation Cautions
- Installation Procedure
- Safety First
- Technical Assistance
- Service
- Definitive Technology Offices
- WARNING: LISTEN CAREFULLY
- UNITED USA WARRANTY
- YEARS FOR DRIVERS AND CABINETS. 3 YEARS FOR ELECTRONIC COMPONENTS
- THE WARRANTY IS AUTOMATICALLY VOID IF
Brand : DEFINITIVE TECHNOLOGY
Model : DT6.5LCR
Category : Pregnant